Nickfromwales
-
Posts
30983 -
Joined
-
Last visited
-
Days Won
328
Everything posted by Nickfromwales
-
🤣🤣. Glad you got it sorted and thanks for the chip oil bum steer. Another BH victory in the most peculiar way.
-
Check the vents first to rule out any air lock.
-
Make an insulated secondary panel, which you lift up into the attic, as putting anything on that hatch will prevent access.
-
Defo keep the isolators to the UFH closed whilst purging and venting. Just don’t forget to open them afterwards.
-
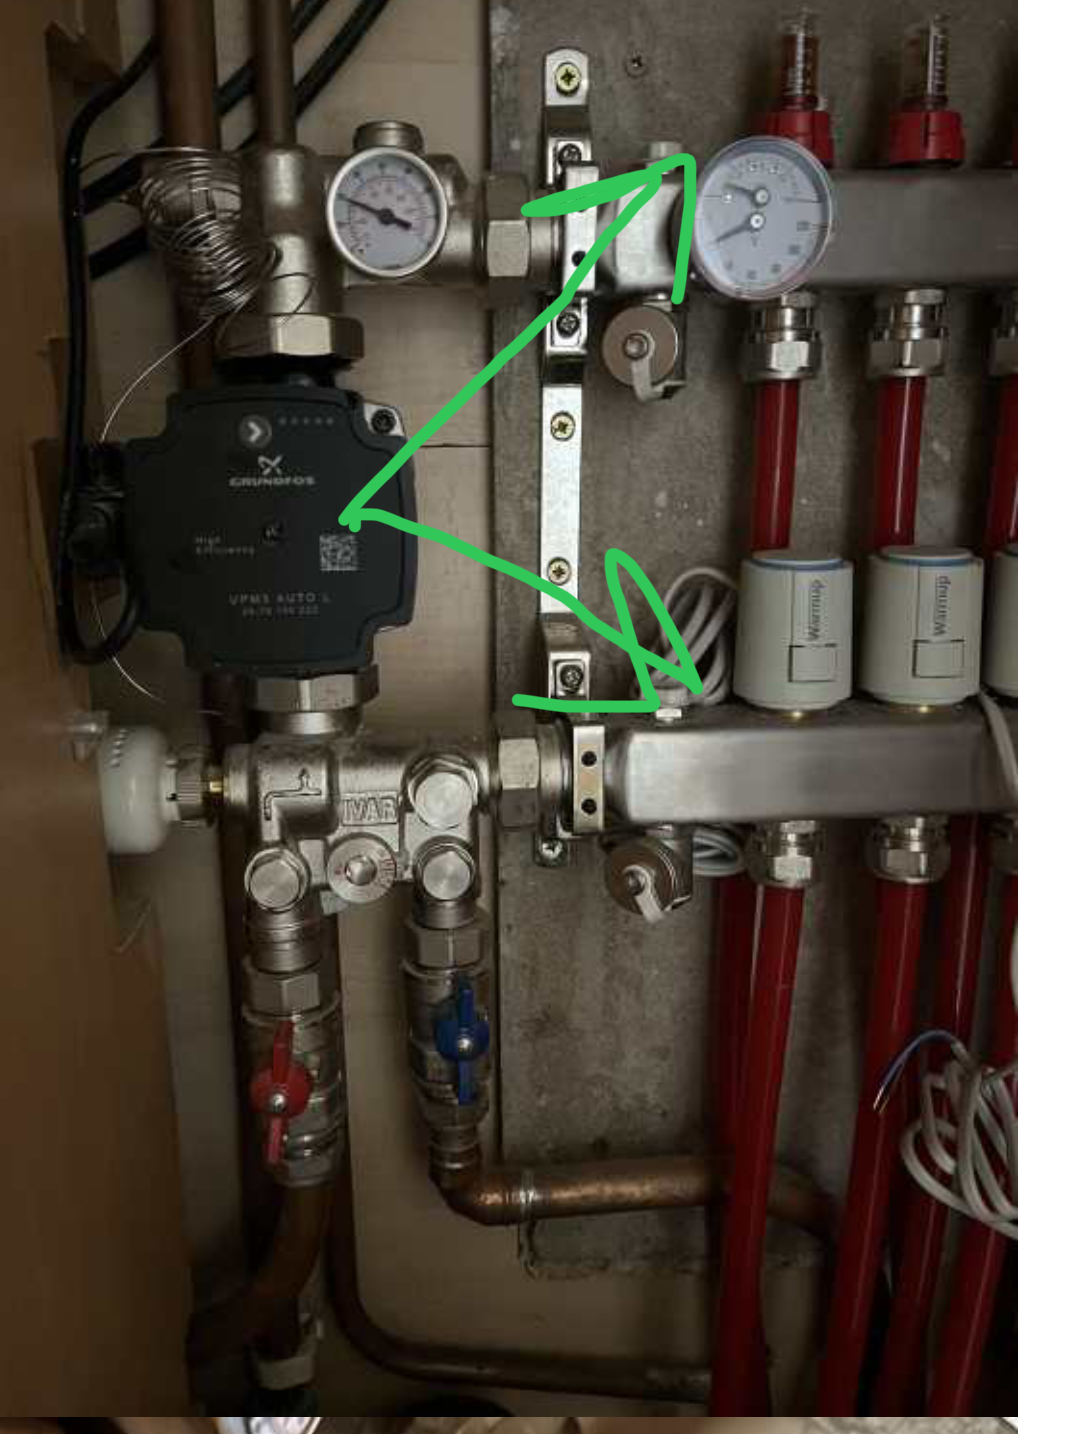
Whoa! Do NOT pull at anything or you’ll be very wet. Do what just pull off? The flow gauges are fixed. Actuators have the cable going to them. The base unscrews via the big ring. Hand loosen, hand tighten. Under the actuator is the ‘pin’, just see if this pushes down with the handle of a screwdriver, and if it pops back up, freely.
-

Architects have messed up. Next steps?
Nickfromwales replied to flanagaj's topic in General Self Build & DIY Discussion
Defo a typo I won’t be editing out lol. -
I was working my way to this being OTT, as essentially we’re just discussing retaining walls for a semi subterranean structure aka a walk out basement. FYI, membranes are very much used in new build basements, haven’t long spec’d a very big 4-sided basement, with a 4m excavation. Measures were needed both inside and out, including internal membrane and 2 perimeter drains, each with their own sumps / pumps due to the size of it.
-
Construction hours condition.
Nickfromwales replied to flanagaj's topic in General Self Build & DIY Discussion
Radios / music is perfectly fine and acceptable. None of your neighbours will petition the surrounding occupants if they wish to listen to their hifi. You simply need to speak to trades regarding this. Roofers on site this week were blasting the choons atop the scaffolding, which wasn’t very considerate tbf. I turned it down each time I went up when putting the MVHR vents in the roof. Was quickly turned back up. -
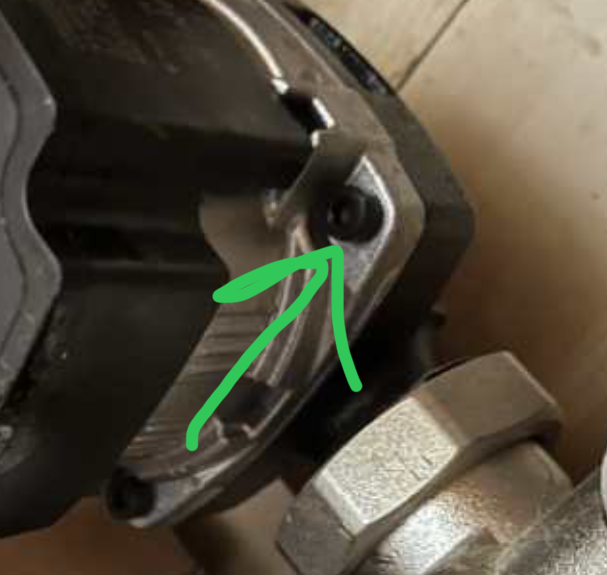
If you’re capable, you can turn the blue and red valves off (1/4 turn) and then drain the pressure a little. Then the screws can be undone and the entire head removed quite easily. You can then see if the impeller is free to rotate or not, and get it moving again if not.

-
Construction hours condition.
Nickfromwales replied to flanagaj's topic in General Self Build & DIY Discussion
Have you been around to say hello to your new neighbours? This can be a very positive thing to do, just saying you’ll keep the noise as controlled as possible, but you’re “trying to get the build done quickly to minimise overall disruption”, plus other clever phrasing. We’ve done WhatsApp groups for urban projects, so we can advise when deliveries or scaffolders etc are on site etc etc, and these often work well. Some will take this piss, but usually the majority appreciate the effort to open communications, and often a question of “how much longer will you be drilling for outside” etc can quickly be answered to say what time you’ll finish that day. That can alleviate the smoke turning to fire, and chill people out with assurances that you’ll respect the area and its occupants as much as is practicable. The other aspect is, if THEY were fortunate enough to be able to build or improve their homes, they’d not expect any grief from you, so a balance to be had vs just being too pleasant / a pushover too. -
Yes, I work on a lot of client projects where disappointment is the norm, from professionals they sought help from (and paid handsomely for the ‘pleasure’). I’m not saying to go for a screed, more just thinking out loud; eg how this can be simplified and therefore become cheaper / faster to do. Bending the pins pre delivery is simple, had this on a project in Oxford, just makes the tying a bit more complicated / time consuming, but plenty ‘doable’. I was more of the opinion that you’d need to be robustly insulated if considering UFH in slab. Has either professional stated this is possible? Some SE’s hate putting pipes in a constructional slab, afaic for zero good reason with a slab this thick! On the job in oxon I suggested (more demanded) that the upper layer of mesh was dropped to get the requisite concrete cover over the top of the UFH pipes, which they eventually agreed to. Saved the client thousands in more layers atop, screed, loss of head-height etc. Go rattle some cages (and go from passenger to driver) is my 2 cents.
-
No vibration or signs of it running when you switch on / off? Flow gauges not moving even slightly?
-
My local glass shop works to 2mm tolerance. Crazy that they got this so far out. Have you spoken to them yet, or just that you fear they won’t resolve this?
-
So. EWI it is!!!! Now to discuss the pros cons and caveats of this, so that @kentar can be kept as a member here…..
-
Fast thumbs and lazy eyes. Oops 👀.
-
It’s an additive to prevent water freezing in an ASHP installation. Im struggling to see what would be sticky, that is leaking from the pump spindle.
-
Downstairs Floor Plan - First Draft
Nickfromwales replied to Cheesus's topic in New House & Self Build Design
What he said. -
Downstairs Floor Plan - First Draft
Nickfromwales replied to Cheesus's topic in New House & Self Build Design
Yup. Best get the horse and the cart the right way around! -
250mm insulation with 250mm concrete over it? EPS insulation? Then it looks like much thicker ring / intermediate beams too.
-
Unlimited hot water with 4 bathrooms - is it possible?
Nickfromwales replied to Indy's topic in Boilers & Hot Water Tanks
Depends on how far you let it drop before you catch it and start regenerating. This is referred to as “recovery” time btw. If it’s from cold mains from the street cold, there’s a huge amount of lifting that needs doing. If it’s from say 45° and back up, there’s a significant reduction in recovery time. This is why a lot of modern, larger UVC’s have a high and a low pocket for the temp sensors, as well as a standard socket for the generic cylinder stat. Means you have options to take better control over this in more demanding situations. -
That’s leaking from the centre spindle, and the sticky goop may be Glycol? Is this heated by a boiler or a heat pump? The UPM3 is a very well regarded pump in the industry, so may just be a ‘Friday’ unit, or has been damaged by misadventure?
-
How much insulation have they proposed under the slab?
-
UFH Mixing Valve advice on Air Source Heat Pump set up
Nickfromwales replied to MorganP's topic in Underfloor Heating
10mm pipes, and suspended / floating wooden floors? Have you any idea how the UFH was installed? In a pug / biscuit mix of sand & cement, or in aluminium spreader plates, or an overlay system (a-la Wunda)? Temp looks high, on the red (flow) side, so assume that the flow pipes are hot? Looks like 10-15 degrees differential, so you’re inputting heat into the floor, so more info please! -
And why are you pushing back? Lack of head height?
-
What ICF product / system are you considering atm?