Nickfromwales
-
Posts
30328 -
Joined
-
Last visited
-
Days Won
296
Everything posted by Nickfromwales
-
 Yup. I always fit 2x thermo probes if I can't install the conduit to change them out at a later date. I'm not able to advise as I've never used Schluter, so it may be better! Have you a link to the one you are considering, or at least just get the spec sheets alongside each other for comparison. The benchmark for a good unit is a bit of self-learning for setback.
 -
Ok. With a compression fitting you need to completely disassemble it, and put the removed parts on to each piece of pipe. So you slide the nut on, then the nylon / plastic slip ring (skinny plastic looking washer), and then the conical black rubber washer. The cone side of the black rubber washer has to be facing the coupler, dito the other side. Push the black rubber ring up the pipe about an inch or so, and then push the coupler on. You may need to give it a wiggle to get the rubber to be as far up the pipe as it needs to be. Slide the nut and the slip ring down to meet the coupler and tighten only hand tight, an angry hand tight (not the angry where you've hit your thumb with a swift hammer blow, but the one where your child has pissed you off and you want to strangle the little bastard, but can't due to recent changes in legislation), and you're good to go. Caveat, if you've bought Chinese fittings off Ali-kebab-express//sweat-shop-R-us, then you're on your own. They prob also sell big towels though...... coincidentally, lol. Are you very sure that you had the rubber conical washers the right way around during previous flood events?
-
Run some water into the shower tray and get a big towel ready in case you have a gusher. TBH, you'd have to go miles out to get that to leak.
-
Wall cracks, advice very much appreciated
Nickfromwales replied to Mike Hawkins's topic in Brick & Block
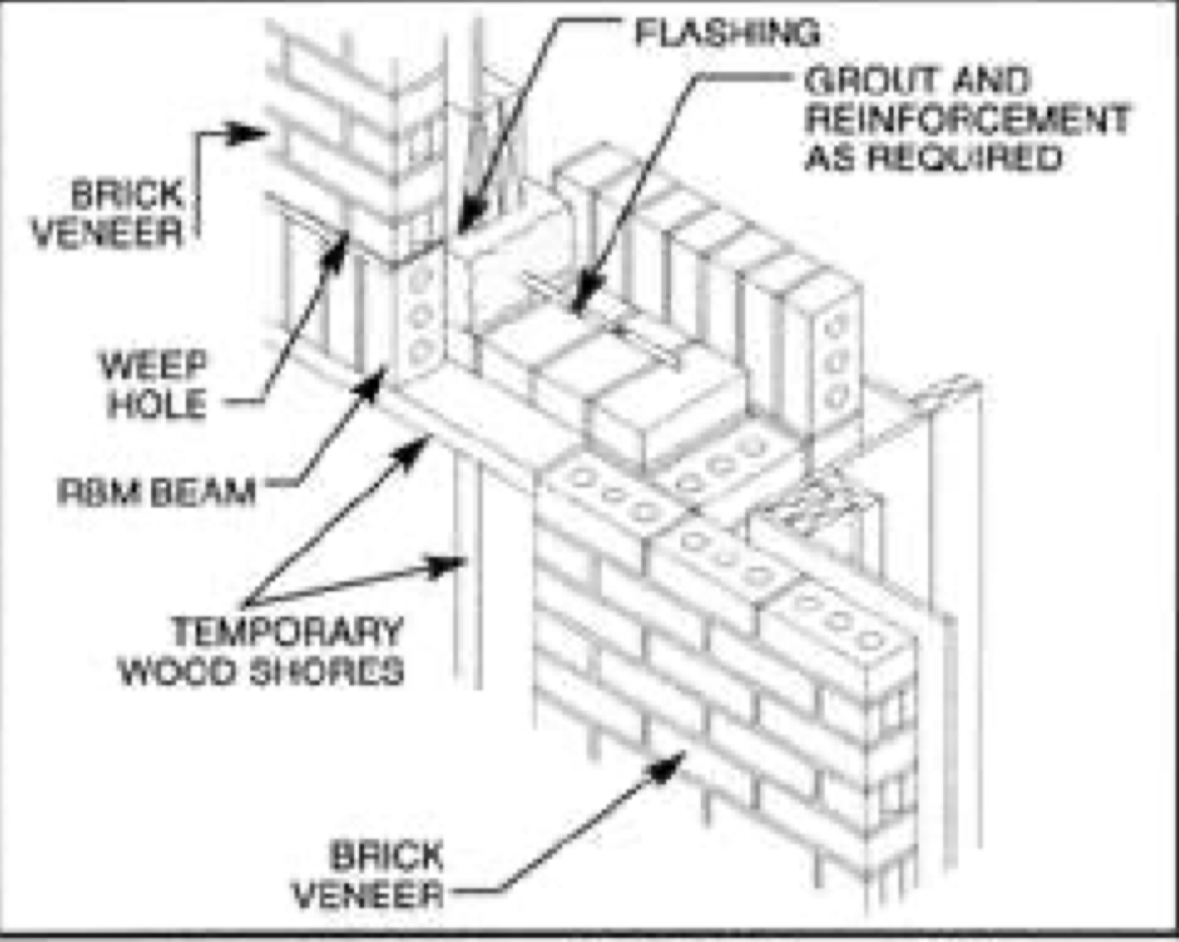
Same happened to my mothers house, same era of shit building / shit quality steel that rusted and burst all the bricks out exactly as per the OP case. My money is on rusting / expanding lintels forcing the brickwork up / outwards. -
Boiling water tap - Quooker alternatives
Nickfromwales replied to canalsiderenovation's topic in General Plumbing
Time to get one fitted............ -
21o (formerly the Green Build Store) stock it in strip form.
-
If that worried just use 2 runs of Compacfoam (20mm) to give 40mm of thermal upstand, instead of the PIR, as that's rock solid and can be bonded without any risk of future movement.
-
Wall cracks, advice very much appreciated
Nickfromwales replied to Mike Hawkins's topic in Brick & Block
Is it worth getting someone to stich this façade and re-point, with lateral bars to tie it back together? -
Boiling water tap - Quooker alternatives
Nickfromwales replied to canalsiderenovation's topic in General Plumbing
Why hasn't your plumber advised you to fit one? At a certain PPM all your manufacturers warranties are voided for shower valves and taps etc etc. Get one fitted el-pronto!!! -
Wall cracks, advice very much appreciated
Nickfromwales replied to Mike Hawkins's topic in Brick & Block
I’d bet the split in the brick is exactly where the end of the lintel is. Prob best to bite the bullet and get the lintel exposed and checked, and replaced if it is the offending article. Obvs it’s very hard for us to say with any certainty, over the internet, so a builder would better advise on site I expect. I’d say you’d have cracks much further down the wall if it were subsiding, and possibly inside too. -
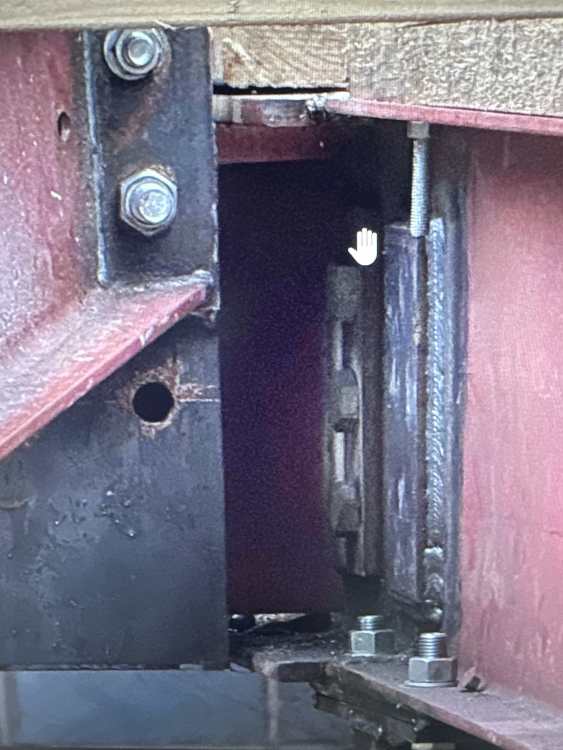
It’s fully welded at the butt joint, as well as additional mechanical fixing. It’s also now plated that side, and also on the reverse, for belt + belt + braces. Needed adapting (beefing up) as we moved the point where the crown sent the load down to founds, on to the smaller width RB2 vs the original wider RB1 that it was first placed with. Originally RB2 just sat alongside RB1 with zero connection. We also introduced a connecting plate at the underside, to accept the rising post, which we drilled and bolted and then also continuously welded too, for more braces. If this moves even 1000th of a mm I’ll buy the drinks. SE will get pics, and sign it off accordingly, and BCO will inspect and nod / smile / shrug shoulders and so on. Loads are small, just a simple (now) roof, so if anything it’s ott.
-
Timber frame internal vapour layer up wall onto warm roof?
Nickfromwales replied to hotnuts21's topic in Timber Frame
Ok. No, it does not need 2 x pink FR plasterboard. That's your BCO taking crack, after a week on the Jack & Jill's. The steel requires 30 mins fire protection, and that is adequately provided by 1x 12.5mm regular PB with skim coat applied. Go back and ask your BCO to show you the written regs and where this requirement is born from, and watch them shrink like my hotnuts when I jumped in the pool in the resort in Antalya last year. "When two becooooooome one" -
Wall cracks, advice very much appreciated
Nickfromwales replied to Mike Hawkins's topic in Brick & Block
Looks to be very much associated with expansion at the lintel, so likely caused by the lintel. When these corrode and expand, they have a lot of force/ energy to get rid of, so the resultant cracks (linear) are characteristic of this type of failure. You can simply keep re-pointing this, and pass the issue on down the line. -
One simply knows when two pieces of metal have been fused together sufficiently. Given the 2 adjoining ridge beams were firstly, at my request, fully welded together (ahead of the fitment of the 2x plates (front and not visible rear)) I am more than happy with the results. Before you fail them, maybe it would be beneficial that you'd perhaps better understand the overall situation, and after those facts are in I will take your punches squarely on the chin Until then, no dice old boy
-
Hollow out door porcelain tile, no movement
Nickfromwales replied to Oxdale's topic in Landscaping, Decking & Patios
If the grouting is all good, and water can't get in, then I'd not worry unless it's over 50% of a fitted tile. Porcelain is very hardy, so you should be fine with some hollow 'voids'. -
Timber frame internal vapour layer up wall onto warm roof?
Nickfromwales replied to hotnuts21's topic in Timber Frame
What wingnut told you this?? -
+1
-
Timber frame internal vapour layer up wall onto warm roof?
Nickfromwales replied to hotnuts21's topic in Timber Frame
If you've got the headroom, I'd do a continuous layer of 30mm (or more) of PIR across all the ceiling as well, and tape the joints with foil tape, as your VCL. Flat roofs are hideously cold, so focus on that well. Stopping the repeat cold bridging should be a priority. Use Marmox boards to line the opening of the skylight, not plasterboard, as those upstands will also be a huge cold bridge. You can plaster straight on to the Marmox btw. Also, where do you think you'll get all the sheep wool from in Aberystwyth? LOL. -
@Ay8452 Do not expect your BCO to have much to say, but if they condemn the welding as sub-par, then you have a good one. I expect, if you say nothing until the absolute last minute of their inspection, that they will glance it over and walk on by. Would be an interesting experiment.......just saying......
-
This is what on-site welding with a decent size MIG can produce, in the hands of a seasoned, expert, fabricator and welder. What you have is just a pile of heated wire laying on cold metal that the unit didn’t have the power to heat and fuse it all together. Almost looks like a crap stick weld from an arc welder, but the guy we had on site made the stick welds exceptionally good too, so this one’s got zero excuse…..they just cannot weld. Ask for it to be all taken apart, ground out, and for it to be welded again properly. Utter shite. 👎👎👎👎👎
-
Week 12 - Windows, doors, battens, roof, …and more insulation.
Nickfromwales commented on Benpointer's blog entry in Contemporary build in north Dorset
May your luck be ever-flowing my good man So far so good is an understatement, you're doing a sterling job and have managed to find some great folk to help you achieve your goals. -
External Wall Cracks - Advice Appreciated!
Nickfromwales replied to CypherP's topic in General Structural Issues
Another good option would be to get a full drains camera / video survey done asap. That will instantly show defects or where leaks could be happening. -
Week 12 - Windows, doors, battens, roof, …and more insulation.
Nickfromwales commented on Benpointer's blog entry in Contemporary build in north Dorset
I’m sure @Benpointer can whittle this down to a few sentences…. …..and if he does, whatever he says will be the first ever tattoo I get lol. -
B I N G O. 👌
-
Possible lintel in 60s semi
Nickfromwales replied to Professionally nosey's topic in RSJs, Lintels & Steelwork