Nickfromwales
-
Posts
30353 -
Joined
-
Last visited
-
Days Won
297
Everything posted by Nickfromwales
-
https://www.tlc-direct.co.uk/Products/HE2CH.html?ad_position=&source=adwords&ad_id=398484945570&placement=&kw=2kw convector heaters&network=g&matchtype=b&ad_type=&product_id=&product_partition_id=&version=finalurl_v3&gclid=Cj0KCQiAip-PBhDVARIsAPP2xc3khvVfd48mNNgTValG50Kyv4thZANH9mbEjeij0EZKwHF5aat3PqYaAmcVEALw_wcB Cheapest I found. Bought one yesterday and very happy with it for the money.
-

How long for sand and cement screed to dry?
Nickfromwales replied to Porthole's topic in General Construction Issues
3 days minimum, unless you're happy to put 18mm plywood sheets down and police the activities. Even then this is not a great practice.... -
So you’ll be fitting whatever she says then
-
Smoke Alarm Regs change in Scotland
Nickfromwales replied to Temp's topic in General Self Build & DIY Discussion
Radio linked systems are quick and relatively easy to install, and just take power from the nearest source eg light fitting with loop-in's, or a socket outlet with a fused spur connected for a 3a/5a supply. Basically you can pinch power from anything as long as it's fused down accordingly ( if a higher power circuit than a lighting supply ). @ProDave, can folk DIY? -
I am also a tiler ( past business for over 20 years fitting high end kitchens and bathrooms ) and have never used a cement board / backer board, unless the client has bought them and has insisted, and then I’ve charged for the total pita they are to cut and finish. I do not like these boards as there is zero give and they do not confirm to the substrate well enough for me. The screws are everything in terms of purchase, and you either fit screws every 100mm or at 200mm and bond the boards on with Sikaflex for belt n braces. MR ( green ) PB for me on every single job, and tanking in every area of concern / wet areas. No leaks, no comebacks, and just about to become 25 years of doing them with all my customers still having my mobile number which I’ve had from day 1.
-
Don’t avoid sockets, just create a robust method to install, so as to reduced / eliminate infiltration, and put as many in as you like. Use fast fix boxes Link and just feed the cables through 30mm holes dead centre of each socket box location. Then you use a pad saw / other to cut out ONLY the amount of depth you need, through the PB and into the PIR. Allow an extra 5mm of depth for foam to expand into. Once the wall is prepped for the fast fix box to be installed you can use a blank module plate Link as a dummy socket face so as to be able to temporarily fit the 2x plate screws and tighten up the fast fix box ‘wings’ and then level off with a small boat level. Fast fix boxes are loose until the plates are fitted and the plate screws fully tightened Then you can use a foam gun to fill the cavity at the sides / rear and the hole the cable comes through for a bombproof install. Use air block foam such as Illbruck pro Link and that will also create a very good mechanical fix too as it cures significantly firmer than builders / typucal expanding foam. The OSB method is a no brainer, it just means fitting regular PIR sheets, then OSB over those, with long screws through for extra purchase where you predict there will be known loads affixed to it later, then the PB ( in each critical area ).
-
By the time you’ve paid for materials and lost much more internal space, the insulated boards soon appear much cheaper eg better value for money ( imho ). A good dabber ( +1 labourer ) will put a lot of sheets on in one day, so you can economise on that cost by making sure materials are to hand, be there to clean up as the guys are working etc. I would only stud if a BCO had spec’d 75 or 100mm , but up to 50/60mm I’d be dabbing for sure.
-
Use a decoupling membrane and you can tile it in less than a month from laying it. Saturate it with a 50/50 water / SBR mix and allow to dry before sticking the membrane on, and use a good quality flexible tile adhesive and grout to finish. Concrete continues to absorb ( consume ) moisture whilst it cures, so if this is internal then I would carry on as above.
-
Cable behind on the bare walls, prior to the boards / IWI going on Negates a service void and unwanted extra depth. Dab is fine over the cables, but they cannot be in continuous runs of foam as that is insulation and would require down rating of the circuits / upsizing of the cables. Back boxes can be parged around and dabbed whilst boarding to mitigate infiltration.
-
-
Check out some of @nod’s posts on dot snd dab methods where continuous beads are formed by closely applying the ‘dabs’ ( which then all meet when the board is dabbed onto it ). Lots of great info on here, but the problem is that the conte t level here is huge so perseverance will be required.
-
Difficult to say definitively, unless more dialogue over specifics follows, but certainly it would be more compact a solution and therefore less impactful to the available internal floor space. An air gap is not your friend, unless you have detailed the joints and perimeters meticulously, as the aforementioned “thermal testing” becomes something to rob you of all your hard work, and even cancel It out in extreme cases!
-
I wouldn’t beat yourself up, as the tile adhesive is usually cementitious and impervious to degradation. The epoxy grout makes you a brave man and a good effort. Do try to ‘ram’ CT1 into every possible gap, forcing it in with your finger. Don’t panic about excess, as baby wipes get rid of it with zero effort ( just use lots of them once only ). Nice job regardless
-
After 9m2, iirc, you need planning permission for a ground mounted array. A great option if feasible, and we’ve done a few with great results. If the trees can’t go, your options are significantly reduced there. Also remember that PV will never offset or aid heating in winter unless you’ve a monster of an array ( impossible to get on single phase ). Can you get another 50mm of EPS insulation under the 150mm of PIR? Will be a better result and you can lay your DPM atop the EPS to keep it free from punctures. The 100mm between rafters is good, but also consider installing 25-40mm of full sheet PIR over the rafters to give you greater results by arresting the cold bridging from where the plasterboard meets the rafters. Pre-insulated plasterboard is a perfectly good option there, but I prefer to separate the two and stagger the joints. The same pre-insulted boards can be used to form your IWI also, ‘stuck’ with dot and dab but with a continuous bead of dab or expanding foam to stop thermal tenting.
-
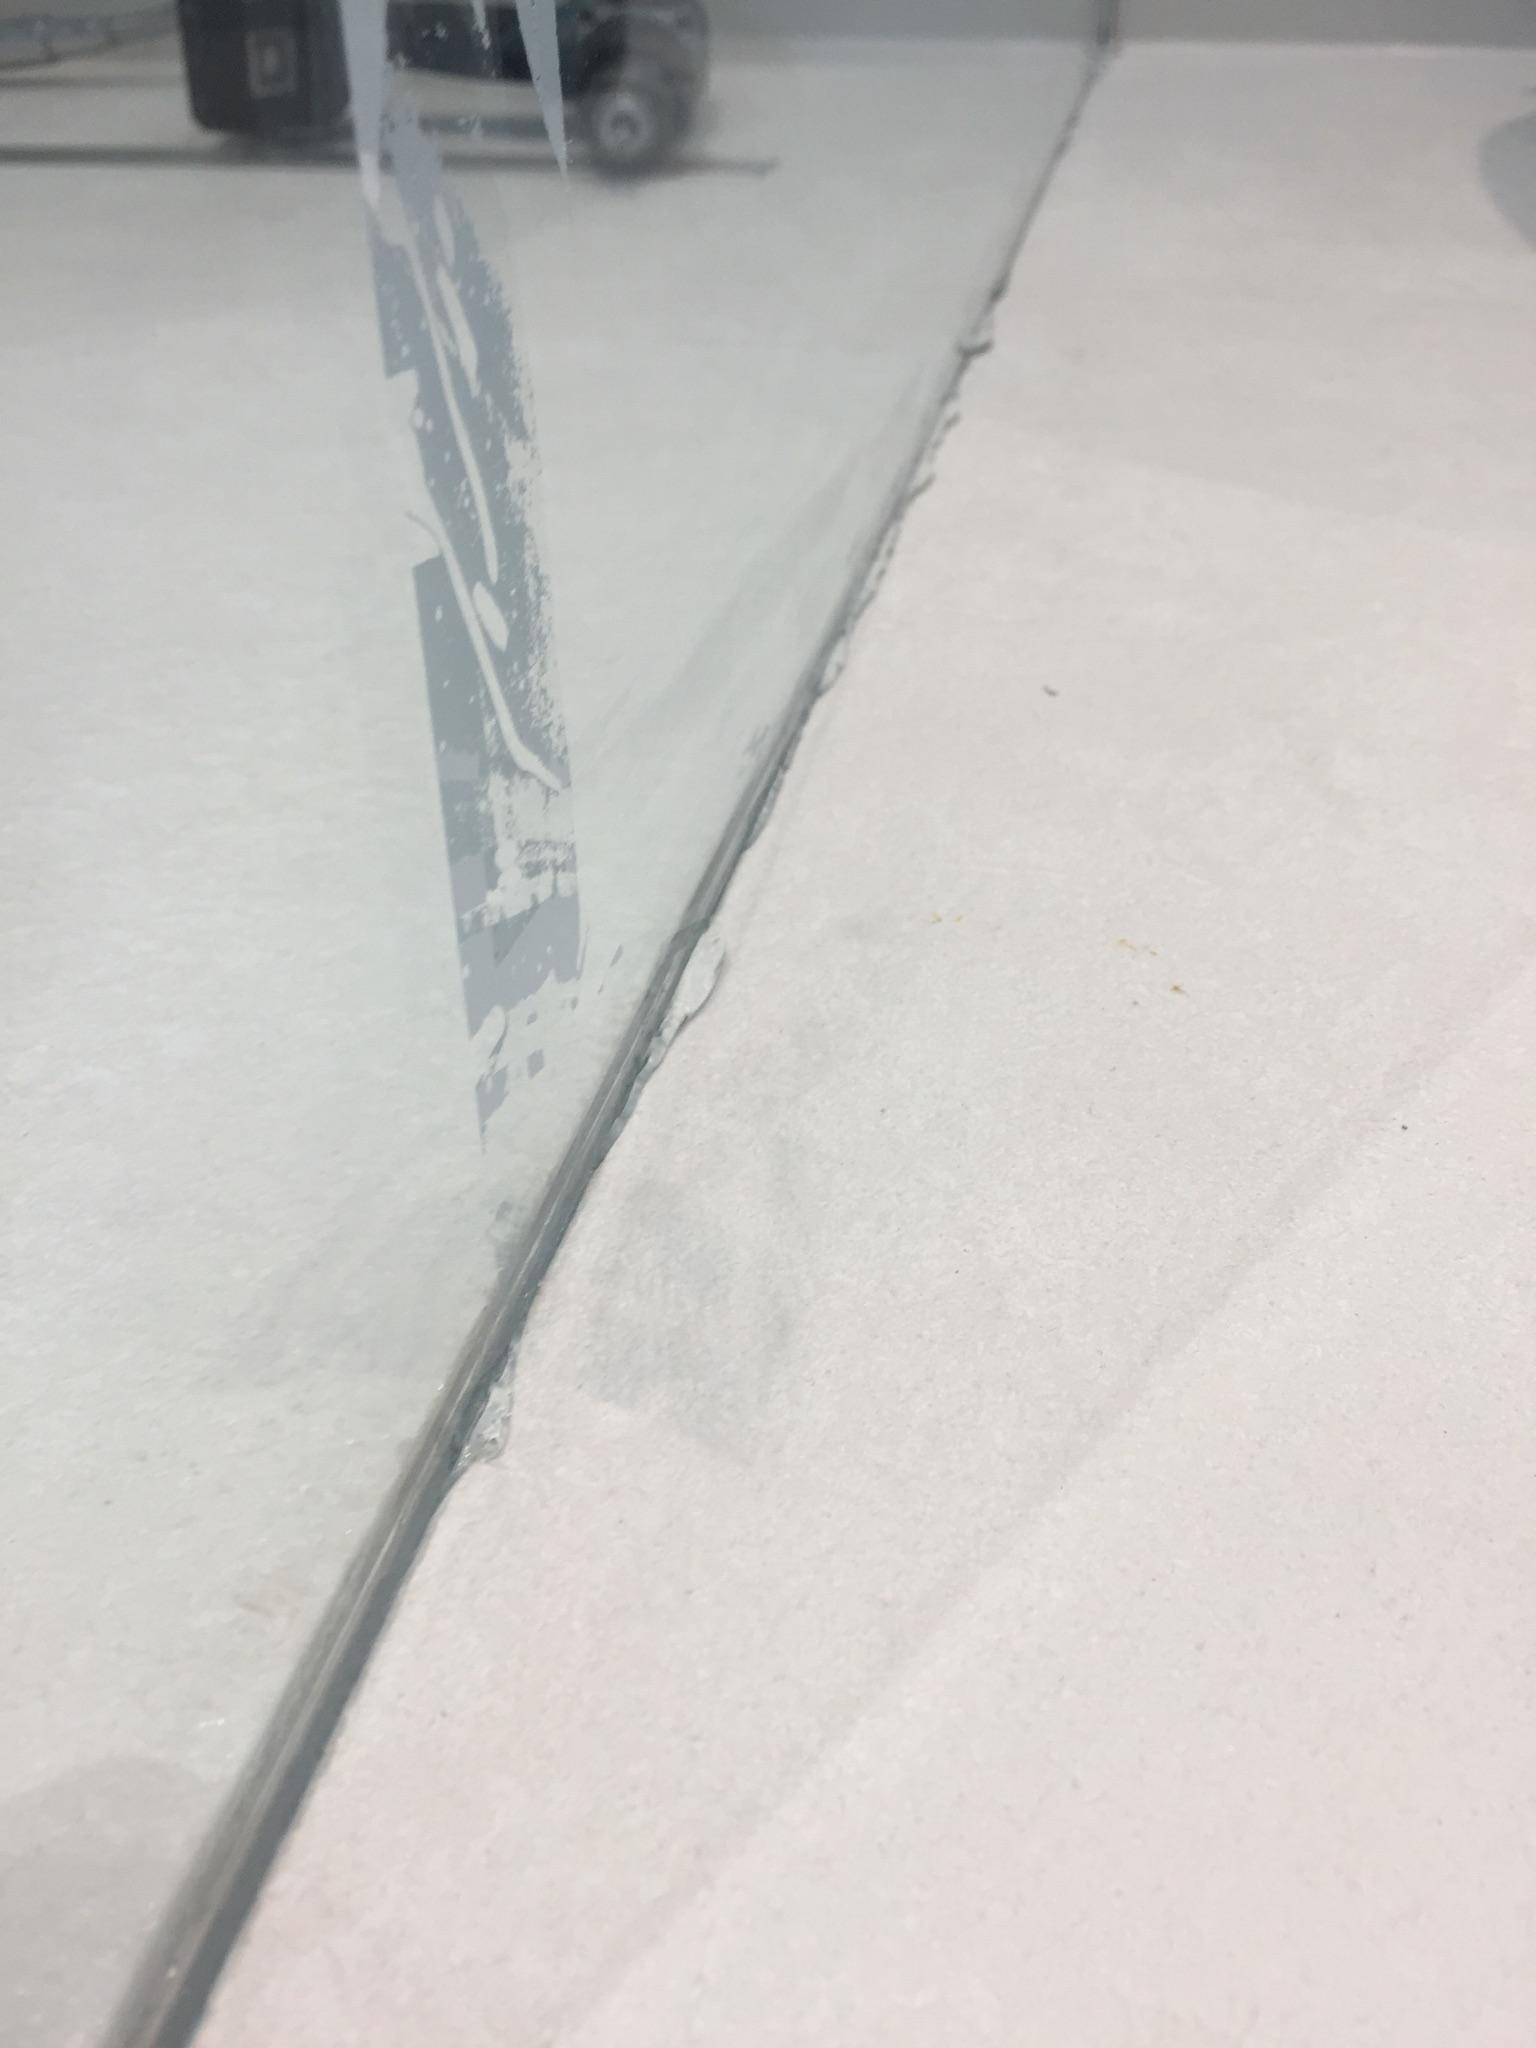
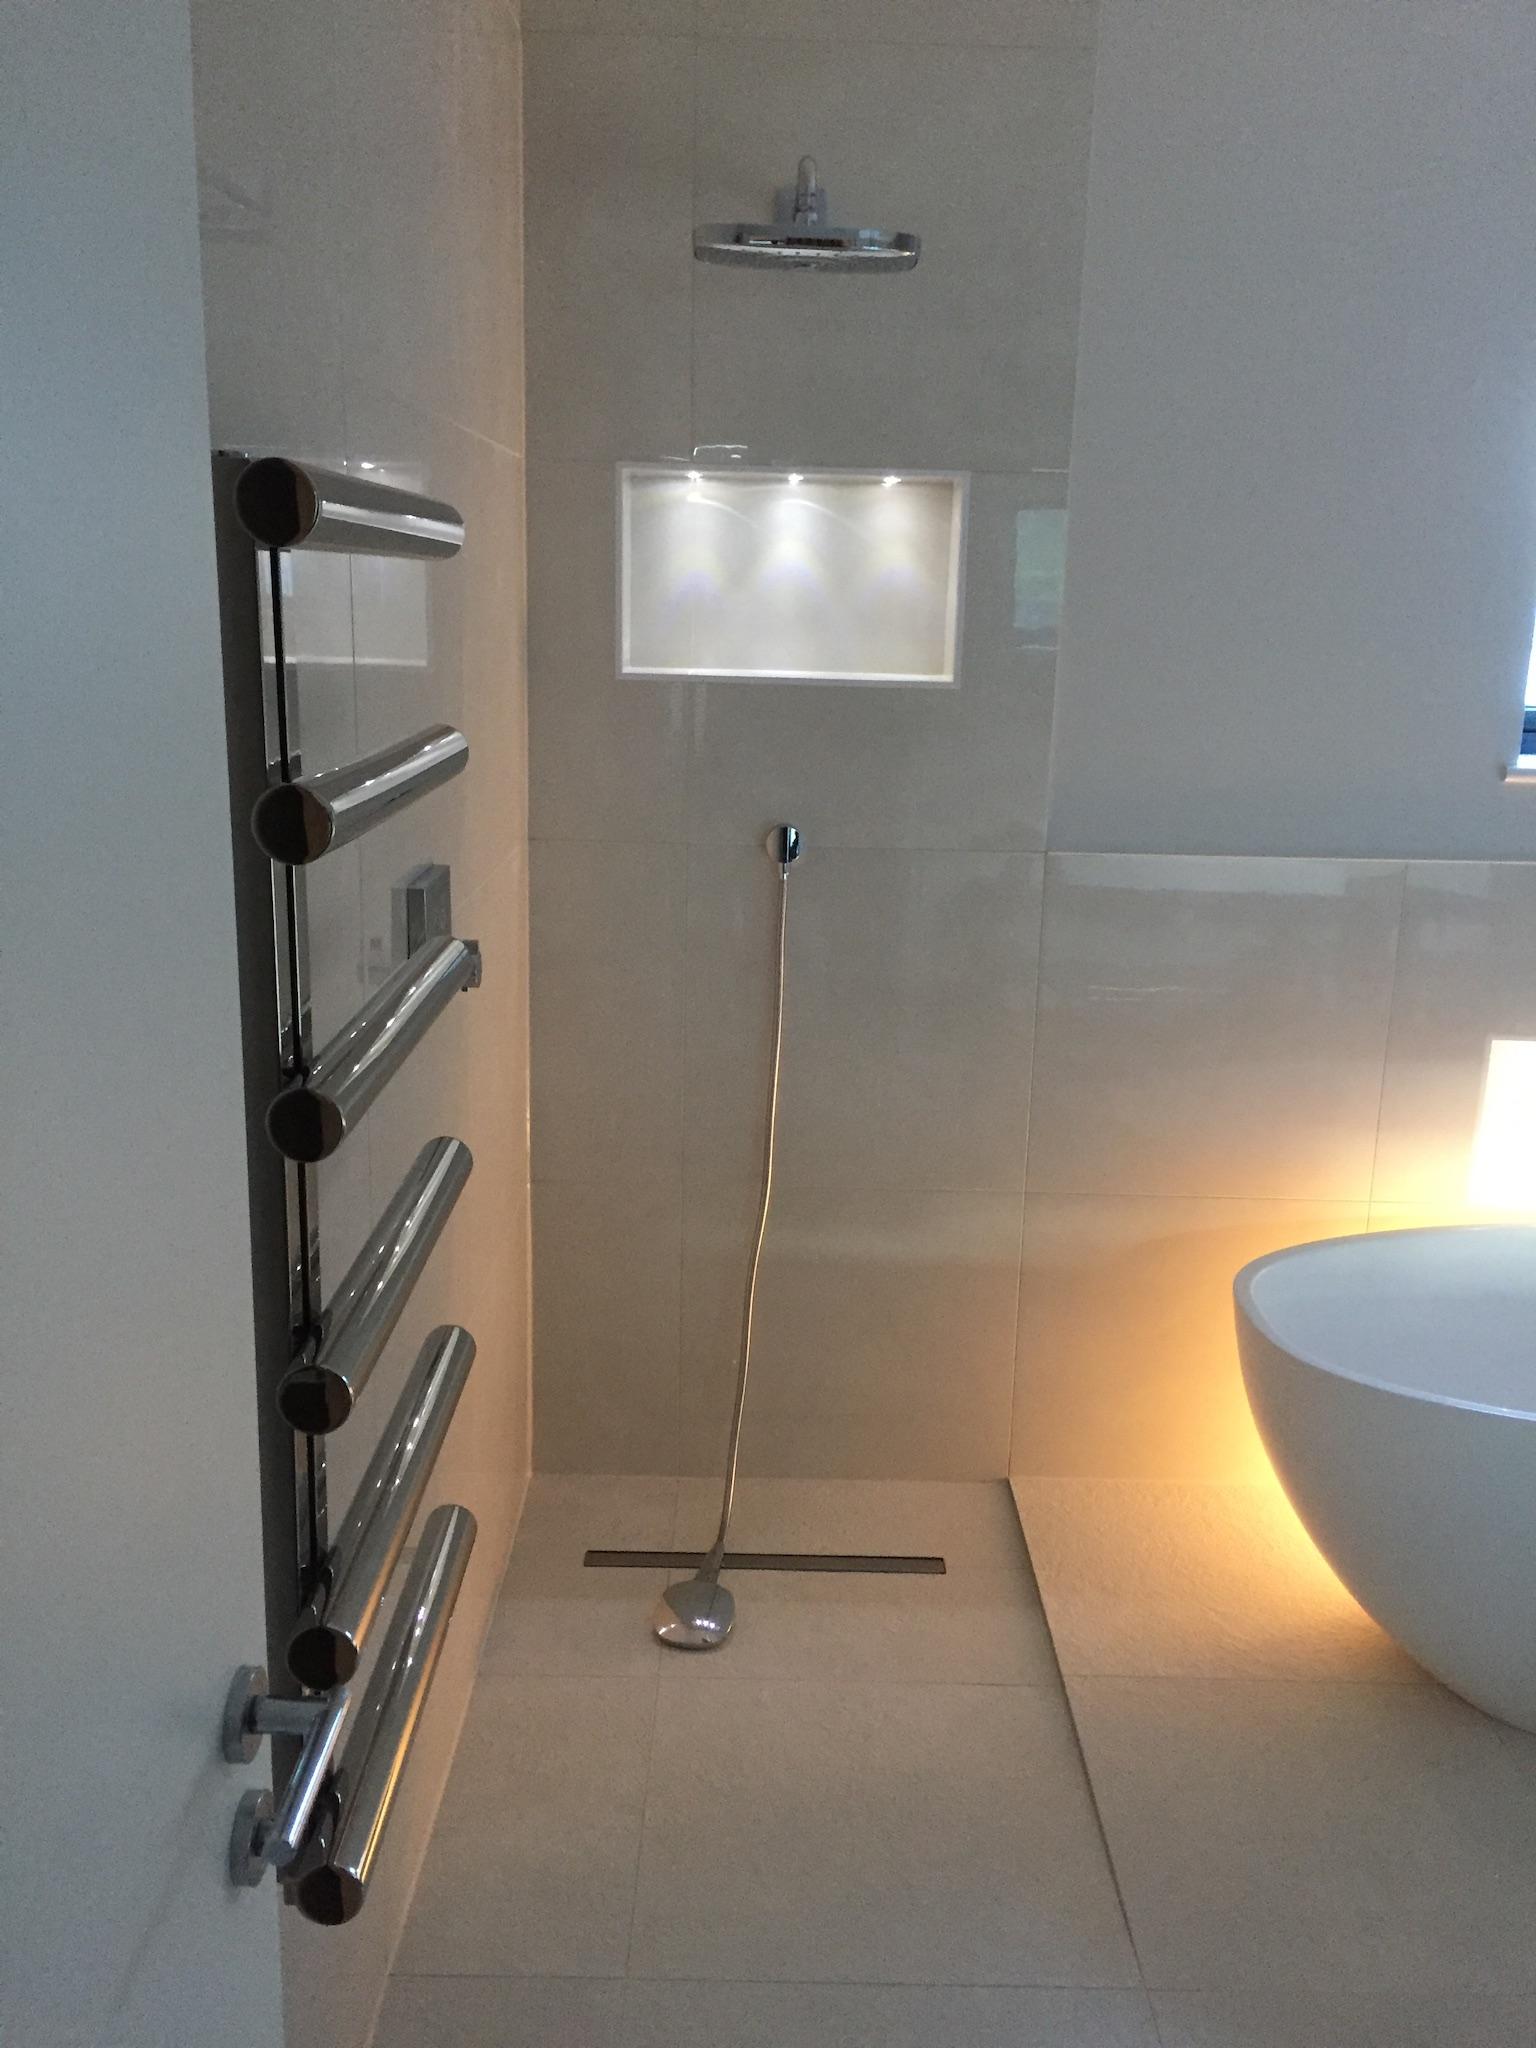
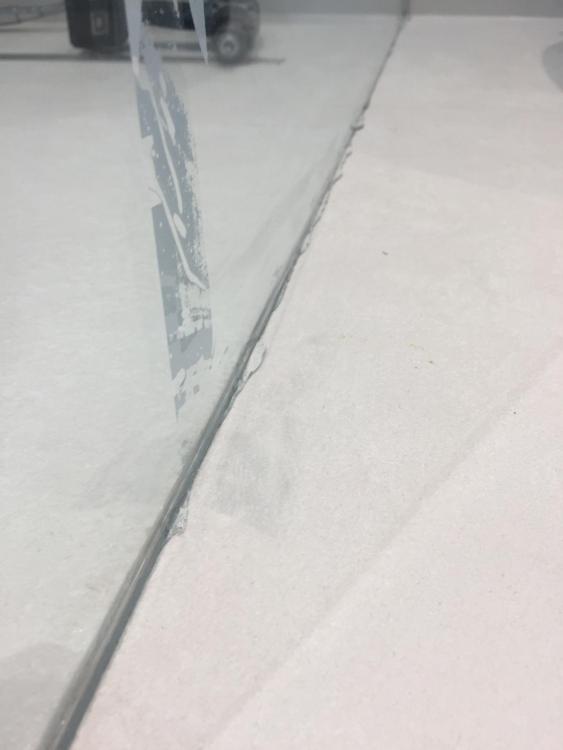
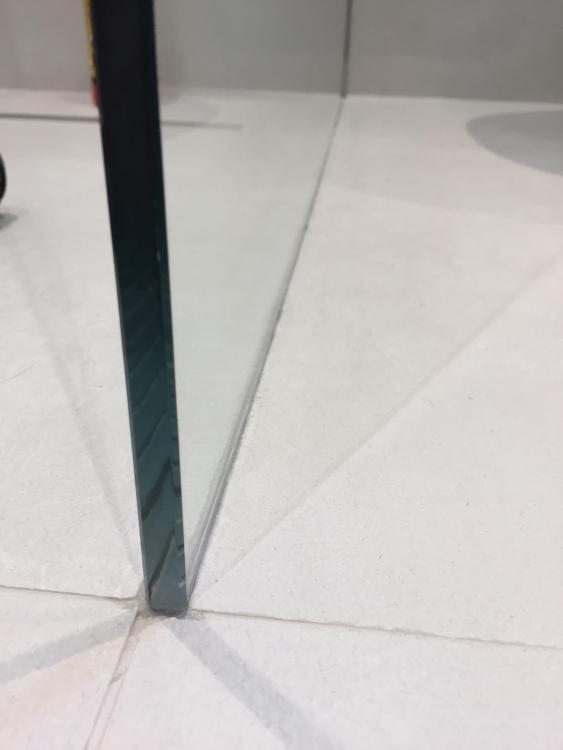
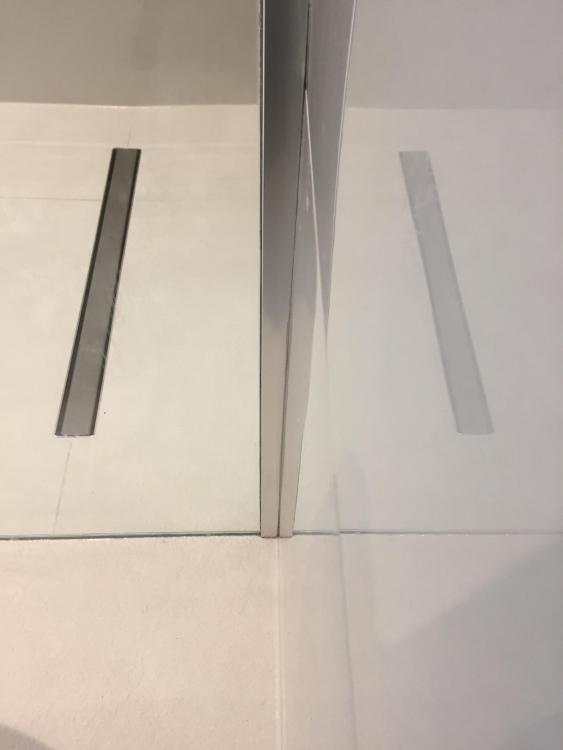
I’m not a fan of going sub-tile-ranian, but that is a nice end result. I’m too much of a fan of keeping the water up out of the floor to ever go with that floor channel, as capillary action will deffo draw water down into that regardless of how tight the fit. If the glass will slide, there’s enough gap for water. May be ok ( for me ) if the floor channel was loaded with CT1 first, which was then duly displaced, but that’s one new trick this old dog won’t get his head around any time soon!!
-
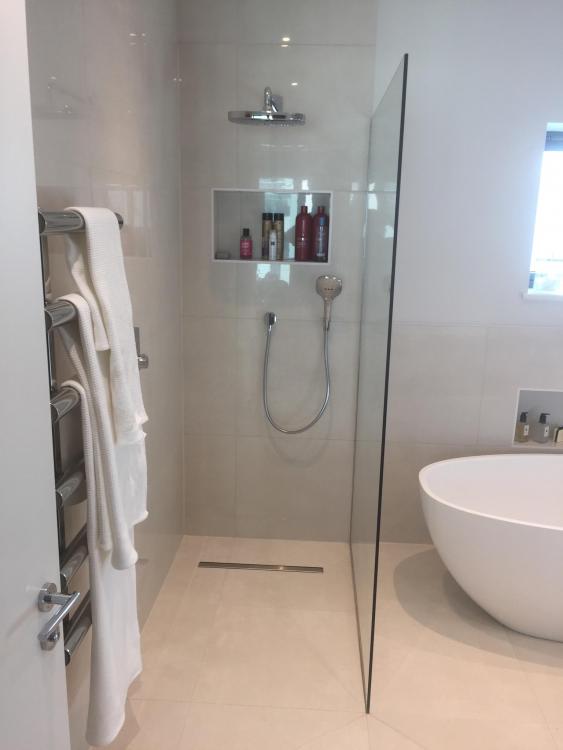
Yes indeed. One was supplied by Porcelanosa , but the clients wife wanted nothing there for Uber minimalistic look. 3rd storey master en-suite and no kids so they just be careful around it. It was rock solid tbh, and iirc 10mm glass. If it was 8mm and flimsy I would have insisted on the stay bar or refused to fit the glass.
-
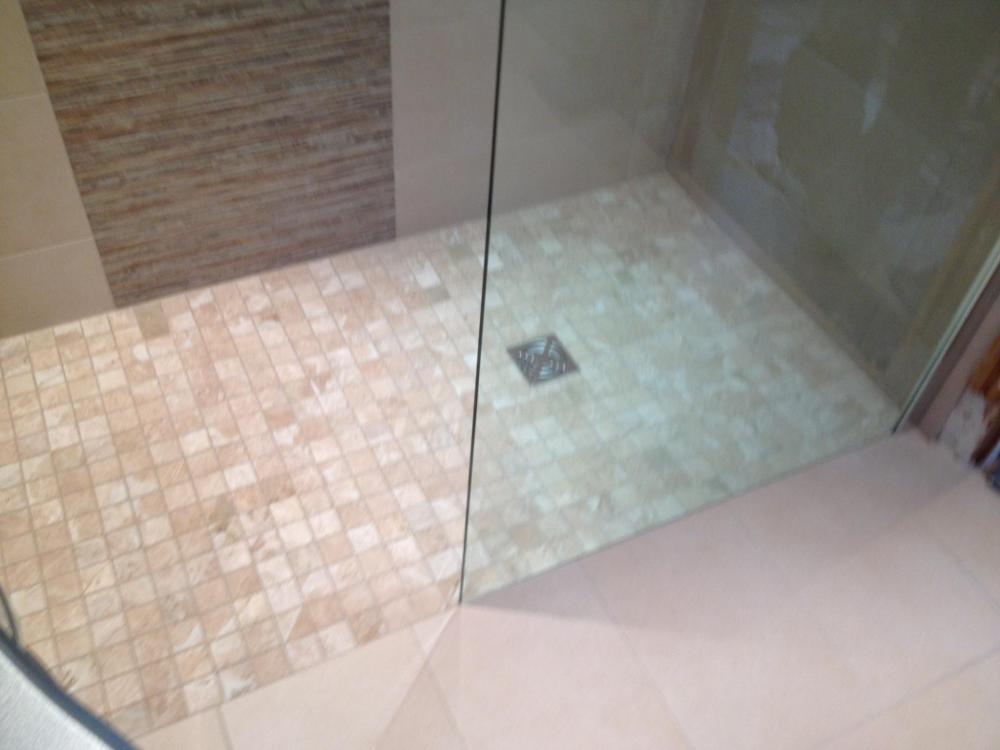
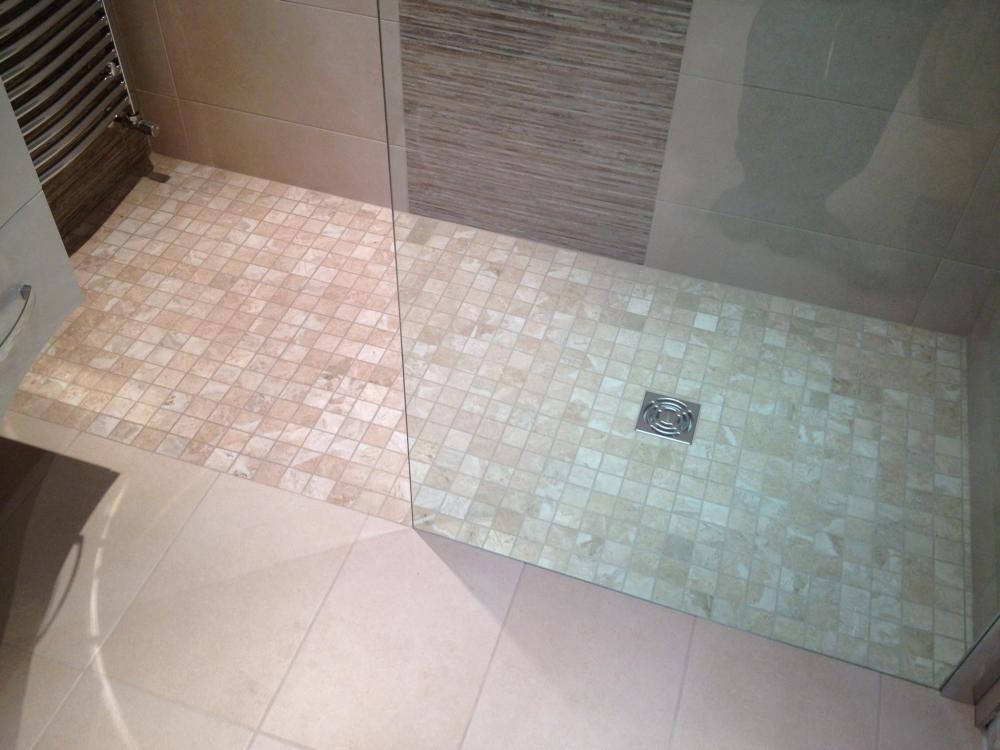
?. Pics show CT1 displaced, then cleaned off with baby wipes. Tres bien. ?

-
-
My jobs are mostly for clients And yes, everything I’ve stuck in place is still in place. CT1 is damn good stuff, but you need to use / apply it correctly to get it to do what you need it to do.
-
Service void depth
Nickfromwales replied to crispy_wafer's topic in General Self Build & DIY Discussion
Same as anything that has 230v going into it in fairness -
Service void depth
Nickfromwales replied to crispy_wafer's topic in General Self Build & DIY Discussion
Above 2250 is outside of ny zone, so you could fit flat panel LED slimline fittings in both rooms. They fit, literally, in the depth of the plasterboard + skim coat(s) but they do have a transformer to connect up which need a recess. You can cut into the VCL and make a circular recess, with for eg a plastic paint kettle or pot noodle sized plastic receiver an tape to that for integrity. A cable grommet atop would allow access for cables etc and happily house a transformer etc. The issue will be the insulation will need the same cutting and foil taping first, ideally, for belt n braces before moving on to the penetration and receptacle is created for the actual light fitting of choice. Fire is moot as this area does not have any habitable spaces above, but FR light fittings are readily available in all shapes and sizes, or you can install a integral FR ( intumescent ) hood. Draughts, agreed, but can be mitigated with some effort. Not had any vermin / insects in mine yet. Vapour control and AT are obvious areas which also need addressing regardless, as the cable needs getting from A>B. If the OP wants to create a service cavity just to avoid some detailing at the locations of the spotlights, then a 35mm service void would suffice for flat panels + transformers, but if any type of spotlight is used, the service cavity becomes way to deep if wanting to avoid penetrations into VCL and insulation. -
Avoiding SVP penetrations through our roof
Nickfromwales replied to Bramco's topic in General Plumbing
Are you sure they said a Durgo ( aka Air Admittance Valve / AAV ) ? It is utterly pointless to go to all that length installing anything that does not naturally vent to atmosphere.....Are you sure they did not say a bird cage ( vent ) vs Durgo? The internal AAV's would suffice, and the proposed external rising SVP > AAV is a complete waste of time / effort / money AFAIC. -
Is corrigated flexible toilet waste pipe ok?
Nickfromwales replied to Porthole's topic in Waste & Sewerage
I've been fitting bathrooms for over 25 years, and have used the flexible soil > pan connectors many many times without ever having a single recorded issue. The velocity of the flush is more than ample to see the bi-products of lunch exiting at enough pace to be washed away / over the riffles of the internal corrugations, and as there is a water trap in the bottom of the pan, there specifically to isolate the stench in the soil pipe, hygiene or smell etc will never be a concern. I've removed WC's where these types of connectors have been installed, and whilst there is 'evidence' of what has been travelling through them over the years, I have never ever seen one that has made me think the aforementioned'items' have been hanging around. The supplied pan connector that these guys have abandoned would typically leave a fixed socket for the pan to push back on to. As there is now a flexi in its place you ( they ) will have to pull the flexi out to install it onto the pan, immediately before pushing the pan back onto the bolts and fixed flush water pipe socket. That is the only annoyance when doing this, and you ( they ) need to 100% sure the flexi is firmly pushed onto the WC outlet. I do not use any silicone lubricant when doing it this way so the rubber grips very well. A bit of soapy water helps if it's a struggle, and washed away to leave the rubber friction fix as good as is possible. Express to the fitters tat you wish to know the flexi pan connector has not been installed with such lubricant, as that will stay slippery for a very long time and can proote the connector coming off over time / many flushes. -
100mm vs 150mm insulation UFH under slab.
Nickfromwales replied to Eric's topic in Underfloor Heating
The industry tends to agree that anything over 300mm of roll /wool insulation has more weight than it can support, so the bottom layers gets compacted. Compaction kills off the insulation value of wool so 300mm is the most I've every installed. I also go with 600mm long x 200mm - 50mm thick PIR angled 'wedges' between joists / rafters at the perimeter ( where there are angled eaves ) to make the perimeter; a) more robust for the diminishing thickness, and b) to engineer the solution at the eaves so as to be 100% sure that there is zero contact between roof membrane / felt and the insulation where access is difficult / impossible. Very difficult to detail that with any discernible results with a wool so I gave up on that and went to this 'hybrid' solution a long time ago. -
100mm vs 150mm insulation UFH under slab.
Nickfromwales replied to Eric's topic in Underfloor Heating
It can make a huge difference to just go hybrid, adding 100mm of EPS under the 100mm of PIR Chesp to achieve if budget is tight with still high performance and good results. Folk here who have done passive rafts are all using EPS @ 300mm NOT PIR. Good thing with using EPS as the underlay, is being able to do that with 25+75 and raising the DPM up atop the 25mm to keep it completely free from punctures. 100 EPS + 100 PIR would be a good outcome and save you a considerable uplift in costs.