Nickfromwales
-
Posts
31387 -
Joined
-
Last visited
-
Days Won
346
Everything posted by Nickfromwales
-
The term is "exporting" the earth, vs "extending" it Exporting the earth is defo something a qualified spark would identify on site, and as this refers to work which would typically be notifiable the assumption would be that it is to be done by a qualified person. The distance and type of service need to be of significant interest to warrant not exporting the supplied earth from source tbh. Needs to be surveyed and understood, but if less than 15m or so from the house I doubt very much it would need the earths being made divisible etc.
-
Assuming just power socket(s) and lighting? If so, as per @ProDave, and just run it to a double socket, Use that double socket as a junction box, and branch off with 2.5mm2 ( regular twin and earth when inside is fine ) to a switched fused spur. Locate that where you want to be able to operate the light(s) from, and install a 3a fuse to comply. Run 3-core flex or 1.0mm2 T&E to the light fittings and job done. No need for a CU there then.
-
Yup. Plus they do nothing when screwed into 12mm of plasterboard. The caulk holds them rock solid, when completely dry. Screws just come out and get binned.
-
Plasterer skims flush to the lip, painter rollers straight over. Easy thing to get great results with.
-
That'll take some explaining lol 😆
-

Are these spreader plates salvageable?
Nickfromwales replied to ADringer's topic in Underfloor Heating
Ok, just not sure laying on the PB constitutes a "safety zone". Sparky should be able to decide that. Yup, wool used to force the panels up about 20-25mm higher than top of joist should work well. -
Are these spreader plates salvageable?
Nickfromwales replied to ADringer's topic in Underfloor Heating
OK, thanks. Not at all ideal to be installing cables in that heated space..... Have you consulted a sparky for compliance /de-rating the services etc? As its 1st floor, just do wool tbh, as you're already within the heated envelope. -
Are these spreader plates salvageable?
Nickfromwales replied to ADringer's topic in Underfloor Heating
!00mm under a heated floor is barely scraping regs btw. -
Are these spreader plates salvageable?
Nickfromwales replied to ADringer's topic in Underfloor Heating
As per my last, I cannot work out what the current depth is between the top of the insulation and the underside of the floorboards? Only then can we advise -
Are these spreader plates salvageable?
Nickfromwales replied to ADringer's topic in Underfloor Heating
Yup. Doesn't look like you'd have room for another 20mm or 25mm of rigid insulation plus the wool? How much insulation is there out of curiosity? -
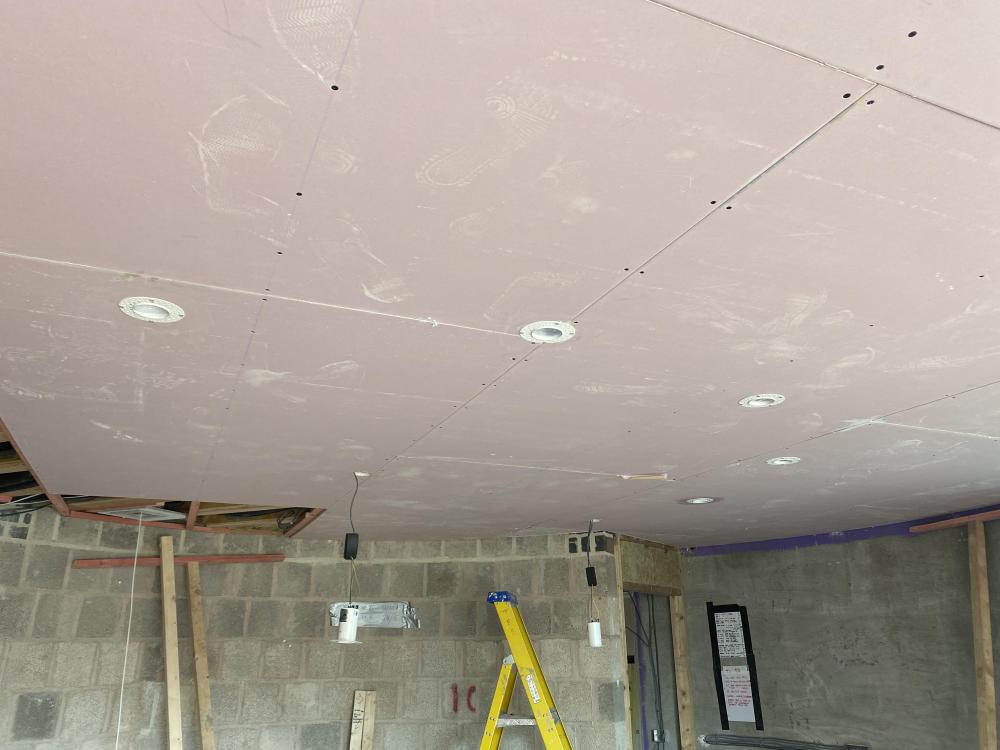
This one shows the lights caulked, screwed and wiped. Plasterer scrim taped these before skimming, taped before on a previous job iirc but works either way tbh. Screws removed before skimming.
-
Have installed a lot of these for my current 2 clients builds. They look a million dollars when skimmed and painted, IMO. I use decorators caulk around the hole, then push the fitting up into the caulk, and fit with a couple of temp screws. I use baby wipes to remove almost all of the displaced caulk and lea e to dry. The screws get removed immediately before plastering. Regarding scrim, I do that every time for belt and 2 braces. Cost = next to zilch so why wouldn’t you ? I apply the scrim around the hole before the caulk and fitting of the light. The tape goes half inside the perforated skirt and half is left exposed to pick up the plaster. I used a bi metal hole saw and cut discs out of foam to use to plug the holes in the light fittings, with the lamp retaining rings still fitted eg so they didn’t go walkeis or get damage in storage.
-
Are these spreader plates salvageable?
Nickfromwales replied to ADringer's topic in Underfloor Heating
If there’s no access from below, eg to staple the plates to the underside of the floorboards / deck, then I always recommend putting sufficient mineral wool directly under the plates to make them distended. The fact they’re left raised up by the wool means that when the deck gets screwed down, the wool compressed and maintains the contact between the plates and the deck. You’d need to spend an afternoon manually reshaping these to get the sag out of them, but no need whatsoever to discard them imho, just needs a bit of time and elbow grease. Leaving the PIR insulation where it is and fit the wool on top of it, as long as it won’t move south under compression of course. -
Just when I thought I’d seen it all.
Nickfromwales replied to Canski's topic in House Extensions & Conservatories
Nah, you always stick a skinny 6 / 8mm drill bit through before coring out, through the repairable cement ( pointing ) to see if the lintel fitted was oversized. Some lintels are ‘too big’ because that was the one that was available on the day of purchase. Always mark the hole out but then, first, drill a test hole the side nearest the opening to ascertain that you’ll defo miss the end of the lintel. 2nd year apprentice stuff tbh. -
Ah, OK. When screwing the plasterboards to the studwork, you should make sure there is timber, and that you screw into it, at the position that the tray will be bonded back to the plasterboard. That make sense?
-
Loads of vids of what to do / how to thin paint and types etc Take a huge amount of time to mask up around windows and doors etc, as cleaning off overspray will take 10x longer Short cuts always take 3x longer or more, so mask and spray in a controlled fashion for an easy life. If you don't put in the effort with masking, you'd be far better off with a roller. Follow the guidelines for cleaning and stowing the machine after each use, religiously. Your idea to use dead spaces for practice is a robust plan. If spraying in this weather it'll dry as you're putting it on, so will be a much bigger challenge to get a good result. Possibly spray early mornings only, and not after midday.
-
Just when I thought I’d seen it all.
Nickfromwales replied to Canski's topic in House Extensions & Conservatories
We're really not helping are we?!? LOL Apologies, I'm stuck in a hotel, arrived back late, and am now drinking to catch up ( under duress of course ). -
They're beats, must have been fun! Looking good
-
At least put a cheap Climaflex 13mm wall pipe insulation on first, and then fill the void with mineral wool to compliment. That stuff is cheaper than shoplifting and will be far better that just attempting to manage the losses by stuffing loose wool around.... Seal up where the pipes start / finish ( each end of the boxing-in ) to stave off any convection ( heated air ) flow. Do you have PV, so as to reduce the amount of summer boiler heating of the cylinder?
-
Thermal insulation between occupied floors
Nickfromwales replied to Crowbar hero's topic in Heat Insulation
Aluminium spreader plates for me, just so quick and simple. Great results every time. -
Less gin, more tonic The 2x2 is ample, relax. This is exactly how most do it. Words from the wise
-
Just when I thought I’d seen it all.
Nickfromwales replied to Canski's topic in House Extensions & Conservatories
Yes, and the cocks fitted that on the internal wall........presumably after coring out and realising there was a Catnic in the way! The round hole in the outside skin of brickwork is where the 100mm through-wall vent duct and plastic grille were then fitted ( doing the square root of SFA ) to hide the fcuk up. They clearly knew they'd dropped a bollock as there are some small holes drilled so they could get a whiff of air through, plus what looks like a failed ( or more likely abandoned ) attempt to drill a 50mm hole with a bi-metal holesaw. Probably limited to the number of tools they could fit in the saddle-bag -
Complete amateurs, or just careless tossers. Either way, a terrible job. The walls should have been dubbed out and dragged straight before even considering applying the render, or it could have been an excellent candidate for external wall insulation which could have been applied and shaved nice and flat. On a scale of 1-10, that jobs a 2 or 3 at a push. If they said to you, before starting, "the walls are wonky so the finish will be poor" then that's a different story?
-
I’ve done a few like this in garage conversions, no complaints to date. I cut that section of insulation in last, the area under the tray plus a few inches more, and set that back down onto wet expanding foam. Whilst the foam cures you will need to put a piece of timber deck down and lay some very heavy weight on it, evenly distributed, until cured ( 2 hours should be plenty ). Bond the membrane to the insulation with CT1 or Sikaflex and roller it out with wallpaper joint roller, and leave to dry for 24 hrs. Fit the timber deck down, bonding it to the area of membrane that you previously bonded, and leave again to cure. Set the tray down into a bed of Sikaflex ( NOT a sand and cement mix ) and be generous enough with it to use that to level the tray. Bond the tray to MR plasterboard the 2 or 3 sides around, and remember to screw into the plasterboard when fixing it to the studs, at the same level where the tray will be bonded to the plasterboard, so it’s nice and solid. FYI, I always do these types of conversions using 2x layers of deck board ( 18mm or 22mm P5 Egger etc ) with the joints overlapped for 2 belts and 3 braces, gluing snd screwing the hell out of them so they become one bit of deck. I have put washing machines on these types of floors ( garage to utility etc ) and even spin cycles etc never see a mm of movement. This is quite a solid way to lay a floor as long as the subfloor is near perfect in level and uniformity. If not, self levelling compound should go down first to get it flat and smooth, as there is no other practical way of levelling once the insulation has gone down. Done properly, this will be fine.