MJNewton
-
Posts
1347 -
Joined
-
Last visited
-
Days Won
1
Everything posted by MJNewton
-

Sink Relocation - plumbing and associated works
MJNewton replied to MyQS's topic in Introduce Yourself
Welcome MyQS! As you can imagine, vague questions can often lead to vague answers but we've got to start somewhere! You really just have two aspects to consider - supply and waste. Moving supplies is generally easier as the pipes are smaller and you don't usually have to worry about gravity - it is often just a case of extending the existing supply pipework to the next room or tapping in somewhere else. For the waste, water only flows downhill and so the greater the horizontal displacement you require results in a greater consideration of vertical displacement to factor in. In both cases consideration will have to be given about the existing pipework i.e. whether any of it can remain in the existing room. Can you draw/scribble a diagram, or describe in words, the two rooms and locations of the current and desired pipework and drains? Doing so will enable more specific discussion and advice. -
What type of joists?
MJNewton replied to osmononame's topic in Mechanical Ventilation with Heat Recovery (MVHR)
I retrofitted our house with MVHR and have I-joists. We were lucky in that I only had to cut through one as I could work with the direction for most runs. The one I did have to cut happened to need it right at the end, outside the safe zone, and so I had to reinforce it with a Simpson bracket designed exactly for this - was dead easy to use but around £25 so could start to add up if you had loads to do. -
We'll be pulling the trigger on ours to be made soon... We actually ordered (and paid) just before Christmas to secure the sale prices but with me being so seemingly slow at DIY, and the pandemic of course which I'll milk the excuse of as far as possible for the continued delay, we've not been ready to receive it until now. No doubt there's some sort of post-Covid sale on now with discounts the size that have never been seen before but I'm avoiding the website for fear of spotting such a thing!
-
We've got a brick slip faced GRP chimneystack and had no idea for 9 years since moving in.... I always knew it was 'fake', insofar that we don't have a chimney or flue within the house (2007 'new build'), but it was only when fitting an MVHR unit in the loft did I begin to wonder exactly how the stack was supported and then discovered the existence of these things. Even now I know it's fake I still can't tell from looking at it.
-
This is starting to feel like Groundhog Day... I'm sure this is the third thread I've seen on here starting with the very same post!
-
Sliding door considerations, 2 or 3 door?
MJNewton replied to Dan_the_man's topic in Doors & Door Frames
No, I don't mind at all. We actually got them from a local conservatory supplier (KMC Vision) and whilst such a place wouldn't normally be my first port of call - particularly for something that isn't a conservatory(!) - they're located in a local garden centre with good displays and are fairly well known. Well known, at least, for the displays - we didn't know anyone that'd actually bought from them - but good displays never the less and I've always been a fan of such things in garden centres since I was a kid! (Seriously, I think that was actually a factor) I also got a quote from Clearway Doors and Windows, another local(ish) supplier and they came in at a similar price but hadn't been selling these doors for as long as KMC. I also figured that if I had to stomp my feet with an issue afterwards then a busy Saturday afternoon at a garden centre would be a great place to do it rather than an industrial estate. Details of both companies were given to me by Reynaers themselves, although they seemed to go to great lengths to distance themselves from their suppliers and point out they weren't 'recommendations' as such. I can understand where they were coming from, but it was a worry bead and almost put me off. If another company had taken the opposite approach and made a point that they only sell through trusted partners who are for all intents and purpose agents of theirs I may have jumped ship. KMC were good in the end, a bit 'laddish' for my liking but then I find most tradesmen like that and just put it down to me being a soft office monkey. P.S. I also found a supply-only place (in Bristol) which I *think* I would possibly consider if there was a next time. I'm sure we paid around a grand for installation and I'm sure I'd be able to do it myself. Lots of risk of course, but a grand is a grand! That said, they were here for 1.5 days and most of that seemed to be setting the things up - they couldn't have asked for a squarer hole to put them so no issues with the actual fitment. -
Thanks everyone, I'll let the plasterer get on with it when it comes to that stage. Apologies if these sorts of question seem so trivial but I want to get things right and if I'm wondering about this sort of thing I'm sure someone else will one day and might just be grateful for finding the answers in the archive.
-
Yeah I did wonder if it'd take me longer to find out how to do it then it would for him to just do it!
-
Thanks for that - will buy some. Shame it doesn't come in smaller bags given how little I need! I take it drywall adhesive is no substitute? Still got half a bag of that left over.
-
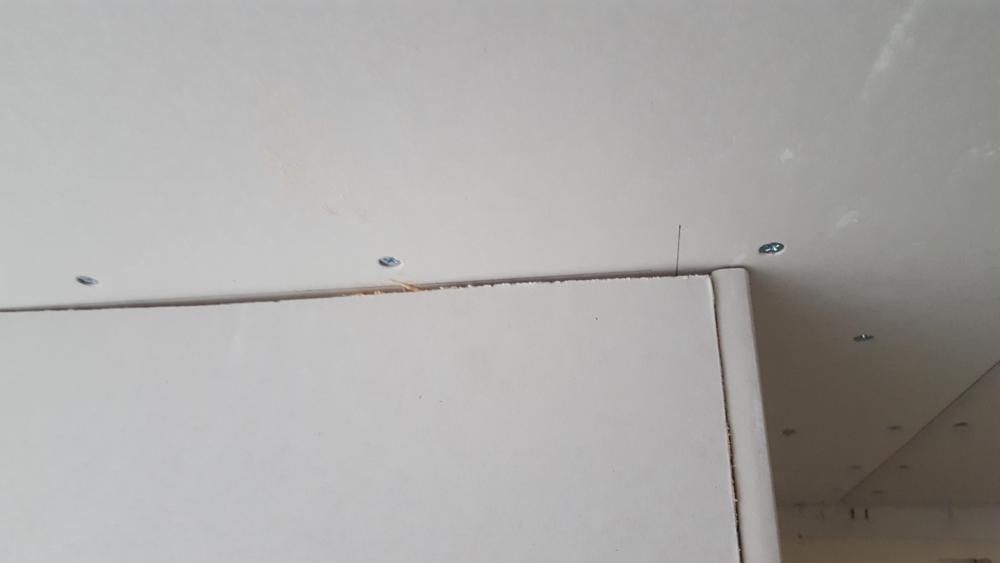
Should small gaps that might've occured between plasterboards (eg where the wall meets the ceiling as below) be filled prior to skimming, or will the tape and skim provide all that is required? I was thinking maybe a quick run round with a tube of adhesive along any gaps might be useful in terms of strength and the keeping the relative positions stable, perhaps helping reduce sound transmission too. I'm normally pretty good keep things together but here I think I must've had to shave off the wall board to cater for a less-than-square join and not done a particularly good job at getting things flush.
-
Sliding door considerations, 2 or 3 door?
MJNewton replied to Dan_the_man's topic in Doors & Door Frames
Whilst not one of your options I thought I'd share what we did with a similar-sized opening (a bit smaller at 3.9m x 2.2m) even if just for you to firmly rule it out if it's not your cup of tea... Our room will be a lounge area with a layout such that we only wanted/needed a centre (not side) opening thus a 2 panel slider wasn't really an option and a 3 panel would mean only a ~1.3m opening which we didn't feel was wide enough when compared to the UPVC french doors we had previously. Hence, we went for a 4 panel, with 2 centre openers, thus given us a ~1.9m centre opening which, in practice, works really well for us and definitely feels wide, perhaps because it essentially represents half of the opening, the rest is glass so doesn't 'feel' closed as such and there's a natural thoroughfare through to the arch on the patio. I honestly don't think we'd want it wider based on the usage we've had so far. The doors are Reynaers CP130-LS and we've been really pleased with them. They've got chunky frames compared to most and whilst if we'd had a bigger budget (these were £5.5k fitted) I suspect we would've sought thinner ones at the time I don't think I would now having lived with, and got used, to them. If anything we now see the chunkiness as part of the appearl nd they match the roof lantern frame well. I guess if we had an ocean view things would be different! Incidentally, we were worried that as this is our (only) back door how they'd be day-to-day just for nipping in and out. Turns out to be a complete non-issue, perhaps helped by the fact that we don't have handles on the outside (only finger pulls) and so don't need to lock them on the inside so it's just a reasonably quick turn of the handle and go out. They've been better in many respects than a swinging door (e.g. on a bi-fold) as we can leave the door in an ajar position of any size (including a just-narrower-than-a-3yr-old width) without wind-induced slamming etc. I think our concerns must've stemmed from sliding patio doors of yesteryear but lift-and-slide are a completely different beast. So simple I'm surprised they haven't always been like this.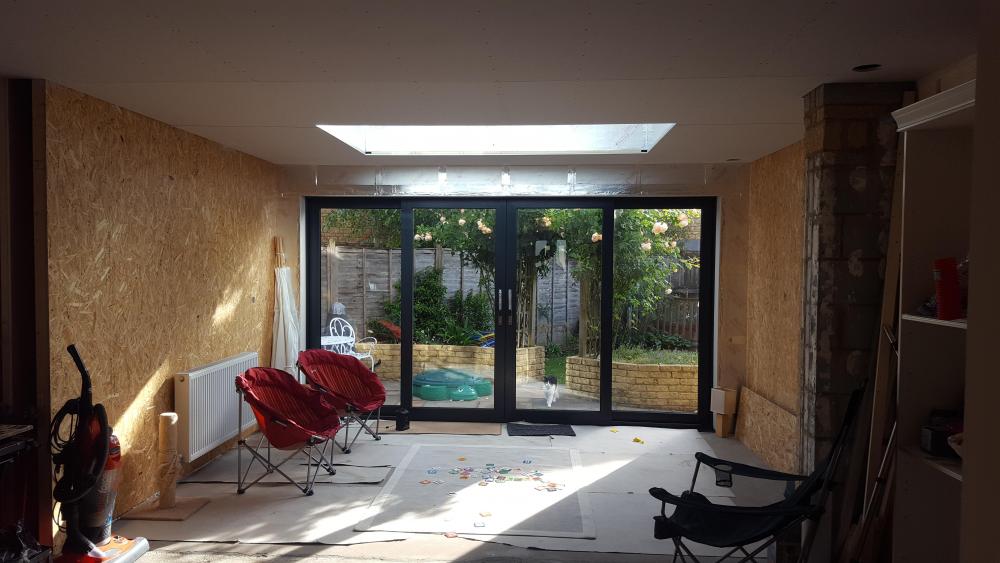
-
Kitchen almost complete!
MJNewton commented on MikeGrahamT21's blog entry in Back on the self-build waggon...
Thanks Mike. Reassuring to hear things were done in a similar way, and effort, to that experienced by Dave. Thanks for the caution about the minimum unit sizes - we're going for a 1.5 bowl Franke Ariane and it specifies a standard 600mm as the minimum; notably with no room either side so if there are going to be any additional blocks etc glued we'll need to the hack the cupboard a bit - they might well just glued the sink and use the cupboard sides as the additional support assuming that's what purpose the blocks serve. -
Thanks @ProDave for your response to my query on @MikeGrahamT21's blog regarding how undermount sinks are fixed to/in stone worktops. Like you I too had no idea how involved it was. Good to hear such attention to detail though, and I hope that's not fitter specific and you were lucky (ours will, I believe, be installed by Natural Stone Surfaces as we're buying through DIY Kitchens). Even aside from the cutouts I didn't anticipate them making a plywoof mockup. I just assumed there'd be laser measurers and the like but, of course, they've got to fact in non-straight walls as there'll be little opportunity to fettling things once it's delivered. P.S. I remember reading your thread above back in December but it's funny how certain details only jump out at you if you're already thinking about the subject at the time... I was probably on MVHR, resilient bars or home automation at that stage (probably all three!) and was more tuned in to those subjects rather than worktops, sinks and taps like I am now!
-
Kitchen almost complete!
MJNewton commented on MikeGrahamT21's blog entry in Back on the self-build waggon...
Oh okay! Hung in what way? Glued presumably? (I am assuming there aren't many screw-type fixing methods available for thin quartz-type worktops? -
Kitchen almost complete!
MJNewton commented on MikeGrahamT21's blog entry in Back on the self-build waggon...
That is looking good! I'm always a big fan of a brand new kitchen. Regarding the sink cutout, do the installers use/need the sink manufacturer's technical drawings or do they just measure up on site? Also, we're having a 1.5 bowl undermount sink just like yours and wondered if it's necessary to ensure it doesn't sit proud of the cupboard i.e. do you need to recess the lip of the sink slightly (by its depth e.g. couple of mm) on whatever ends up supporting it? (Ours will be sitting in single width cupboard so it'll be supported by the vertical side panels). -
Okay, thanks. Good to hear it wasn't an absolute certainty! (I imagine like a lot of rumours there's a grain of truth; perhaps just not quite as much as sometimes sounds)
-
Cutting holes before or after skimming?
MJNewton replied to MJNewton's topic in Plastering & Rendering
On that point I was myself concerned about my clean backboxes ending up full of plaster so I've shoved in some pieces of cardboard to at least cover the cables up and help keep it out. Perhaps this'll just mean the plasterer will really go for it and I'll be poking around looking where my holes are! I might put a little piece of tape over the screw lugs too.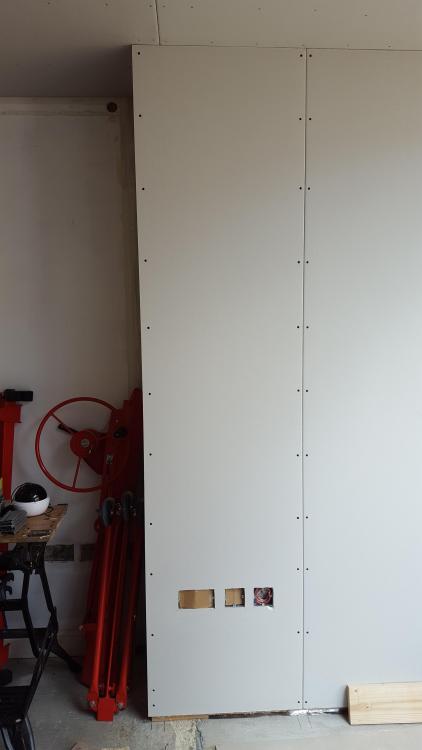
-
Thanks everyone - really helpful. I'll definitely try some temporary lash ups to better understand exactly what effect the positioning has. We'd already done this to an extent but didn't do it so accurately as to see what +/-100mm might do. I imagine that, 1.5m above a surface it won't make massive amounts of difference unless body/head shadows come into play due to having them too far out. Yes, that's an idea. And seeing the ones linked to by @joth in my other thread did make me wonder if adjustable ones might prove worthwhile. That said, in a couple of positions we don't have much clearance due to an upstairs basin waste pipe run and so the Integral (the make, not as in built-in bulb type) Evofire downlights with minimal clearance requirements (basically just the bulb length plus a small connector) were looking appealing.
-
Cutting holes before or after skimming?
MJNewton replied to MJNewton's topic in Plastering & Rendering
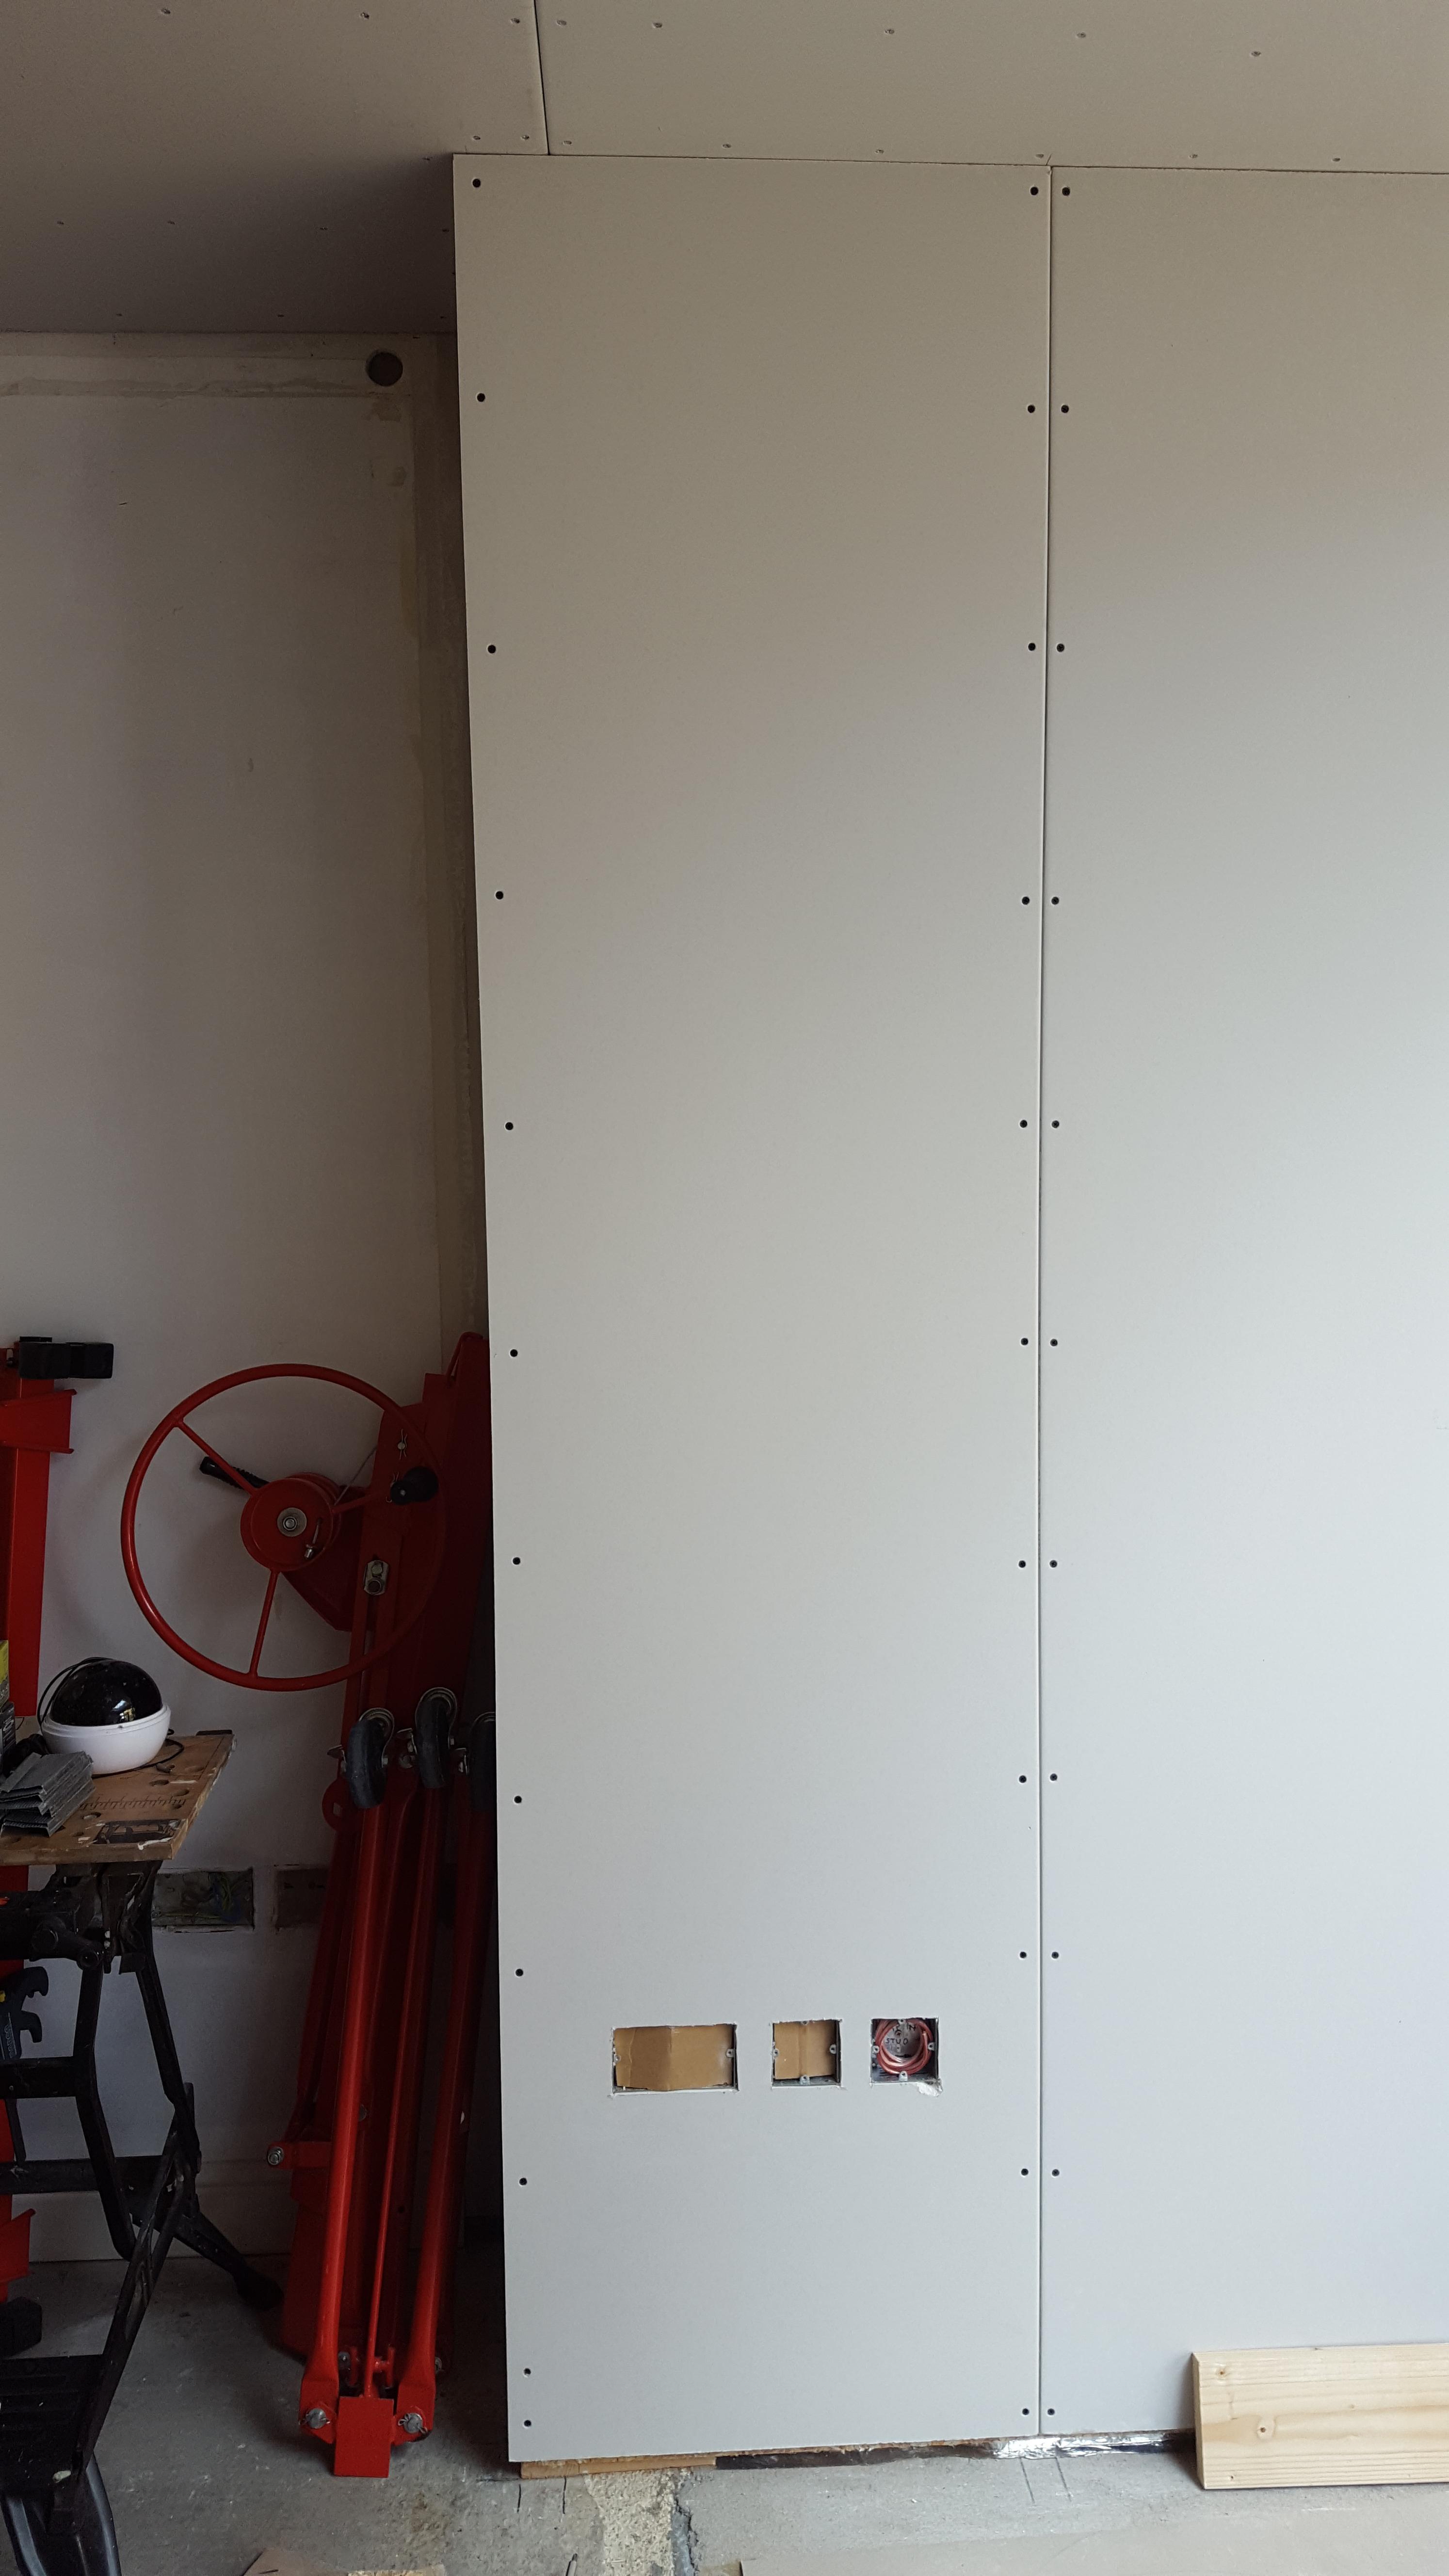
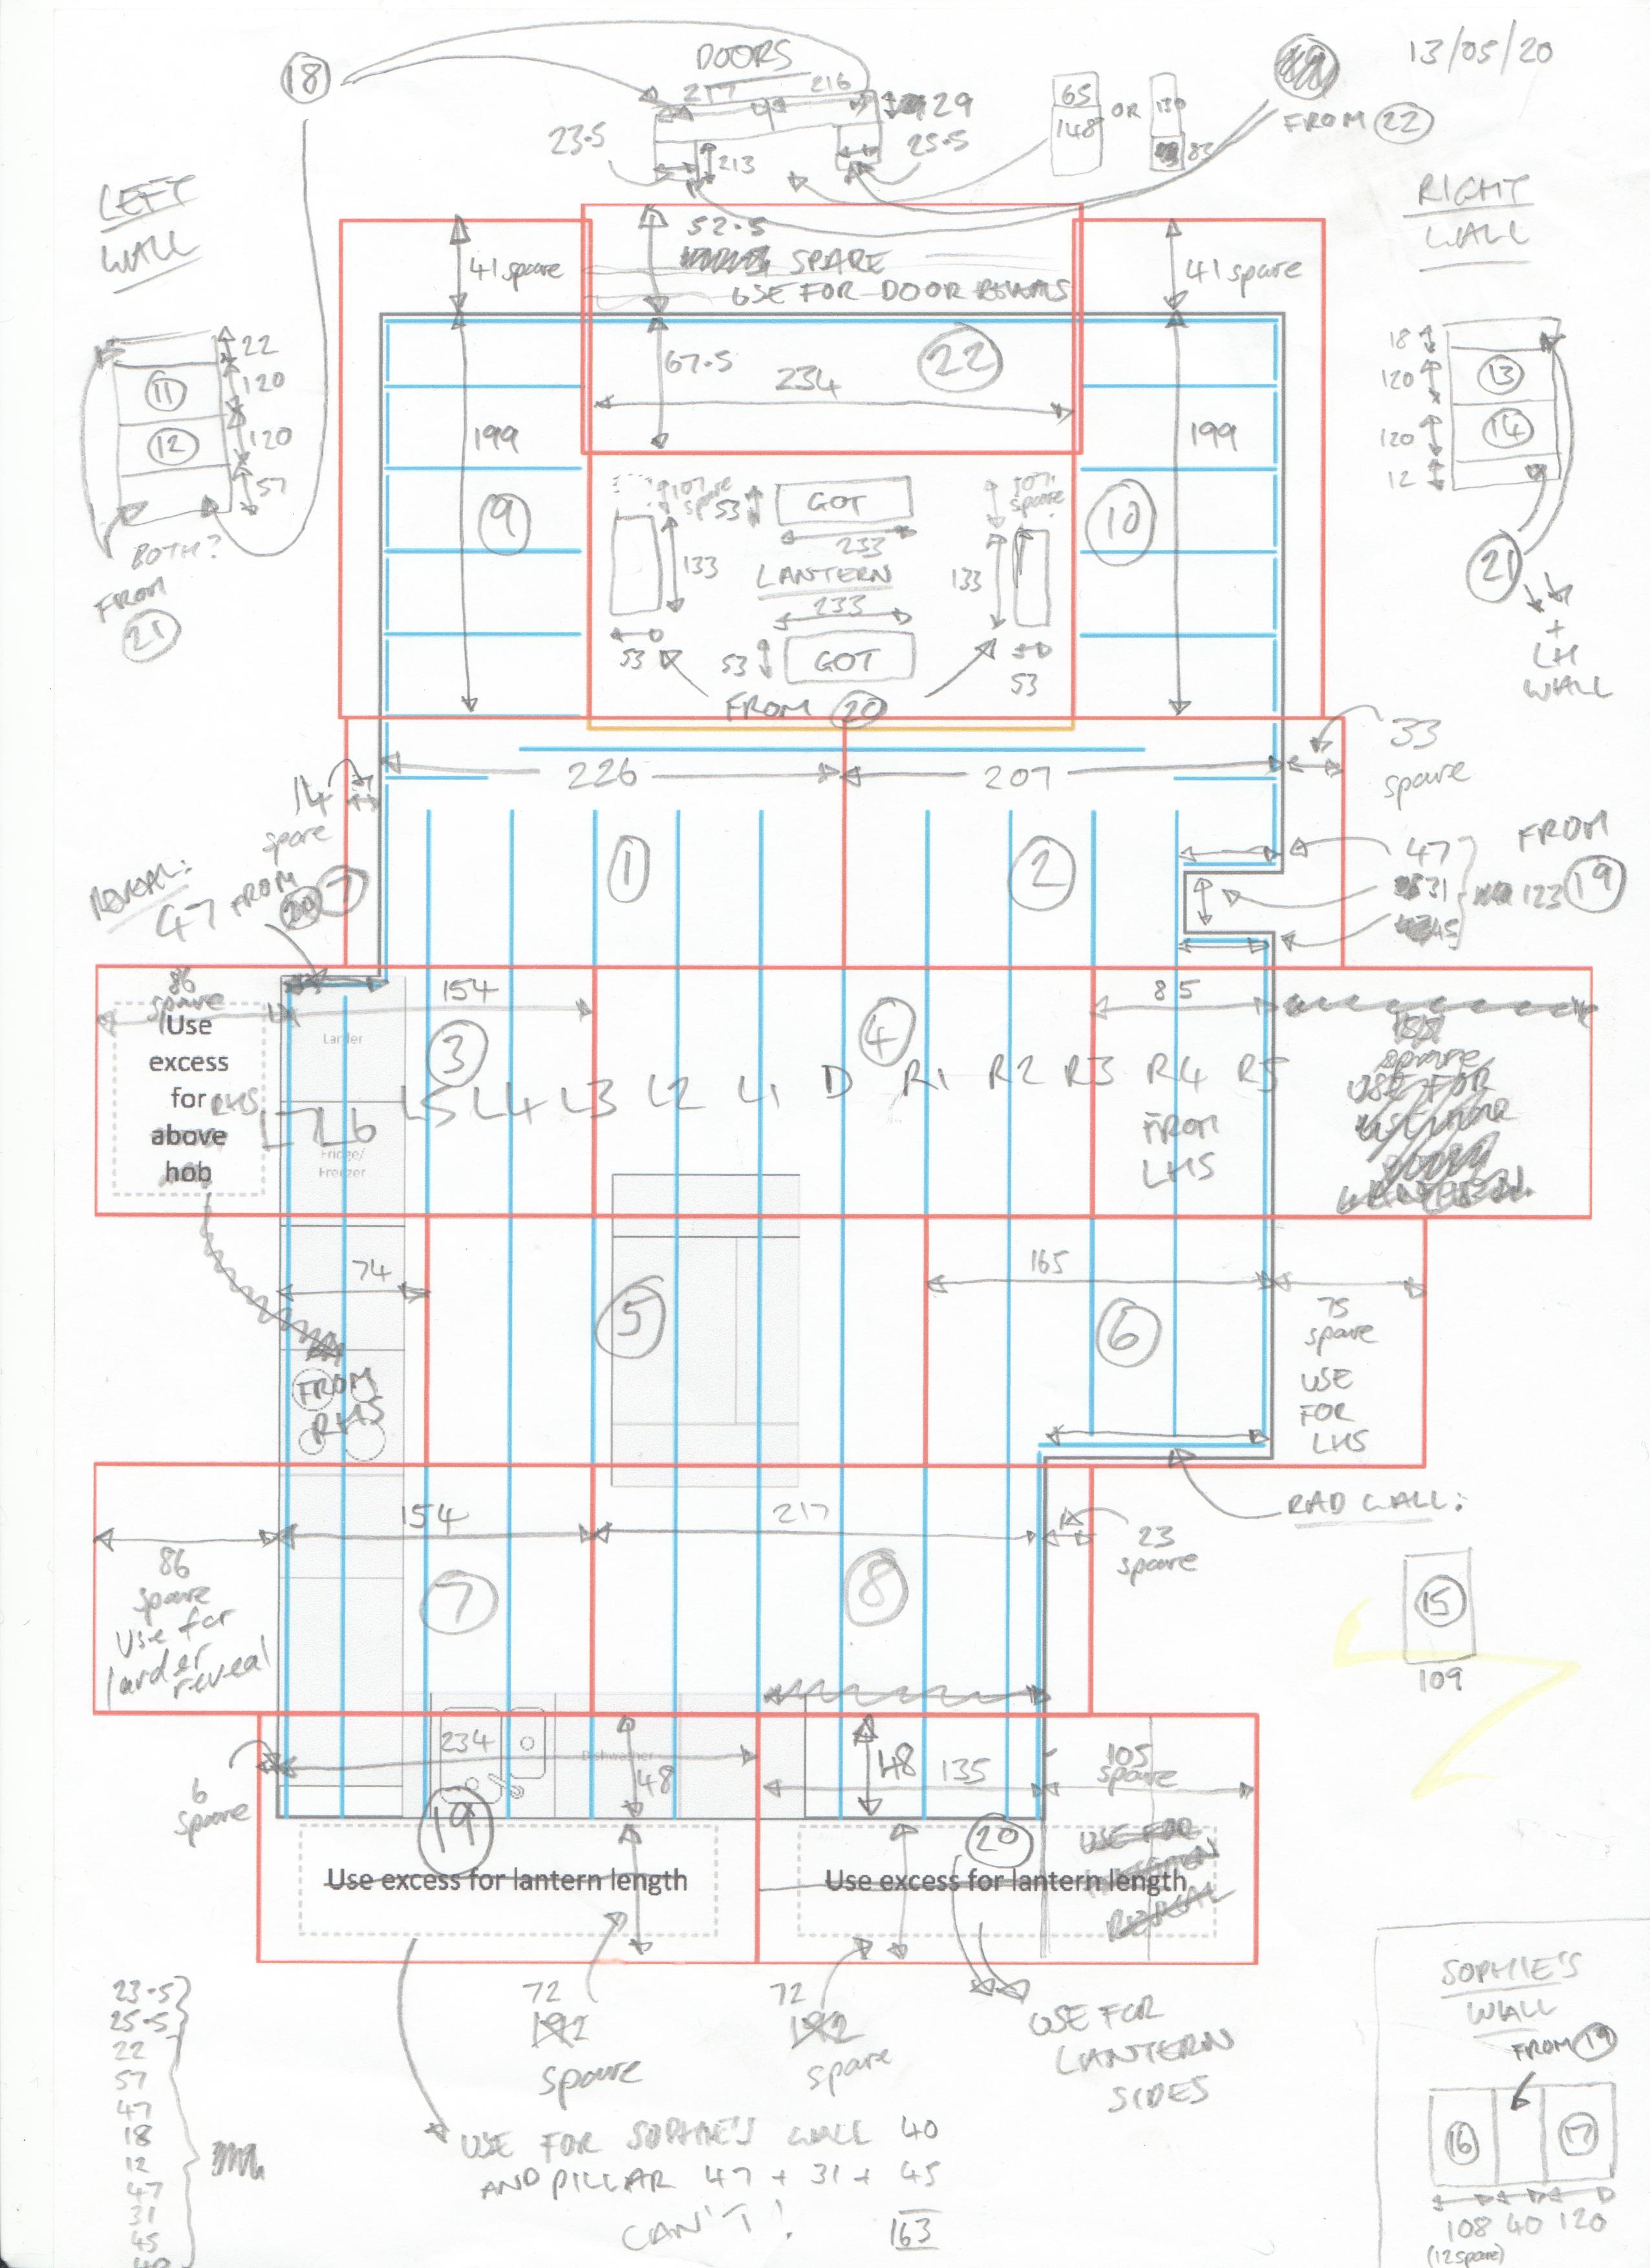
Thanks everyone for the input - all really useful. Following up on a couple of points: Yes, that's what's concerning me. Even more so that I might screw up a hole and have to perform a repair of some sort. Doing that on a beautifully finished skimmed ceiling would make me weep! It's a bit of a complicated room shape, with a lantern cutout and numerous corners to accommodate, and moving the boards round on my board plan didn't give me many options without resulting in thin slithers or another joint-related problem (e.g. MVHR vent holes) somewhere. The problem join is the bottom row of boards below (where 7 and 8 run alongside 19 and 20) above the worktop beneath. More to the point though; the boards are already up! That's good to hear. As long as the plasterer can cope with it (i.e. it's not a showstopper - just a preference) then I'm a bit more content. I could always bung him £20 or something as a token gesture for any grief these holes cause him!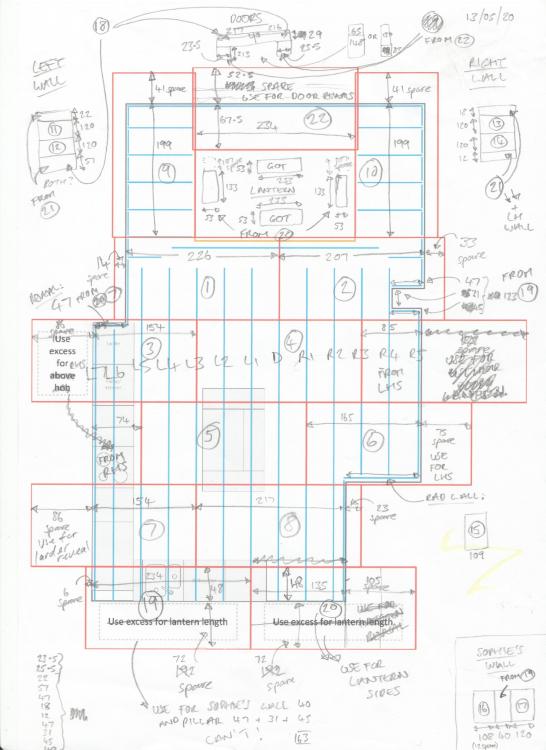
-
The question as to whether to cut downlight holes before or after skimming seems such a commonly asked question on the Internet, but with a seemingly 50:50 split response this doesn't sit well with someone like me that prefers a right and a wrong way! I have just finished plasterboarding our new extension ceiling with 12.5mm square edge board on resilient bars at 400mm centres. As my (bad) luck would have it, 3 of the 5 downlights (for worktop task lighting) look like they're going to end up slap bang on unsupported board edges/joins (paper edged of course) and so I am getting nervous about what consequence that might have in terms of causing cracks, either during installation (if I drill the holes after the ceiling has been skimmed) or just long-term due to a compromise of board strength. I was thinking I might cut the holes before I get the boards skimmed then any movement during cutting won't be an issue. I could also then feed some adhesive-backed timber/plasterboard up through the hole and position them across the board edges/joins adjacent to the holes just to give a but more support. Does drilling holes beforehand make life hard for the plasterer? Will it inevitably compromise the finish he can achieve? I did ask him when he quoted (pre-lockdown) and I seem to recall him just saying he prefers no holes - mentioned something about plaster falling out - but I didn't really push him as at that stage I didn't realise I'd be wanting to drill on some joins. I also didn't realise what a maze of joists and resilient bars I'd be up against, and typically how nearly all of my desired downlight positions seem to be really near some sort of obstacle so if I screw up I'd rather do that before it's skimmed (to allow an easy repair) than after. I might be worrying over nothing... I do that. A lot. But if you can honestly tell me a plasterer won't have any issue with five 70mm holes (okay, and three 125mm holes for my MVHR vents too) over a 35m² ceiling that'll set my mind at rest.
-
I'm sure my wife ponders how best to make my already stressful DIY even more testing. For example, in our new 'family' room (kitchen, diner, lounge) declaring she doesn't want an extractor hood leading eventually to me spending over a grand and 8 months on a retrofit MVHR system. Anyway, I digress... Latest on the list of challenges from the missus is that we are not going for any wall-hung cupboards in the kitchen area... Ordinarily that's where I'd be fitting worktop task lighting, which we're a big fan of, and so instead we're going for GU10 downlights in the ceiling to illuminate the worktops (an L-shape along two perpendicular walls). My question is: how far from the walls should I be fitting them? I have made the assumption that we should be aiming to avoid/reduce shadows from us standing at the worktop, so for a standard 600mm worktop depth that'd presumably put the maximum limit to be 600mm. I'm thinking something less than this would be even better though - perhaps 450mm - 500mm just to be sure we make the most of the light available? What about even less eg slap bang in the middle at 300mm from the walls? I am mindful that the closer the downlights are to the wall the more of a 'cone' shape illumination pattern on the walls, particularly with hard edge LED GU10s. However, I don't anticipate that necessarily being a problem - it might even add to the aesthetics?
-
Okay, that sounds reassuring. Do you happen to recall any other info on the label eg branding?
-
Are you able to elaborate on any of that @MikeGrahamT21? We paid for a kitchen from DIY Kitchens a couple of months ago but have yet to specify a manufacturer/delivery date. The worktop was the 'Innova Unique Marble' which, when visiting the showroom, I do recall they said it was exclusively to them (perhaps just by name though?!), but presumably still supplied via Natural Stone Surfaces? I'm wondering it we might be best cancelling the worktop bit of the order (it might end up being done for us when we hit the 'go' button anyway!) and making sure we go for a branded product that has wider availability...
-
A 3rd for the Titan. I bought it on the assumption it'd be disposable but still represent value for money for the jobs I had to do. Despite several years hard labour (not continuous, admittedly) it still soldiers on.
-
It sounds like it must be regional as all my local Wickes round here (North Wiltshire) have plenty of drywall adhesive in stock. Plasterboard too but granted little plaster.