


MJNewton
-
Posts
1354 -
Joined
-
Last visited
-
Days Won
1
Everything posted by MJNewton
-
 As Jeremy says it sounds like there might be a design/installation here. We live in a semi-rural location - silent at night - and our system is completely inaudible in normal background mode. Even on boost you can only really the airflow which I would regard as fairly inoffensive, regardless of what dB value it might actually have. I actually find the noise to be psychologically beneficial on a hot stuffy night as it makes me feel like the house is being freshened/cooled probably more than it actually is! Incidentally, ours was a retrofit and so we had to make some compromised in terms of installation (positioning, routing etc) and so I would expect a new build to be even better.
 -
Welcome! Do ask away - you won't be the only one to benefit from the discussion and answers, and we all like to read about what others are up to! ?
-
Hmm.. That was my original plan to be honest but to be honest I got a bit nervous about a method I'd not used before. You think it'd be better then? And by 'regular' boards do you mean 12.5mm? There will be five downlights; fireproof fittings though so not completely open like some. Appreciate they will still compromise the acoustic barrier though.
-
Thanks everyone - maybe it's not so strange a route to take afterall. I do actually have a few joists on 600mm centres (not sure why - I guess it saves on a joist or two in an area that doesn't otherwise need them) and so the 15mm should be better suited (notwithstanding the point about noggins likely sufficing). On the supply front I must admit to bit having asked the local builder's merchant (they're all closed, I think) and so was only searching online which might not be representative. I think I'll continue with the plan.
-
I am putting a new ceiling into our extended 'family room' and was planning on using 15mm plasterboard rather than 12.5mm. The reason being was that I figured it might provides benefits in terms of improved acoustic attenuation for the bedroom above and slightly better fire rating. Perhaps even some benefit regarding stiffness and strength? I've got a plasterboard lifter so the extra weight when installing isn't of concern and I probably only need around a dozen 2.4m x 1.2m sheets so the extra cost should be minimal. However, I didn't realise that 15mm PB doesn't seem to be widely available, even aside from the current supply issues for all gypsum products at the moment, and so I am beginning to have second thoughts if it's not the 'done thing'. Also, where it is sold, it is generally tapered edge and yet I was going to get the whole thing skimmed and so would be wanting square edge. Am I do something odd here? Just wondered if anyone has any thoughts on whether 15mm would provide the assumed benefits, or should I just stick to 12.5mm?
-
Home automation server/system makes?
MJNewton replied to gc100's topic in Networks, AV, Security & Automation
You had me 'til that point! Whilst price and value and two separate things that need weighing up against each other, for me that sort of money is too much to justify given it doesn't give a perfect solution in terms of avoidance of vendor lock-in, bespoke knowledge etc. Everyone is different but I would prefer to go down the open software route even if it means a steeper/longer curve. £2.5-3k would go a *long* way in terms of buying a variety of open products and open source software to drive them, and leave a fair bit for a holiday to recover from it all! -
Note that if it is warmer outside than in then keeping the heat exchanger 'in loop' will cool the incoming air as heat will transfer to that being extracted/exhausted. Your bypass should therefore not be activating in such a scenario.
-
Whilst the Shelly is a 'smart' relay (a buzzword term which in most contexts just means it is 'network enabled'), like others of its type it can also accept a physical switched input. The Aico relay base is simply just a relay that activates when the alarm triggers hence it was just a case of wiring it up to the Shelly switch input. At the outset I wasn't quite sure how I'd want to control the unit, and I didn't want to assume I'd end up with a 'home automation' type control system or if it'd be suitable to retain if we ever sold the house. So, I figured that 'dumb' boost switches for extract rooms would be worthwhile and would provide utility for dealing with events that cannot be automated and do so without anyone having to reach for a phone etc! Where something could be automated I was keen to do so and humidity-based boosting was an obvious one. This unit does have a humidity sensor but it is based on absolute values and whilst it worked pretty well it wasn't perfect e.g. it could trigger unnecessarily at times of the year when humidity is just generally higher or might miss an 'event' if set too high to avoid these false triggers. I figured a 'rate of rise' trigger - ideally alongside an 'absolute limit' trigger - gives a better method of control and so that's what I did with the Pi. It looks for a >5% rise in humidity in any 5 minute period and also keeps an eye out for a maximum threshold being breached. I believe others have had success with a standalone humidity sensor/relay and so a homebrew Pi approach isn't the only way to achieve this though. I did consider a motion sensor but I felt I'd already got enough bases covered and didn't want to go over the top (if I hadn't already!). Furthermore, I was concerned at the time that unnecessary boosting at night might be a noise nuisance but as it happens whilst you can hear the boosting (airflow rather than fan/unit noise) it is not intrusive and so it would've been okay I think being triggered simply because someone nipped for a wee in the night.
-
I've drawn everything out so it's a bit clearer what external components I've used: ...and a screenshot of the GUI interface that the Shelly relays provide for app control over the LAN or Internet:

.thumb.png.b251ca716bb7bcdc276c3d31eb330a5c.png)
-
Just familiarity; it's what I learnt when I first began to use Unix/Linux. There's probably a certain amount of ignorance of what else is available and better too I imagine!
-
*following for updates*
-
I just taped them inside the where the ducts attach to the unit: ..before then fitting the semi-rigid ducting over which I've used to attached to the rigid piping (to avoid transferring vibrations): I will eventually tape everything in place but they were a tight fit and so I don't think there'll be any leakage.
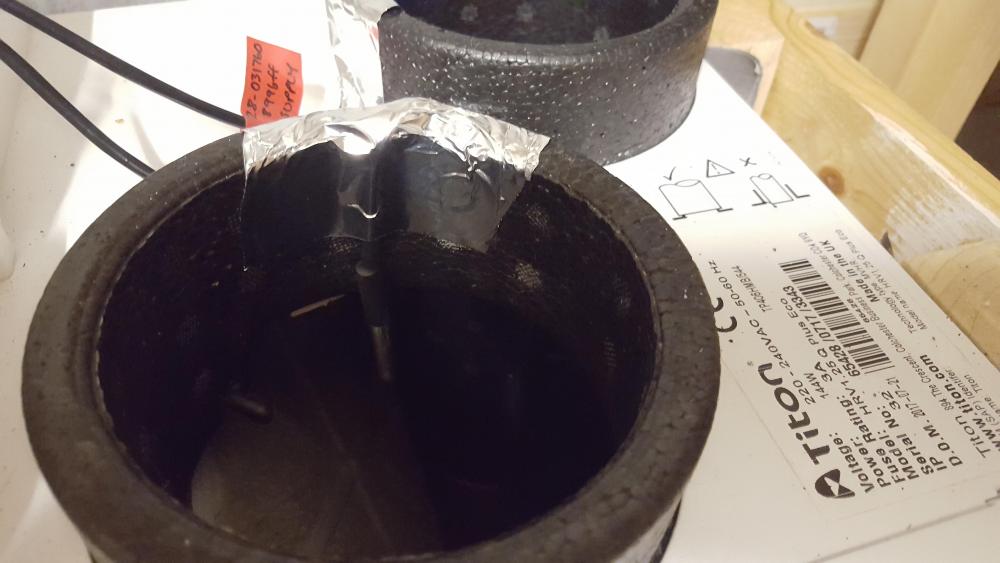
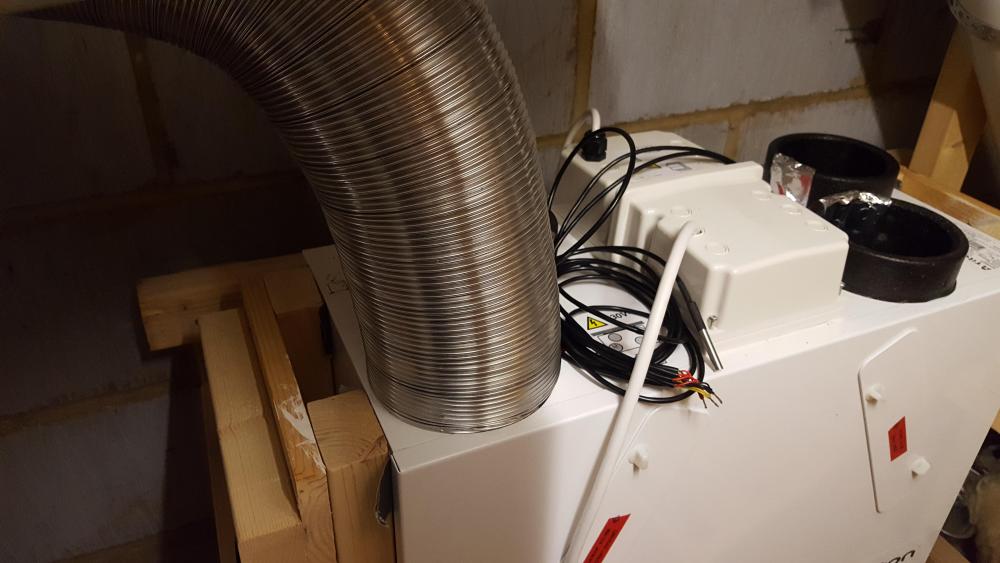
-
This introduction might help explain how they work, although truth be told with things like this I tend to find someone else's example that's not a million miles off and work out what differences I need for my case. I'm usually too eager to get the end result, although inevitably I do end up learning something along the way. As for your question, well, given my strategy above I am probably not best placed to answer! Or I might've just not understood the question properly and it is sounding more complicated at first glance than it really is.
-
Thanks chaps. Sounds like I was overthinking it (as normal)!
-
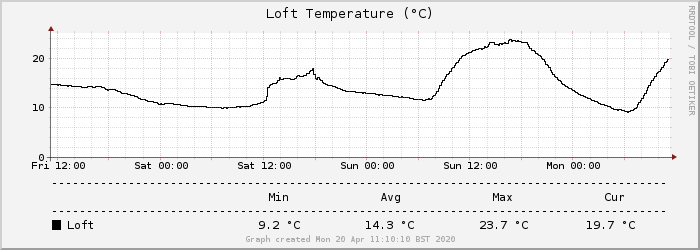
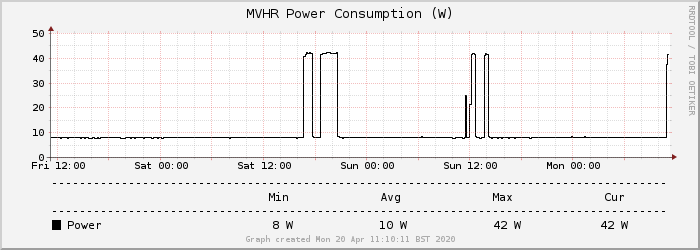
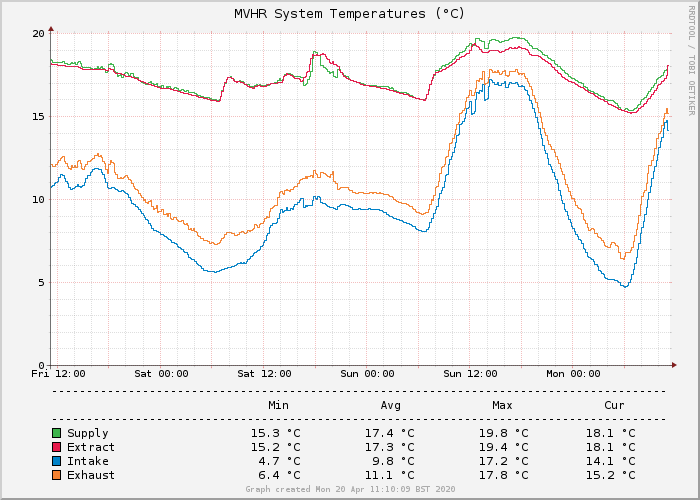
A few months back I promised (to @SteamyTea I think) to share further details about a side-project involving monitoring and controlling our MVHR unit with a Raspberry Pi. I was hoping to mature it to beyond beta stage before presenting it but, frankly, it'll probably always be in some unfinished state of development as between my extension and nearly-3yr old daughter I don't find much time for 'playing around' (as my wife calls this sort of thing). So, I thought I'd just share what I've got now in case it's of interest of use to others. As background, our MVHR unit is a Titon HRV 1.25Q HMB Plus Eco which I believe is towards the lower end of the range but I got it cheap (£350) on eBay (an interesting story involving a development of 50-odd houses all fitted with the wrong model MVHR!). As a seemingly basic model it comes with potentiometer-controlled fans speeds and boost timer, absolute humidity detection for boost, automatic summer bypass and provision for switched boost inputs. It uses a Recair heat exchanger which, being their party, could well be common with a lot of other manufacturer's units. There's no fancy screen or controls, although Titon do make such a device but I'm not sure it works with our model. Furthermore, it's something like £150 and my Northern genes made me think I could do better with a Raspberry Pi for a lot less than that! I'd like to show a detailed schematic showing all the component parts but as I don't have one I'll just list them: - Raspberry Pi Zero W (a cut-down, low power, version of the Pi with WiFi) running Raspbian as the OS with lighttpd (web server), rrdtool (stats gathering and graph creation), a couple of 3rd party tools installed for reading the sensors and a couple of scripts (attached) pulling it all together - Shelly 1 smart relay connected to the MVHR boost input (the Pi could handle this but the Shelly has been in for a while, hardwired to boost switches in the kitchen and outside the bathrooms, and has been left in for now as it works without issue) (Incidentally, the MVHR unit itself is powered through a Shelly 1PM smart relay which is connected to my smoke alarms such that if there's a fire the MVHR is switched off and I am sent an SMS to alert me of the fact, but all that is separate to this Pi stuff described here) - Four DS18B20 1-wire temperature sensors taped inside the MVHR ports to measure supply, extract, intake and exhaust. A fifth is dangling in the loft space as, being outside the thermal envelope, I've always been curious what the temperatures are actually like up there - One AM2302 humidity sensor (unfortunately not 1-wire and so requires different software to read and its own connection to the Pi's I/O port) As things currently stand, the attached script (capturetemps.sh) reads all the sensors every 5 minutes (trigger by cron) and records their values, and various calculated ones too, to an RRD round-robin database using rrdtool. I've always been a fan of graphs - not entirely sure why - and so via creategraphs.sh (and rrdtool again) it also produces some charts for whatever time periods are required, examples of which are shown below. Speaking of time periods, it currently stores - and produces graphs from - readings at 5 minute intervals for 3 months, 30 minute averages for 6 months and hourly averages for 5 years in a 12MB database. First off, system temperatures are recorded for all the ports which has been very reassuring in terms of the actually knowing this MVHR malarky actually does what it purports to do in terms of providing a supply of air at a temperature near to that being extracted (sometimes higher!) despite what's going on outside: These temperature readings are also used to calculate the efficiency of the heat exchanger which again appear to show it broadly working as advertised: The two calculation methods are as described by Paul Heat Recovery, the second of which (Method B) aims to factor in heat losses (or indeed gain) through the unit itself and hence be more accurate. I also measure and graph instantaneous power consumption (figures obtained from the Shelly 1PM 'smoke alarm' relay I mentioned that the MVHR is powered through): The system isn't yet fully installed (10 vents out of 12 done), balanced or properly configured and so the trickle (~8W) and boost (~42W) figures shouldn't be taken as necessarily relevant although that said we've been pleased with the performance at the current settings and so wouldn't be surprised if they don't change too much. This graph (not this actual one as it hasn't happened for a few days) also reveals when the summer bypass kicks in as it jumps the line up by ~5W. There's also the loft temperature graph which doesn't serve much purpose other than curiosity, and use up the fifth-of-a-pack-of-five sensors I bought: Speaking of curiosity, the novelty of looking at graphs will wear off one day I'm sure but one important reading I am logging is the humidity in the extract duct: This one has been particularly interesting, and indeed useful, given that the large 'spikes' correspond with taking showers and so are easy for the script to detect (it currently looks for a >5% rise in any five minute period) and request a 30-min boost via the Shelly smart relay. It hasn't missed a shower yet, and I am confident it'll work well for cooking as previous experiments show it being quite easy to pick up simmering pans. The script also looks out for an absolute value also being breached but it's only been running for a few weeks and so I really need to see a full four seasons, particularly when windows are closed in winter with washing drying indoors, to determine what sort of value would be suitable for that. Given the freedom and flexibility of the script it could even self-adjust over the year if need be? That's pretty much it! It's been good fun, a worthwhile learning curve and I think it'll have some utility too. My next step is for the Pi to take control of the summer bypass as the thresholds for operation cannot be adjusted on my unit - confirmed by Titon as being active when the extract temperature (dirty room air) is >22°C and intake (fresh outside air) >15°C, but not if the intake air temperature is greater than the extract as the heat exchanger serves to cool the incoming air slightly in such a situation. I think I'd like it to kick in sooner as 22°C is a bit warm for my liking on still summer nights where even the thought of 'cool' air being pumped in could have psychological benefits even if it won't actually cool the house down much given the volumes involved. Longer term I might even use the Pi to control the fan speeds too (reading the datasheets for them show they accept a 0-10v speed control input) but that might be overkill as I'm sure in time I'll be more than happy with just having fixed speed trickle and boost modes. If I can expand on anything I'd be more than happy to do so. And if there's any 'real programmers in the house please forgive my scripts as whilst I'm aware there's something called 'programming style' I'm not following anything other than what works for me as an untrained tinkerer! capturetemps.sh.txt creategraphs.sh.txt
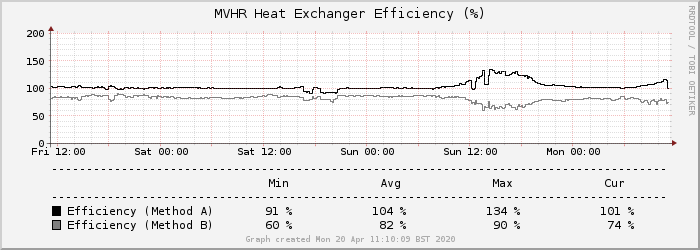
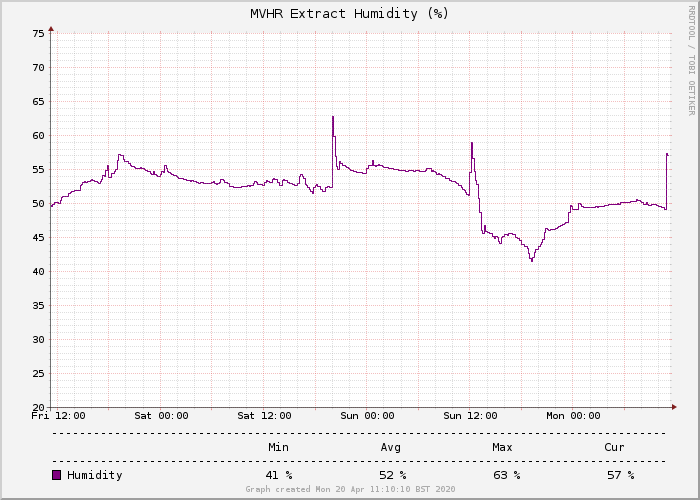
-
The joist hangers on our timber I-joists sit proud (2-3mm) of the base of the joist and I am wondering how best to deal with this when it comes to plasterboarding the ceiling given the non-flat surface this creates. I understand that it is common practice to notch solid joists to ensure a perfectly flat surface however whilst I haven't managed to find anything from the I-joist manufacturer (James Jones) about it I am mindful of the warnings (printed every couple of metres) not to cut into the flanges and the NHBC standards do say not to notch them on the hangers. I was thinking I could use 2-3mm hardboard packing towards the end of the joist to at least give me something to screw through without risk of cracking the board and just letting the plasterer deal with the slight bend in the ceiling when he skims. Perhaps this bend won't be noticeable anyway and will fall within the tolerance of unevenness across the ceiling anyway? Or I could notch out the plasterboard instead over the hangers, noting that I'll be likely using 15mm board and so should be able to tolerate the loss of material if that's better?
-
Insulating MVHR Unit Ducting
MJNewton replied to MJNewton's topic in Mechanical Ventilation with Heat Recovery (MVHR)
Good job! -
Thought it worth checking, as to me an 'outlet' supplies. 'You say tomato..' ?
-
Just to be clear; by 'inlet' did you mean supply or extract? I would expect the former for a snug.
-
MVHR airflow reversed
MJNewton replied to OllyH's topic in Mechanical Ventilation with Heat Recovery (MVHR)
I must admit to often having to do a mental double-take with these symbols but then I also do with supply, extract, intake and exhaust! -
MVHR airflow reversed
MJNewton replied to OllyH's topic in Mechanical Ventilation with Heat Recovery (MVHR)
I haven't experienced this, but the fix is obvious? (Swap the offending ducts round) Do you have any freedom in how the ducts are running and positioned near the unit? Edit: Apologies; overlapped with Jeremy's reply. -
Insulating MVHR Unit Ducting
MJNewton replied to MJNewton's topic in Mechanical Ventilation with Heat Recovery (MVHR)
Great minds think alike! That's exactly what I was thinking of doing as whilst I've become quite adept - cat-like in fact - navigating the trusses I am sure it's only a matter of time before I fall through, and no doubt right above the stairwell too! The horizontal joists like you've fitted were what I had in mind, and I've got loads of 11mm OSB sheet offcuts which I figured I could double up on? Need to experiment with how strong a base that provides. -
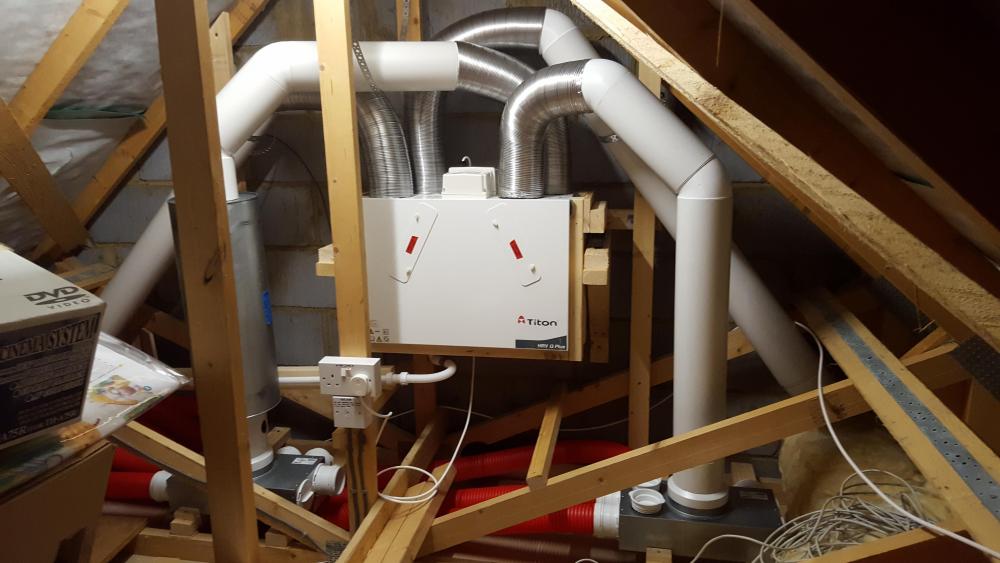
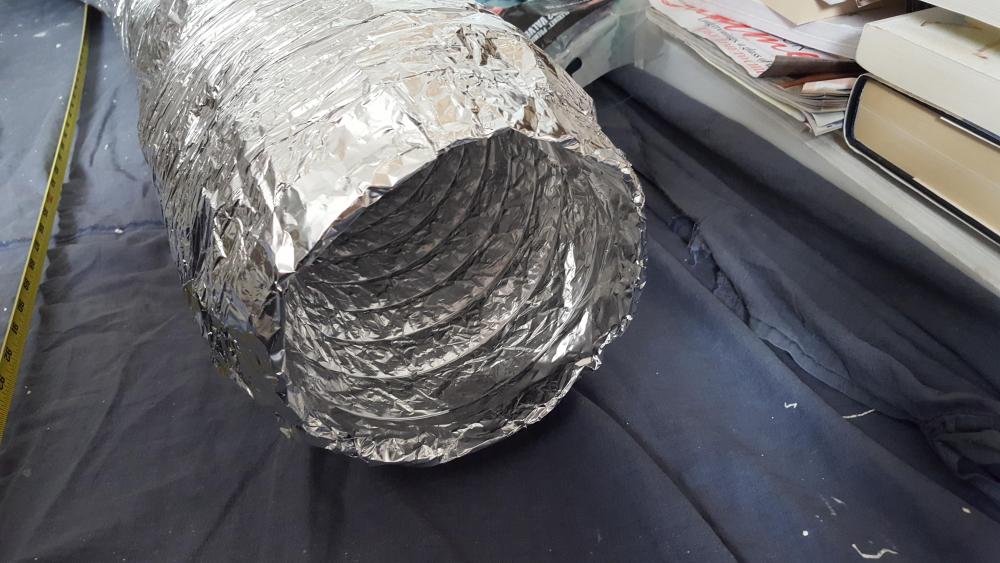
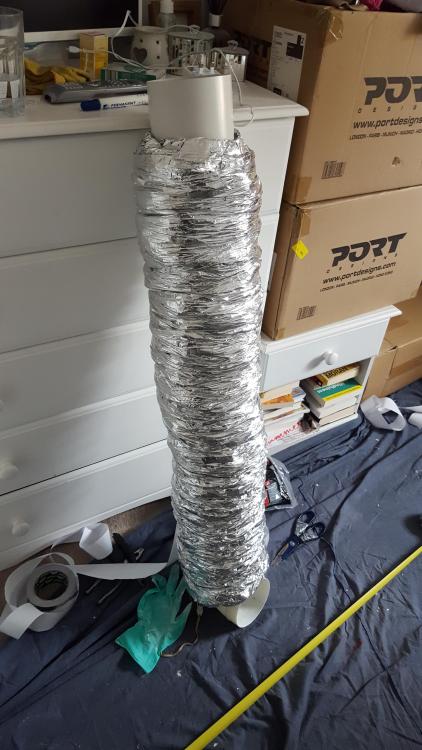
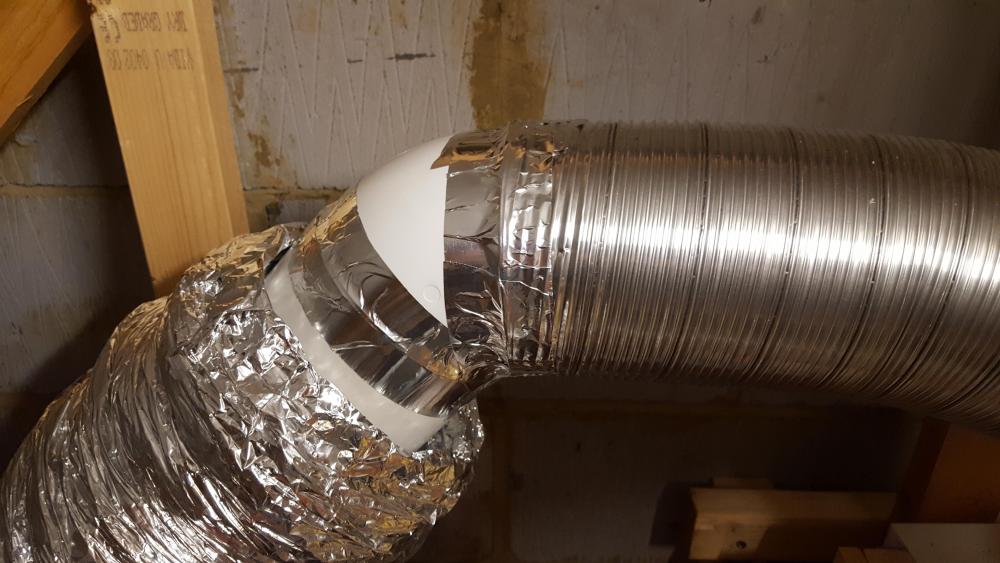
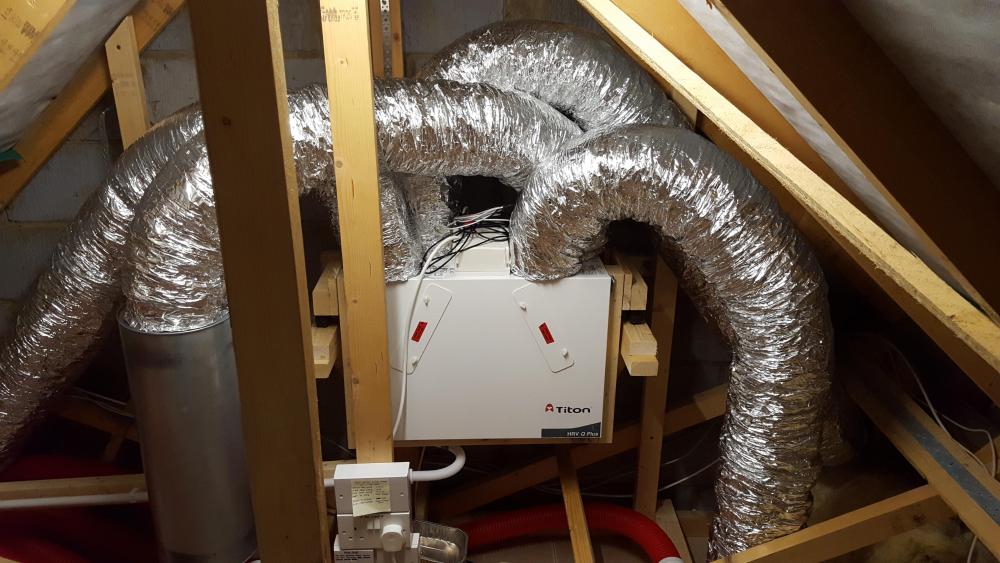
Given the need to to insulate the ducting going to/from the MVHR unit (which, in my case, is installed in an unheated loft space which is a bit cramped given it's what's left of the roof space in our 2.5 storey house) I was wondering how best (read: easiest!) to do this. Here's my unit which as you can see I went with rigid smooth-wall piping for the unit-to-manifolds where possible and aluminium semi-rigid ducting for the final connections so as not to transmit vibration-induced noise (the whole unit is sat on a frame sitting on rubber exhaust mounts so is fairly free-floating): I did consider flexible insulated ducting for these final connections but didn't fancy wrestling with it to ensure it was taught enough to avoid flow restrictions. The idea did however occur to me though that it would make an ideal outer insulation layer for my ducting and as I hadn't heard of others doing so (maybe for good reason!) I thought I'd share what I did... My ducting is 125mm and so to ease fitting of the insulated ducting - particularly round bends - I bought the next size up (150mm) and taped the ends to keep things clean and easy to handle (the inner core, vapour barrier, insulation and outer layer are all separate and can move around a bit when manhandled): After stretching out the insulated ducting and cutting to length I then compressed it back over a section of rigid ducting: I then refitted the ducting, taped up the inner ducting joints... ...and expanded the insulation round giving what I thought was quite a neat final installation with no joins: Not only was it easy to fit but with the ends taped it provides what I assume to be a decent vapour proof insulation layer, which I believe is important. I also went for the acoustic insulation option (it has small holes in the inner core to allow sound through to be absorbed by the insulation layer) although this was more down to 'why not?' than any particular need as the unit is fairly quiet in operation. As I said, just though I'd share this in case the method is of use to anyone else.
-
Current draw of a wax solenoid?
MJNewton replied to MJNewton's topic in Mechanical Ventilation with Heat Recovery (MVHR)
Yes, when heated by the element the wax expands resulting in linear motion. With power removed it cools and a spring pushes the whole thing back (I guess the contraction is insufficient to pull things back by itself). Also often used in washing machine door interlocks I believe as even if the power is removed it still takes a few seconds to retract and open thus allowing the spinning drum to come to a stop. -
Current draw of a wax solenoid?
MJNewton replied to MJNewton's topic in Mechanical Ventilation with Heat Recovery (MVHR)
This bypass is a nearly-A4 sized 'hit and miss' metal vent and it I think it needs to move around 10mm and so, as you said, 5-6W sounds about right (perhaps even on the low side!) when compared to the UFH actuator.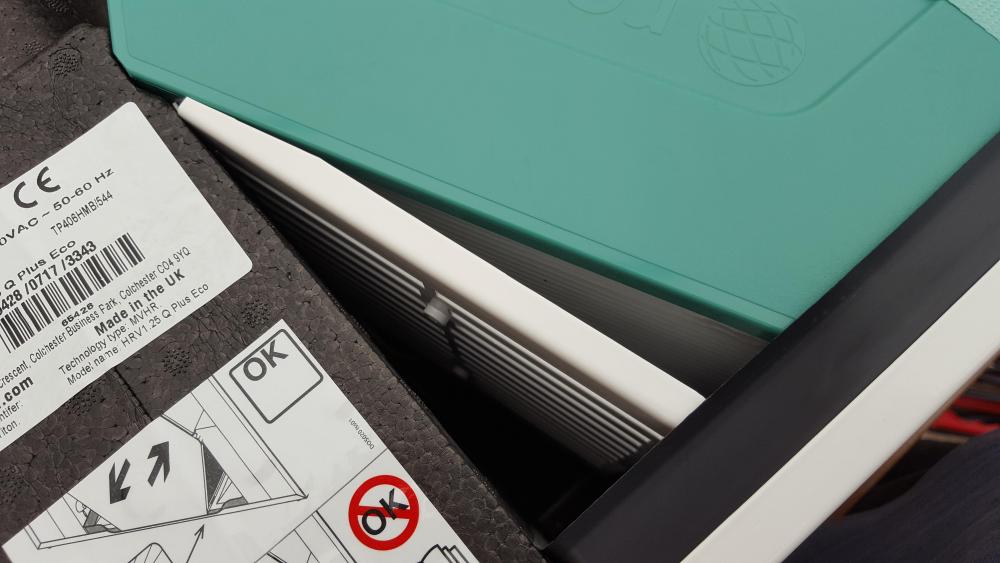


.png.4fc2f6cbd0ee43abb4ff0bade3f54709.png)





