


Dreadnaught
-
Posts
1819 -
Joined
-
Last visited
-
Days Won
5
Everything posted by Dreadnaught
-

Raft Foundation Costs Estimate
Dreadnaught replied to BristolBuild2020's topic in Costing & Estimating
Price seems a little high. I would recommend splitting the job in to two parts. Groundworks in preparation for the raft. And the raft itself. Personally, I would say neither part is suited to a general builder. Use a groundworks specialist for the preparation. I used a team I found locally that were digging up the streets to lay new cables. I just stopped in the road and asked them if they were interested in some side work. For the raft itself, get a local concrete specialist to do it. He will have spent most of his time doing commercial jobs (such as the floors of warehouses) but will have no problem adapting to your needs. You'll get a much keener price. I agree with the others: make sure an SE designs and specifies your raft. From the SE, you should give the dimensions drawings, detail cross-sectional drawings showing steels, and a steel schedule to your concrete guys. He will pass the latter on to his local steel supplier. -
Will I be eligible for ASHP Grant?
Dreadnaught replied to richo106's topic in Air Source Heat Pumps (ASHP)
I have hust been quoted £12,000 (zero VAT) to install a 5kW monobloc ASHP (R290) and matched fully-plumbed un-vented cylinder for my new build. Elsewhere I've been quoted £4,300 ex VAT for the same AHSP and cylinder, supply-only. So that's £7,900 on top for labour and minor sundries. Oh, and I'm eligible for the £5,000 from the Boiler Upgrade Scheme ("BUG") too. I know MCS has a lot of overheads and ASHP installers are in short supply. He may well have all the work he needs for months ahead. And there are costs for guarantees, overheads, etc. But I still assume the installer has a parrot on his shoulder and a tricorn hat. Everything is in place for the install. UFH & manifold. Insulated pipe from outside to inside. Even the external temperature-compensation wire. Its as simple an install as you're likely to see. Disregard the £5,000 from the BUG, could a normal G3-registered plumber install this instead? YouTube shows it being a relatively simple install and commissioning seems understandable. Anybody taken this route and can provide encouragement? -
Which regulations are those? Are those regulations related to the coolant, R290 (propane) only? Is there some form of minimum distance requirement? (Am considering an AroTherm Plus ASHP for my build.)
-
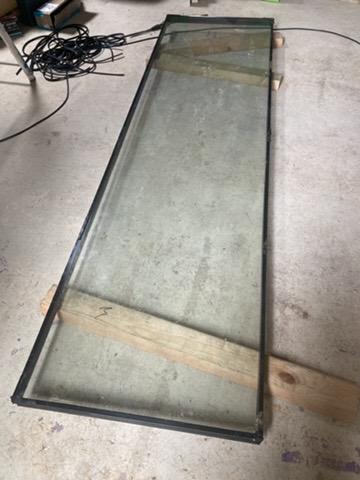
Thanks yes, its both toughened and laminated (outer pane) 👍 Was going to be a ground-floor window within 800mm of the ground before being bashed in transit.
-
In this photo you can see the glazing unit from one my Danish IdealCombi windows. Its from a window that Idealcombi replaced as the frame was broken during delivery. The glazing unit is fine. Wondering if I can mount it as an internal window in my build. Any thoughts about how I could make a frame for it and mount it horizontally securely within the wall? I am going to have MF walls (70mm studs). I can create the opening for it quite easily in the MF wall, like that for a door, with a reinforced MF beam above and below the window. That's the easy bit. Any ideas? The unit is triple glazed, 620 x 2220 mm …
-
Thanks @nod. Now I understand. Got it! Ingenious.
-
By vertical stiffener, @nod, do you mean a timber batten inserted inside the floor-to-ceiling stud?
-
@nod, my supplier can't get Fixing-T, would "fixing strap" be an acceptable substitute for those joins? Or should I instead source fixing-t elsewhere?
-
Thanks @nod. Perfect. I will add it to my order.
-
A question for @nod if he's around… Hi Nod, for a MF wall, where a stud is taller than 2.4m and so two sheets of plasterboard will meet with a horizontal joint, which product do you use for securing the short edge of the boards at the join: Fixing strap (e.g. Gypframe Fixing Strap 2.4m x 70 x 0.5mm); or Fixing T (e.g. Gypframe GFT1 Fixing T 2400 x 50 x 0.5mm). I am finalising my order of MF components for my internal stud walls. Fixing strap: Fixing T:
-
Are you in a conservation zone? I assume not. But in my case I was. And having the conservation officer visit site was key as it felt much easier to find a compromise over cladding-type face-to-face than through formal written communication. We walked around the vicinity with me pointing out the broad range of cladding types on neighbouring building. This enabled me to suggest my chosen solution, while pointing my finger at an example on a neighbouring dwelling.
-
I you have MVHR, you may need to cut a slot under the door to allow air movement. Alternatively, if sound through that slot is a concern, you could do what I plan to do. Have a close fitting door withut the slot, which is much better for sound proofing. And instead install a small air vent of an appropriate size in another wall where sound is not a concern. In my case, the vent will lead to a quiet neighbouring corridor via a built-in wardrobe.
-
I share your concern. Your phrase is certainly true in some parts of the internet. Apple is much stronger on privacy. One of the reasons I buy Apple products. See here. With regard to "Matter", see here. I suspect that when using "Matter" privacy will still depend on whether your in the Apple ecosystem vs the ad-based ecosystems of Google (e.g. NEST) and, to a growing extent, Amazon (e.g. Ring), let alone Meta/Facebook/Whatsapp, etc.
-
As I am a layman, I see the technical benefits as: Rock solid privacy and security. IP-based network communication. This is BIG! This means it is much easier for developers to integrate their devices with the wider internet and offers many other benefits. There is an open source implementation of "Matter", supported by Apple & Google on Github. See here. You can add code to it if you like Inclusion in Matter of the new "Thread" communication standard, which allows, for example, for sensors that run for 5-years on a single battery, and self-healing networking, and very low latency, and so on and so on. This is BIG! "Thread" is like Zigbee on steroids. Note that "Matter's" use of "Thread" is in addition to also using Wi-Fi for data-hungry devices, such as CCTV cameras. A "Matter" "packet of information" will seamlessly traverse both the Wi-FI and Thread networks in your home to find the right destination. There will be a hugely wider range of devices available from a wider range of manufacturers, all inter-operating. No more walled-gardens. At present the categories of devices encompassed by "Matter" for the "1.0" launch includes light bulbs, smart plugs, blinds, and thermostats. But security cameras, video doorbells, robot vacuums and washing machines, etc., will need to await a later upgrade, such as "1.1" or "1.2". I would. But there are others on this site who would say otherwise, quite legitimately. I am bullish about the speed of the roll out. Others are more skeptical. Time will tell. If you hold on to your current devices you will probably be able to integrate them with "Matter". Many manufacturers, including Philips Hue, have already announced upgrades to their hubs to support "Matter" (although IKEA announced a whole new hub and not a software upgrade). However for me, integrating non-Matter-devices in to a "Matter" network is a half-way house. "Matter" is intended to do away with such bridges. So if you can sell up and fully embrace "Matter" when it arrives, while accepting any lumps and bumps with its launch, that's the way to go. Note that with a "Thread" network under "Matter", the more Thread-devices on a network the stronger that network will be. Bridged non-thread devices don't count. If you keep any devices for a few years longer and bridge them to "Matter" and then upgrade them a few years later when "Matter" has fully taken over, those devices will have lost their residual value by then.
-
You would need an Apple TV box (under your TV) or a HomePod mini one to control your HomeKit network. There is a new home automation standard being launched in October called "Matter", which is supported by all the big names: Apple, Google, Amazon, Samsung, Ikea, Philips Hue, Dyson, Miele, Panasonic, Toshiba, and so on… Apple already supports "Matter" (including in the HomePod mini and Apple TV) so you are future-proofed. With "Matter" home automation devices will become interchangeable between platforms. You can control a "Matter" bulb from Apple HomeKit or Google Assistant for example. It should make the buying and setting-up of home automation devices smoother. ("Matter" offers many other techy-style advantages, which I won't bore you with unless you are interested.) I am building a new dwelling and I recently sold all my Philips Hue and other home automation gear. I will buy a new "Matter"-based set when my house is nearly finished. (interestingly I got all my money back when I sold the old lot. Quite a surprise! The items held their value well.) No, no additional functionality. Indeed the manufacturer's own apps sometimes offer a few bits of extra functionality that is not available through the Apple Home app. Plotting of graphs is very limited at the moment in the Apple Home app. That is the sort of function for which you would use the manufacturer's own app. And even there is it likely only to be a simple basic graph. Generally speaking, if you want (which I doubt you do) to log data points and be able to, for example, export a .csv data file of readings then you would need to run software on a raspberry-pi or use an online service for the purpose. Those functionalities have not really reached domestic home automation setups, and that is unlikely to change any time soon. Domestic home automation is realitcgialy aimed at convenience and ease-of-use for simple tasks like turning on the lights or locking the front door. (And until now many such systems have not been easy to use, or reliable, but that should improve with "Matter"). And such systems are not really aimed at techies who want to monitor CO₂ and humidity levels.
-
As you may well know, if you have an iPhone or other Apple devices then you can control everything exclusively using Apple HomeKit and its app if you wish. You use the Philips Hue app to "flip the switch" to do so and then don't need to use the Hue app any more. You can use Siri for voice controls or add widgets to your Home Screen to control the various devices. You can also automate your devices from the Apple Home App (e.g. all lights off when you leave home). By the way, the Apple Home app is in-line for a full re-design when, in the autumn, iOS 16 emerges from beta and is released to the general public. Form the beta, it looks much improved. I think the main reason to leave the Hue app behind is privacy (data sharing with an outside server) and better user interface.
-
It doesn't help you, but when I asked the concrete team that poured my raft when my concrete would finish setting, they said 40-years . There's some truth in that.
-
Adding extra insulation to the wall service-void?
Dreadnaught replied to Dreadnaught's topic in Timber Frame
Yes I came to the same solution too. 52.5mm seems to be a standard depth for insulated plasterboard: 12.5mm plasterboard, 40mm of PIR insulation. Looking at YouTube videos, its seems easy to chase-out channels for cables, back boxes, etc., so you can use it even in areas where you have services. I am not yet at the stage of installing plasterboard but am thinking of using this when I do.- 8 replies
-
- 1
-

-
- u-value
- insulation
- (and 1 more)
-
UFH - is it actually a good idea or not
Dreadnaught replied to Lord Greyabbey's topic in Underfloor Heating
Perhaps think of it a different way. Think of UFH as having radiators the size of the floor. Such large "radiators" gives some distinct advantages. The circulating water can be a lower temperature for a given room temperature, which is helpful for an ASHP (now or as an option for later). The even infrared warmth that comes from across the entire floor is more pleasant than (hotter) radiators producing convection drafts. UFH when combined with an ASHP offers the option of cooling in summer. Can't do that with radiators. -
In my case my manifolds will be in the plant room just below the plasterboard ceiling, so accessible. I would think you do need access to the manifolds for periodic cleaning. And also access during commissioning if you have the option of restrictors at the manifold (as well as at the terminals).
-
Is the entrance door a 'first fix" item?
Dreadnaught replied to Dreadnaught's topic in Doors & Door Frames
Thanks everyone. That's very helpful and clear. Much appreciated! -
When during my build should I install my entrance door? Is it ideally a first fix item before plastering? Or can it be left to second fix? When did everyone else install theirs? I have a temporary front door in at present. With my build, I am can now see the end of external cladding and am heading towards starting first-fix proper. Given the entrance doors typically have 2- to 3-month delivery times, my thoughts are turning to the spec-and-order.
-
MVHR Designers
Dreadnaught replied to Tilda's topic in Mechanical Ventilation with Heat Recovery (MVHR)
A manufacturer designed my MVHR system (after I designed it first and sent them my version). Pleased with their service. I suspect all manufacturers that sell directly to retail customers will have a design service. -
I am using the fixings supplied by Eurobrick as part of their system.
-
Oh, good point. My BCO queried my choice of racking board on the outside but was fine with the brick slips system I am using. I am using Eurobrick's P-Clad system, which uses for a cement particle board for the backing board. For racking board, I had to swap my original choice of Medite Vent board for MagPly to make the BCO happy.