Leaderboard
Popular Content
Showing content with the highest reputation on 07/22/17 in all areas
-
A bit slow to update the blog, been busy making frames up to the first floor, Caberdek laid to make it all a bit easier to work off, second hand Kwikstage up and 2 x 6m glulams for the ridge. Rafters and counter battens on top for the 35mm Isoroof. Membrane on top. The weather has been great until today. Some photos enclosed.2 points
-
Two good choices are: Corex I.e. Something like: https://ewistore.co.uk/shop/corex-sheeting/?gclid=EAIaIQobChMIxbOJl6Gc1QIV4bftCh0LSgCYEAQYBCABEgJfCvD_BwE or simple hardboard. Tape the joints with gaffa tape. If it's down for a long time remember that any area that is visibile may get bleached by light quicker than the areas covered. You'll only notice it when you take it up and youll be very upset.2 points
-
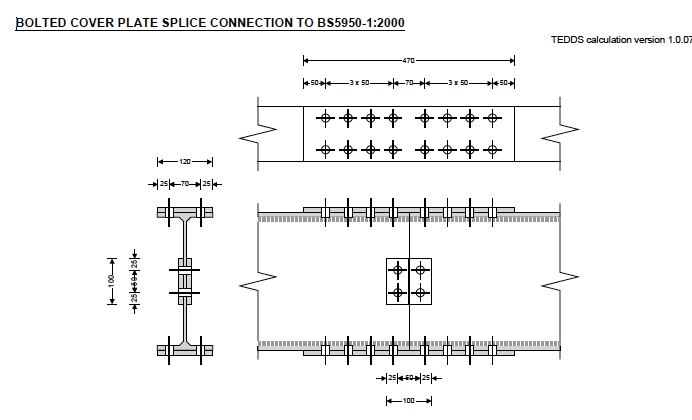
This was last Monday and was quite a challenge for my Dad and I. Steel was 10.5m in length spliced in the middle, about 400kg + the added timber ridge and needed to be 4.7m high sitting on two 100mm square posts. Overall length was 15m.. The night before I realised one of the posts was 400mm to short. We carried on using some blocks until the post was replaced on Tuesday. Blocks visible in 2nd picture on top of post. Rented 2 x Genie lifts and away we go. Well, it took all day really making sure it was all seated properly and square. Felt slightly sick all day. Hopefully rafters next week.1 point
-
1 point
-
I could not not agree more, I can honestly say the hardest part of self building I've found so far is getting people to take my wads of cash that I have waiting in return for work. I could name 20-30 suppliers of various products/services that I've had in depth conversations with about work, then left it awaiting them to come back to me with various quotes or further info etc, or even in some cases to book in a date for the work - never hear from them again, even if I chase them up I just don't get anywhere. I was was starting to think it was me! Like you say there must just be so much demand for the limited supply. Customer service just goes out of the window in the building industry it seems.1 point
-
1 point
-
If you get stuck, then you're not that far from me, I suspect, maybe an hours drive, so I could possibly bring my thermal camera up and take some images. Ideally you'd want to try and position one of the new glazing units next to one that doesn't have the externally reflective coating, facing towards the sun, if possible, with a colder surface behind.1 point
-
Welcome, it's good 'ere! I've a couple of 1800s terraced cottages. All slate damp courses, suspended timber ground floors, lath & plaster, lime mortar and airbricks! You sometimes have to be sensitive to all that applying "modern" techniques. But this is THE place to ask.1 point
-
Just up the road https://roncurrie.co.uk/gates/stock-gates/ledged-braced1 point
-
Also make sure the floor is spotlessly clean before you lay the Correx - one of our places had to have an oak floor relaid as there was small pieces of gravel and sand caught between the correx and the flooring and the slight movement made it work like sandpaper ...!1 point
-
You want Correx type sheets. Antinox & Proplex are other names to look at. And there's plenty of copies. Fit with a Stanley / big scissors and duct tape the joins. Something like this: https://intersiteuk.com/products/black-fluted-temporary-protection-board-2500-x-1200mm-x-2mm?utm_medium=cpc&utm_source=googlepla1 point
-
By the way. Don't be tempted to buy the specialist protection sheets sold by companies selling site protection. Every one I have ever seen is simply cortex like I pointed to above.1 point
-
I did ask MBC to quote for the work but they declined, mind you that was before they opened their UK factory, maybe I'll talk to them again.1 point
-
Suspect the key is to find a very experienced (10 years or more doing similar to what you want) Person from the UK who moved out there to be a Project Manager or other professional, and can recite explicit examples of the problems you wish to avoid, and how a later project avoided the problem. F1 point
-
Extract similar distance for me. Depending on your joist type (we had metal web) you may be restricted in how neatly the duct arrives at the plenum and you'll then have to position the plenum to best receive the duct and allow a snug connection (buy WD 40 silicone spray, a must for getting the duct with rubber washer snug into the plenum). It's easiest to have the duct arrive straight at the plenum (at least 1m) to give you the room to position and insert it home, avoid very tight bends immediately before the plenum as you'll find it tricky to get the duct in. I used 50mm batten offcuts to create two noggins across the underside of the top web of the joist and screwed the plenum into this. There was initially quite a bit of fiddling about to get them where I wanted and consistency spaced from walls, webs always seemed to get in the way but you get the hang of it after the first few. I then ran the duct from the manifold location (leaving plenty of slack) to the plenum and secured it (rubber washer and clips). Be prepared to reposition duct a few times, especially if you have a few coming together through a penetration in wall or floor - can take a few tries to get the flattest arrangement. Two people are better than one when running duct as it can sometimes need a pull and a push to get round bends - usually gets caught on metal webs (I used bits of cardboard to minimise this). Making a lasso from poly rope can help pull it along from ground level and avoids hopping on and off a ladder. Keep your duct loosely coiled - I used a batten across a door way as a cable spool, if it totally unwinds then it will knot. Last thing I did was connect duct to the manifolds, be cautious when trimming to get a neat fit, suggest you get them roughly connected first and then trim each to get rid of excess, if you over trim, you may struggle to get any additional length in the duct to get a tight fit to the manifold. I zip tied these when final as my manifold only had two spring clips per duct. If you have the ceiling mounted type of manifold that has ducts on either end and the main duct to the base, you need to ensure it's flat otherwise the duct down to the unit will be crooked. Can take a bit of trimming of duct either side to achieve. After I was done, Sparky moved a few plenums to line up more neatly with downlights and other roof furniture, provided you have a bit of slack in the duct, this is not an issue. I left my plenums untrimmed and had the tackers cut board to fit - they were pretty neat, only a few mm of gap. Left them untrimmed for plastering too, probably should have trimmed with a multitool to get a neater finish, however the cowl extends an inch or so past the plenum edge so ceiling looks fine.1 point
-
1 point


