Leaderboard


Popular Content
Showing content with the highest reputation on 06/17/16 in all areas
-
Having rented all my life, desperation set in after being gazumped, shafted and outbid in the so-called 'property game'. But it's no game if there's no fun! Finally, after getting lucky with an honest and reliable estate agent, I came across a place on the fringes of a small Kent village.The empty property was snapped up by us as soon as we laid eyes on it. Overgrown, but cared for, it dates from the early 1950s and was (is!) structurally sound. Lots of vegetation on the plot and lots of it too close and too big, right next to the building. Loose gutters, heavy concrete roof tiles. It had it's issues being dated, oil central heating and a bit cramped with only 2.5bedrooms. It was also badly laid out with only 2 bedrooms looking out to the rear 1/2 acre plot. Things needed re-jigging, and in doing so, we would also extend the place.1 point
-
After 4 years of Planning and Marketing processes I finally sold my former family smallholding for housing to a developer this morning, with exchange and completion. That means I may be in a position to do a small project or two in the next couple of years. I'll also say a bit more about lessons and prices, and the psychological mincing machines involved in this process. Phew. But first thing tomorrow I'm off to London for Open Garden Squares weekend. Ferdinand1 point
-
Nick, how you relax on a Friday night is up to you.1 point
-
Are you sure about the pea shingle? The MIs for our permeable pavers specifically mention not using any rounded aggregate at all. The sub-base is clean (no fines) Type 3, wacked in layers, then the bedding layer is 6mm to 2mm sharp grit. The MIs are absolutely clear that it has to be a sharp grit, as this locks together and holds the pavers securely. They warn that using pea shingle or similar will result in instability, which I can understand - it's be like laying blocks on ball bearings. I found the invaluable "Paving Expert" site to be a mine of useful information of SUDS and particularly of laying the paving: http://www.pavingexpert.com/permeable04.htm I needn't have worried, though, because the chap that laid our drive had done loads of them using the same pavers and so was a dab hand at doing it.1 point
-
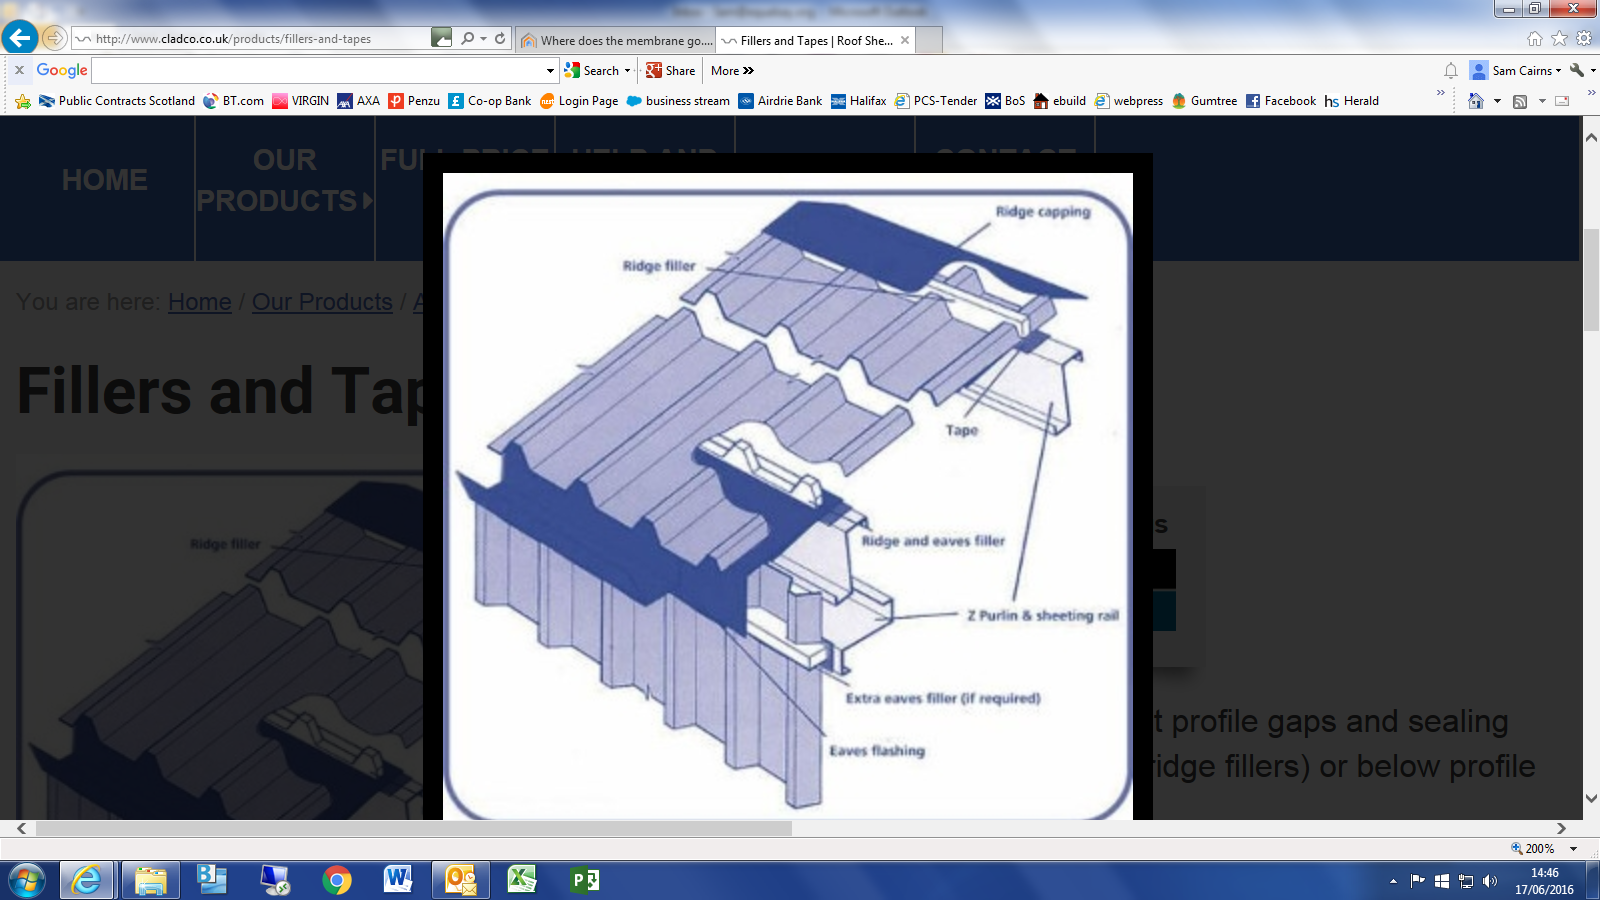
http://www.cladco.co.uk/products/fillers-and-tapes Does this help? Looks like they have an angled flashing...
 1 point
 -
Yup, I did a post on eBuild. We had originally planned to slate after the stone skin was up, pretty much as Ed @Construction Channel described in one of his recent YouTube videos, but my builder and his stonemason had a fall out and we had a small problem with planning enforcement which meant that we couldn't wait and had to do the slating first. The folded aluminium detailing saved our bacon and made this doable without compromising the look of the house. We did the detailing ourselves working ahead of the slater. This made sense to us both, as the corners were fiddly and took time to get right. This meant that the slater could bash on at what he was good at. A decent pair of tin snips and some round head outdoor Japan black screws are essential.1 point
-
Try my fabricator, P & W Nash (Engineering) Services Ltd in Hoo near Rochester. Tel: 01634 250986 and ask for Stuart. Been using for 30 years at work and for home. They're first class. They also have an excellent relationship with Medway Galvanising so can supply in that finish depending on size etc. (It does add a fair bit to the cost). Tell Stuart Clive said to call. http://www.pwnash.co.uk/1 point
-
It's 17.6m at its widest point and tapers down to 10m at the bottom of the garden. From end to end it's 43m. Our build is 120m2 footprint with rooms in the roof, plus a (large) double garage / man cave.1 point
-
Well, the good news is, once we got past the hurdle of actually getting a reply to phone or email, appointment was made and man came. Clearly knows his stuff. Found some stuff i really did need to know too. or may that should be1 point
-
Have a look at my epic. I excavated (personally), by HAND, down to a similar depth and basically stopped when I hit firm clay/chalk. Whatever, it was solid and I was peed off digging. I knocked in a few pegs and then compacted (5kN electric wacker) down a minimum 50mm of homemade Type 1 - basically hardcore I graded through a 40mm mesh. I then levelled it with sharp sand and it was flatter than a flat thing. Immediately over that went 25mm of EPS to protect the following DPM from and sharp bit s of the Type 1 poking through. My thin depth of hardcore was another reason for the mesh as in it's a floating "raft" almost. And just for any new fans out there: The original floor 60mm higher than the rest of the house to start with: Not too bad once I got going: The original floor level was where the white painted wall stops: Levelling pegs: Home made Type 1 going down: My purchase off of Preloved when I abandoned making my own electric wacker (watch this space 'cos it's back on the cards): Quite satisfying. The missus said "It makes it look bigger!": Like a billiard table: I think at one point I may have laid naked on this and kept putting the level on it and smiling: The moral is to do better at school so you can pay some other **** to do it for you!1 point
-
What about this yoke. I'm still trying to find out about Secondary air but looks much better traditional wise! http://www.stovesonline.co.uk/wood_burning_stoves/Stratford-Ecoboiler-Stoves.html D1 point