Jump to content
  • entries
    24
  • comments
    246
  • views
    15451

An Overview of my House Heating and Controls 4 years on


TerryE

4498 views

We moved into our new build mid-December 2017 in time to host an extended family Christmas.  We are now over 4 years into living in our new home.  We have lots of accumulated experience and made a few small tweaks.  However, we are delighted about how the house has turned out, and we love living here.  There were no material cock-ups, or regrets on design decisions, so we have probably fared a lot better than most new purchasers or self-builders.  Maybe a general experiences post should be on the to do list, but what I want to focus on here, and a couple of follow-ups, is a general topic that others on the forum have asked about over the years: that is how our central heating system works in practice, and how I control it.


The system as currently implemented is still largely the same as when I first commissioned it, that is a now 5 year-old RPi-based custom control system directly controlling the CH and DHW subsystems.  This is a pretty minimal headless system running Node-RED, MySQL and MQTT client for control.


The three material changes that I've made since moving in are:

  1. I have followed my son and son-in-law in using Home Assistant (HA) for general Home Automation.  My server (an RPi4 in an Argon One case) uses an attached Zigbee gateway, and I have a lot of Zigbee devices around the house: switches, relays, light sensors, etc. and I do the typical home automation stuff with these.  There are loads of YouTube videos and web articles covering how to implement HA, so please refer to these if you want to learn more.  My HA installation includes an MQTT service for use as a connection hub for these IoT devices.  I also have another RPi4 acting as an Internet-connected portal / Wireguard gateway/ file-server for caching video snippets from my PoE security cameras.  Note that none of my IoT devices directly access the internet, and the only in-bound access into my LAN is via Wireguard tunnelled VPN, and my HTTPS-only blog. All other ports are blocked at the router.
     
  2. Before moving in, we assumed a target internal temperature of 20°C.  In practice, we have found this too cold for our (fairly inactive OAP) preference and so we have settled on a minimum control threshold of 22.3°C.  As you will see below, because we largely heat during the E7 off-peak window the actual room temperatures have a ~1°C cycle over the day, so the average temperature is about 22.8°C.  This hike of 2.8°C increases the number of net heating days since my design heating calcs and the increased delta against external temperatures in turn increases our forecast heating requirement by roughly 18% over our initial 2017 heating estimate.
     
  3. Because our UFH is only in the ground-floor slab, we found that our upper floors were typically 1-2°C cooler than the ground floor in the winter months. We also need more than the 7 off-peak hours of heating in the coldest months, so I have added an electric oil-filled radiator on our 1st-floor landing; HA controls this through a Zigbee smart plug that also reports back on actual energy drawn during the on-time.  HA uses MQTT to pass the actual daily energy draw back to the CH control system.  This radiator provides enough upper-floor top-up heat, and does so using cheap rate electricity.  

Note that all servers are directly connected to my Ethernet switch, and the CH/DHW system has all of its critical sensors and output controls directly attached.  It can continue to control the CH and DHW subsystems even if the HA system or Internet is offline.  There is also no direct user interface to the system, with all logging data is exported to MQTT, and key CH/CHW set-points and configuration are imported likewise. This integration with MQTT, enables user interfacing to be done through the HA Lovelace interface.  If there is sufficient interest I can do follow-up posts on some more of the "Boffins Corner" type details on these implementations, or if this turns out to be more of a discussion then it might be better to move this stuff to its own BC topic.  However, for the rest of this post I want to focus on the algorithmic and control aspects of the heating system.


In terms of inputs and outputs to the control system, these are:

  • There are ~20 DS18B20 1-Wire attached digital thermometers used to instrument pretty much all aspects of the CH / DHW systems.  Few are actively used in the control algorithms but were rather added for initial commission, design verification and health checking.  Some are also used to monitor and to trip alarms; for example, there is a temperature sensor on the out and return feed for each UFH pipe loop.  These were used to do the initial zone balancing. However, the average of the return feeds is used as a good estimate of the aggregate slab temperature.  One of the temperature sensors is also embedded in the central hall stud wall to act as a measure of average internal house temperature.
     
  • There are two flow sensors on the cold feed to my 2 SunAmp DHW storage units to monitor DHW use and to help automate during-day DHW boost.
     
  • There are 4 240V/20A SSRs used to switch the power to my (2-off) SunAmps, my (1-off) Willis heater, and my (1-off) circulation pump. These and the rest of my 240V household system were wired up and Part P certified by my electrician.  These SSRs are switched by a 5V 50mA digital input, and so can be driven from an RPi or similar. (I used a I²C attached MCP23008A multi-port driver to do this, as this can drive 5V 50mA digital inputs, but its input I²C side is compatible with RPi GPIO specs.)

There are many ways to "skin this cat", but whichever you choose for your control implementation your system will need to control some 240V/12A devices and take some input temperature sensors. My preference was to directly attach all such critical sensors and outputs.


My heating algorithm calculates a daily heating budget in kWh (each midnight) as a simple linear function of the delta between average local forecast temperature for the next 24 hrs and the average hall temperature for the previous 24 hrs.  This budget is then adjusted by the following to give an overall daily target which is converted in minutes of Willis on time.

  • heat input from the heater mentioned above.
     
  • a simple linear function of the delta average hall temperature and the target set-point (currently 22.3°C). This is a feedback term to compensate for systematic over or under heating.

I initially calculated the 4 coefficients of the two functions using my design heating calcs and an estimate of the thermal capacity of the interior house fabric within the warm space. After collecting the first year's actual day, I then did a regression fit based on logged actual data to replace the design estimates by empirical values.  This was about a 10% adjustment, but to be quite honest the initial values gave quite stable control because of the feedback compensation.


The control system runs in one of three modes:

  • No heating is required.
  • Up to 420 mins of heating is required. The start time is set so that heating ends at 7 AM, and the slab is continuously heated during this window.
  • More than 420 mins of heating is required.  420 mins of heating is carried out in the off-peak window.  On each hour from 8 AM to 10 PM, if the hall temperature is below the set-point (22.3°C), then an N-minute heating boost is applied, where N is calculated by dividing the surplus heating into the 1-hour heating slots remaining.


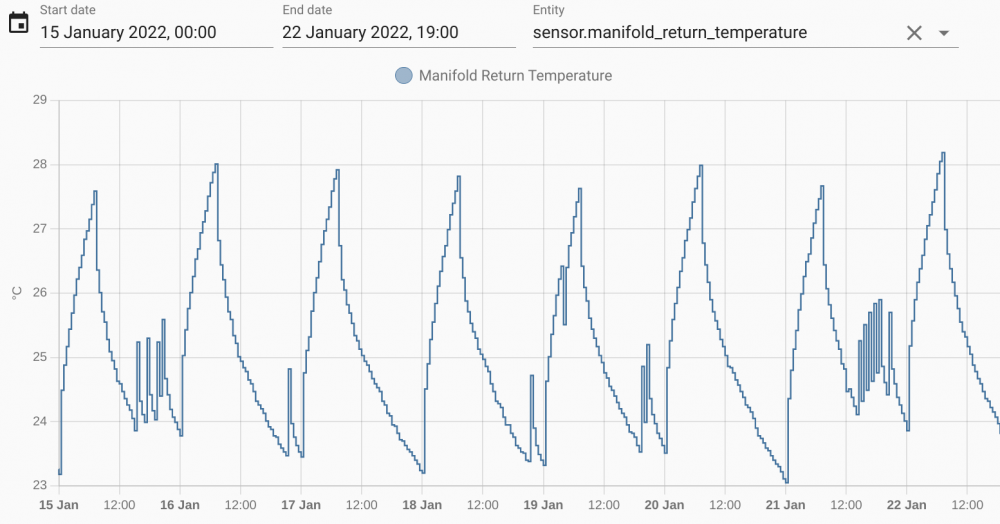
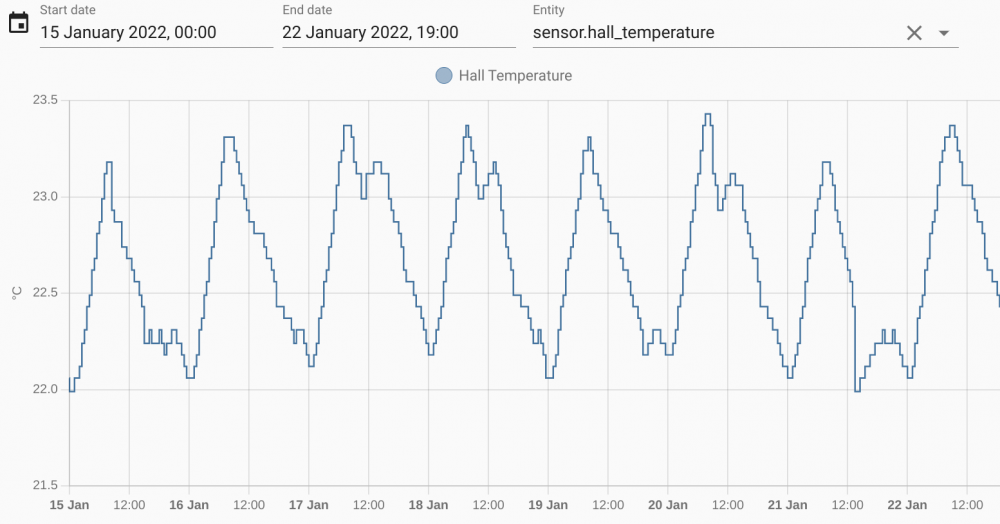
 image.thumb.png.edd654631141f8e2a6eee153594c5988.png image.png


Here are two history outputs from HA showing some of the logged results.  The LH graph is the slab temperature over the last 7 days.  The general saw-tooth is identical from my 3-D heat flow modelling discussed in my earlier topic, Modelling the "Chunk" Heating of a Passive Slab.  The 7 hr off-peak heating raises overall slab temperature by ~4-5 °C; well within UFH design tolerances, and no need for any HW buffer tank: the slab is the buffer. The RH graph is the hall temperature.  Note the days where on-hour boosts were needed.  (Also note that the CH system only updates the MQTT temperature data half-hourly, hence the stepped curves.)


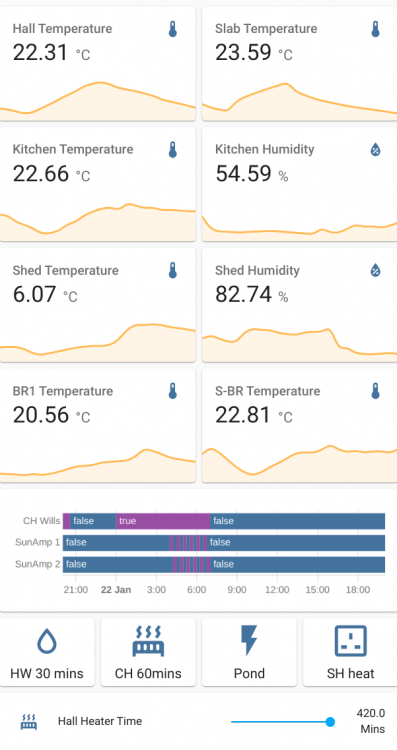
So the approach is fairly simple, and the system works robustly. ?  And here is a screenshot of my HA summary interface, which gives Jan the ability to control everything she needs from her mobile phone or tablet.


image.thumb.png.6cdcb1d60175d8d7610023c12cf8fc54.png

  • Like 12
  • Thanks 1

36 Comments


Recommended Comments


I seem to recall you saying you don't have much glazing? I was using local temperature forecasts to advance the switch-on time for the UFH in our highly glazed garden room but this was not taking into account the solar gain from the SE elevation first thing in the morning. I'm now looking at using the free tier Solcast API as a better predictor. On another issue, do you have UPS for your RPi's? I found this absolutely essential in my setup (which uses many of the same components as you do).

Link to comment
8 hours ago, Radian said:

I'm now looking at using the free tier Solcast API as a better predictor

That is interesting.  I studied this, in part, at university.  For my area (Cornwall) I found wind speed and direction a good predictor of both temperature and irradiance. Never looked at other locations though.

Link to comment

@TerryE Fantastic, thanks for the update, I've read your blogs and although  some of the " Boffin's" bits are over my head, I'm considering this approach for my heating.

As you pump after heating, did you design the UFH loops on a room by room basis? Or just 100m loops, as it seems your goal was to have uniform temperature across the slab?

I'm keen to adopt the sensors and monitor via RPI but want to ensure the system can run in the future without programming. 


You mention that sometimes you need to top up the heating in the day,  could this be overcome by 2 willis heaters or is this related to the thermal calculations and the inability for the slab to take this heat in one go? Out of my depth here?.

Thanks

Link to comment

@Jenki IMO, implicit to all this is that I have a passive class house in terms of U-values, air tightness, MVHR, etc.  In this, inter-room or inter-zone heat transfer is an order of magnitude higher that interior to exterior transfer.  I have what is called a warm slab -- that is the entire reinforced floor slab is within the insulated perimeter so my total thermal mass internal to the external insulation barrier (I did the sums once and reported these on a post somewhere) IIRC is equivalent to that of ~100 tonnes of concrete. If the heating fails, then the house as a whole cools at around 1°C per day.  In my previous house we heated by room, with only a few rooms kept at a comfortable temperature.  In our current house every room and touchable surface is essentially at the same temperature within a degree or so; zones make no sense in this new context.


Our UFH, loops were laid into the slab by being tied to the rebar before pour. The layout avoided walls etc, but MBC advised that we keep the loops all the same length (and close to the 100m roll length).  We could have just about fitted in 4 × 100 loops, but this was tight. As I only needed to pump a few kW into the entire floor, we spaced the runs out a little and dropped heating the utility room, so that we could make do with 3 loops (which when laid actually varied from 93 – 100m,  IIRC).  I trimmed the manifold valves by setting them to max and slightly closing them as need so that the temperature drop across all three zones when heating was the same.


The Willis actually draws 2.88 kW, so an entire 7 hour heating budget works out at just over 20 kWh.  2 × Willis seemed like overkill at the time, as a single unit should have been enough to keep within cheap rate for maybe 95% of the year with our planned 20°C target, given our expected other waste heat.  However as I said previously, we upped the heating set point for comfort ending up with an average some 2.8°C higher.  BTW, pretty much all electricity used within the house ultimately cascades down a waste heat within the environment.  In practice our new lighting, computers, and our other base electric load ended up being quite a bit more energy efficient in the new house, so this waste heat element was less than anticipated from previous use. 


The electric rad on the landing typically adds 8 kWh over night for a full 7 hour window.  We have maybe 30 days a year where we need to top up over this 28kWh threshold, and end up using peak rate electricity.   So yes, using a bigger resistive heater such as a 5kW inline or just 2 × Willis (as others have done) could have kept heating in the cheap rate window, but it just wasn't worth the hassle to make this change, as our current arrangement only adds maybe £10 - 15 to our annual electricity bill.

Edited by TerryE
  • Like 2
  • Thanks 1
Link to comment
15 hours ago, Radian said:

On another issue, do you have UPS for your RPi's?


Given that the whole heating system dies without electricity, I don't view loss of power per se as an issue.  What I want to avoid is system corruption on power-fail.  I have lost microSD cards in the past, so I regard these as suspect. Hence I always use SSD storage on my RPi servers and this seems to be a lot more resilient to power-fail and wear levelling failures than microSD storage. Also Linux / Ext4FS gives excellent file system resilience to power failure.  All of my configuration and critical data gets backed up off server and to cloud storage -- and on a occasional basis to offline USB HDD for disaster recovery.


My CH RPi3 does have a small battery backup hat which basically facilitates orderly OS shutdown on loss of power.


Both my Hass.io server and my general server are configured as Docker hosts, so for example my pihole and WireGuard setups use standard containers;  their build scripts are ~20 lines of bash script each and the R/W volumes are a few Mb that is backed up nightly.


I don't use RPi0s at the moment, but if I did, then using OverlayFS is nicely enabled through raspi-config, and this allows you to boot and run with a read-only SD card setup.  If I did need to store data locally on the SD card, then my inclination would be run OverlayFS for the root partition, but to have a separate F2FS partition for non-volatile R/W data.


I generally prefer to use protocols such as MQTT on such IoT-style devices to transport updatable configuration and logged data off-board to an external MQTT server.

  • Like 1
Link to comment

@TerryE, thanks for the post! 


Have you missed not having any cooling capacity for the summer months, which an ASHP could have provided via your UFH system?

Link to comment
Just now, Dreadnaught said:

@TerryE, thanks for the post! 


Have you missed not having any cooling capacity for the summer months, which an ASHP could have provided via your UFH system?


Yup.  We have a vaulted central hallway running though the 3 floors of the house and with a roof-light window on the top floor.  We find this gives good convective cooling to mitigate this issue if we open a door or window on the side of the house in shade, and this allows us to dump the hotter house air during the early morning or late evening.  Even so overheating is a nuisance typically for a couple of weeks a year when there is a sustained heat wave and even morning temperatures rise above 20°C or so.

  • Thanks 1
Link to comment

@TerryE I have similar to yours, Node-Red, MQTT, SQL etc. I use a Radio Spares Power Bank (RS7757508) as UPS for the two Pi 3's employed in the monitoring and control of the UFH and MVHR. The RS power banks are the only ones I could find that do not interupt the output if the supply fails. They will run the Pi's for more than four hours. One of the pi's is also a wireless AP which allows connection should  a long power cut be on the cards. Most of our cuts (which we have a few of) are only a few seconds.  Node Red has repalced all the functions of the provided MVHR controller as it is junk, a power cut needs a clock reset.. what!! + I have added temp sensors into each of the four pipes plus a Co2 sensor in the extract pipe.

  • Like 2
Link to comment
9 minutes ago, Ajn said:

controller as it is junk, a power cut needs a clock reset.. what!! 

Thats a checklist item right there. We have loads of power failures here, not so much in the new place, every one causes problems. Wonder what else would / should be on the don't buy unless it can meet these challenges list?

Link to comment

@MikeSharp01 Its called a "blue brain" controller. It retains all the settings and program but not the clock on power failure. Happy with the MVHR though although one has to question the 100% bypass option. It may bypass the heating of the incomming air BUT the air coming in gains heat fom the fact of it just passing through the unit.

Link to comment

I have tidied up some typos in the OP, and added a link to my topic discussing how I modelled the heat flow in the slab during "chunked" heating.


Also in this topic, Raspberry Pi based CH and HW control, I discuss some the design issues and implementation details of my system.  I'll do an update post here and will role up my overall conclusions in a new blog post.  

Link to comment
55 minutes ago, TerryE said:

have tidied up some typos in the OP

Wish us 'ordinary' contributors could do that.  Main reason I have never bothered with a blog.

Be alright when @pocster becomes a moderator, then a simple bribe, or blackmail, will get anything we like posted up.


Good to know that the old RPi is still chugging along.  I left one logging at @joe90's some years ago, the 'sister' one at mine has been very reliable.


  • Like 1
Link to comment

Nice !

I don’t have the energy or time to do the heating so analytically . Mine simply comes on when below temperature x - then off when above y . I use “ SWMBO technical logic “ to analyse the success of this . So far 100% ! . I keep the mistresses bedroom cooler though , as the temperature can rise quite quickly in there . In essence I guess I’m saying how it “ feels “ to an individual. I find this simple approach with ufh to be more uniform , better and more efficient than anywhere I’ve ever lived .

Link to comment
Just now, SteamyTea said:

Wish us 'ordinary' contributors could do that


Actually TerryE is an ordinary user just like @SteamyTea.  I resigned from my Forum roles back in 2018 after being trolled by some members who held to some conspiracy theory that the forum as being run by a bunch of MBC-paid infiltrators. ?  I also have access to the Admin user but I only use this account when I need to debug some SysAdmin issue on the server.


Creators are free to edit the any of their posts in their blog or new topics, including the opening post.  I often paste the post content into Google Docs and do a Spelling and Grammar check; I find that this picks a load of stuff that my typing / proofing misses.


Disclosure: My house does use an MBC TF and slab; however we paid the then commercial price for this.  I have never received any payment or other in-kind gift from MBC.  (For that matter, I've never received a penny for my time and expertise acting as the forum SysAdmin this past 6 years.)  Jan and I think that our choice of MBC was probably best single supplier decision we made, and we would recommend them unreservedly to other self-builders.

Link to comment
8 minutes ago, TerryE said:

Creators are free to edit the any of their posts in their blog or new topics, including the opening post.

Has the 30 minute time limit been lifted then?

Link to comment
23 hours ago, Ajn said:

I use a Radio Spares Power Bank (RS7757508) as UPS for the two Pi 3's

Shame they discontinued those. I have a home brewed battery UPS for mine but I think if I was reorganising things I would use POE to distribute power and network to all the connected Pi's. This would bring together a handful of PiCams and the home control stuff under one supply that could be powered by the big UPS I keep for NAS and desktop PC.

Link to comment

@TerryEI would be interested to know what EPC rating your house has? It would help me understand how your experiences will map onto my, likely lower rated, property.


Also how many 420 heating mode days do you clock up a year?


And finally do you have enough data make that final decision on whether an ASHP makes sense?

Link to comment

@epsilonGreedy, the EPC is a poor indicator: ours got knocked down, because we don't have a gas boiler or ASHP.   What is more relevant here is the overall heating requirement. This is mainly a function of delta of internal vs outside temperatures, but heat loss through air exchange (without heat recovery) is also a big hit.  Our house is super insulated; it is also very airtight (about 0.4 on the ACH50 test compared a more normal 5-10 for dot&dab boarded block + brick skin.)  The house air is always fresh because we have an MVHR cycling in new air 24 × 7 through a heat exchanger which recovers about 90% of the heat.


IMO this approach wouldn't be cost effective if our house took twice as much energy to heat -- and that is still far better than stock builder build to.

Link to comment

@Dan F, picking up a relevant point in your last PM, IMO the MBC built -- or equivalent -- low energy houses have some common 

  • high insulation, little or no thermal bridging, very airtight, MVHR.
  • Large thermal mass within the insulated shell. 

This first leads to a typical daily heating requirement of perhaps 50 kWh (+/- a factor of two) for typical January temperatures. 


A good way to evaluate the second is to let the house read a stable "normal temperature" and then turn off the heating for 24 hrs and measure the temperature drop.  Our house loses about 1°C / day.  That is the house as a system has a very long time constant.


IMO, most heating control systems are based on a on/off demand based on some dead-band around a temperature set-point; these really only work well for typical houses which might lose more like 1°C / hr.


Given this 1°C per day response, I think that my overall strategy is far more robust:

  • Once per day calculate how heat will be required for the following day based on some simple formula.  I base mine on external temperature, but if you have large window areas, then you might need to factor in solar gain, etc.
  • Execute a daily plan to dump the calculated amount of heat into the house.  In my case I pack most or all into the cheap-rate time window then dole out the remainder (if any) based on a simple temperature sensor threshold.  I use resistive heating but IMO the same approach would work equally well for an ASHP.
  • As part of the daily calculation I check to see if there has been any drift against set point (e.g. if your supplied heat was only 75% of that actually needed, then the house will have dropped ~¼°C or so) and then adjust the heat demand accordingly to correct for this.   (I had to add this feedback term because I found that the daily average temperature would slow drift without it.  This feedback also corrects for effects like guests staying which can generate quite a few kW from their body heat and all the associated entertaining!)

We do most of our heating overnight because we use E7, but the downside is that we do have this ~ 1°C ripple on room temperature.


With an ASHP then it might be better to have a more spread out execution plan.  You should avoid letting the two control systems (the house and the ASHP) fight, and to do this you want to configure that ASHP to be as dumb as possible: if the heating / cooling demand is on the supply a fixed heat input (say 2-3 kW) in your case in blocks of one hour on (or so) spread through the day.   Even if you can't monitor the heat the heat output directly from the ASHP, there are measures which correlate very well and could be used as proxy -- for example, use a power monitor relay to measure the power input to the ASHP and the actual heat output can be estimated from this.

Edited by TerryE
  • Like 2
Link to comment

@TerryE    Just given you a thanks!    That's thanks for jogging my memory about the way you have implemented your system.


We've been planning to do the same and I've recently been talking to the main contractors plumber who is having a hard time understanding that the slab is the heat bank.


Our build is also an MBC TF and slab to very high insulation levels. we haven't had the airtightness test done yet, roofing is turning out to be a bit of a nightmare but that's a different story. It's 250m2 with a maximum heat requirement (mid winter -4C outside) of just over 5kW. There's 12 UFH loops in the slab with a total length of just over 1000m.


Our plan is, like other on here, to suck it and see with respect to heating and install Willis heaters or equivalent and forget about an ASHP until we've worked out how things perform.


We were planning to run our build as 2 main zones. There's a single storey vaulted kitchen/dining/lounge and attached to that by a flat roofed utility, is a 2 storey section with the hall, snug, plant room and 3 bedrooms. So we'd run the 2 main sections as 2 zones.


I was planning to ensure that we had temperature sensors throughout the build, so one or two in the single storey section, then, the hall, snug, master bedroom (downstairs), the landing and the 2 bedrooms upstairs.  Then we could average those readings to get three temperatures; the single storey section and the ground floor and 1st floor of the 2 storey section.  Then for the UFH, one sensor on the return to see how the heat is being taken up so to speak.


You seem to have gone the other way round and had sensors on flow and return for all the UFH loops and only 1 sensor for the ambient temperature in the house.  I can see that sensors on flow and return for the UFH would enable you to balance the loops but surely they are then redundant?


One final point on MBC - any TF supplier can be brought down by the crews that do the actual build. The first crew (subcontractors) on our site were so slap dash that it's taken an age to iron out the fallout from their screw ups.  I should emphasise that these were subcontractors, so not MBC folks and the company in question no longer does contract work for MBC.  MBC have either fixed everything, or will do so at the airtightness stage but it's caused us a heck of a lot of stress, not to mention the time needed to analyse why things aren't as they should be, explain to MBC what the root cause of the issues were and agree remedial work. And then the delays.   I think you and others may have contracted at a golden time for MBC while some of us more recently have suffered from their growth pains...    We're still happy overall I should add and I would recommend MBC to anyone wanting to go down the TF route.


Finally - thanks for documenting in detail the systems you've put in place as well as your experiences with them.  It's incredibly helpful.  (When does the book come out?)


Simon

Link to comment
9 hours ago, TerryE said:

A good way to evaluate the second is to let the house read a stable "normal temperature" and then turn off the heating for 24 hrs and measure the temperature drop.  Our house loses about 1°C / day.  That is the house as a system has a very long time constant.


Great call - thanks for the tip. One more thing to add to the things to check for when we're implementing our system.


Simon

Link to comment

@Bramco Simon, I am quite surprised that you managed to fit 1200m of UFH heating in your slab. We only have  280m or so.  IIRC we have ~ 230m² living space (but that's over 3 floors) and only the slab is heated by UFH.  We were lucky to have a large plot that we could get planning permission to split off a plot for a new dwelling, so we were literally living next door to the new build and being retired we were able to provide lots of tea, coffee, and bacon butties to the onsite crews as well as being able to keep a very close eye on build process and quality without being overtly intrusive.  We were also very lucky with the crews who were extremely hard working and committed to doing a quality job.  Even so we did pick up a couple of major design cock-ups early enough that we could liaise with MBC and get fixes put in before the consequential ripple forward.


The MBC build process compacts their onsite work into three intense 7-10 periods.  IMO, you really need a project manager who is independent of the construction crew on-site daily during this work to do quality control, trouble shoot and handle supplier liaison.  In our case I was competent enough and also had the free time to do this role.  So many self-builders seem to think that you can leave it to the subs and trades and assume that magic will happen.


IMO you don't need in-slab sensors as you can measure out and return water temperature directly.  I have a quite few Zigbee Aqara temperature / humidity dotted around the house for my home automation system.  But my CH control system uses a directly connected DS18B20 embedded inside an internal stud wall as the reference internal temperature.  I also bought 20 of these. They were cheap as chips and I ran some calibrations on them to ensure consistency and discarded 3 that were out of my spec.  I also determined a temperature offset for each individual thermometer so that the reported temperature for all were within a ¼°C tramline across the operating range. (I posted about this calibration exercise).    


One other thing my CH control does is to circulate the water in the slab for  8 mins every hour throughout the year.  This has two benefits: (1) this redistributes heat from hotspots (e.g. from direct sunlight through windows) to the whole slab (Thanks to @Jeremy Harris  for this suggestion); and (2) the averaged UFH return flow temp is an extremely accurate measure of the overall slab temperature.


I only use one thermostat for feedback into the CH control system because (i) this was easy to directly wire up; (ii) when you go around the house with a FIR temperature probe, every surface is the same temperature within a degree or so, so a single probe is quite adequate. 

Link to comment

Create an account or sign in to comment

You need to be a member in order to leave a comment

Create an account

Sign up for a new account in our community. It's easy!

Register a new account

Sign in

Already have an account? Sign in here.

Sign In Now
×
×
  • Create New...