Jenki
-
Posts
830 -
Joined
-
Last visited
-
Days Won
7
Everything posted by Jenki
-

ICF Foundation Details - Thresholds
Jenki replied to Jenki's topic in Insulated Concrete Formwork (ICF)
Poly steel only do one size block - so EWI to get a U value. most likely clad, so fixings will go through batten, EWI and into the Steel flange on the Poly steel block. alternative option was to but EWI on the inside, but my thought was to have more insulation on the outside of the concrete core for it to be more stable to wind and temperature change. is this to prevent the insulation lifting during the pour? or another reason. If it goes between 2 layers then I can staple UFH pipe direct not worrying about the membrane, (which as you point out is a secondary layer anyway) -
ICF Foundation Details - Thresholds
Jenki replied to Jenki's topic in Insulated Concrete Formwork (ICF)
Thanks for positive input. So this is what I'm planning. hopefully put it all together.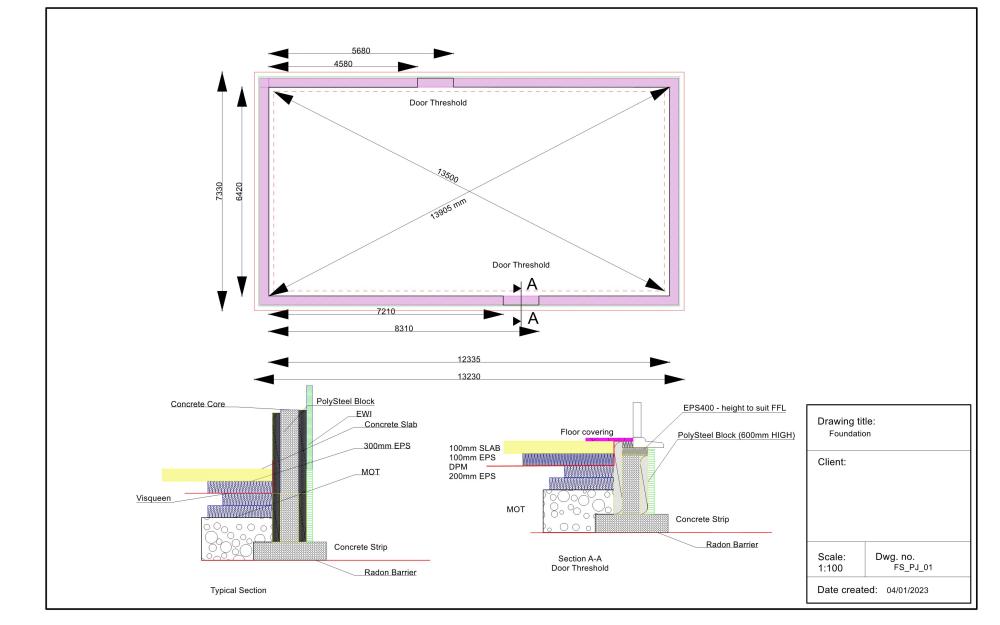
-
maybe for another topic, but I'm thinking of adding DS18B20 sensors into my slab prior to pour, and was thinking it might be good to put some into the core of the ICF - any thoughts on this.
-
I'm still researching the best "affordable" option for our house build. and do like the idea. but definitely want UFH. My system will be DIY, and EAHP seem to be too expensive. need to do more research on this. list of to do's is: compare costs of DIY MVHR system with ASHP, UVC buffer tank / UFH . Vs EAHP coupled possibly with Pool ASHP for UFH - is this an option
-
Caravan is 30mm polystyrene in the walls. so poor when it was 0 outside, caravan would drop to 6 with no heat. - the joys of thermals and bed socks prevail.😂 The heat up time for the cabins is quick, and the A2A in the cabins have separate modes - so it does do a heat only cycle - thus turns off when satisfied and comes back on again when needed , whereas the one installed in the caravan has a set point that it try's to maintain, so will cool as well.
-
It's early days for the cabins so no cost feedback. Noise wise no issue really. The one installed in the caravan is a cheaper version, we've had a few days below 0. I think the worst has been -4 with -7 wind chill. And it still performed well. Although it did go into defrost mode more often. Cost wise on the cold days it way averaging 0.8 kw/h. For 6 days in Jan it's used 56Kwh.
- 17 comments
-
- 1
-

-
- the windy roost
- camping cabins
- (and 1 more)
-
ICF Foundation Details - Thresholds
Jenki replied to Jenki's topic in Insulated Concrete Formwork (ICF)
@Russell griffiths. Looks like you had a screed after? my slab is finished floor level. so the height will be 100% correct. I take it both you and @Nickfromwales don't like the thermal bridge, and I want to get rid of that Which I thought I had. I'm struggling with the detail. If I don't put the concrete slab into the reveals then the door will need to be sat further back? otherwise I'm going to have concrete slab, then insulation, then door threshold sat on insulation? Also if I set the door back, this will expose the timber, that is used to shutter the blocks at the openings. So the door needs to sit at least flush with the outside edge of the timber, leaving the EPS of the poly steel block and the EWI exposed? For Clarity my thoughts were- pour the strip foundation. place and locate 1 row of ICF blocks, Prepare the base for the slab, Drainage, Utilities. 2 layers of EPS, Visqueen, 1 layer EPS, UFH pipe, cast the slab. (hence the detail at the threshold. Then build the blocks to wall plate. -
ICF Foundation Details - Thresholds
Jenki replied to Jenki's topic in Insulated Concrete Formwork (ICF)
Yes. but I want to sort the detail out, and then get him to confirm he's happy . rather than just end up with a genreric that will do... -
ICF Foundation Details - Thresholds
Jenki replied to Jenki's topic in Insulated Concrete Formwork (ICF)
@Temp Are you confusing the SECTION - A-A - this is at the door threshold?. The slab is not taking any weight from the walls or roof. Section A-A is intended to show the detail at the door way. - I have added the Typical section to the drawing to emphasize this. Or am I missing something? Thanks -
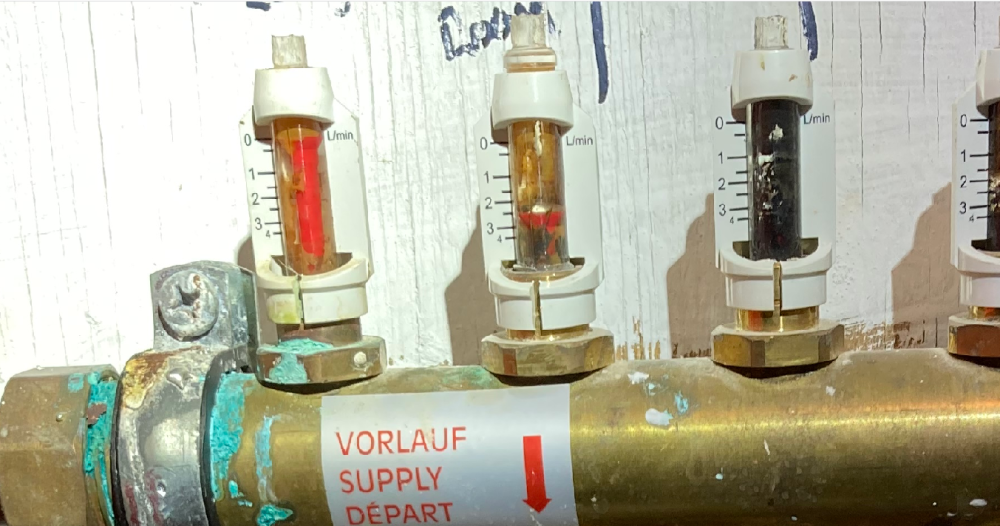
All the flow meters look blocked. Agree with @ProDave, get this flushed, cleaned and then see where you are.
-
ICF Foundation Details - Thresholds
Jenki replied to Jenki's topic in Insulated Concrete Formwork (ICF)
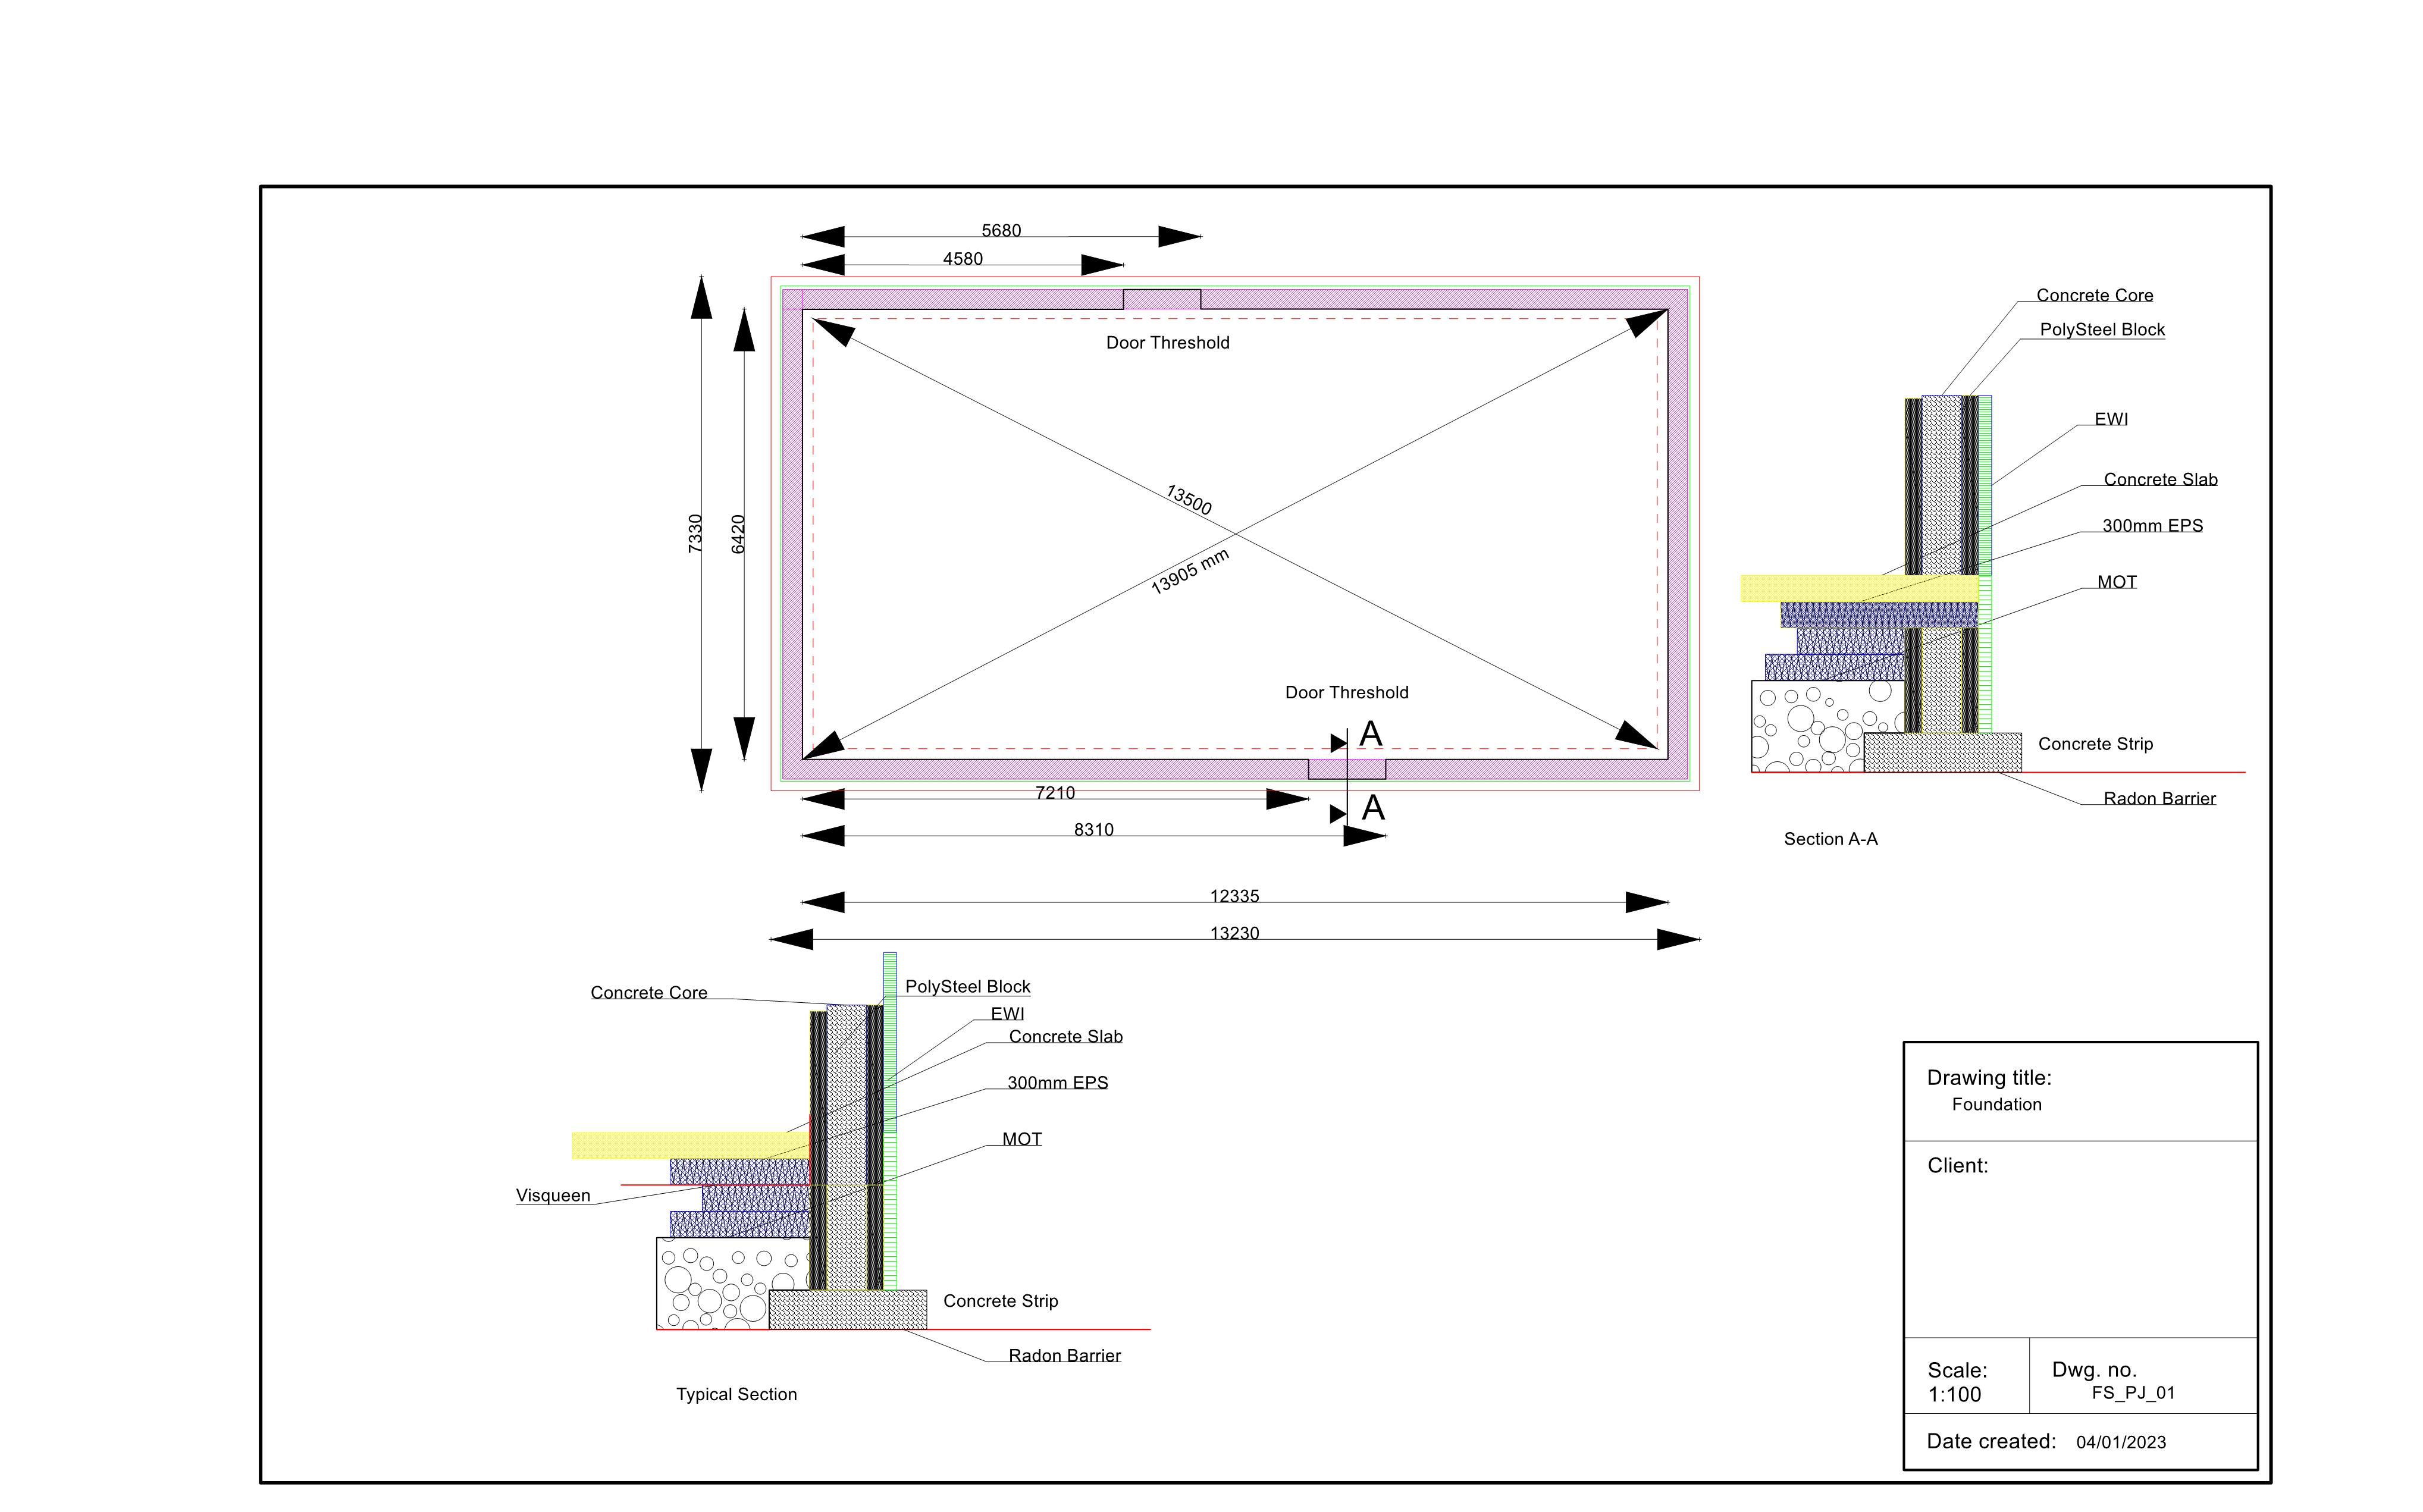
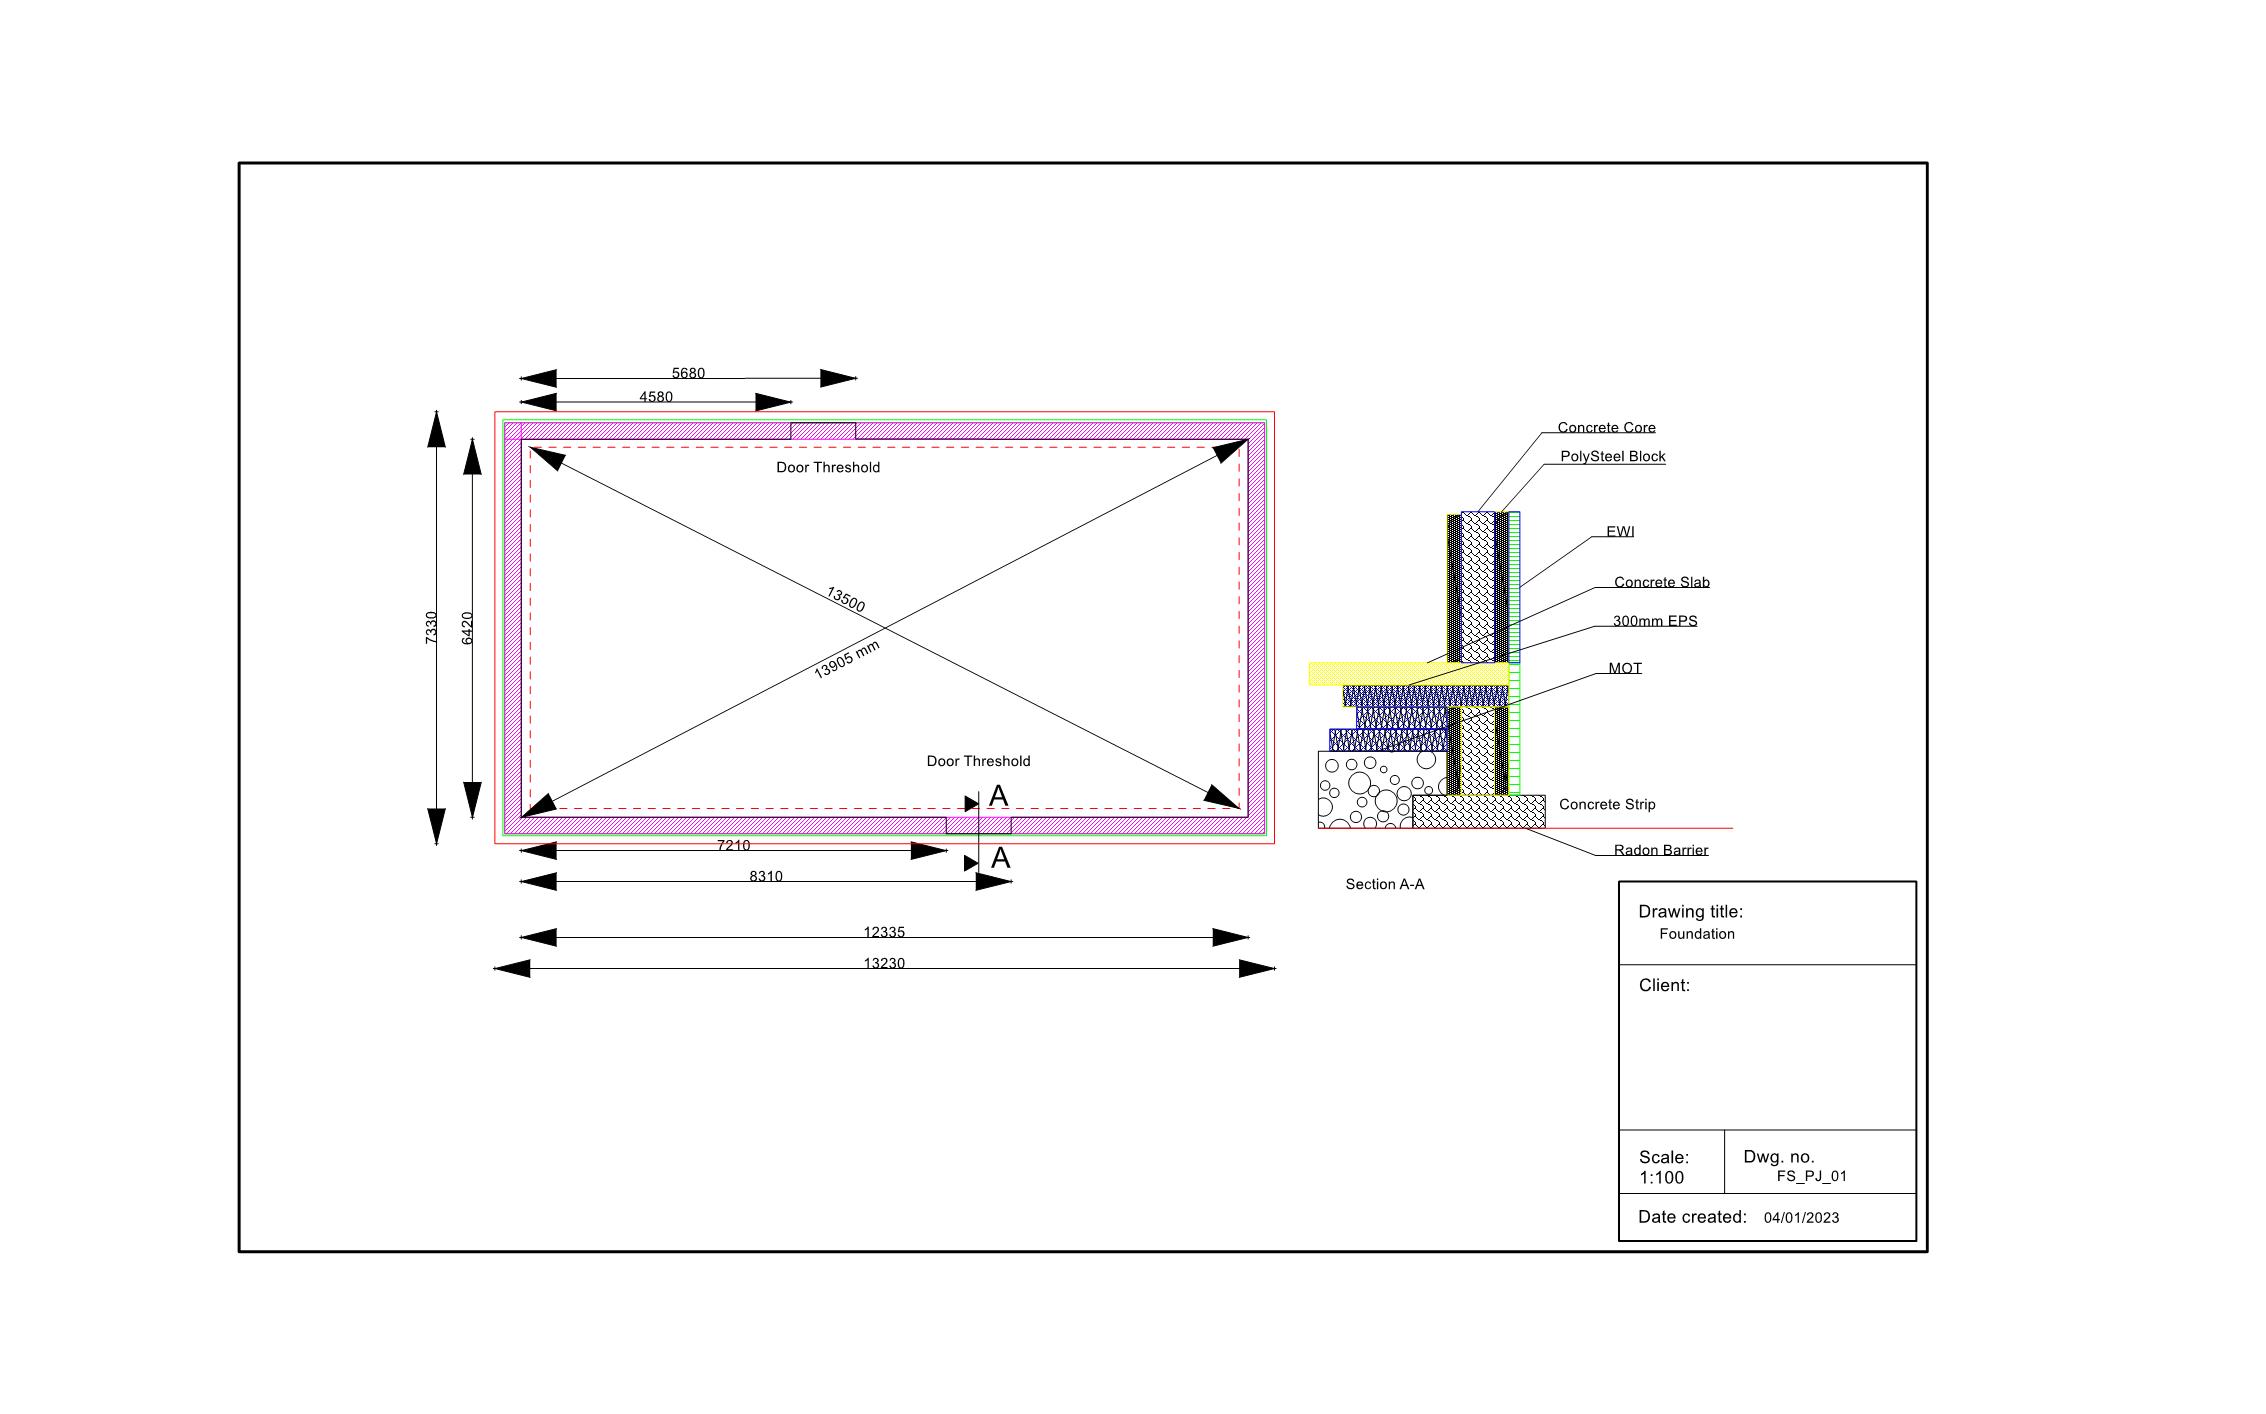
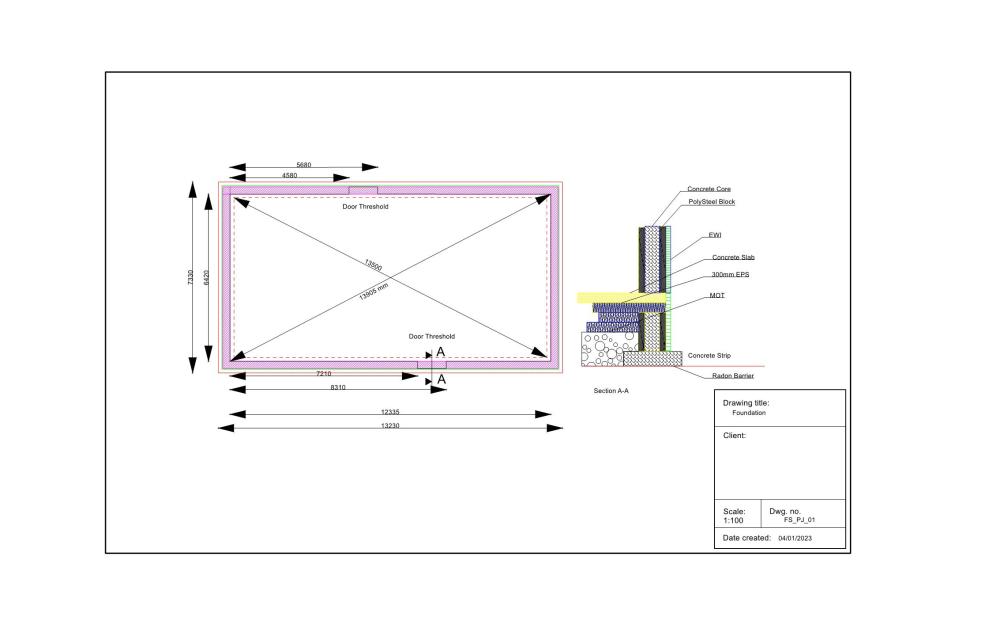
I was hoping my drawing would be this.. with any mods suggested here. 040123_Foundation.pdf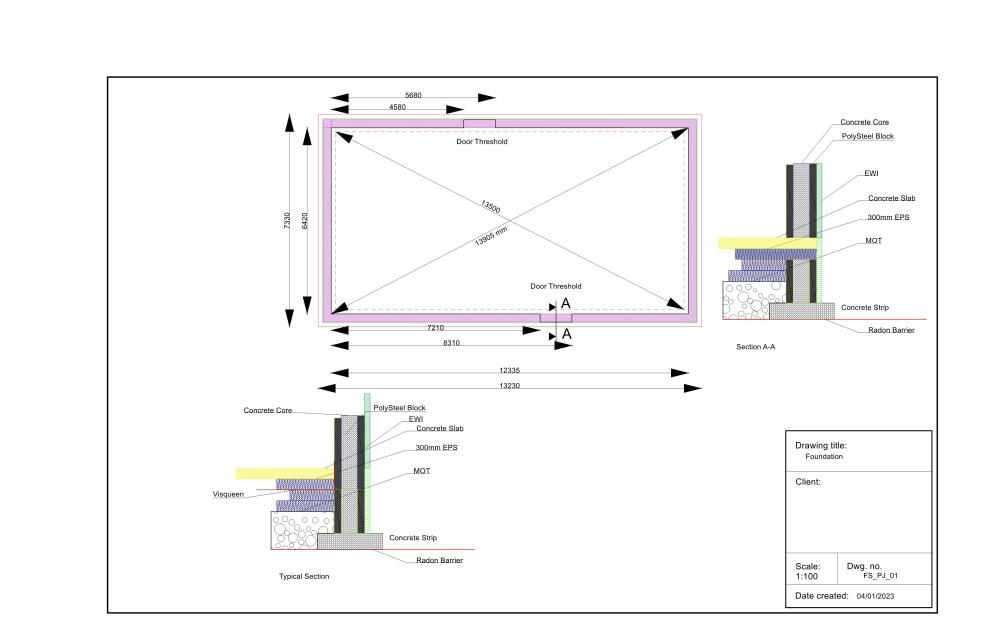
-
ICF Foundation Details - Thresholds
Jenki replied to Jenki's topic in Insulated Concrete Formwork (ICF)
I'll have to change the Warrant for ICF construction, so trying to ensure I've got the details correct before I apply for the certificate of design / Warrant changes. The section of the footing on the drawing is at the threshold. The majority of the slab is inside and sat on EPS, and butted up to the EPS of the ICF block. I was thinking that (at the thresholds only) cutting the ICF to allow a layer of SLAB EPS to sail over the concrete core and touch the out EPS (thus stopping the cold bridge from the Concrete footing) ? -
ICF Foundation Details - Thresholds
Jenki replied to Jenki's topic in Insulated Concrete Formwork (ICF)
I have thought about this - was going to wait for the design to make that decision. Its not so much the timber cost. The design I was given added 3 Simpson Steel Strong walls (around £700 each), double layers of OSB to both gables and then insulation. I too prefer timber, but I do like the idea of this being concrete. Yes- both sides of membrane. The issue with the height is that the land falls to the SW, considerably over the last 3M, if I don't sink the E elevation the W elevation will be around 1 M above ground to FFL. I've already experienced some huge stones in the crushed rock we have had. 300mm EPS as you say is similar to 150mm PIR but as I have the depth to fill, this is the most economical way forward. Hopefully the slab, as it is ground supported wont need reinforcement - but might add steel fibres I agree - Visqueen between top and second layer of EPS (allowing for UFH to be stapled to top. EWI is 50mm plus the ICF block. this gives a U of 0.16. House will be clad, plinth to DPC level will be slate, tile, stone - not sure yet. The threshold detail is one of the main purposes of the post. -
First of a few posts, Having lived in the Highlands for a long time, (5 months and counting), We have had a re-think on the construction of our house. The decision is two fold, firstly the increased cost of stick build and insulation, plus the delivery costs, secondly the Weather. Its windy and I've never really experienced the issues with (constant) driving rain until now. If it rains its driving rain. ICF will be dearer, but not by much, and then with some tweaks to the design and the foundation, a simpler (thus cheaper) Air tightness detailing I'm not sure there is a lot in it. SO that's it, were going to build with ICF, and the decision is to use POLYSTEEL blocks, with EWI on the exterior. SO down to the Questions. My site is rock, the house plot is currently stripped of all top and sub soil down to the bedrock. The excavation results in depths of 350 - 500mm below the original ground, but this is sloping to the SW corner approx. 800mm drop to this corner. I will be breaking out some of this rock to reduce the slope. Once I've got this more level, the initial idea is to lay the radon barrier on the rock (sand blinding under the slab area) then shutter a 600mm trench strip for the concrete footing. The idea being that the radon barrier will not have any protrusions for services. 1, DPC - Poly steel says I don't need a DPC - ? Thoughts and comments please. The sketch shows the section. 600mm block sat on the strip foundation. If I opt for adding a DPC, then I'm introducing a moment in the footing and thus more reinforcement will be required. 2, The Visqueen would then be lapped up the wall, but not returned into the blocks? 3 How does my detailing of the thresholds look? - With Poly steel, the cavity is closed with 6*2 treated timber. I was thinking that as the doors need low thresholds the the door should be positioned on the external EPC of the block, and strapped back to the timber. Be Kind... 040123_Foundation.pdf
-
We have had a re-think on this, and have purchased two set of bunks - your comments confirmed our worries. so both will now have a double, a set of bunks and Sofa bed.👍
-
Airtightness was plastic vapour barrier on face of studs, tapped & sealed to the slab / ceiling. I tapped and sealed the PIR board as well. Ventilation was compromised by cost and Building control. - for the shower we just went for a standard extract fan and BC are still un decided if we need a big extractor for the Kitchenette. I've sent them the details of the Air to Air heating hoping that they will accept the de humidifying function. But obviously this is not extracting. Over spent on everything, opting for the Air to Air heating will allow for affordable year round use, paying for heat recovery ventilation fans was a bridge too far...
- 17 comments
-
- 1
-
-
- the windy roost
- camping cabins
- (and 1 more)
-
HI, If you search on here, you wont find many people endorsing rainwater harvesting. some have installed and wouldn't again etc... I was planning on rain water harvesting, but I'm leaning towards soakaway and spending the money on insulation. There is a blog on here (cant remember who possibly @Marvin) with a DIY version and good results. good luck..
-
Due to height constraints (planning) head height isn't great at the back wall. so two double beds, and the sofa is a sofa bed.
-
Since the last blog, a lot has happened in a relatively short time. The last blog was Stage 1 of the Amenity block, needing cladding and the roof, and as I'm sat here early in the morning , with the wind constantly blowing 20MPH, 2mm rain p/h. and a toasty 8 deg. inside the static, which is our home now - yey. The Cabins are complete. A lot of work and a move thrown in to the mix since the middle of August. The cabins are stick built on site, under the supervision of Building control, this means that the insulation and detailing falls within the small building regulations and thus U values are quite tight. The positive is that they will be relatively cheap to heat year round. The downside was we spent a lot more on insulation. The process was the same as the amenity block, the foundation slab was cast, and the floor insulation (120mm PIR) was sat on top of this and a radon barrier with floating chipboard on top. 6inch walls with glass wool insulation. Due to the extreme cost variations and difficulty getting hold of Frame therm 32, the walls were filled with a mixture of Frame therm 32 & 40, I managed to get some at £18/ roll in Bradford and dragged it up with me, collecting some over ordered frame therm40, from Stirling on the way (thanks Market place). The bottom line was that I needed to add 25mm PIR inside to get the 0.21U required. The Roof was 120mm fibre glass coated PIR, with Firestone rubber bonded direct. The original plans was to clad the pods in Black Metal, but after some thoughts through BH (Salt in the air etc, we changed to Scottish Larch. We had 300, 4.8M lengths delivered from Huntly area. Mandy spent around 2 weeks solid staining these both sides and edges black. she was amazing, this was not an easy task. I think I painted 3/4 of 1 plank before I was off doing something else. The Orange look would have been too harsh, so we decided to stain them , and hopefully as the Larch ages and the stain fades they will eventually take on the natural look of Larch. Another tweak to the design was to cut the corner off the bathroom. allowing for 2 double beds, thinking that as our customers will in the main be only staying for a day or two, the bed was more important than sitting areas. My biggest concern was heating and hot water. I've asked on here before, and was thinking of using a 300l UVC, but was never happy this would supply enough hot water for two cabins and up to 10 people. - so either the expense of a Heat pump or direct immersion. I had laid 20mm MDPE pipe x 2 to each cabin from the amenity block. for the H&C supply. We bit the bullet and decided to supply the hot water via 2 off Cointra CPA11 open flue caravan heaters (LPG), I was concerned if the temperature would be ok, especially as the water travels between 3 & 6M underground . This was compounded further, later on, as we started having problems with the same heater in out static. Low temperature HW and problems when the wind picked up over 15MPH. Too late to worry, money was spent and It was suck it and see. Fitting the Open Flue heaters in the Amenity block created another issue, so we have ended up with a little extension on the side of amenity block that houses the two heater, basically its like they are outside, but inside. I have insulated them, but I will have to add a small heater with PID control (Job to do) to ensure the water does not freeze inside the boilers. For the hot water I fed 10mm PB pipe inside the MDPE pipe and hope the flow rates and temperature would work.... (I thought about asking on here, but sometimes you have to bite the bullet and see) We have installed UPVC DG windows, and I created MDF reveal liners, this allowed for the plaster boards to be fitted flush to the liners, with face mouldings to finish. I taped and jointed the PB, but to be honest it was a pain, due to the number of butt joints, on a couple of occasions I nearly went and bought some Multi finish. In general were happy with the finish, but it has confirmed that this WONT be happening on the house build. Mandy wanted a feature wall (interior design is where I stop), and the en-suite seemed to be a good place for this. We had just enough Larch left over, so Mandy cut and ripped this down, sanded one face and painted in various contrasting (I think that is what she said) colours. I helped a little with the first row or two install, as it does have some 22.55deg bevels, then I was back to to the other cabin sanding and filling. Due to the success of the Air to Air HP in the static, we decided to install the same in the cabins, this way we know the heat all year round will work. As this was a little after thought - external cladding was complete, I had to be creative with the internal pipe run, I created a box / shelf which can be seen in the photos below, this now acts as a cup holder with some cup hooks. The Bathrooms were clad with shower wall cladding. a Boxed in WC allows for all the utilities to enter and also houses the Wireless access point, which is powered POE. from the amenity block. Once the bathrooms were fitted, it was time to see if the HW works. Its a resounding yes. we had -4deg (This is how I know I need to stop the boilers freezing). but once I'd managed to thaw the boiler out, we were getting 40Deg in the cabins. The showers are not power showers, but they work really well, better than an electric shower. and heat up time is around 35 - 40 sec. The boilers have worked in 30MPH winds, so the issues with our static are just that and I'm still exploring the why. As we stand today 1 cabin is ready to let, and we are waiting delivery of 2 beds for the other cabin. 200m of livestock fencing in the new year will see this side of the project complete.
- 17 comments
-
- 3
-
-

-
- the windy roost
- camping cabins
- (and 1 more)
-
Self build mobile home with high efficiency ASHP questions
Jenki replied to Tricky's topic in Introduce Yourself
+1. I've built 2 cabins in Scotland, the walls needed 140mm frame therm and 25mm PIR to comply. -
Raised Tie Trusses - Insulation + Airtightness
Jenki replied to BadgerBadger's topic in Heat Insulation
On my planned build I was thinking similar, but I see massive issues with getting this airtight ( planned camber truss and a few attic truss for storage) I'm now leaning to moving to standard truss and cold roof. The MVHR ducts will be below the insulation, and I was thinking of adding a 75mm service void at the ceiling to run pipes/ cables minimising the penetrations to the cold loft and airtight membrane. -
If you do the floor, why not consider a floating timber floor, more insulation no concrete so a little cleaner. You will need to ensure the base is flat. But 150mm of PIR (OR 200MM EPS) would have a great impact. You could still add UFH.
-
WC connections are usually 180mm on centre. I think all is ok. and if your paying a plumber, its his issue anyway?
-
Anyone fitted a pre-charged aircon unit?
Jenki replied to Jeremy Harris's topic in Air Source Heat Pumps (ASHP)
I fitted 3 of these now well this 1 and 2 others.