saveasteading
-
Posts
10644 -
Joined
-
Last visited
-
Days Won
90
Everything posted by saveasteading
-
Which I do appreciate will be good in the traditional hot week in August, especially where we plan to have metal cladding instead of slates. If I was to mention decrement do you think the BCO will understand? We have bought samples of PIR and Knauf batt and tried them for practicality. both ok, and will maybe get a bit of Frametherm to try too. I'm a bit confused as I think I have seen some of your photos showing PIR. What is the construction here? frametherm tight up to osb? You will have a VB above the osb, which we won't., as the rafters, sarking and slates are already there.
-
Ok, so it didn't take much persuasion to get me to reconsider mineral wool instead of PIR. My original plan was to use cavity wall batts, especially as they are waterproof, would completely fill the gaps between rafters and would be easy to cut and fit. Against it? not such a good U value, although it doesn't shrink. wastage will be bad with cutting to fit 390-410mm gaps. Also a lot of batts have developed form dense to rather loose, and almost like loft insulation, and I somewhat doubt the performance. (No names but I have found that the cheapest fibreglass needs a lot of puffing to get to theoretical thickness, and just doesn't look 'right'. Considering filling between rafters in the existing roof, with sarking boards 200 wide and penny gaps, slates above but no vapour barrier.........does this really need an air gap? My logic is that any drips getting in the gap will as easily evaporate again, whether running down a 25mm space or sitting on the tightly placed surface.
-
Good point. No they will have to stay politely outside, which is selfish I know. but we can put boxes up either on walls or on trees. Bat nests are just made of ends of scaffold plank and some batten. Cost nil if from offcuts, and half an hour to make?
-
I'm good on rodents! Had buildings approved 'as built' by Mars , M and S, Waitrose among others. It was interesting observing their inspections as they headed straight for where they expected to find gaps....and were surprised to find it was dealt with. 6mm for a mouse I think, but insects can be much smaller of course. Once in mice, rats and wasps will chew away PIR if necessary to make a nest. On site so far we have also seen a slow worm, so we will create piles of recovered stones and timber for refuges. There is already a midge dormitory, so we need to encourage swallows and bats, and will.
-
ouch. can we even fit it without 1mm gaps?
-
Dry is good. I have a philosophy that nobody wants a building: they just want to keep the weather out. That doesn't apply to bankers, dictators and trillionaires who want us to notice their building, using OPM. If I was you I would be showing off your project at any opportunity. Beautiful re the ventilation. Some people say that the walls are porous and no further ventilation is necessary or desirable. Yet it seems that BCO's ask for vents at 1m cc near the base. I don't think we have a issue as there will be no rising damp and the wall is either porous (both ways) or not. I see a strategy statement coming on. Cpd, did you apply an impervious membrane to the inside, bottom of the walls? I think this is sensible but it does not seem to be standard.
-
A couple of probing questions if you don't mind. I relish the challenge. 1. How do you plan to install the breather membrane while maintaining the ventilation cavity? Yes, I fell asleep thinking of a solution to this one. Easy to draw. Has to be done so there will be a solution.. Either: wrap the membrane round the back of a set of a few studs and staple on. then staple on the face of the last and continue. Theoretically a gap where the 2 faces touch, but de minimus. OR after that, warap another piece round the stud to lap both; OR , build as a cassette on the ground and do the same OR some better idea, that some genius is about to come up with. 2. How do you maintain that PIR is twice as good as mineral wool? I get a U value of 0.304 for PIR and 0.398 for full fill rockwool (lambda = 0.035w/mk) with 100x45 studs @400cc. PIR 0.022 or thereabouts , Mineral batts 0.34 or thereabouts (have not checked). OK then not twice and you are starting to sway me. 3. How do you plan to deal with the shrinkage and expansion of the studs with varying humidity and temperature? Won't the boards loosen and you'll get thermal looping? All buildings move. The studs will prob move less than the rest of the building. Character anyway. They are wrapped in membrane. My understanding of thermal looping is that it needs a route, and a sizeable gap. for example, double glazing has a small gap and it isn't an issue, but secondary glazing has a big gap and there is circulation. Legend has it that PIR off gasses and degrades in R value over time as well as shrinking like most other foams. I've been searching for over an hour to find a non biased long term study on this but can't. The below is a screen shot of one manufacturers declaration of dimensional stability. 4. Maybe someone more qualified can explain what this means. There is some anecdotal whisperings of this. http://www.greenbuildingforum.co.uk/newforum/comments.php?DiscussionID=16490 I have not heard of this before, and would have expected to. However I have an instinctive trust of mineral wool....unless it gets wet. I suspect any such issue will be related to atmospheric change (esp heat) . This will be in the dark behind a very thick wall. I don't trust PIR, never did even before recent disasters. Several years ago I tried some in a brazier to see what happens.....burns, but needs a lot of heat to start it. When grenfell was first on tele i said to my wife I could see what the problem was, and was correct. Also , years a ago, spoke to fire fighters and fire engineers......they said they don't like to be near to PIR filled composite, but can't say that publicly. So show me some better figures for mineral wool please.....it was always my wish but it needs too much thickness. Thankyou for the opportunity. any more questions please? By creating a clear ventilated cavity you'll completely negate any insulative benefits of the current stone+ rubble wall.
-
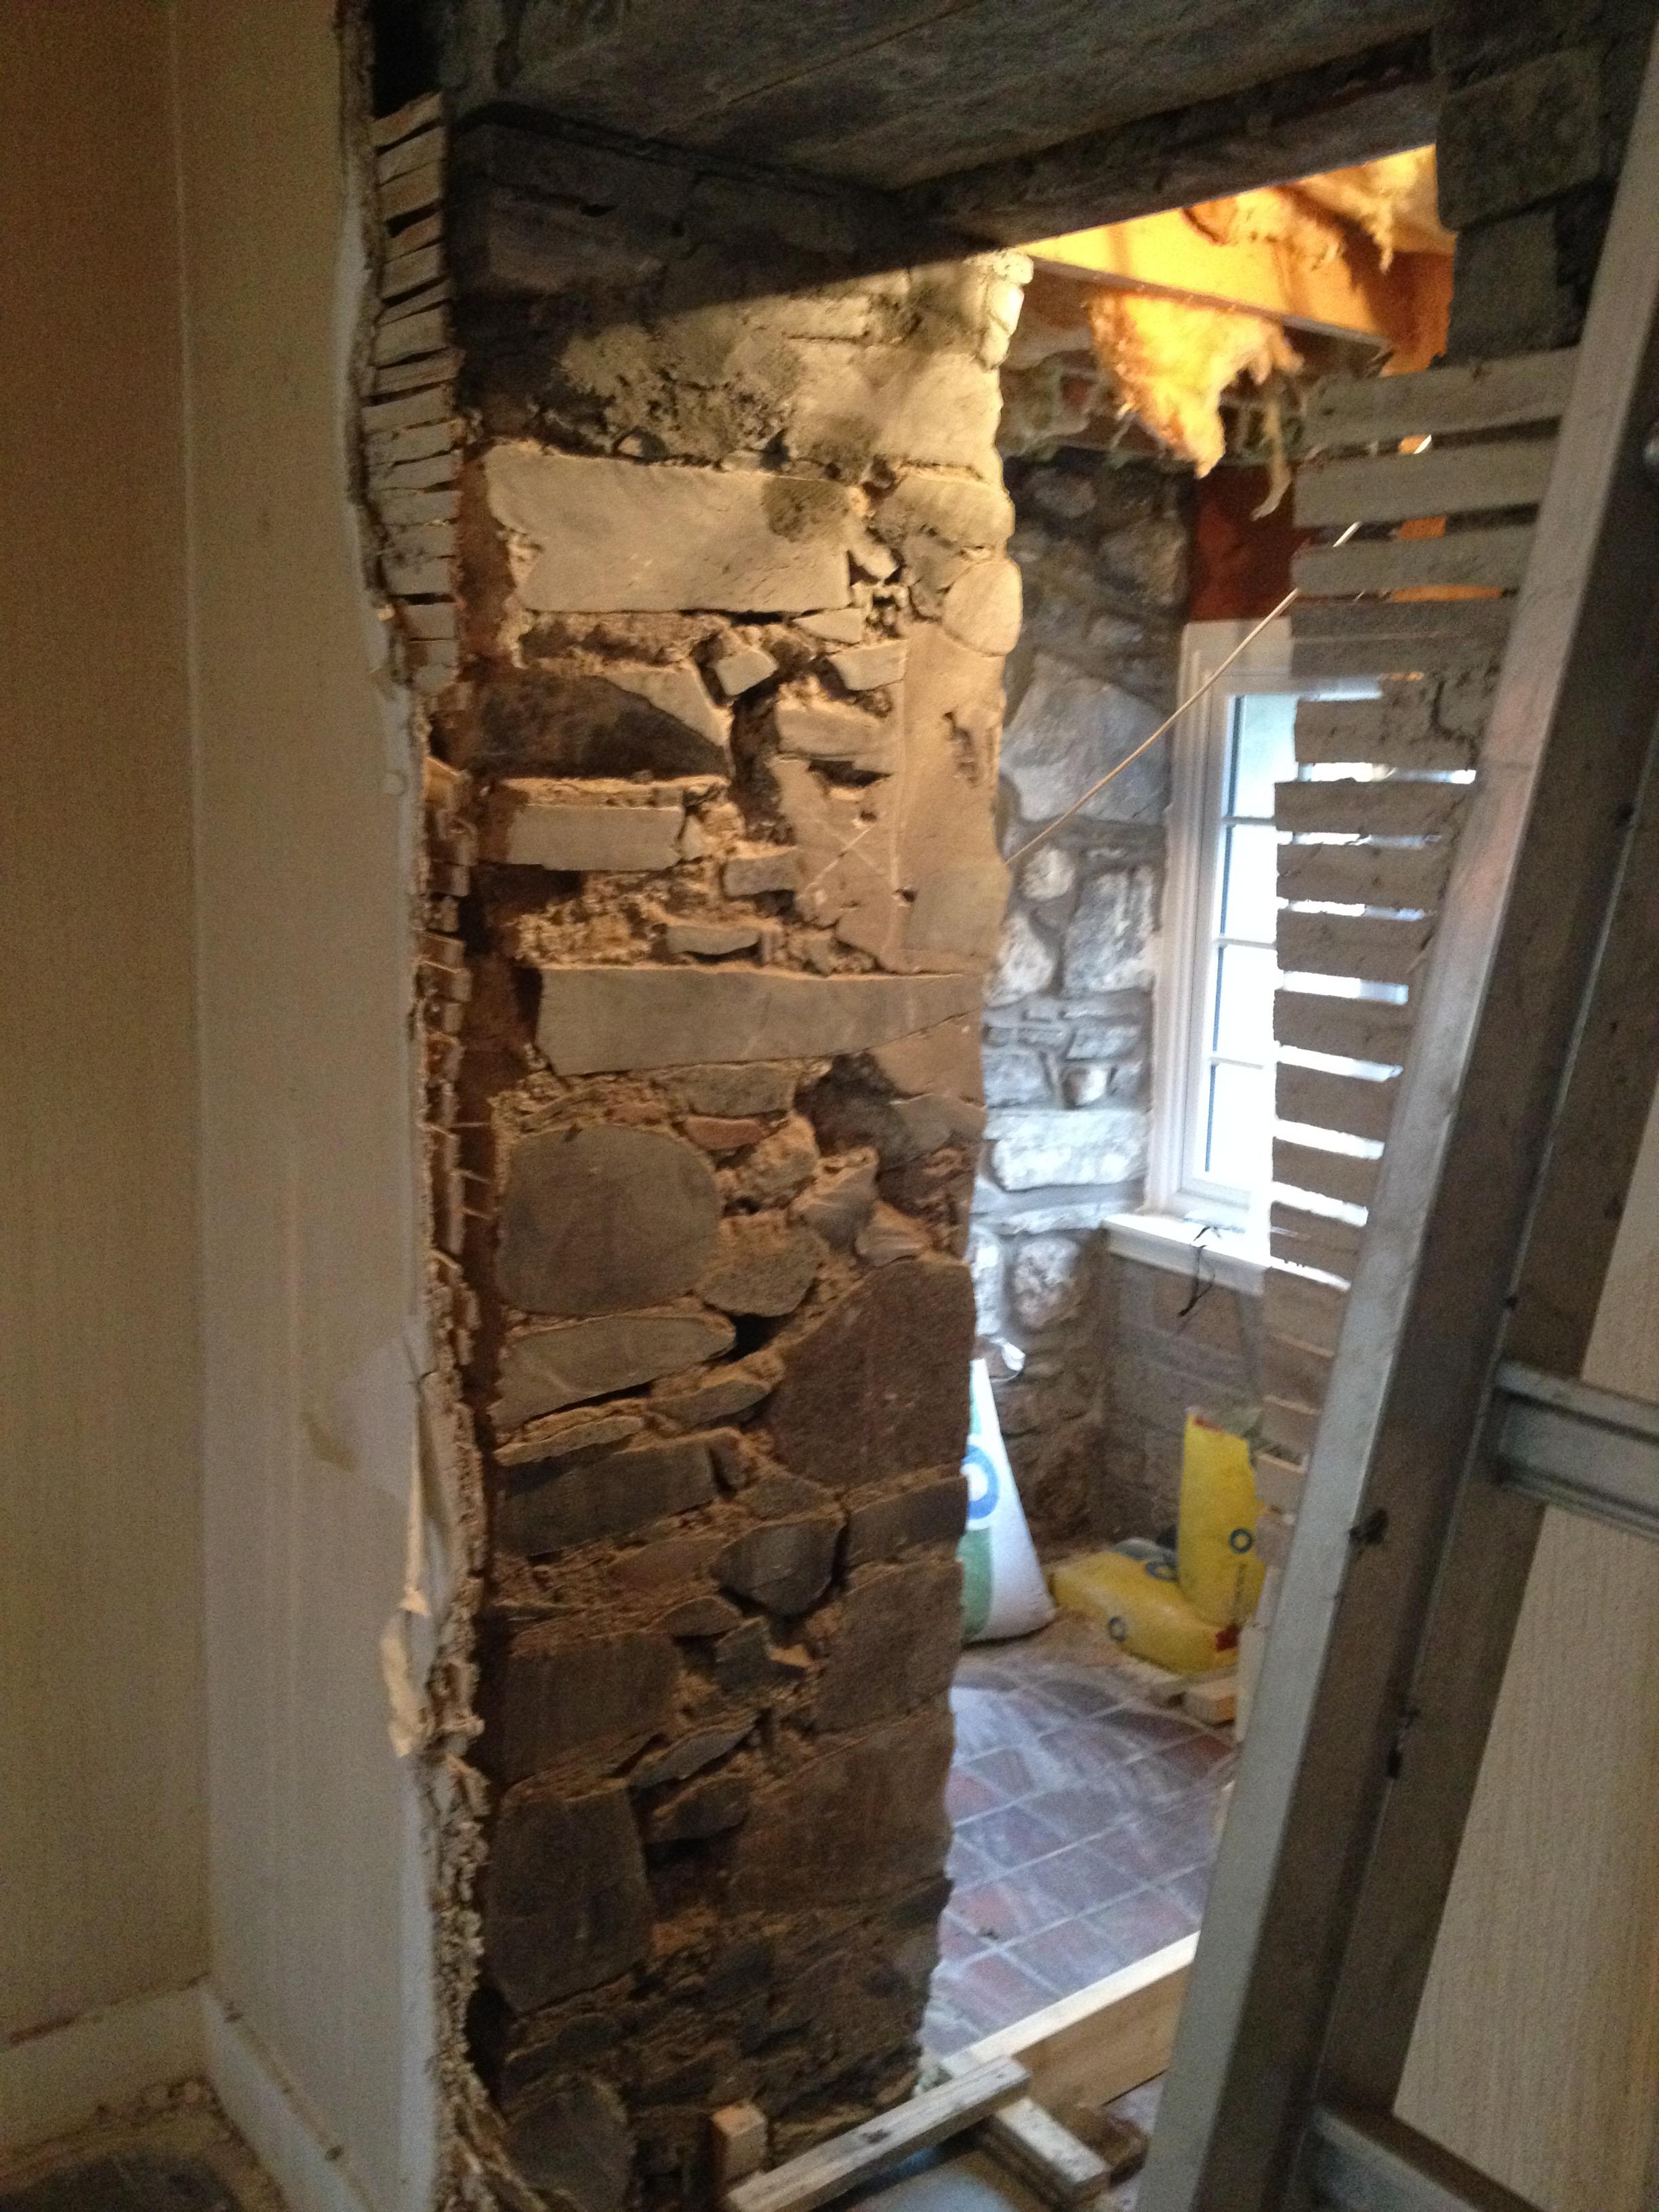
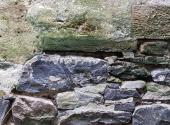
There are 3 layers. Outside is solid stone, mostly granite. ashlar at features and roughly flattened faces elsewhere. At openings it is ashlar to all faces, and usually sandstone. Inner is granite , smaller stones but still about 300 x 300 In the middle is rubble, and by all accounts it is normally 40% mortar. From what I have been pointed to and read, the mortar being in the middle contributes to the decent U values, and the outer stone keeps the wall pretty dry. this photo is not it, but was in someone's website and is a decent example and a literal cross-section. .

-
tis. them twice better dan mineral wool. Twice the price too and not nice to work with but we only have 4.5m between the walls, so don't want to lose another 200mm. Vapour and moisture layers encapsulating it within timber studs, effectively a cassette, so we don't expect any issues apart from, grumpy installers.
-
This will take some time to digest. Worthy of note everyone interested in big buildings (over about 13m width) is page 35....the insulation suppliers used to publish this but now don't....hence insulation is often over-specified. This is for any ground, so will be better on dry granular.
-
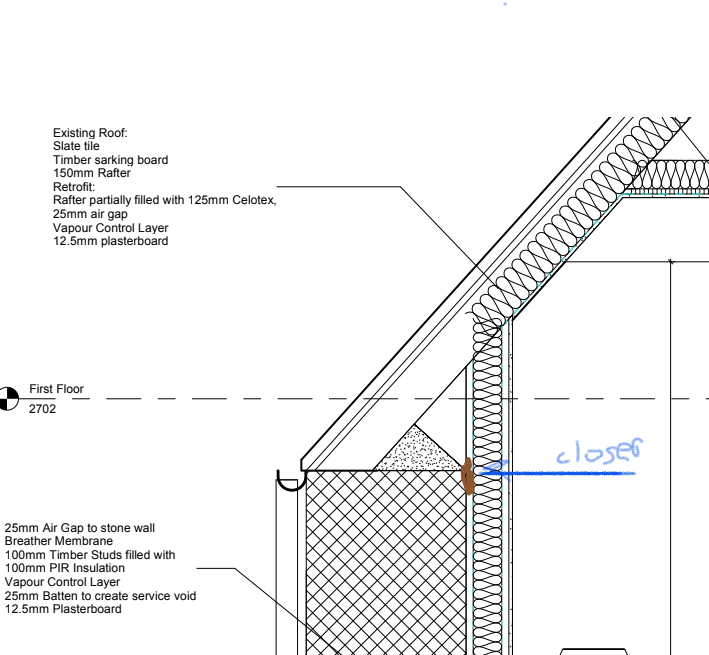
Hearts and trophies to be distributed later this evening. Good work so far team. This is the draft drawing, some changes to make, eg increase service void to 50mm. As a solution to ProDave point above, I think we add the closer filler at the top of each wall, and also vertical the same at about 8m cc. This can be a strip of rockwool bat compressed in the 25mm gap. Then the wall can breathe but not create a flow as such.
-
Traditionally these walls were rendered so that the rain ran off. Without the render they look very pretty.......of course we are going for pretty. But with good new pointing most of the rain will run away. I am not trying to fiddle any numbers, but am hoping for a bit more certainty in the future performance, tweaking of any details to improve the performance, and to submit a proposal that BCO will accept without any further justification.
-
file:///C:/Users/Jenny/Desktop/Lower%20Remore/hstp102011-u-values-and-traditional-buildings.pdf 2.4 W/m2 K for 70% stone / 30% mortar compared to 1.5 W/m2 K for a dry wall. sandstones: the average values are 1.9 W/mK for dry material and 3.0 W/mK for wet sandstone.
-
we are on very good draining sand: at least 10m of it. Once there is a complete roof and a drainage system it will dry out dramatically. I think that the footing stones are solid stone, 600-800 wide, with core rubble/mortar starting at ground level, so that will reduce rising damp up the core too. So I am optimistic that the walls will be quite dry in the longer term.
-
This is a very good point. Shows non-joined up thinking in the regs. Some posts have shown that BCO requires vents to outside to increase the draught! The Historic Buildings guide says both that the insulation value of stone is much better than thought AND to put vents in if lining. Idea, for support or shooting down: We detail it without the link to the the roof ventilation gap, ie physically closed at the top of the wall. There will still be a draught but much reduced without the chimney effect. Also if the areas are defined, as partly by fire barriers anyway, this will keep all planes individual and so little draught from wind, just natural movement.
-
I am playing around with the U values before finalising the construction details for internal lining and insulation, inside a 600mm granite wall. Thanks to those who have provided info previously on this: the reality of solid walls. I thought I would check out once last time for any official view on actual U value of thick walls, as it may help with the presentation for warrant application. Some people on here say solid stone walls offer little benefit, others that it is undervalued. (Another document suggests that both may be right depending on circumstances) Therefore I now share this. I came across it in the official Scottish documents (for SAP rating) and based on in-situ testing. My red underscoring for our own situation.

-

£70,000 in grants for a heat pump.....
saveasteading replied to MAB's topic in Other Heating Systems
Lots of naysayers will jump on these stories for reasons I don't really understand. I think others on BH have pointed out that the grant value often disappears in the extra costs of an 'approved installer' who has more costs than the local specialist. ie the grant does not benefit the end user. I know of many failures of ground source systems, and it was down to being inappropriate and badly installed. What chance that this 'story' could be resolved by some expert attention? -
I use may own charcoal. I don't believe for a moment that the cheap commercial charcoal in bags comes form sustainable sources. Anyway if it is from 'abroad' then it has travelled a long way. Start the barbecue with any old bits of stick from the garden with some hardwood cuttings (fruit tree prunings) on as the next layer, along with 'harvested home-made charcoal. At this flamy stage put food on in frying pans/planchas to make use of the heat. As the fire becomes glowing and controllable, it can be used as a conventional bbq grill. Meanwhile, all around the fire is lined with oak logs, which burn smokily along with the starter fire and then char for the next time. After cooking, extinguish the fire asap. The amount of water shows just how much heat and fuel is still in there. Next day set aside the recognisable charred logs and charcoal for the next time. Then collect all the ash in a bucket and hose and stir. 5% ash at the bottom, and 95% reclaimed charcoal (very fine) floating above it. The oak is local and it takes 3 logs per session. No parrots died.
-
As I have said before, I don't like expanding foam. It is not controllable, goes where you don't want it and not where you do. Also somewhat irreversible. I would leave the plastic bag where it is, perhaps adjusting the position, to act as a stop. Then fill the end of the pipe with concrete or mortar, perhaps in 2 stages. Let it harden and shrink then paint on a coat of bitumen paint. OR wrap a bag around the outside of the pipe with a tie around it, and fill the hole with weak concrete/mortar. Close off the other end when the time comes too, in case the pipe becomes a home for creeping things, or there is some other pipe connection in the run
-
asbestos Asbestos Exposure
saveasteading replied to Gary33's topic in General Self Build & DIY Discussion
No problem, here it is. https://www.hse.gov.uk/pubns/guidance/a23.pdf Please note that this comes under the heading of non-licensed work. ie it can be done by anyone and obviously is not seen as high risk. Of course they are wearing masks in the pictures. Why wouldn't you, if you knew? Now please stop worrying yourself about what you have already completed. btw a test kit is not a test kit. It is a mask and a bag for putting a sample in, and you have done all that stuff. -
Have seen it happen...lucky I arrived to save the day. The usual problem of too much water in the mix. It pushed down again. sealing the joints or polythene over is such a good and simple thing.
-
It is a logical process so it doesn't need specialist knowledge in most cases. When it does become specialist you are unlikely to get permission. Following the template is expected and easier for the checking authorities, so no points off for following the pattern.....it is sequential after all.
-
Not good news when that happens! A lot of floating insulation carrying up any reinforcement and also pipes if you have UFH.
-
asbestos Asbestos Exposure
saveasteading replied to Gary33's topic in General Self Build & DIY Discussion
I should have added. If you google the subject you find mostly contractors and consultants looking for the work, so they say it is dangerous and to call them in. Hence the HSE document is best. Although the risk is low, and you are allowed to remove them yourself, (not required to be a licensed specialist) you should follow protocols. They are all in the leaflet from hse. For now, if you have already removed some, they should be in plastic bags. the tiles will cut through a normal bag so either use rubble bags, or put the bag into another, with carboard round it to stop it cutting through. if opening the bag, wet it so that there is no dust. When you have made sure it is in 2 layers of plastic bag, your local authority will take it and dispose of it safely. Normally you phone them and they take it from you at an agreed transfer station. no charge, as they don't want it fly-tipped or binned. It gets taken to a special tip and buried and capped for ever. Check out you local authority website for this. Dust. It has been removed already, I'm sure. If you were to come across any pockets in the future: dampen it and brush it up, just in case, but it will probably just be house dust. -
Expanding foam rant...
saveasteading replied to Carrerahill's topic in General Self Build & DIY Discussion
Expanding foam should only be available from specialist suppliers and with a certificate from an Engineer or Architect. Too easy for a builder to squeeze it in wherever something isn't working out....might hold the building together for a while, and meanwhile expand at random and create other problems. So many issues with it over the years.