Cambs
-
Posts
111 -
Joined
-
Last visited
-
Days Won
2
Everything posted by Cambs
-
I used this to fix foil backed insulation to blockwork. It's good stuff and does go off quite quickly. I think it said on the back of the tin that it'll do 5 or 6 sheets of plasterboard, so about £2.50 a board. https://www.screwfix.com/p/dow-insta-stik-expanding-foam-grab-adhesive-gun-grade-750ml/72793
-
A variation on the floor glue/screw conundrum.
Cambs replied to epsilonGreedy's topic in Floor Structures
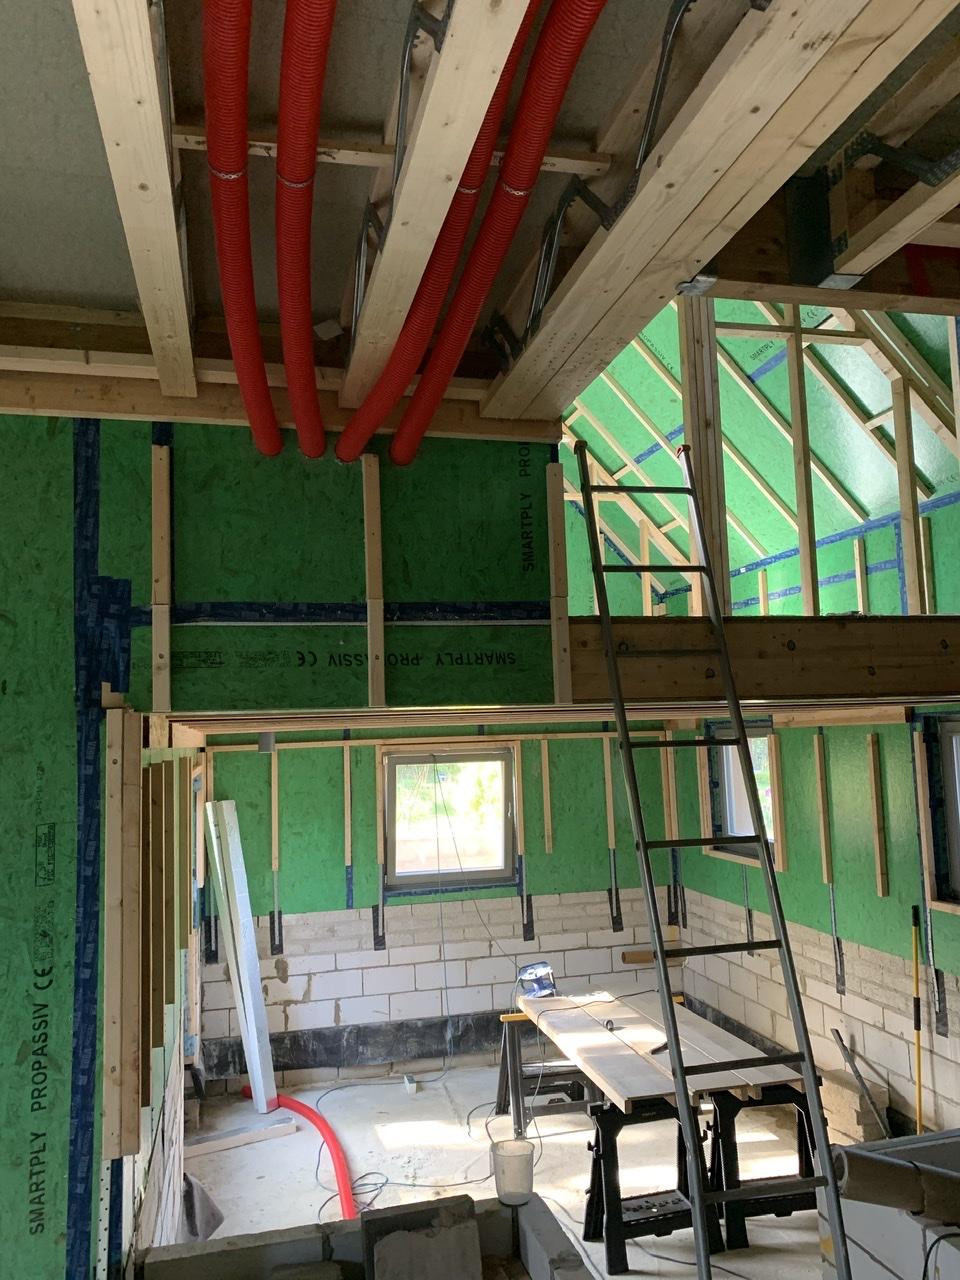
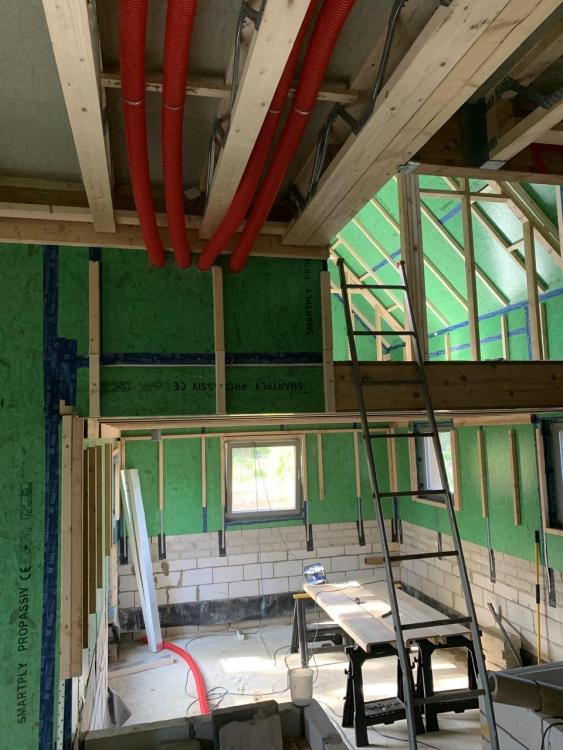
One of my next jobs is to get an airtight seal on the block walls shown in the picture below. I’ll be doing a parge coat using Gyproc Soundcoat Plus at about £7 - £8 a 25kg bag (assuming I can find it somewhere, at the moment) which will cover 5m2 at 6mm thick. It’ll be behind plasterboard, so my dodgy plastering skills will be well hidden! I looked at Blowerproof and PassivePurple but at about £10/m2 it’s too expensive for large areas.
-
I will be fitting a length of flexible ducting. That’s why the 150mm pvc pipe shown in the pics is currently running at an angle because I haven’t installed the piece of flexible ducting between the end of the pipe and the MVHR spigot. I need to avoid it being crushed so the plan is, on the final fix, to hang the incoming PVC pipe from the timber frame to stop it crushing the flexible ducting. That’s a good reminder about rubber mounts. I seem to recall that you used bushings from a Mini or something similar?
-
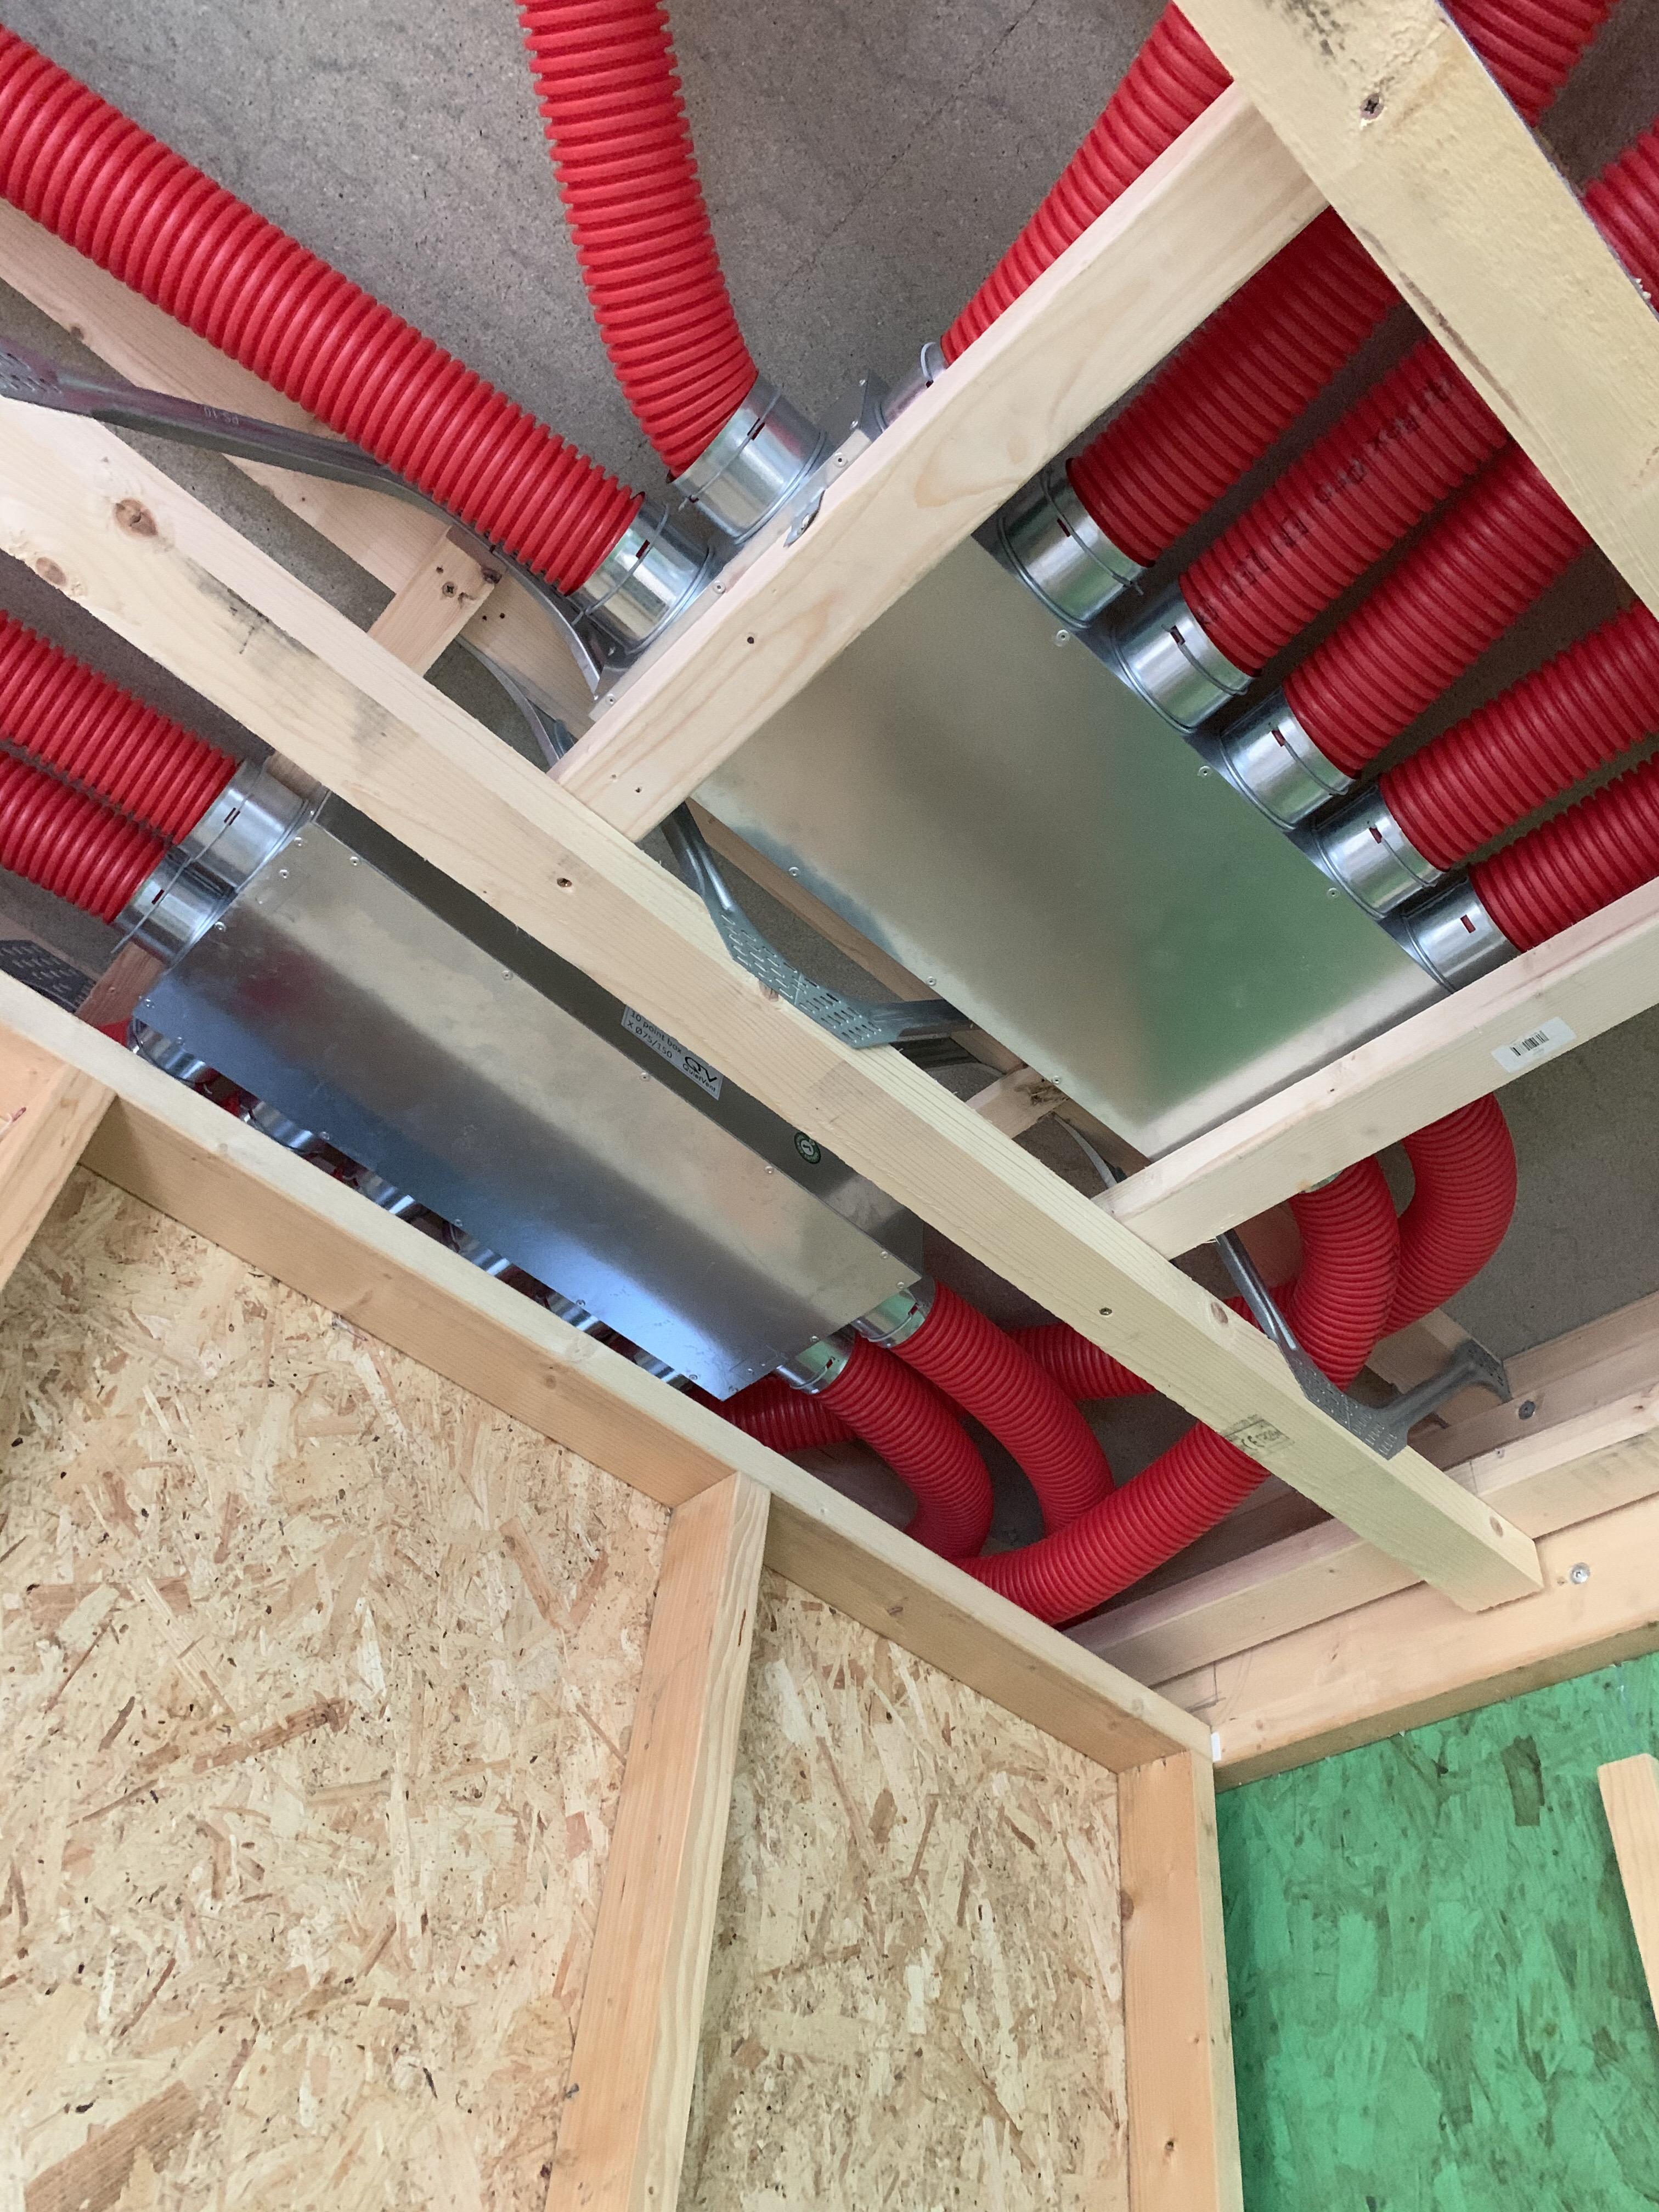
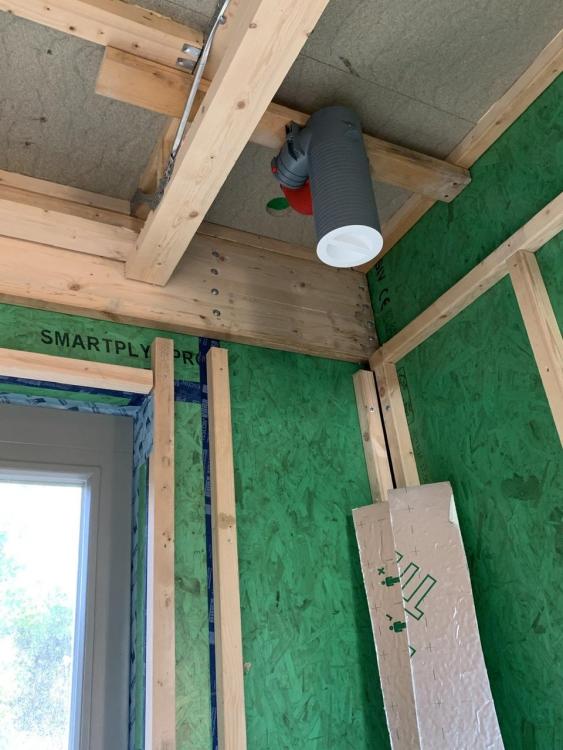
Thanks for that. The plenum is a tight fit for wall mounting. I took a length of 89mm deep timber to use as a noggin and had to cut a little notch out of it at the front to seat the little lug on the plenum in to. Drilling through the 89mm stud was ok. It’s all nailed down to the floor anyway. The posi-joists are 253mm deep.
-
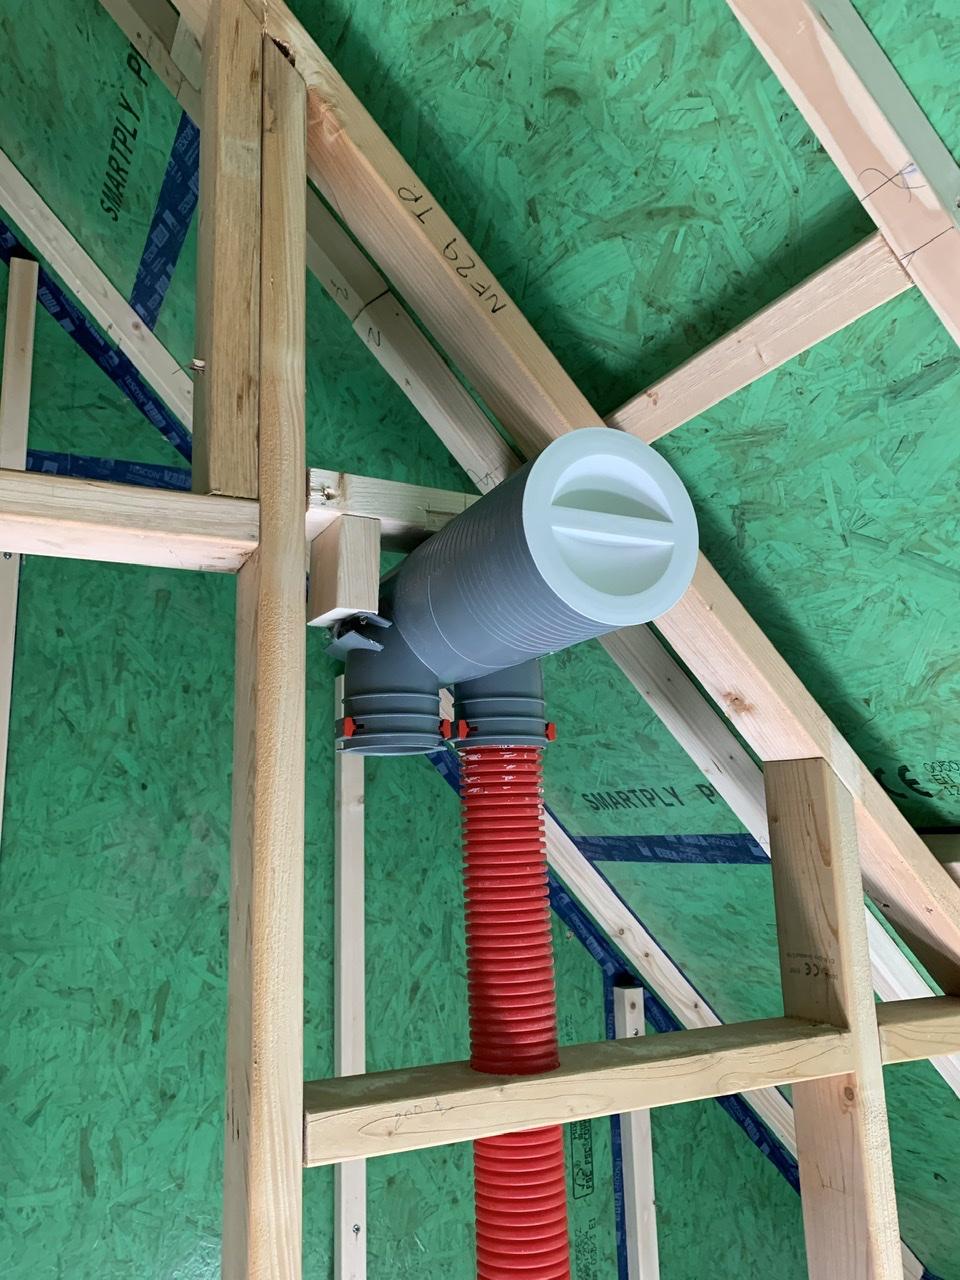
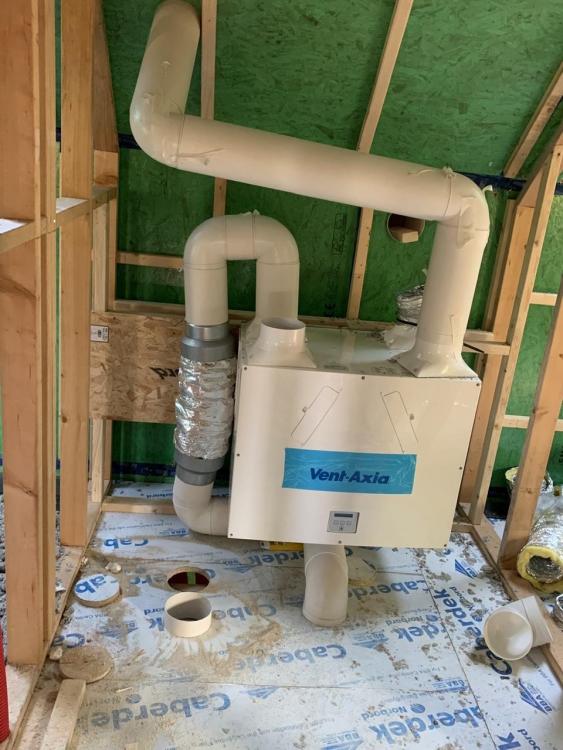
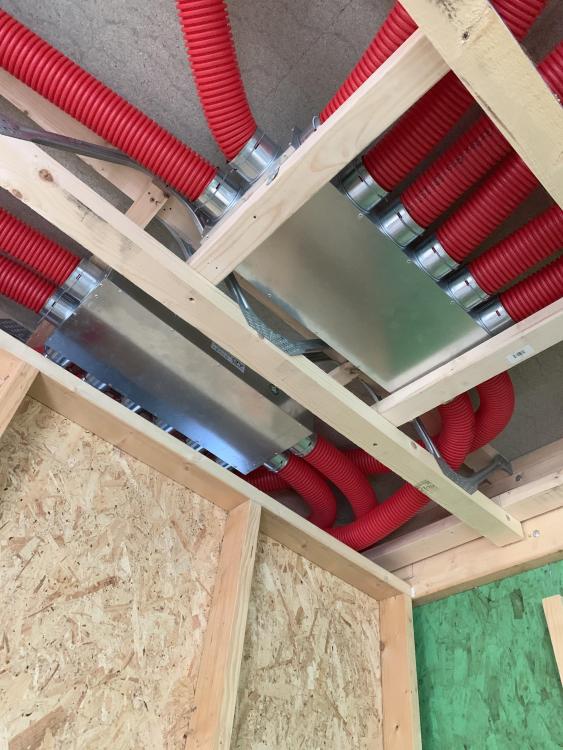
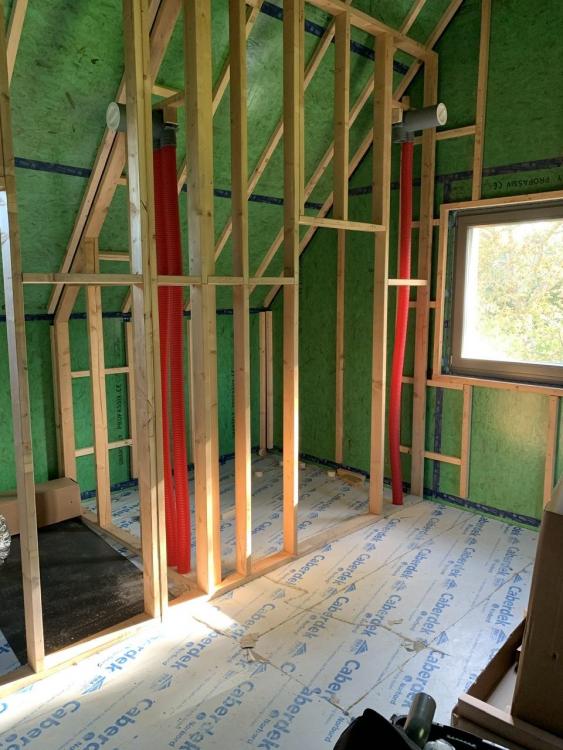
I’ve just spent most of last week installing the distribution boxes, ducting and plenums on my BPC/Vent Axia system. I thought it would be worthwhile sharing some pictures, It went well and was relatively easy to do. I tried to keep ducting passing over each other in the joists to a minimum but it was unavoidable in some places. Having two ducts on top of each other in a web joist was a bit tight and didn’t leave a lot of room for insulation. I had already installed the 150mm PVC pipe through the roof and drilled a 150mm hole for the second PVC pipe through the wall. I then mounted the Vent Axia unit on the wall and figured out where to mount the distribution boxes in the metal web joists between the ground and first floors. We have vaulted ceilings upstairs so it seemed easiest to mount the boxes here rather than up high in the first floor. Here’s my rough in of the MVHR unit. Ignore the angles of the pipes. These will be straightened up on the final fix. Here are the distribution boxes. Required careful planning and it didn’t seem to matter where they were because of the metal web joists there was always at least one duct which was a tight squeeze through the joists. I have a change in levels between the main part of the house and the lower level which causes a bit of head scratching as to how the get the ducts from one section to another. This was exacerbated by the fact that there was a steel running across the lower level which I had to navigate around. I built a dummy stud wall in the lower level and ran the ducts behind this. I need to get 3 extract and 2 supply ducts into the lower level. Here’s a photo after the first 4 ducts were run. A bit of boxing in required to hide them, but relatively easy solution. and here’s what it looks like in the lower level. And finally, a ceiling mounted and wall mounted plenum. I quite enjoyed doing it and it was satisfying to see it all done.


-
I’ve just finished the first fix of the radial ducting on my BPC supplied system. We have vaulted ceilings on the first floor of a one and a half storey build so easier to wall mount them. One thing to watch out for was the depth of the plenum. We have 89mm deep studs and they fit exactly in the stud depth. I had to cut a little notch in the top stud to recess a little tab in the plenum to keep within the 89mm depth. Here’s a couple of pics.

-
Some questions on MVHR installation
Cambs replied to bluebirdnick's topic in Mechanical Ventilation with Heat Recovery (MVHR)
I’ve spent the last few days fitting my Vent Axia MVHR with the semi rigid ducting, supplied by BPC. I had the design done by them but it needed to be tweaked when I was doing the install, so it wasn’t perfect by any means. I suspect that what they mean by the “rubber connectors” mentioned are the things that are used to make the final connection between the rigid pvc pipe coming in from / going out to the outside of the building to the spigots on the MVHR unit. I think they are specified to reduce vibration. They supplied me with flex ducting instead to cut a small piece to make that final connection. It has to be kept uncompressed so, I’ll have to support the vertical pvc pipes which drop down in to it. Have a look at Page 7 of the install guide to see the rubber connectors to the spigot. https://www.bpcventilation.com/mvhr-installation-guide They supplied me with the necessary 90 degree bends and connectors that fitted with their design, so you will definitely need to include them in the parts list. I’ve got the semi rigid attenuators and they do give you a bit of flexibility in fitting which I found useful -
Total MVHR cost/quotes
Cambs replied to gc100's topic in Mechanical Ventilation with Heat Recovery (MVHR)
Bought all my kit from BPC last October. Vent Axia unit + all ducting, plenum etc. for about £2600 for self install which I’ll be doing in the next month or so. Extract from 3 bathrooms, WC, utility and kitchen. Supply to study, hall, dining, living and 3 bedrooms. About 170 sq. m over two storeys. They did the design, cost then was £100, deducted from the order. They’re still working during the lockdown, so might be worth a call. -
I took delivery of these yesterday - tempted by the £50 off (valid to 9th February) https://www.amazon.co.uk/Security-eufyCam-Wireless-Weatherproof-Compatible/dp/B07W4MY7HL/ref=sr_1_3?crid=XK41J3NB2EXU&keywords=eufycam+2c&qid=1580983683&sprefix=eufy+cam%2Caps%2C137&sr=8-3 I wanted something portable that I could move around as we move into the new house. These seemed to fit the bill although a bit of an impulse buy. There is on board storage in the hub so no need for a cloud or subscription if you don't want to, they are Homekit compatible and I read somewhere that they will be upgraded to HomeKit Secure Video in future. Easy to set up, easy to use App. I think the issue may well be battery life - this model (2C) promises 180 days before you have to take them down and recharge them but I'll believe that when I see it. The Eufy 2 promises 365 days of battery life but I didn't want to pay £150 more for them.
-
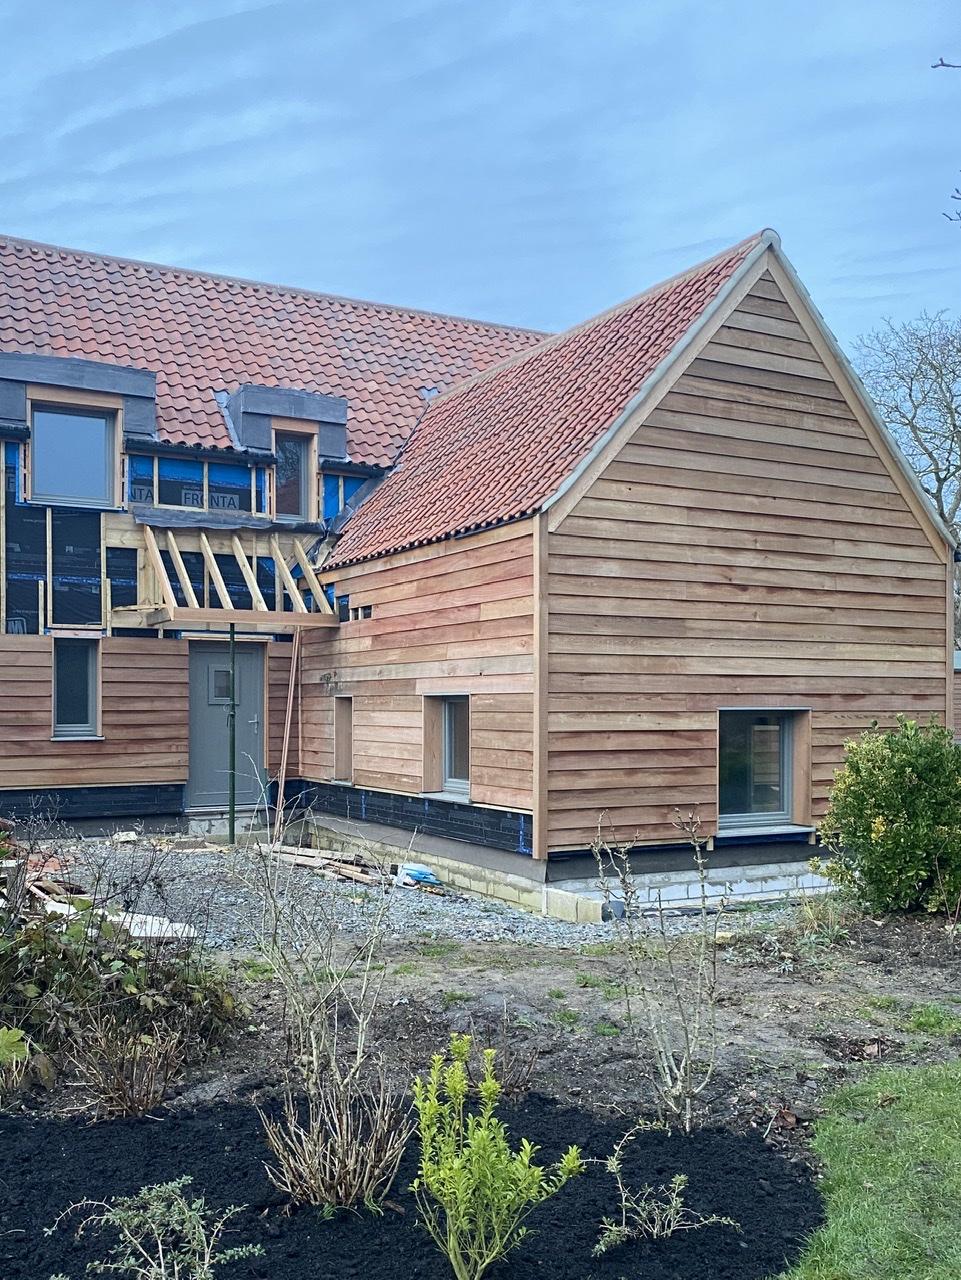
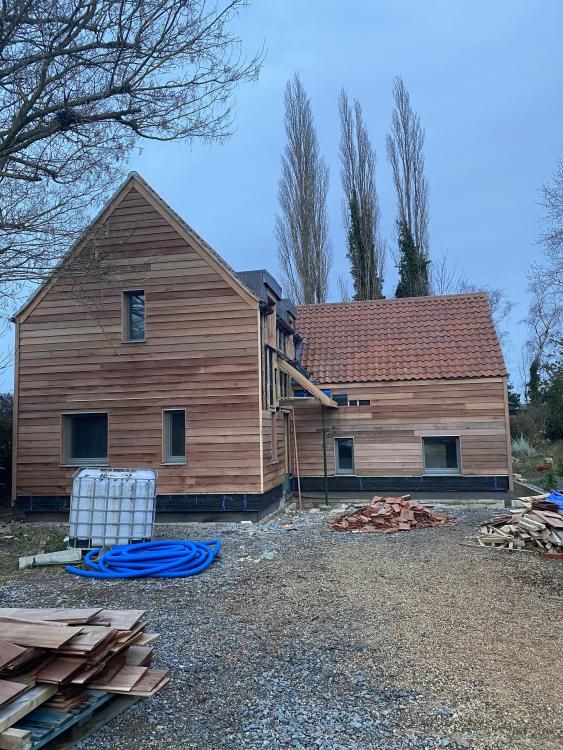
I was required to fire protect my WRC cladding. Had the same problem trying to find a suitable product. I was doing the whole house - didn't need to do it all but there was so much of it close to boundaries that I thought I'd do the lot. I used this, applied in their mill by the timber supplier: http://fireretardantuk.com/shop/hr-prof-holz-prof-wood-fire-protector/ The cladding has been up now for a couple of months and here's what it looks like at the moment:
-
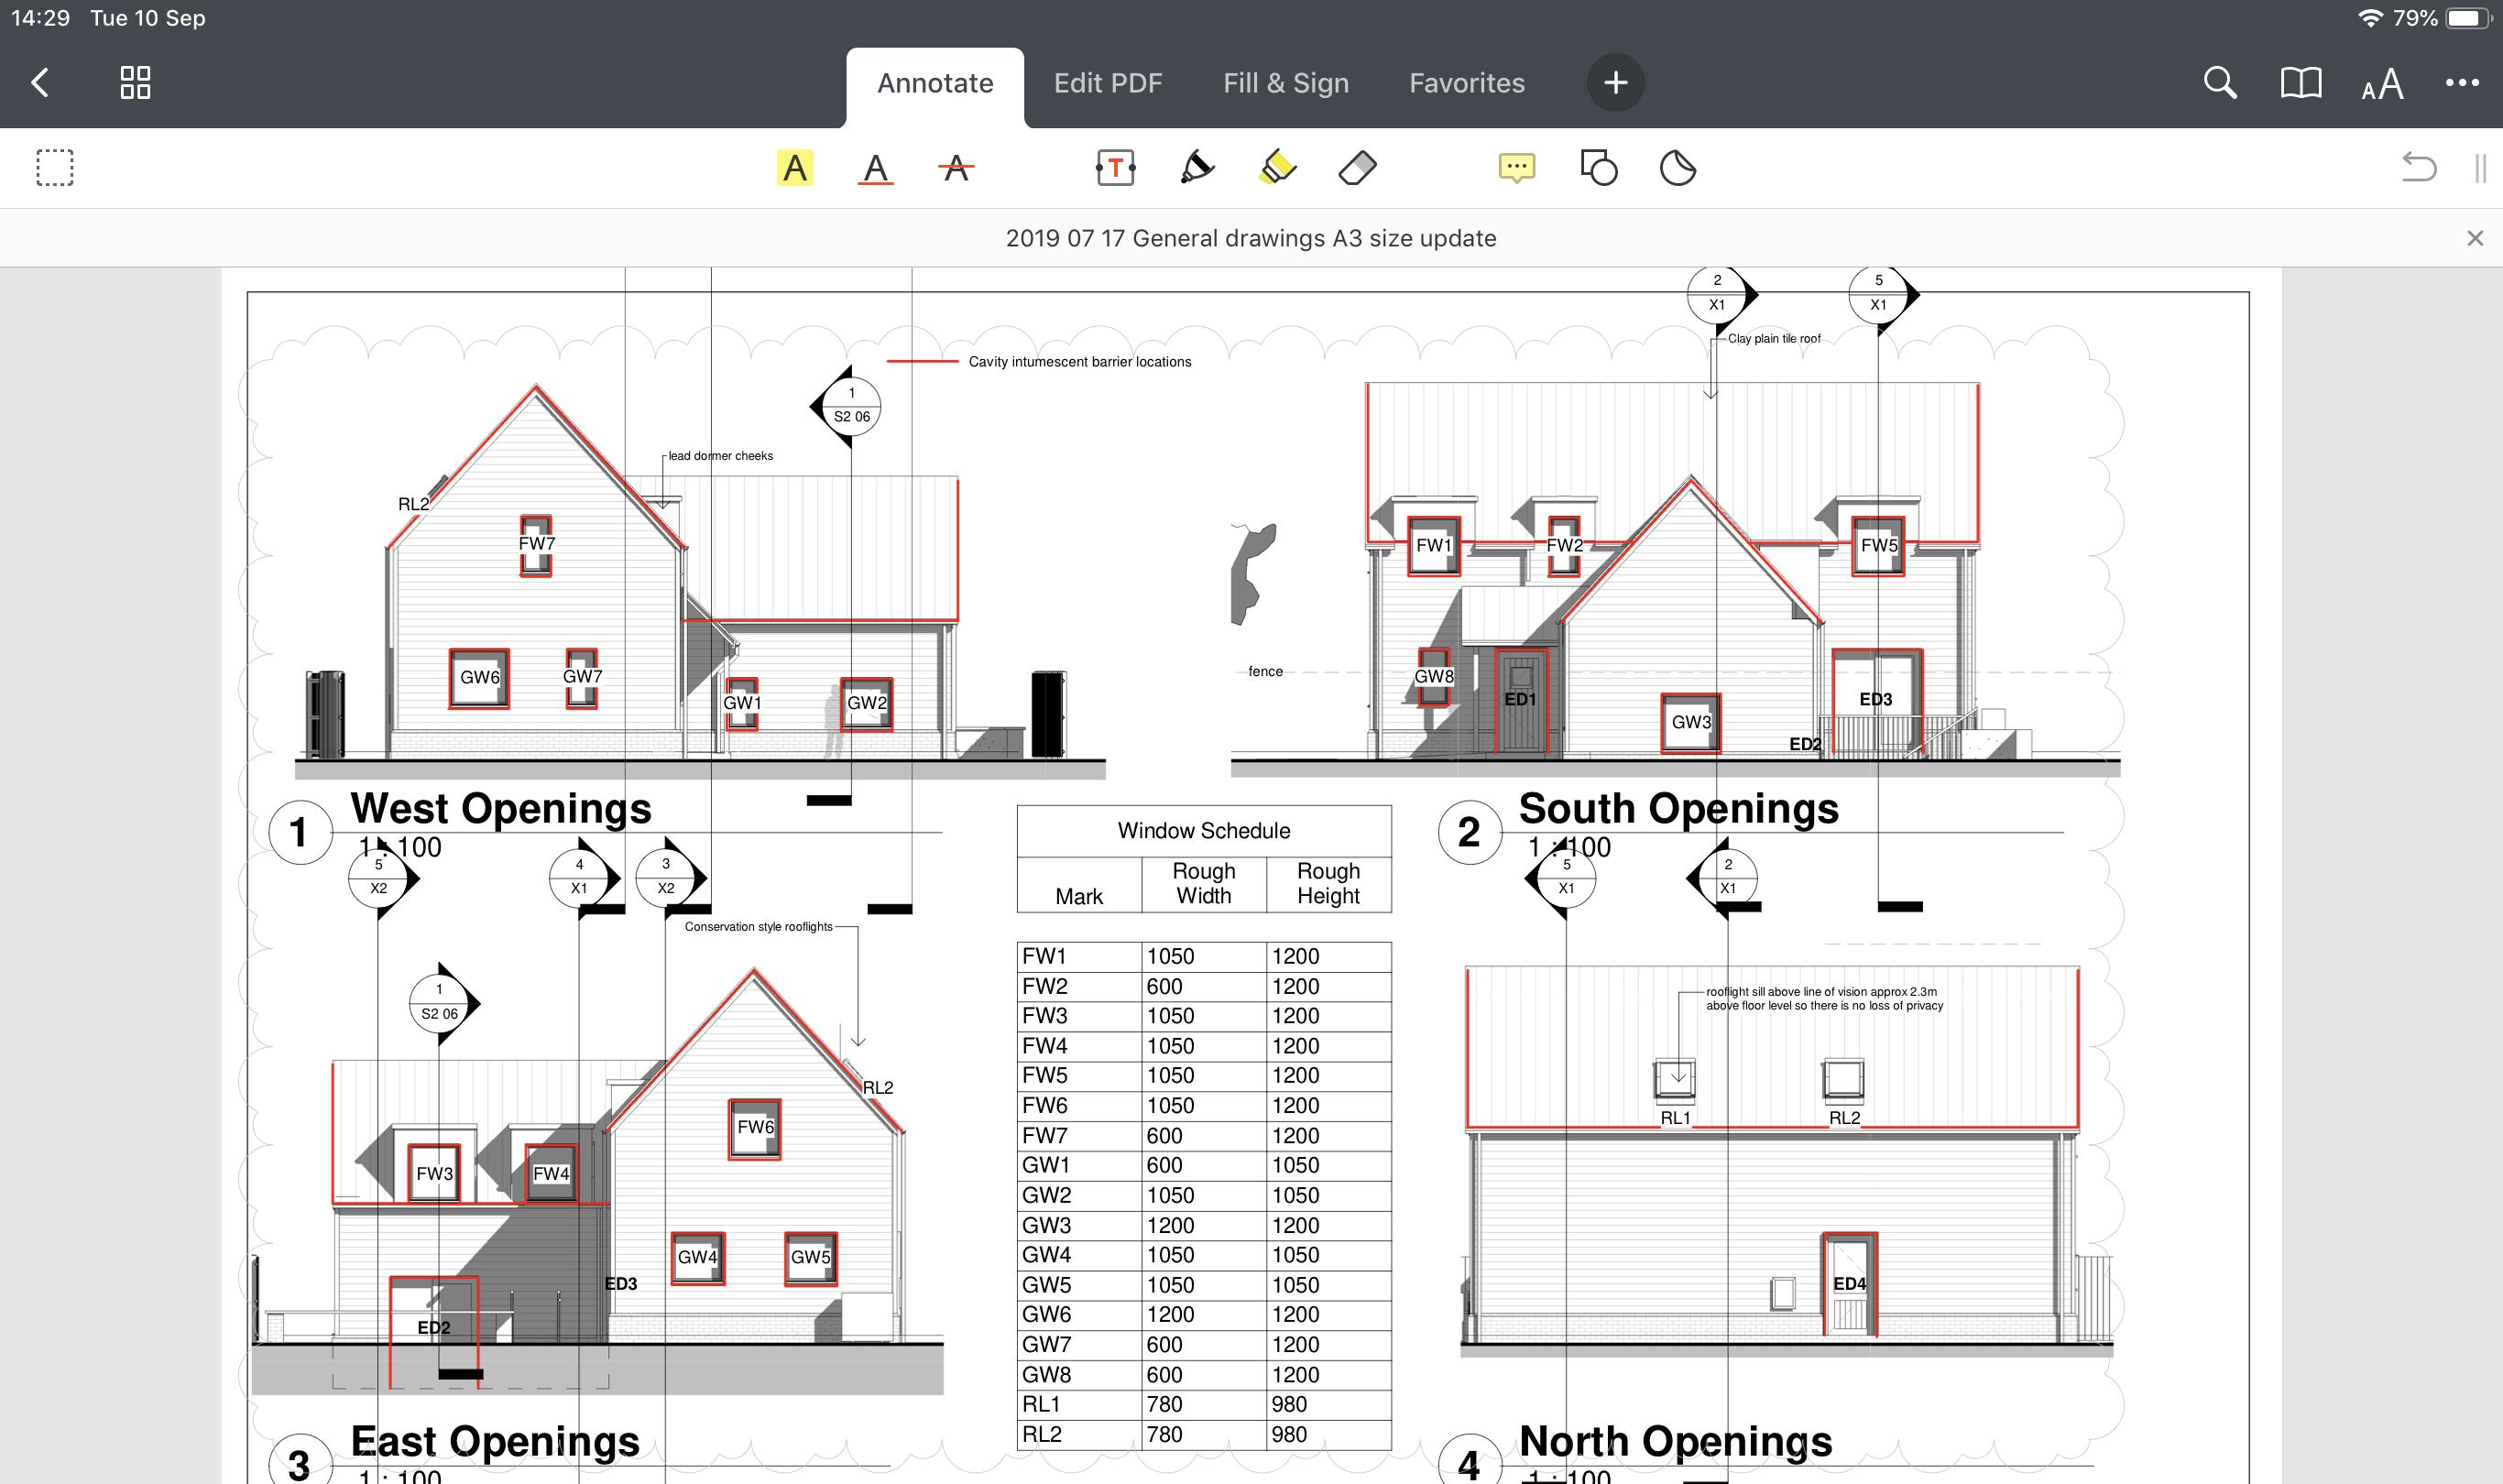
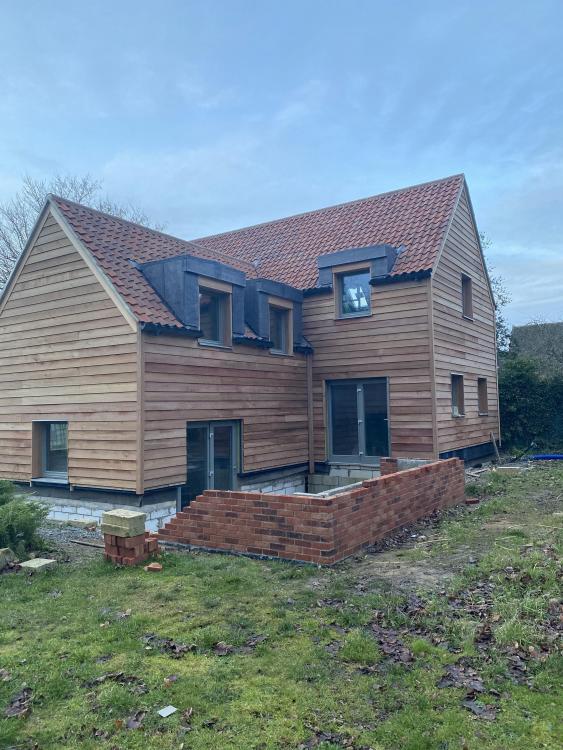
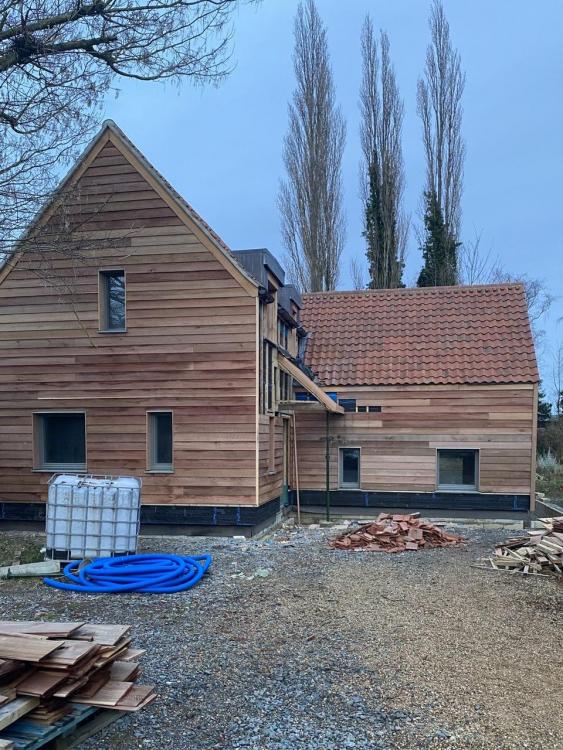
Yes, cladding is Western Red Cedar, 200mm wide rebated feather edge. You can’t really see it from the pictures but the dormers slope up from the side to the middle of the roof so rain drains off that way We’re in a conservation area and in the grounds of a listed building so the Conservation Officer was very particular about what materials we could use. Generally the most expensive ones ?. The Pan Tiles are hand made clay tiles from William Blythe.. Really expensive but they look great, I think, and should age well. They are Barco Old English Weathered colour Windows and doors are triple glazed timber from Green Building Store. Again, Conservation Officer insisted on timber exterior finishes, rather than AluClad. I think we went for RAL7023 Concrete Grey in the end but I could be wrong.
-
At last, we’ve got the scaffolding down. It’s taken a while and we’ve still got the cladding around the porch to finish off. On to the next stage - brickies on site tomorrow to do the plinth. Slightly out of sequence but we’re getting there.

-
Where to learn how to airtight the house??
Cambs replied to gc100's topic in Environmental Materials & Construction Methods
Green Building Store have done a number of retrofits to existing properties. Their website is a pretty useful source of information, so have a look around there. Here's a link to their Technical Resources page https://www.greenbuildingstore.co.uk/technical-resource/ -
This company do a hybrid straw/timber frame product. It might be the "Eastern European" company mentioned above? http://www.ecococon.lt/english/straw-panels/
-
Norwich council houses entered for the Stirling prize
Cambs replied to joe90's topic in New House & Self Build Design
Hope this link works for you .... They're on Page 34 https://issuu.com/passivehouseplus/docs/ph__uk_issue_21_digital -
I've read these on and off for years - picking them up as I have been starting a build. They've definitely got worse, in my opinion, over the last few years. They've become much more about interior design and less about the actual build processes and people's experiences of it. They're now filled with articles which feature things like £5,000 baths and other extravagances. Bringing it back on topic, I really like Passive House Plus magazine. It's got great detail on build methods in each case study, detailing construction methods from inside to out as well as all of the components used in the build.
-
Good idea - fixings are on their way, I’ll put some of this on too. It’ll all help.
-
A bit more Googling turned up some options today - a "spiral anchor" turned out to be the best search term. Fischer do them, as do a number of others. Ended up getting them from Amazon so I can get them tomorrow. About 50p each, so not cheap but that price is similar to most of the suppliers.
-
It looks like it takes about a minute to install the solar module, according to this Velux video so not a lot of extra effort for the builder
-
I'm now battening out and cladding our flat roof dormers in OSB in preparation for the lead cladding. The dormers are constructed with wood fibre board on the exterior. I can find structural timber behind the wood fibre board to fix the battens to in most cases, but there are a few areas on the cheeks of the dormers where I'll need to attach battens to the wood fibre boards without structural timber behind them. I'm struggling to find and source suitable plugs that I can put into the wood fibre board and then screw the battens to. There's enough support elsewhere that I don't need a great deal of strength. I have found these two potential solutions: https://www.rawlplug.co.uk/product/r-iso-plug-insulation-fixings/ https://www.fischer.co.uk/en-gb/products/fixation-on-etics-insulation/fixing-in-insulation-material/insulation-fixing-fid I'd welcome any thoughts on the best way to do this.
-
We are going to put intumescent barriers in the cavity and having all of the exterior timbers factory treated with HR Prof to stop spread fo fire. We need to do this anyway for at least part of the building due to proximity to the boundary and adjacent properties.

-
DIY Kitchens now do an Express Range, not sure if it's cheaper than their standard or not. They'll do these 10 kitchen units in the Mirano range for £1,187 + VAT. Not exactly your layout but it'll give you some idea. Haven't used the Express range before but will be fitting one from their standard range in the current build, having fitted one in our last place. https://www.diy-kitchens.com/kitchens/allstyles/allcolours/express/l-shaped/low-high/ Here's what is included : What's included in this kitchen layout? 500mm Single Highline Kitchen Base Unit (FD5) 1000mm Double Highline Sink Base (SBF10) 1000mm Wide Highline Corner Base Unit (FDCB10) 500mm Single Highline Kitchen Base Unit (FD5) 1000mm Pan Drawer Units (P2D1-10) 500mm Single Highline Kitchen Base Unit (FD5) 600mm Built In Oven Housing - 1970 High (SOH) 500mm Single Wall Unit - 720 High (MW5) 500mm Single Wall Unit - 720 High (MW5) 600mm Single Wall Unit - 720 High (MW6) 14 Mirano Cashmere Doors (For above units) 2 x Mirano Cashmere Plinth 2 x Mirano Cashmere Cornice 1 x Mirano Cashmere Corner Post Appliances, worktops, sinks & taps are NOT included in the pricing.
-
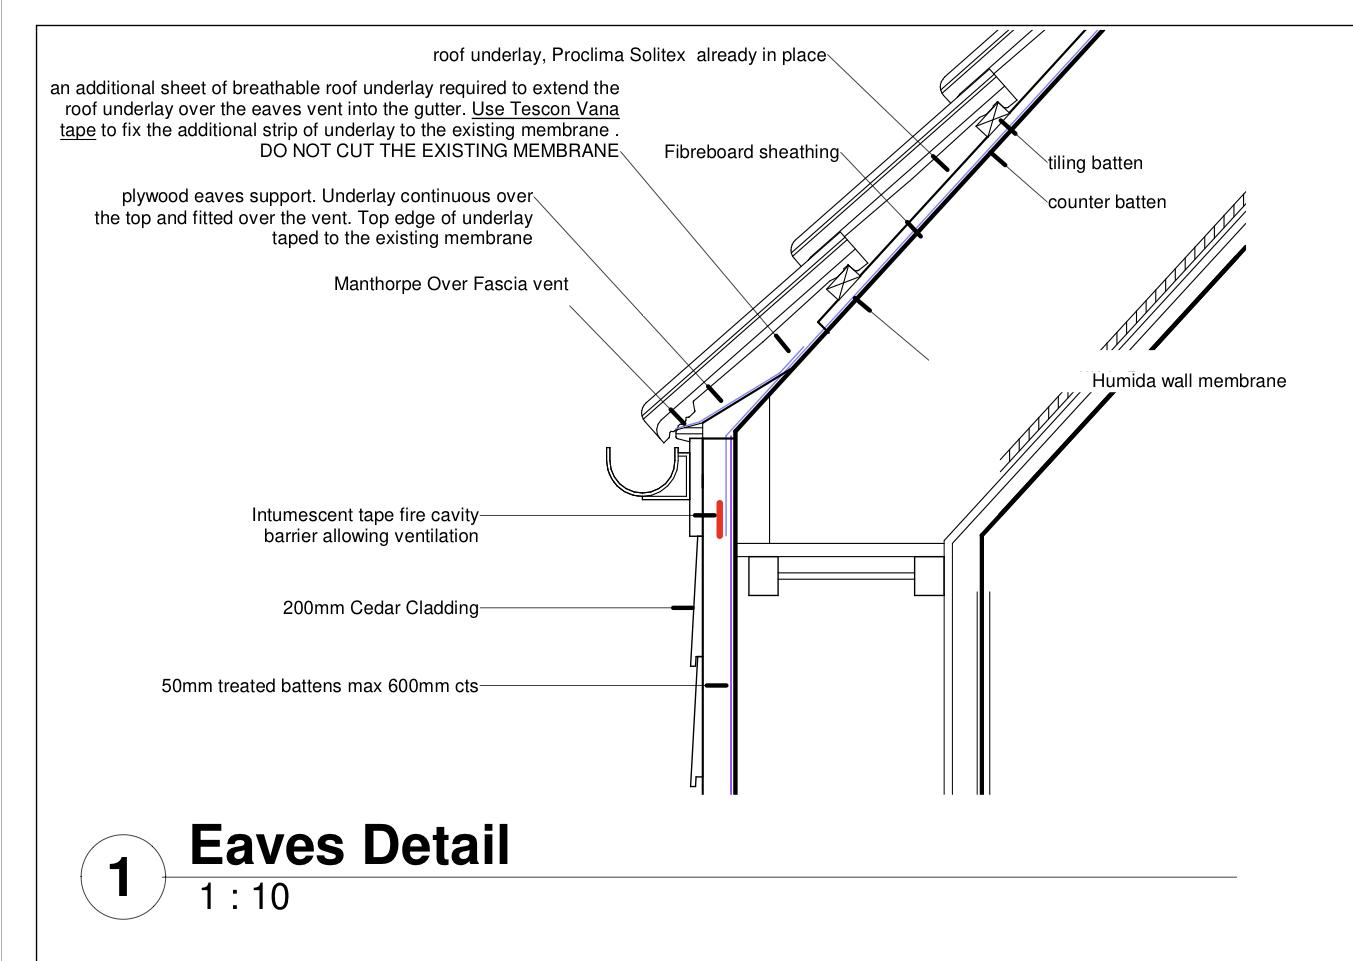
Here’s my detail. Roofing company have suggested that I move the fascia board up by 50mm so that it aligns with the batten and counter batten. Note the requirement for a fascia vent - Manthorpe over fascia vent below

-
Resurrecting this thread - how did you get on with this? I have a similar requirement - timber frame, 50mm vertical battens and timber cladding
-
I fitted one on the first floor of our previous build - the safe had holes on the bottom and back of it. I hooked a bracket with threaded ends under the joist and into the bottom of the safe then used nuts and washers to fix it to the floor. Perhaps drill holes in the concrete floor, epoxy in some threaded rod, feed through the holes in the safe and then use nuts inside the safe to secure? I'll be fitting another one in this build - very useful for important documents and jewellery etc. when going on holiday