Gus Potter
-
Posts
2155 -
Joined
-
Last visited
-
Days Won
26
Everything posted by Gus Potter
-
Just as a comment as a philistine. Why on gods earth are you sticking you ASHP in a recess. It's retarded and I think that is what you have clocked! Do you smell shite? Oh yes your ASHP installer says it's ok! .. how much have they evaluated the wind in the winter (when you need it most) and the geometry of the building and how the wind flows around it locally? As an SE I am interested in local wind loads and often see ASHP insatallers are talking pish. Look ASHP's needs in the winter a bit of fresh air and free flow of air around the building is essential. Next is why are you locating it near a window that let's sound in, more retard. If I was you I would think.. I'm spending a lot on an ASHP so let's think about where the prevailing wind comes from in the winter/ defrosting and see how we can get the best air flow. If you can't get to this level of thinking then you are just chucking your money away and when it gets proper cold your heating won't likely work as well as you expect. Advice.. go back to basics, recognise that if you want an ASHP there might be an Architecutral compromise. So get the thing out the recess and place it where you get some wind in the middle of winter. Or you buy some electric heaters. |I made another post about wind uplift on roofs. But here is a diagram about how how wind work on walls. Ideally you want to place an ASHP where it gets some residual wind even on a cold daydue to the geometry of the house. The best wind flow Zone A is near the corners of the building. Another way, my sister has two tandem ASHP's on the island of Tiree which faces into the prevailing wind. But it is not always mega windy. The ASHP's are placed about 1/3 from the corner walls. When you do a wind analysis you'll find that 90% of the time you get a flow over the ASHP. That is clever design.. understand how the winnd flows around the building and postition your ASHP in the best place. If there are any ASHP designers out there let me know. @Nickfromwales Just to name check you, would welcome your professionall comment, am I being to practical or not? They cost a shit load, so why tie your hands at the outset by putting them in the wrong place? I've given pelters here but it would help a lot if you posted a plan view of your house so we can see the orientation and size of the house with dimensions. My gut feeling is that you may be paying for something thta may not perform as well as you expect.
-
Great stuff folks, I live in Scotand but would be nice to have attended. Now, it's a small world, have heard reports that you are all a nice bunch!
-
Ok on the face of it, does not look promising. My first question is how did you find this out? Do you have some photos? Before I was an SE I used to be a builder and often we would form cavity trays with DPC , fold them at the ends correctly and provide weep vents. I often work on older buildings. In the 1950's to 1960's the cavity trays were often formed from heavy duty bitumen felt that is still often hanging in to this day and age. My guess is that your builder has made a bollocks of it as the cavity tray is up a slope and stepped. I always smell shite here as cavity trays take a lot of time = labour cost to install. Remember I'm a poacher come gamekeeper! Ask the builder for an elevation detail showing how the cavity tray is stepped. My guess is that these will not be forthcoming, next ask for some photographs, they may not be forthcoming either. Now look at your contract.
-
Labour only. What are my obligations?
Gus Potter replied to flanagaj's topic in General Self Build & DIY Discussion
@flanagaj The above is blunt. As a word of encouragement |I've got a couple of self build projects on my books in England, they are of high value, very complex design, carry extra risk and probably subject to local scurtiny by BC and the passing public. I've seen photos of their sites and the set up looks great and safe. I ask, has that cost you lots? the answer is, we budgeted for that and it's not as hard or expensive as you think. The guys on site love it and that leads to harmony, everyone enjoying thier work. I understand that they have an element of labour only and that the extra insurance cost is not too onerous. But they are both the Principle Designers and I act in support. Are you seeking a warranty from say Protek? If so read the fine print of their offer. If going the warranty route then labour only needs to be supervised. I've recently had a run in with ProteK as they were blatently passing liabilty, but it seems to be sorted now. They got far too anal about passing risk to me as a PD and SE, they were, I think, just chancing thier arm, but turned out is was admin error? It's stuff you have to navigate and make the best choice for yourself. -
Every day is a school day, did not know that, ta!
-
Labour only. What are my obligations?
Gus Potter replied to flanagaj's topic in General Self Build & DIY Discussion
To give yourself some cover then you might want something in writing, with a valid name and address (think how the VAT man may take a view on your zero rated build) that they have stated that they are a contractor on a self employed basis and providing a service on a labour only basis. And here it gets tricky and you are potentially out on a limb. @Nod mentions public liability. I have public liabilty insurance.. this covers me if I walk out with my ladder and scratch the home owners car, cause someone to fall over in the street. It costs me less than £200.00 quid a year. I also hold PI insurance and that costs thousands. In an ideal world (which it's not) your direct labour should hold Contractor's insurance which would cover you if they burst a pipe just before going off site and flood the works during the night. Now let's face it.. you are looking for savings via labour only. The reality is stuff like this happens more often than you would wish for. Who do you sue? your direct labour probably have no assets. I'll be the devils advocate here. If you are employing direct labour then you well and truly fall under the CDM regulations and likely under the statutory Principle Designer rules as you are directing site operations. I've made some posts about this recently. To finish, the least of your worries is being treated as an employer in terms of tax, think safety.. it's all fine until something goes wrong and someone gets hurt. Often labour only stuff has folk that are less experienced and thus the risk of an accident is much higher. I'l make a point here. Just say you had a young son or daughter setting up on their own in the building trade, they need the bread and butter work so labour only is great work. But they go to a site that you have not set up safely, you're not properly insured and they get hurt due to your negligance, lack of insurance. I'll tell you this, most parents will take you to the cleaners if that happens. You can take out insurance for this. Have a look on the internet for contracts works insurance, you can exclude tools / plant and so on. The above is tough love but when you do labour only it can work.. and you save money but you need to understand the risks and manage that to suit your circumstances. -
And here is the crunch. I made what was a admittedly a rambling post a few days ago about principle designers in response to a thread by @Oceanjules. One point here is that it's not what you can get away with.. much more about designing safely and the onus is now much more on the designer and everyone involved in that process, the liability has now much been past to the designer. There are two key principles. 1/ If a fire starts the occupants need to have time to exit safely. 2/ That the fire fighters should not be put at risk. But here is the business case. The onus is very much more on the designer. One thing my PI insurer broker pointed out to me when we were talking the extent of my fire design liability is, hey Gus.. from the underwriters perspective.. a fire does not need to occur, all it needs is for a Client to potentially later say.. your design could be flawed and it's up to you to prove it's not! This liability does not lie with BC anymore but with the designer, although to support our case we may refer to BC regs and manufacture's data. But as soon as we go off piste life becomes a design and cost adventure!
-
Steel pipe retaining wall
Gus Potter replied to flanagaj's topic in General Self Build & DIY Discussion
Is the wall near your boundary? This is a key consideration. It's a low retaining wall so you have lots of options if away from the boundary. You'll be surprised how deep you need to knock in tubes to get them to work as the soil contact surface to resist the rotation of the wall is low. Some basic options and things to consider and rule in or out are; soil terracing with or without careful selection of planting to stabalise the soil, gabion baskets, Universal beams as a king post retaining wall with sleepers, if you have the room in your site then tying the head of the retaining wall back into the soil behind.. basically long rods with a big end plate.. like a tent guy rope but more beafy. You could go masonry reinforced like hollow block or a thicker masonry gravity wall.. but they can be expensive. Post a photo or two so we can see what you have to work with and what you would like to see in terms of appearance / material finish... the look.. cottage garden or contemporary for example. -
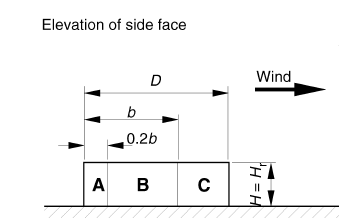
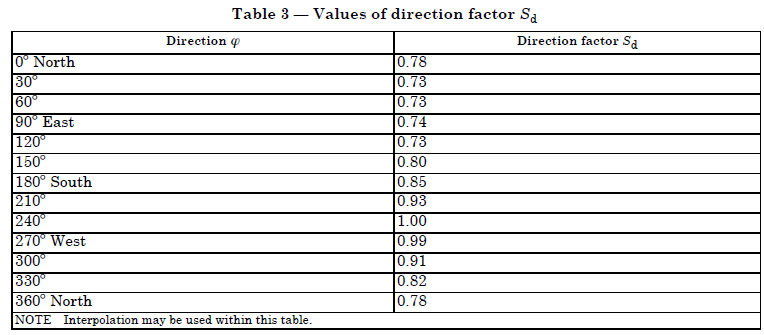
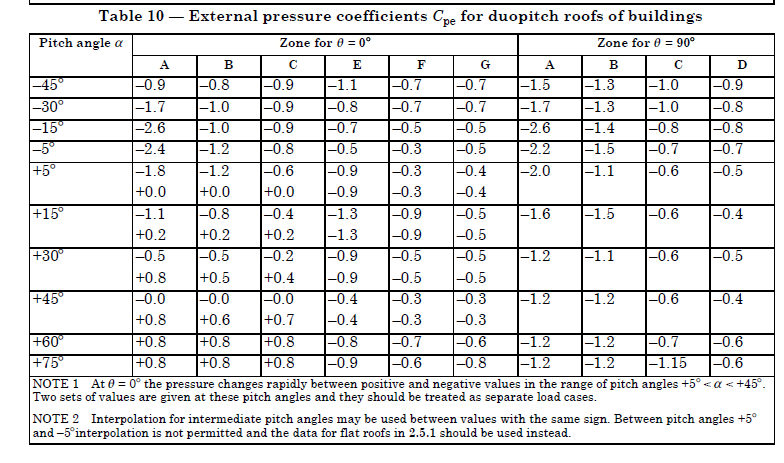
Well done, bit of belt and braces works.. it would look a lot worse if the roof blows off! You mention 45 deg roof slope, these in general tend to be less vulnerable than roofs with a 5 -10 degree pitch for wind uplift. Much depends on the wind direction. For a bit of fun and to cut short the wind calculation we first calculate the site wind speed and then convert that using factors for the height of the building and orientation and so on. The worst case wind load often comes from 240 degrees and in terms of roof orientation we look at how the roof faces and apply a direction factor. I screen shotted some tables from the British standard that lets you see how we reduce the wind load depending on which face of the building / roof we are considering and the wind direction. NOTE here I'm not considering a quatering wind like the Citicorp building as has featured on BH... and I'm assuming the topography is reasonable benign.. ie you are not at the top of a cliff or on the upperside of a hill. But it's an old house you've got so let keep things simple and qualitative. In the above you can see that a 240 degree wind gets no reduction but a North wind gets reduced by a factor of 0.78. Now if you have a look on U tube ( and I've have seen myself) at videos of roofs getting blown off, intially you often see some rippling movement at the edges / verges or ridge of the roof.. it's often tiny but here the high local suction lifts an edge, the wind gets into the roof which increases the roof internal pressure that cause the drama of the whole roof flying off. To stop that we need to keep the vulnerable edges and occasionally bits around chimneys well tied down. Roughly to calculate the wind load on small parts of the roof we take the wind pressure and multiply it by a local coefficient to give the local pressure, in this case we are interested in the local suction loads. Below is a diagram that shows the wind directions and the notation for a due pitched roof. The above lets you understand the table below which shows the external coefficients that are applied to the wind loads for a duo pitch roof. In the table above the positive values indicate wind pressure.. a downwards load on the roof zone.. which is beneficial. The negative values are the suction coefficients. The wind load in the tables above is calculated as being applied perpendicular to the plane of the rafter (snow loads and roof access loads are on plan load so applied differently) thus the we need to calculate the vertical uplift component of load when designing the holding down straps. We take the perpendicular load and divide it by the square root of 2 = 1.41. One thing you can easily take away from the above table 10 is that flatter roofs are more onerously loaded in suction than a roof in the region of 45 degees. But the 45 degree roofs are still vulnerable when the wind is blowing on the gables or quartering to some extent. If you have a study of this Roger it may hopefully inform and you can have a bit of fun looking at the values. The roof ventilation effective area is probably small, call it more trickle ventilation and thus is unlikely to dominate the internal roof wind pressure which gets added to the roof external suction. One word of caution again, if you have some significant topography then this can be significant. From time to time if say building near a big farm shed we may need to look at any wind funneling effects, but this mostly applies to walls.
-
Architect won’t sign Completion Notice Form
Gus Potter replied to Oceanjules's topic in Building Regulations
Some approximate general comment, I don't touch on all the facets only some, but try and write in the context of self build. The CDM 2015 regs tried to reduce the amount and severity of accidents on site. I remember in the early days before 2015 CDM folk were saying to designers.. look you can't do your "Concept design" and bury your head in the sand. You must now introduce the concept of safety to your Clients pretty much at stage Zero. It was good practice as if a Client gives you a funny look at this stage it does not bode well for fee generation. The reason for this was to encourage Clients to set aside an element in their budget for health and safety on site and enough to cover the professional design fees / early engagement with Contractors and so on to enable this. A common figure that was suggested at the time was 3 -5% of the budget. Now that kind of worked ok to drive down the number of site accidents as the CDM 2015 caught in the net some of the smaller Contractors who were winging it. Architects got used to it and folk became a bit more responsible, not much but it helped.. there is still a way to go but the CDM 2015 did reduce the accident rate on site. Grenfell tragedy changed things a lot in England BC and in the UK in general. In Scotland we have a slightly different and nuanced set of building regulations, but these were still open to abuse after 2015. In Scotland when you apply for a completion certificate you have to sign it to say that what you have designed and what you have built is compliant with the building regs, you need to sign off on that. But the BC regs were open to abuse by corporate interests not least. OK to stop this becoming tooo lengthy.. the CDM 2015 got you to the place (with a fair wind) where you built something where no one got hurt during the build. But now after Grenfell folk as asking designers.. now that the building is occupied is your design safe! It's a fair, reasonable and moral question. This could be in terms of structural safety, fire and seviceability for example? What this means to me is that when I design something as a lead designer I carry the can. I'm responsible for ensuring that if for example a sub designer submits a glass design package I am experienced enough to say.. that looks ok. If an Architect or TF manufacturer submits a design the same applies. If I am not experienced enough ( happens from time to time) in a particular field then I must alert the Client to my lack of experience and make recommendations. In summary the lead "New Principle Designer" is now responsible for ensuring the future performance of the building to a greater extent in terms of design, safety and seviceability than before. They are not responsible for the quality of work on site in terms of "supervision ~= a traditional clerk of works function). @ETC has posted about this. But on the other hand Designers are responsible now for not designing something that is so difficult to built it introduces a safety risk in the short and in long term, once the building is occupied. Personally I think this is a good thing as you should be held accountable for what you design. Here is an example of how I'm navigating, in a pratical way, the change in regs for self builders. I have a number on my books all over the UK but one in particular is a great example. Their design is complex with different materials that behave in very different ways and this extends below the ground with the associated geotechcal and ground water excitement. The Client is the Principle Designer and we have this recognised in writing. I'm in principle the lead SE and have a level of checking control, but also part of my "tacit role" is to support the Client ( self builder) in fulfilling their responsibility, call that hand holding for which I get paid for. The Client can point to the chain of communication and say.. I have made a big effort to fulfill my Principle Designer Duty as a self builder. With my SE hat on I design the bits and coodinate the interfaces, often connections that the work package suppliers don't want to design. Now this role I perform comes at an extra cost to the Client. But what I try and do is mitigate that by saying see if we knock a few heads together you might even make my fee cost nueutral! In self building and I see this all the time.. work packages are procured but no one designs an coodinates the interfaces, calls out the Architect, Contractors go off and do their own thing, you as Clients start to "fall in love" with your builder and take their advice without question, it's not uncommon to see fore protection getting changed and so on. As a point of note.. I have had some recent dealings with Protek, the warranty provider and, they are asking some deep questions about this design liability in terms of the new "Principle Designer Role". My own PI insurance is coming up for renewal soon so no doubt there will be another page of questions about what I'm up to! In summary I don't think this is insumountable if self builders are willing to adapt and start ot think about keeping a professional on board during the build to hold their hand. And here lies the fundamental issue! Self building is often traditionally about getting prices for work packages; the founds, timber frame, roof, and so on and you sort the bits out in between. In the old days you could still make a tidy profit by doing it this way as a novice sefl builder. My own gut feeling is that I can see how self builders are finding it more and more difficult and costly to navigate Planning, BC and now the Principle Designer stuff. From my end I think.. ok this "Principle Designer Role" is not scary provided your Client is willing to pay a bit more. In return I think.. now I have more to contribute to the project and I can chip in more and mitigate my "principle Designer fee". Every cloud often has a silver lining for everyone.
-
Yes, stunning view so worth paying a bit more to get the large uninterrupted opening. Do that out of interest. It could be you have a height restriction over the head of the opening which would make the rebar in the ICF too congested for example. One question that can be a bit of an elephant in the room is fire protection and here ICF has advantages at times over steel. With that view come weather exposure no doubt so it's really important to get the weathering details nutted out. All the best and keep at it!
-
Ok you say reasonably exposed. The vulnerable points are the eaves, verges and roof ridge. Say you don't live in the north of Scotland, Islands. Very quick sum and to cut a lot of the maths out. The wind load uplift will be about 100 - 150 kg/ m^2 (working load on a 50 year return period) at the exposed edges of the roof. But as you move towards the middle of the roof it will be less as an area average., the design codes call this roughly "non simulataneous action" as the wind is made up of vortices, big and small, that don't act on a roof evenly. The original part of the house is probably ok? How old is it, if it's been ok up till now then is that ok? Think about this another way. On new build stuff as an SE I design to the codes but when assessing existing historic houses we need to be pragmatic. If the wind gets up it often blows the tiles / slates off at the edges of the roof; verges, eaves or around chimney stacks. There used to be guidance on this in the old building codes. Yes, but the quality of roof tiling workmanship would have been good. The key here is to not let tiles get blown off in the first place as as soon as that happens you lose the dead weight resisting the wind uplift. And here the quality of the extension roof needs to be examined. This is obvious.. if you prevent the tiles / slates getting blown off at the edges of the roof and thus prevent progressive peal back of the tiles / slates then you, maintain the dead weight which resists the uplift. Your big purlins will not be contributing much unless the ends are well strapped down to the gables. Go back to basics and think.. what has been changed in terms of wind loading. The extension is the obvious thing.
-
Trench fill acceptable tolerance in level and dip
Gus Potter replied to Stu84's topic in Foundations
Hiya. I get @Stu84's disappointment. But as others have said, and which I design for, is to be able to level things out with the masonry underbuilding. You can often go for a 20mm thick mortar bed with no detrimental effect. Thicker mortar beds can be ok but you thicken the wall base on the first couple of courses.. it's still economic. A few SE / Geotek comments for all. Trench fill is a rough business. Often we need to do it in sections, dig a hole and get the concrete in rapidly to stop the sides of the excavation falling in and, in sensitive clays, stop it from getting compromised once you expose it to air and let the pore water pressure change. There is no time to work to 10mm tolerances.. it's like trying to polish a jobby (shite) , what is under the skin is the vital thing. Pore water pressure? Some clay soils are quite happy to bear load until you change the water pressure, by digging a hole and disturbing them. Sometimes digging a deeper hole is counter productive. Now there are lots of photos on BH where folk are doing trench fill. very badly.. They worry and sometimes try and shutter the sides of the founds, the ground water is rising and it all turns into a mess. Think.. if we need to excavate for a rear extension and doing trench fill.. how do we get rid of the extra muck in a hurry? As an SE often what I want to see is you leaving the sides of the trench rough as we get a tacit beneficial key up the sides. Occasionally, if in made ground that may settle I'll say, drape some plasic down the sides so the settlement does not "drag down the founds", this is standard procedure in pile design. This sounds rough but it works and in the heat of battle on site when the weather is bad.. it's a pragmatic option. Now can I ask. Just say you had added the cost of a site visit to your SE design brief? Say that would top out at £500 quid. Usually that will be about £200 as for the SE what they charge as a headline rate ( graduate Engineer cost at "£90.00 an hour) you get back in recommendations.. it's good for business to provide "after sales service". -
Basement excavation - safely retaining earth banks during works
Gus Potter replied to Ed_'s topic in Basements
Do you fancy sharing your ground investigation results. Over lay that with your site boundary and then give us some section details so we can see what you want to build in the excavation. A few good and clear drawings are worth thousands of works. Once we know a bit more then you'll get more targetet advice and suggestions. You'll probably get the most impartial advice on BH. Yes, it may be that there is a way of executing your design with limited support but we can't comment properly unless we have access to all the information. -
Basement excavation - safely retaining earth banks during works
Gus Potter replied to Ed_'s topic in Basements
Clay soils are probably one of most unpredictable materials that we encounter on self builds. The soil mechanics books we commonly use as designers refer to undrained and drained shear strengths, the drained shear strength is commonly used by CE's like @saveasteading for earth works design when say designing a dam. However, I have a pal that did his PHD and he developed, and I think got a patent, on how you measure the "latent cohesion" of clays when drained. In my earlier post I tried to explain the difference between drained and undrained strength of clay. Although my pal was an Engineer he clocked that the ceramic manufacture's that make toilet bowls/ sinks etc were having a high failure rate in manufacture.. and thus he got his research funding on partly this basis. Basically (I think) it works like this. Even if you dry out a clay it still binds together due to the behavoir of the minerals and the molecular interaction. @saveasteading the brick like shape I think is driven by the way the clay is deposited in layers coupled with the above. Incedentally my pal now runs a specialist Geotech Company and gets most of his work from the major UK developers designing ground improvement and lime stabalisation schemes. I can see his work as on the outskits of where I live, he has desinged the groundworks for a few thousand houses in tricky ground. -
Hiya. Have commented, impartially of course. My view is that on many self builds now a days you don't make a massive, if any profit, if you value your time at market rates and go for say MBC / raft foundation packages etc. But what you can't put a value on is building a home, a fortress for you and you family, you learn loads of skills that also compliment our day job. I think you have taken a completely different hands on approach which shows that self build is still more than viable and there is money to be made if prepared to work hard and put yourself through what can be an steep learning curve. From my experience doing this as a day job.. you often end up with a much better built and durable house, even if you are a bit crap at it compared with a lot of the rubbish build by developers. My logic is this.. if you have the where with all to raise the funds, buy a site, get planning and put some building plans together you can't be that stupid. I do and have benefited from your advice, thanks. This is an important figure and realistic in my view. If you have included this in you sq m price then it really makes your figures valid. I have Clients a bit like yourself and they also factor in a cost for their time. This shows that if you are able and willing to work hard you will reap the rewards. Now Nod is not daft but at the same time he is probably just like you and I. Yes ok he has a contracting business and has a "trade advantage" but even if you say build for 1.5 k per sqm the first time that is still going to work out very well. I don't need to as you have shown that self building is still viable and profitable. Well done sir!
-
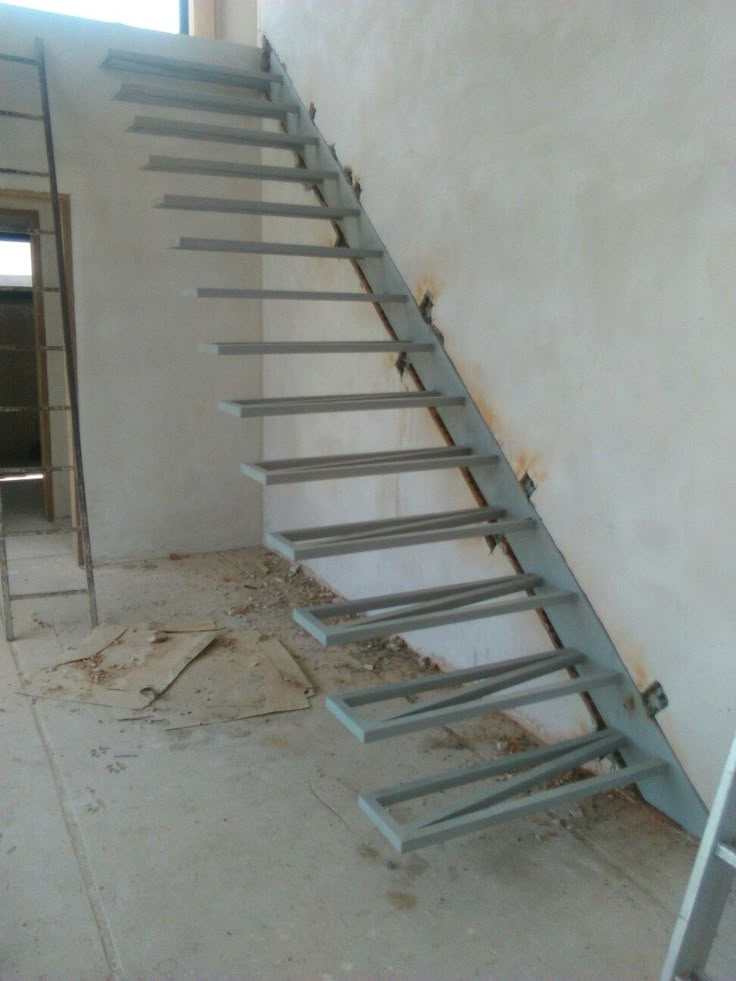
Pre-cast concrete staircase
Gus Potter replied to flanagaj's topic in General Self Build & DIY Discussion
Enjoy my numbers that put some flesh on the bone of your steel option. They will help you sleep! -
I'm sure Mrs Nod is more than capable. Seriously though, self building can make or break a relationship. It's not for the faint hearted.
-
Pre-cast concrete staircase
Gus Potter replied to flanagaj's topic in General Self Build & DIY Discussion
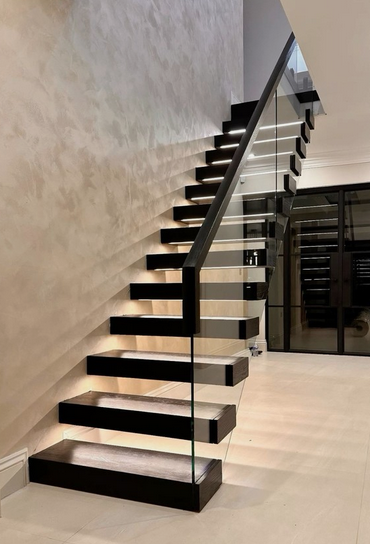
My sums are just qualitative and intended to give hubbers an insight into how we quickly determine if something has got a chance of working. There are so many things to think about and ideas you have when self building that often, just seeing how folk like me take a view on things can prevent a lot of runs down blind alleys. The steel option is the next port of call. My approach is to say.. lets see if we can design and fabricate the stair and the wall as one steel assembly, bring it to site and fit it in. Then later, once the dirty work is done,fit the treads. Ok allow me to digress. An SE and sometimes CE's are descibed as people who practice the art and craft of Engineering design. Part of the craft (the really fun part for me) of design is often to be able to design within a budget and still make it look Actitecturally appealing and intelligent. But of course appearance is all in the eye of the beholder. Now if (and it's a big if) you have bought into that then next time you are in B & Q in one of their portal frame buildings then look at the rafter to column connection. The tapered haunch is usually fabricated often from a steel I beam cut diagonally.. so you get two tapered bits out of one cut. If you could live with this then what you would see on the underside of your floating tread is a tapered steel section. What you are doing here is marrying up the industrial look with a cantilevered tread. Now here is the clever bit! If you sit the trapered section closer to the front of the tread and detail it you make any gap less than 100mm so it is now BC compliant. Many of the stairs you see on the web are non BC compliant. But if you do it this way then you do get some twisting (torsion) in the treads so you also use the tapered section and fixings to resist that small amount of twisting. My guess is that you can cut diagonally a 152 x 89 UB steel which would give you less than the BC 100 gap. It depends on your choice of tread and material as any fixings need an edge and end distance from the tread. Using a tapered section means that it has greater depth at the wall end and thus the connection here is simplified. So now the idea of fabricating the wall and stair as one work package becomes easier to get your head round. This may not be for you but often design is saying.. hey we looked at that and ruled out. There is no getting away from the fact that if you want any kind of cantilever stair like this it comes at a premium and you have to decide "is this right for us or should we just introduce a stringer to the stair and go for a better quality glass and tread? As someone who does this as a day job then I would, if my own house, on the budget you have, go for a stringer and better quality treads and glass fixings. If you have kids / a dog now or in the furture then go for the most durable tread you can afford as in a few years time, if the treads suffer and start to look bad then any cantilever becomes a moot point. -
Well done NOD. When I was younger I did a self build, I was a builder anyway at that time. We built roughly 180m sq of 1.5 story house. I built the garage first with a kitchen, shower room and we slept in a caravan so the planners did not boot us out. Wife went to work and I got up every day and built a bit of the house. From memory I think I spent about 4000 man hours doing the house, garage excluded, septic tank, services went with the garage and so on. About 100 weeks on the tools went on the house if you base that on 40 hours a week ~ 2 years. But then I had to manage stuff / source material and at the end of the day it took about 2.5 - 3 years. Now all that labour was tax free. When we came to sell the house we made a tidy profit. In terms of your cost per sq metre have you an idea of a value for the time you spent and how many hours that has required. If you take your figure of under 1.0k per sq metre then the idea of taking time off work to realise that, or doing extra hours outside the day job becomes very attractive.
-
Pre-cast concrete staircase
Gus Potter replied to flanagaj's topic in General Self Build & DIY Discussion
For a bit of fun and some sums. The above won't fly as others have pointed out, but let's see if a floating stair like below might work conceptually in a 100mm thick concrete block wall 2.4m high with no significant compressive load from above. Say the wall has a door opening and thus the wall is only able to span vertically top to bottom. Before we do any detailed design we want to look to see if is it in anyway possible. Say the stair is 0.9m wide and its a domestic stair. The imposed (live load) is 1.5 kN/m squared, from the design codes. That roughly covers you say taking a big family photo when everyone gathers on the stair. Now this is an area load so let's convert that to a line load applied up the centreline of the treads. 1.5 kN/m^2 * 0.9m = 1.35 kN/m per metre run horizontally. The line load acts at a distance of 0.9m / 2 from the wall = 0.45m. Now we can calculate the bending force that is applied to the wall, say half way up the stair by going 1.35 x 0.45 = 0.61 kNm per metre run of wall. And now lets apply the Eurocode factor of safety to that of 1.5. The design moment is 1.5 x 0.61 = 0.915 kNm which is the factored bending force applied to the wall. Now say the wall is built from 100mm dense 7.0 N/mm sq blocks in an M4 mortar. Once you do a few calculations you see the bending strength of the wall is about 0.175 kNm per metre run which is a lot less than 0.915kNm . We stop there as there is no point in calculating the self weight of the stair and glass balustrade as this just adds to the bending force. What happens if we make the wall out of block on the flat so the wall is 215mm thick? Well the resistance of the wall jumps to about 0.6 kNm still short of our 0.915 kNm, no self weight etc has yet been included. Now if we add another story of wall above this increases the compressive load in the wall which stops tension developing at the mortar beds which increases the bending strength of the wall (up to a point). Let's add another 2.4m of 215mm thick wall above. So that's a line load on the top of the wall = wall density x thickness x height = ~20 * 0.215 * 2.4 = 10.3 kN per metre run of wall. If we recalculate the bending strength of the wall we get about 0.95 kNm which is more than our 0.915kNm. Ok we are closer but once we take the detailing into account, self weight of the stair, balustrade etc we are on the wrong side of the equation again. In summary, you can see if we do a qualitative analysis like this we are going to have to do a lot of work to get a blockwork wall even in a two story dwelling to work and then we have to detail for not least shrinkage, build, course and bond it all properly. Even if we change the tread material is still does not get rid of the bending force in the wall. Now what happens if we change from 7.0 N concrete block to Engineering brick 215 mm thick 2.4m high with no wall above. Well, now things look more promising. A wall like this has a bending strength of around 1.45 kNm per metre run > our 0.915 kNm so now we maybe want to look to see if we want to do a bit more work by calculating the self weights , stair tread deflection and so on. It's going to be close and and may not work, but even if it does then you still have to build it and bond in the treads somehow. All this kind of leads you towards not using masonryin this kind of construction and to consider a steel based option for the wall as @Nickfromwales suggested.
-
Basement excavation - safely retaining earth banks during works
Gus Potter replied to Ed_'s topic in Basements
Very impressive! Look forward to the point when you start installing the structure.. going up instead of down. Fascinating looking project. -
Basement excavation - safely retaining earth banks during works
Gus Potter replied to Ed_'s topic in Basements
Hang fire for now before you incurr professional cost until more folk from BH chip in. You can do a lot to help yourself by providing a bit more info if you feel able. Main thing is BH is not a competition, there is no such thing as a daft question! Don't worry about abbreviations, the lingo or that. You can look at it this way.. you provide info, some folk on BH can chip in for free and have fun sharing what they know. I like to teach so enjoy trying to turn what can be very dry SE stuff into something that folk can benefit from. When I did my self build the internet did not exist! Can you imagine, it was onl;y 30 years ago roughly. BH members get to learn from your journey, then you are more informed and can ask you SE / Goetech folk the right questions.. everyone is a winner. Now I post on and off on BH but there are some clever Geotec guys lurcking and a good few retired CE's SEs and Qs's .. if you spark their interest it would be great! Then @ETC can chip in with 20- 30 years experience of Architectural input... FFS you have one a watch! Now the seasoned self builders chip in and contractors.. you literally have access to thousands of years of man hours experience on BH. So gather some thoughts and then see if your SE / Achitect can take all this in their stride, you are just digging a hole after all. That said you are doing a basement @Alan Ambrose is a good thread to follow. -
Basement excavation - safely retaining earth banks during works
Gus Potter replied to Ed_'s topic in Basements
This is a great question. If you search about on BH you'll find posts by Geotech Engineers, but someone who is much active is @saveasteading But here is a rough rundown on things, I'll put myself in the shoe of acting for a Contractor designing their temporary works.. we want to dig a big hole, build something in it and back fill without anyone getting hurt. We refer to an old addage called "stand up time". Which means how long can we keep the excavation open for before the sides etc start falling in. Now in say chalk the stand up time is often good. Chalk is graded a bit like a rock where we look at fractures and where water might be getting in that loosens the chalk. This is important as we dont want big slabs falling into the excavation. @saveasteading knows a lot about this so I'll stop there. In summary though, we can often dig a big hole in a Chalk soil, do what we need to do and go home, provided we control the ground water. Clay soils are a different animal. Lots of soils are a mixture of things but let's just stick to a pure Clay soil. Now we know from gardening that clay is "sticky". But if you dry it out it can turn to dust, almost like a sand and it fractures, starts to fall apart.. like your garden soil cracking. When we dig a hole in a sticky clay soil you'll often see that the sides don't fall in right away. But after a few days/ months the sides do fall in. As Engineers we might call this the "undrained soil strength" (right after digging the hole) and the "drained strength" once the clay starts to dry and loses its stickyness, called the cohesion. In summary what the Contractor Engineers do is assess all of this and find a way of executing the work safely at minimal cost.. That is why you see batters at different angles and weird looking stuff. Each site is different. -
Power floated slab. Now rethinking micro-cement
Gus Potter replied to flanagaj's topic in General Flooring
Yes you will find folk that promise you this. But then if you presented them with a specification and said Gus is going to check their work and hold them to the specification.. they will either run a mile or infate the price. Do your slab and then put a 50mm screed on top. I've done hundreds of raft slab designs, well probably (by defualt) thousands as I was a development SE that wrote the calculations for one of the biggest suppliers in the UK of raft slabs, long before MBC/ Advance Foundation Technology etc came on the scene, and the economy comes from keeping it simple stupid, buldable and allowing you to use local contractors as opposed to specialists. Part of the stuff I wrote for the software included practical tolerance levels for flatness and level of the slabs. There is no free lunch here, trying to save on your structrual slab by introducing tighter tolerances is false economy when a self builder. In summary it might sound counter intuitive but the extra thickness of concrete is small beer.