bassanclan
-
Posts
1352 -
Joined
-
Last visited
Everything posted by bassanclan
-
if the requirement is that that given plot of land should support three houses, then design a house that only sits on a third of the land. in the application you have to say what area of land you are seeking permission for and if you own any neighbouring land, so you could draw the line around around 1/3 of the plot, in your application describe the 2/3 land as "future development" The downside would be that the 2/3 would not be within your residential curtilage, but it depends how you would need to use the land.
-
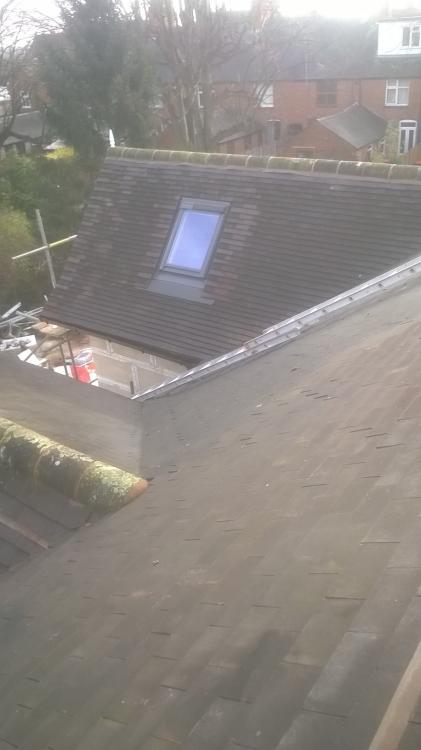
If the roof was less steep (e.g. 35 degrees) then the bonnets would kick up more, but personally I think they look excellent how you have them in your picture, it means you are seeing more of the tile and less of the compo
-
looking good, but it doesn't look like you've put any compo under those bonnets??? Its a good idea to do this as you go, so hopefully you have just laid them loose and not nailed them in!
-
yes obviously, this thread is only about plain tiles.
-
Yes, there should be a course of eaves tiles (not visible) and ideally felt support tray too
-
It looks to me that the gauge is set too tight for that bonnet. I assume the bonnet is not original to your roof. If your gauge is say 90mm, then imagine it was 100mm it would push the bonnet up, therefore moving the second row of tiles across. This could be solved with a tile and a half, or by moving the bonnet up so the bottom of the bonnet would not be exactly inline with the row of tiles by say 10mm, or you might find you have enough variation in the width of the tiles to have a pile of wide and a pile of narrow tiles to overcome this, but more fiddly and time consuming
-
why don't you put one loop in areas which definitely need heat in either layout, one loop which needs heat in layout a) your idea and one loop in layout b) your architects idea? Probably more loops than you had planned, but would give you that flexibility
-
It might be that you need to move the batten down, but if not, I wouldn't worry about it, remember that every tile for the first two rows (and then every 5th) row needs to be nailed. If need be use slightly longer nails
-
Its not like traditional grout, where you have a powdery consistency, imagine expoxy resin for fixings etc, so its a 2part paste you have to mix up. I would borrow some scales and weigh about 250g for the first time until you get used to it as you only get a short window before it goes off. You clean the excess off the tiles (diagonally) as you go with lots of warm water and a scotchbrite pad or similar. Its useful to have a kitchen scourer sponge too for smoothing the final grout line. I have only used it on polished porcelain as I think it might be a nightmare to get off "open textured" tiles
-
I'm looking into this as I've got around 250sqm external render and probably twice that internal to decorate, but I am unsure about whether it is worth buying one, as hiring seems expensive. I would be interested to hear how it goes next week @JSHarris
-
I haven't come over to the plastic pipe side yet! It'll be in 15mm copper, so I will see how the meterage looks.
-
I can understand you wanting to get the right colour if it is on display at the front of the house, the ones in my picture are not easily visible (unless you are on the roof taking a photo). Depending on the nature of the position etc have you thought about cutting two tiles to the size of a tile and a half and putting a lead soaker underneath, this could then be replaced as and when you find the correct tile and a half. (no good if you are cutting the tile and a halves)
-
I am about to start making up a similar manifold myself. I understand the desire for performance (particularly on the hot side), but is there the need for performance when filling a WC? Is there any reason why I couldn't run one/two pipe(s) from the manifold and T off to each of the 5 WCs planned in my house? In our current house there are 3 WCs = basins teed off one pipe and it seems satisfactory. Presumably this would mean I would also want to fit an isolation valve just before the pipe reaches each WC. Am I missing something?
-
I would highly reccomendhttp://www.roofconsult.co.uk/articles/tiling/default.htm http://www.roofconsult.co.uk/articles/tiling/tips88.htm It's not the easiest website to get around, but there is some good info for getting started with roofing
-
You will be able to get them from Carwarden Reclaim in Rugeley, Staffordshire. I had a similar desire, but looking for Acme Sandstorm in dark/black coloured, they have EVERYTHING at Carwarden, but at a price. £4.50+VAT for a tile and a half I decided to buy new. At the end of the day nobody spends that much time looking at the roof. You can see in this photo I used new tile and a halves. They are a decent match except where my supplier gave me staffs mixed instead of staffs blue, but I wasn't going to waste time going back to change them!
-
Bath Surround / Boxing In, and concealed pipework
bassanclan replied to Onoff's topic in Bathrooms, Ensuites & Wetrooms
5-10mm gap around that will be nice a nice gap to get a bit of silicone sealant in afterwards, 3mm will be tight and the chances of cutting it so accurately will be slim -
When you are putting it on you have to work quickly and make sure it is nice and smooth because there is no second chance to go back and smooth it out, like you do with normal grout. Make sure there is good ventilation Make sure you are wearing good rubber gloves
-
What are your thoughts on adding a porch externally to give you the entrance vestibule back and storage for coats etc?
-
it is a bit difficult to see in this photo as the grout I so well matched to the tiles, but its Mapei Kerapoxy, about 7 yrs old. You can see the Dow Corning sealant I mouldy (should have used ct1) but the grout is smooth, mould and mildew free and non porus
-
Epoxy grout is good, but a pain to put in. I will take a photo when I get 2 mins
-
Post liquid screed pour treatment - sanding?
bassanclan replied to readiescards's topic in Underfloor Heating
I used Tarmac Topflow ( used to be Agilia) and didn't remove the laitance quickly enough! It forms a really hard wax on the surface and I needed the wire brush attachement on the rotary sander to even scratch the surface -
Reclaimed bonnets are usually not had to find. Valley tiles are probably an issue because you are never going to find them in the angle you want. You could have an open lead or GRP valley or a mitred valley. Reclaimed tile and a half are like hens teeth - its a much better bet to buy new, they will blend in fairly well and at the nd of the day nobody is looking at the roof that closely unless it is leaking!
-
Help me deal with a neighbour!
bassanclan replied to hmpmarketing's topic in General Self Build & DIY Discussion
Is there room for him to park between your boundary and the side of his house? You could offer him access over your land to get to this strip of land I.e the first part of your drive would be shared access -
There is a 15mm joint between the beads. We considered laying on the topcoat of render and then cutting out the ashlar grooves, but the renderer thought it would be harder to do. Also you only get one chance to get it right! The beads could have been nailed on, but then water could get behind the bead and hence topcoat and then freeze and blow. I think I will have to scrape off the silicon, scotchbrite the pvc, prime the pvc, fill any gaps etc with a non silicone caulk, then paint
-
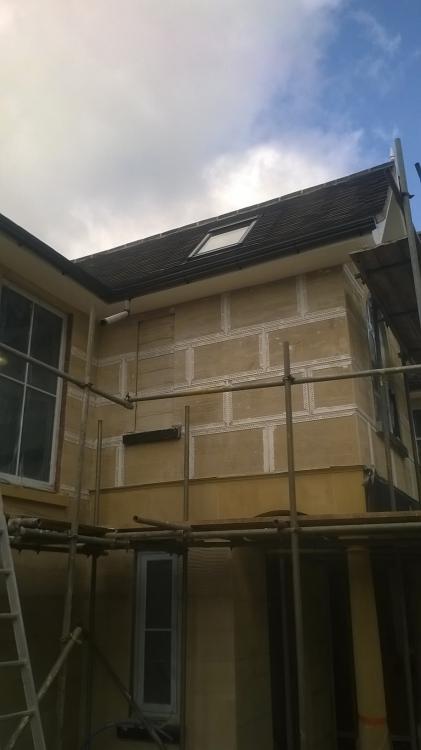
After looking at lots of alternatives for render we decided that the need for a smooth finish and the desire to have an ashlar groove effect (like houses from Leamington Spa etc) meant we chose sand and cement render. The S&C is then to be painted cream colour with a self cleaning paint e.g. Sto Lotusan The renderers have marked out the "blocks" using upvc beads, sticking them on with silicone. The beads and the silicone are white. Today I realised that the paint won't stick to UPVC and virtually no paint will stick to silicone (which has inevitable squeezed out into the groove of the ashlar when sticking the beads on). Any bright ideas?