Onoff
-
Posts
21127 -
Joined
-
Last visited
-
Days Won
206
Everything posted by Onoff
-
Cheers. I meant 22mm thinking about it! It's 22mm above the stop cock. I'm just not used to having fittings so close to each other! I might turn the outside tap feed so it goes up the side of the cistern then out the wall with a saddle bend to cross the feed to the cistern & basin (not shown). It'd put the outside tap at a more convenient height then.
-
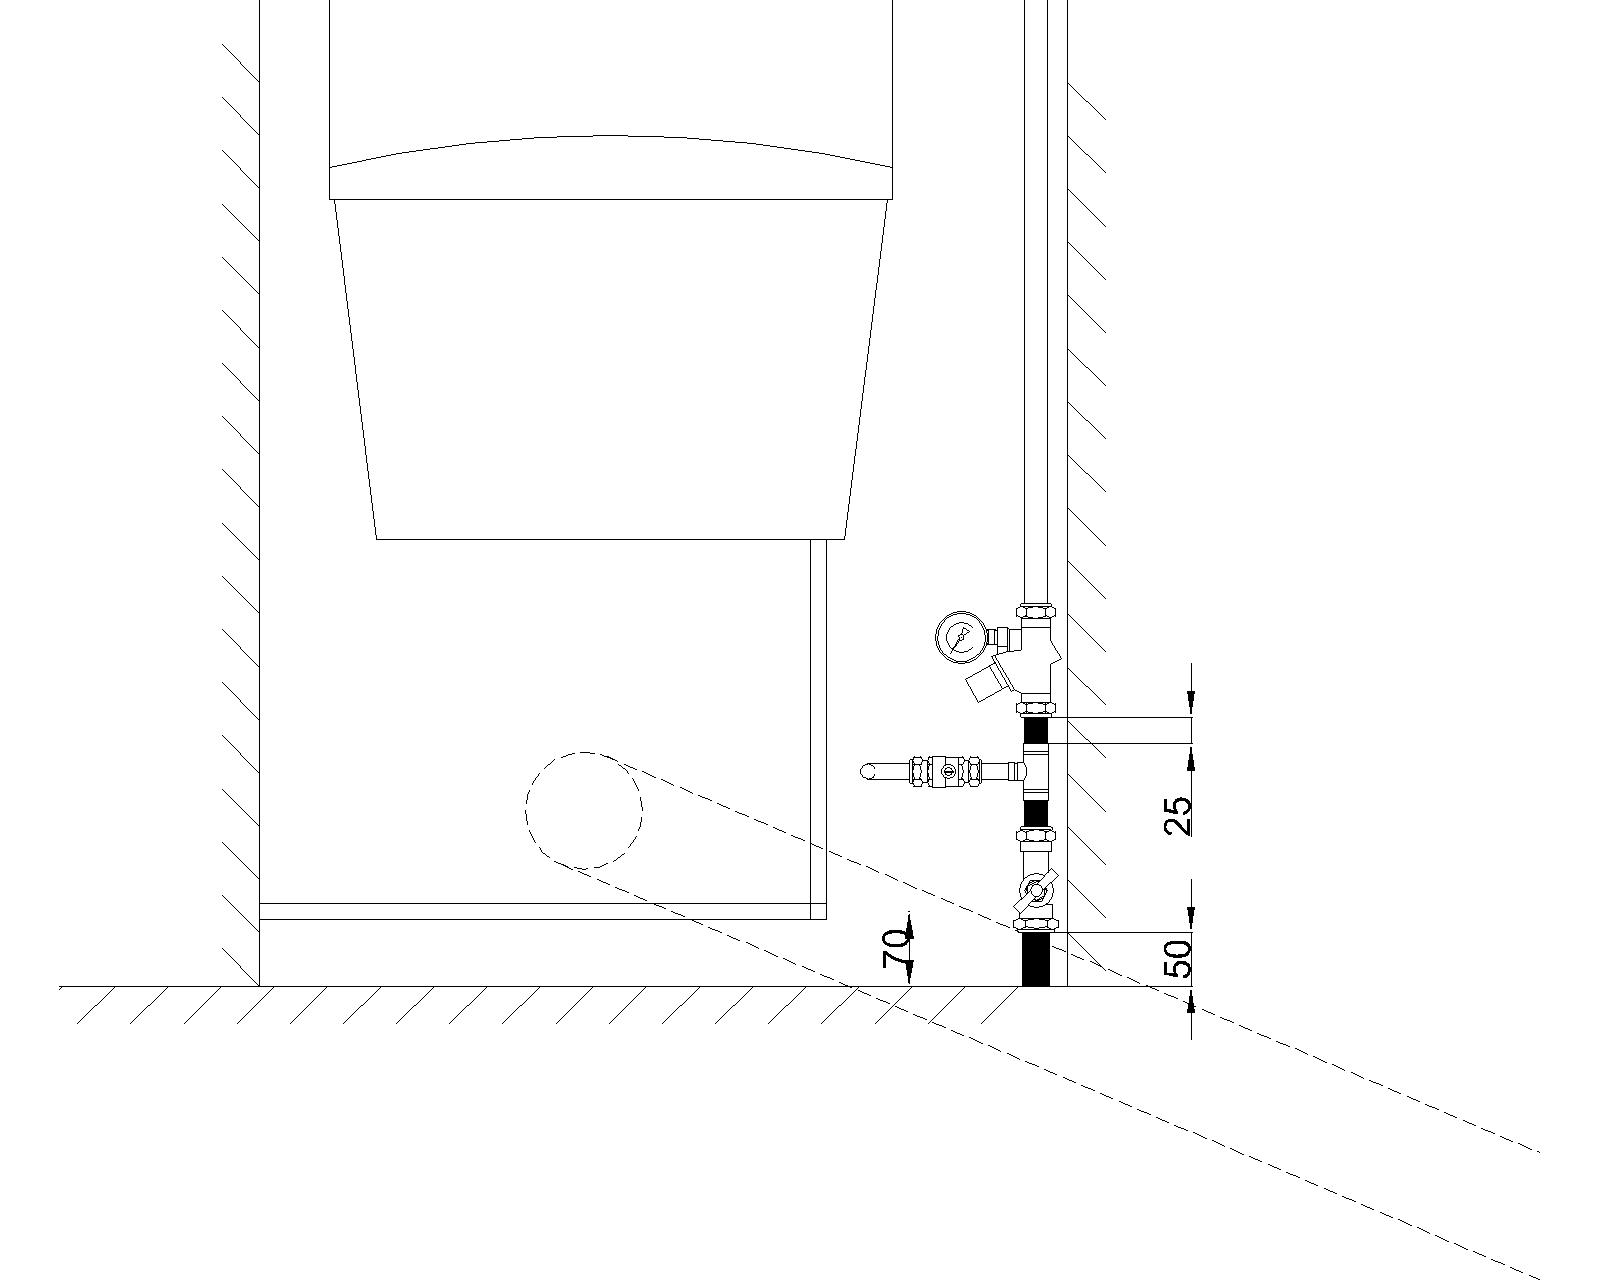
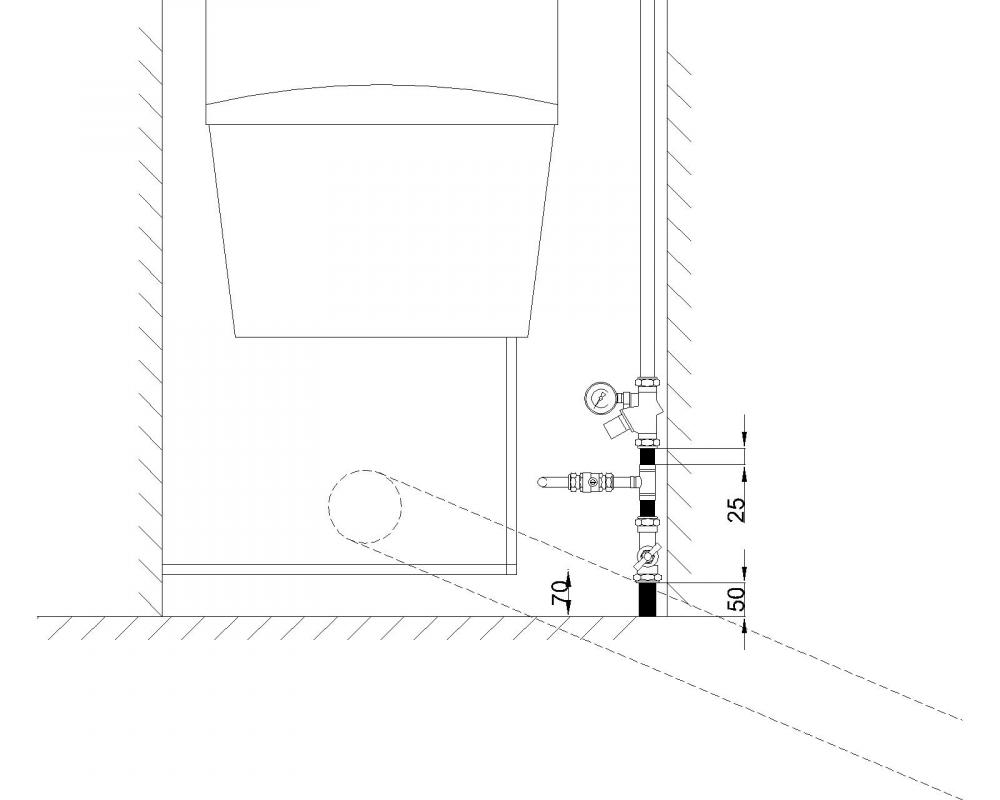
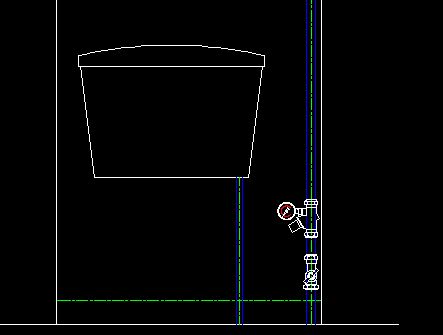
Tundish? Getting there figuring all this tight space out. Still like the idea of the outside tap at "full" available mains pressure. Showing below the MDPE stop cock 50mm above the floor then a Yorkshire T coming off to a Pegler isolating valve and out though the wall to the outside tap. This will however sit it just above the angled soil pipe and I think only about 8" up from the DPC so about 350mm off the ground. That soil could later go vertical down outside on the wall. Then PRV above the T. I've now to add another T above the PRV to tap off a line for the feed to the bottom fed cistern and along the bottom to the basin. BUT is's tight for vertical height Any hard and fast rule about butting compression fittings together i.e. little if any copper showing? Thinking to do away with the solder T after the MDPE stop cock and use a compression T to feed the Pegler isolator / outside tap. I could then get rid of the 25mm bits of copper either side of the Yorkshire.
-
Erm.....is some of that in Welsh? Lots of Googling now, G3, D2, TPRV...multiblock...but I'm OK with NRV & UVC!
-
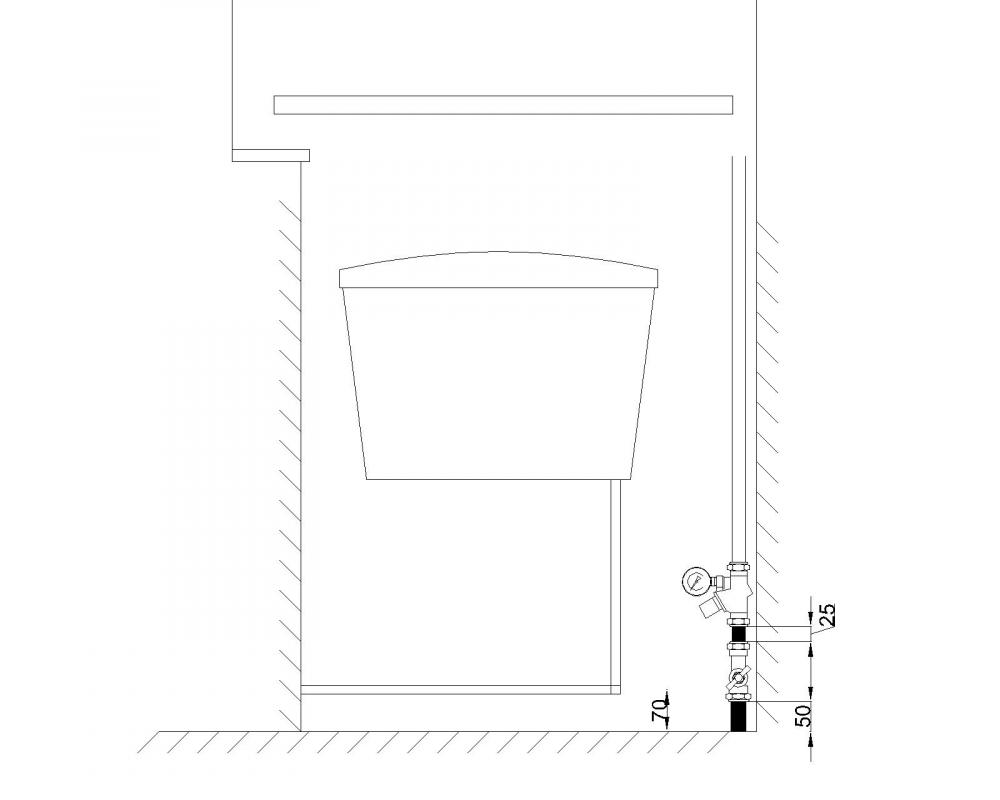
I'll often CAD it & THEN draw it physically on a board/big piece of card! All a bit tight next to this existing cistern. Showing what I think are some minimum spacings between fittings. I suppose I could turn the PRV thru 90deg? Its where to put the outside tap..... Maybe thinking about this the WRONG way. If later on this cistern comes out I need to think about just getting the MDPE connected even if a bit rough. I guess I could even feed the cistern and basin via a flexi for now?
-
If I methodically CAD everything maybe even beyond:
-
Cheers for that, spot on!
-
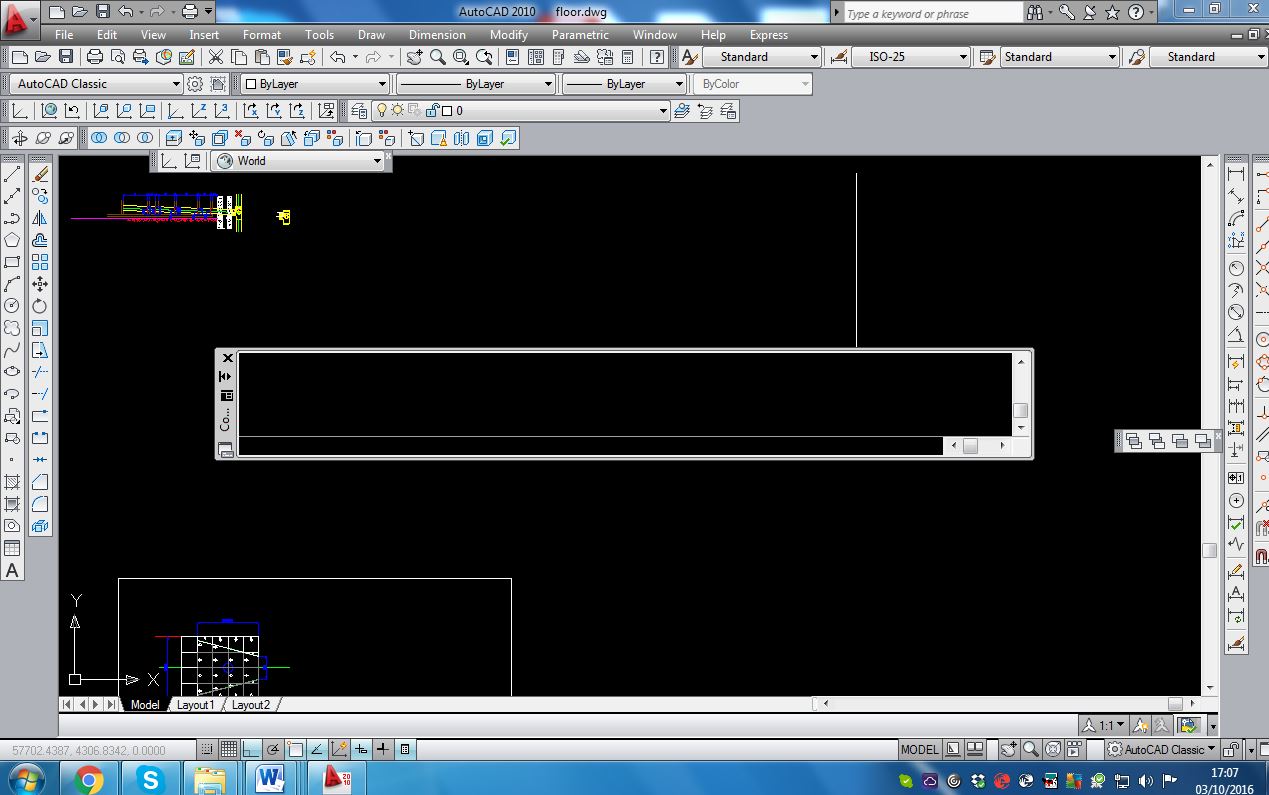
Evening, AutoCAD 2010 running on 32-bit Win 7. As per the attached screen shot the Command Line (dragged centre) is odd. For a start it's now black and just has a flashing cursor in it. As you type the cursor moves but you can's see any text. Not sure what I've done wrong! Any ideas?

-
I can't see her not wanting this lot boxed in! Wonder if its worth chucking in that spare Geberit wall frame and getting a wall hung WC. Working round this one I'm having to virtually hug it, and you realise how often kids "miss"!
-
A flaw in the plan maybe! The tee off to the outside tap, put before the PRV to allow full mains pressure, is proposed to also feed the downstairs WC and cold to the basin there. Do I really want them at full, unadulterated mains pressure which is circa 9 bar?
-
Purging the 25mm pipe...a thought... At the mo the excess is coiled up as shown above. I was thinking to first cut it long enough to poke out of the WC window. If I then turn on the stop cock at the gate it should clean out the pipe? I can then cut back further and fit everything inc the PRV which shouldn't get contaminated by any crud in the pipe. Saying that I've been super careful about leaving the yellow caps on the MDPE until the last minute.
-
Compression it is then. Just waiting for the moaning to start ref the visuals on the PRV etc! Committed the cardinal sin earlier and LOST the draw cord! The vacuum and plastic bag trick sorted it though. Duct now all in and covered with a bit of sharp sand / ballast where I ran out: A pig getting a 1m length of lagging over the MDPE and down the duct as there's a bend. Goes in about 750mm which will have to do. Was going to push it in a couple of inches into the duct and foam?
-
So, inside now, debating a 22/22/15 compression T with the drain valve in as opposed to a solder ring fitting. Thinking it'll be easier when I come to redo the mains throughout in 22mm: ?
-
As an aside to the thread: Note how the earth rod in Barney12's link is 5/8" diameter and that it is THREADED. The 3/8" dia ones are not threaded so you can't couple them to make a longer rod which can be useful to get your earth electrode resistance (RA) down. Of course the 5/8" can be a bit harder to bang in but then they're less "bendy" when doing so. The 5/8" one has obviously more surface area in contact with the ground anyway for starters!
-
One end on and neat! Need to make some sort of an enclosure around this for easy acess / digging if I need to get to it later. Thinking a cut down blue barrel? The one pita is that between the above isolator and the stop cock / meter point at the roadside it's still the old iron pipe - about 10' or so. The oddity is that that's supposedly the water companies responsibility as we originally had the meter in the white tube above. Sod's Law it'll leak there and I'll have to get them in! Cue their argument it's after their meter so it's mine!
-
I put some of that yellow, foam, scaffolding protection (like pipe insulation) on a couple of poles in the garden (kid's treehouse) and the birds had a right old go at it BUT only on the horizontal sections where I guess they can perch. Most external pipe lagging I see on commercial roofs has like a "zinc" shell over it. You could roll some gauze like I just did for where my 63mm duct comes up through the suspended floor with the mains water pipe in: I was told recently of an EPDM roof job on a school where birds had destroyed it. Seems that they drink from any pooled water and eventually damage the roof. They then go mad for the PIR insulation. Something I think to do with it aiding their digestion like grit does naturally. Or maybe it's like humans with bubblewrap! (I considered running trace heating up the drive set at the same width as the car wheels.....)
-
Slightly off track but is that the way it's done normally ref running pipes in the floor? I mean the way the PIR has been roughly channelled then normal pipe insulation used? My goto not knowing otherwise was to carefully V everything and replace when the pipes were in then foil tape over the top:
-
I had to remind myself I'd bought from Wickes and NOT Seconds & Co such was the variance on thickness of some 50mm Celotex I bought. It was bloody awful. Well over / under 50mm in the same board!
-
Ta. The connection onto the stop cock came undone a treat. All in good nick so will re-use. Duct laid in half the trench with some excess. Also brought under and up through the hole drilled in the footings. I went with a rolled bit of galv mesh to protect the duct within the suspended floor. Hopefully I won't need to get there again until I take the hall and adjacent bedroom floor up and make back into one room with en suite. One day it will all be a distant memory!
-
Back on topic..... Not sure where to connect the new 25mm MDPE pipe to as I've a couple of options: The site of operations! Incoming mains comes in from the road (top of the picture). Off to the house, bottom of the picture via the old iron pipe. The white plastic housing is where another meter WAS but now just has a stop cock in it's place. Handy for isolating without going outside the boundary fence. Unscrewing the joint to the iron and swinging it up I can't seem to remove this fitting on the MDPE that I'm holding. I can push it on a bit then pull it back as the video shows but it won't come off. It has teeth I'm sure. Is there a knack for getting this off? I was going to connect the new MDPE to it at this point: When swung down the joint I'm holding is nom 600mm down. The iron pipe then goes off deeper which is how far we've dug the trench. I'm thinking maybe though I could connect the new MDPE direct to the stopcock. That is approx 300mm down. I could insulate the pipe as I'm putting it anyway in 63mm blue duct. It would save on 5 joints in the MDPE:
-
You could splice and solder with heat shrink to get the joint a bit thinner of course..... EDIT: You would though need to be bang on with your soldering and not have any wispy bits of sharp strand that could poke through the heat shrink.....itself which is unlikely to be as thick as the original insulation. With a staggerd joint there's less chance of course of it shorting out but the joint is potentially longer etc. We're really trying here to do what's NOT done and for good reason! But it's FUN!
-
And to think I turned down an evening with Rachel Riley to do this: So, proper crimps (RS from memory). Done them side by side whereas I'd usually stagger them if joining T&E: See how the glue seeps out, sealing the crimp to the wire and making it watertight (theoretically): Mmmmmm.....FUGLY! Would look even more "python/large meal" like with 3-core flex: It's a good strong joint tbh. Best thing you could do with it is HIDE it! White heat shrink would tone it down but not in a kitchen surely? Don't know if I'd want it on anything but the lightest light fitting anyway! TBH I think a tube would look good: http://www.houzz.co.uk/photos/1111933/open-concept-great-room-with-vaulted-ceilings-contemporary-kitchen-vancouver
-

Stainless steel screws 70% off
Onoff replied to DavidFrancis's topic in General Self Build & DIY Discussion
And people think I need to get a life! Disappointed you didn't try Toolstation's own brand and maybe some SPAX though.....and where's the photos? But seriously, kudos! EDIT: Just picked my lot up a couple of days late. The GIRL at S'fix offered to help me out to car with them as no bags any more. "S'alright LUV I'll manage!". Must have looked a right idiot struggling out with them stacked high under my chin. -
BUTT crimps.....still makes me smile as does RING main! Not as much as our old lower school master though.....Major Williard! (TRUE btw). I'll get me coat!
-
"Mummy, what's that lady doing?"
-
Stainless steel screws 70% off
Onoff replied to DavidFrancis's topic in General Self Build & DIY Discussion
Rearrange the words to make it sound really dirty!