Onoff
-
Posts
21127 -
Joined
-
Last visited
-
Days Won
206
Everything posted by Onoff
-

Help with kitchen renovation/ 1st house.
Onoff replied to zoothorn's topic in Bathrooms, Ensuites & Wetrooms
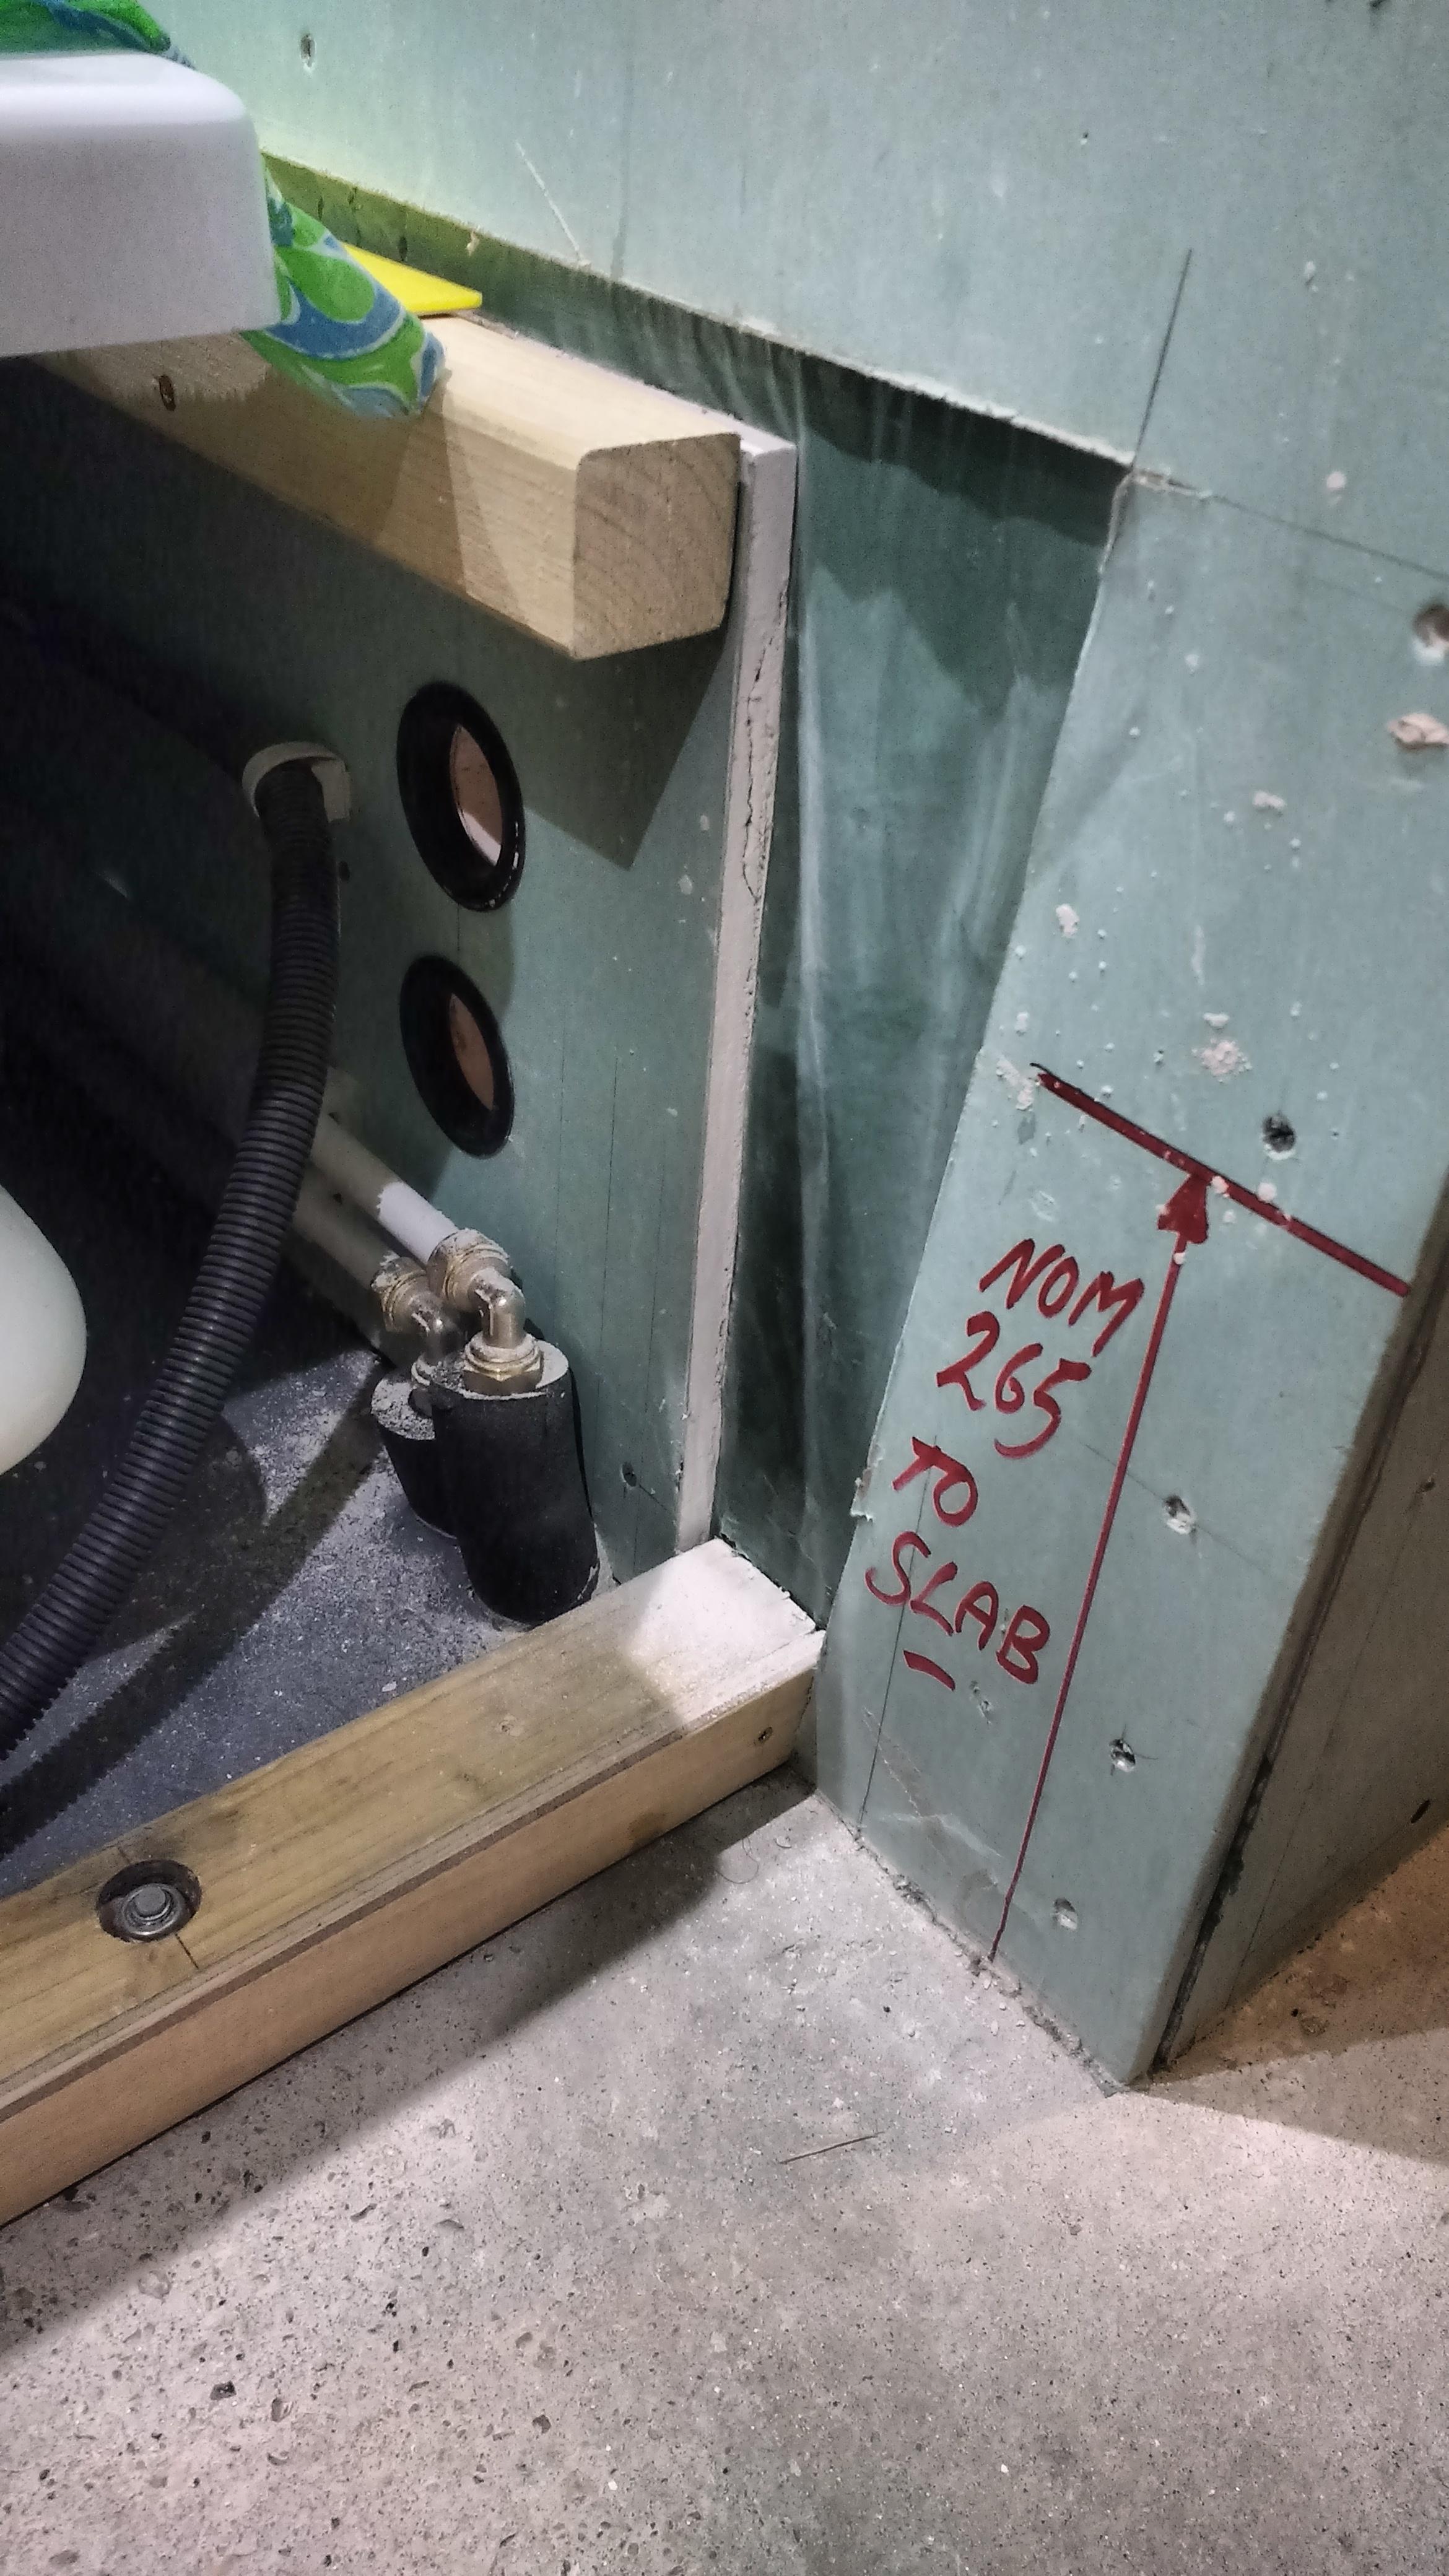
Assuming he brings the concrete infill level with the top batten then he needs to know where 27mm of insulated pb + wood sill or tile will come in relation to the window. That's a fixed window anyway isn't it? -
Help with kitchen renovation/ 1st house.
Onoff replied to zoothorn's topic in Bathrooms, Ensuites & Wetrooms
I'm thinking you'll need 35mm extension boxes for those sockets. Thinking 25mm batten + 3mm pack + 9.5mm pb = 37.5mm so the box will be a couple of mm under. Are you using 9.5 or 12.5mm pb? You might be best getting from a local electrical wholesaler rather than suffering the postage cost if ordering on line.CEF, Edwardes, Newey & Eyre are names to look for. Some bigger builder's merchants might do them too. Typical online supplier: 1-gang: https://www.ukelectricalsupplies.com/norslo-extension-box-steel-1-gang-35mm.htm 2-gang: https://www.ukelectricalsupplies.com/norslo-extension-box-steel-2-gang-35mm.htm? -
Help with kitchen renovation/ 1st house.
Onoff replied to zoothorn's topic in Bathrooms, Ensuites & Wetrooms
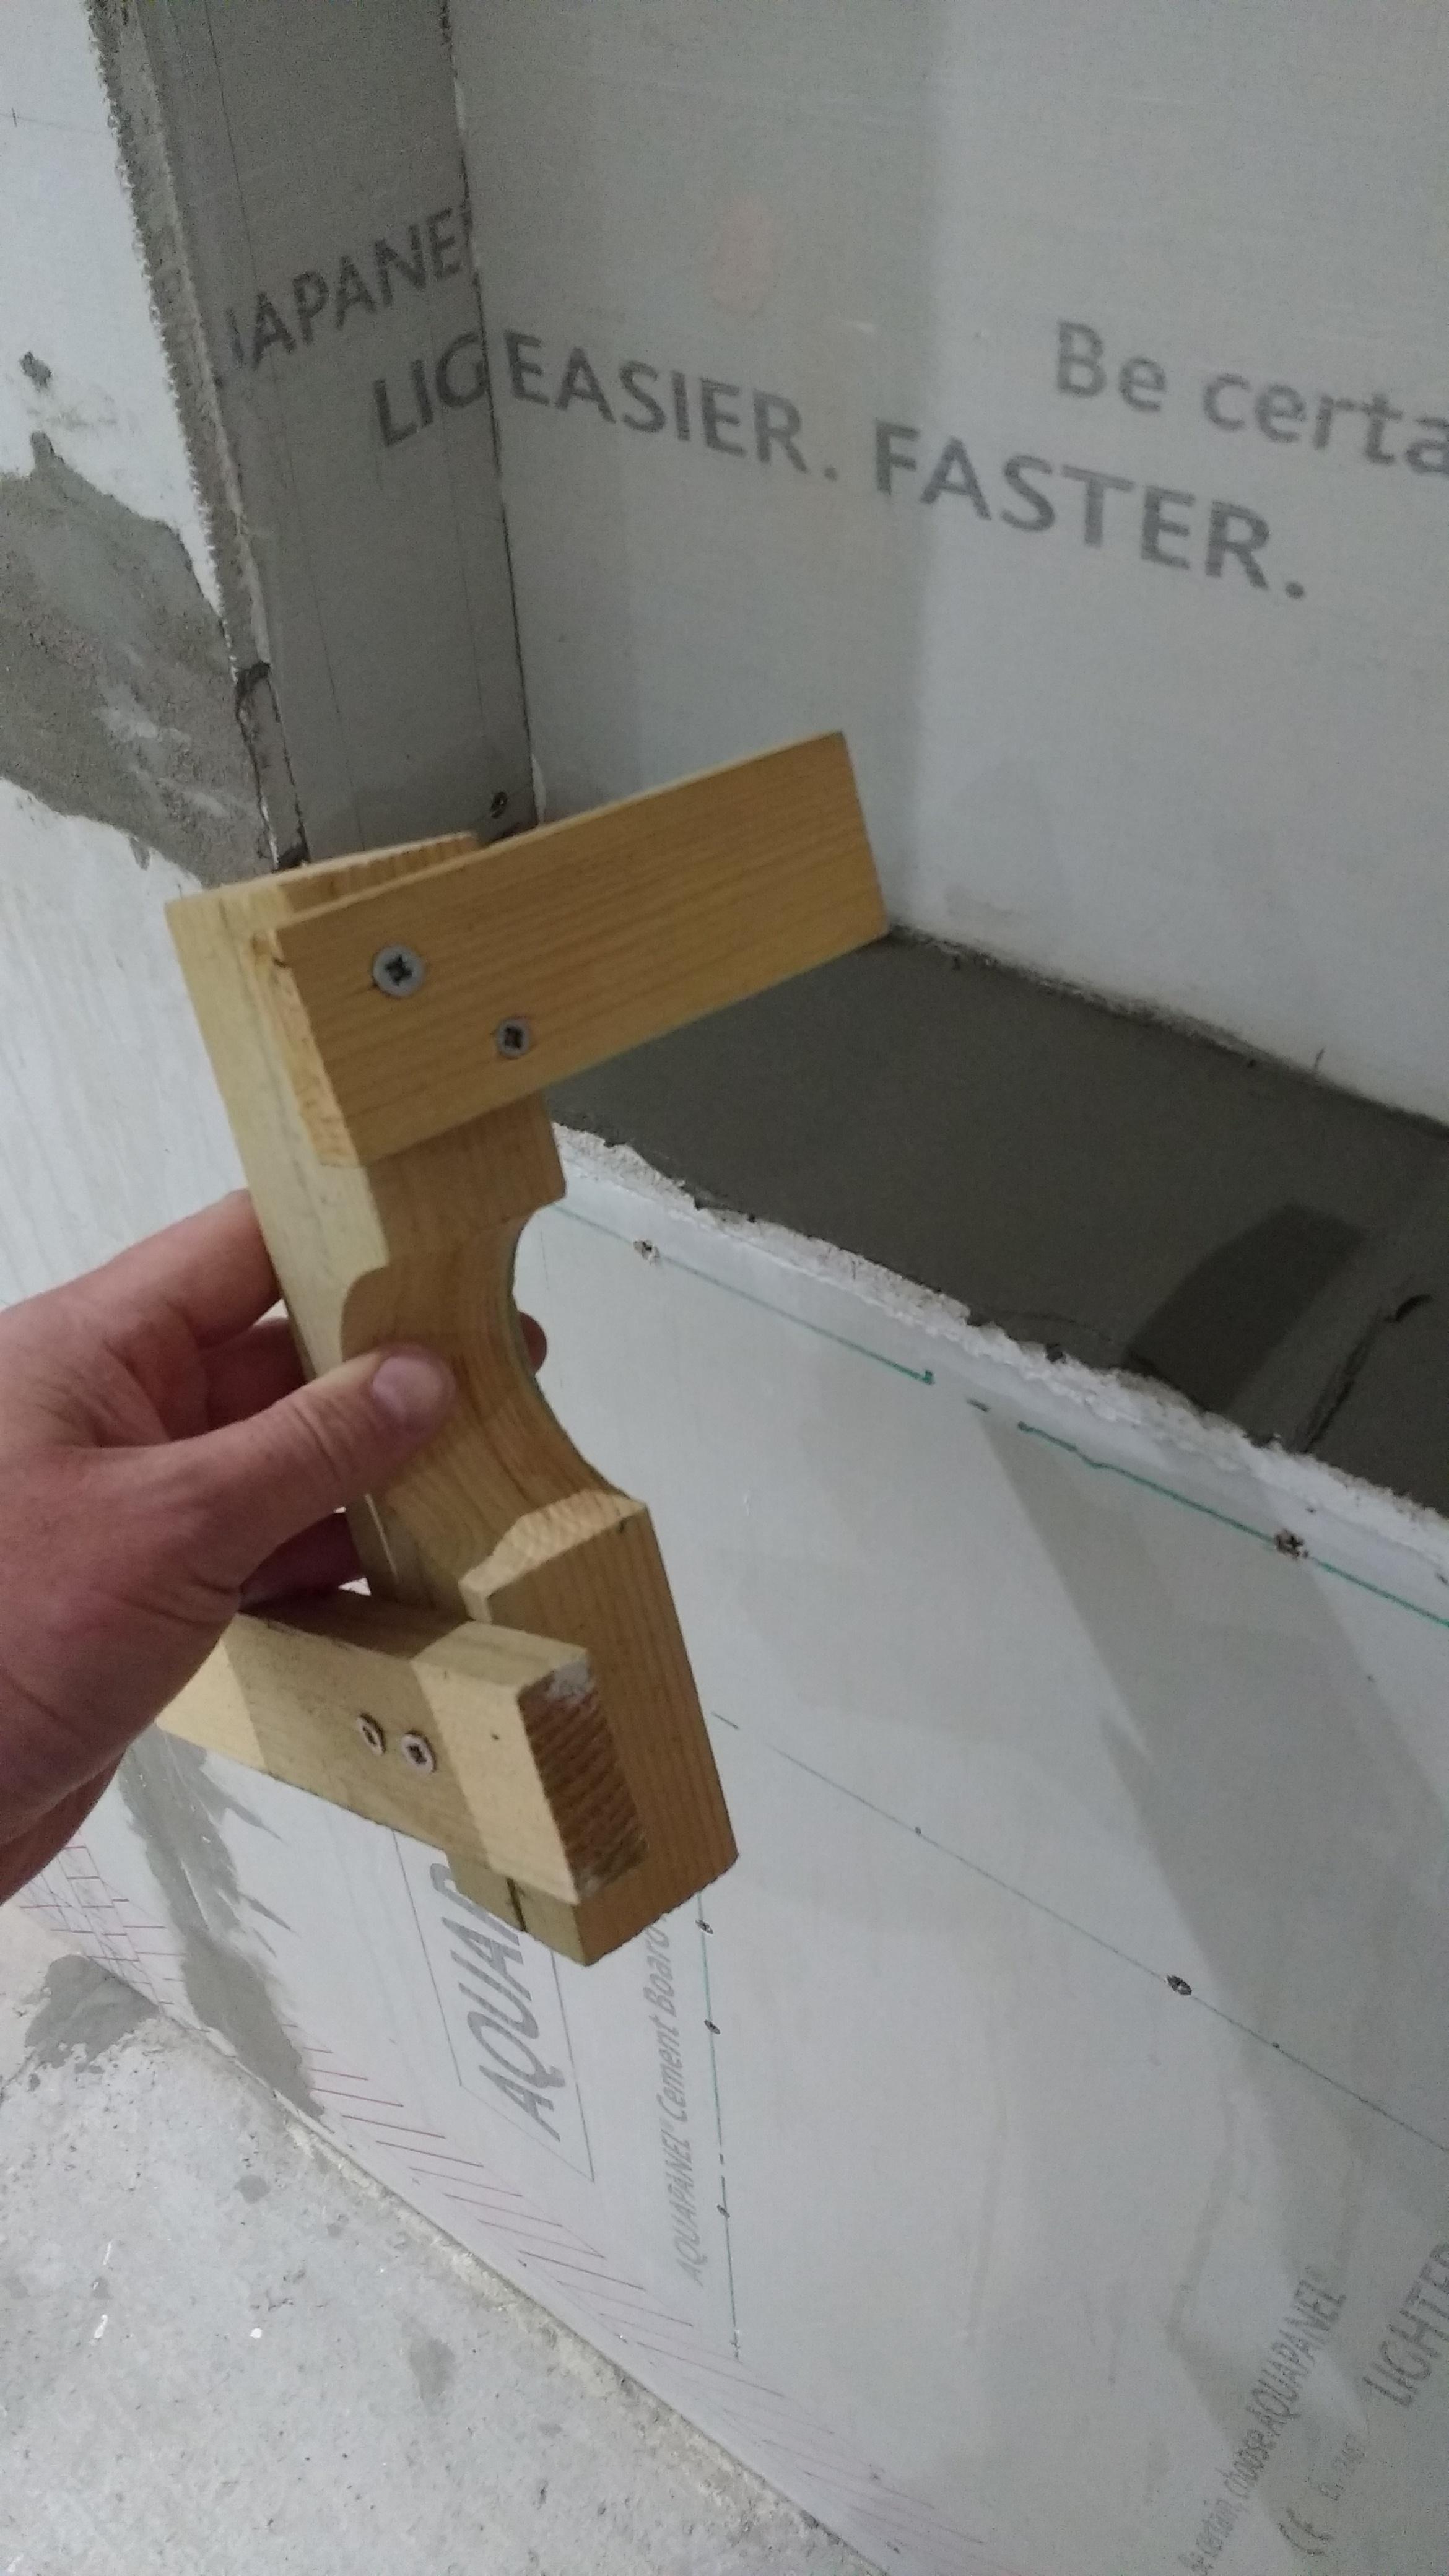
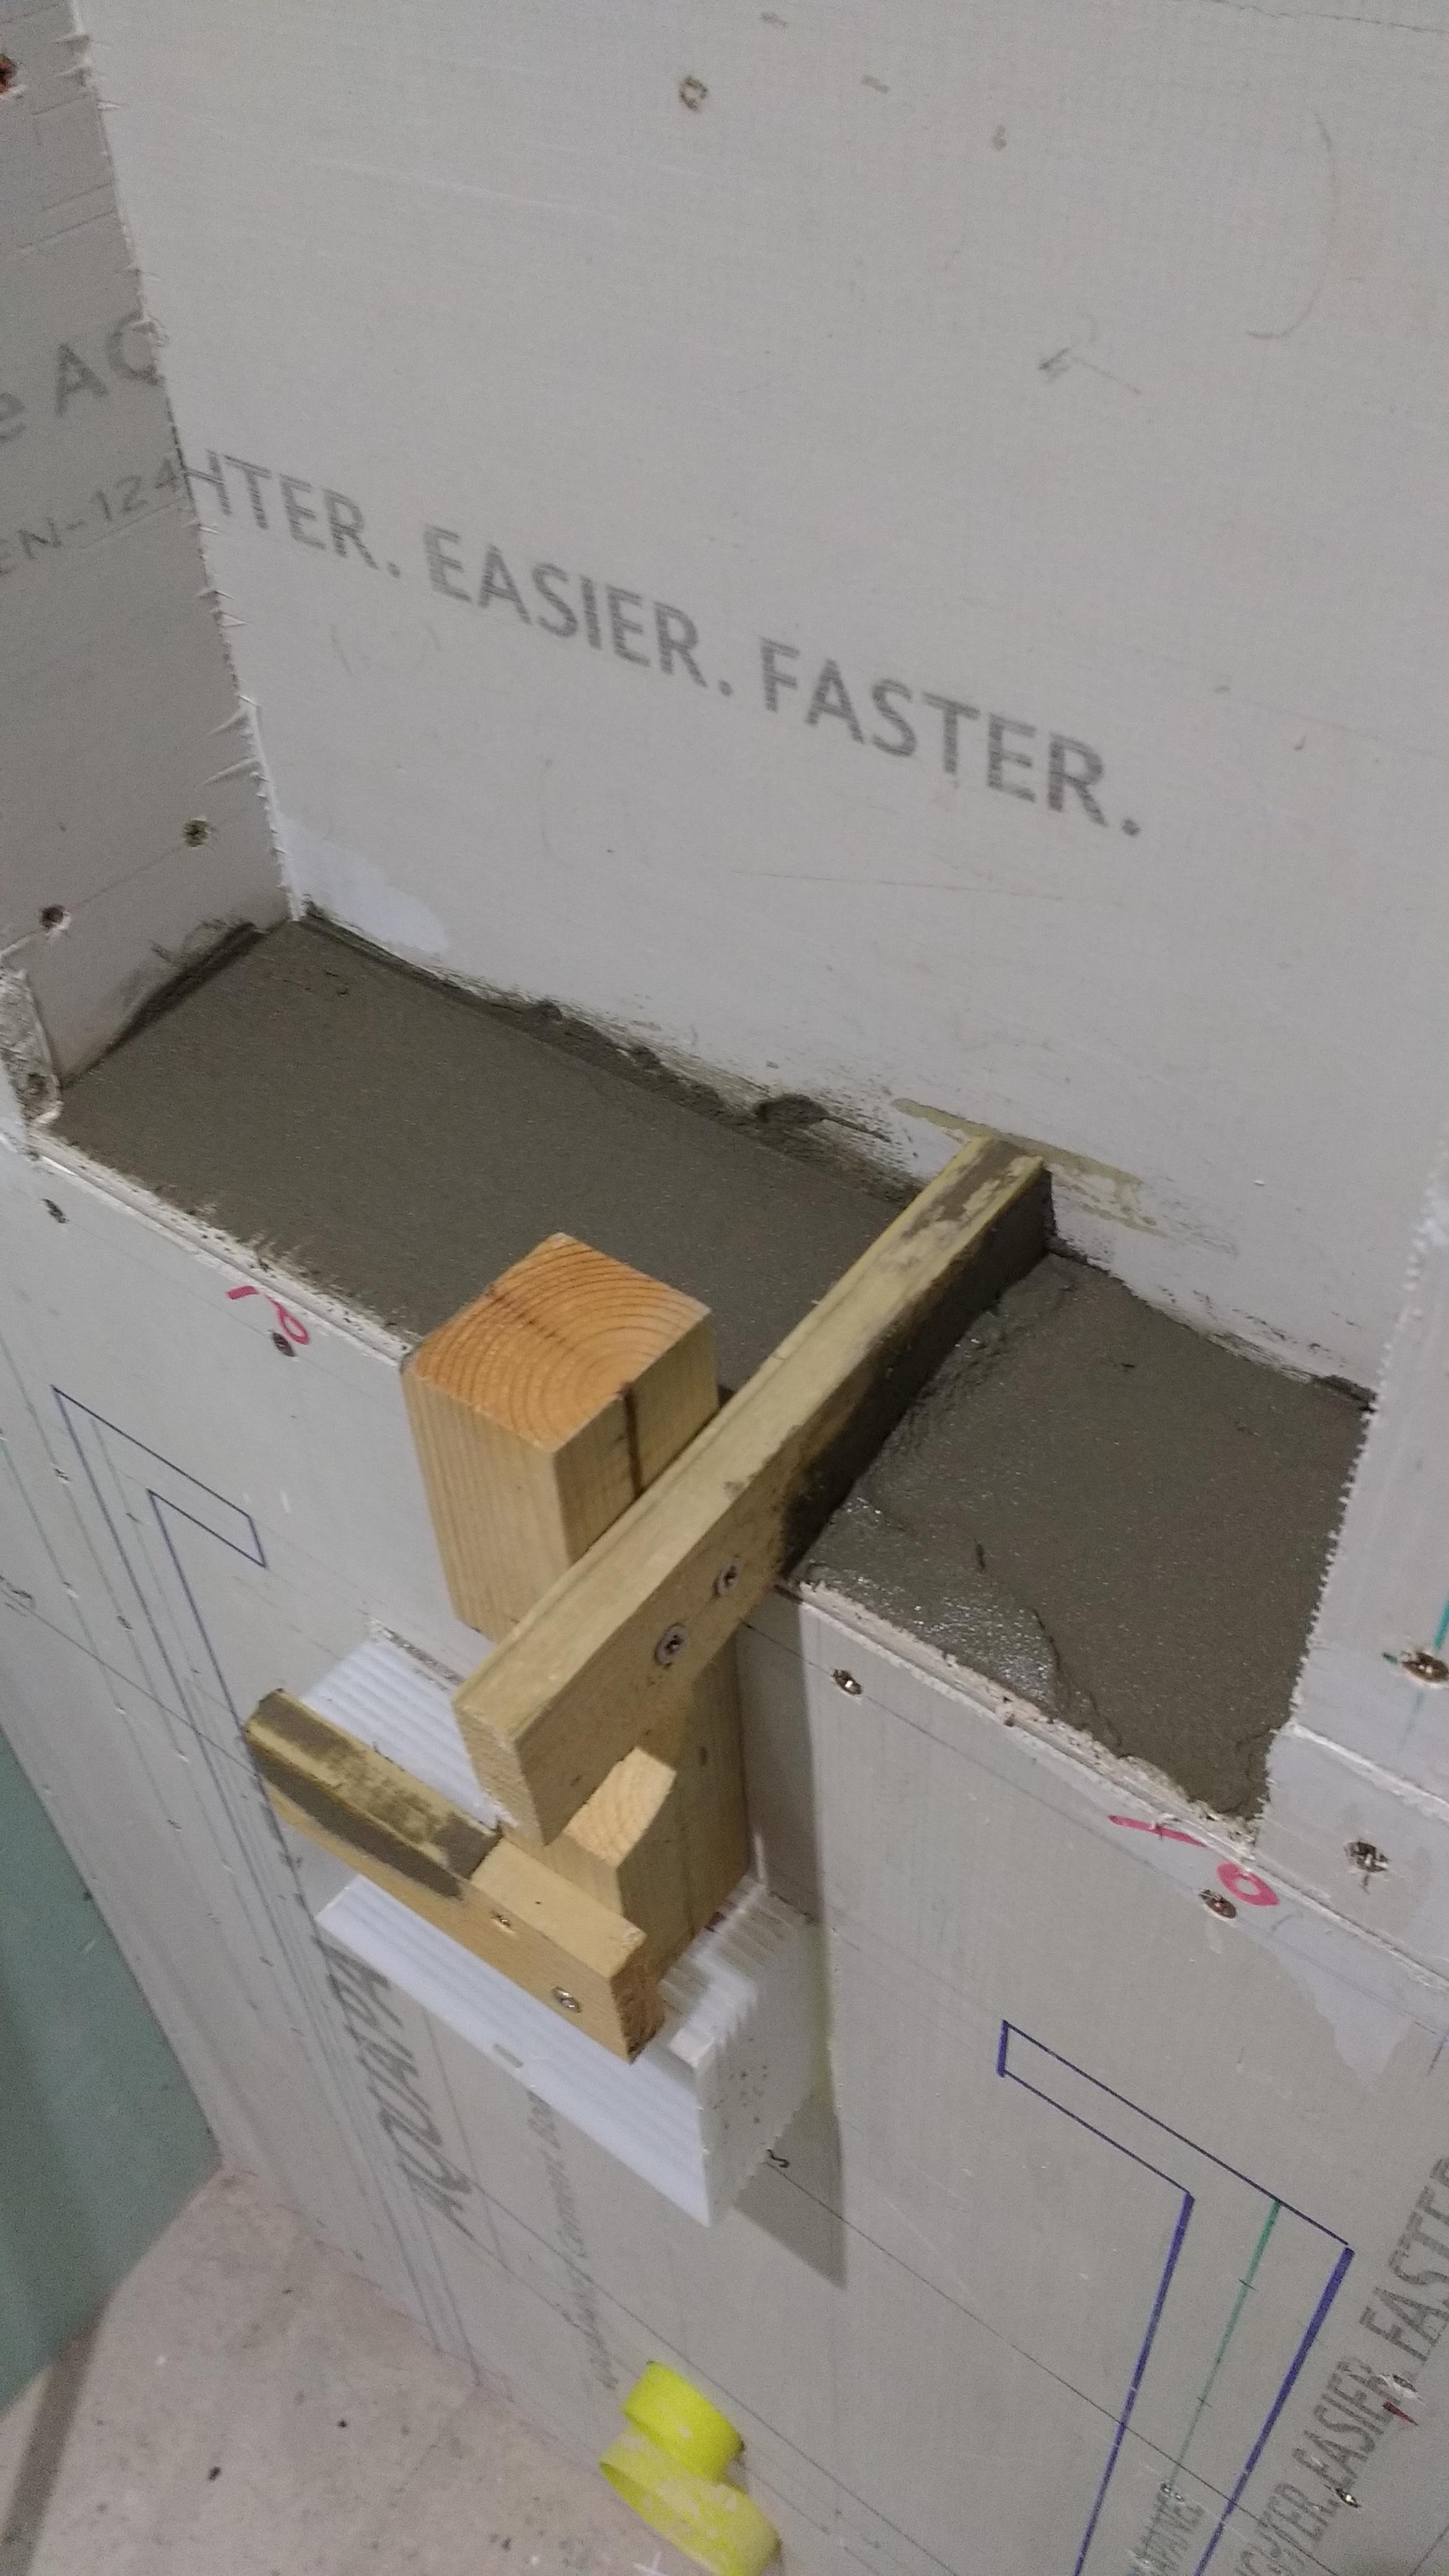
Just seen your latest pic with the extra batten. Cut two short bits of batten and make a tamping tool like mine. Use the height of the double batten as the "wall". -
Help with kitchen renovation/ 1st house.
Onoff replied to zoothorn's topic in Bathrooms, Ensuites & Wetrooms
You COULD use a short level atop a piece of timber as a tamping board. Tbh I've even used my short box level to tamp without the wood and cleaned it off well. Or..... Make up a right angled tamping tool like I did (without the slope like mine of course). Repeated here as you probably won't have read my other thread! :) Put the muck on: Knock up something like this: Drag/tamp. I know you haven't got any pb on yet but you could screw on a board temporarily across the battens to act as "wall": Crack a tinny!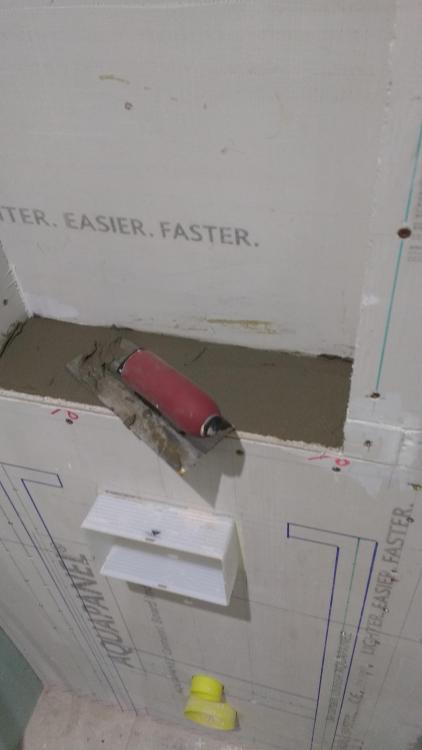

-
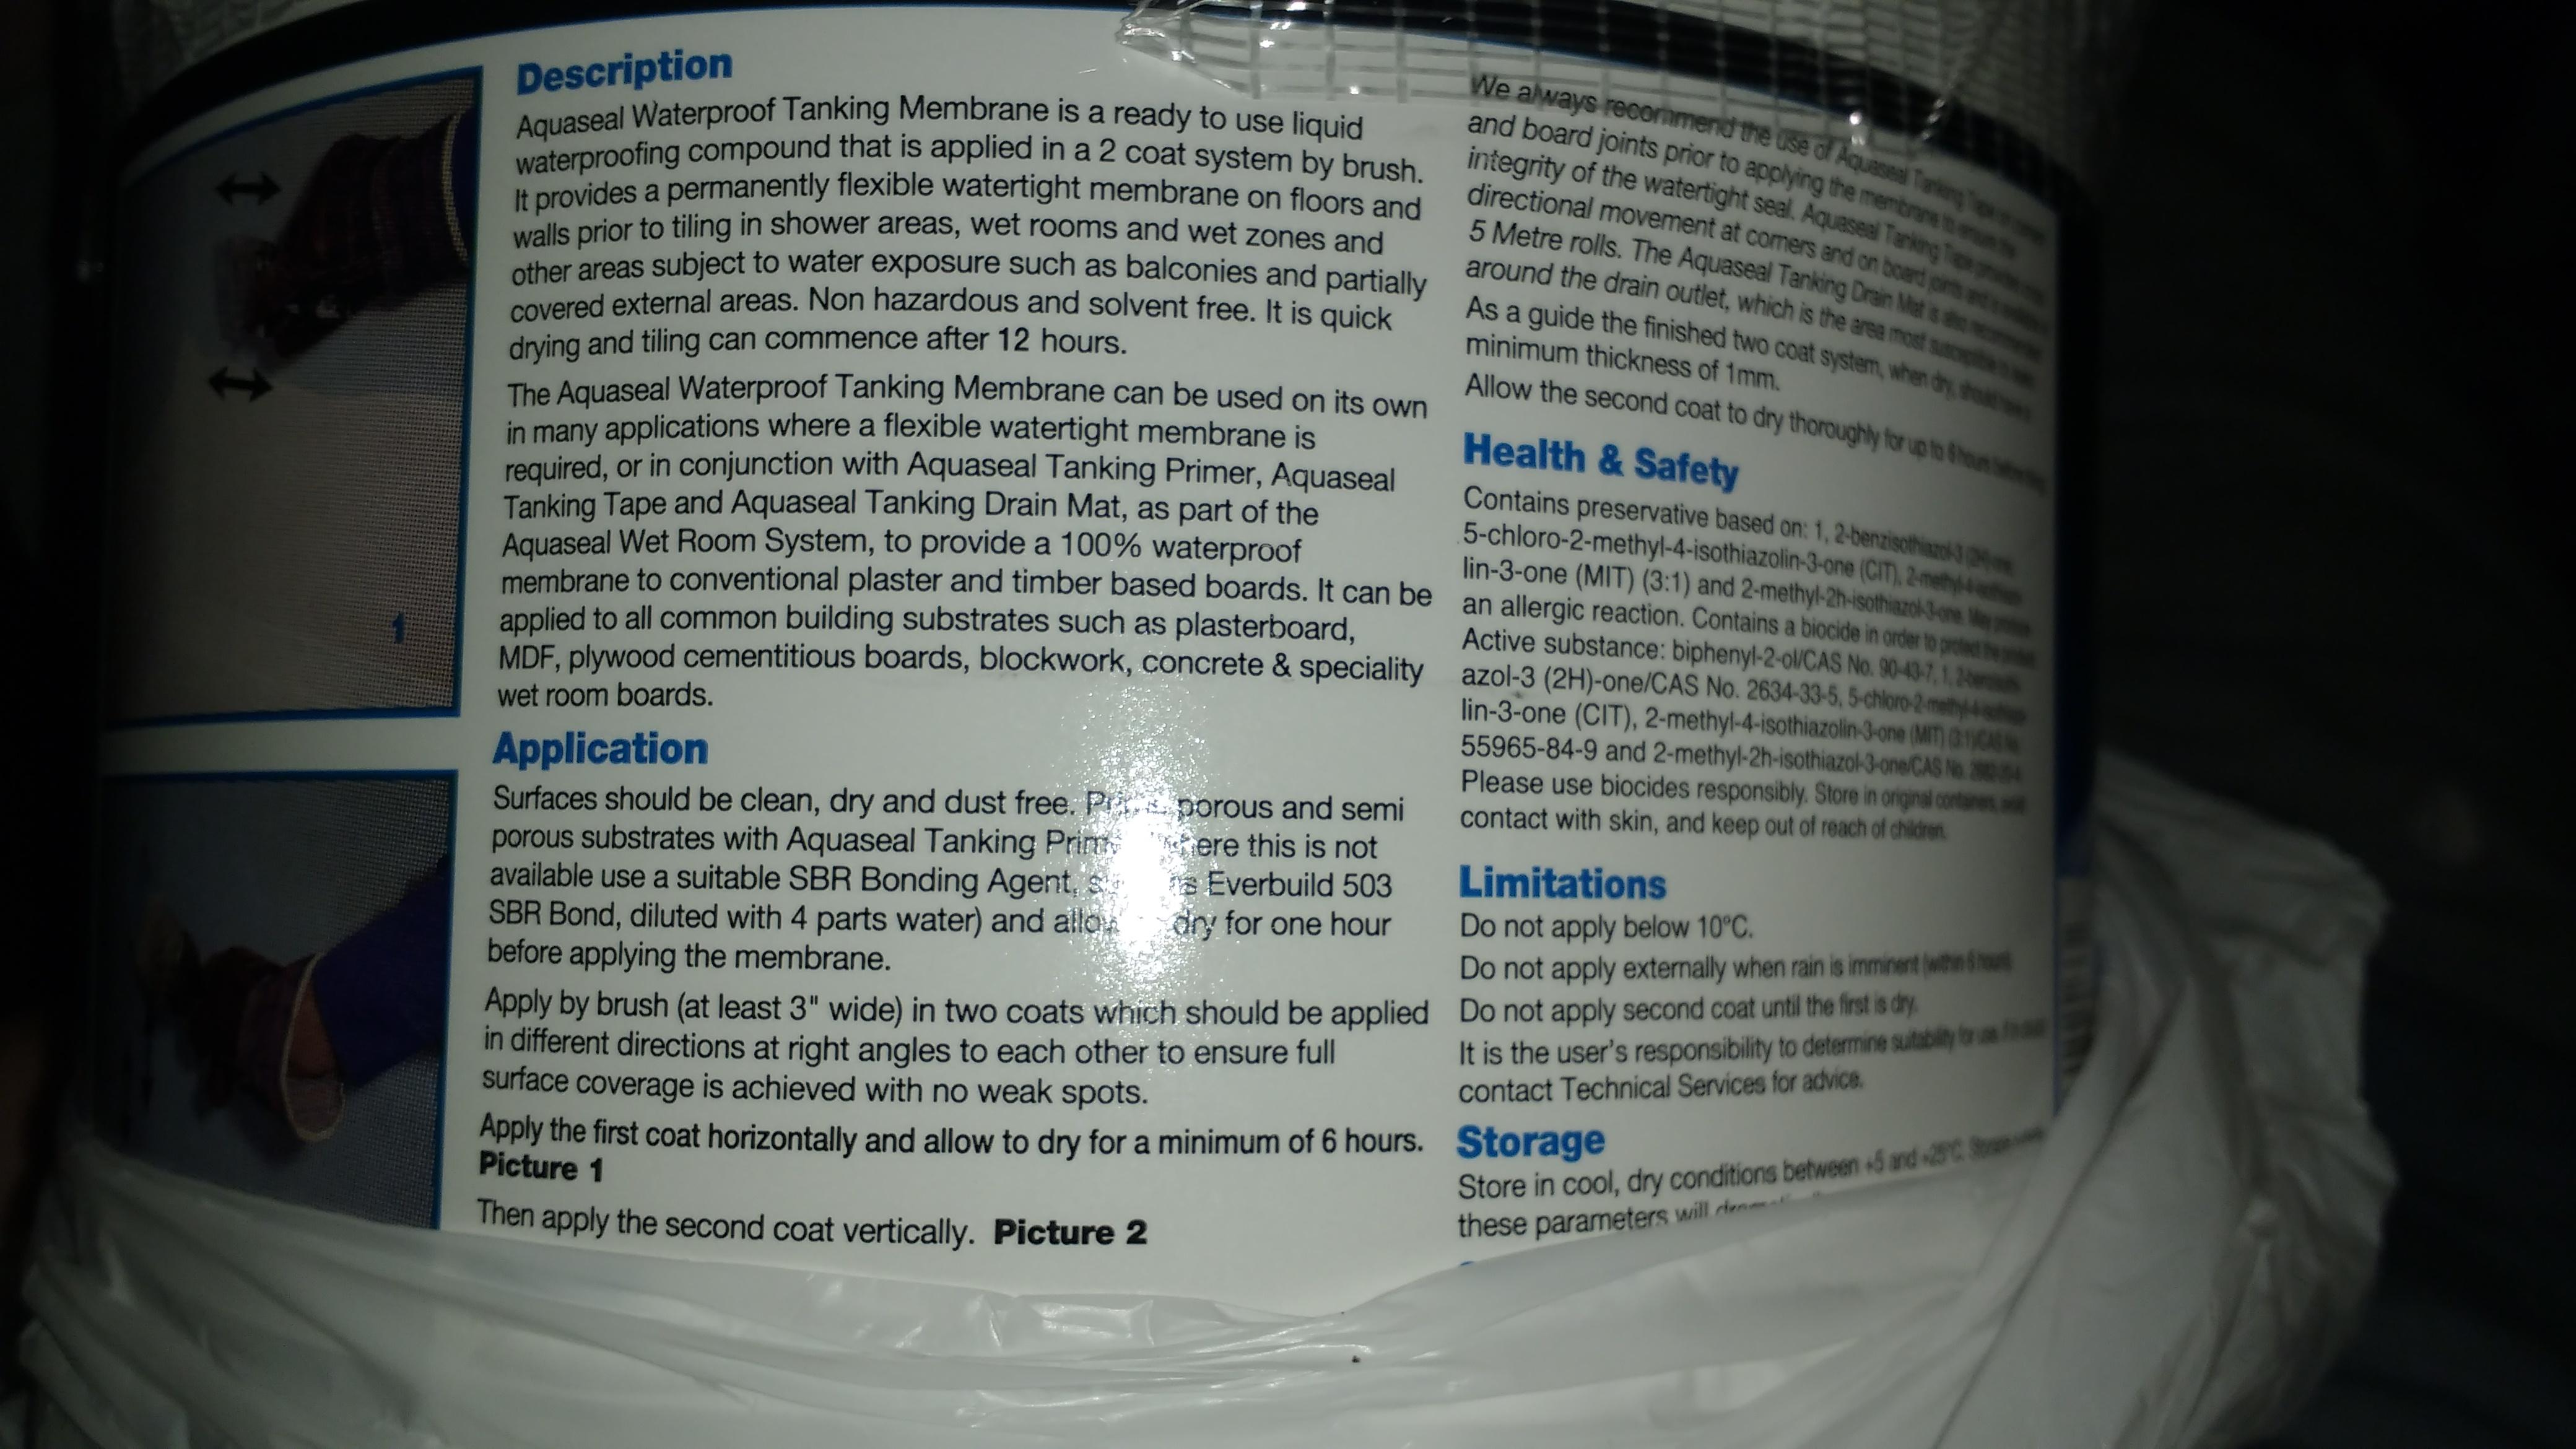
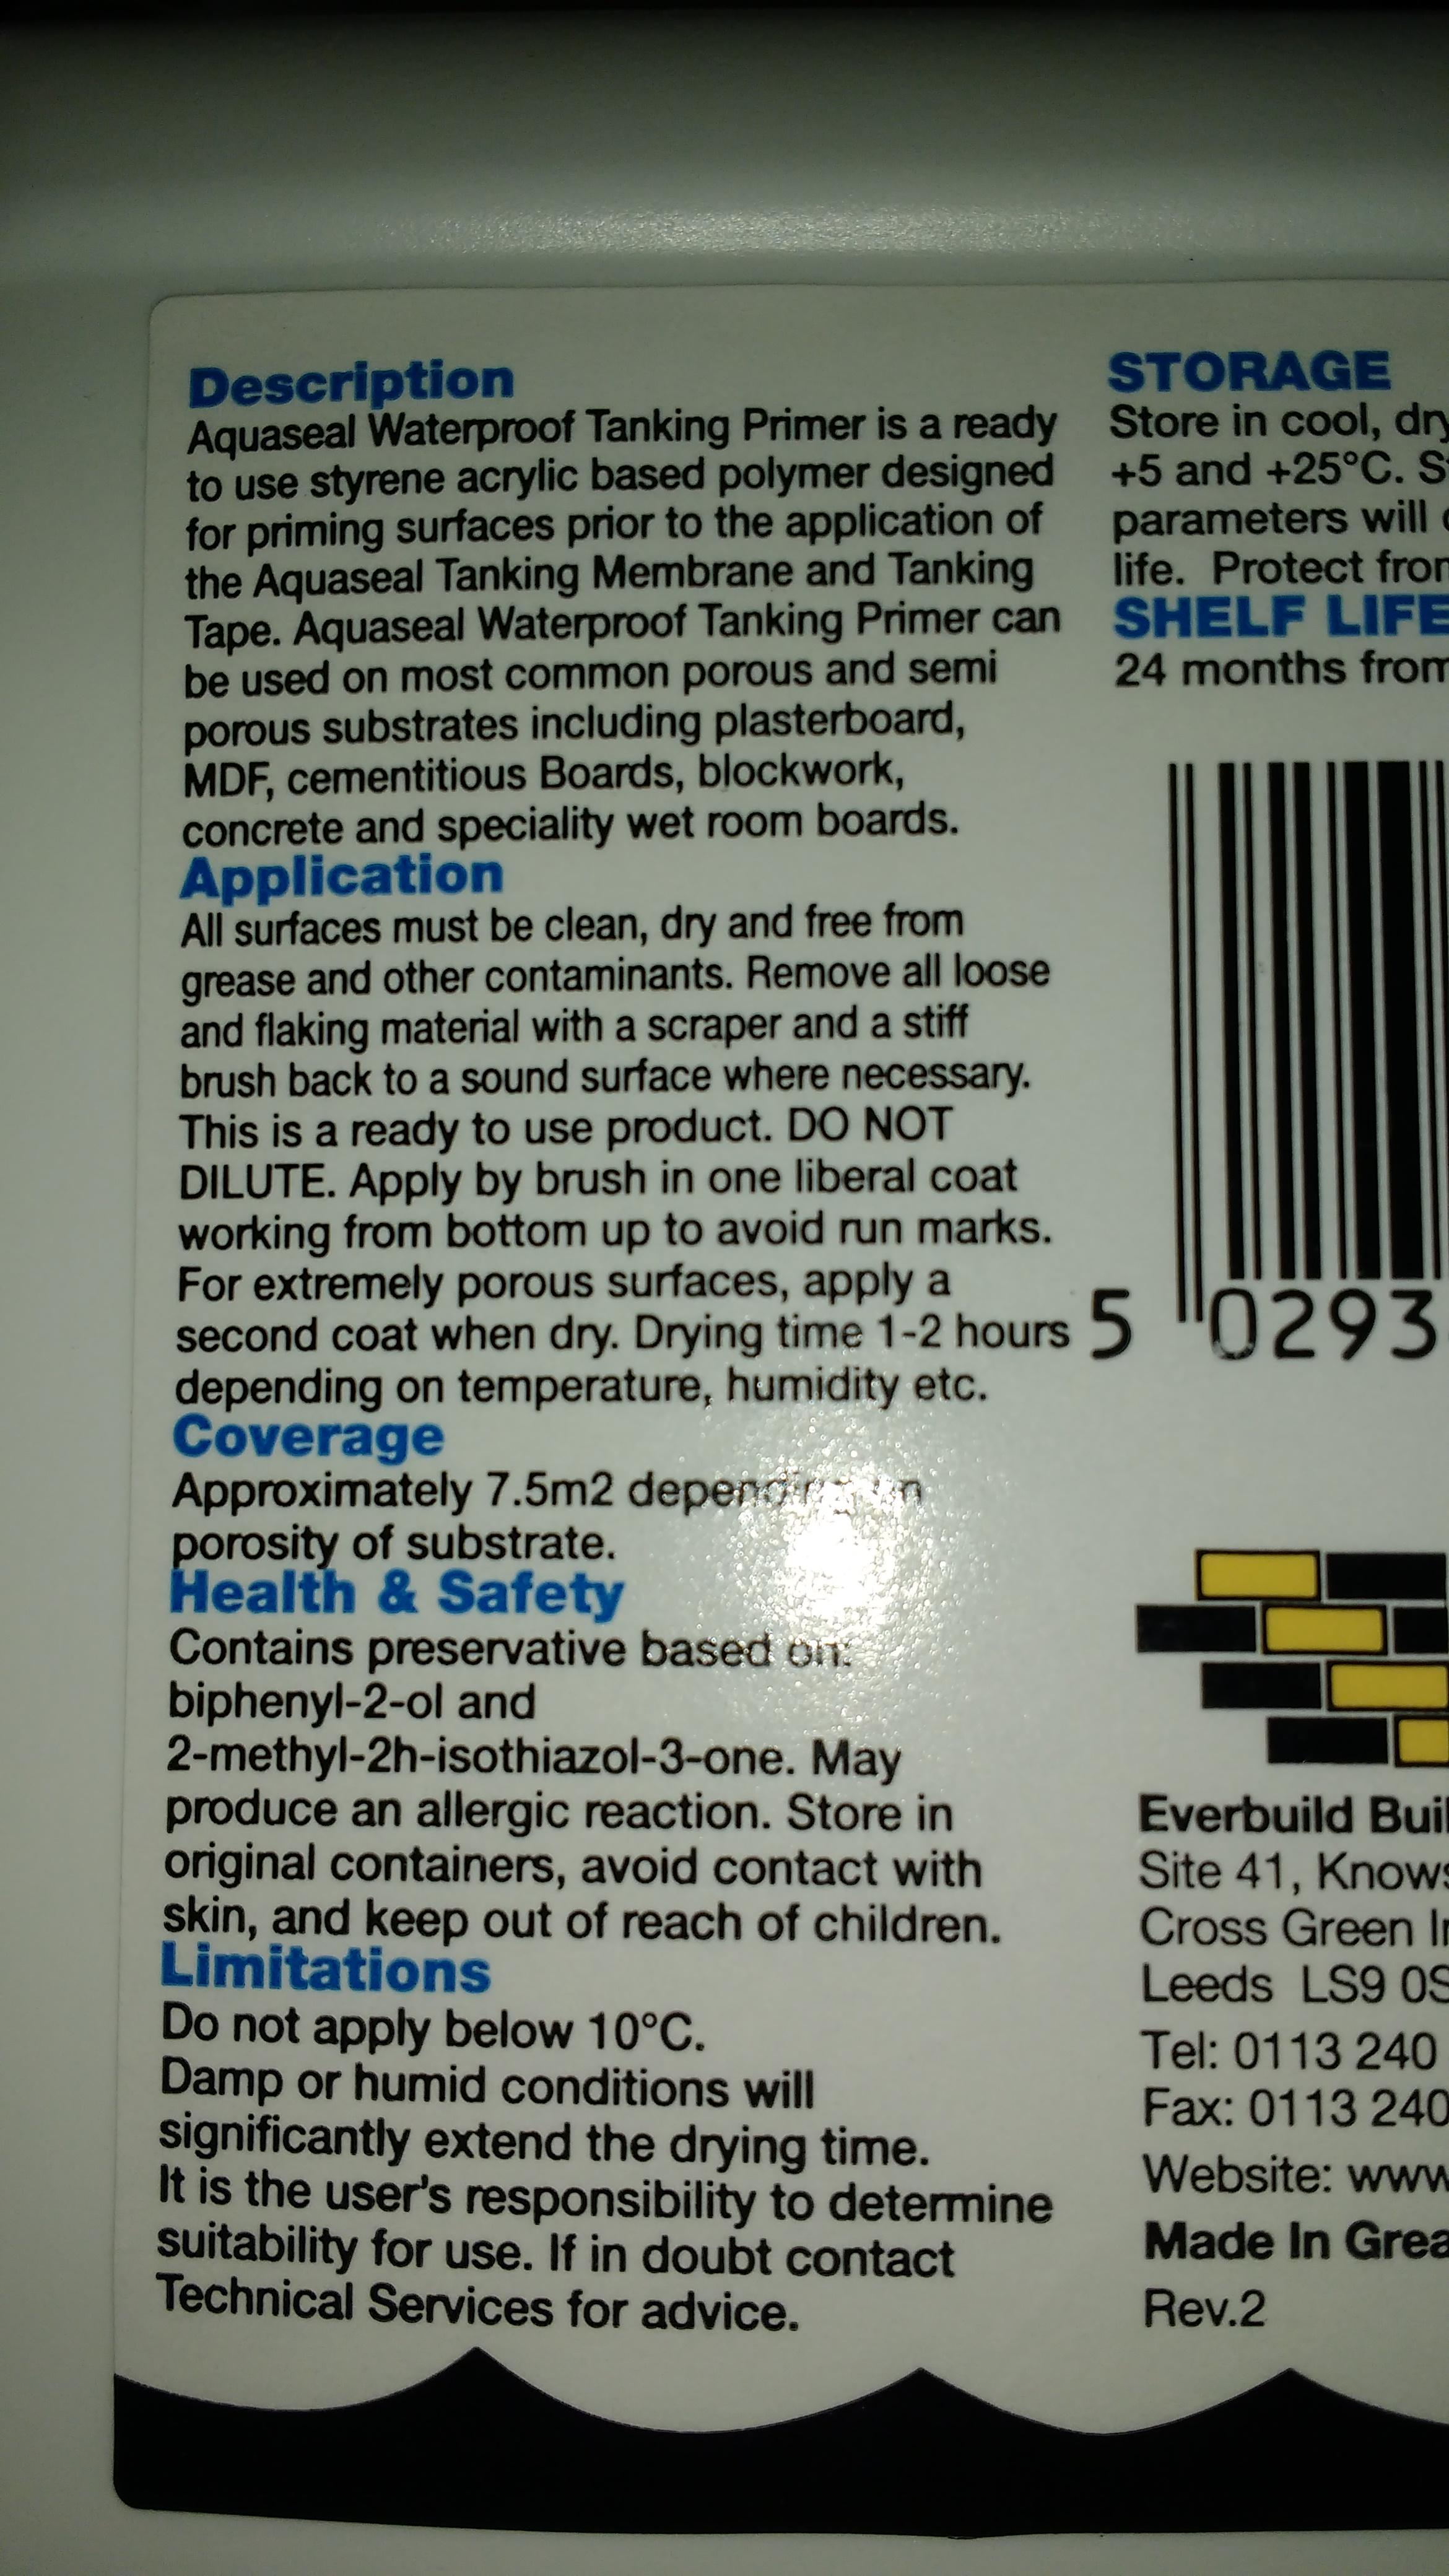
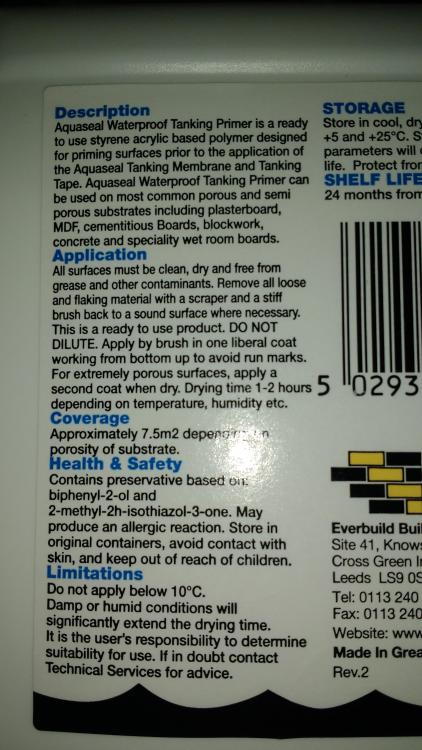
What did you prime with, the stuff that came with the kit or SBR? & how the Hell is 1L of primer in the kit supposed to cover 7.5m2 it's just not possible?
-
I used the corrugated bitumen sheets from Wickes years ago and they were utter crap. Never, ever again. BiL used them on his woodwork shop too, same result. Not much of a slope tbh on either roof. They just sunk between the roof beams leaving like soggy washing up bowl sized depressions that then split. Can't remember the centres on my roof but I put extra angle irons in to have the distance the sheets were spanning. Think it ended up 18" maybe 2'. I always wondered if a ply deck first would have helped.
-
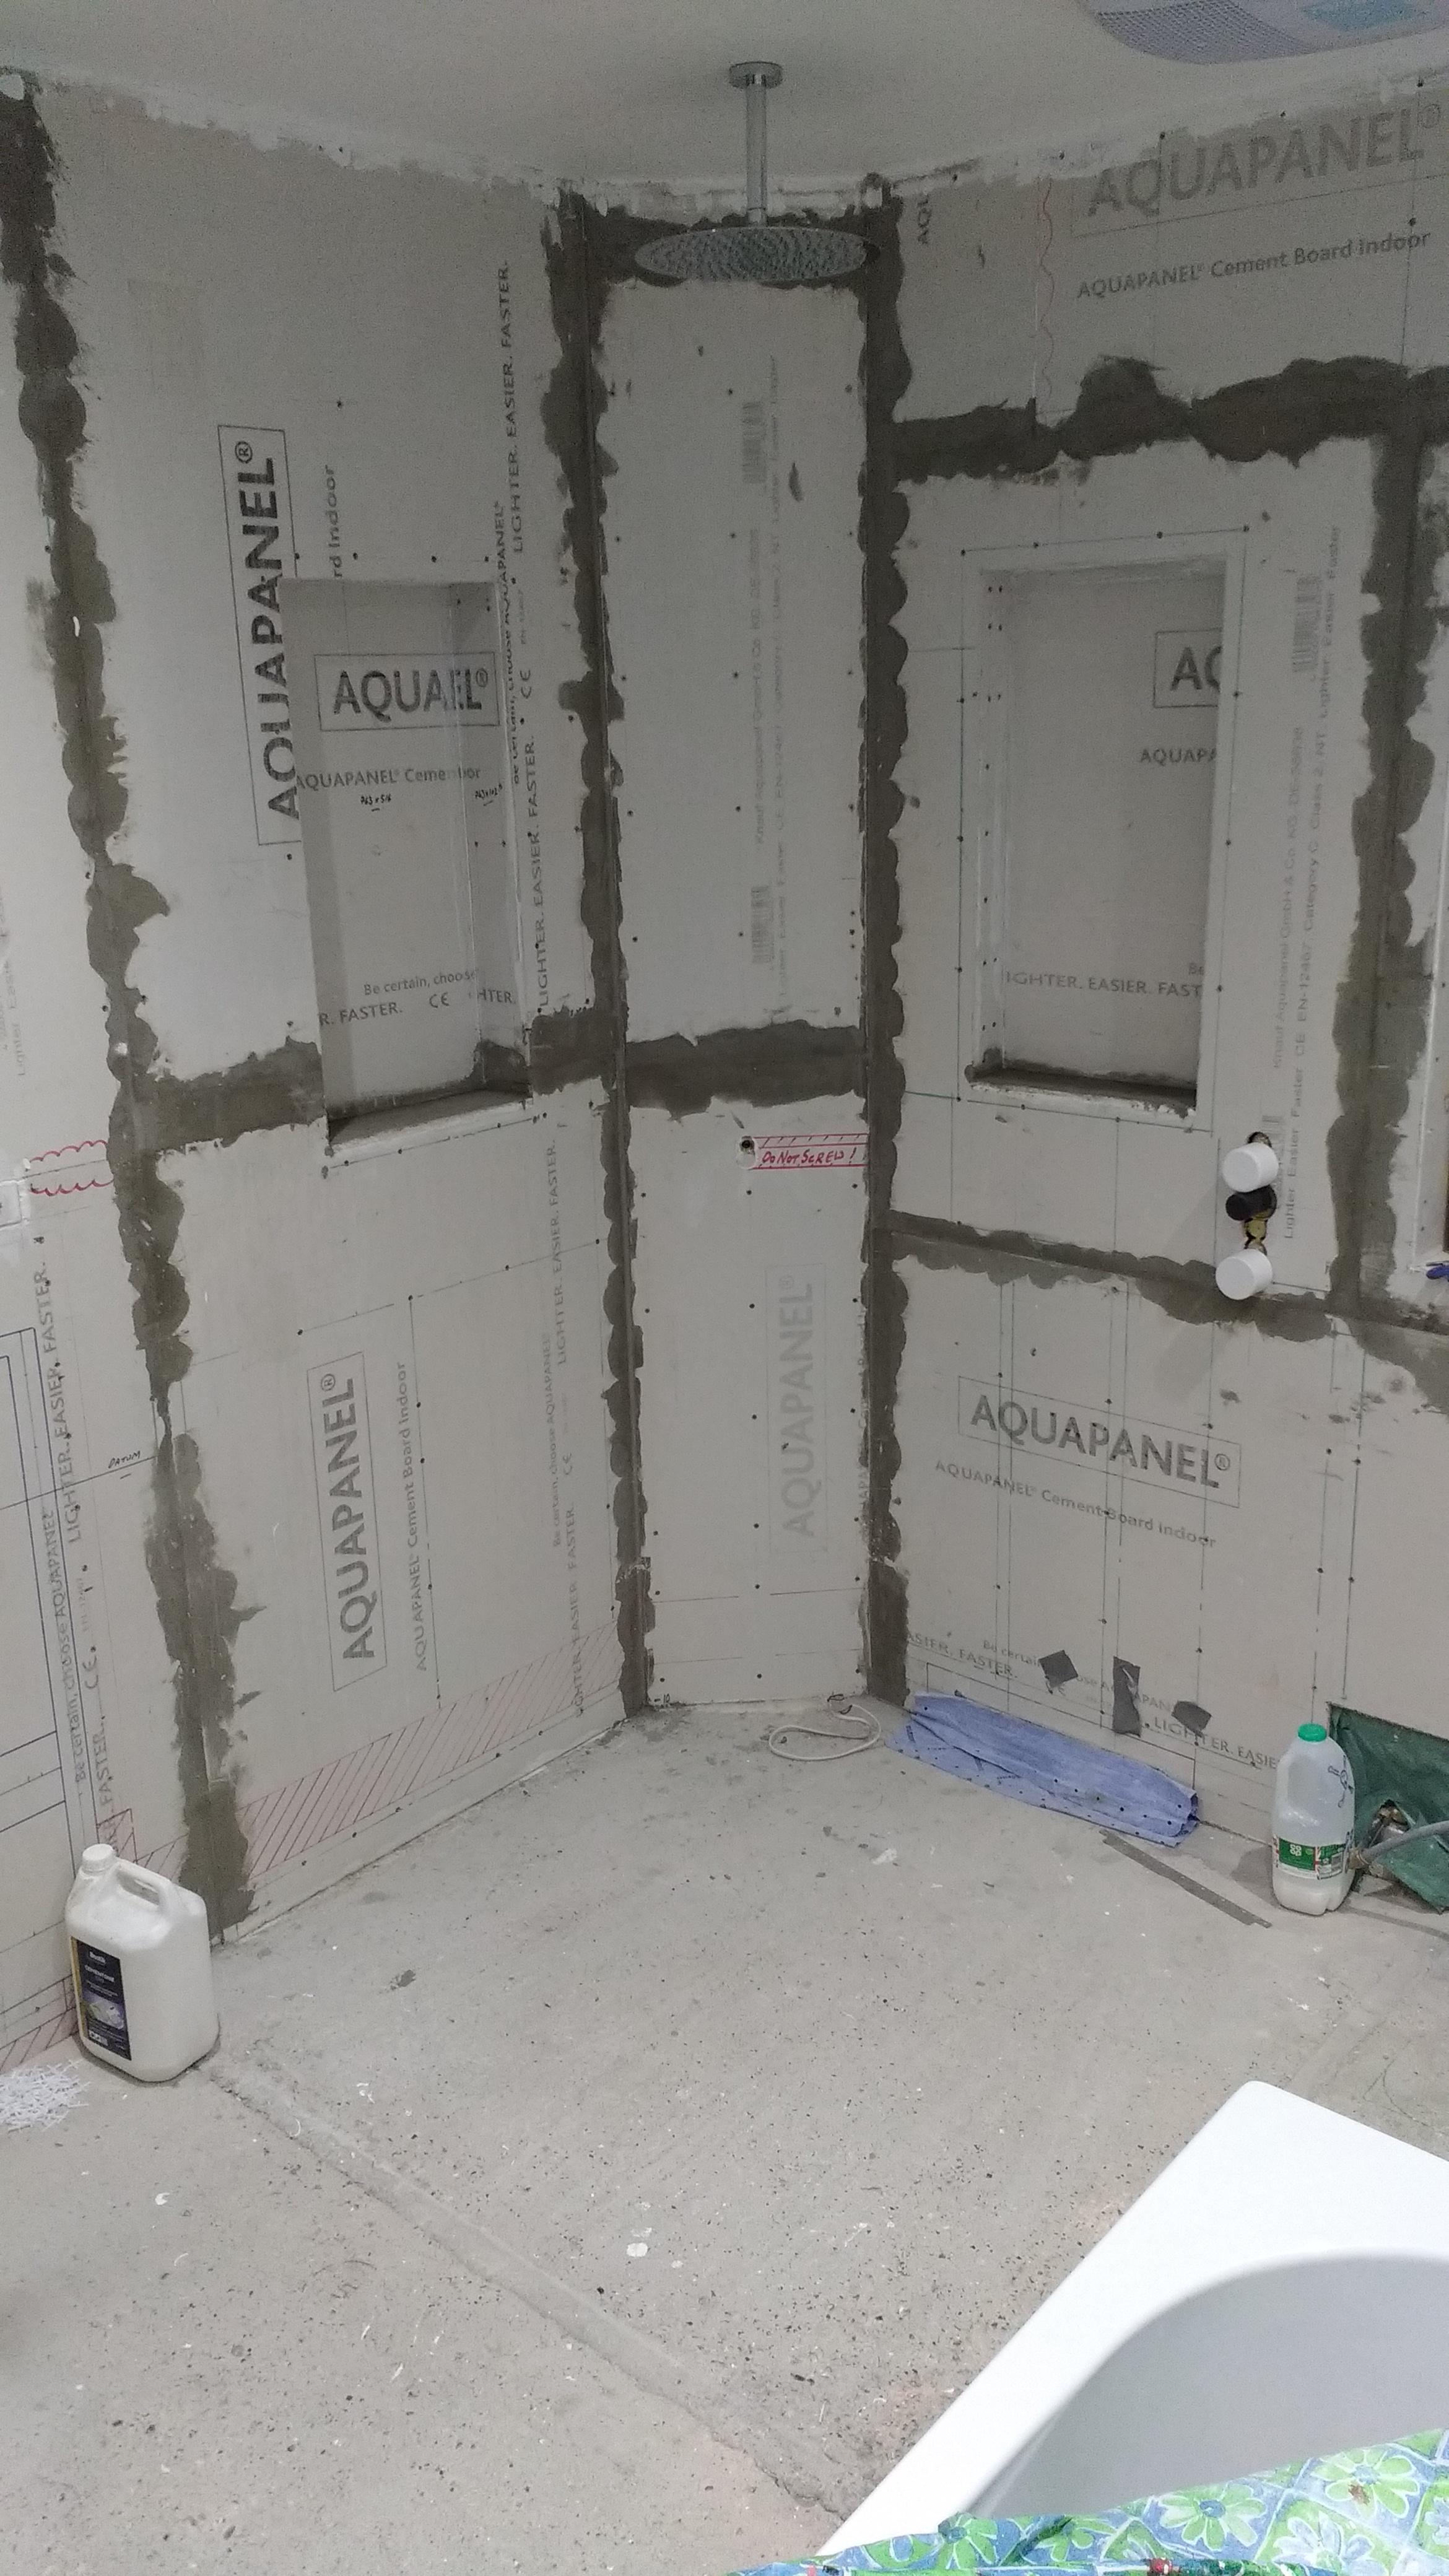
I was originally intending to, at a minimum, tank the wet room corner floor, nom 1.3 x 1.3 AND all the walls including the pockets above this area - roughly straight up in line with the SBR container on the left and milk container on the right: As said before if I do that, the 7.5m sq. kit isn't really enough to do this which works out as below. I wonder if I could maybe do the higher section of the wall in SBR? Wet room corner floor is 1.3x1.3 so 1.7m2 The mitred wall bit is 1m2 Each wing with the pocket in is 2.47x1.3 so 3.2m2 x 2 = 6.4m2 Over 9m2 just there!

-
Bath Surround / Boxing In, and concealed pipework
Onoff replied to Onoff's topic in Bathrooms, Ensuites & Wetrooms
How did you apply the primer and did it go far enough? -
Bath Surround / Boxing In, and concealed pipework
Onoff replied to Onoff's topic in Bathrooms, Ensuites & Wetrooms
Interesting that the label on the membrane container says that Everbuild 503 SBR Bond can be used as a primer if the actual Aqua Seal primer isn't available: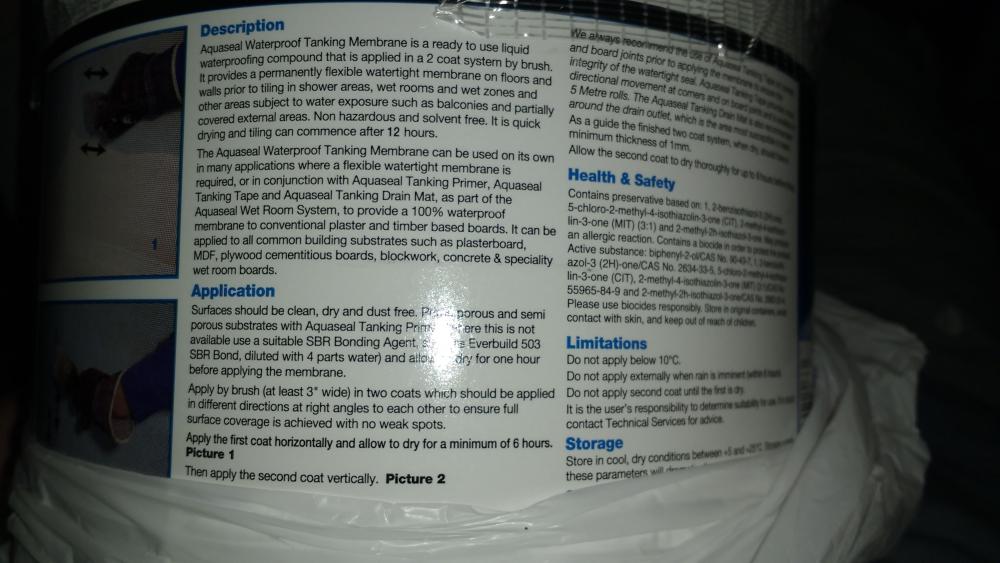
-
Says on the primer label that it can be used on "cementitious boards...and speciality wet room boards". Does that not suggest ALL the Aqua Panel needs doing not just the joints?
-
Bath Surround / Boxing In, and concealed pipework
Onoff replied to Onoff's topic in Bathrooms, Ensuites & Wetrooms
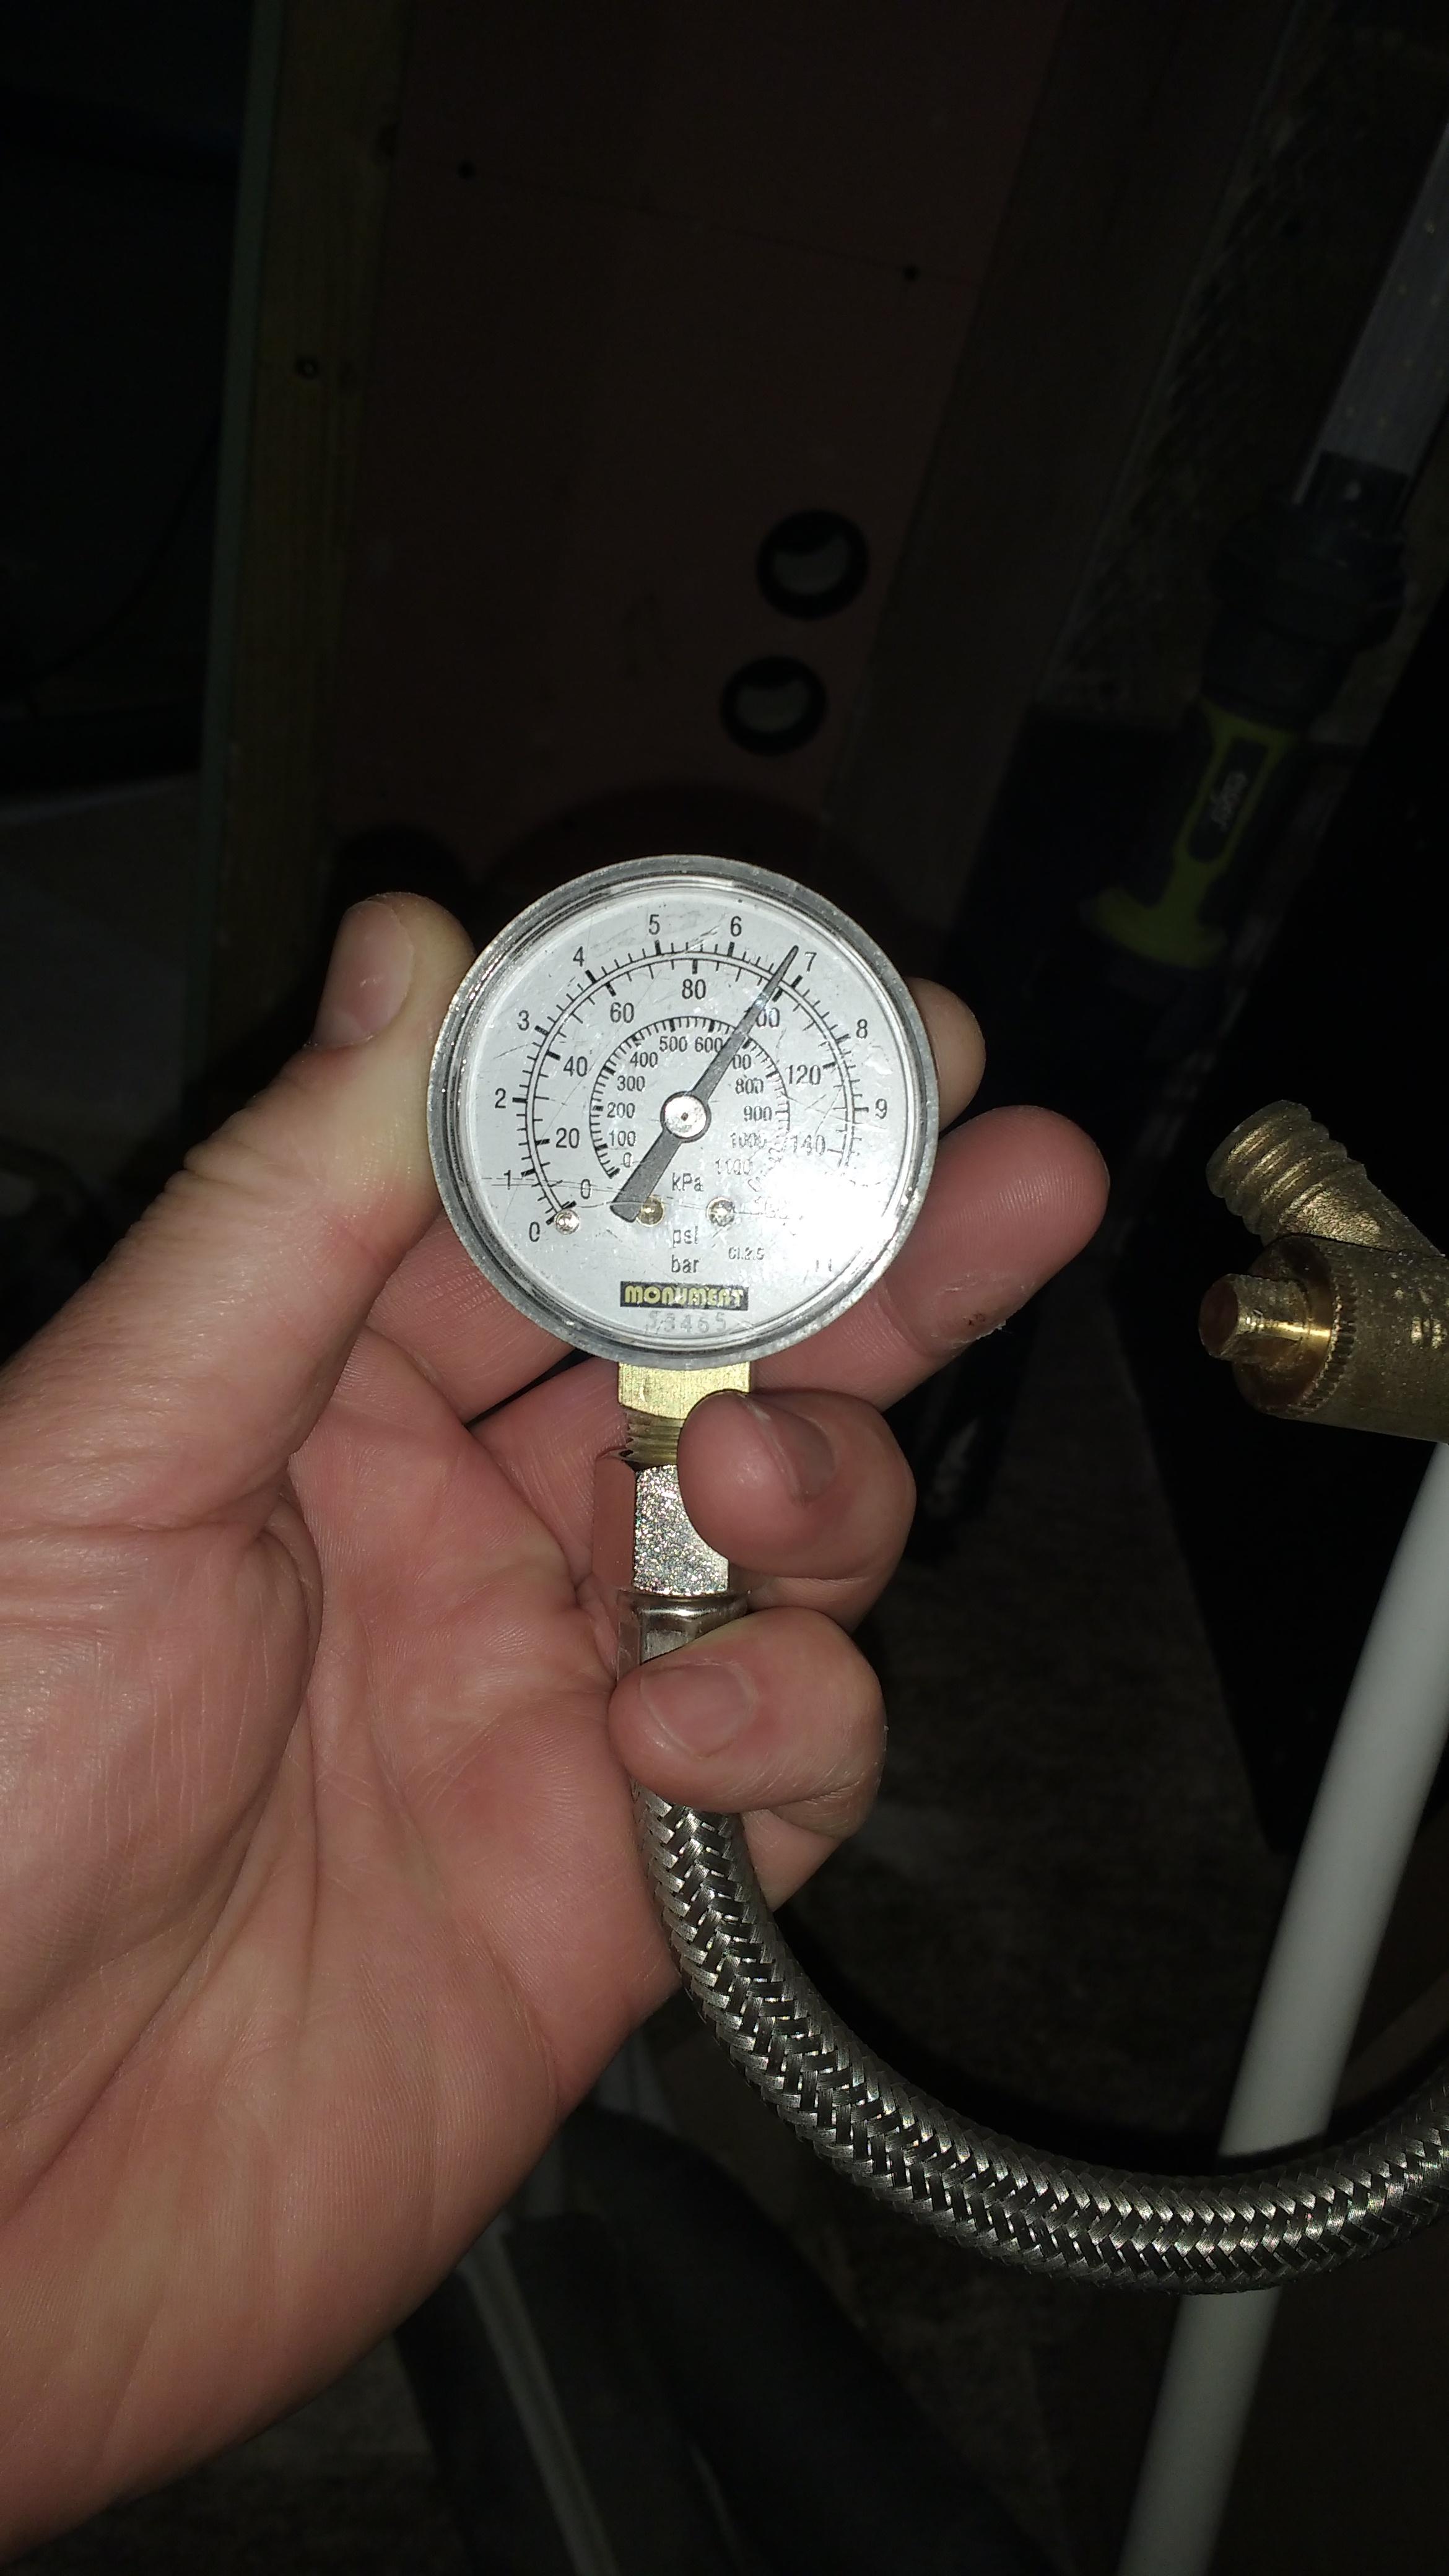
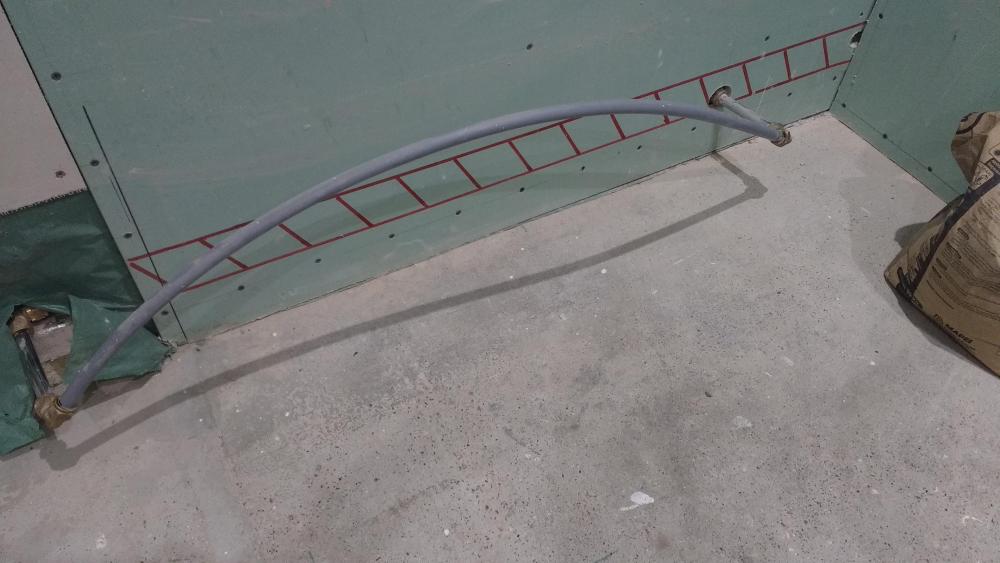
Pressure testing the towel radiator loop over the last 24hrs and it's dropped by a bar. Can't see any leaks though, at least at the testing end or 6 elbows! There's one hidden elbow on the RHS in the wall that's straight onto Pex-Al-Pex. Nothing on the floor though. Ambient has dropped massively though. Could that be it? I bled it pretty well I thought too. Via the drain valve one end of the loop until it ran bubble free.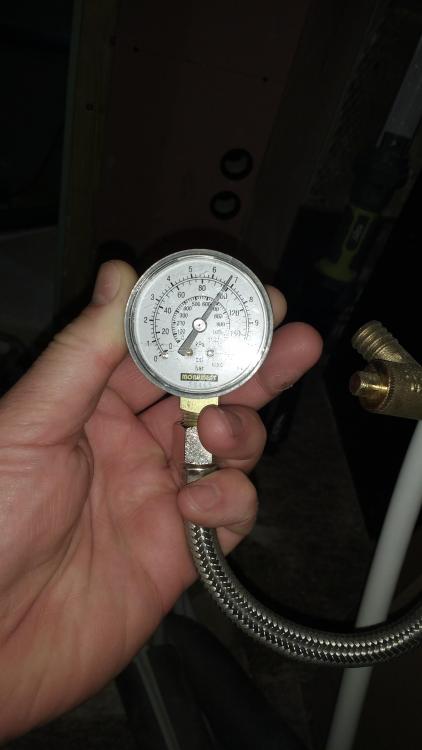
-
My one loop for the bathroom UFH held 3bar for months...in fact years!
-
Help with kitchen renovation/ 1st house.
Onoff replied to zoothorn's topic in Bathrooms, Ensuites & Wetrooms
It'll be fine. Mortar is soft sand and cement. Concrete is sharp sand + aggregate + cement. When you buy "ballast" to make concrete (by adding cement) then that's just sharp sand and aggregate mixed together. The aggregate is often up to 20mm diameter. Concrete is stronger. As I said the bag linked has aggregate to 10mm max diameter. Add water just not too much. -
Jesus no! Like drinking Fairy!
-
As Boy George said I'd rather have a nice cup of tea!
-
Help with kitchen renovation/ 1st house.
Onoff replied to zoothorn's topic in Bathrooms, Ensuites & Wetrooms
How about a cheap concrete or mortar mix then like this? 20kg but cheap & mix as much as you need. 10mm max aggregate size too so as long as your "trough" to fill is deeper than 10mm it'll level up nice. https://www.diy.com/departments/blue-circle-multi-purpose-ready-to-use-concrete-20kg-bag/135767_BQ.prd? You could put some Rawlplugs and screws into the brick to help grab the muck. -
Help with kitchen renovation/ 1st house.
Onoff replied to zoothorn's topic in Bathrooms, Ensuites & Wetrooms
Your post yesterday at 19.14hrs showed the top of the inner leaf? Expose that and your "muck" will bond to that. Been there mate! Slipped disc. Tramadol & Naproxen mix. Nerve issues meant No.1s & 2s were fun. Never sure if I needed to go...or already had! -
Help with kitchen renovation/ 1st house.
Onoff replied to zoothorn's topic in Bathrooms, Ensuites & Wetrooms
My weapon of choice for trimming foam. Old bread (?) knife. Wavy one side and serrated the other. I seem to remember it was forked at the end at one time. It's seen use for weeding before! And my other weapon of choice. Reminds me of the Party Sevens as a kid! A winning combination!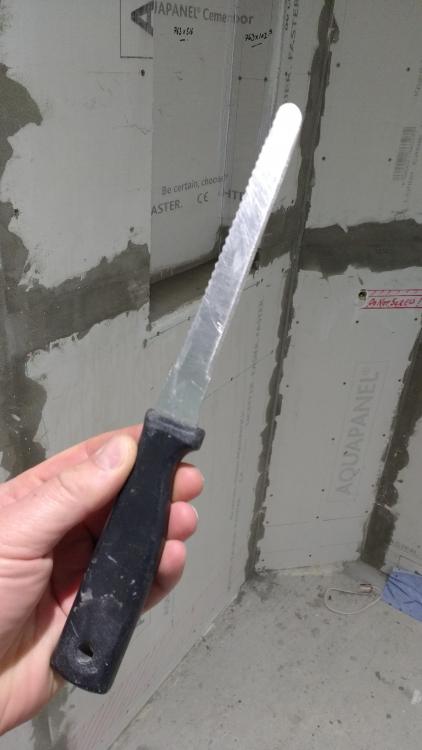
-
No idea. She wants white I want grey!
-
Help with kitchen renovation/ 1st house.
Onoff replied to zoothorn's topic in Bathrooms, Ensuites & Wetrooms
Honestly it's looking good. Hand on heart you could stick insulated pb down to the brick with low expansion foam. If you're really set on doing something more solid though... Put another batten in then to form a lip. Your 27mm insulated pb will sit on that at the front and screw to it. Screw from the side thru the other battens as @PeterW says. Pilot drill it so the wood doesn't split at the end. Then stick it as best as you can along the wall with some No Nonsense stuff. Let it go off. Dig out some foam to expose the "bricks" . Give it a Hoover. Soak with pva (or sbr) mixed 5:1 with water. Kid's craft glue if you're stuck even. Mix up a strong sharp sand / cement mix say 4:1 using the same 5:1 pva mix. Not too runny, and pack it in and level off. Have a beer. With the drugs you're on it should be a ride! When the cement has dried loose fit your 27mm insulated pb. Try and make sure it sits level to the window horizontal lines. Blob with No Nonsense grab adhesive and weight down. Have a beer! -
Right then I'm going with Larsen tile adhesive products. NI company, products get good reviews. If anyone knows any different let me know! This acrylic primer: https://decoramic.co.uk/larsen-acrylic-primer-tub-primer-5l?search=larsen And this adhesive, I'm assuming I use grey adhesive with grey tiles? For some reason grey is cheaper than white..... https://decoramic.co.uk/larsen-flex-standard-set-single-part-adhesive-20kg-grey?search=larsen I'm going with a 6mm bed on the floor as it's so level. They reckon 4-5m2 per 20kg bag so that's half that coverage with a 6mm bed? I've got just over the 5m2 typically so I'm going to just get 3 of the 20KG bags to start with and see how I get on with it. Any left over can start the wall tiling. A question.....the tanking kit comes with "acrylic primer" would that be similar stuff to the Larsen gear? Cheers
-
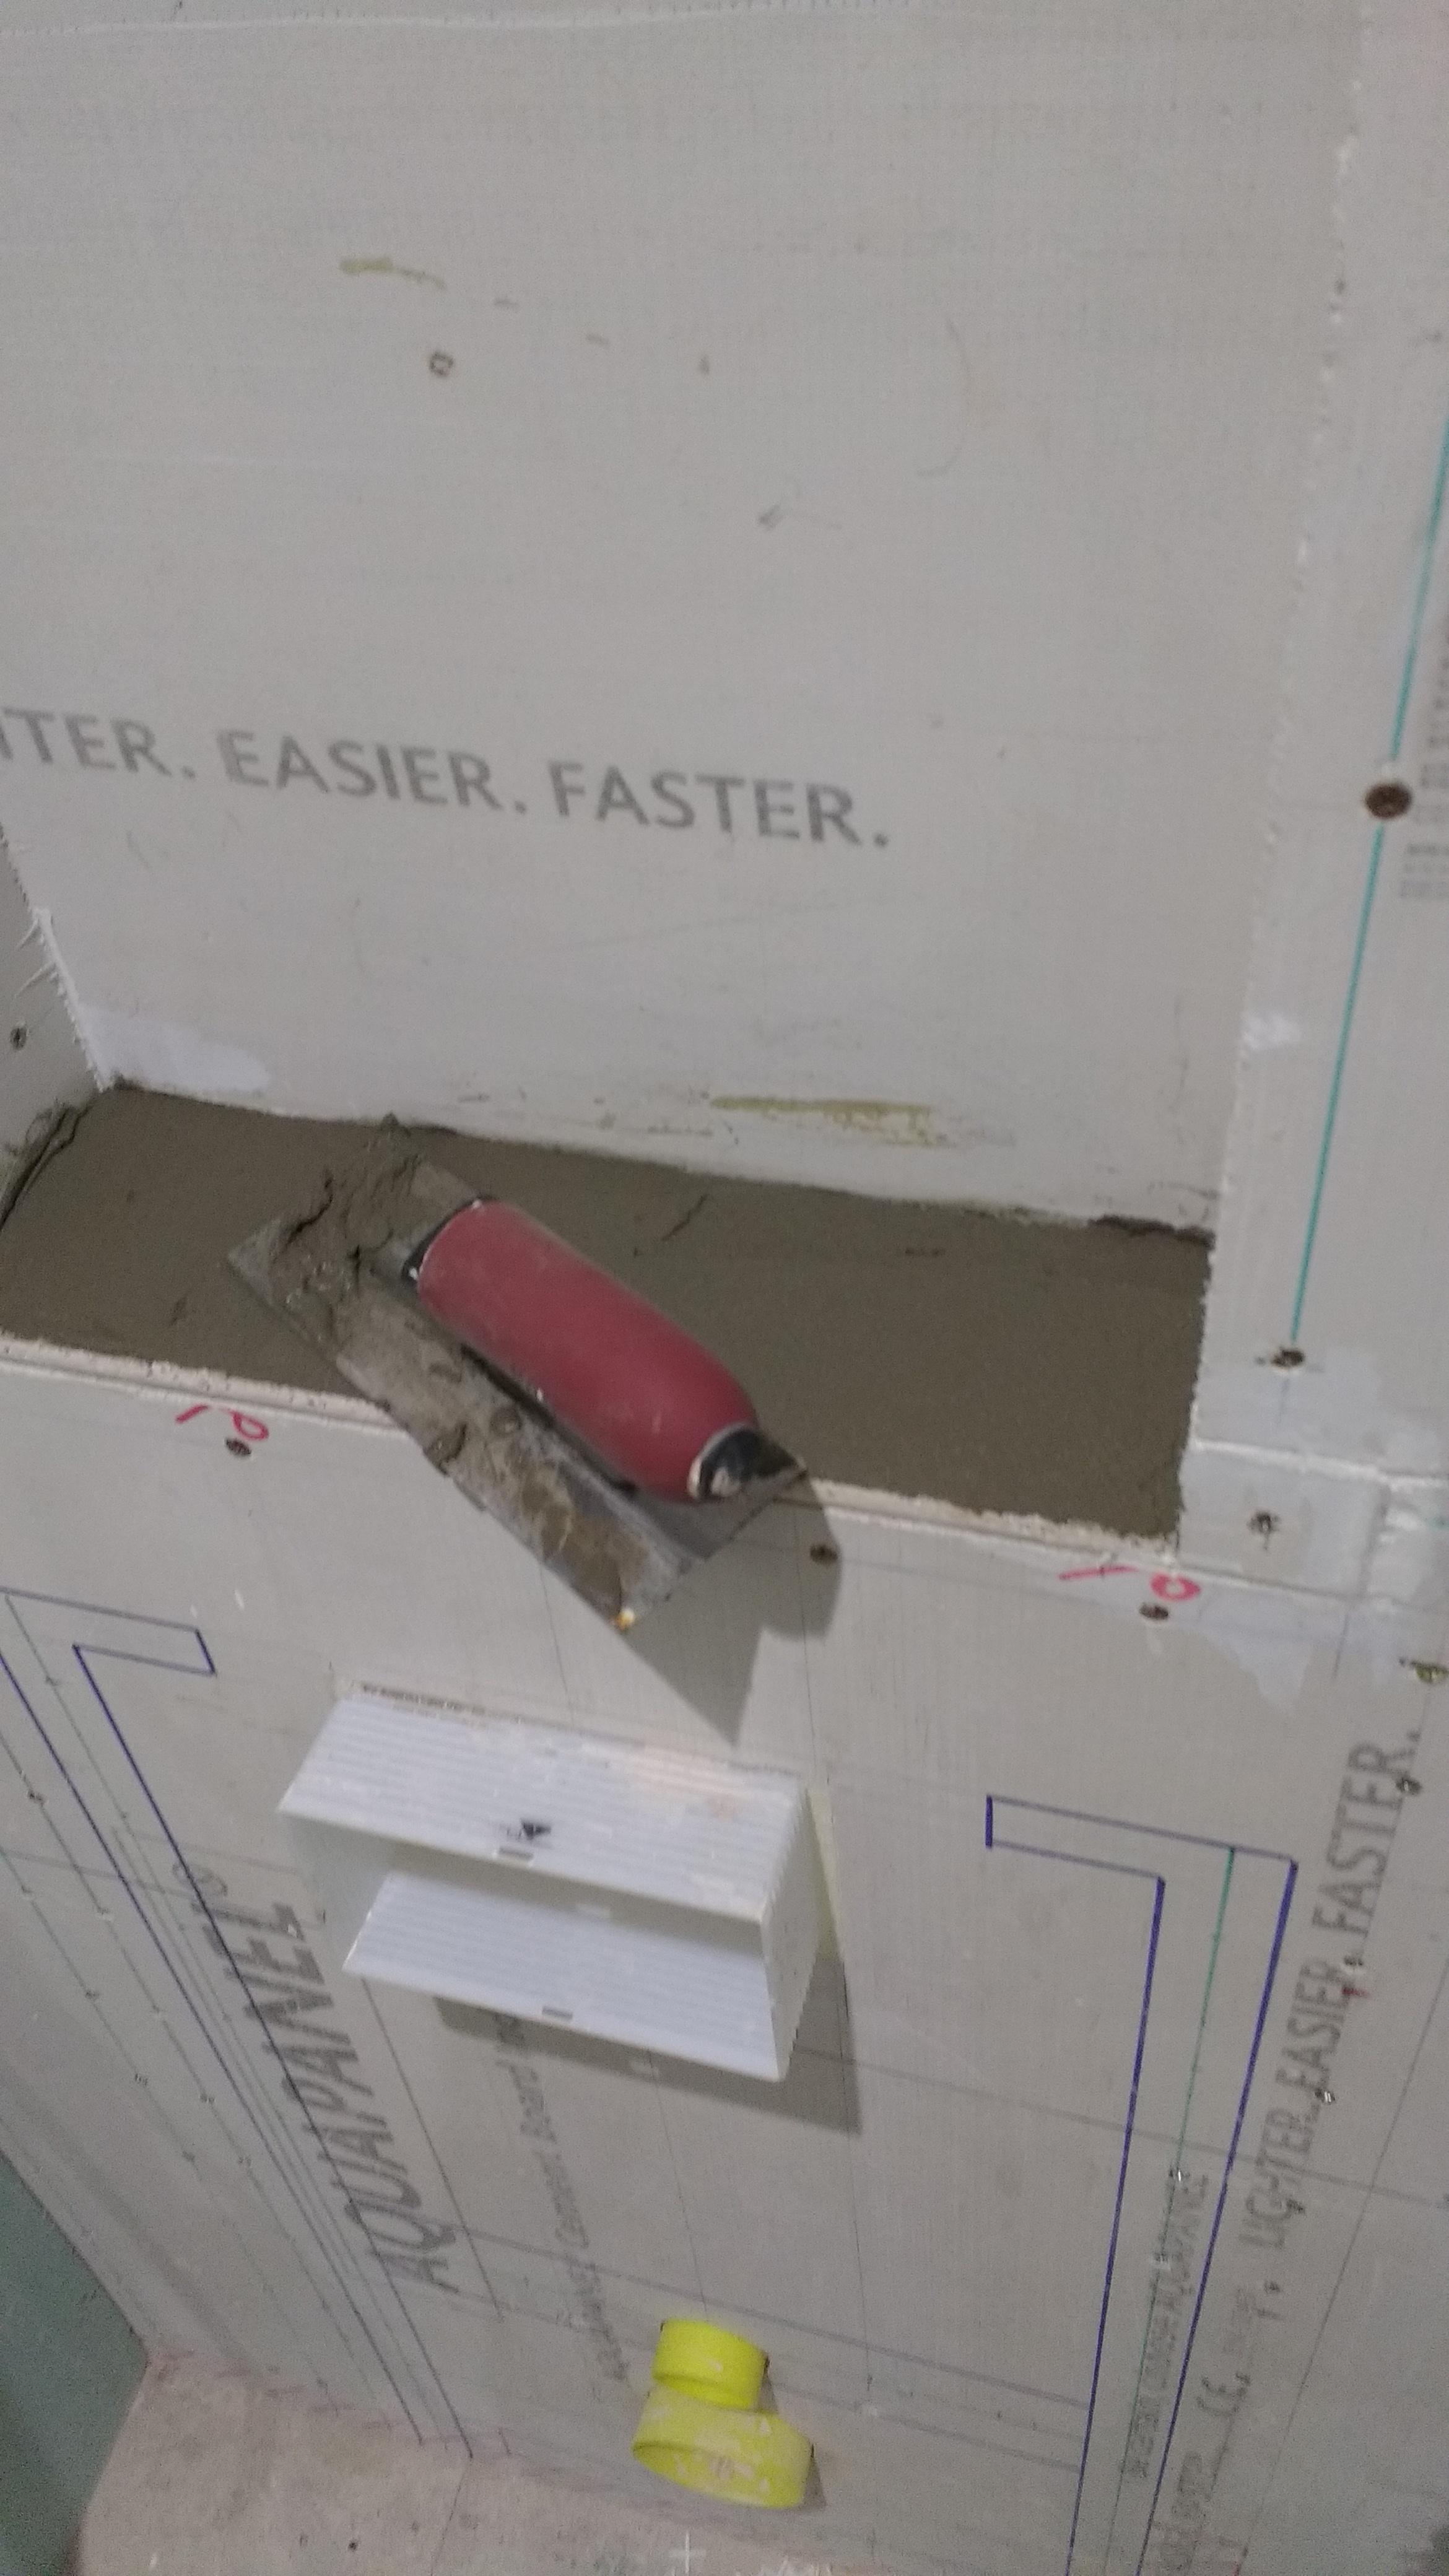
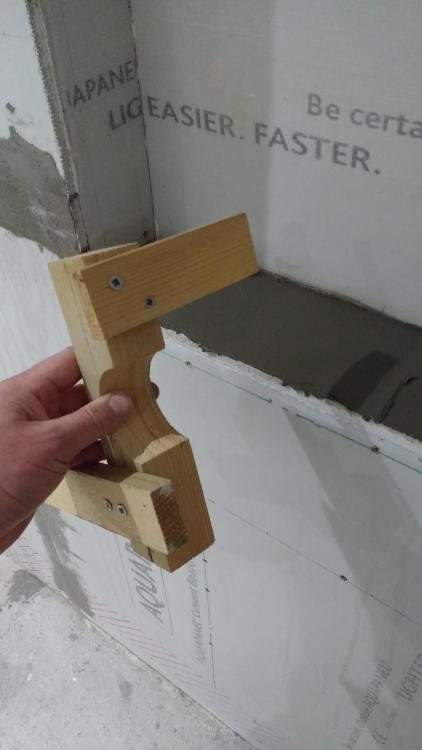
Put a 3o taper on the pockets. Primed with 5:1 SBR then used my special tool. You can't buy this in the shops! Does two different depth pockets: They'll do!

-
Bath Surround / Boxing In, and concealed pipework
Onoff replied to Onoff's topic in Bathrooms, Ensuites & Wetrooms
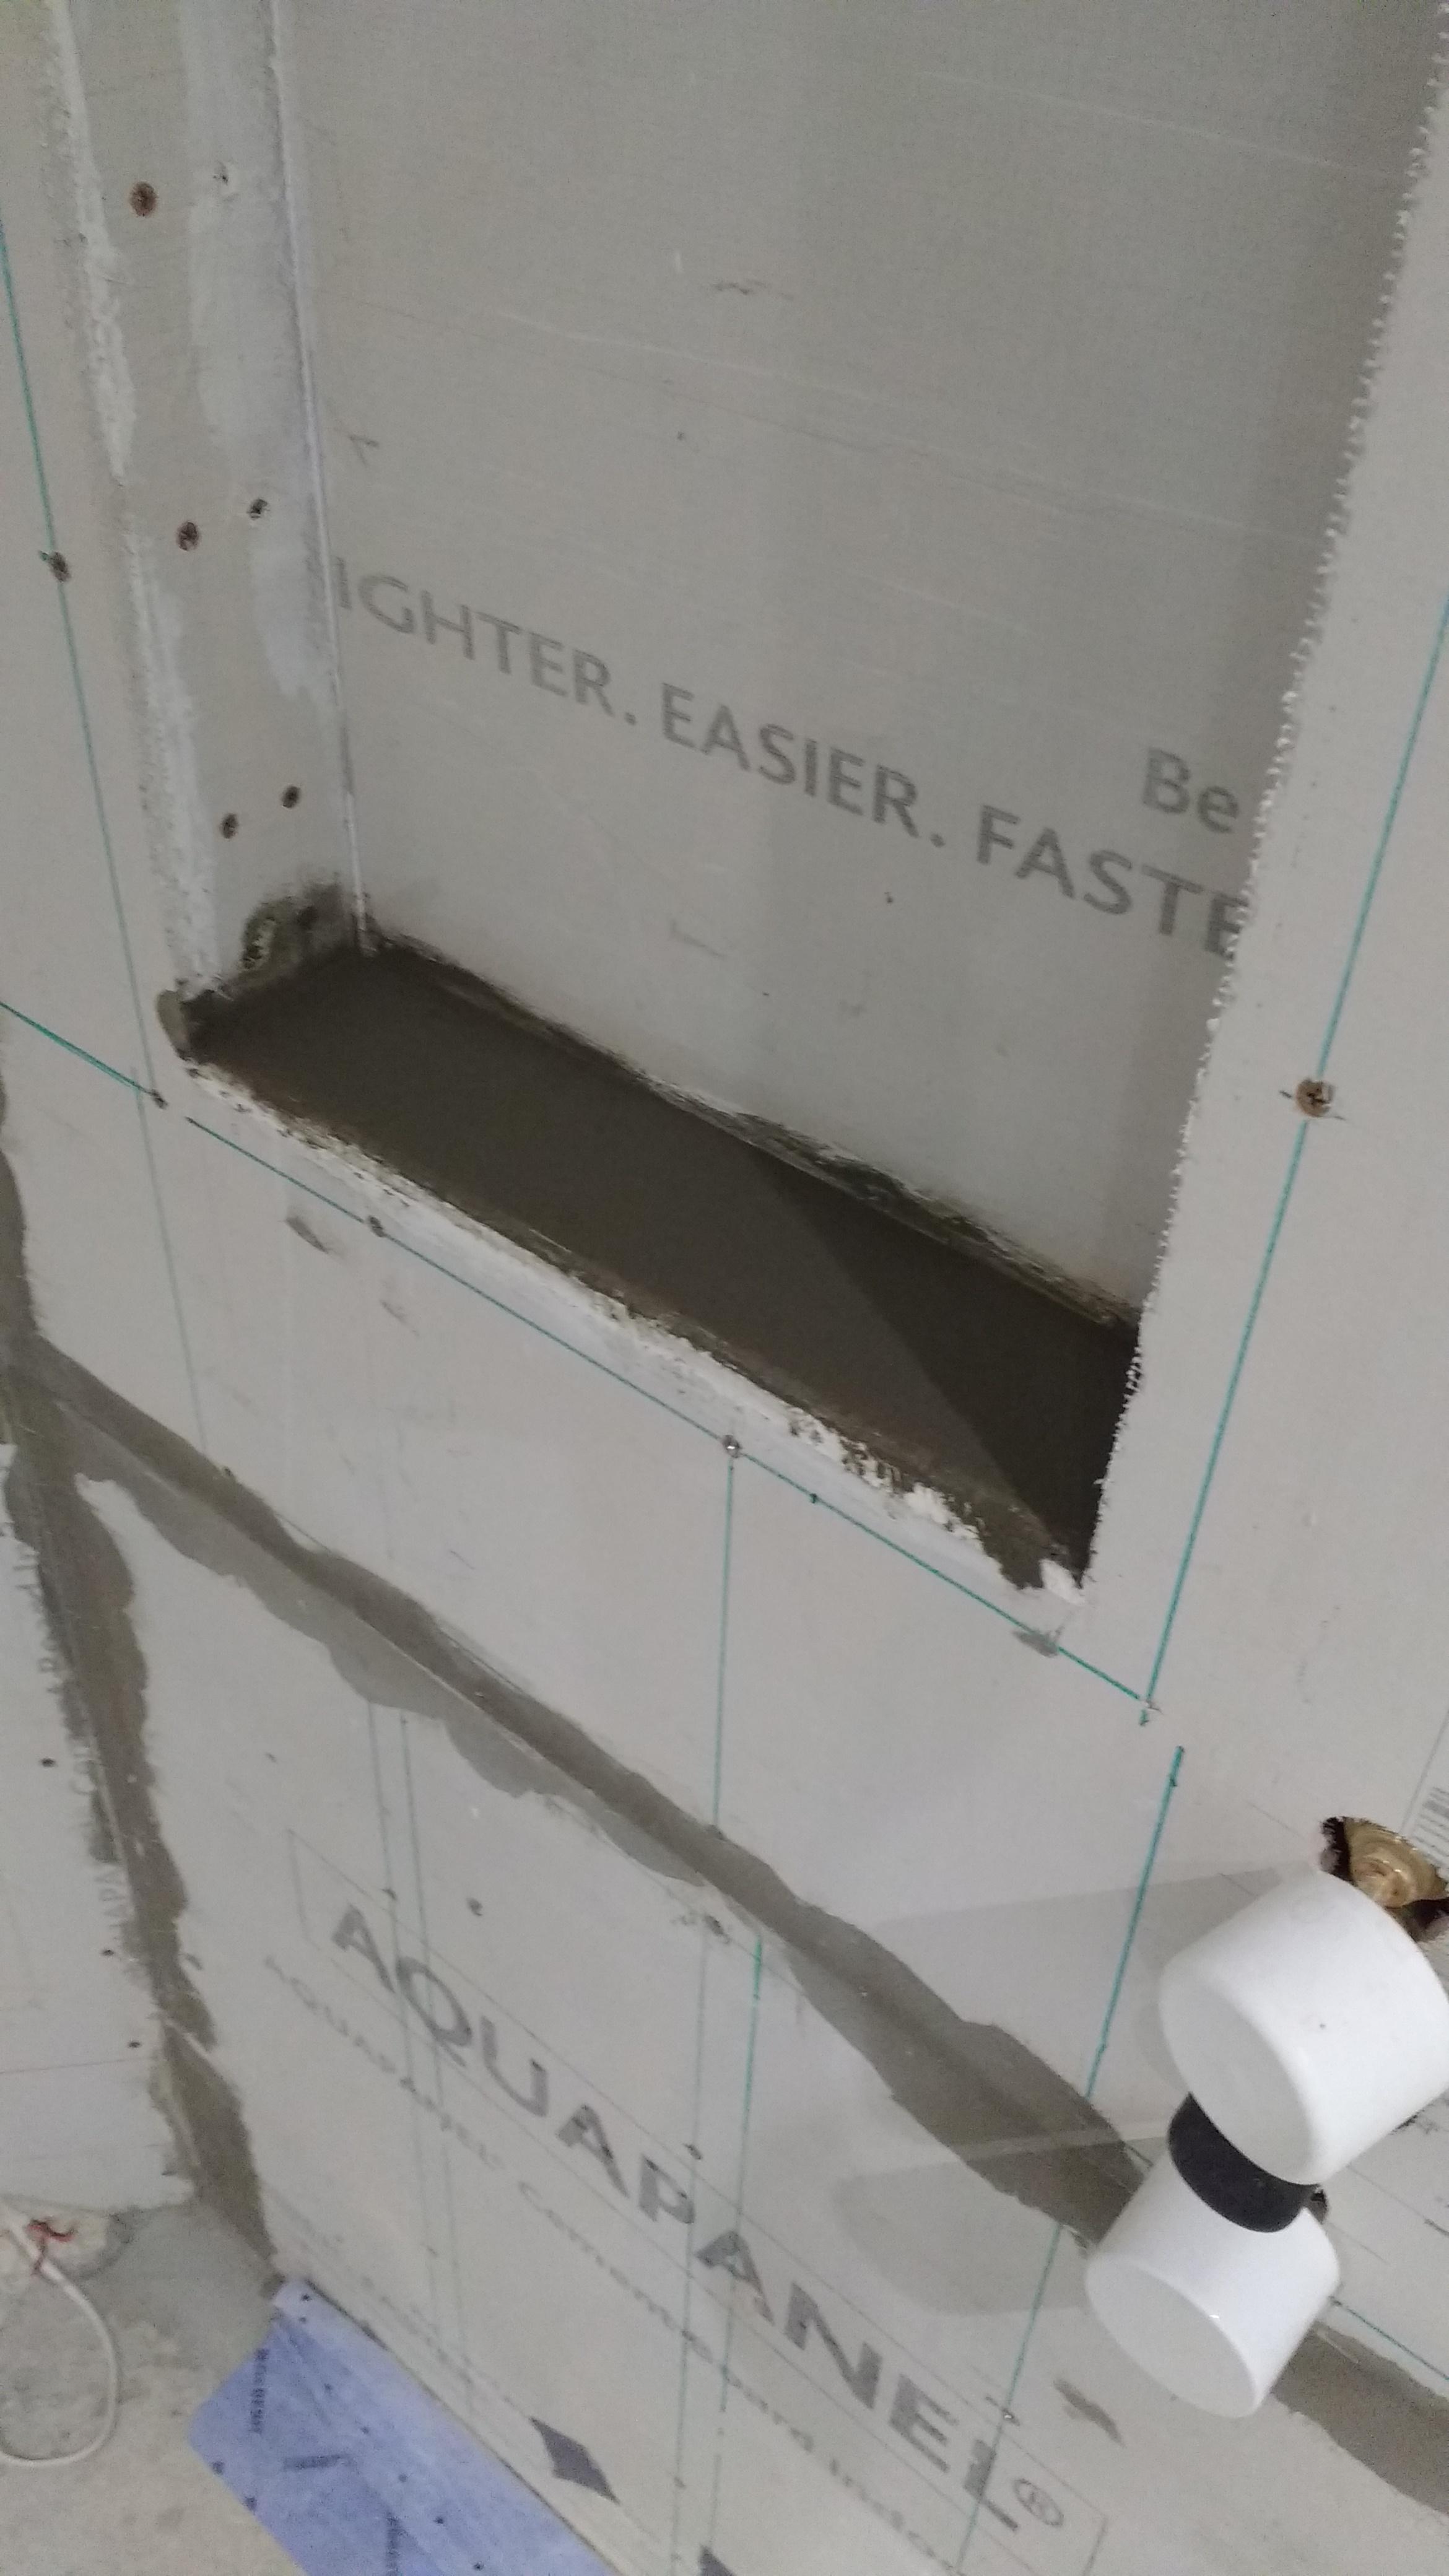
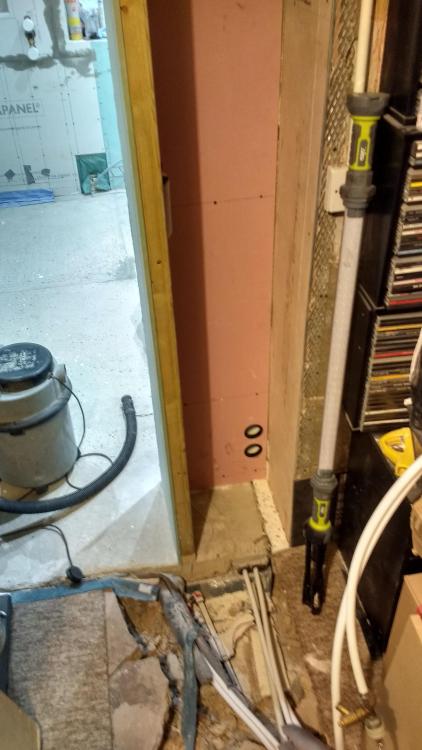
Anything to put off this tanking! I filled the floor void at the back of the cupboard. Wetted the void with 5:1 SBR then 4:1 concrete made with the same SBR mix: Made a start on drilling thru for the bath cabling. Some frpb in the little cupboard outside the bathroom where the relocated bath controls will sit at a convenient height (they were strapped u/side the bath originally). The black plastic things come off of heat shrink reels I use at work and fit into a 50mm Starrett cut hole a treat: Tapered the pockets too with tile adhesive. Running out of excuses. Need to do a beer run so I can think straight!

-
Help with kitchen renovation/ 1st house.
Onoff replied to zoothorn's topic in Bathrooms, Ensuites & Wetrooms
You're doing alright! Just cut that foam monstrosity level and stick your insulated pb direct to that. I stuck my insulated pb on with a combo of Sikaflex EBT and some low expansion foam as said above. Tbh the screws attaching it to the batten are doing most of the work. Screw yours around the edge like I did and on the back of the pb put some big blobs (don't skimp on it) of the No Nonsense grab adhesive under the sill, behind the side bits and the bit at the top of the reveal. It's cheap enough. Put some bracing timbers between whilst it sets to keep all square. If using LOW EXPANSION foam then weight down the insulated pb with bricks. You will need long dry wall screws ideally. I think ordinary ones might rust and show through? Remember the side bits support the top and keep the ends of the sill bit down. Yes I'm neat...but if I look back at what I did way back on my first house I probably wasn't. New things are scary until you try 'em! I'm putting off tanking my bathroom because I've never done it. Does mean that today I've sorted a few niggly bits instead though! -
Help with kitchen renovation/ 1st house.
Onoff replied to zoothorn's topic in Bathrooms, Ensuites & Wetrooms
I found broccoli made excellent small trees...