Onoff
-
Posts
21127 -
Joined
-
Last visited
-
Days Won
206
Everything posted by Onoff
-
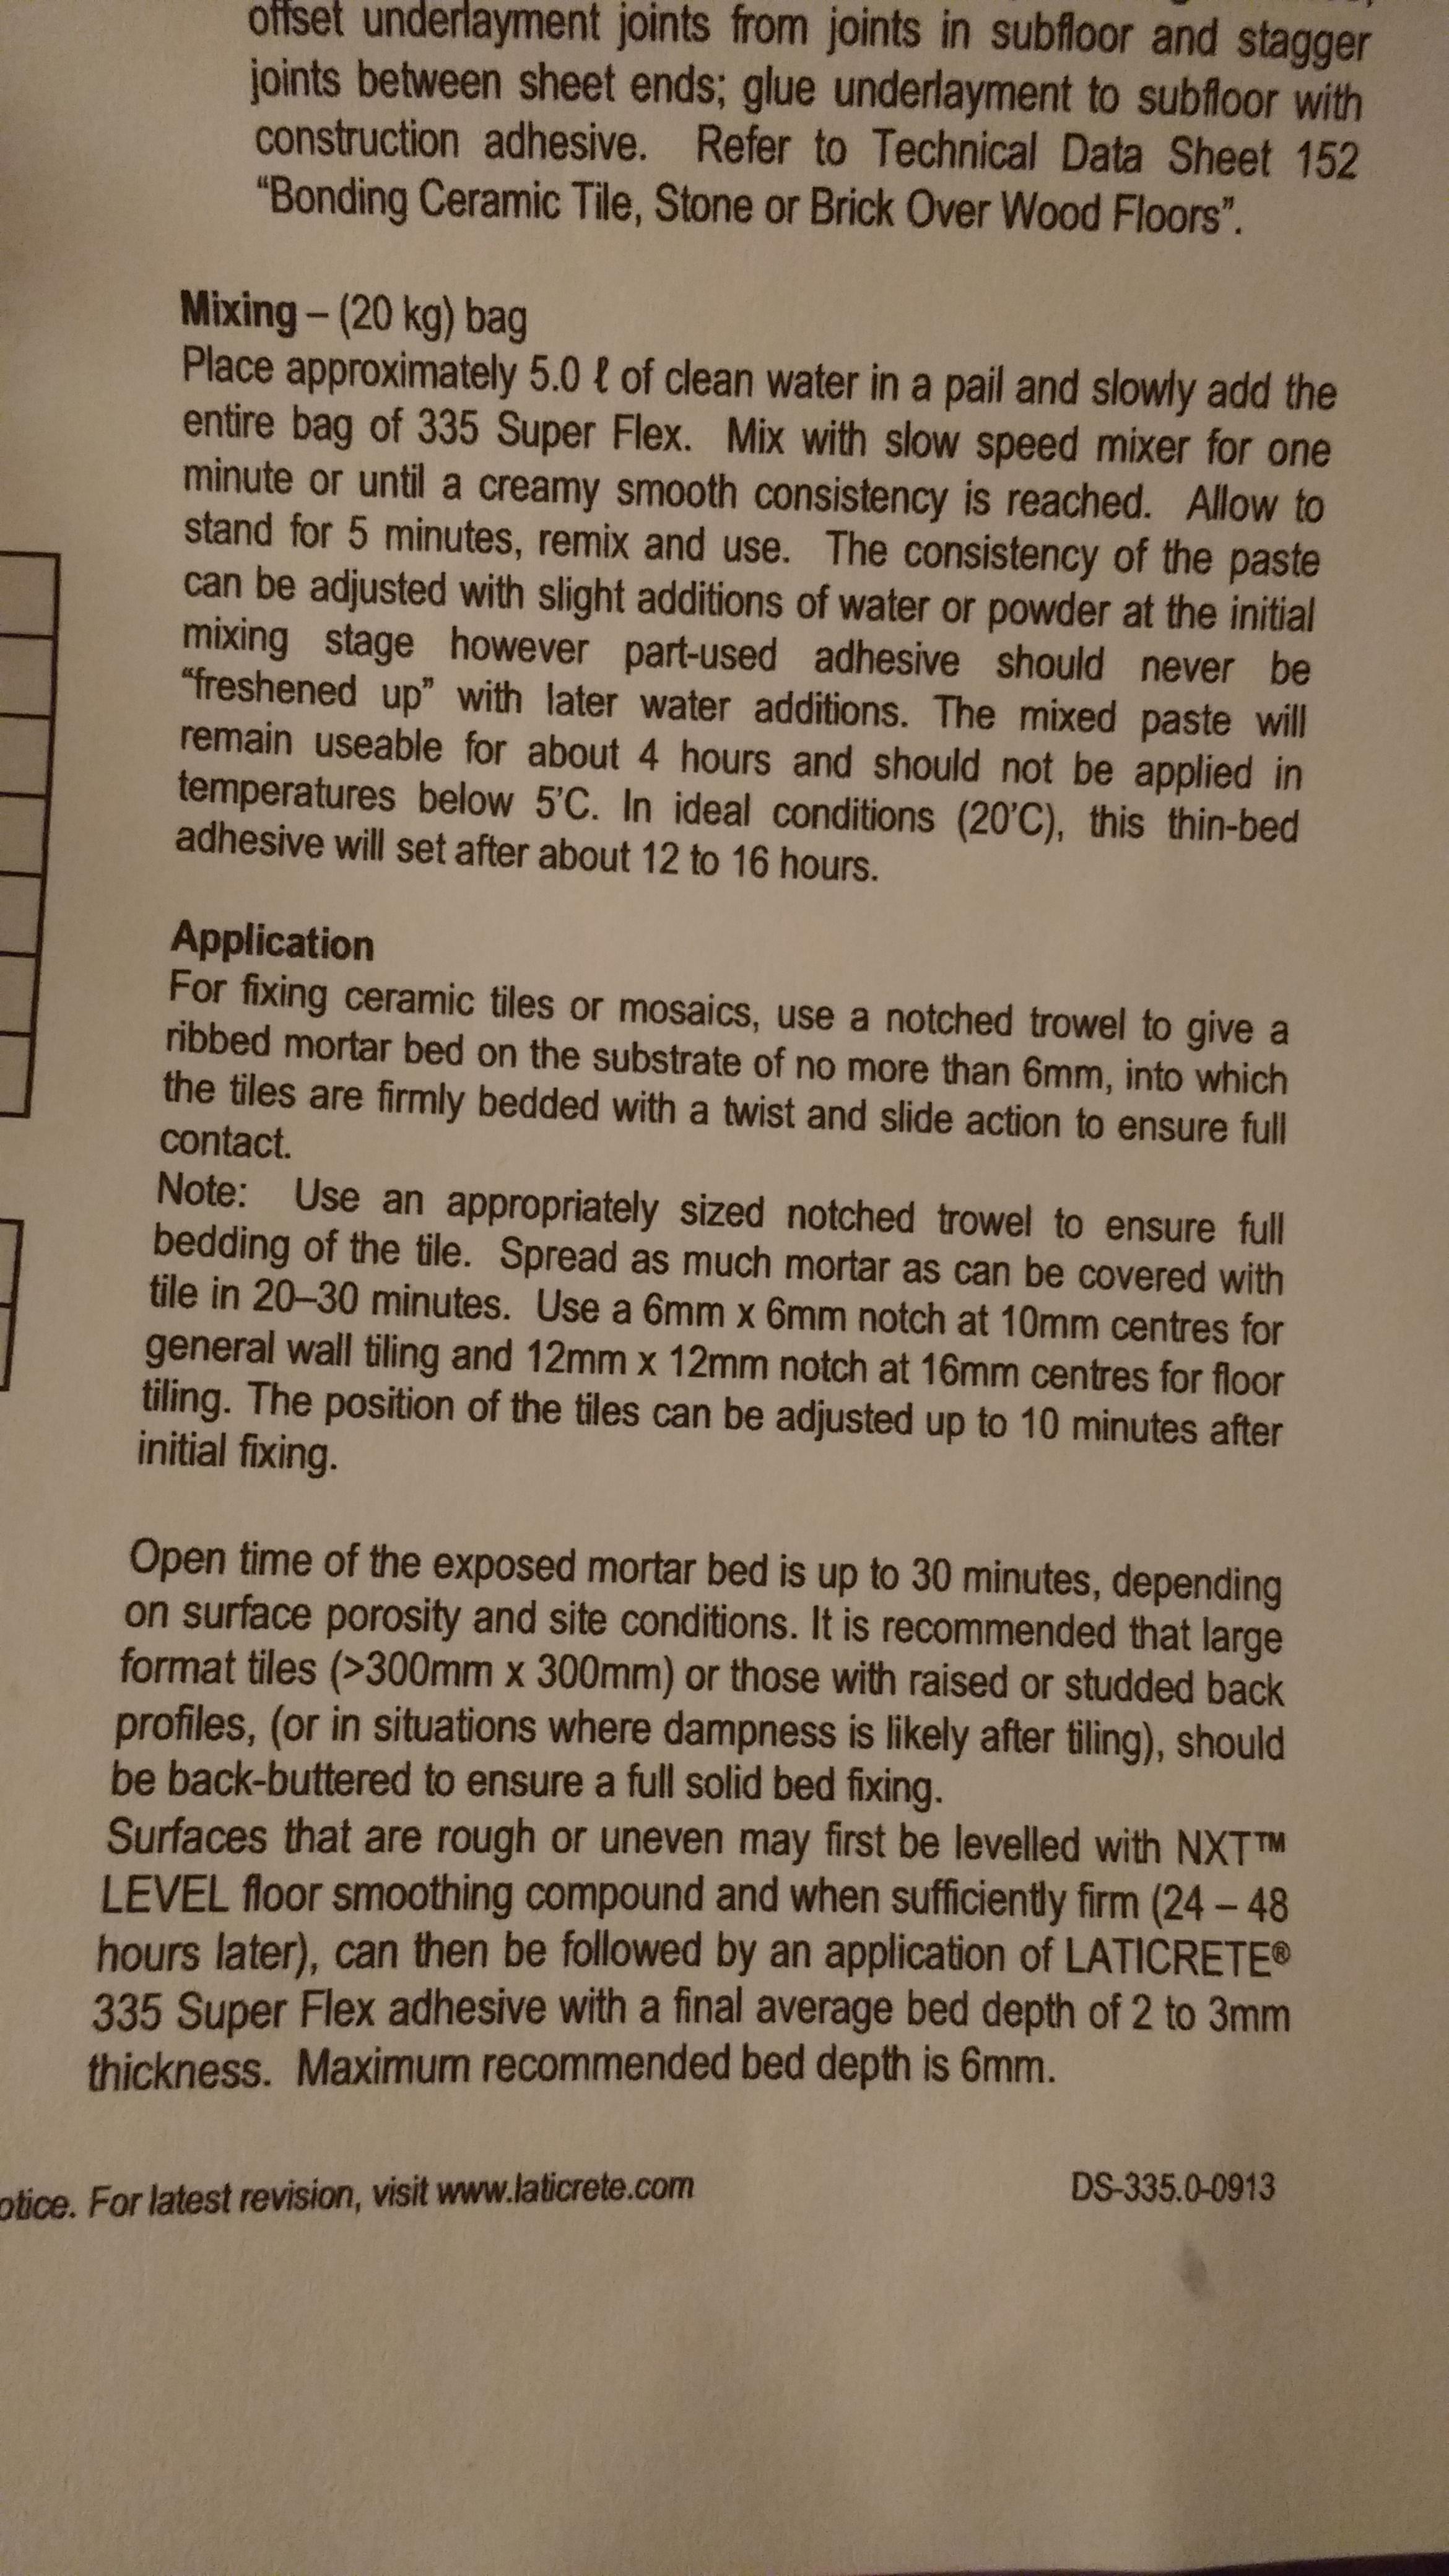
Yep. Bed on the floor, trowel held at 45deg. Then buttered the back of the tile in the opposite direction. Laid with a twist!
-
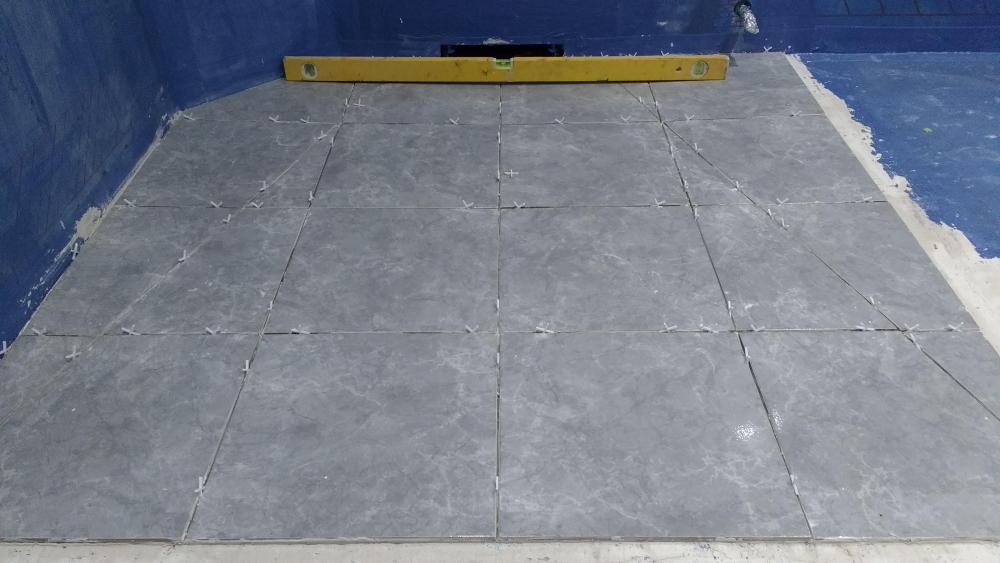
Just did the bit under the basin area tonight. Buttered the tiles. Felt "better" laying them. Also a couple under the wc with last of the muck: Found a method to get shot of the excess adhesive too. I laid all the tiles with spacers. Then removed them and wiped the faces with a sponge. Used a 1" paintbrush in the joints to get rid of the excess. Another go over with the sponge and then put the spacers back in. Used a 4' Stabila level and "knees" to level across them.
-

Help with kitchen renovation/ 1st house.
Onoff replied to zoothorn's topic in Bathrooms, Ensuites & Wetrooms
If you've bought tapered edge boards you can tape and fill the joints. You'll have to get creative around the reveal as said earlier. Near the door.....let's see what gaps you end up with. Better fit = less filler. -
Water valve was missing on the TWO that @Onoff bought in that case. Weird. Same private seller, still in the original boxes & unused.
-
@ThePoplars, you might find this document useful should you go for the UP200 cistern. Page 8 for instance gives the Kappa flush plates available. Typically SWMBO liked the ones from the Sigma range. Seeing as I got two new cisterns and frames for £100 she was having Kappa flush plates and liking it! Picked the flush plates up I think for £25.00 a piece on eBay. "115.228.something" in chrome are the ones I have. Geberit_Flush_Brochure.pdf You might also find you need to buy the water connections with valve like this. About what I paid I think: https://www.ebay.co.uk/itm/Geberit-water-connection-with-stop-valve-for-FM-cisterns-Art-240-269-00-1/173201397850?epid=2255554737&hash=item28539b985a:g:orkAAOSwJEdaoBUO
-
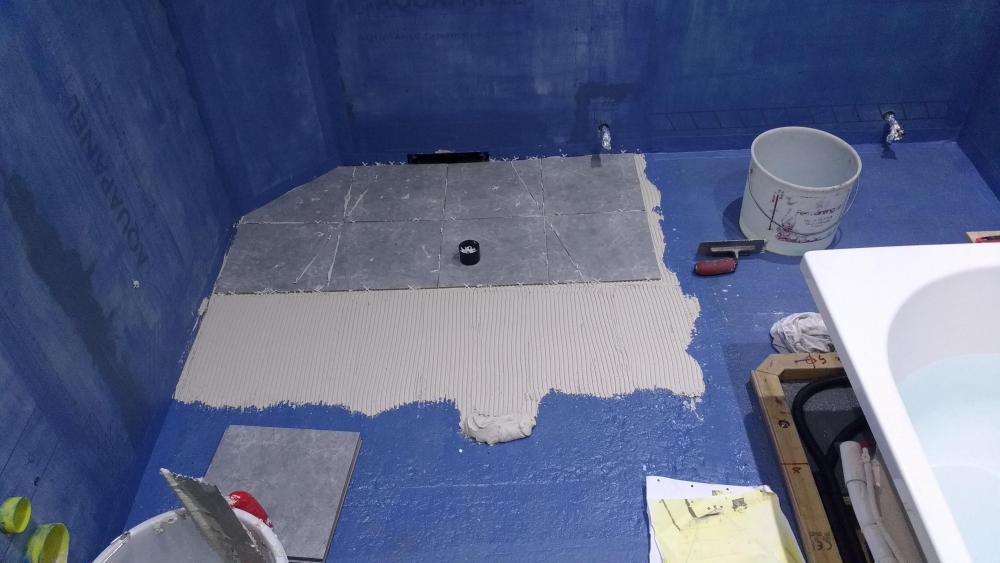
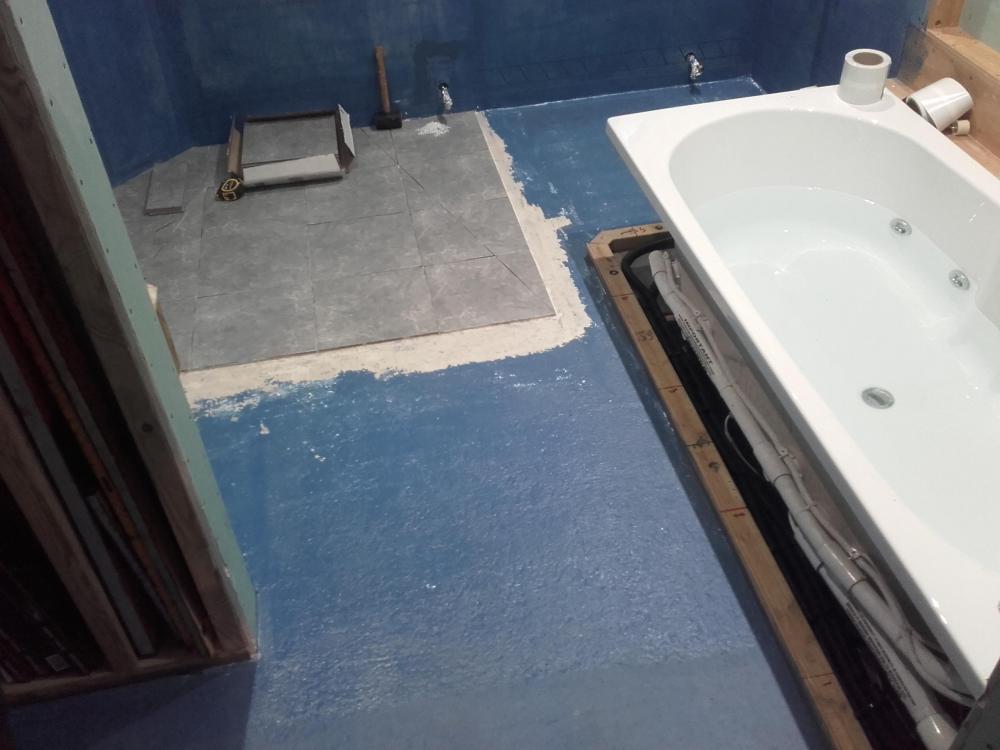
So tonight these two areas abutting the wet room corner. If I butter both floor and tile now won't I just have more adhesive ooze out / to clean up?
-
Help with kitchen renovation/ 1st house.
Onoff replied to zoothorn's topic in Bathrooms, Ensuites & Wetrooms
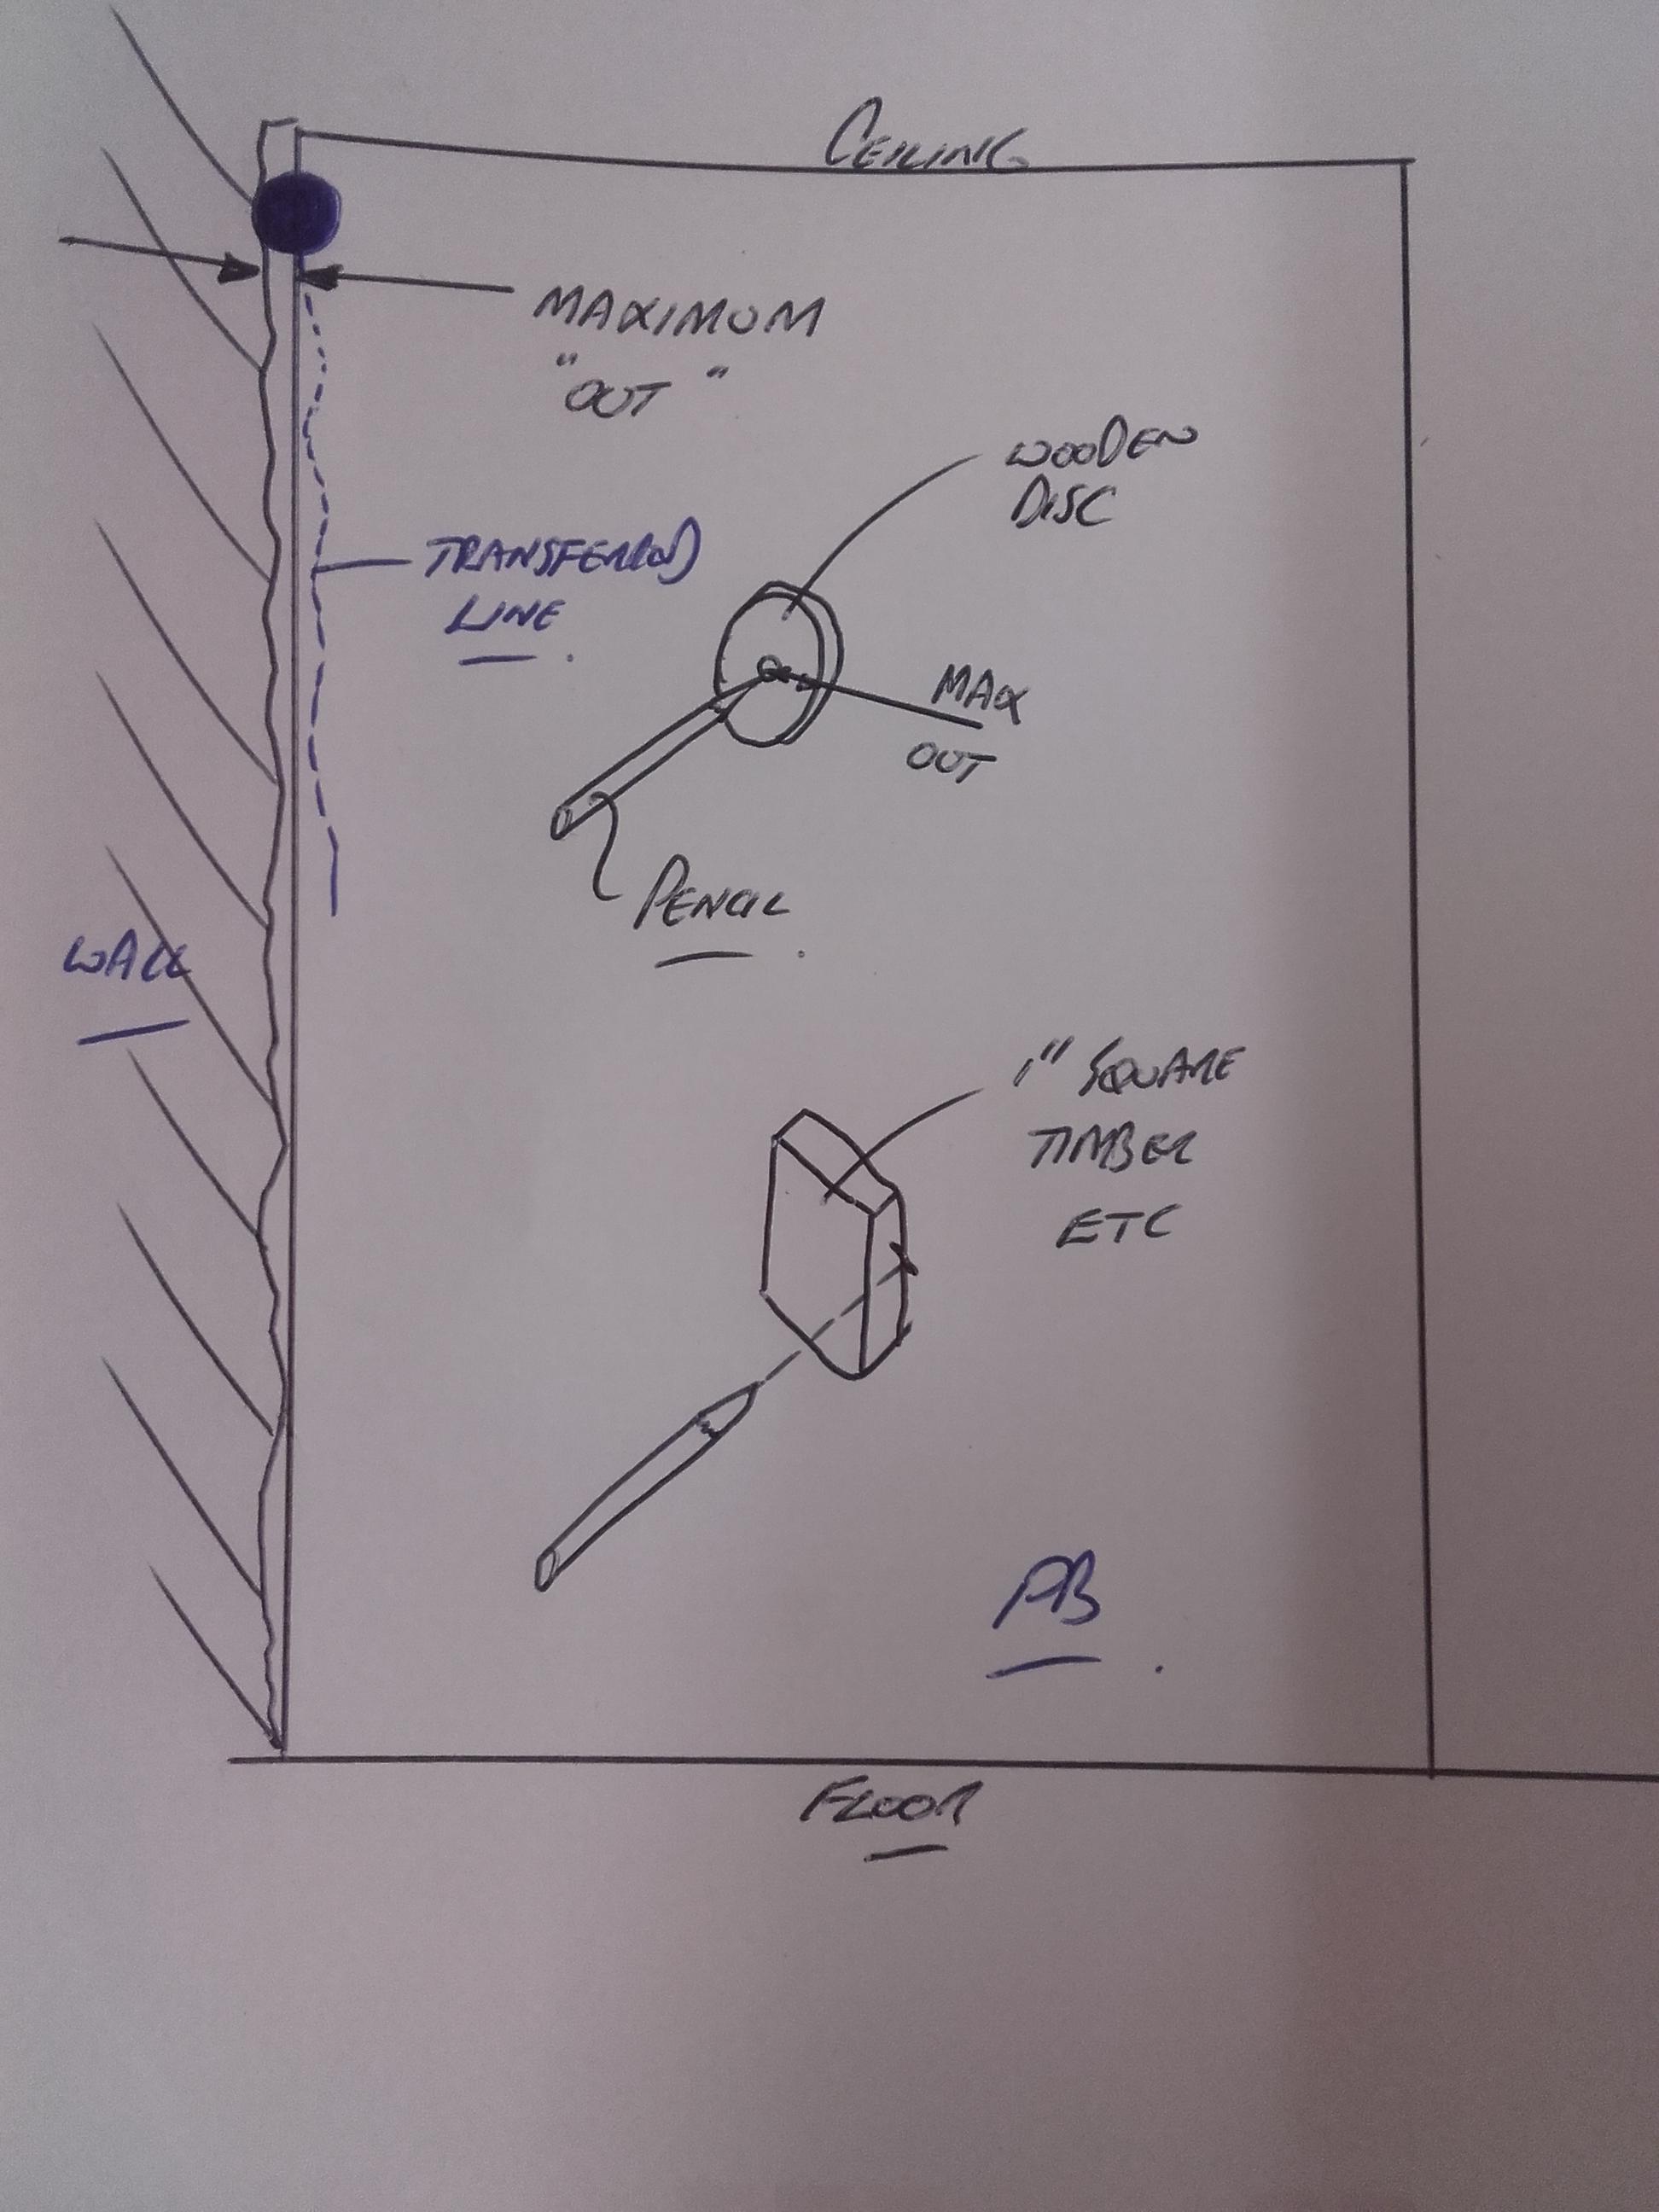
Pretty sure someone said something similar earlier I think....NO I'm not going back to find who/when! Butt your board up to the dodgy wall. Measure the maximum that it's "out". Cut a disc with a hoke in the middle. The appropriate sized hole saw would be ideal. Run it down the wall/board and you'll get the near exact profile of the dodgy wall transferred to the pb. Alternatively use a small block of timber and do much the same thing. Or just a straight edge if the outs are long, straight sections. Then cheap plaster filler etc which you can get in a tube. This dries semi hard so you can sand it: https://www.screwfix.com/p/no-nonsense-instant-plaster-filler-white-310ml/72591? Or even cheaper caulk. This is a bit more rubbery: https://www.screwfix.com/p/no-nonsense-decorators-caulk-white-310ml/57568
-
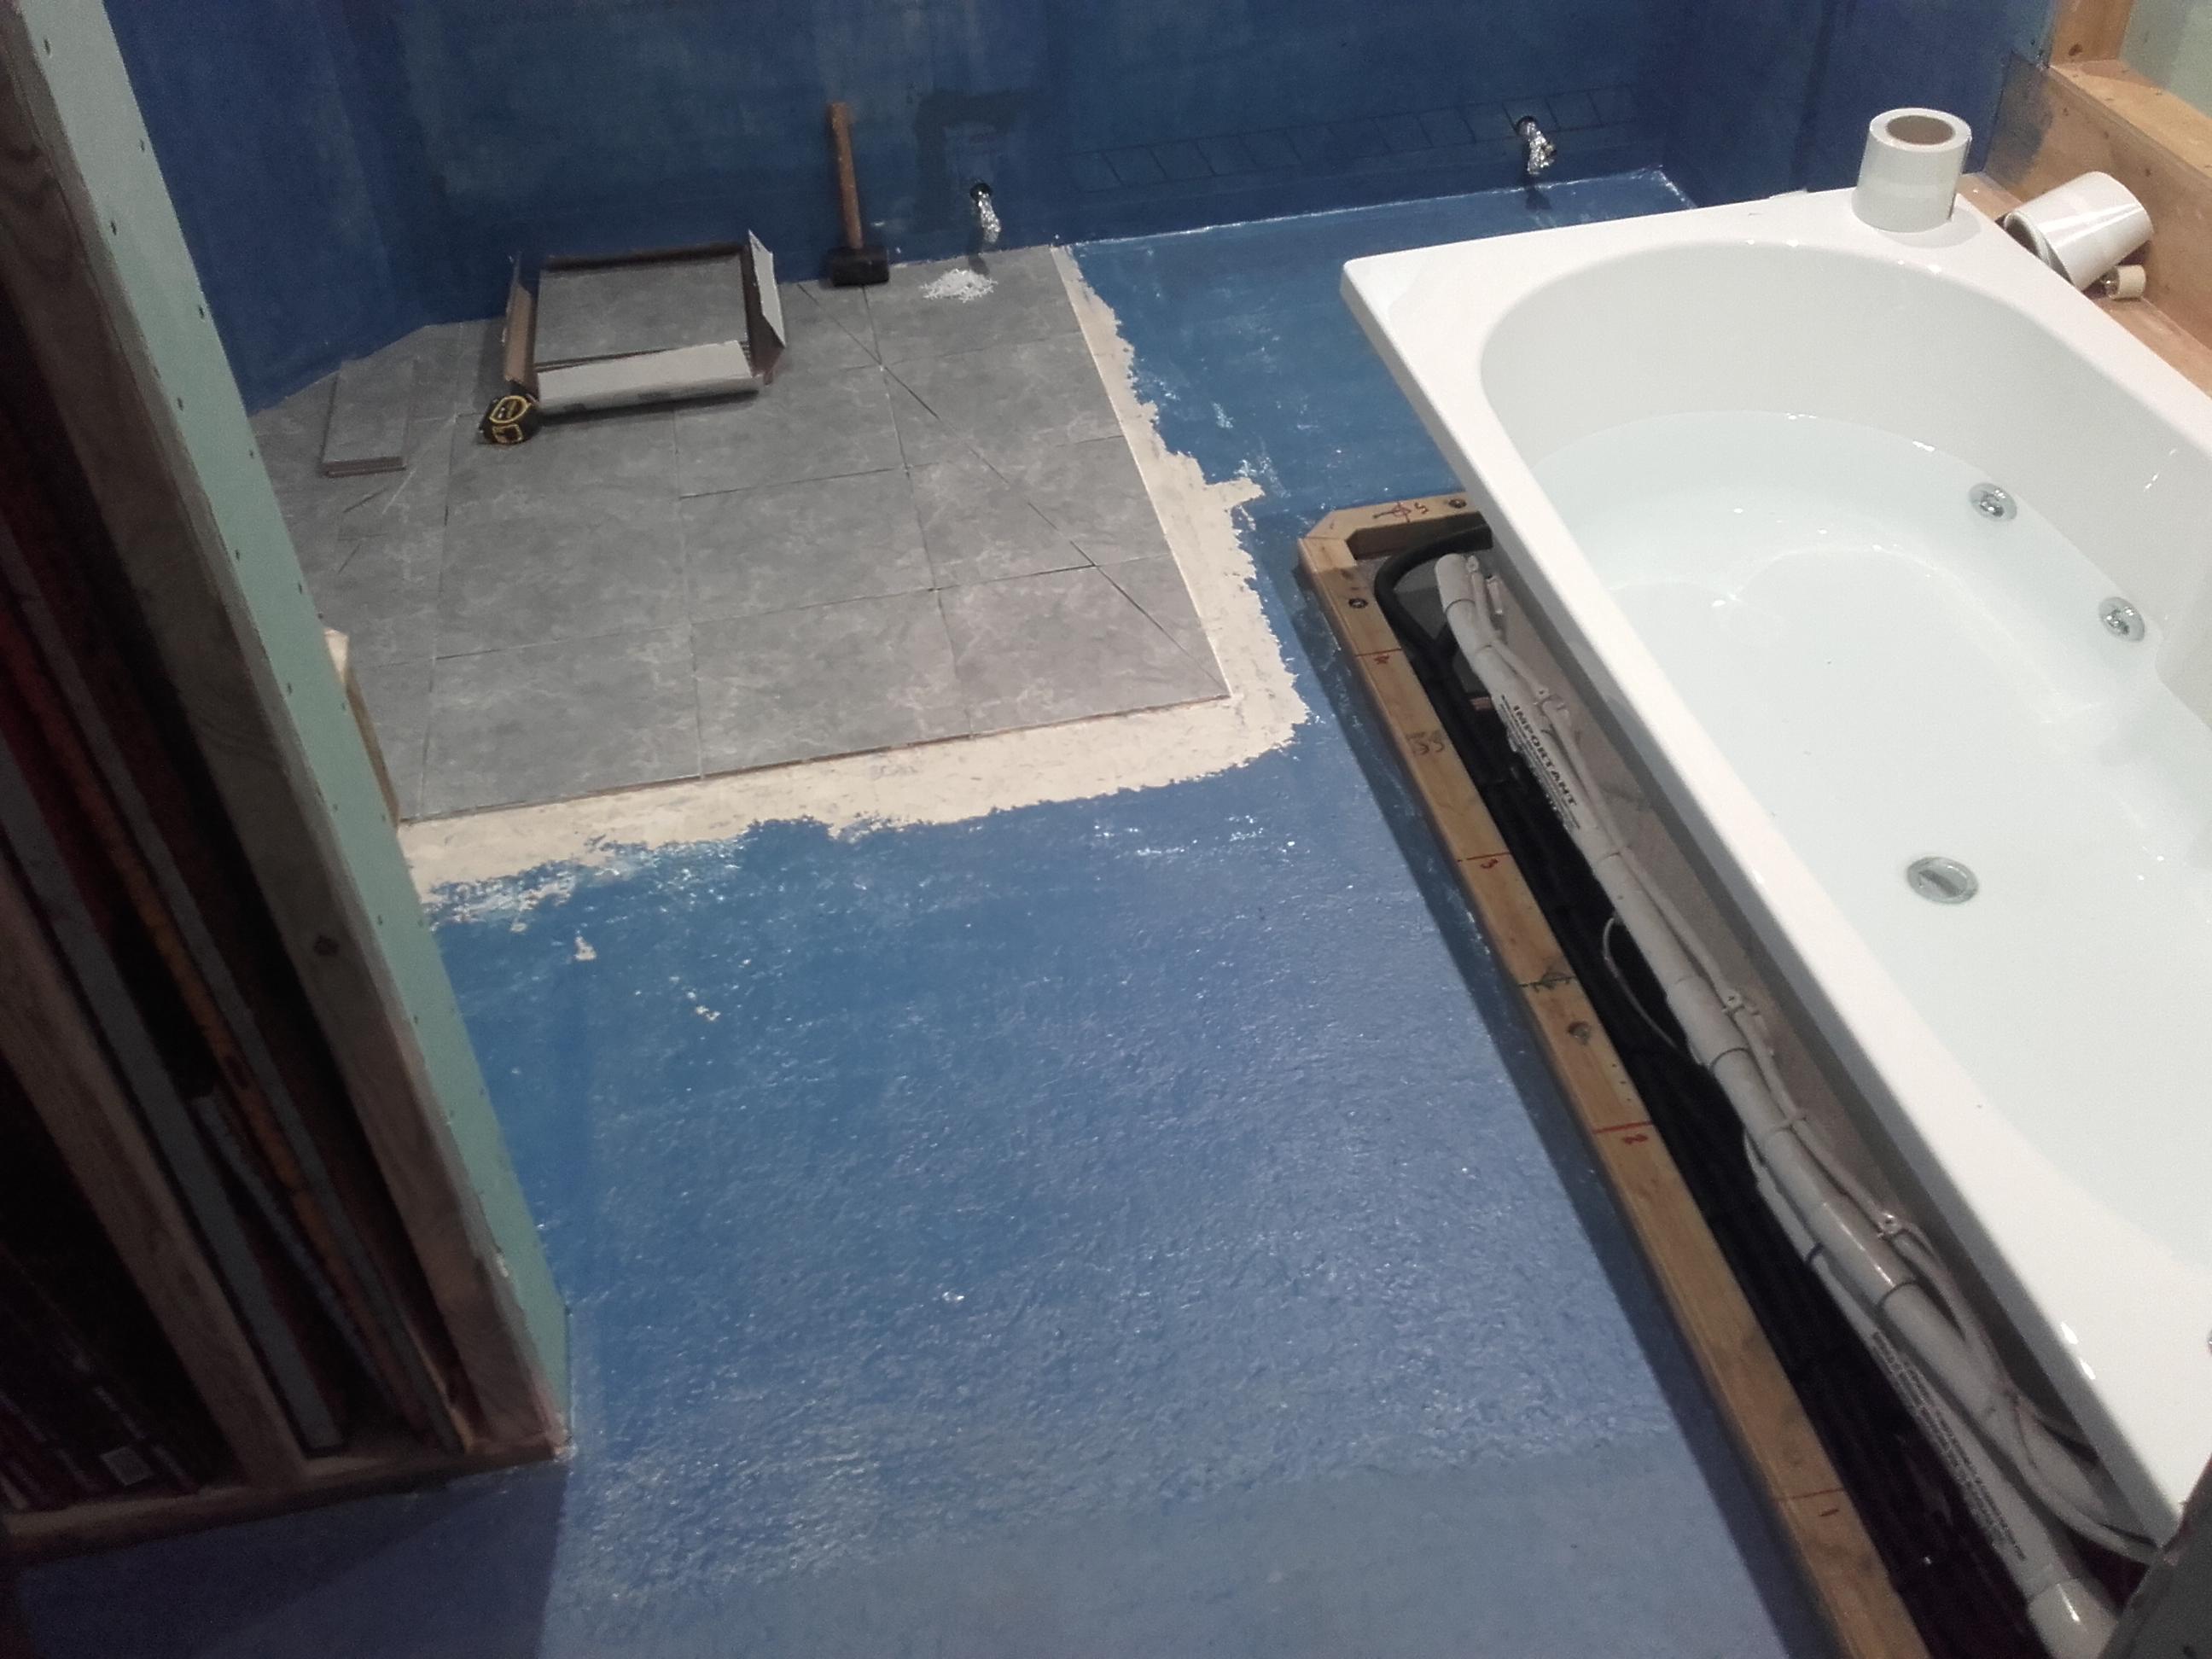
@Nickfromwales, not wishing to agree with SWMBO here but why can't I now do the section where the basin will be to the right in this picture? It's about 1m2 so not too much for me to get into trouble. THEN from the bottom of the picture to the stub wall. When that's dry the bit in the cupboard & out the door? Ta.
-
Help with kitchen renovation/ 1st house.
Onoff replied to zoothorn's topic in Bathrooms, Ensuites & Wetrooms
Sides go between will and header bits. Keeps the ends of the sill down and the ends of the header up! The small person was to mark with a pencil the cut out required for the pb whilst I pushed the pb against the battens. Shouldn't be any need to hold the C'tex in between the battens with anything unless it's well loose. Push it in and low expensive foam any gaps. Not too much foam though you only want it at the sides not behind the Celotex. Less is more, easier to add foam later than cut away. -
So if apply tile adhesive to the floor in one direction I should butter the tiles going down in the other direction?
-
I found the wacker plate in the shed yesterday. I might get my lad to make the single to 3ph converter whilst he's off from uni. If he's not too busy gaming like when I was doing the tiles last night!
-
Resin topped coffee table to start with...
-
Help with kitchen renovation/ 1st house.
Onoff replied to zoothorn's topic in Bathrooms, Ensuites & Wetrooms
For the reveal I think now. -
Help with kitchen renovation/ 1st house.
Onoff replied to zoothorn's topic in Bathrooms, Ensuites & Wetrooms
Have you started boarding yet? You need to decide how you're going to finish the reveal where the pb meets the insulated pb. I was tiling so everything gets covered. Quickest is probable some form of L trim be it wood, plastic or metal. If you look at mine I fitted the insulated pb in the reveal first. I measured the deepest bit of the reveal from batten face to window. I then cut 4 strips from the insulated pb to that width making best use of the insulated pb. If the window is less than 1200x1200 then it's 4 strips off the board width ways and a nice square bit left over! Cut the sill bit to width, slide into the reveal then put a straight edge across the battens either side and draw a line on the piece. Cut to that. Do the same with the top and sides. You should then have 4 bits of insulated pb that fit the reveal and come level with the battens. Fit these with low exp. foam, screw at the front and bricks to weight down a bit, sticks to keep in place. If you don't have a small, willing child to fit the reveal and mark the cut out the you CAN if you want cut your pb once on the wall assuming it fits height wise! - Screw the pb to the battens as aforementioned. - Measure from face of insulated pb on the left to the rhs of the board you've just put up. Do it at the sill and header positions. - Transfer those dimns to the front of the board. Add marks 3mm to the right of these and draw a straight line down. - Do the same for the top and bottom adding 3mm. A big square is useful here. If you're not sure where your cut line will end up you can drill some holes with a 2mm drill to find the corner where the lhs and sill bits meet. - Cut with the Stanley and clean up the edges with the surform plane. -
I assume it must be self levelling to a degree? If you can DIY a resin drive it must be possible to do a resin floor imo.
-
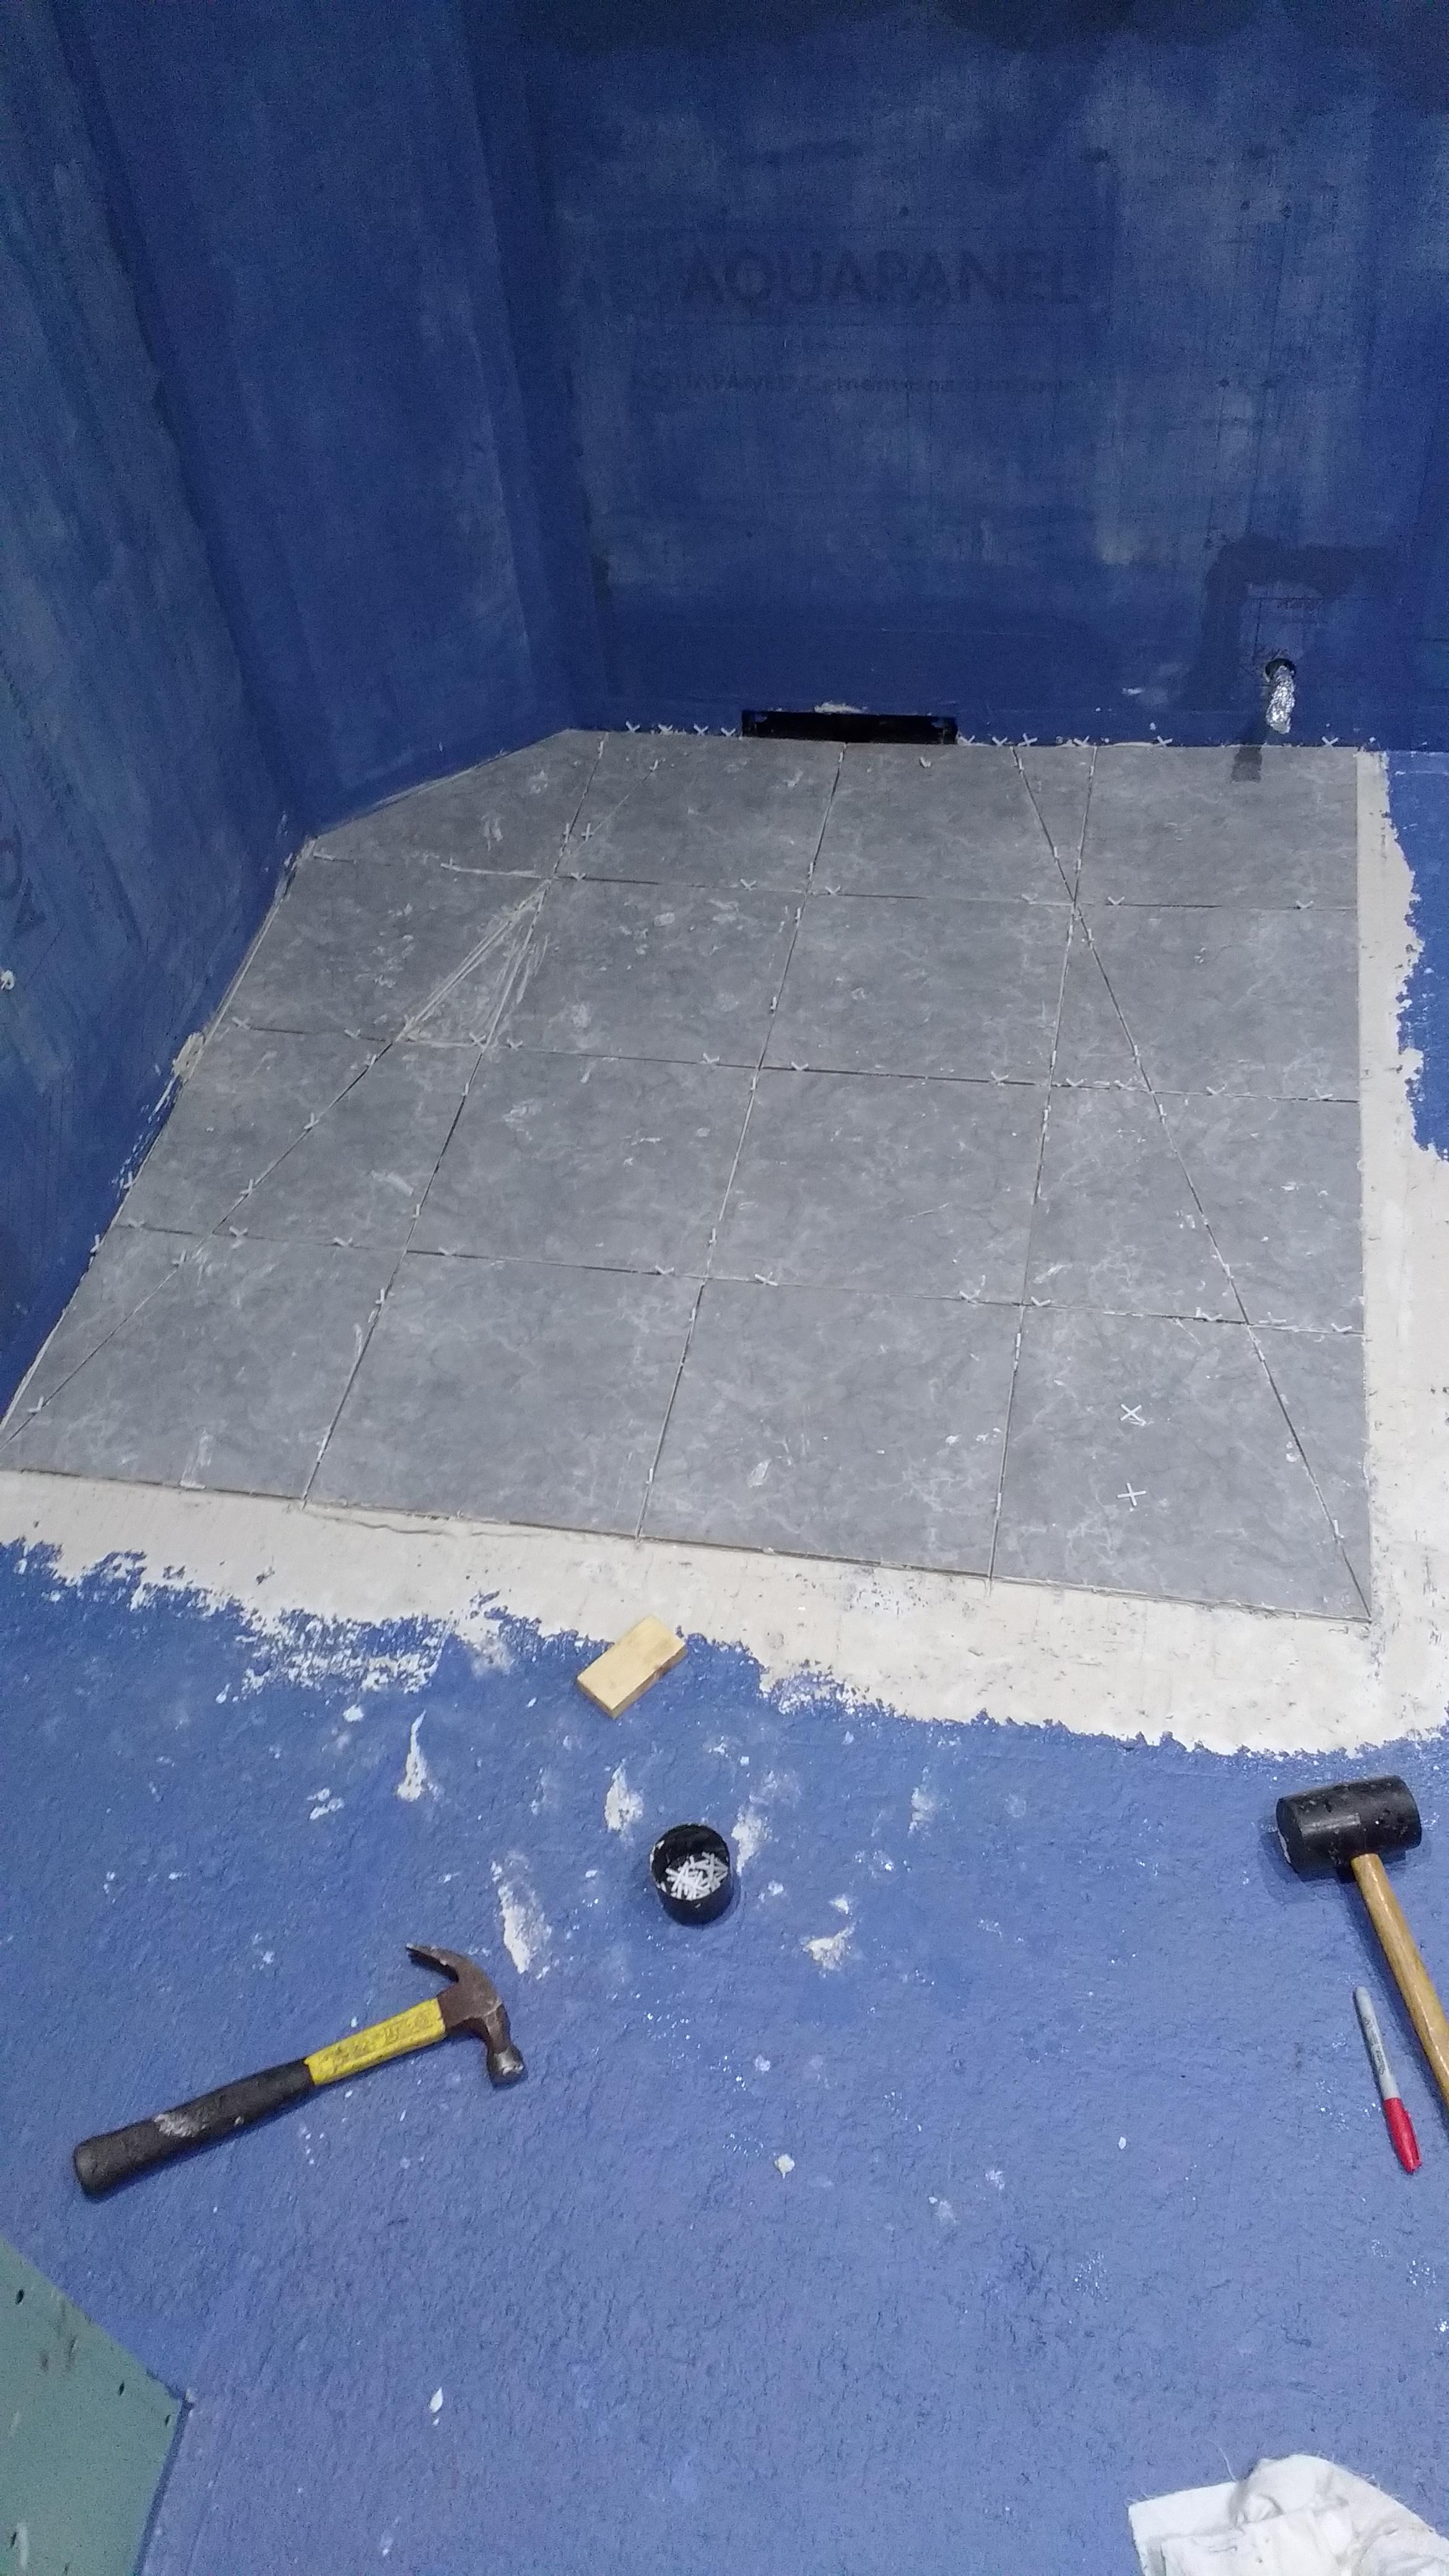
It was drying fast along the edges so I didn't chance moving anything. Too late as in midnight anyway. I think I'm "saved" as the concrete was so flat to start with. When I was spreading the slab it was going on a dream with no undulations under the float. I didn't have to put it on thicker anywhere. Had a look and a gentle tap this morning and all seem solid. For the remainder I'll butter the tile back too.
-
Boll@cks! ALWAYS read the instructions... Seems I SHOULD have back buttered the tiles! >300x300 and where dampness likely after tiling... Too late now.

-
Ceiling height for open-plan room
Onoff replied to Dreadnaught's topic in New House & Self Build Design
My bathroom ceiling height is 2470 from concrete to u/side of pb ceiling. No skirting. Meant I had to get 2700mm high specially ordered in from TP. Lot of waste. With hindsight etc! -
Yeah...remember when I went to similar trouble with the the "Dulux Diamond Satin" and she said "I don't mind matt!"
-
Can it be DIY'd? Not sure how you'd mix industrial quantities of resin though!
-
It very pale...in fact it's white! Not my choice.
-
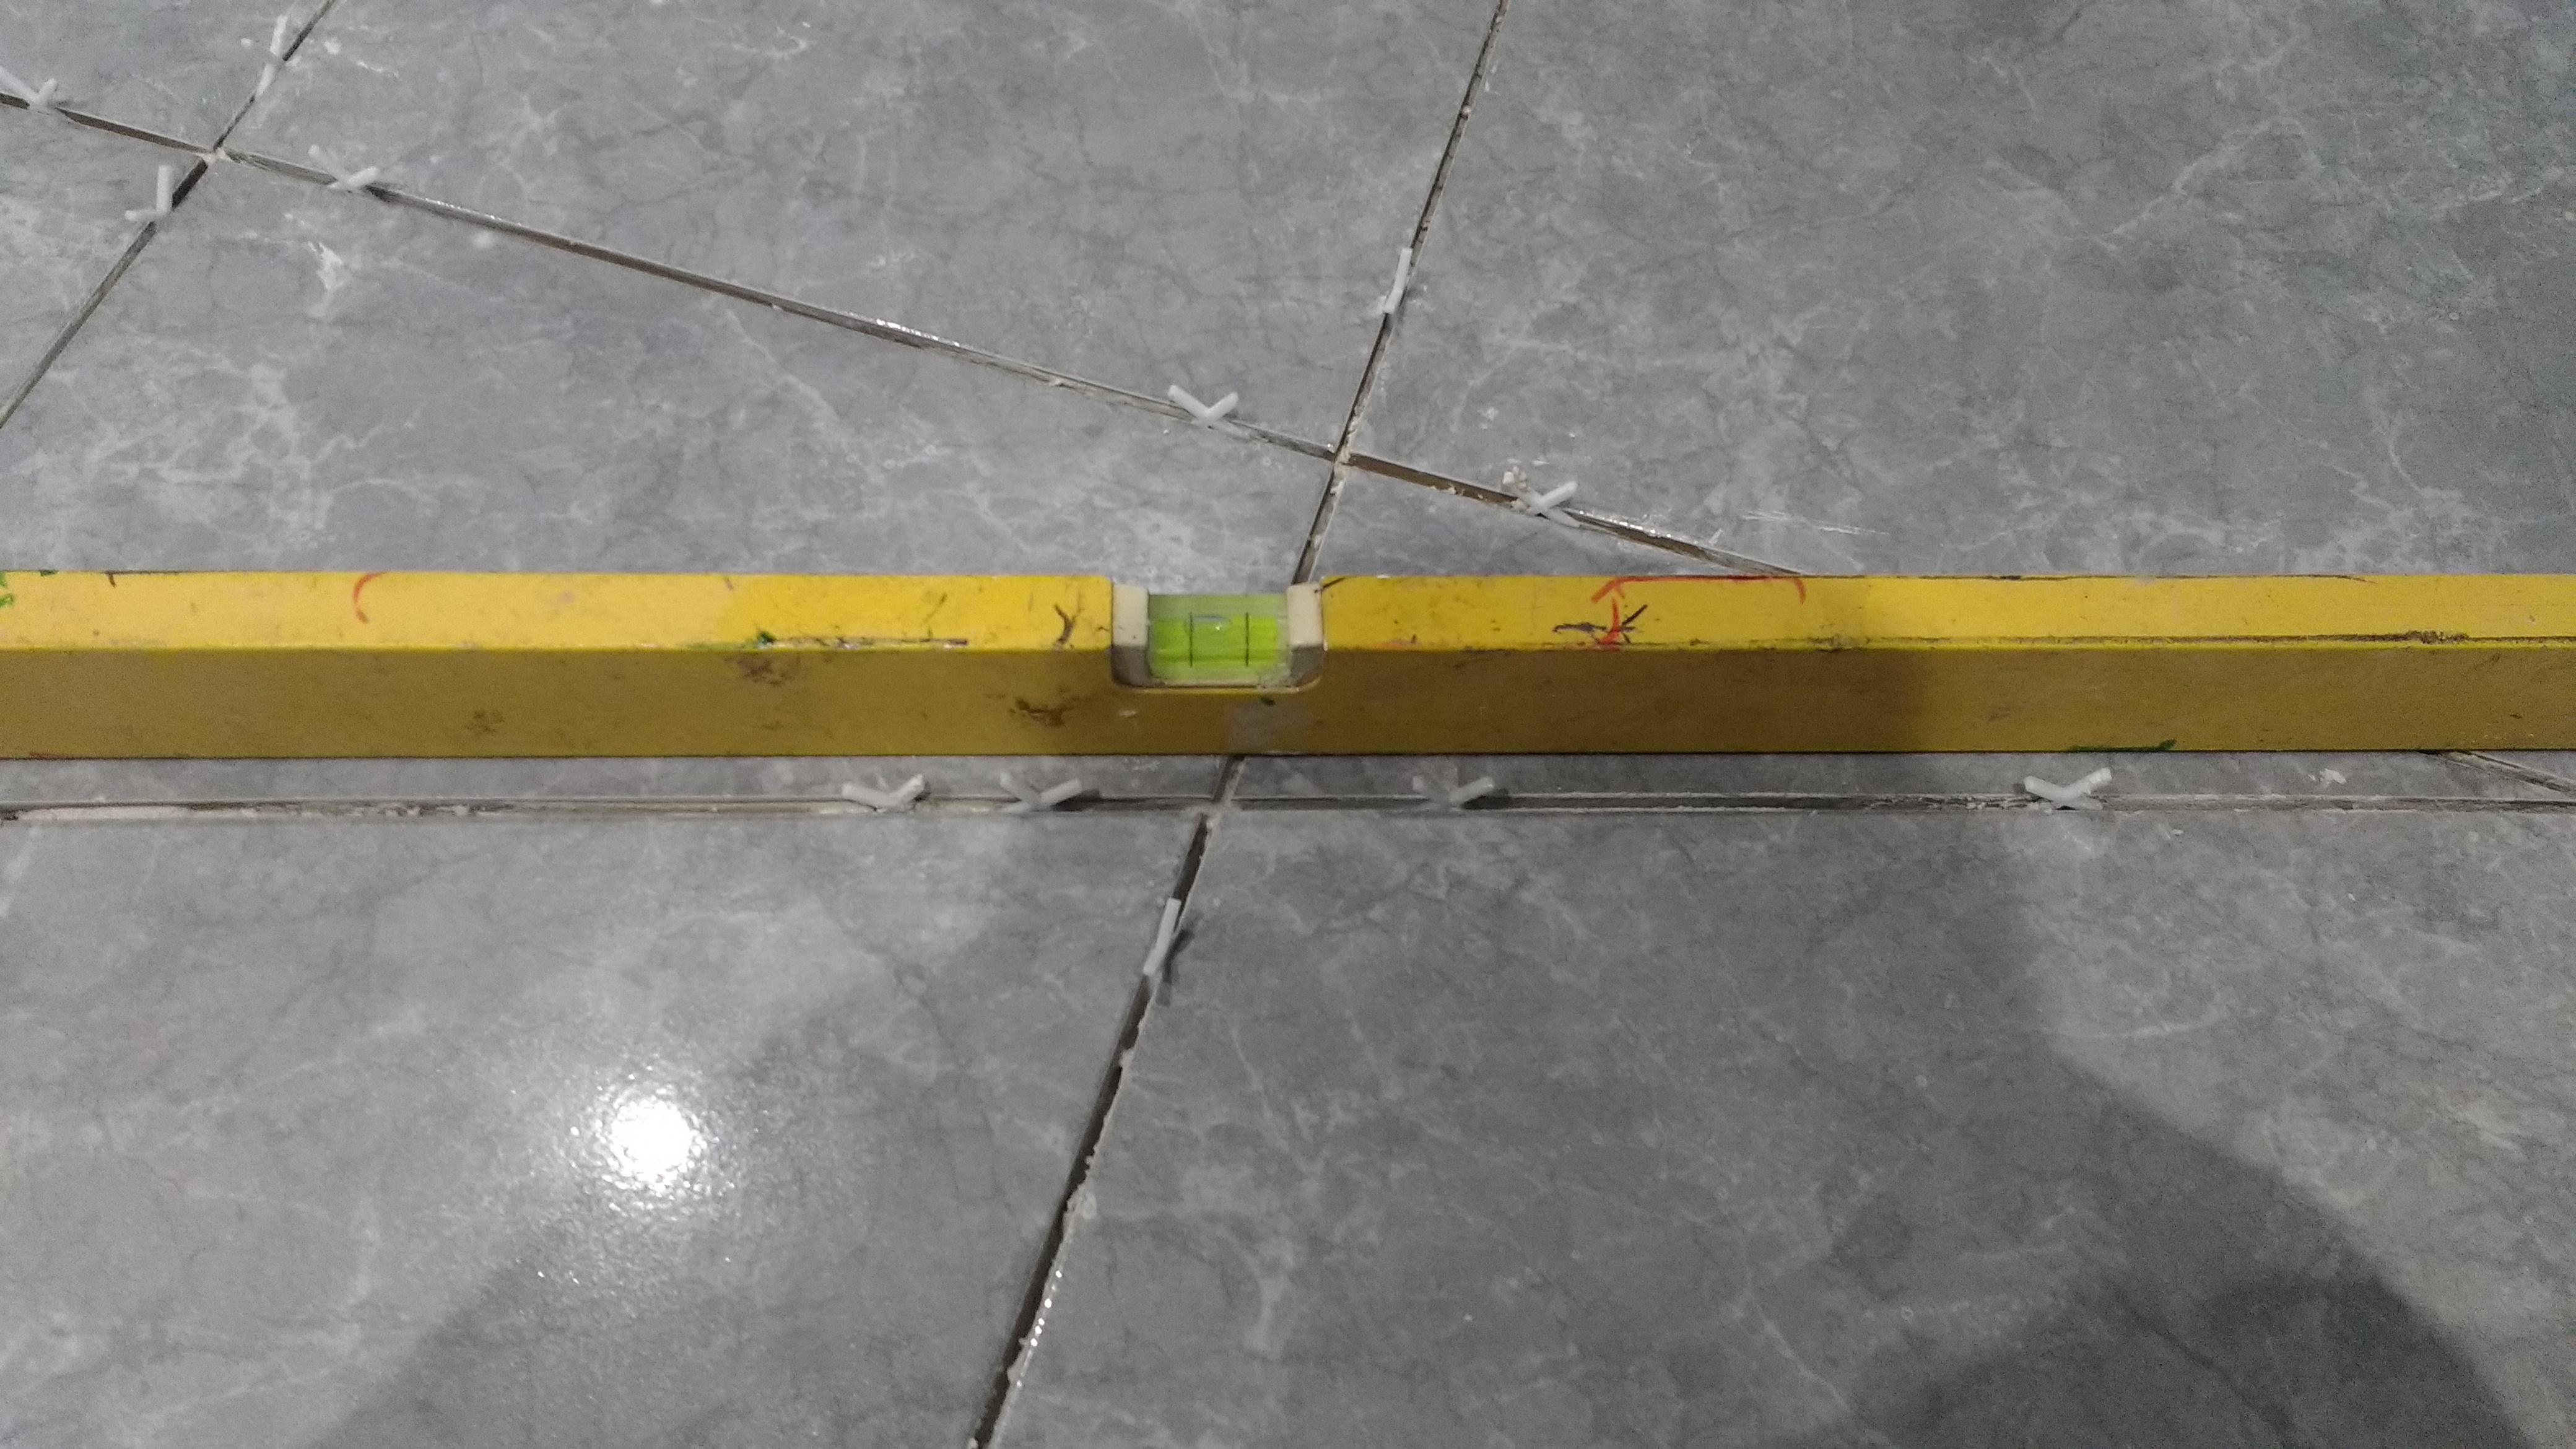
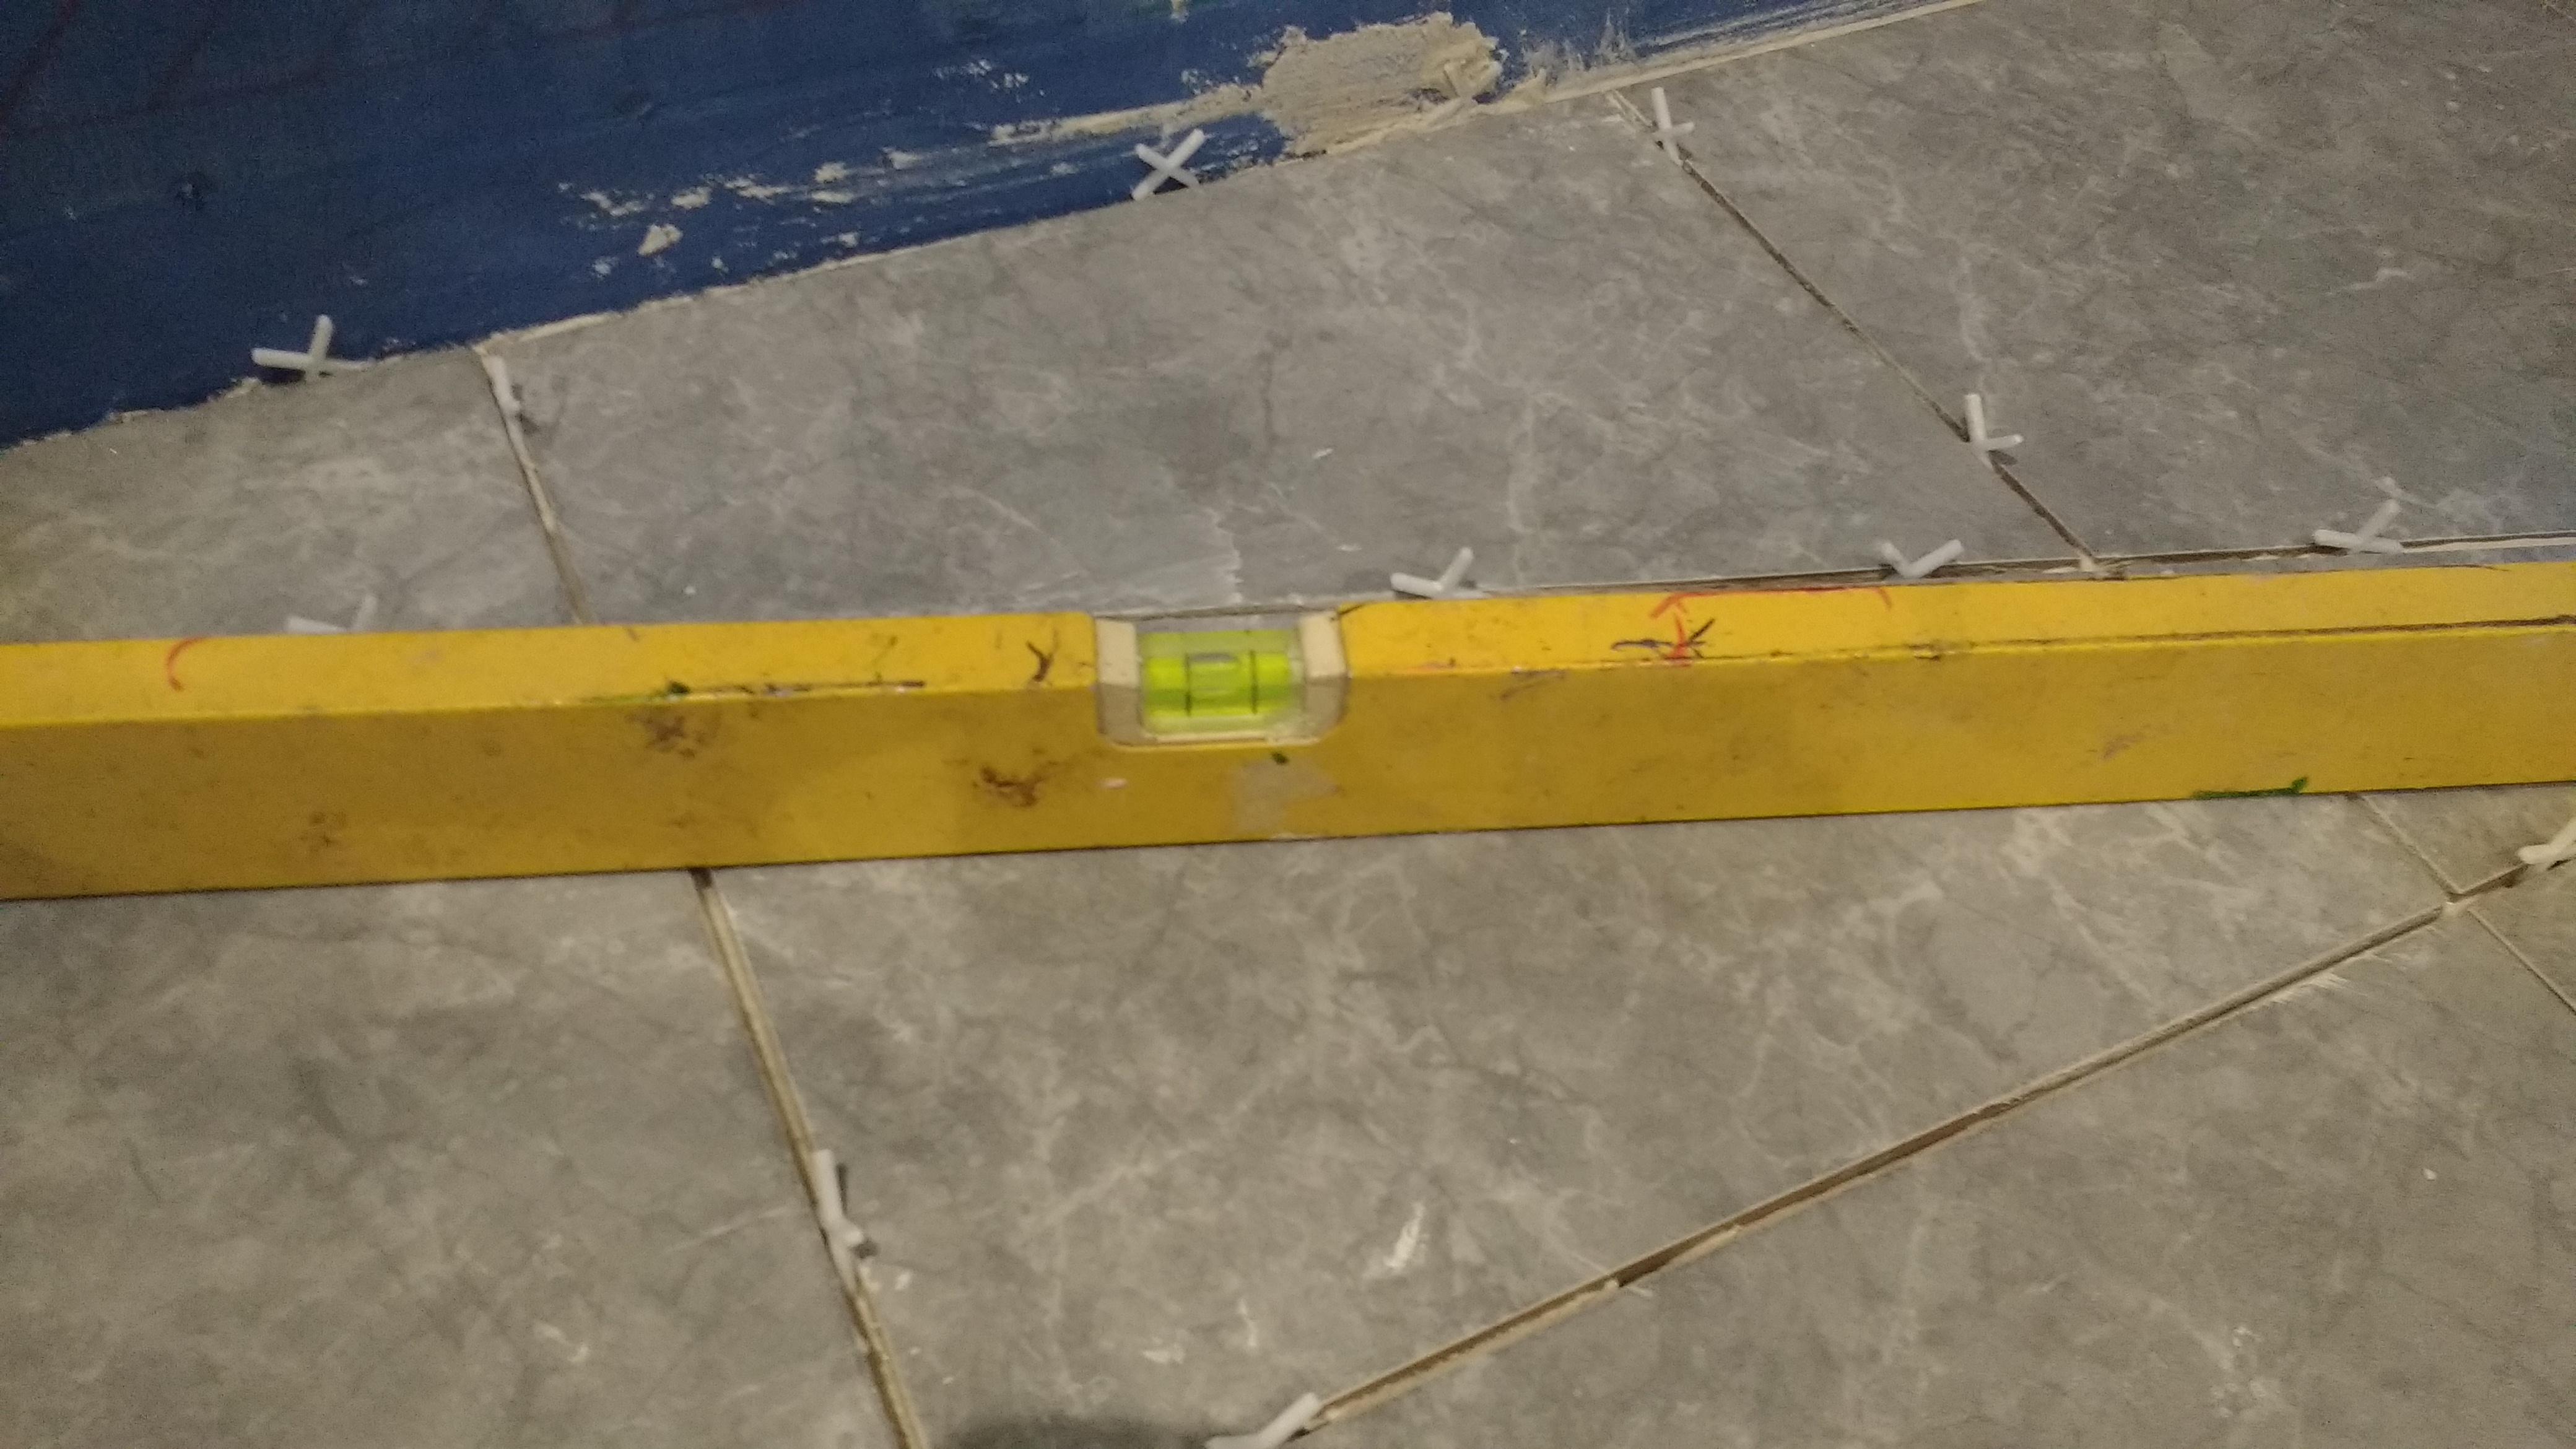
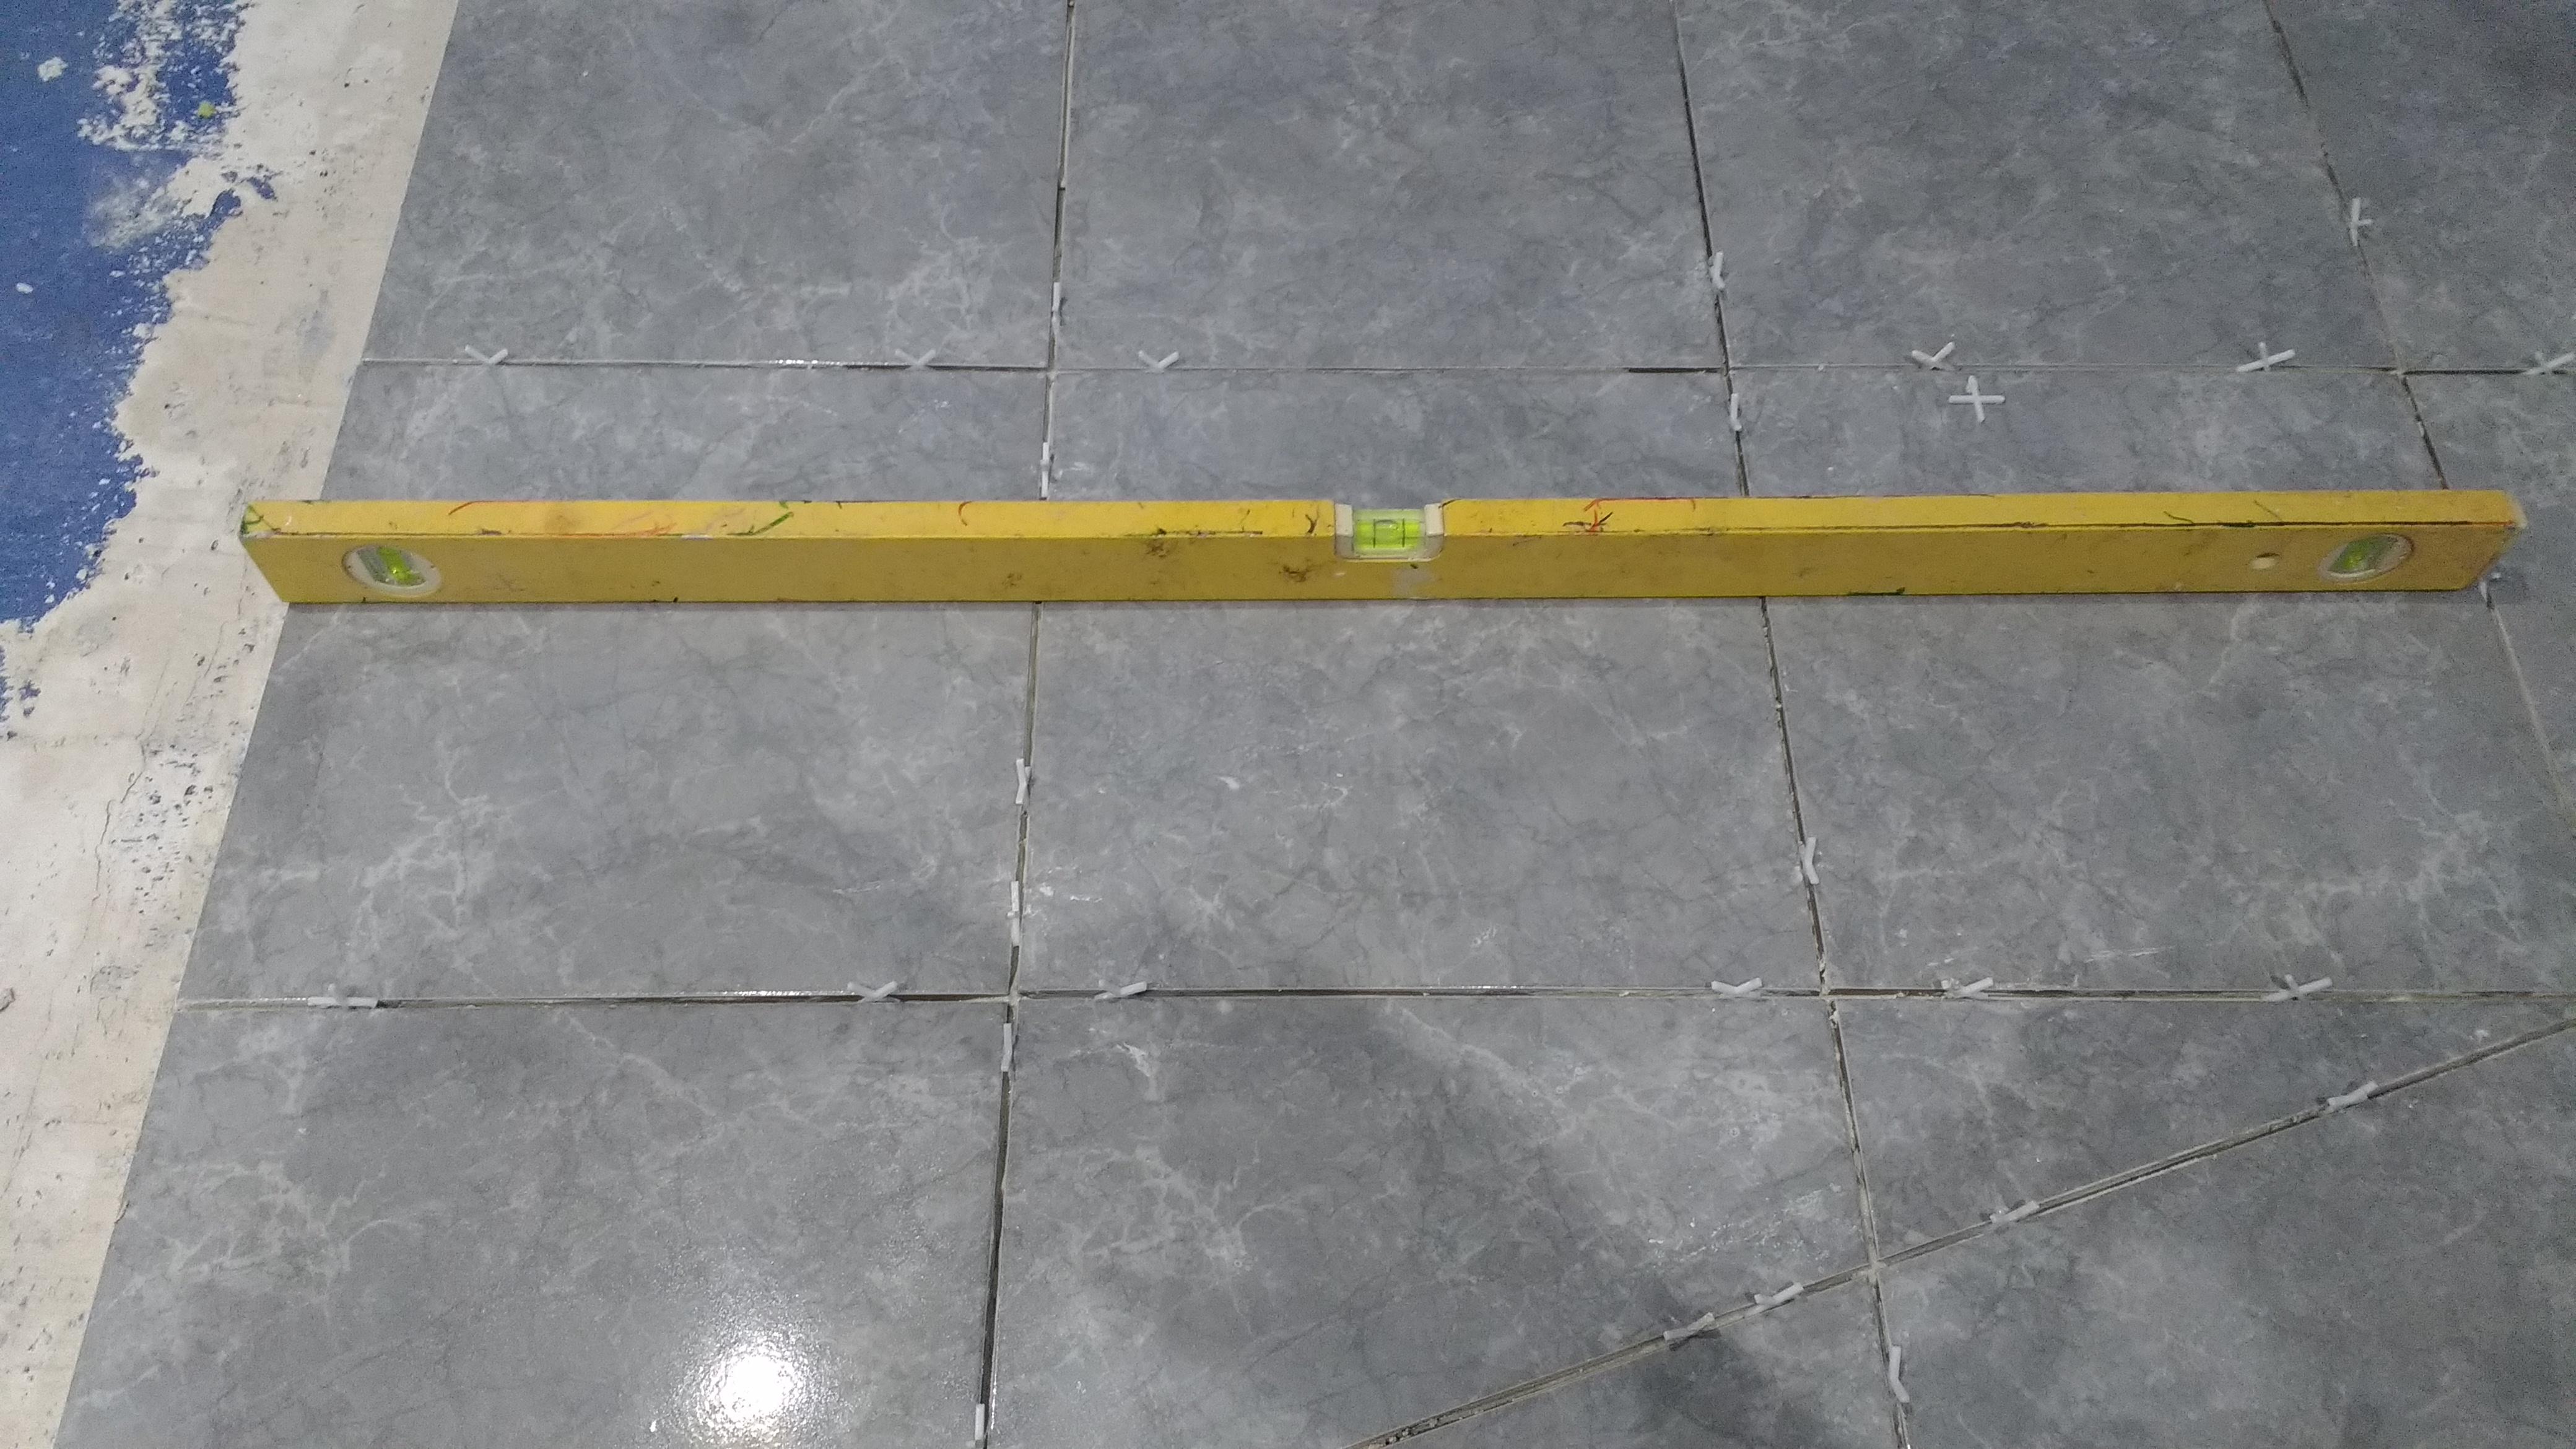
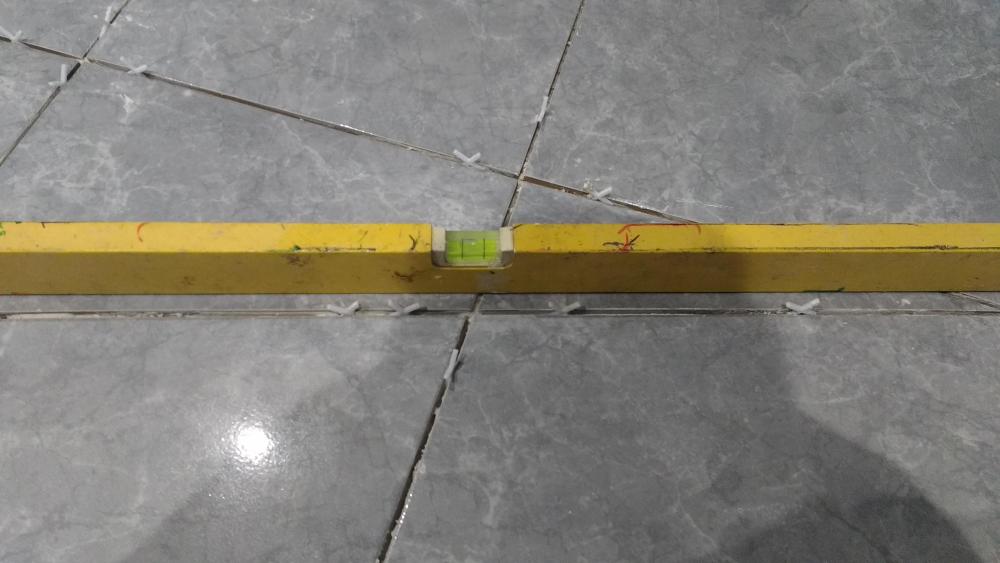
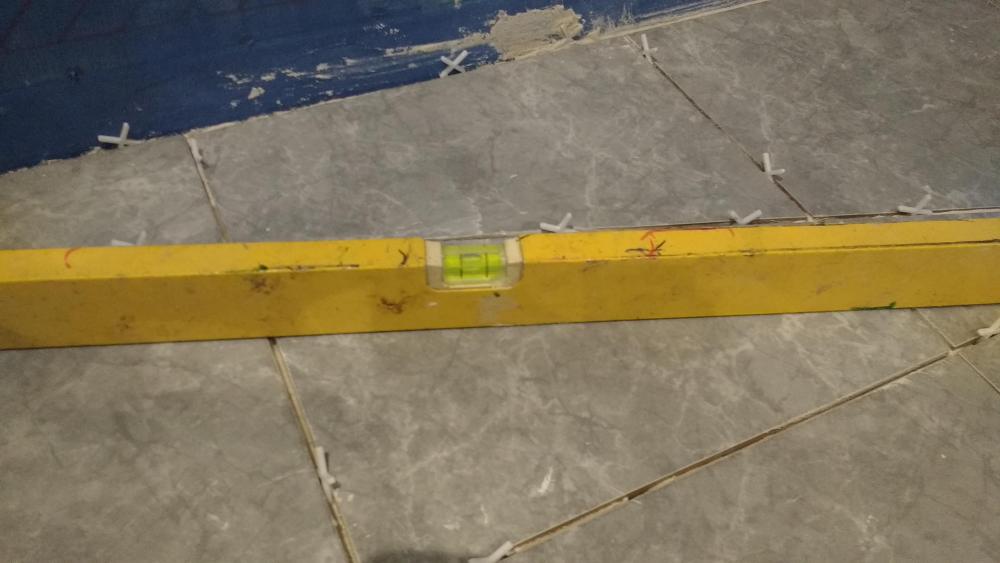
Just to show I've got a fall:
-
@IanR's thread:
-
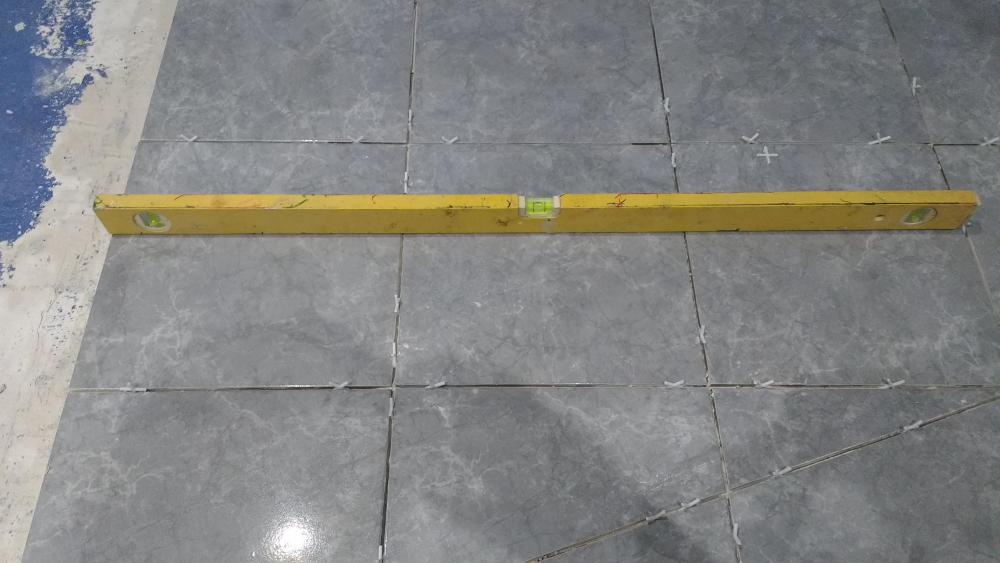
Tell me about it, I think I officially prefer plastering to this. Hats off to you doing this every day! Maybe starting on the wet room corner wasn't the best re-introduction after 30 years! Although I wouldn't have managed rapid set I was surprised how "live" the tiles remained with the extended set as in move one and its neighbour's neighbour shifts...as you said! It's level where it should be, the fall lines don't rock with the level on them and they fall to the drain: One fall: The other: And straight down the middle: Not 100% happy with a couple of joints but I'll have to live with them. Main worry is whether I'll have any sharp bits underfoot at the 6 point "confluence"... Knackered just doing that. Thought it was going to go pear shaped.

-
Too late! Didn't butter, wishing I had! It is what it is: 6mm on the floor only and they pushed down OK. Lucky the floor is pretty level. Tbh I think I could have done with the "butter" as well Trying to clean them up now. Grief where it's oozed out of the joins. Htf do I get the excess out? At the mo resorting to running a spacer along the joint to drag out most of the excess then wiping with a cloth! No way on Earth I could have handled rapid set.