Onoff
-
Posts
21127 -
Joined
-
Last visited
-
Days Won
206
Everything posted by Onoff
-

Help with kitchen renovation/ 1st house.
Onoff replied to zoothorn's topic in Bathrooms, Ensuites & Wetrooms
Mark the ceiling LIGHTLY with a soft pencil before you fit the boards so you know where the centreline of the battens are. Like this though maybe NOT with a BFO green marker! The line should be perpendicular to the wall and long enough so the pb doesn't obscure it: What @Ferdinand means is if say you've fitted a board and aren't sure where the battens are you can use the end of a screwdriver handle to locate the batten. A hollow sound means you're likely NOT on a batten. A denser, sharper sound means the batten is there 'ish". AVOID the need to do this and mark on ceiling AND floor. You can just draw a line between the two and that will g'tee you're on the centreline.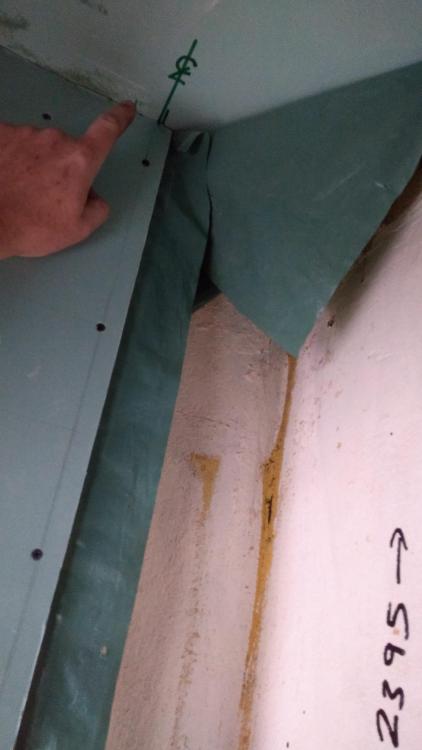
-
Help with kitchen renovation/ 1st house.
Onoff replied to zoothorn's topic in Bathrooms, Ensuites & Wetrooms
I think you may struggle to fit "25mm" Celotex in between 25mm battens in that the Celotex might be more than the nominal 25mm thick it says it is. I hope I'm proved wrong! It was why earlier in the thread I said about packing behind the battens. In what school does 3x440=1200? -
Cuprofit push fit or similar is that?
-
That dog rough socket behind waste pipes and melamine cut out like its been done with a gas axe...not a new build surely???
-
SWMBO wants the door frame white glossed...so that's the end of this thread!
-
Help with kitchen renovation/ 1st house.
Onoff replied to zoothorn's topic in Bathrooms, Ensuites & Wetrooms
@zoothorn not sure if you answered but what size are those battens? -
Help with kitchen renovation/ 1st house.
Onoff replied to zoothorn's topic in Bathrooms, Ensuites & Wetrooms
Don't you read the replies? As @PeterW said above: Don't drill and "screw" it, cut a piece of timber to fit between the verticals and stick it on with grab adhesive - cheap ones in my link. I have to say it looks like you're getting the hang of this lark! Back to "foam". I stuck on the eps (expanded polystyrene) direct to concrete, brick etc using the Soudal Low Expansion foam in my link above. As Peter said, put a few lines on and let go tacky for a few minutes then push whatever onto it. I held mine on with the bricks you can see, It was @JSHarris put me onto that method with the Soudal Low Expansion foam. Back to the window reveal. This is deliberately picture heavy. It's how I did MINE. You'll have to glean from it what you can and adapt to suit: My reveal. A 60mm cavity between two 4" breeze block walls: See how I had the white plastic trim up the side: I removed the trim from the sides and top. They stick it on with "Superglue". Usually a thin line. It came of with a chisel. See how the top trip was covering a bloody great gap. There were gaps up the sides too: IF you take that upvc trim off you will have MORE draughts before it gets better. With the top trim all off revealing the HUGE gap across the top of the window: Nearly an inch. I could see daylight through it: The "cure": Foams all round with Soudal Low Expansion gun foam. Let it go off and cut flush: I then wedged a 2" bit of eps in first and foamed between it and the inner leaf: Let dry, cut flush. I then put a smear of sand and cement on: I then sprayed the reveal with spray adhesive and stuck some strips of dpm (damp proof membrane) on. Tbh you could use clean, cut down rubble bags etc: Did the dpm top, bottom and sides. I ran a line of Sikaflex EBT up the corner against the window and in lines on the dpm and pushed my 27mm pb onto it. The sill bit went on first, weighted down. The bricks are on the eps, the eps is only there to protect the insulated pb. Could have used Soudal Low Expansion Foam instead: The sides support the top bit. Supporting the underside of the top bit whilst it's going off. Note front edges of the insulated pb also screwed down to the batten around the window: Done: It's made a huge difference to draughts around the window. -
Help with kitchen renovation/ 1st house.
Onoff replied to zoothorn's topic in Bathrooms, Ensuites & Wetrooms
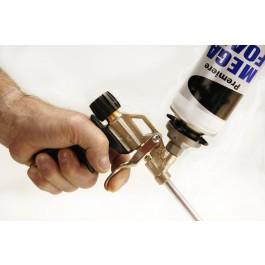
OK, so you've found where a lot of the draughts were probably coming around that window! I had exactly the same issue! Not all expanding foams are made the same! You get the normal high expansion stuff, you get low expansion stuff and you get extra sticky type ones for "gluing" boards on. Now this might seem an expense you don't want but if intending to do a lot of "foam" work then an expanding foam gun is an absolute MUST! Much much more controllable than the "hand held types. Photos are atypical, just grabbed off the web. This is a hand held foam can. Comes with a plastic drinking straw type tube you slip on the end. Push the trigger down and foam comes out of the tube. Really though you want to be using it all in one go on a big job or the foam goes hard in the tube. This is a typical foam GUN. Has a valve on the back whereby you can adjust the flow rate of foam or switch off altogether. You can leave it on the shelf like it for a few months and come back and its good to go again. Note you use it with the can above: This is my gun from Screwfix: https://www.screwfix.com/p/no-nonsense-foam-applicator-gun/28483 This is the low expansion foam I used. See earlier photos in this thread where I stuck the blue membrane to the reveals with spray adhesive then used this foam between the back of the insulated pb and blue membrane to stick the board up. Note how I used temporary bracing in the reveal. Also good for gap filling where pir doesn't quite fit etc. https://www.screwfix.com/p/soudal-soudafoam-expanding-foam-gun-grade-750ml/5026d#product_additional_details_container As Peter says use a grab adhesive like Pink Grip, No Nails, Stick Like Sh!t etc to put that batten up where you're hitting the lintel. A couple of quid a tube like these: https://www.screwfix.com/p/i-cant-believe-it-s-not-nails-solvented-grab-adhesive-350ml/1120d https://www.screwfix.com/p/no-nonsense-11665502-grab-adhesive-solvent-free-white-310ml/87451 I used a chisel and took off the upvc window trim to allow the insulated pb to fit better (I'll find some pics shortly). Double glazing fitters are notorious for using this stuff for covering up horrendous gaps. Basically they can't be arsed / don't have the time to foam fill / wait for it to go off etc.
-
Help with kitchen renovation/ 1st house.
Onoff replied to zoothorn's topic in Bathrooms, Ensuites & Wetrooms
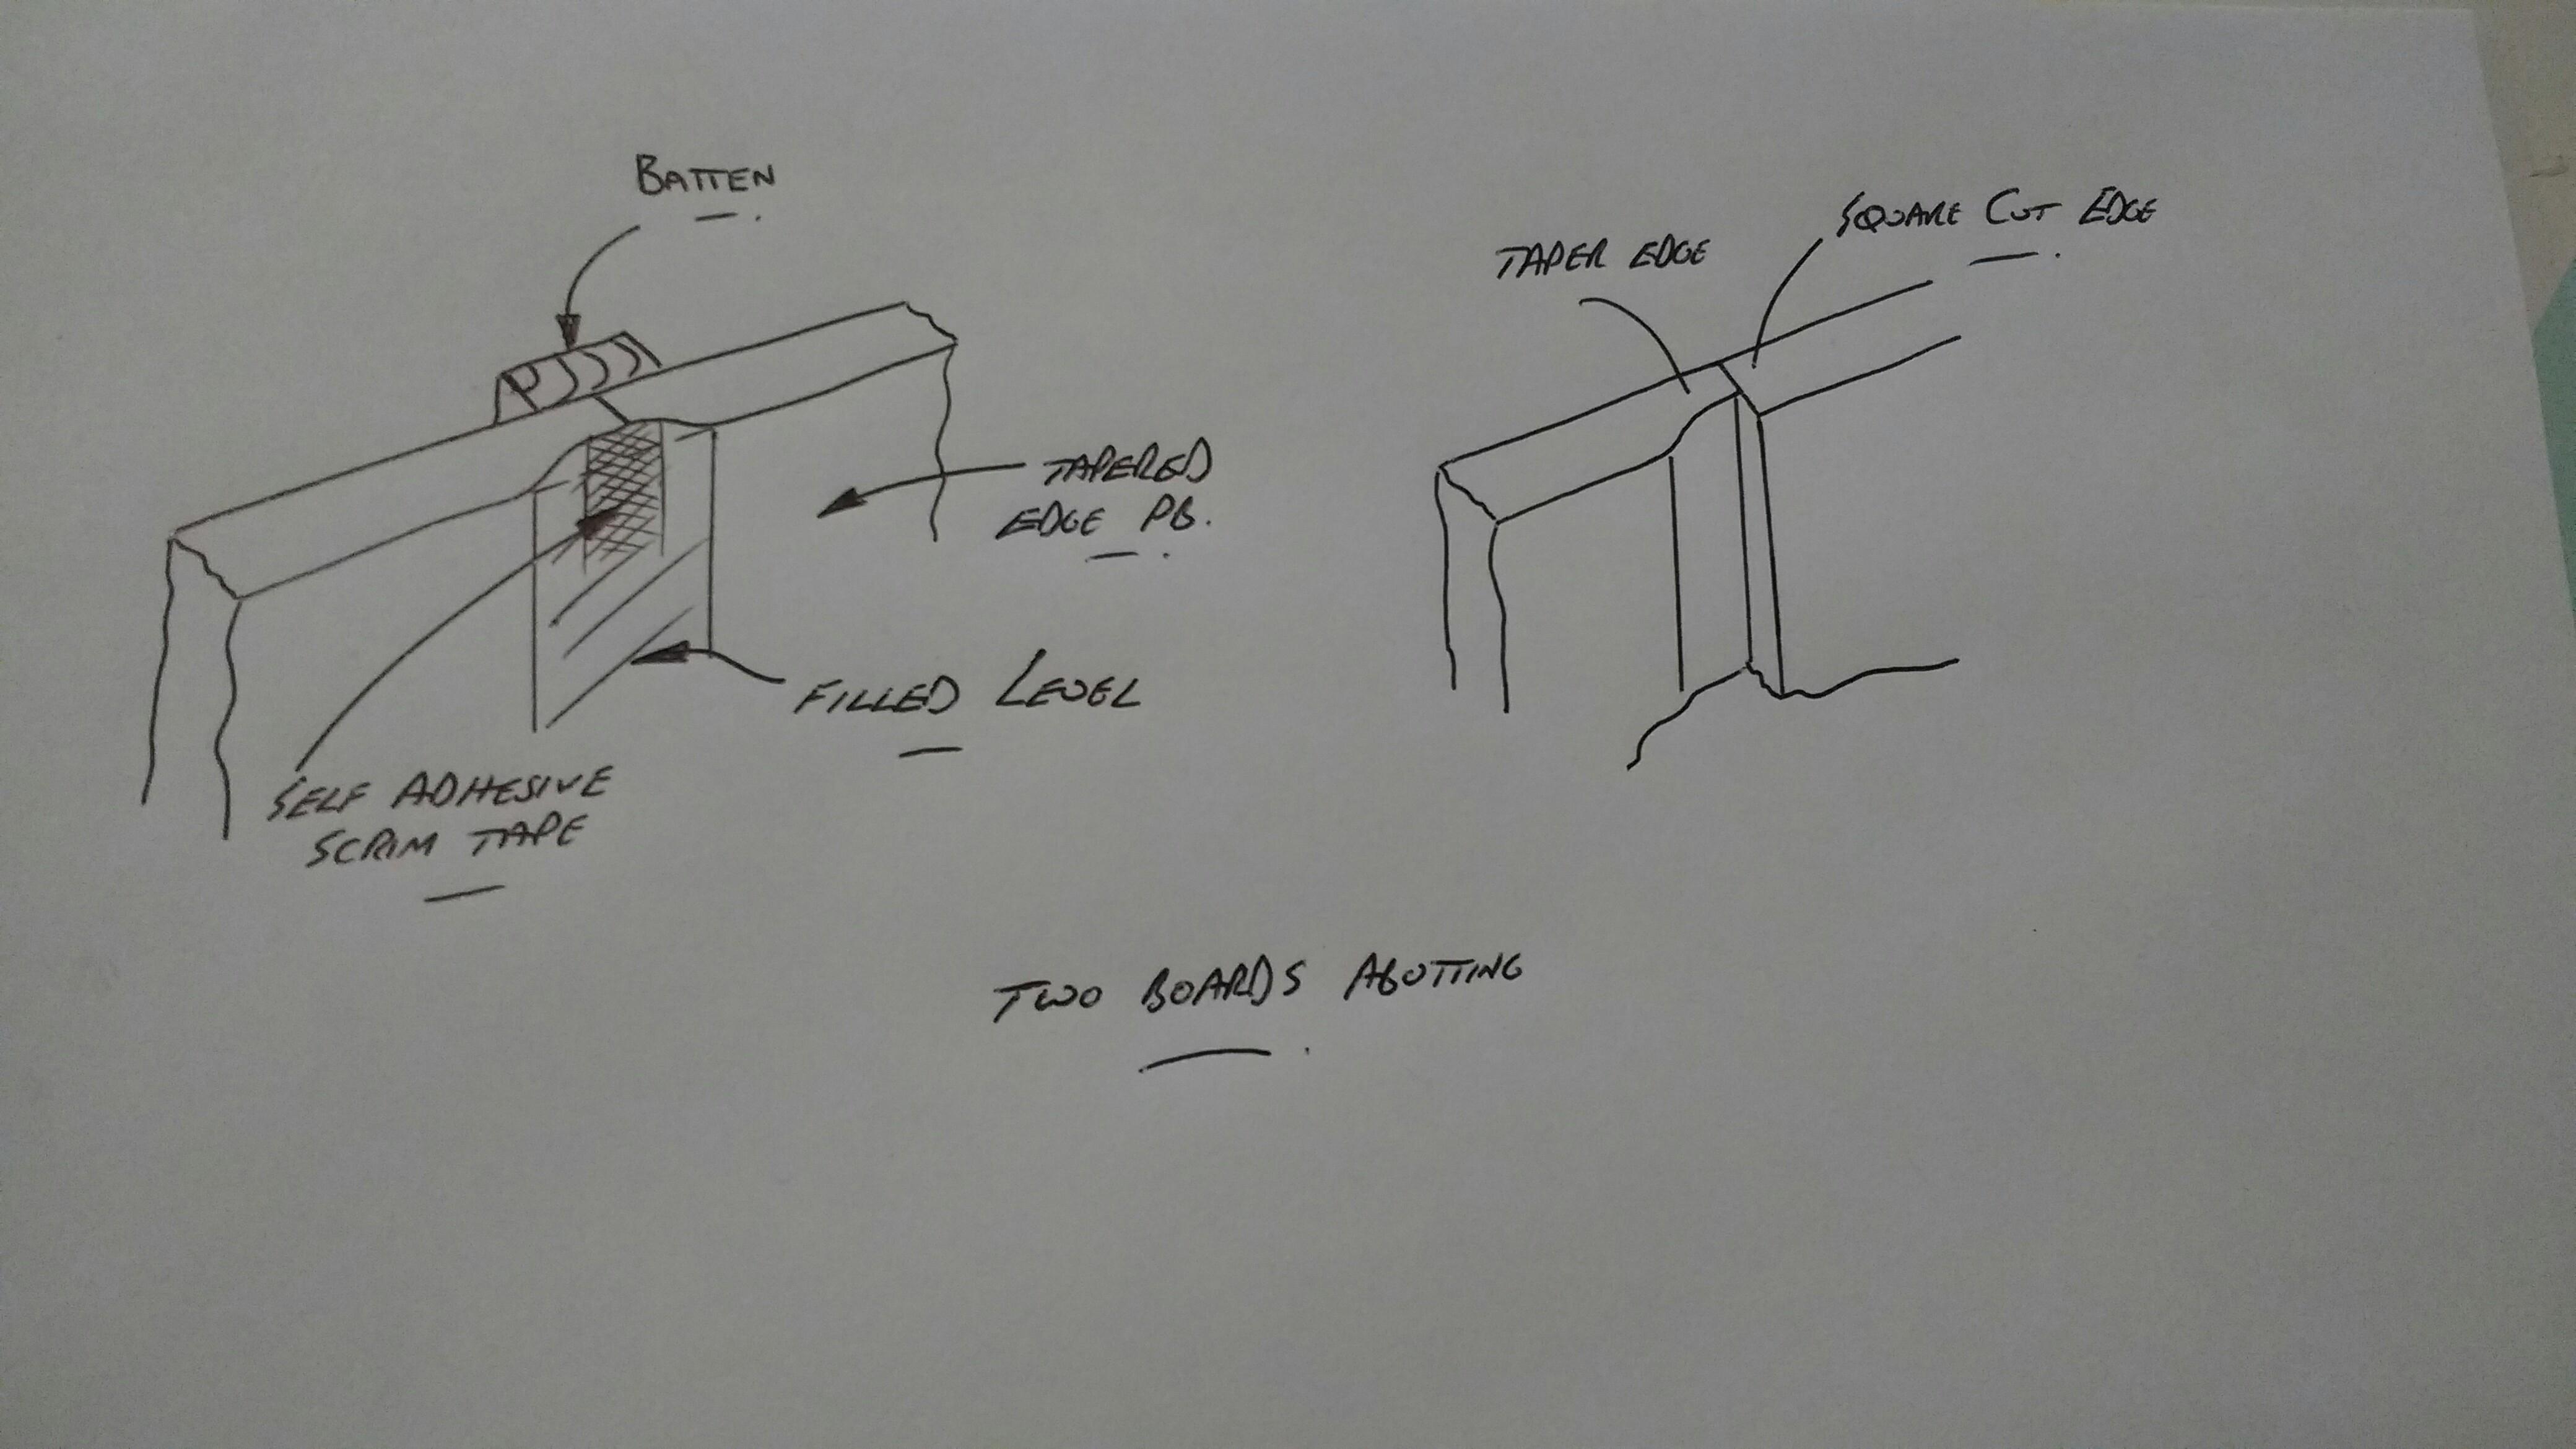
Abutting - where two things meet / join together. In this case where the edge of one board meets another. If you go full board followed by another full board from L to R you might end up having to put another batten in. However this option might be better if intending to tape and fill, that is tape the joint, fill (and sand if required). Two tapered edges are easier to tape and fill than a tapered edge abutting a square edge. However...if you've wall units going below the window you would lose most of a dodgy tapered meets square edge joint. The only bit you would need to worry about is between the top of the worktop and window cill and then above the window. If tiling above the worktop then that's the joint there covered. If you can wriggle that black sill out you could tack a bit of timber on the back to bring it out over the new pb. Whilst the sill is out block up any gaps under the window. Looking good btw!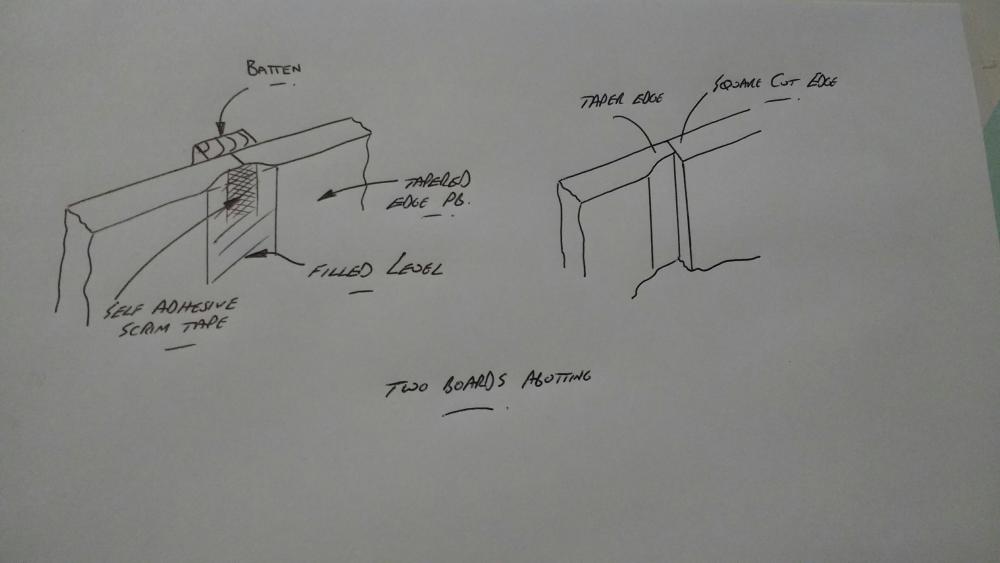
-
Help with kitchen renovation/ 1st house.
Onoff replied to zoothorn's topic in Bathrooms, Ensuites & Wetrooms
If jointing and taping go full board, full board and finish on an odd size, cut one in the corner ensuring that tapered edges are always on joints. Otherwise you'll be abutting a cut, square edge to a tapered edge. -
Help with kitchen renovation/ 1st house.
Onoff replied to zoothorn's topic in Bathrooms, Ensuites & Wetrooms
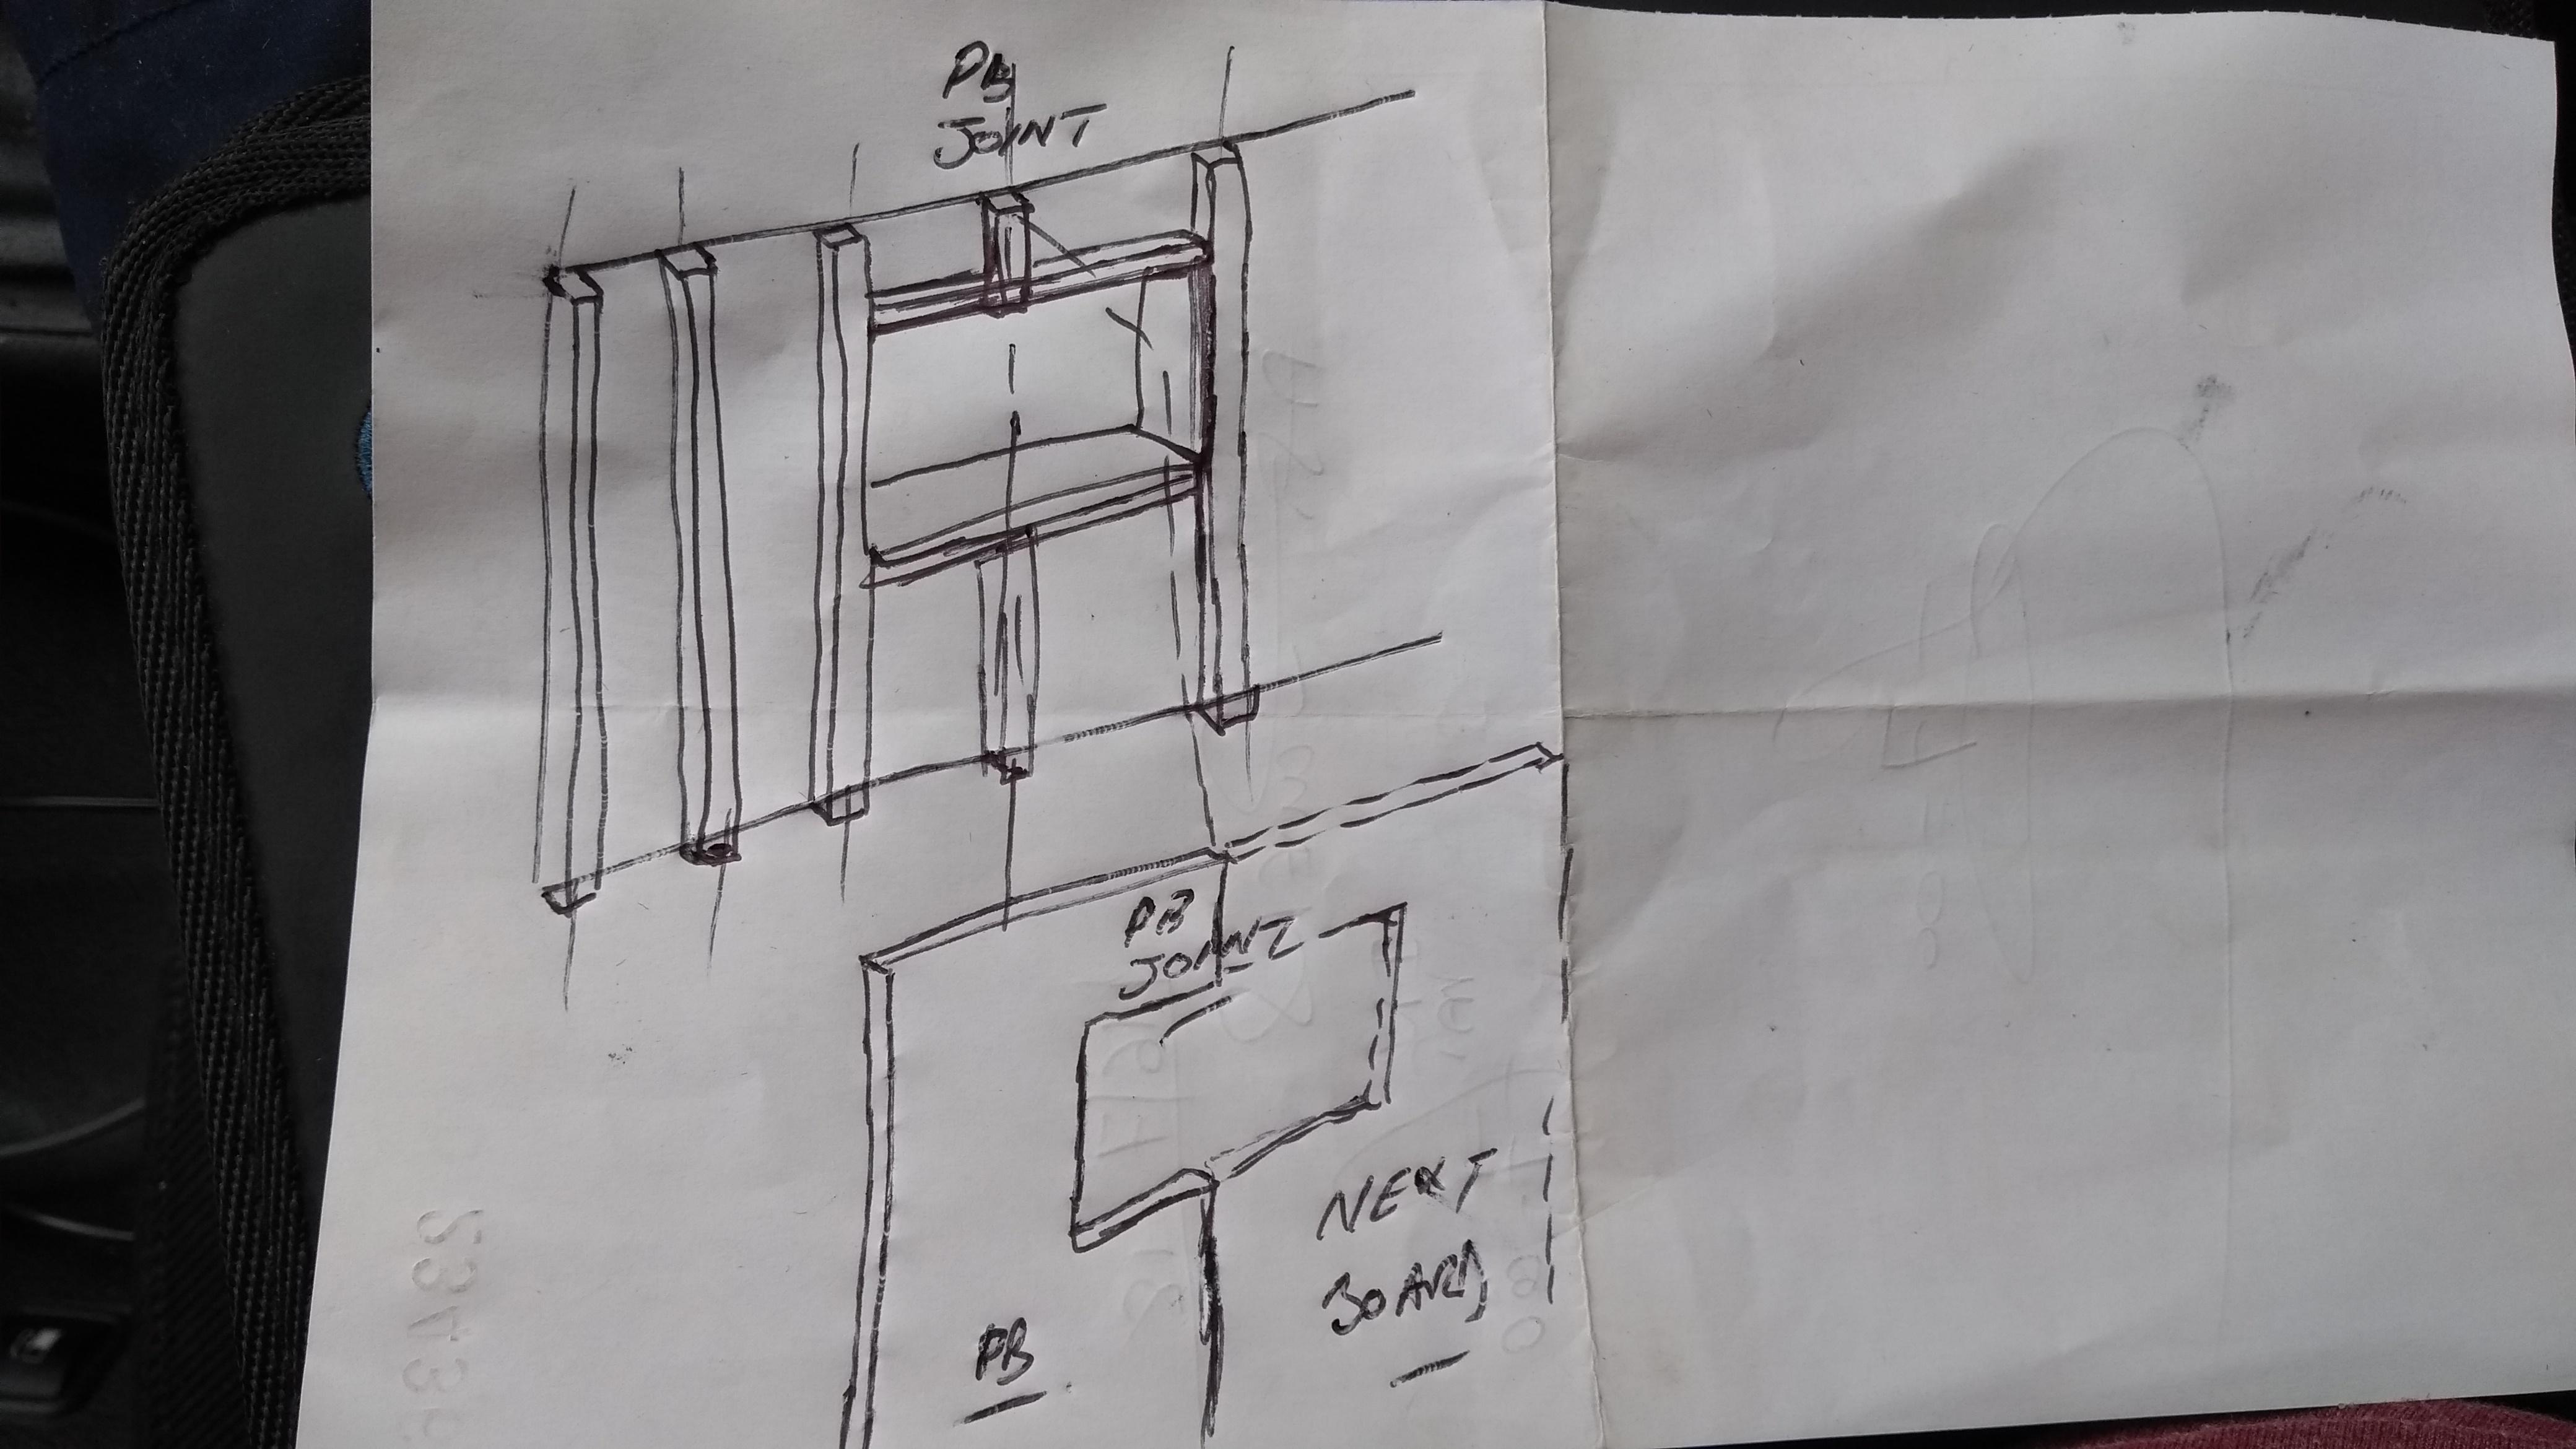
First board is 1200 wide, something like this:
-
Help with kitchen renovation/ 1st house.
Onoff replied to zoothorn's topic in Bathrooms, Ensuites & Wetrooms
CAD - Computer Aided Design...drawing on a computer rather than a fag packet sketch! Look at page 6 of this thread. Exactly the same as your area except mirrored. Battens up to the window and top and bottom over the window. A full sheet of pb cut in a backward C shape. The 1200 width goes from the corner and finishes halfway over the vertical batten top and bottom of the window. Are you lining the window reveal like I did with insulated pb? -
Help with kitchen renovation/ 1st house.
Onoff replied to zoothorn's topic in Bathrooms, Ensuites & Wetrooms
Not near a CAD machine at the mo! -
Help with kitchen renovation/ 1st house.
Onoff replied to zoothorn's topic in Bathrooms, Ensuites & Wetrooms
Yes you can cut pb in an L shape or C shape. Look how I did it when my kid helped. Same as yours just mirrored. Yes pir is Celotex, Kingspan etc. https://en.m.wikipedia.org/wiki/Polyisocyanurate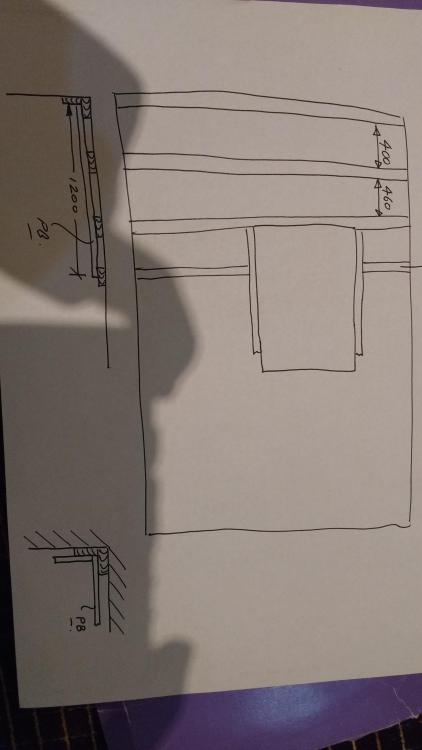
-
Help with kitchen renovation/ 1st house.
Onoff replied to zoothorn's topic in Bathrooms, Ensuites & Wetrooms
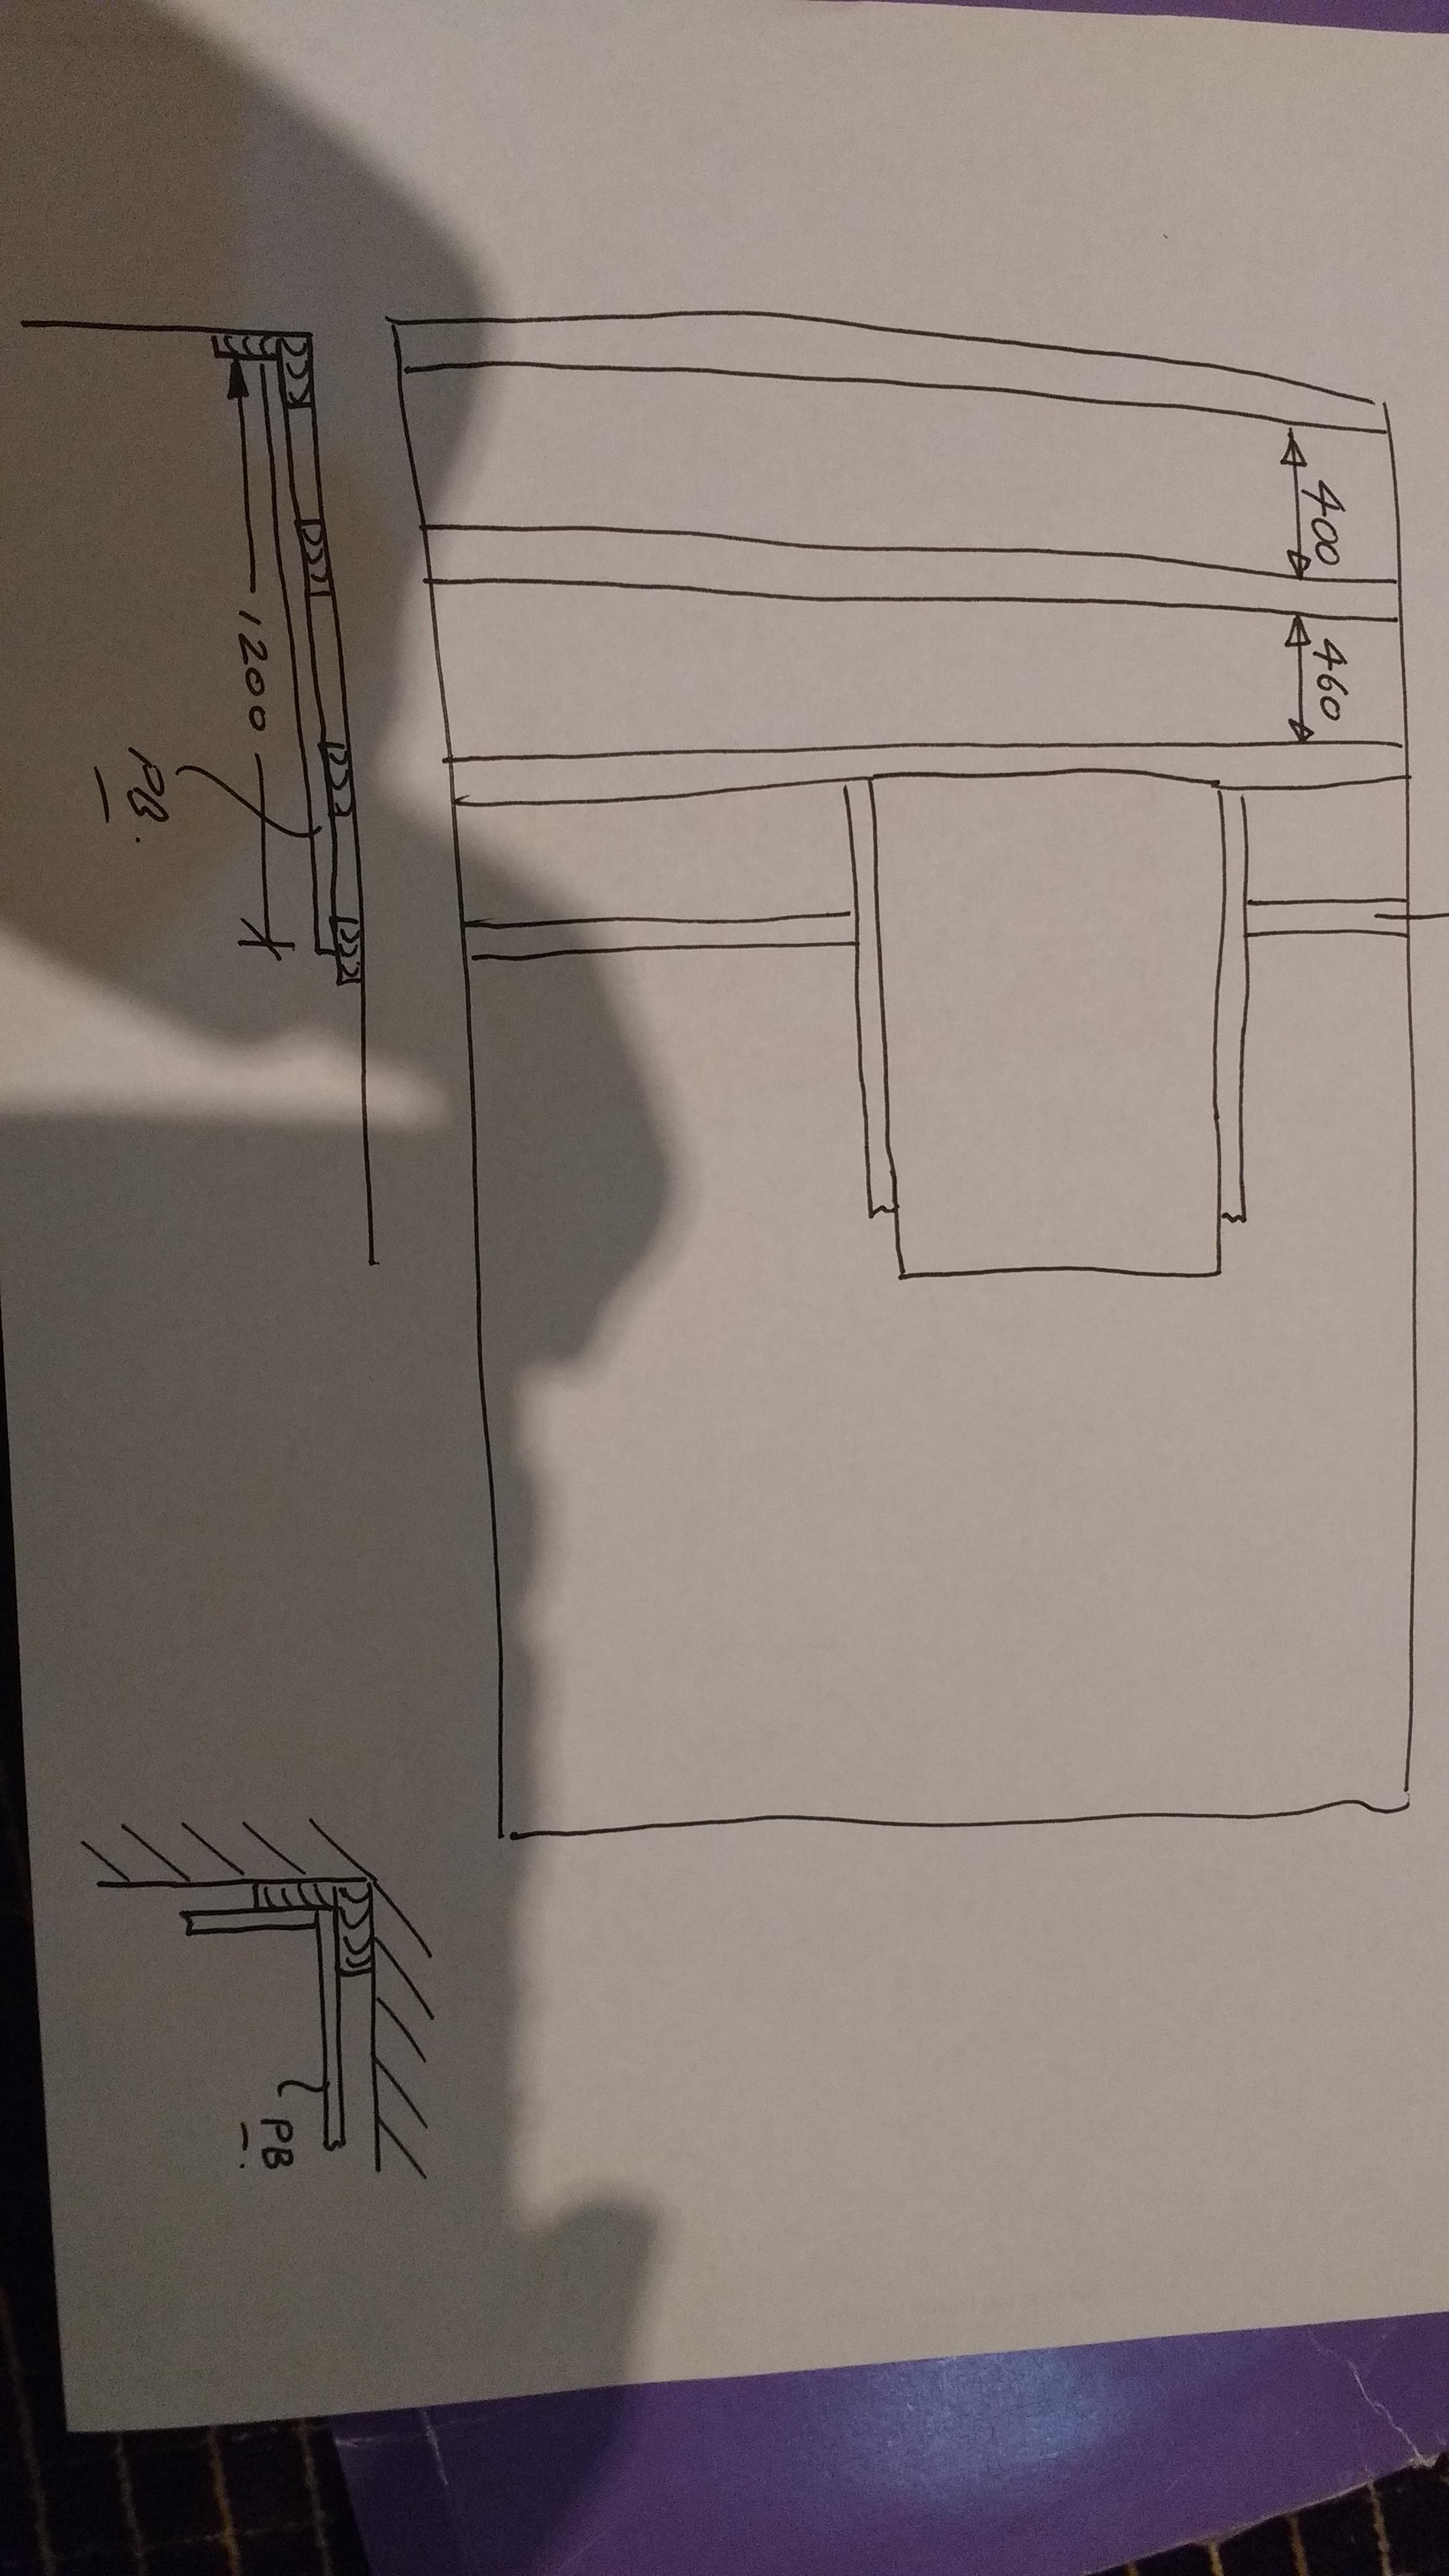
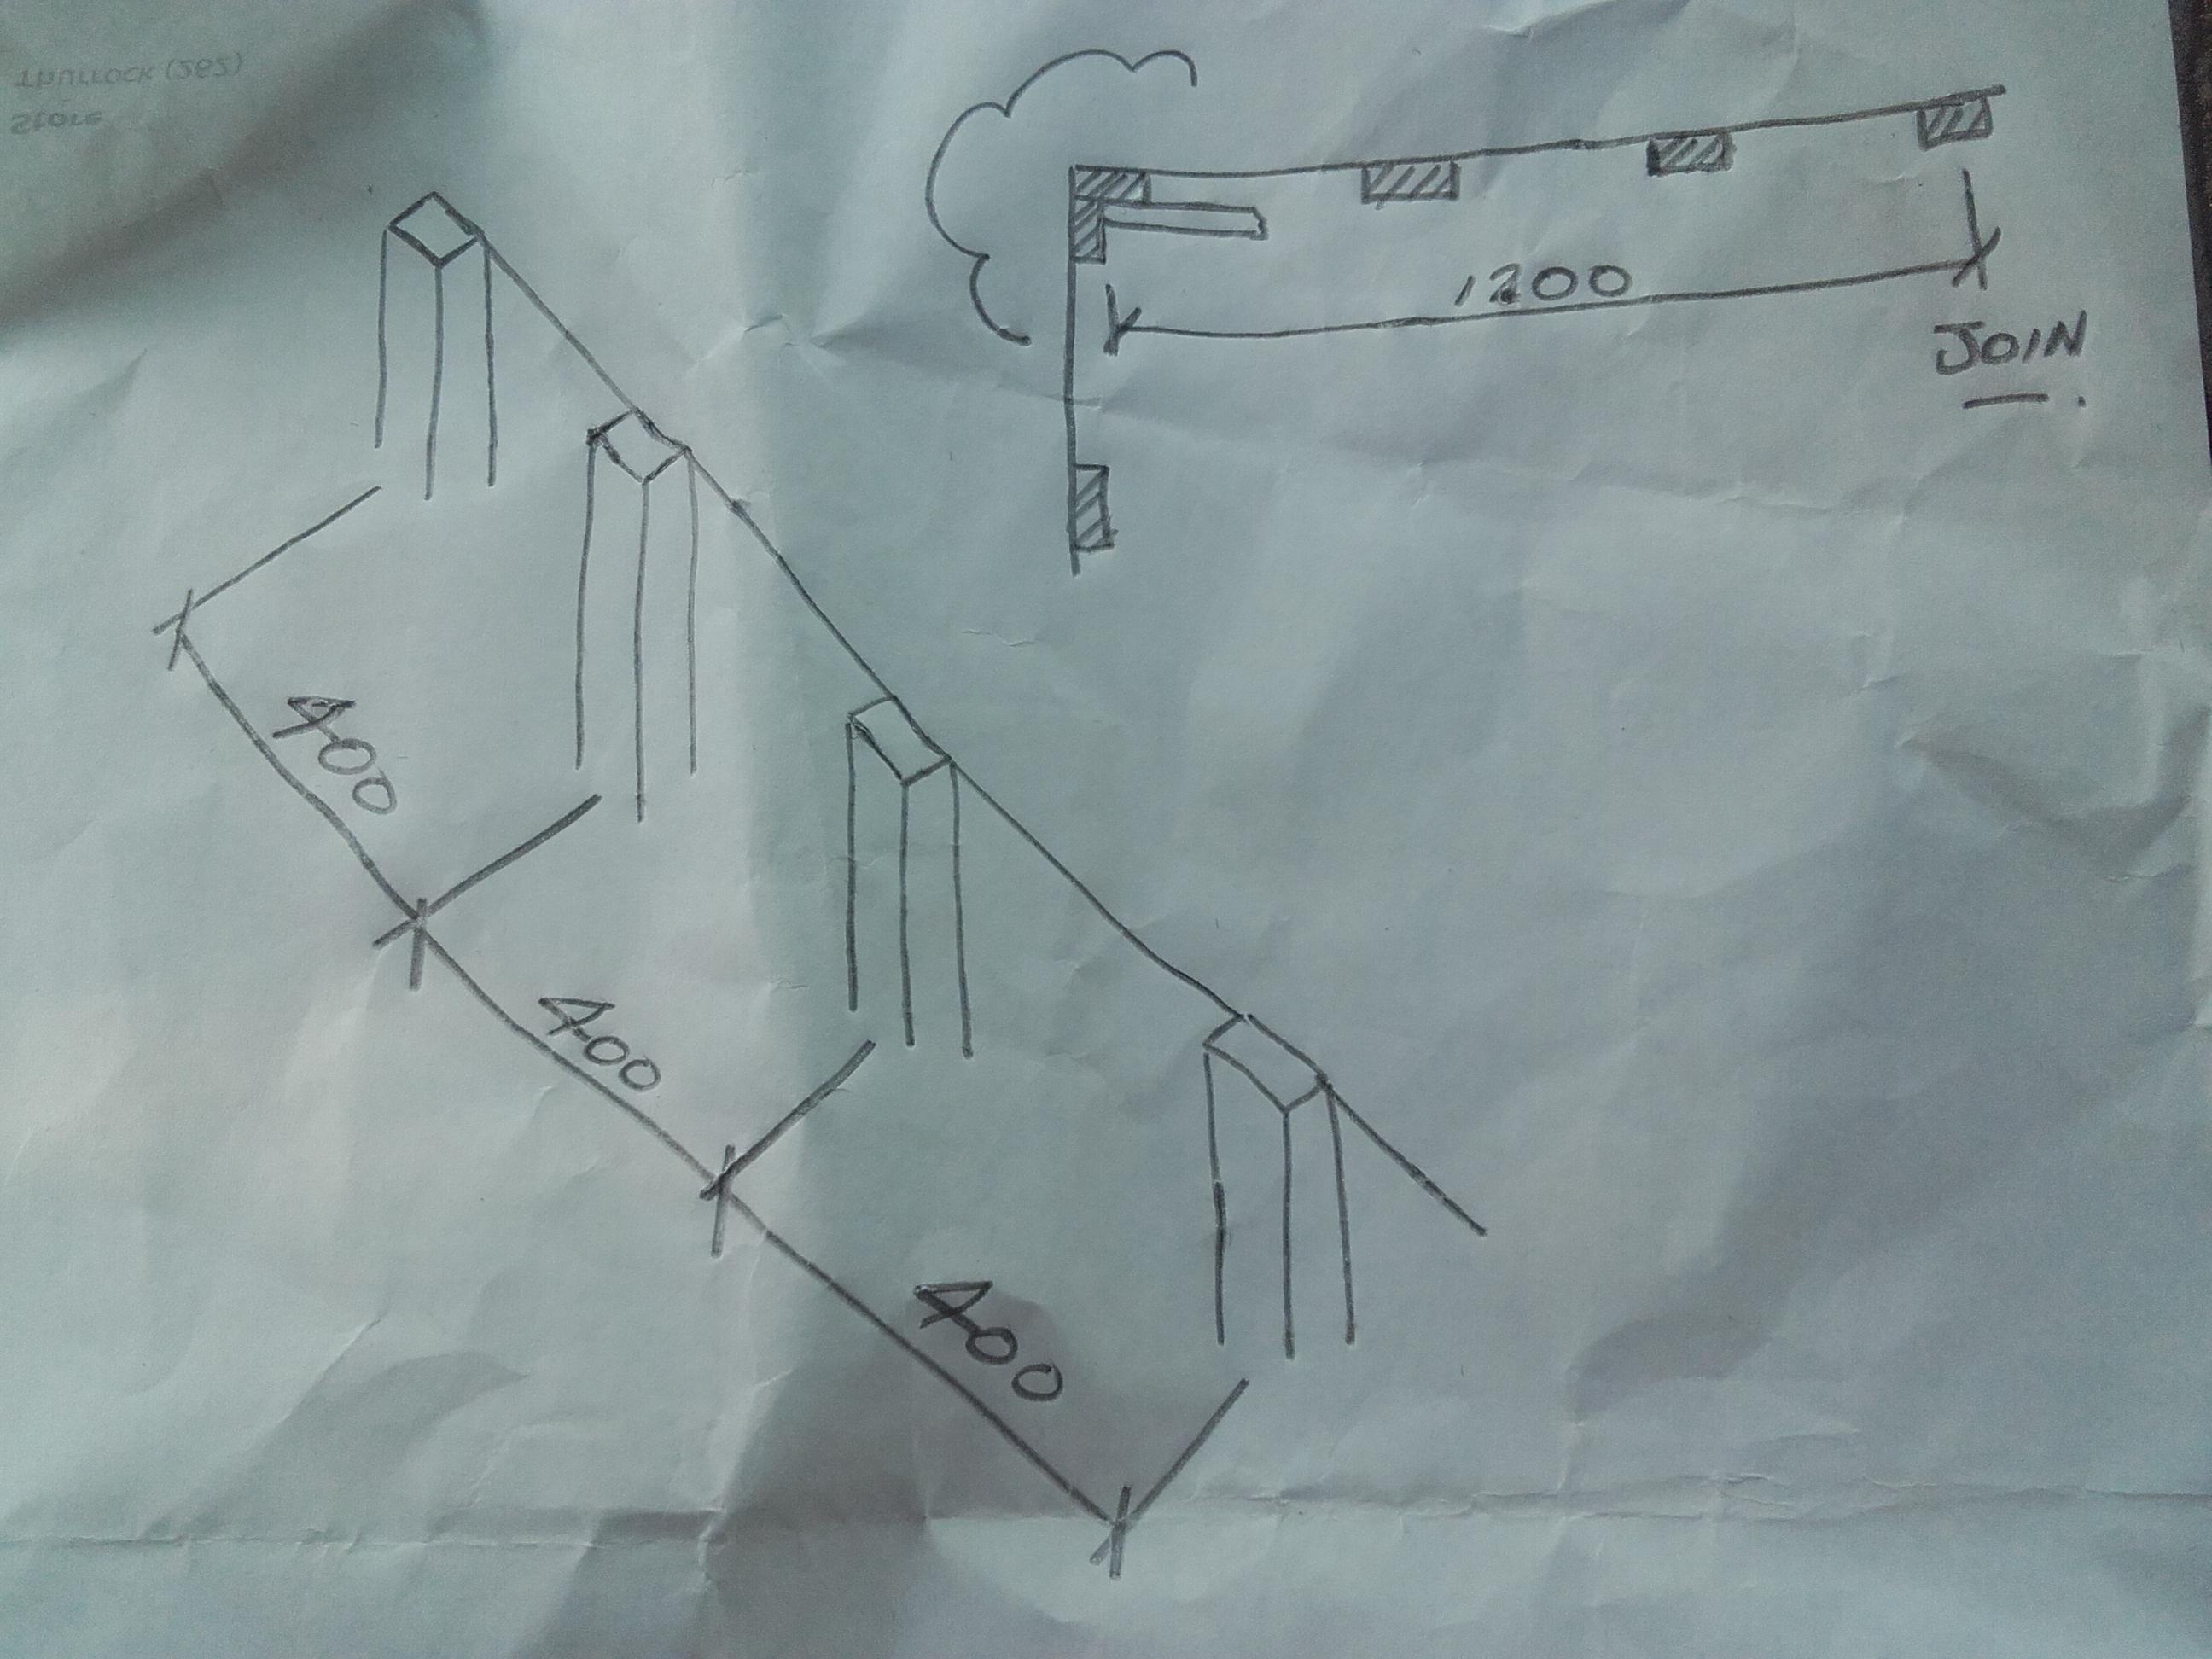
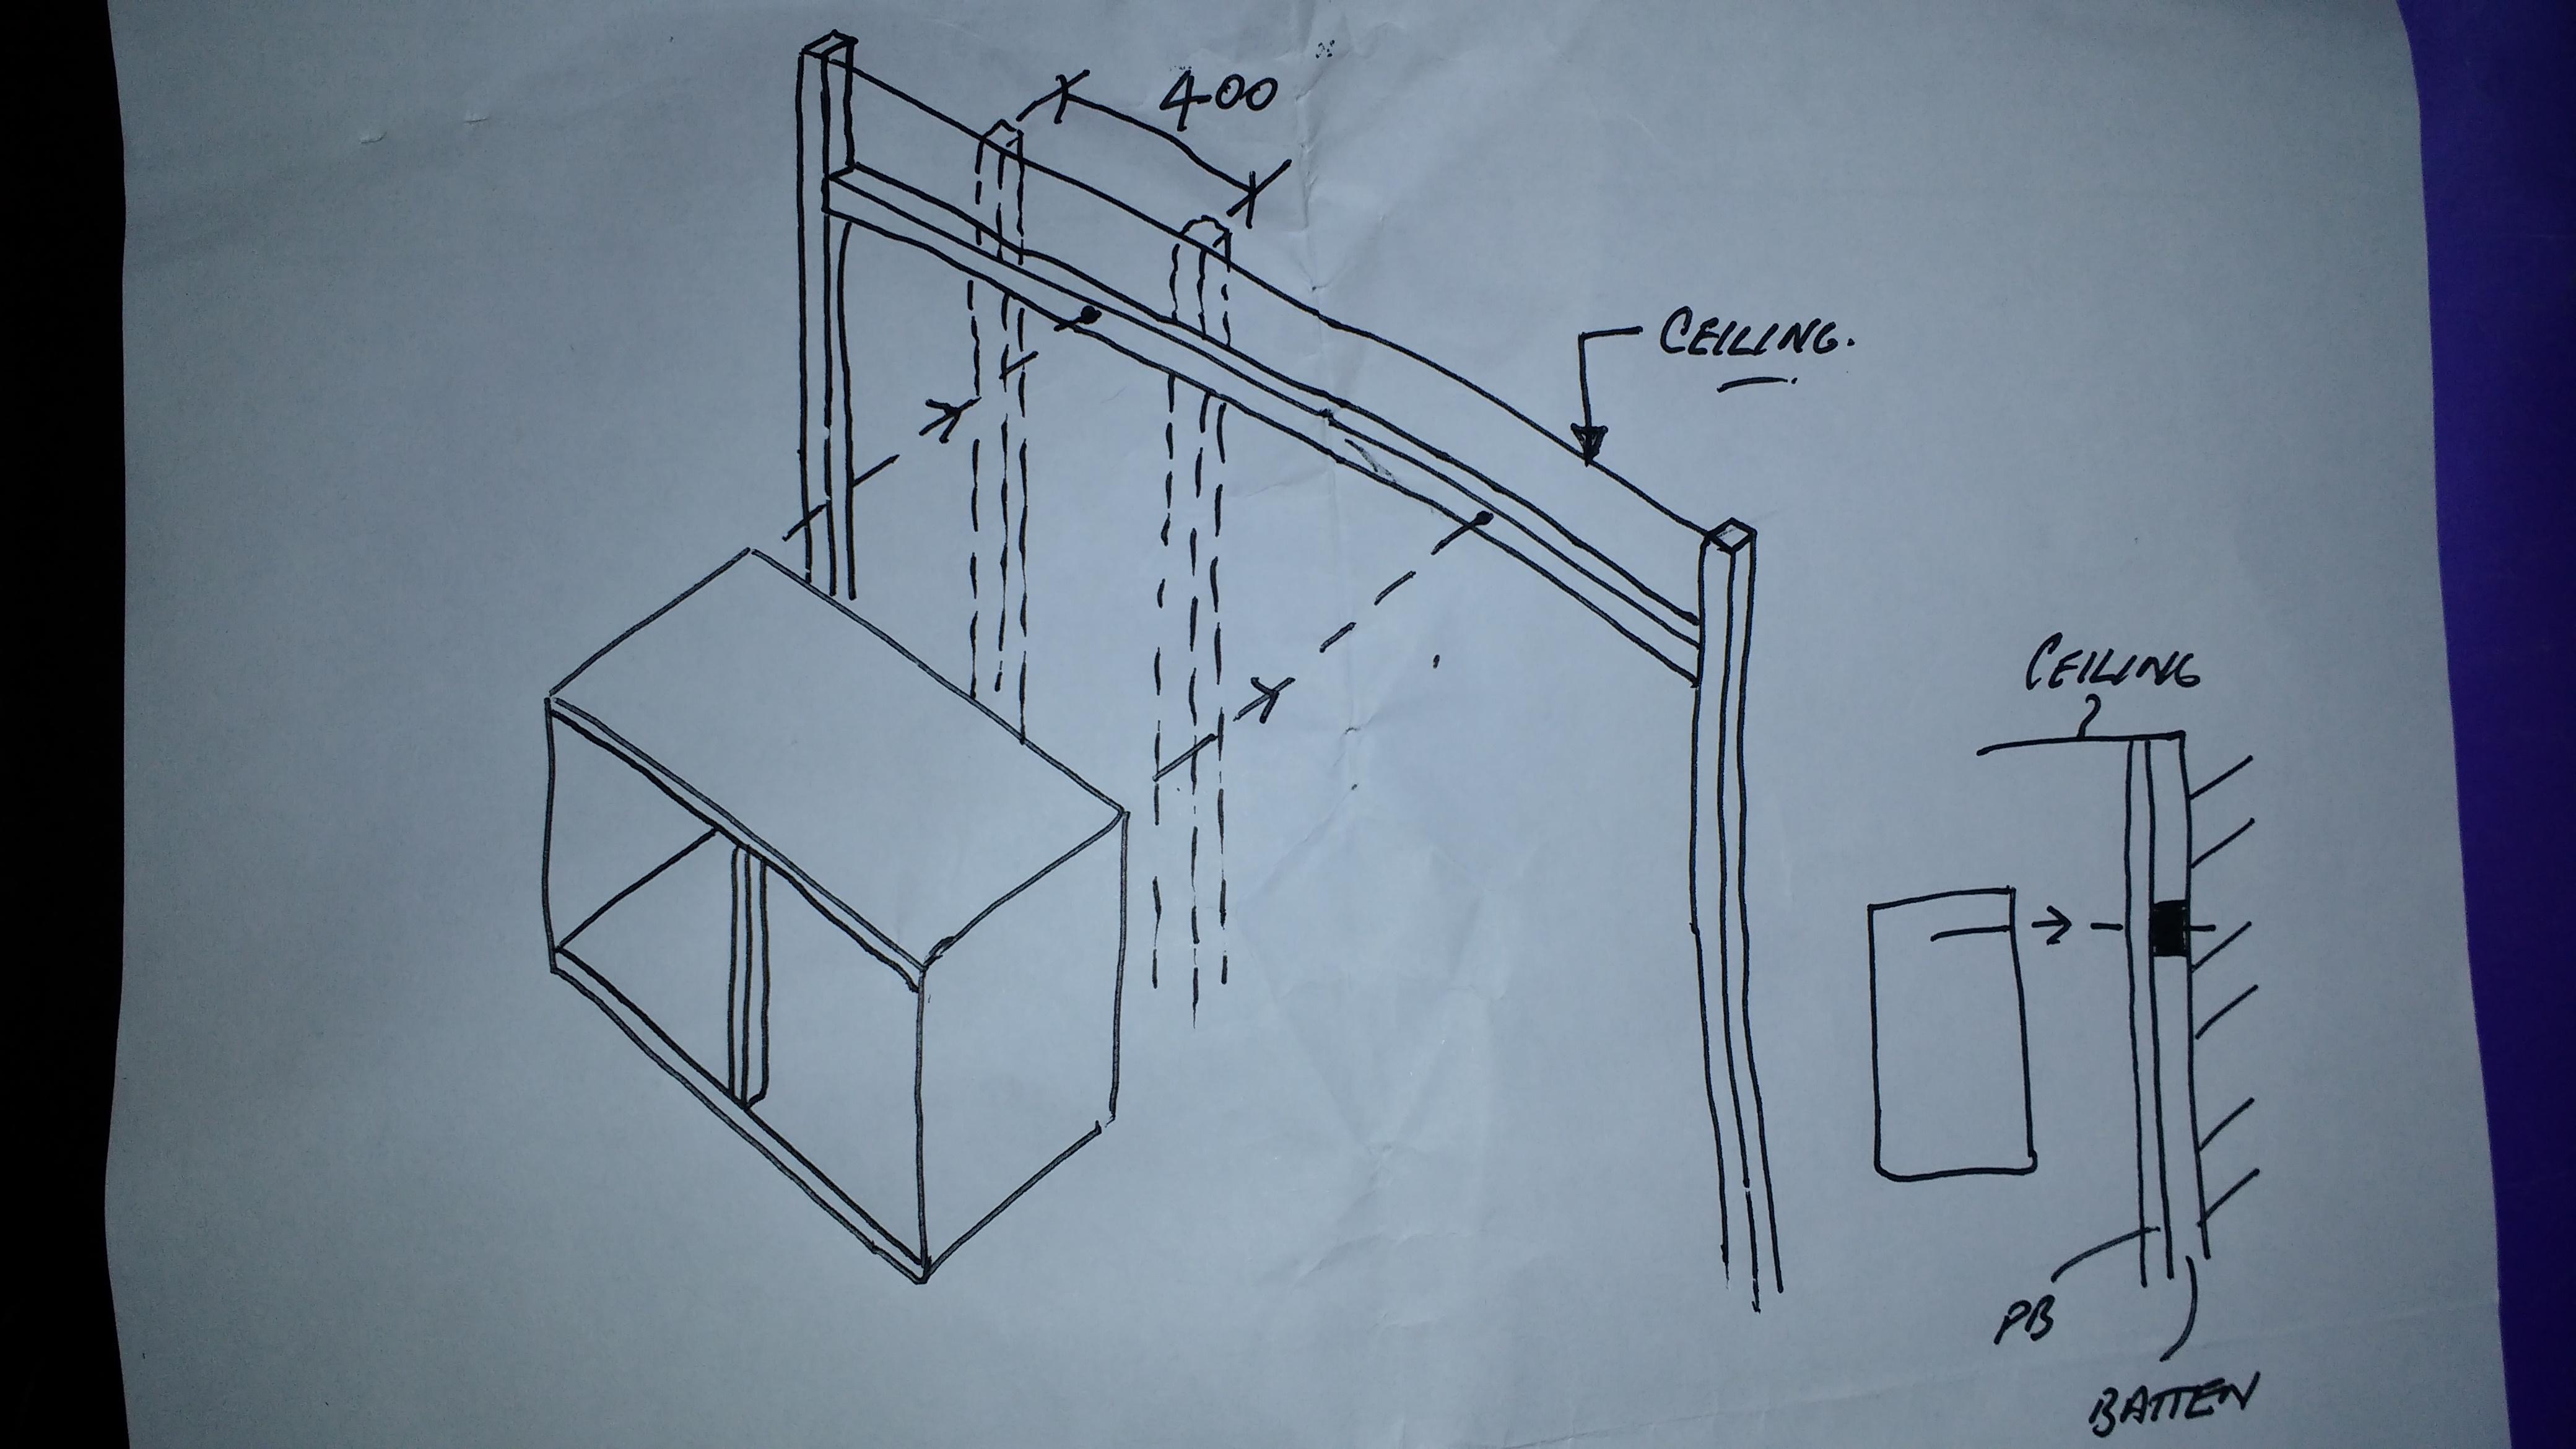
Go B. The pir will just get cut a bit wider there. Think now where your 1200mm panel will start from the lhs. You'll need a batten above & below the window so that 1200 wide panel finishes exactly on the centre line of the batten. What size are this battens...30mm thick? -
Help with kitchen renovation/ 1st house.
Onoff replied to zoothorn's topic in Bathrooms, Ensuites & Wetrooms
400mm - pb comes in 1200mm wide panels. Abutting boards need to join on the centre of a batten. Except at the corner: It's that "out"...I have no solution as I packed as required and squared off. One of my walls I think was 75mm out. I'd be bringing the bottom batten out. Find the bit of the wall through bows out the most. That's point "zero", no packing.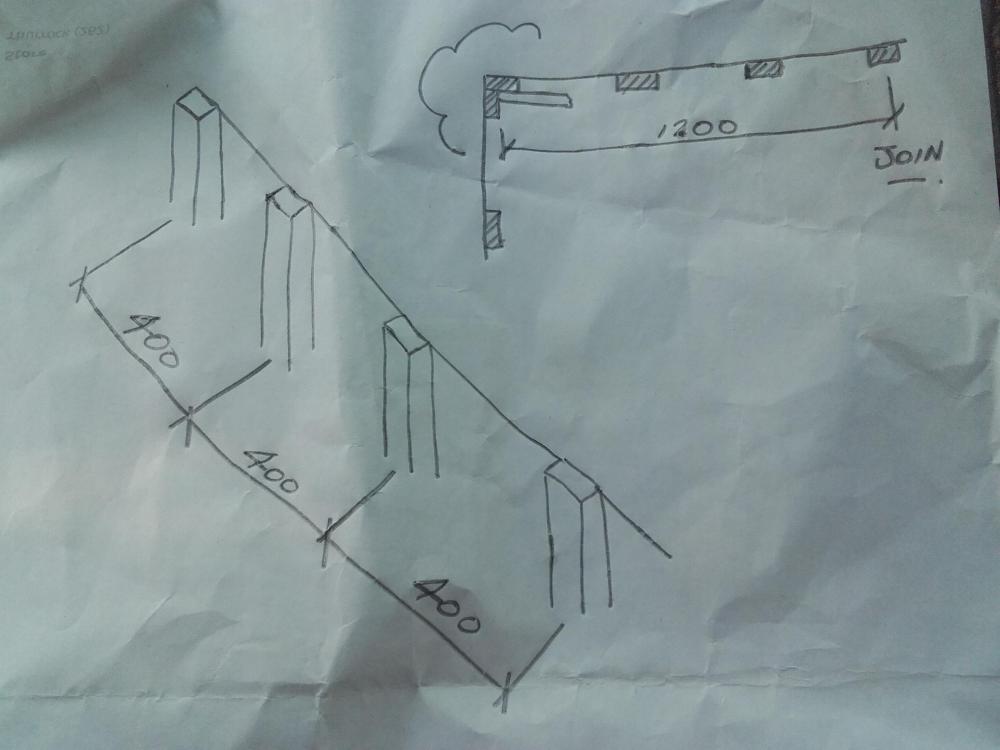
-
Help with kitchen renovation/ 1st house.
Onoff replied to zoothorn's topic in Bathrooms, Ensuites & Wetrooms
Over that length you should be able to fix say at the top and bend the batten to a drawn vertical line before fixing. -
Help with kitchen renovation/ 1st house.
Onoff replied to zoothorn's topic in Bathrooms, Ensuites & Wetrooms
Only way to judge how vertical is with a laser. A long, 2m level is pretty good too. A string top to bottom at a push. UK Electrical do back box extenders: https://www.ukelectricalsupplies.com/search.htm?search=Extension+Box -
Help with kitchen renovation/ 1st house.
Onoff replied to zoothorn's topic in Bathrooms, Ensuites & Wetrooms
Unless the ply is the exact same size as the cupboard! Mostly I've seen a bit of thick ply attached to the wall through to whatever battens are there and the cupboards attached to the ply. P.P.P.P.P.P etc! I don't think this op wants to ply all over at all if anywhere, cost etc. It was me just saying what I've seen. Tbh the need for "ply" can be avoided by careful battening. Try and avoid your cupboard screws hitting a concrete screw @zoothorn! ! Something like this. Probably easier for you to do the verticals first and horizontal battens between as above bearing in mind where the cupboard fixings are going. And indeed your fixings could go through the pb, batten and into the wall rather than just into the batten.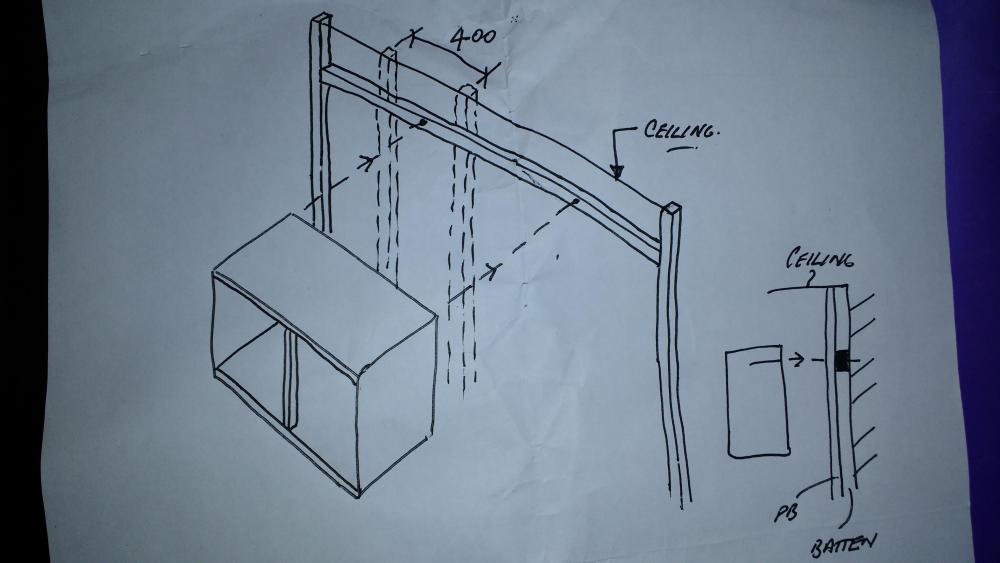
-
Help with kitchen renovation/ 1st house.
Onoff replied to zoothorn's topic in Bathrooms, Ensuites & Wetrooms
I have seen people affix sheets of plywood direct to the battens where cupboards, radiators, TVs are going instead of or over the top of pb. Tbh though you can end up with an unsightly board or edge of board on show. 12mm ply would sit near flush with 12.5mm. 18mm ply however would be better for a fixing into but stick out beyond the pb. Aside from the cost it's better to accurately plan where your cupboards are going and make the centre of any horizontal battens a known distance down from the ceiling. Then when it's all pb'd over you simply draw a feint line on the wall and you can put your chunky cupboard screws into that knowing you'll hit batten. -
Go to a self build where the attention to detail stands out and the quality is a tangible thing. Where you CAN'T hear a thing from outside. Ask questions. Take heed. Aim for that if ever you do it! You know who you are!
-
Help with kitchen renovation/ 1st house.
Onoff replied to zoothorn's topic in Bathrooms, Ensuites & Wetrooms
Remove the worktops and slide sections of pir down between I suppose? Going to be rather bitty! I'll go back and reread his posts. The danger is leaving loads of gaps which sort of defeats the object of insulating the wall. Not impossible...sort of thing I'd do! -
Help with kitchen renovation/ 1st house.
Onoff replied to zoothorn's topic in Bathrooms, Ensuites & Wetrooms
My room was not square btw, sort of a parallelogram. I wanted to square it off and leave "depth" for the illuminated pockets. You can see the top batten on this wall: In your case you have a ceiling and floor already in place. You want to put the battens on the wall but have the faces flush. If your wall is wildly in and out your plasterboard will follow suit. If that doesn't bother you just whack the battens on. If you want it dead flush maybe put the 1st and last batten on with just 3 screws and string between them? Mark your other verticals on the wall in between and measure to the string. You might have to pick a minimum pack depth (I did 5mm) and put plastic trouser shims or slivers of timber at some fixing points - I used both. -
Help with kitchen renovation/ 1st house.
Onoff replied to zoothorn's topic in Bathrooms, Ensuites & Wetrooms
Yes, in effect I have a top and bottom batten. As I said earlier I made up stud walls consisting of top and bottom battens screwed to the verticals then stood them up. The top batten is screwed to the new ceiling joists - I had the advantage they were new, so I knew where they were plus I had no wires to miss. This left my studded walls floating. I screwed screeding rails to the stud walls and then poured the new concrete wall bringing it up to the underside of the bottom batten. -
Thinking to ditch the softwood door lining I have for the bathroom and go for a hardwood one. What's the going price for one 1981 x 762mm? I'm saying this assuming SWMBO wants a wood finish.....