Onoff
-
Posts
21127 -
Joined
-
Last visited
-
Days Won
206
Everything posted by Onoff
-
In the words of Will Smith I decided to get jiggy with it. Anything to put of more tiling. WTF did I pick the most visible, awkward corner when I've never tiled a wall in my life? Main bits o/of scrap MDF plus some softwood edging, not sure how long that'll last! 40 & 65mm diamond grit hole saws from eBay. Was going to varnish it but me and my impulsive side... Tile dropped into the holder, jig plate dropped in. I can add holes to this piece for the hose outlet, basin feeds etc or just cut another MDF "tile": One of the smaller ones: For the 65mm dia one found it easier to fill the hole with water rather than pi$$ about trying to squirt it in: Jig plate removed: A quick rinse: The backside: I can do these to order, might take a while : I'll get away with this I reckon. @ProDave, I need to drill more holes in this tile don't I, between the big and small ones? Has anyone seen my cheapo Parkside set of diamond grit edged hole saws? Need a smaller size for the hose outlet!
-
Option 2 and his wife's recipe for lemon ice cream!
-
The "getting much worse" is I assume the brown stuff coming back up the sink?
-

Help with kitchen renovation/ 1st house.
Onoff replied to zoothorn's topic in Bathrooms, Ensuites & Wetrooms
You can get woodgrain effect trims and cills though a bit pricier than white. You can get golden oak, rosewood, mahogany effect etc. Random link. Remind me what your worktop finish is. https://www.trulypvc.com/window-door-parts/board-sill-trims/window-board-cill-capping-cover-1.25m? -
Which is why I'll be running a separate 50mm waste with AAV!
-
Kleenex?
-
Post a picture? Knock the tabs back over?
-
No. Bodger!
-
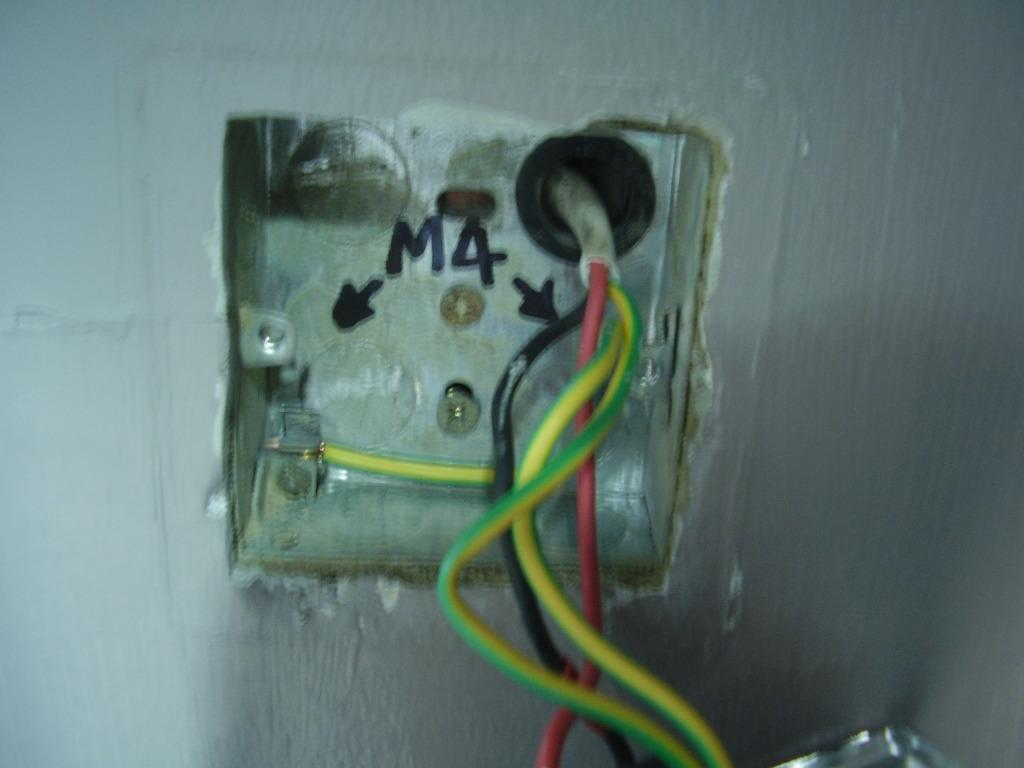
You might have to drill out slightly the face plate / countersink a bit deeper if using M4 screws as the heads can be bigger than M3.5 electrical screws. Otherading tools are available: https://cpc.farnell.com/draper-tools/37924/rethreading-tool-m4-0-x-0-7/dp/TL04580 Crap pic but I Sharpie the back of the box if I do it so the next person is aware:

-
Yes, white grout. Nothing happening tonight, so knackered I'll screw up something...else!
-
First thing I thought of tbh! Easier when you're younger...
-
Only come across 75mm here so far...will stop looking!
-
The time approaches when I'm going to tile over this shower valve (not the best pic): I didn't use the tanking membrane tape over it but had planned on just keeping the adhesive bed say 1" away all around and leaving the bottom open as per @Nickfromwales instruction. Seeing though, where I've drawn on the rough tile position and where the top of that tile is makes me think I perhaps should have membraned over it? If nothing else it should stop the adhesive encroaching on the valve gubbins.
-
Go back far enough and I think some were wired almost like a spider's web so every light had its own radial. There's specific regs in what you might term "spurs" off lighting circuit's. You musn't for instance take two outgoing cables from a rose meant to only have one.
-
These aren't the ones I linked you are they? Seem more expensive than I paid. Thinking to get a few to help figure my "valve"issues. The point and shoot, cheapo, laser thermometer, I don't really rate tbh. Temp varies wildly according to how close you are to the object.
-
OK
-
Could have been worse:
-
I remember the that! The giant Hampton shadow looming as you showered!
-
Lighting is usually referred to as a radial circuit not a spur. That is just fed one end that radiates out from the cu.
-
A blank grommet with a carefully cut split, backed up by some silicon as above should suffice imo.
-
And it's goodnight from him! Must get new glasses, the full tile 2nd in from the right, 3 up is slightly to the left at the mitre. Think I went wrong at the mosaic on the right. Didn't see it until too late! Reckon the bed is between 6 - 8mm on these tiles.
-
Rubber grommet in the back of the lamp if you can/required say if through a metal fitting. BFO slug of silicon on the back of the light in a U shape, left open at the bottom. Screw lamp on wall. connect. Fyi you CAN get glands for T&E: https://www.tlc-direct.co.uk/Products/TLTEG2.html
-
Yeah I was looking at videos of it being done with an angle grinder. Started to make a little combined jig for the shower valve and hose outlet as the grit holesaws have no pilot drill.
-
I guess so? 10mm notched spread horizontally on the wall then 10mm notched vertically on the tile. Think just this area will have used a 20kg bag. I've had to add 1mm shims to the 3mm spacers between the mosaics going up as they're a tad shorter than the grey tiles. Found I've too much left in the second mix but hadn't primed any more wall. Reckon my first half bag was about 9kg to 2.5l water as it was a little wet. 2nd mix was a bit stiffer with 2.5kg so was probably 11kg of adhesive. Just added a bit more water to get the consistency. Whacked some primer on and having a bit of grub whilst it goes tacky. Might even squeeze in an episode of Insatiable on Netflix! Shower valve / hose outlet ones next. A little worried I might have "stuck" my angles to the wall in places I need to drill out for the wall mount wc pan outlet. A series of 3mm holes with a tile drill?
-
10mm notched to give some leeway at the mitre. TF for grout!