


Onoff
-
Posts
21126 -
Joined
-
Last visited
-
Days Won
206
Everything posted by Onoff
-
With terms like "flange", "black rubber", "lube"and "insert" I'm wondering where he's gotten to!
-
.....and another thing: The little plastic lugs: Looks like they want to naturally invert due to gravity. So does the ceramic seriously just rest on the M12 stud? The pan is 40mm thick where the stud passes through. The projection of the plastic bit is nowhere near that long.
-
Made my night that!
-
Seems they got a reprieve: https://www.popularmechanics.com/military/aviation/a15914932/the-air-force-is-re-winging-a-10s-after-all/
-
Weren't the Americans retiring the A-10? I know the Russians about the same time were upgrading their Grach SU-25s (A-10 equivalent). Did they know something the Yanks didn't?
-
Standing on the shoulder's of giants mate I just chronicle it!
-
Decided to go for it! Removed the yellow bung ready to figure the flush pipe length: Lubed the end with some silcone spray: And inserted into the frame inside the wall. It stops hard against the shoulder on the flush pipe. Marked it: Removed the flush pipe and inserted into the back of the flanged, rubber "stopper" that goes in the back of the pan. Not sure tbh whether the flanged stopper goes on the pipe end with the flange or the plain, to be cut end? Inserted into the pan. Dry it's quite a tough push, lubed with silicone spray almost too easy and seems almost to want to pop back out: And pushed in. Again, would the flush pipe flange be better against the rubber? Can't see it'll really matter once against the wall: With a straight edge I note the back of the pan is pretty much flush with the rubber: So I need to shorten my pipe by the distance from the back of the rubber to the mark I made earlier when it was pushed into the frame: Cut: De-burred inside with a Stanley, outside with some emery cloth and then inserted back into the rubber flange: And pushed into the pan: Onto the poo pipe! Slip the poo pipe onto the pan: And straight edge across the back of the pan: Gloves on and a bucket of Dettol: A plastic bag sandwiched between pipe and rubber helps to stop the stink from the live stack branch: Lube the end of the poo pipe: So out with the large yellow bung, trying not to breathe and into the bucket of Dettol. Push the poo pipe in and mark as before the face of the tiles on the pipe: Remove the poo pipe put the yellow bung back in. Dip the end of the poo pipe into the Dettol! The distance between the two marks needs to come off the end of the pipe. It's the inside of the lhs and far right lines: It was 18-20mm so. used the multi tool and a couple of bits of 3/4" MDF. De-burred inside with the Stanley and then chamfered the outside with it too. We're here, nominally ready to fit: @Nickfromwales, two questions if I may. Should I turn the flush pipe around so the flush pipe flange sits against the black rubber insert? Secondly, should I try pushing it all on as is or put the pipes in the frame first the offer the pan up to the pipes? Cheers
-

ASHP- struggling to warm house in the cold weather
Onoff replied to Jude1234's topic in Air Source Heat Pumps (ASHP)
We've seen some member's pi$$ poor builders attempts at sealing around windows and lack of cavity closers! -
ASHP- struggling to warm house in the cold weather
Onoff replied to Jude1234's topic in Air Source Heat Pumps (ASHP)
Can you end up with the unfortunate scenario of an airtight dot and dabbed pb layer that is massively cold behind because of lack of parging of the block work the boards are stuck to? Thus you can get a reasonable air test. -
Did you know an MOD photographer Nick Coleman?
-
I used Knauf Aqua Panel. I tanked over the top just to be sure. Weird stuff.
-
ASHP- struggling to warm house in the cold weather
Onoff replied to Jude1234's topic in Air Source Heat Pumps (ASHP)
How to go about pinpointing said leaks then? -
Isn't DU used on helicopter rotor tips? Something to do with the idea being in the event of engine failure it gives some continued momentum and hence lift. On the basis every little helps when you're hurtling towards the deck.
-
ASHP- struggling to warm house in the cold weather
Onoff replied to Jude1234's topic in Air Source Heat Pumps (ASHP)
Don't forget a lot of people on here aren't the type to compromise with cost a considered but secondary factor. There are some of course for whom compromise is or becomes a necessity but given the choice they wouldn't have. There's then the pure satisfaction of being able to say "I did that and it's the very best it can be!" Means a lot to many for them and their family. Tends to be that the best air tightness figures are achieved by them either doing it themselves or paying close attention to their builder / having a builder who understands and is willing to meet their requirements. Simply put many on here at least are prepared to go the extra mile whether it be by DIY'ing, paying a premium or even having the tenacity (often need) to shop or sometimes wait for the best deal. Many will not like to be told they could have done better. Many builds are a labour of love. Hand in hand of course there's the bragging rights such a build gives you. Then there's the feeling as you watch visitors marvel at the warmth, sound and draughtproof qualities of your build that costs a pittance to heat. Can't put a price on that! -
ASHP- struggling to warm house in the cold weather
Onoff replied to Jude1234's topic in Air Source Heat Pumps (ASHP)
10-12" of eps in a wall or whatever means deeper studs than if using pir so there's probably no cost saving over using pir in the first place. Paying for extra insulation now guards against the volatility of future energy prices. Taken over the lifetime of a house that will presumably outlive the builder it just makes sense. Just because it might not payback in their lifetime isn't a reason enough I imagine to put most on here off of doing it. -
ASHP- struggling to warm house in the cold weather
Onoff replied to Jude1234's topic in Air Source Heat Pumps (ASHP)
That when I retire my annual oil bill will probably eclipse my pi$$ poor pension makes me wish I lived in a passive spec house. You only pay for insulation ONCE. You are at the mercy of A N other whatever energy source you consume. -
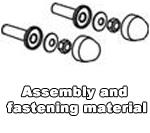
This is the fixing kit picture on the Bernstein eBay ad. The "top hat" inserts seem longer than what I have:
-
The Berstein pan came with a decent 19mm ratchet spanner in the box!
-
Not a bad Grohe guide? https://www.grohe.co.uk/en_gb/our-service/installation-videos/install-wc-solutions.html
-
These fixing holes in the Bernstein pan seem rather large for the plastic inserts that came with the Geberit frame? Can't help thinking they should offer support all the way through the depth of the hole?
-
Learn to plaster?
-
Just had a tally up of what Geberit (mainly) bits I've left as I'm going to fit the wc next. Think I need another one of these... Hoping it's in the box with the other Geberit WC frame!
-
It's overflowing HOT from the header.
-
Went with the big st/st countersunk screws. On two of them I had to put flat round washers (BZP ) under the head so the st/st boss could move a little rather than the screw "centreing" it. Loaded the back of the boss with CT1 and screwed them down. Then CT1'd over the top of the bosses before pushing the rad on to the bosses and the chromed pipes. Out with the baby wipes! I'd deliberately not grouted this pipe in to allow for some movement when fitting the rad. I presume just grout it along with this one: Then clear silicon or CT1 these on?
-
Thanks all. The towel rad comes with M6x60 zinc plated, flanged coach screws. If I use them then i) I'll worry about them rusting and ii) they'll only go into the timber behind by about 20mm. As an aside there's masses of clearance between the screw and inside of the st/st fixing boss: I reckon then I should use these 6x80 A2 stainless screws: These of course are countersunk whereas the coach screws allow some "wriggle" room. Whatever the screws will be loaded with clear CT1.


