

Declan52
-
Posts
4449 -
Joined
-
Last visited
-
Days Won
10
Everything posted by Declan52
-
It's not the worst I have ever seen to be fair. You will still notice it as at the bottom of the tile there will be hardly any grout but at the top there will be 2-3mm. Might need a bead of sealant if you can get one to match the grout up the edge so it looks like on continuous bead all at the same width. The only way I could cut my porcelain tiles was to score and snap using a good tile cutter. Even with a wet tile cutter it still flaked off some of the edges.
-
You could do a dpc test that will plot a graph showing the bearing pressure. http://www.lab-quip.co.uk/dynamic-cone-penetrometer-dcp Any site investigation company will do this easy enough. Also done a slightly different test where we jacked up a land rover defender with a steel plate under the two jacks lifting the Jeep up. The smarter guys in the office where able to work out the pressure the Jeep put on the plate and how far it sunk over the space of a few hours. Easiest days work I ever done!!!
-
Just a case of elimination. Is your stopcock under a sink and is its pressure ok.
-
Did you check that the stopcock is fully opened.
-
Do you have a builders bucket that has the litre marks on the side. If so run the outside tap for 1 min into the bucket. That will let you know if the problem is the incoming flow or something inside your house.
-
Did he use a gauge to test the pressure or even measure how much you fill a bucket up in a min so you end up with a flow of 10-15 litres per min.
-
 Forgot to add mine is a two storey building so the stages are slightly different to a single storey. Also I only had the inside plastered out. They weren't concerned with the outside not being plastered.
 -
My four stages with the ulster bank where, 1st wall plate, 2nd roof on, 3rd plastered out, 4 th complete. Each cert than my architect wrote out went something like, I can confirm that following an inspection of the building at, house address, it has been plastered out and the building is in accordance with building regulations.
-
Put a plumb piece of timber on the block walls at the doorway to allow you to plaster the walls. This will mean that you can leave the door frame out which will give you another few inches which hopefully will be enough to get a larger ts in place. Easy enough then to fit the frame to suit the plaster which should be plumb if the timber was set correct and hang the door. Just use the likes of concrete screws so in the future if it needs to come out it's not a messy job.
-
Mine is on the first floor joists but it's sitting on top of an internal block wall.
-
Same sort of look as mine. I painted all the pine bits white before they where installed. Gave them all a buff with fine sandpaper and put about 4 coats of paint on. When you are oiling the treads make sure you tape up the pine or the oil will make it go yellow. The green frog tape is good for this.
-
If you are putting in a stove then it's going to need fuel so you might as well heat the water when it's lit.
-
I have more or less the same set up with a 350l TS feeding the ufh downstairs and rads on the first floor. I use a pellet stove for my heat needs as well as PV for prob 5/6 months of the year. We also questioned if we would need an electric shower as a backup but in truth the water is usually hot enough during the summer with excess PV and the stove would be on maybe every 2nd day during the winter so the TS is rarely cold. I heat the water in the TS to 65 degrees and have a manifold system to feed the rads and then the same for the ufh where it gets mixed with cold water to go into the system at 32. Put the rads in as if it isn't as warm upstairs as you hope your life won't be worth living!!! Can you not connect up the stove up to the heating system to use as backup option. Extra cost wouldn't be that much.
-
The 72m run, is it a straightish run through just your garden or have you roads and paths to cross. For that length you are easily talking 2 days in a mini digger to dig it, lay the pipe, cover with stone, backfill and leave tidy for an experienced operator. How deep will your pipe be to get the fall you need. The bottom of the trench needs to be fairly level but you can use height sticks to help you do this. If you do it yourself you will use more stone as I am sure your trench won't be as flat to begin with. How do you propose to get the stone from where it's tipped to all along the trench, a dumper or a wheelbarrow?? The inspection chambers don't really take much longer to do, it's just a few scoops either side of your run. Why don't you hire one out for a weekend, a 1.5t would do your job plus can't really wreck too much in that size. Do one of the less important cable runs and see how it goes. You will be jerky and have the digger bouncing all over the place to start with but you will be surprised how quick you pick up the basics. If you think after the end of the weekend you have got the hang of it then get everything material wise in place for the next time and away you go or if scared the shat out of you then get a pro in instead and pay him the money.
-
Would be like a ploughed field in mins. An ordinary tracked 5/8t digger with the extension arm would have done the job.
-
Scottish parliament Committee 'expert' opinion
Declan52 replied to jamiehamy's topic in Environmental Building Politics
Seems whoever wrote it must have skipped school and just learnt how to build houses. Big windows that have bits missing so you can't open them , my god. If you build a house that doesn't need much heat why would you build in something to store loads of heat. I thought it was just our politicians who had a few screws loose. -
An 8 tonne digger would have done what he needed. At a push maybe a 5 T. Made him out to be a real smart guy then it shows him manhandling the timber up using the kwikstage as steps. Never heard of a lever hoist or if he wanted to go all out you can even get scaffold hoists. I bought one to lift the 4.2m concrete heads on my build. Done the job in mins with out killing myself.
-
VAT Invoices
Declan52 replied to pauldoc's topic in Self Build VAT, Community Infrastructure Levy (CIL), S106 & Tax
Wasn't a problem for me and I had materials delivered to site, my address and my parents as well. -
I just gave it a wipe down with a cloth to remove any dust. Used a lint free cloth and dipped it into the oil and rubbed it in. After it was rubbed in I wiped any excess of and then put another coat on and repeated the steps until it wouldn't absorb any more oil.
-
I used the same Danish oil on my own doors plus on my oak stairs. I also put 3 coats on and my doors are now 2 years old and still look well. Can you use both products on the back of a door that you will never see much of and see what one you like best.
-
Found a Newcastle spade about the best for a deep narrow trench.
-
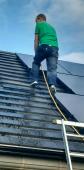
I did do it the hard way. My wife, dad and wee lad carried the tiles onto the scaffold and I walked them around the roof. Think there was 2250 tiles so by the end of the day I had buns of steel.
-
The hardest bit of tiling the roof is all the work setting the roof out to suit your tile width and the amount of overhang you want. Once you have all the laths on its pretty straightforward, assuming your good at heights. Never ever get on a roof if you are any way frightened by being up there, its not a safe place too be working with wobbly knees. Getting the tiles up onto the roof ain't much fun either. No matter how you do it it still involves a lot of man handling.
-
The black tiles with the lead work look really well as a contrast against the cladding, very nice indeed.
-
When you have kids you need to be able to hear them when they are upstairs. As the moment the noise stops you just know some ones up to no good.
