


TerryE
-
Posts
3806 -
Joined
-
Last visited
-
Days Won
30
Everything posted by TerryE
-
Ours was ~£450 IIRC and that was from a private firm, JHAI. The government changed the rules some time ago so firms like JHAI are licensed to carry out building control and most of their inspectors are ex-Local Authority inspectors. Based on a sample of one, I'd go with a private every time. Our inspector has been ever so helpful, and not an irrational pain in the arse as is the case with the planners and planning enforcement.
-
Three points in response to this: Manifold systems are radial so in our case the runs from the supply to the manifolds are an mix of wide bore (that is 22 and 28 mm copper), and the pipes from the manifolds to each appliance in 15mm (we just standardised on this). HEP2O is flexible and will take a bend up to 150mm radius (though at this tightness you should use a former/bend support to take the bend. Tighter than 150mm then you need to use a bend fitting such as a 90° elbow (say where the pipe run in the service cavity turns to tails into the room), but the resistance is a pressure drop for a given flow rate and given that the manifold is at well over 2bar, a single 90° isn't a material issue. In term of high flow copper, then as you say swept bends are preferable to minimise pipe noise as well as pressure drop. Here is a good page on understanding and calculating pressure drops: John Heartfield: Water Flowing in Pipes - real systems (2).
-
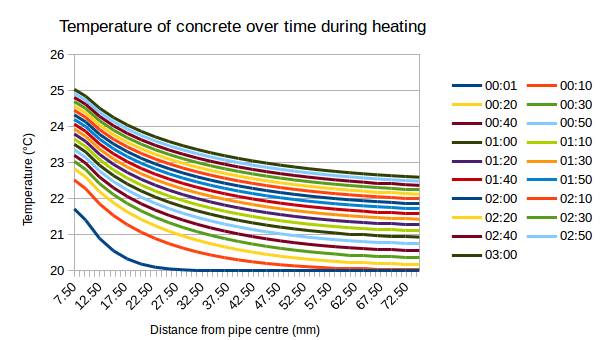
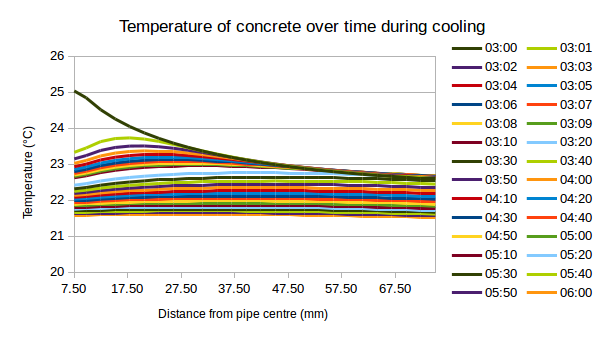
To pick up the earlier discussion about modelling the slab, essentially this slab has two broad works in one of two broad regimes: Heat is being pumped into the slab. If we ignore the very short transitions, the slab rapidly settles down into a quasi-static state, that is most of the rate dependent terms in the heat flow equations are small enough that you can almost ignore them. So if you are pumping in N kW with a water flow rate of X ltr/s simple maths give that the water comes out Y°C hotter than entering the heater. When you plug in the figures for my case where I am using 1kW per loop, this Y will be about 1.6°C, so the water entering the slab will be about 1.6°C hotter than when it leaves it and the temperature drops uniformly along the length of the pipe ad roughly 10W of energy is pumped into the slab for each 1m of pipe run. As the slab heats up, the 1.6°C drops very slightly so the temperatures all slowly rise together. If you crank the maths, there is a solution for the heat equation in the radial heat flow case and this is Tr = Tstart - K log(r/rstart) than is if you plot the temperature vs distance from centre of the pipe and use a log scale for the temperature then the plots are straight lines. So my model plots is as follows as it enters the slab for the three hour heating period. Heat spreading through the slab. As soon as the heat is turned off, the temperature of the water entering the slab now drops by the 1.6°C, and the hot region near the UFH pipe quickly start to disperse radially through the pipe and also the water circulation redistributes the heat along the pipe redistributing this 1.6°C gradient uniformly throughout the slab, so that after another 3hrs the temperature is pretty uniform (note that the first 10 plots are every minute, then every 10): So I can pump 3kW heat into the slab starting at 20°C. The hot spots in the slab will be where the UFH pipe enters the lab and here the temperature of the concrete immediately around the pipe will get up to just over 25°C after 3 hours of heating, but within 30 mins of the heating being turned off the heat will have redistributed itself pretty uniformly throughout the slab (with the residual variation less than ½°C). In our case the heat will also redistribute itself through the whole slab -- that is including the load bearing beams -- again dropping the overall temperature increase. Whilst there will be some heat losses externally through the slab (largely mitigated by the EPS wrapping) the main heat loss will be through the internal floor level surface into the living space.
-
Nick the master prefers copper tails with copper elbows and straight HEP2O connectors. We just used HEP2O elbows, but as Peter says, noggins are a must. And the silicon spray which you'll need if you want to reuse connectors.
-
Design @MrsRA happy. Might you know how?
TerryE replied to ToughButterCup's topic in Kitchen & Household Appliances
Yup, go to Wickes, Howden's, whereever. Costs nothing. No need to buy their kitchens if you don't want to but all the standard suppliers use the same carcass form factors so the only material difference will be the colours, door handles, etc. -
Window and Door Detailing on a Stone Clad MBC Timber-framed House
TerryE commented on TerryE's blog entry in The House at the Bottom of the Garden
Yes, this is a mandatory requirement in Scottish regulations, but optional (and extremely rarely done) in the UK. I did have a long discussion with my builder about the pros and cons of doing this, and his point was that doing this would act as a trap to catch any snots from the upper stonework and therefore breach the cavity and require another DPC at 1st floor level. On reflection I agreed and we decided not to have a horizontal fire brake at first floor joist level. It wasn't an issue for our building inspector. I think that a timber batten could meet the English / Welsh BReg requirements. @ProDave can comment of the Scottish ones. But MBC used the 50×50 mineral wool in-bag for their fire breaks, so we just bought another couple of bags of this. It was just ever so convenient because you can hammer-staple it into position. And in fact we had to remove it and move it out about 20mm to give the stonemason room to put his wall ties in down the side of each window frame. Note that we've almost gone overboard tying the outer kin to the wooden frame. we have the special-to-purpose frame-to-stone ties at 400mm centres horizontally and 450mm vertically. -
Window and Door Detailing on a Stone Clad MBC Timber-framed House
TerryE commented on TerryE's blog entry in The House at the Bottom of the Garden
If you read other posts on fitting internal cills then you will see why. The height of the KF200 base profile is 78mm IIRC. If you sit them directly on the MBC window opening, then you just don't have enough room to fit an internal cill. Remember also that the inner surfaces of the window openings are lined with air tightness membrane which you can't compromise. So I glued and screwed 20mm deep battens (3 or 4 depending on the window width) running front-to-back on each window base). I made cut the inner cills to fit each window out of water-resistant MDF (I got all of the cills out of 2 × 2400×1200×25 sheets. Fitting the cills was trivial: a bead of CT1 along each batten and along the edge of the cill facing the window and place in position. Leave the cills 6 hrs for the CT1 to cure; then fill the under-void with gun foam and cut flush to the service cavity framing line. So no screws or fixings breaking the surface of the cills. The risk here is that the plasters puncture the air tightness by random fixing screws. So we similarly battened out the reveals but with 10mm battens glued and screwed them down. The rule for the plasterers when fixing any plasterboard was: you can screw through any wooden battens or use sticky foam, but no screws through the bare membrane. I've updated the photo of the internal window detail. Click on it and expand to see the finish of the reveals and cills. I did have somewhere, but not to hand. In essence, the tongue bridges the outer EPS300 rim under the door opening and extends out 45mm in front of the line of the EPS. I made up some 45 × 50 L-shaped trays which we fixed to the outer side of the EPS at the door openings and dropped some extra rebar into these. They were filled with concrete as part of the pour. See my last post, Coping with a Thermal Flaw in the Design, for pictures of the profile of the wall base. We used the same FoamGlass blocks in front of the tongue to provide the thermal break. Yes, there is a tiny thermal path catty-corner, but nowhere near enough to have condensation problems. -
@jamiehamy, from our likes, you've been tracking my thread, so you will know that my costs are comparable to Jeremy's. The 2×SunAmp PV instead of the Megastore costs more, but doing this removes the G3 certified engineer requirement for installation and annual inspection. They have considerably smaller heat losses as well, so E7 tariff or E7 + PV is very affordable. By far the most time consuming bit was all of the carpentry for the carcassing for the 5×Gerberits + wall hung basins + foulwater. The plumbing itself has been very straight forward once the design is in place, a few day work for Jan and me. OK we are retired so can afford the time and the learning curve (I plumbed my current house so have done copper / solder-work before), so avoiding £10K is a good idea for us. I can see the need for paying £250 a day for the G3 certified stuff if you are going the UVC route, but surely that's only a day's work tops. Another friend used a plumber with a bundled price and this does seem a very costly route to take. We did decide to use a certified sparky, partly because of the regulation requirement, but also because he supplies labour only, and we've been busy doing other second fit stuff. We've bought all of the electrical materials and fittings ourselves as we've the time to shop around for the best online prices and by doing it ourselves can reclaim all the VAT. Perhaps if you want to go the plumber route, then perhaps you should consider asking for an unbundled price where you supply all of the labour for the HEP2O to appliances and materials for everything and he only plumbs up the core copper-work in the service room where you have the UVC and manifolds? Just a thought.
-
@jamiehamy, yes, the potable water is fed from the cold supply after the stopcock, Dbl check valve, filter, PRV; the accumulator optionally plugs in at this point or expansion vessel if not. The supply branches at this point to feed both the DCW and DHW as well a fill loop to CH or UFH, but that's another story. Track my companion thread since I seem to be running ahead of you. A lot of this stuff has been covered in earlier threads, so search and browse
-
Window and Door Detailing on a Stone Clad MBC Timber-framed House
TerryE commented on TerryE's blog entry in The House at the Bottom of the Garden
Both we and the planners wanted this. A contemporary or even an estate-style brick skinned house wouldn't have fitted within the street-scene, and we decided that if we were going to have a traditional look then we wanted to do it well. This wasn't just for our future benefit, we want to sell the farmhouse quickly and for a good price, it looks directly onto the gable of the new house so we wanted it have very consistent styling. For example we went out of our way to keep the old plum tree in the first photo alive and well as this sits smack in the middle of the gable and softens its visual impact. But once you step across the threshold the house is totally modern inside. The one slight discord is the front door, but we were stuck with for reasons that I've discussed in earlier posts. -
Extractor hood
TerryE replied to Pocster's topic in Mechanical Ventilation with Heat Recovery (MVHR)
You can't extract air with a cooker hood in a house with MVHR. You still need a recirculating hood though because this will remove the vast bulk of oil and particulates in its filters. The de-greased air will then be removed by the normal MVHR extract duct(s) in the kitchen. -
Buying part of a neighbour's garden - the process
TerryE replied to jack's topic in Party Wall & Property Legal Issues
Quite a few actually: It can take months to get a plot registered with the LA and get a street number formally allocated and ripple around the service databases. if you don't start this process until you've agreed a sale and are on the way to exchanging contracts, then you might be living in a plot that some or none of the services know about. If you haven't split the plot then as far as the DNO etc are concerned you are trying to add second connections to an existing plot. With the plot split, you are adding connections to a new build on its own plot. Financial. You will almost certainly want to have a mortgage on one or the other: a remortgage on the old build or a self-build mortgage on the new. The mortgage company will normally want to record their interest in the relevant dwelling in its LRO title. Having both dwellings on the one title complicates this and could give the mortgage company claims on the second dwelling in the case of a default on the first. Splitting titles keeps this all clean, Insurance. Similar argument. The new build needs a standard self-build insurance before final certification, the old house standard house insurance: keep them separate. If your plot is unregistered, then the process of getting it registered can reveal boundary disputes that can take a long time to resolve. Get this all out of the way before you even want to put the property on the market, otherwise you've lost your negotiating position with your neighbours. Simplifying the sale. Many buyers will want to use a fixed price sell and buy package from a solicitor. Messy conveyances which include a split off of land will surely fall outside the scope of such standard fixed price packages, so you might find yourself losing the buyer that you wanted over what is a pretty trivial reason. They are the ones off the top of my head- 43 replies
-
- 1
-

-
- land registry
- titles
- (and 3 more)
-
Buying part of a neighbour's garden - the process
TerryE replied to jack's topic in Party Wall & Property Legal Issues
Declan52 CalvininMiddle -- total mindfart! Didn't your Gran get like this? -
Buying part of a neighbour's garden - the process
TerryE replied to jack's topic in Party Wall & Property Legal Issues
@Declan52 Declan, there's a bunch of LR guidance notes on this. But you need to submit a scale drawing of the plot showing the division. It isn't a determined boundary, so pretty much anyone can do it. If you had a local AT do your drawings for your planning applicaiton, he or she should be able to do it for a nominal fee, and this will be based on the digitised OS local plan anyway. In your case it is probably worth getting a solicitor to represent you doing the registration because you need to think about the covenants that you need to include in the front plot, preferably now so you don't forget them when you come to sell it. You also need to think about observations, e.g. if you have a loan on the newbuild, then the BSoc will normally want their interest recorded on the LRO title, but this should only be on the half that has the mortgage on it. But we found this process pretty straight forward -- at least this part. -
@Barney12, see my latest blog entry
-
Like the other guys, Jan and I are really pleased for you as well. Now that you are truly above the ground, you've got a whole bunch of issues and challenges coming your way
-
As I've previously discussed we have an MBC Passive Slab and Timber-frame, but unlike most builds, our house also has a very traditional stone cottage-style exterior because the new build sits between our current farmhouse, which dates back over 400 years and a cottage which dates back approaching 200 years, so our planners required that we use the same local quarried stone. So a topic that often comes up is "how do we do the window / door treatment on a timber-framed house with an exterior stone / brick / blockwork skin?" In this blog entry I want to describe how we approached and addressed these issues on our build. Whilst I make no claims about our approach being the only or the best one, Jan and I do believe that this has worked well for us; we are pleased with how it has all turned out and we don't think that we would do it differently if we were doing this all again. So if you are in a similar situation to us, please consider this as one possible approach. There are a number of issues that we considered in designing our detailing: Decoupling the inner and outer skins. In order to achieve thermal isolation of the inner passive slab, MBC also lays a separate outer ring beam for blockwork, brick and stone skinned houses. The inner slab carries the Larson trusses of the MB twinwall frame, and the outer ring beam carries the stone skin. The inner frame is CLS; the outer stone and mortar, and these two have different expansion characteristics so you should anticipate up to 5mm, say, differential movement between the inner and outer skins. So we decided that we should not use the window and door furniture to couple these. Closing the gap. Even so, we still have the issue of the 50mm nominal air gap between the inner and outer skins and how we close this for weather protection and cosmetics. Our solution to thee two points is to move the front of the windows some 45mm forward of the outer surface of the frame. The stonework then sits immediately in front of this,overlapping the window frame by some 30-40mm. Fixing the windows and doors. We have Internorm KF200 Aluclad PVC windows and I agreed a fitting profile with both MBC and ecoHaus SW who supplied the windows. This comprised a box section (something like marine ply would do here) that framed each window opening at the top and sides as follows. there was a 10mm filling gap for fixing the windows there was a 15mm filling gap at the top ditto the windows had to sit hard at the bottom, but I inserted a 44 × 38 tanalised carrier to lift the base above the internal frame base. This was to give adequate clearance to fit the internal cills. Protecting the windows during the build. EcoHaus SW fitted the windows on day 8 of the the frame erection, so by day 9 we had a completely weather-tight and lockable house. The windows had to be in place before erecting the stone skin, and so needed protection from the stone erection process. The solution that we agreed with the ecoHaus technical manager was very simple and extremely effective and one that I would suggest to anyone else doing this. We simply covered the windows in heavy grade clear building polythene, and this served a dual purpose: It provided total protection against the muck and dust of stone erection. You need a slip surface between the aluminium cladding and the stone skin. (Cf. the first point) The PVC does this. Once the stone skin was complete we simply cut around the PVC on the mortar line. All that is then needed to achieve a total weather seal is to run a thin bead of sealer at the join. Minimising any bridging impact. The windows have fire-break socks around them which acts both as insulation and a gap closer. The doors require special treatment. Here prior to slab pour, we had the MBC team cut out 50mm deep slots at the door openings and we placed extra shuttering in to extend these out by some 40mm in front of the outer frame line. These were rebarred and when the slab was poured, these became a 50mm deep concrete tongue that extends out to the front face of the door opening. The doors then sit on a 30mm upstand on these tongues. The upstand acts as a thermal break, but to minimise any bridging through the tongue itself, we used FoamGlass structural bricks to isolate the tongue from the outer cill and the stone skin. If you do the 2D thermal calcs (or at least I did), the thermal capacity of the stone face overlapping the face of the windows materially mitigates the extremes of the temperature variation, and whilst there is a little uplift in the Psi-factors for the window, in absolute terms this equates to adding an extra ½m2 of glass to the house overall, and not enough to cause condensation risks Maximising internal light. Our old farmhouse has thick stone walls with window reveals and these work well. So we decided to ask MBC to do a similar treatment in our new build. In short not only do they work, they work brilliantly. They let in perhaps 10-15% more light than deep squared frames and they help open out the rooms. They are an extremely attractive feature and both Jan and I would recommend them to anyone considering using a twinwall frame. Here is a picture of the slab during the pour. Note the trays for the kitchen French windows and the back door. Here are a couple diagram extracts showing the window treatment and detailing: and some photos of the wall in construction showing the set forward windows and the finished effect (less the porch that still has to go in.). and an internal shot of the kitchen window detail showing the angled reveals:
-
Peter, the JTM site seems a great find. Much appreciated. The stuff was ordered last night, and has already been despatched. One other observation re the pressure testing. One issue with using an air based meter behind a double check valve is that you can't really use this to check for slow leaks, so I've splashed another £8 for a wet gauge and connector, so that I can crank the test run to 6 bar, say, and isolate it. If the pressure drops on the wet side, then I've got a leak somewhere . We hummed and harred about even bothering to check all runs before we put the appliances on, but as I said to Jan: it's going to be months before we do some of the wetrooms, so it's better to know now that we haven't got any pipe breaches during boarding out before we start decorating. PS. This thread is a somewhat dynamic and evolving story. I wonder if it will ever compete with @Onoff's Bath Surround / Boxing In, and concealed pipework? I will have to roll up a summary for normal mortals when we're done in a blog post
-
@Steptoe, I didn't misunderstand you. The point I was making was really addressed to other self-builders reading this. In chatting to the guys that have worked on our build, one very common observation is just how ignorant and inconsiderate some customers are; they seem to think that just because they are paying for something then they have the write to treat the workers involved as servants, and then they bitch about the workers' attitude. The whole idea just makes me and Jan cringe. Our slater worked on our roof last February and it was really cold and the wind was cutting at times, so we kept him supplied with hot drinks and the odd bacon butty, as well as working along side him on the verge and eave detailing and fitting the roof windows. He mentioned that that having customers like us was very rare, and by example he'd worked reslating a roof on his last job, and the customer had been at home all of this time; during the 3 weeks, she had said hello once and had never offered any hot refreshments. Our philosophy is: Treat anyone that is working on your site as a peer and offer them the normal courtesies that you would expect. Make sure that you've prepared the area and preconditions so that they can do their job efficiently. At the end of the day, anyone pricing up a job has included a contingency. If this is eaten up working around and dealing with hassles that aren't really their fault, then they might start to cut corners, but if they are running ahead because they haven't had to use their contingency, then they will use it properly on real issues that do occur. Accept that everyone can make mistakes. So you should be tolerant of and cooperate to work around reasonable mistakes; the sort that you yourself could make. OK, some people adopt a hard nosed "it's your responsibility; you fix in your time; not my problem" policy, but in the end if you do this then you are just cutting your nose off to spite your face. The only important thing IMO is: is the final job fit for purpose and to the general standard that you expect? Going to war over petty demarcations is just stupid. If you are flexible on others' mistakes, then they will return the attitude when you make yours. I know that this approach can open you up to be exploited, but our honest view is that we've liked every workman who has worked on our site, and I can't recall a single "bad penny", and we've been very please with the standard of work. We've only had one real issue with anyone trying it on during the whole build, and that was our plasters' boss who did the pricing and scheduling was just a liar when it came to promising and keeping start dates and he pissed us around terribly, but the plastering team themselves (when they did start) did a fantastic job, so we still ended up recommending them to friends. Maybe we were lucky, or maybe you make your own luck.
-
@Steptoe, the main reason for the absolute ban on no smoking in the house is that our new-build is a timber-framed one, and by far the greatest risk to a house before boarding out and plastering is smoking and flame gun work. We didn't need the latter and the former was an obvious thing to ban. Ian and my house are / were construction sites pre inhabitation. I feel that different rules would apply for using tradesmen and workers in an occupied family home.
-
If you do want to fill the internal box sections, then the trick is to use the foam gun with extension piece and start be squirting in a small amount in the middle ,say about 1/10th of the length. This will then expand and harden over the next 6-12 hours to fill the middle third. Then repeat on each side in one or two more goes. Practice on one, then do all of the other cills in batch. Cut of the excess when full hardened. Doing it in multiple fills like this will avoid undue internal pressure build up and the risk of distorting the exteriors.
-
We have AluClad PVC KF200 range. Absolutely no complaints. Zero maintenance, and the outside is sun-proof. As to the cornered mitres, my immediate reaction was Eh? I am not in the house at the mo, and so I checked some of our internal photos for a blow-up of the detail. Yes, you can see a very slight line at 45° in the window corners, but it is extremely subtle. @MikeSharp01, Mike do your picture frames have mitred or square corner joints in your house? A mitred corner is just a different approach. It doesn't make rational sense for one to be fine and the other offensive; this is purely cultural. Having inward opening windows is another thing that some people hate the idea of, but once you see them in practice they are brilliant.
-
When it comes to anyone other than you and the better half, IMO if you even hint at a "boots off" or "clean boots" policy, then they just won't bother coming near the house; just too much hassle for them. Except our slater who liked to come and have chat occasionally (and who was good company and as it he was slating in Feb, having his lunch with us was a good way to warm up), all of our builders or guys on site didn't want to come into the kitchen, except on an occasional basis, but we did make the loo next in the hall next to the back-door available (in lieu of a portaloo) and they did regularly use it for 1s and 2s, but: we never used this downstairs loo when the guys were on-site so they knew that they had it to themselves and, we put down heavy dust sheets between the external door and the loo, so they were comfortable with the idea of using it. One advantage of a timber framed house is that it goes up and is water proof within a week or so, so our workmen tended to use the house hall as canteen area when it was raining, but we did have an absolute smoking ban inside the house. A good alternative is a shed or even a gazebo in the milder months, but again it has to be reserved for their space if you want them to be comfortable to use it. As far as teas etc., we simply asked each team when their preferred break times were (and most preferred a set routine), say 10:00, 12:30, 15:00 and we took tea and biscuit out to them. To us it's just a matter of treating the people that work for you with respect and consideration, they will invariably reflect this back on us. In our case Jan and I had different rules: boots off or ear ache. But easy slip-on boots and a separate set of cloggies for working inside the new-build once weather tight helped a lot. So did a conscious effort to maintain and enforce clean access paths. You'll rapidly collect lots of pallets and they make excellent duck-boards.
-
End feed (don't use PF copper), but I was being a dozo. I missed the 1 off items hidden in the bulk buy lists
-
One issue with JTM is that they only sell standard parts like 22 x 22 x 22 in bulk , and I don't think I'll ever use 50× those, but I an always get them at Screwfix.