TerryE
-
Posts
3806 -
Joined
-
Last visited
-
Days Won
30
Everything posted by TerryE
-
There are a few issues here. As you both say, sunshine through the windows is a major source of heat input, and it isn't being measured directly. Moreover whereas there is a lag of >24hrs with the external temperature, the input of incident radiant heat has no delay. Picking meaning out of correlations especially in the 0.3 or less range is extremely difficult. The underlying causal linkage isn't at all clear. Tuning your system further is going to be difficult without some home automation system, even if it is just a chunk of Fortran that runs once a minute on RPi3 However, one obvious strategy to consider is to shift your ASHP cycle to around midday (or at least have a boost midday) when your expected PV output is maximum and therefore you have the highest expects PV input. Another thing that I note is that having your services split over two floors in itself introduces losses. I was originally going to have some in the "services" room in the loft and some adjacent to the GFL toilet. However I was luck enough to be able to replan mine after reading your blogs. Now we only have the MVHR in the loft. All of our heating and water services is in a 0.65 × 1.4 × 2.4m services area off the GFL toilet. (Though it has been a bit of a challenge arranging every thing to keep pipe runs clean and accessible, but that's another topic.) My last thought is there's nothing like collecting hard data to understand how your system operates and how to optimise it.
-
Like @joe90 we are on blue Oadby member clay and there was no way that anything would drain from what was a local low point. So we dug a sump hole and had a small (pond) pump in it. We just pumped it out onto the road. Worked brilliantly. The water table is still at ~25cm at the moment (my water meter is under 150mm water!)
-
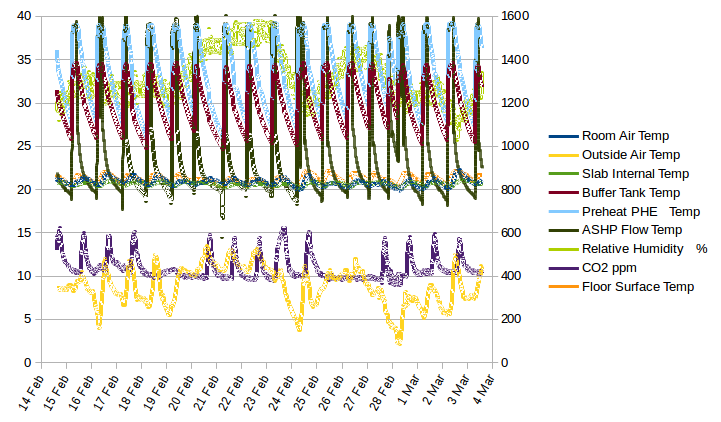
Jeremy, I did a quick plot of this, for the benefit of others. The temps are in °C, the RH in %, and the CO2 PPM are on the right hand scale. e PPM is on the RH scale.
-
Plumbing Design – Part I
TerryE commented on TerryE's blog entry in The House at the Bottom of the Garden
Nope, two give us all the hot water that we need. -
Yes, but they only sell Laco and Fernox Powerflow Flux (which Screwfix also sells, BTW). So I guess its a case of just washing out. And talking of working, I'd better get on, otherwise I'll be getting a slap on the botty.
-
OK, but none of Screwfix, Toolstation, Plumbase, Plumb Centre, B&Q stock it. So it would be a Q of getting some by post and putting my work on hold until Wed next week, say
-
Plumbing Design – Part I
TerryE commented on TerryE's blog entry in The House at the Bottom of the Garden
@MikeSharp01 Mike, a slightly longer answer. First, I forgot to add in the water softener which cost nearly a grand and no doubt a few other odds and sods since this was just a running total in my head. (Jan keeps the accurate figures.) So let's say just under £6K. Even so, I know that a friend paid £18K for a similar sized traditional installation, but that was a bundled price including labour. When we laid out our house, one of the design parameters was a hub approach to the entire heating and potable water system, so having a small central services area (~ 1.4 × 0.65 m) off our downstairs loo was part of that. With the exception of the kitchen and the loft wetroom, all of the pipe runs are 3m or so from this, and the longest copper run is about 2m. I couldn't have done this with a UVC or a TS or a Combi for that matter, since I would have needed an outside wall to fit it against and this would have involved either completely replanning the house layout, or a 5m run from the Combi to the manifolds. What we've done here is to embrace the "sweet-spot" enabled by having a passive-class house that @JSHarris and others have described and optimised our heating and potable water design around that. So it's a case of "swings and roundabouts": super passive means that we can get away with no upper floor heating and rely only on the ground floor UFH. We can also go electric only and have very few components which need maintenance or that we can afford to have on a 2-3 day replacement basis, so we don't need maintenance contracts. So our bottom line is a system that is as stripped down and clean as possible, and yes the double SunAmp is part of that. But the final result is on the cheap end of the spectrum and very cheap to run on a yearly basis. -
Plumbing Design – Part I
TerryE commented on TerryE's blog entry in The House at the Bottom of the Garden
The total cost of my potable water and UFH system is about £4½K and that includes the elements that I paid to MBC to put the UFH loops in the slab, but excluding reclaimable VAT and the bathroom and other end fittings. Is that expensive for a 4 bedroom house? And I avoid the Gas standing charges and maintenance, with my solution. -
I know that you told me to use a mild flux and not a self cleaning flux one, but I've only got a pot of Laco, so I clean off the pipe ends and fitting with plumbing wire wool and a fine smear of flux then only use a tiny amount of flux on the burnished surfaces and on the solder itself. It flows and wicks fine. I then wash out the part before testing.
-
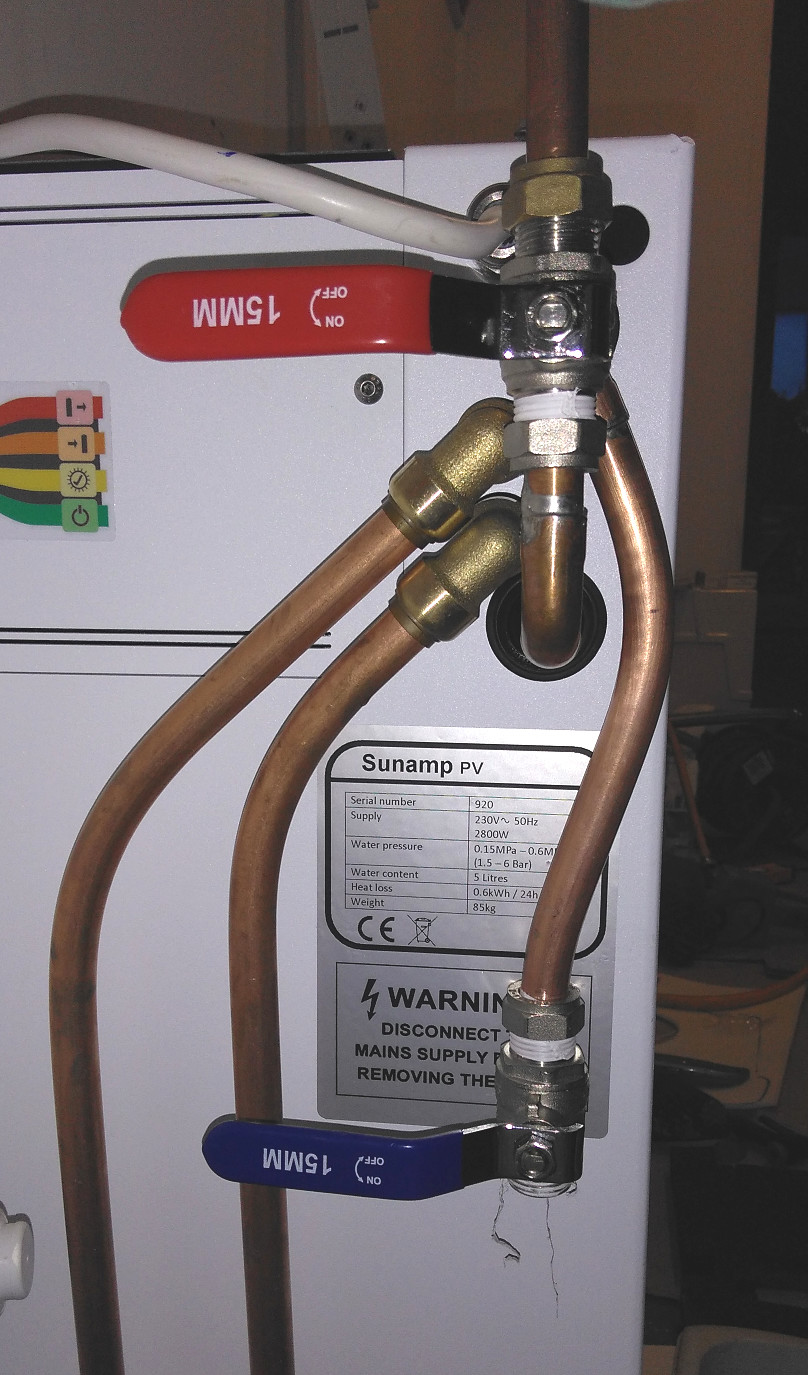
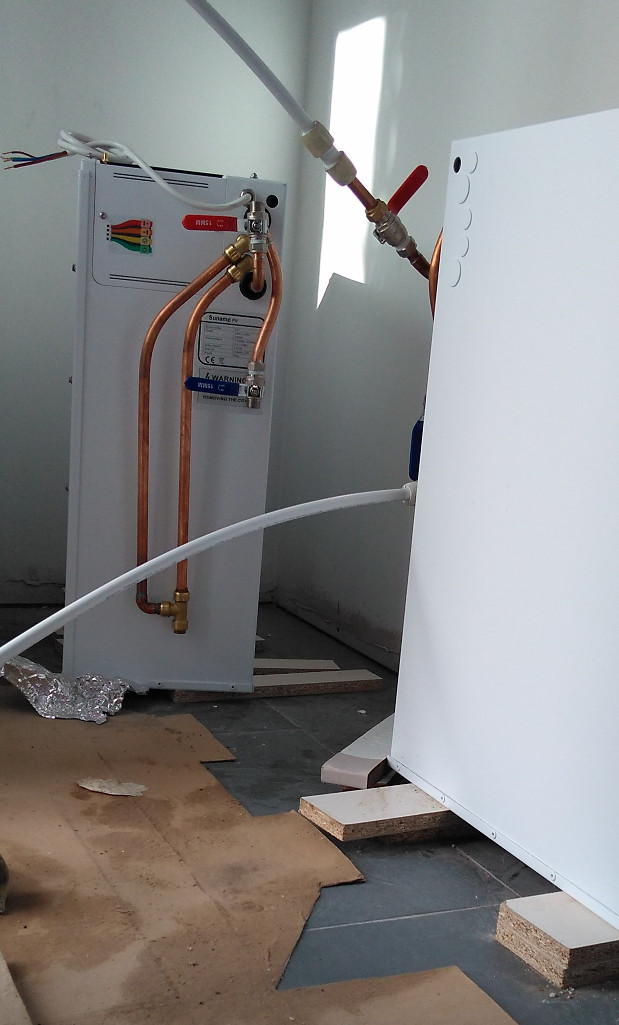
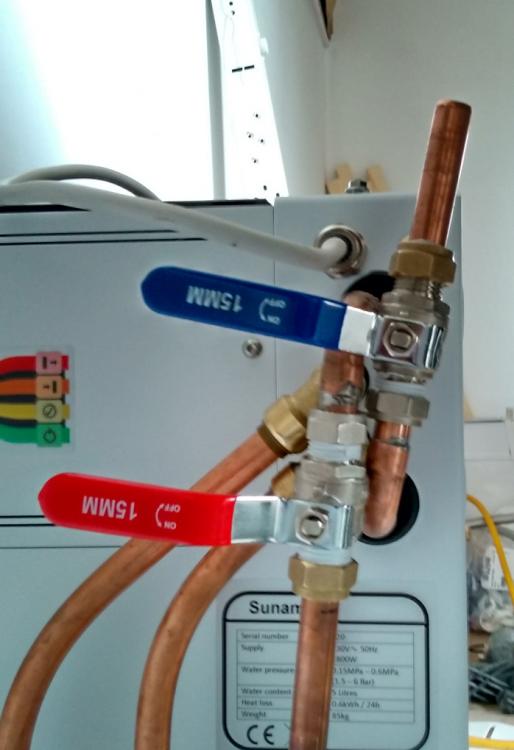
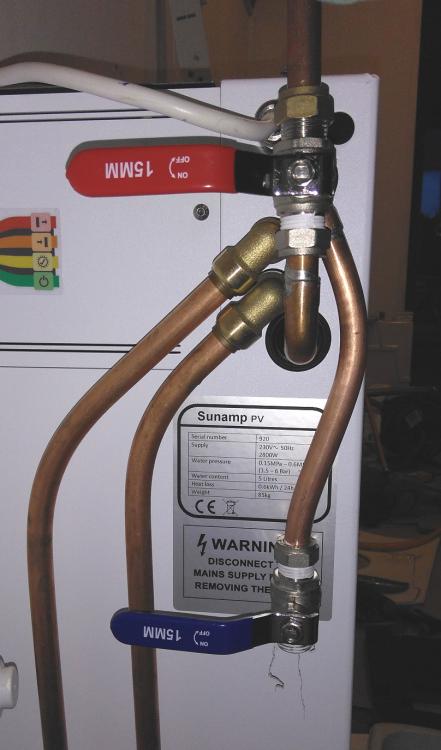
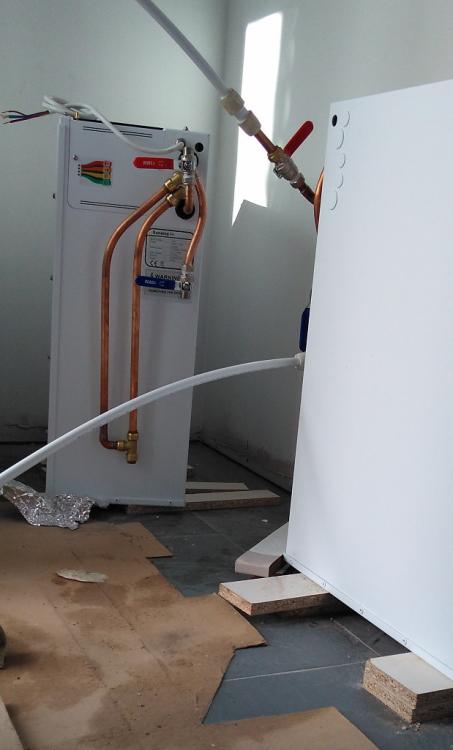
My latest whoops is on the SunAmps. See photo below. (The two tails on valves are for pressure testing. and the red/blue handles are on the wrong valves.) I had carefully made up rigid tails to allow me to mount the two SunAmps side-by-side. There are four pipe connections all arranged vertically on the back: the cold in, the hot out and two overflows for the PRelV and the cells. So I laid it all out: cold from the bottom, hot out of the top, the two overflows off to the side and down to a tundiish. Great. Except that when I came to connect them, I realised that the cold was on the top and the hot on the bottom -- and of course they are vertically aligned. Given that the cold normally rises and the hot often goes up to a manifold, then they could have at least swapped them or even offset the access holes. But neatness trumps functionality. Thank-you SunAmp. Now I've got to remake all of the bloody tails so they can neatly cross over. Shit, shit, shit. Before and after and pressure test I know the levers are upside down, but if I turn the valves around so that they are the other way up, then they'll jam against the back wall. Oh, yes and a codicil to the leaded vs lead-free solder debate. I am using the lead-free solder for our potted water after all. Once I got used to it, I find that I prefer it. It seems to wet / wick better than my old lead alloy solder.
-
Sounds like a plan, but if you are doing this then perhaps you'd be better letting the DPC turn up behind the render board in a J profile, and that way the water will escape down the sides rather than rotting the render board.
-
@lovo, one comment that I will make is that architects seem to love having walls of glass in a house. Yes, you need glass for passive light into the house. Yes, glass opens out a room into a view, but I've also seen designs with houses with huge openings onto a row of neighbours' back fences and run-down backs of houses. So yes, have windows where they work for you and provide positive views, but don't have them just because some architect wants to make a statement. Just remember: Glass loses typically 8x the heat as the same area of wall. When the sun shines full-on into a window there's ~1kW/m2 of heat incident on the glass surface and may 50% will find its way into your house. Most passive-class house have more design problems dumping this excess heat than maintaining warmth in the deep winter months. If you can see out then your neighbours can usually see in, so maintaining privacy can become a real problem. Many of us have realised that once you start down the route of building your own house, that it's more an issue of attention to detail and thinking through the design issues to achieve this ~1kW base heating in the depths of winter and have therefore chosen to go down this route. You have to think of the house as a system and balance the components and losses -- for example there's no point in spending a fortune on super U values if you have a house that leaks like a sieve. Read some of the testimony / blog examples here and use a typical set as a starting point and vary the costs in a balanced way to seek the optimum that you want. The sorts of issues that you might need to factor in are that you might end up spending £50-80K on architects / project manager and other professional fees, and £100K on other trades + materials on top of the core structure. You need to decide your pace of build and how much are are able / willing to commit, and where you need to spend your hard cash. For example we chose to split our work between a specialist timber-frame (TF) supplier who supplied the slab, TF, insulation and contractually guaranteed air tightness, a reputable local builder who did all of the groundworks, drainage, stone skin and slating, a reputable specialist window supplier. We used the builder's preferred contractors to do the specialist work such as electrics and the slate flooring. We decided to do most of the planning submission, all the architectural work, the overall project management, most of the procurement, and most of the internal works ourselves. This gave us the best value and exactly the house we wanted, but we are both retired and have the time to devote to the build. This split would have been impossible for us 15 years ago (when we both had work commitments). Mark Brinkley's House Builder's bible is quite a good intro to some of these trade-offs.
-
We have a stone skin, so the issues are different; nonetheless, the point that would concern me abut this detailing is that if the integrity of the outer skin is compromised for any reason, then the closer / external panel will act in such a way as to hold the moisture against the internal frame. Not good. I would have expected some form of DPC and drip ventilation about the window to carry this moisture away from the inner frame and to ensure that it stays dry.
-
Bath Surround / Boxing In, and concealed pipework
TerryE replied to Onoff's topic in Bathrooms, Ensuites & Wetrooms
Clive, now I am confused. One end of the flexible connector goes to the internal service valve that is accessible through the front plate. It's the other end which is mounted in a through hole on the external casing, and it is this end that is against your stud. In our Gerberits there are 3 alternative exits for the flexible pipe. Even if your Gerberit only has the one, then what is to stop you just bending the internal flexible connector up and taking the end up vertically and if necessary cut a hole in the top cover if yours doesn't have a punch-out. -
Bath Surround / Boxing In, and concealed pipework
TerryE replied to Onoff's topic in Bathrooms, Ensuites & Wetrooms
Clive, What I see in your photo is a flexible connector terminating in a ½" BSP male. Why does the male end of the flexible connector need to come out in some totally inaccessible location? As to where the "Hep2O link" is, I only suggested Hep2O because you were talking about going through a set of holes in studding, and a flexible piping like Hep2O makes a doddle of this, and try this or this, or lots of other options which simply involve taking the connector out some other route. -
Bath Surround / Boxing In, and concealed pipework
TerryE replied to Onoff's topic in Bathrooms, Ensuites & Wetrooms
Clive, sorry I missed the point here. you are worried about the filler feed. Its got to come in somehow. On the Gerberit you can come in from the back or the sides -- or even the top if you want, So what wrong with this? Hep2O works wonders. -
Bregs Part B Part B1.viii, B1 sect 1.7, 2.4, 2.6. Diagram , etc. The essence of the regulations is that if you have a "protected stairway" then with a 3 storey house, then you are OK. This means that you need linked battery backed fire alarms on all landings, plus a smoke detecting fire alarm in the kitchen; you also need the protected stairway lined with pink plasterboard (or equivalent) and 30min fire doors on all rooms opening onto the stairway.
-
Bath Surround / Boxing In, and concealed pipework
TerryE replied to Onoff's topic in Bathrooms, Ensuites & Wetrooms
Clive, the bolt hole on the wall mount is offset for a reason. You don't have to fit it horizontal +/- ½°. If you do as I suggested and put in a wood packer glued to the upright, then it will be easily strong enough to take the bolt. You must have somewhere on that 6cm dia circle where you can put the bolt in. I really can't see the issue. -
Cutting existing 110mm stack thats tight to the corner?
TerryE replied to Barney12's topic in Waste & Sewerage
You can also get female/female/female 110 branches which will do both jobs but if you've got no up and down play then Jeremy's idea is the best. -
Bath Surround / Boxing In, and concealed pipework
TerryE replied to Onoff's topic in Bathrooms, Ensuites & Wetrooms
That stud beside the Gerberrit must be about 50×180 in cross section. What are you planning to have sitting on your loo, an elephant? It looks like you've got room to glue and screw a bit of 50×100 or the like down the back and onto it, then put your bolt mount on that. An angle-grind off the excess bolt sticking through the wall. It ain't doing anything apart from get in the way. -
Also note my mounting the manifold on a mounting board. I did this partly because there's only OSB behind this, but if also proved very useful for another reason. MBC use PexAlPex UFH pipe which is a lot more rigid then the stuff Wunda supply and the tails only came up 60cm or so our of the floor. It would have been really fiddly trying to manoeuvring them into position with the manifold fixer, so I put the board in place, measured and marked the correct tail lengths, then took the board away again. I then cuts the tails to length, chamfered and fitted the insert fittings, before lowering the board into place and over the tails. I then screwed up the tails, and finally screwed the board back to the partition wall. This worked well and was painless.
-
One thing that did surprise me was that I did a flow test (after I had purged the circuits individually) by opening all three circuits and letting the mains 3 bar run from the filler though the loops in parallel and out into a bucket. It was quite slow. I think that this is time for a properly measured flow and some Boffin's Corner flow calcs And thanks for the hint about the air exhaust vent, Nick
-
@Barney12, yes on both accounts. Have a look at the Wunda videos on YouTube. The only difference is that I didn't buy the Wunda pressure test kit, because I already had my home brew one.
-
stand outside an look at the vent. If its condensing, it will come out as steam rather than turning to steam 10-30cm away from the vent.
-
So the timber floor board don't rot! Hang on a sec. What timber floor boards?