


TerryE
-
Posts
3826 -
Joined
-
Last visited
-
Days Won
30
Everything posted by TerryE
-
This is the Part II roll up of a couple of earlier blog posts and forum topics which provide the groundwork and context. Plumbing Design – Part I Heating the Slab – an overview Modelling the "Chunk" Heating of a Passive Slab Another DHW / DCW / UFH design. in summary, so far into commissioning and early use, everything is at least achieving our expectations and the house might in fact perform better than my predictions. The key design points that I listed in part I seem to be spot on. I want to compare a figure that I gave in the modelling topic with a corresponding plot during commissioning and testing to underline this: The first graph is a theoretical model based on a few simplifications, and the second live data, warts and all, and complete with hiccups as I test and restart the control system. The bottom line is that the slab is reacting exactly as I modelled in overall behaviour, though one of the parameters is different. The UFH pump at its medium setting is under half the modelled flow rate, increasing the delta temp between out and return from 2°C modelled to 5 °C measured. However, I decided to stay with this setting because the pump is almost silent at its medium setting, and the system and its subcomponents are still operating well within specification at a delta of 5 °C. So in my view, if you are building a house with near Passive performance (wall, and roof U values < ~0.15; windows < 1 and not too much area; well sealed warm space and MVHR; decent insulated slab), then you should expect heat losses of less than 40kWhr / day in worst winter months. You therefore need to put roughly the same into the house. You only need to input the net top-up, because your occupancy, normal electrical consumption and solar gains all contribute to this input; this net is going to be 1kW or less on average. Given that a cheap and simple Willis heater can provide 3× this, using something like a gas boiler capable of 16-20 kW is just crazy, in my view; in our case even the economic case for considering an ASHP is marginal at best. Yes, in terms of running costs, the electricity unit cost per kW is more than that for gas, but you also have to factor in other running costs such as boiler maintenance. In our case, the British Gas boiler maintenance contract in our old house is less than our total expected heating cost in the new house so unit price comparisons are irrelevant to us. As I commented in the Boffin's thread, you need to limit the heating going into the slab: one way (the one Jeremy currently uses) is to throttle back the heating rate right back (e.g. using a buffer tank and an accurate thermostatic blender) ; the other way is to use a chunking approach and simply heat the slab in one (or possibly two) chunks per day. In the chunking case you instead limit the total heat injected into the slab per heating round (that is the integral of the power rather than the power itself). Doing this might seem awfully complicated, but in practice you can let the slab physics do this maths for you. You can use any moderate heating source that has a reasonably consistent but limited heat output; this could be an inline heater like a Willis heater or an ASHP with the flow temperature and rate at present set-point giving water at, say, 30°C. The slab itself slab acts as the buffer, so no additional buffer tank is needed. The algorithm is simple: Turn on the heating at a fixed time. This could be the start of E7 or in the window of peak power if you have PV installed. Turn it off when the average return temperature from slab reaches a specific set-point threshold. The actual set-point (which in my house is going be around 27°C in winter) does vary by season because what you are doing is control the total heat put into the slab, and it will need trimming for any specific house and heating scenario, but it is largely self correcting for short term temperature variations in that if the house gets a little colder due to greater heat loses in a cold snap, then the slab will require more heat to reach the set point. At the moment we are using a twice a day heating cycle. This is settling down to ~6 hrs overnight during the E7 window about £1.50 and a couple of hours top up during the day (another £1). This being said, we are still warming the house from a pre-commissioning temperature of around 13°C to a pre move-in target of 20°C as as you can see from the graph, we are currently increasing the house temperature by ~0.5°C / day on top of the sustain heat losses. This in itself takes a lot of energy as we have approximately 17 tonnes of slab, 5 tonnes of plasterboard, 11 tones of wood inside the heated zone of the house and 8½ tonnes of cellulosic filler in the insulation. Plugging these numbers and their Cp's, it takes roughly 25 KWhr to raise this fabric by 1°C, or 4 hrs of Willis Heater to raise it by ½°C. So at the moment roughly half of the heat input is maintaining heat loses and the other half is slowly raising the temperature of the house fabric . This maintenance heating element is less than the JSH spreadsheet estimated for current average outside temperatures. So another way of thinking about this is that if we do without heating for a day, then the house will drop in temperature roughly ½°C to compensate for heat losses. The daily ripple in temperature with a single heating chunk will be less than this. If we only heat the slab during the E7 time window, say from 2 - 7AM, then the house temperature will peak roughly 3-4 hours later late morning and then fall by maybe ½°C during the rest of the day. I feel that a ripple of ½°C will be barely noticeable to the occupants, and given that the heating during the E7 window is effectively half price, it is better to accept a midday peak (and possibly set the target temperature half a degree higher) than to pay double for an afternoon heating top-up to reduce the ripple.
-
Help me identify this, please
TerryE replied to ToughButterCup's topic in Bathrooms, Ensuites & Wetrooms
I thought that was you. -
Help me identify this, please
TerryE replied to ToughButterCup's topic in Bathrooms, Ensuites & Wetrooms
On the specific oxygen permeable /barrier point, Hep2O sell two types of pipe one slightly cheaper than he other. The more expensive barrier pipe must be used for CH applications for the reason that Peter explained, and can be used for potable water; the other can only be used for potable water, but is perfectly fine for that use. -
I still don't understand the issue. How do you control the ingress of moisture above the lintels? In our case the lintels extend ~150mm beyond the end of the frame and we have a secondary DPC and weep vents above each lintel so this forms an "umbrella" over both the windows and gap closers. In principle you could still get some moisture ingress along the mortar stop between the brickwork and the window, but (i) this is sealed with a flexible sealer bead anyway and (ii) the preferential path is straight down. Though, in our case we fitted the windows into the frame on the last day of the frame erection and subsequently put the skin up to the frame which made things a lot easier. In terms of the gap closer, the one we used was mineral wool in a heavy duty PVC sleeve so there isn't any entrance path for trickling water. They were exposed to the elements for about six months and didn't show any signs of getting wet, so I doubt that we'd have any problems once protected by the skin. We can have chat on Thursday.
-
The inner frame and the outer skin have different material and thermal characteristics so you will always get some form of shear movement between them, even if the odd mm. If you mount your windows in the brick then this will always end up compromising the airtightness of the build. If you mount the windows in the frame, immediately behind the brickwork then this shear line is at your outer weatherproofing mastic seal. I don't understand your point about the PUR being close to the cavity tray. You have to do this for two story buildings or higher to form a proper fire stop (remember Grendfell tower). I realise that it might be a bit late for you to do this but if you are mounting the windows forward, then putting a 60° angle on your inner reveals makes a huge difference in terms of light and impression. This opens the windows form the inside and make them feel far less like a tunnel. We've done this (and I've posted some pics to the forum too) and visitors to the house often comment on them --- always favourably. See this for more details:
-
A bit late, but the other alternative is to mount your windows 50mm forward and surround them with PUR or mineral wool gap closers to act as side insulation. That way you'll only have a pointing gap between the windows and the brickwork. If you use PUR then you might need to do a little surgery to allow them to slip over your edge wall tiles, but modern triple glazed window cassettes are reasonably deep. You can hang the windows on decent steel straps, but just make sure that you foam up properly; cut the excess of and silicon up the cut surface and face with decent airtightness tape.
-
Jan did our Hep2O pipework and it was her first plumbing project, though I acted as her labourer and did all the calcs and the central copper work. Absolutely no regrets. I would never subcontract this to a plumber unless we'd agreed the overall design and pipe runs. I did invite NickFW for a few days but he declined as he didn't want to mix business and pleasure -- Jan is far prettier anyway. Manifold layouts rule forever, IMO.
-
There's no such thing as free in this life. "Free" in this case means that you pay no annual or monthly fee but there will either be scraping of your content or ad placement on your viewing. Lots of service providers provide budget hosting services at a low annual cost that avoid this crap. For example I use Hear Internet for my personal website and mail domain. They are UK-based and do a basic entry service for ~£30 p.a. which would do what you want (though I use their Home Pro offering with costs ~£100 pa.) but there are lots of alternatives around this ballpark. I suggest that you stick to EMEA-hosted services so at least you know that they have to conform to current data protection legislation.
-
I reckon on 1-2 tubes for a 4×4m room. It depends how flat the walls are. Skimmed boarded, that is. If brickwork or blockwork and the plastering a bit wibbly then maybe double that. BTW, its easier to put the adhesive onto the skirting before you finally offer it up. Put the wedges in before you do the last offer up, then you wont be running around like a headless chicken. If you are sticking to block or brickwork and can't use the wedge trick then pre drill any fixing points in the MDF, then through drill into the blockwork through these holes using a decent SDS masonry bit and insert the pluug and screw through the hole. This is fast and avoids all of the "hunt the hole" hassle.
-
No, the adhesive fixes better to a porous surface, so you just have to be careful about it moving or pulling off the wall in the first few mins because it might not re-adhere well If your walls are very straight than you can just press it intimate with your toe and show grab fine, but if they are slightly vary then use the wedge trick on wooden floors. If you doing skirting on stone floors then you might need the odd lost head nail. just to keep then in place until the adhesive grabs. Also work from any outer corners, mitre and mitre bond them first. For inner corners don't mitre but but a negative profile to a square cut piece. Cut the negative profile but using a 2cm slice of skirting on the back side and you find that you can cut this fine with a jib saw and fine blade. Work round the room swastika fashion clockwise or anti clockwise (or both away from any outer mitred corner. Cut the profile on one side first and them cut the other to fit the run. The next negative profile will cover this.
-
Or to rephrase this, use adhesive to stick and decorators filler to caulk once fixed. They've got very different material properties. If you are filling "gappy" cracks then it's easier to do the fill in 2 passes, the first to do the bulk fill and the second to get a decent level.
-
As Crofter says, the Screwfix no-nonsense adhesive is cheap and effective. Just be careful that the boarding doesn't move within the 1st 10 mins or so after fixing otherwise you will create a shear plane between the adhesive and the plaster. A good trick if you've got a radial arm chop saw is to cut a bunch of ~25° wedges from a bit of CLS, say 88 × 200 on the rectangular sides. If your walls are at all wavy, then you can use a single temporary screw to screw these to the floor on the 200 long side about 2 cm from the skirting surface (so the sloping side is facing up and the 88mm side near the skirting) and tap in a couple of 2cm folding wedges to push the skirting back hard onto the wall until the adhesive cures. We have a box of 20 or so these that only took a few mins to cut and we use them whenever we are fixing skirting over a wooden floor.
-
Somewhat like Peter, we laid out our house to keep things simple. It is double fronted and roughly organised as a 3×2 file with the middle front third the hallway stairs and landings, the middle back third is where our utilities bathroom, ensuites are clustered. The only exception is our kitchen sink. My "plant room" is a 1.4×0.65m cupboard off the downstairs toilet. There are some pics in my recent Boffin's Corner topic. We saw no point in wasting a room on what could be fitted into a cupboard with a little thought.
-
You two must have boundless energy, so congrats and well done. But what next??
-
Timing of House Sale vs Ordering Timber Frame
TerryE replied to mike2016's topic in Self Build Mortgages
As @AliG said, you have to be brutally realistic about selling a house next to an adjacent building site. This is going to hit both the saleability and the value of No 66. Find a local estate agent or two that will give you honest advice (if that's possible), and get their opinion about the value of the property and the impact of an adjacent building site.. You also need to think of the risk that someone could buy No 66 and then attempt to derail your adjacent development: that way the new buyers will get a two-for-one: a reduced price for No 66, but no building works next door. At a minimum I suggest that you get full PP and discharge as many conditions as you can -- certainly to clear all preconditions for build above FFL and that way you de-risk this for both you and the the new buyer of 66: its' a lot more difficult for a neighbour to derail a development once you have got the foundations / slab down, and also the new buyers will have a better idea of what they are going to have to live with next door. Less risk = less price impact. The other thing that you need to factor in is that your mortgage company is an "interested party" in your title, so you aren't going to be able to split it without their permission. They will want to be convinced that their agreeing to the split isn't going to increase the risk on their loan -- especially if the mortgage is worth more than say 80% of their valuation of the reduced No 66 with an adjective building plot. We fully own our farmhouse at the centre of our village and it had a large plot that we could split and we had quite a bit of savings to get us started. We cleared planning approvals, then split our title, and took out a new mortgage on the farmhouse in its new title to finance our new build. At the early stage we had pre-planning advice (which proved very worthwhile by the way), and I remember the planner's jaw dropping when we mentioned that we hoped to move in in 9 months. It's now over 3½ years later, and we are just about to move in. So this is all going to take you time, and you need to have an honest expectation of how long it is going to take. For example you'll be very lucky to get full planning permission and clear preconditions within 18 months, IMO. And you have to agree an update to your mortgage and sell your existing house before you can begin in earnest. So I suggest that you make the best use of that ~18 moths by building up your knowledge preparing and also trying to improve your existing property cost-effectively to maximise its current value and saleability, which is going to help with agreeing any mortgage changes. Hard advice, I know, and to be honest my wife and I wouldn't accepted it if some gave it to us 3½ years ago. All I can suggest if that you read some of the blogs and related threads here. Our experience is mid spectrum, and about the only people who can build in short timescales have a shit load of money to throw at the project, and you don't seem to be in that category. -
Out of interest why didn't you just have one water softener between the water filters and the PV? Surely the purpose of the PV is that this acts as the primary accumulator to handle high demand so that the borehole pump can run at a (steady) low rate? There's nothing wrong with storing softened water in the PV.
-
Water supply - temporary and permanent
TerryE replied to Weebles's topic in General Self Build & DIY Discussion
Unless you can avoid it keep these runs as short as possible, e.g by taking them on a direct tine to nearest sensible side of the slab. We just laid some extra 110 soil pipe runs form the services area out to the boundary of the slab. I suggest that you use a swept 45° to bring them up into the service area. You can use a multitool to cut them off flush to the slab when it's cured. It's just a lot easier to pull ducting and stiffer pipe through these if you have a slow sweep coming up through the slab. -
Ditto. The Harvey model that @JSHarris and I use is pretty much the top of their range, but it would still struggle with two showers and the kitchen tap running.
-
We used a radial Hep2O approach and minimised the pipe runs by (i) having our DHW + CH service area manifolds centrally positioned, and (ii) taking a near-as-practical to direct route for the pipe runs. IMO, the only thing that we got wrong was not using 10mm pipe for the HW to the low flow taps -- these 10mm runs hold a ⅓ of the dead water than the 15mm ones. You can see my total lagged pipework in the two earlier photos. My building supplier was @RandAbuild who had a couple lengths left over and that was all I needed.
-
IIRC the recommendation is that the house internal pressure should be limited to between 3 and 3½ bar. Our issue is that where we live is pretty flat, so Anglian use boost pumps to maintain the supply pressure, and they must set it so that the "top" of the village which is some 2m higher than we are is at 3 bar, so we are at a pretty steady 3.2 bar. This can drop by maybe ½bar during peek water demand in the early evening. The PRV itself takes around 0.2-0.5 bar off the head , so if we use one and set the target to 3 bar then this will take our pressure at the PRV closer to 2bar at peek use in the evenings. Not good. Hence we decided not to use a PRV at all, but I do monitor the pressure and will put one in if it looks as if Anglian increase the supply set point. Having a pressure transducer feeding into your HA system or even a visual pressure meter (as you can see in my system) or both is sensible, IMO. PS. @dogman, sorry for hijacking your thread, but at least I can plea in mitigation that you are going to interested in this anyway.
-
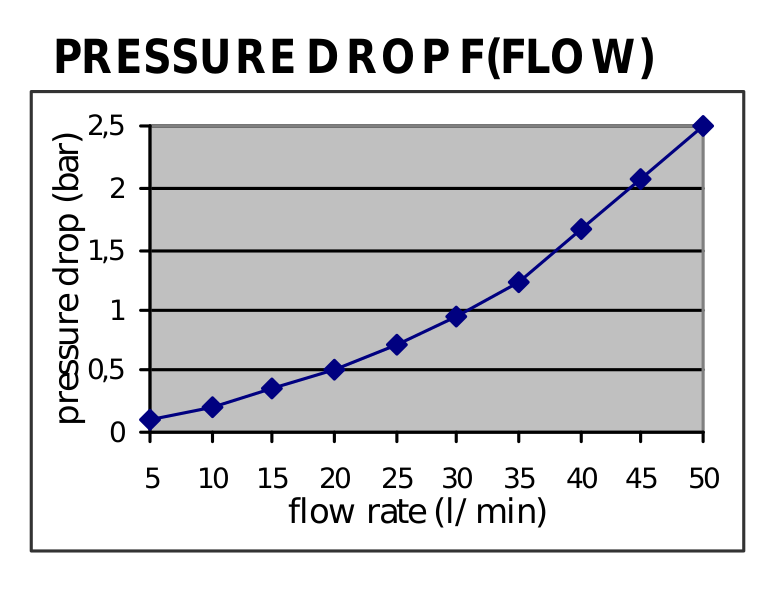
I think that this comment has been raised before, but I bought proper 22mm flexible couplers for mine. But the main issue is the internal ion exchange unit inside comes at a pressure drop cost, particularly as the flow ramps up. I came across this in one of the Harvey data sheets: At a nominal aggregate 35 l/min with this and the DoubleCV, SunAmps, TMV, etc., I suspect that the flow will pretty marginal for showers and the 2nn floor. But TBH, I've still to do his test.
-
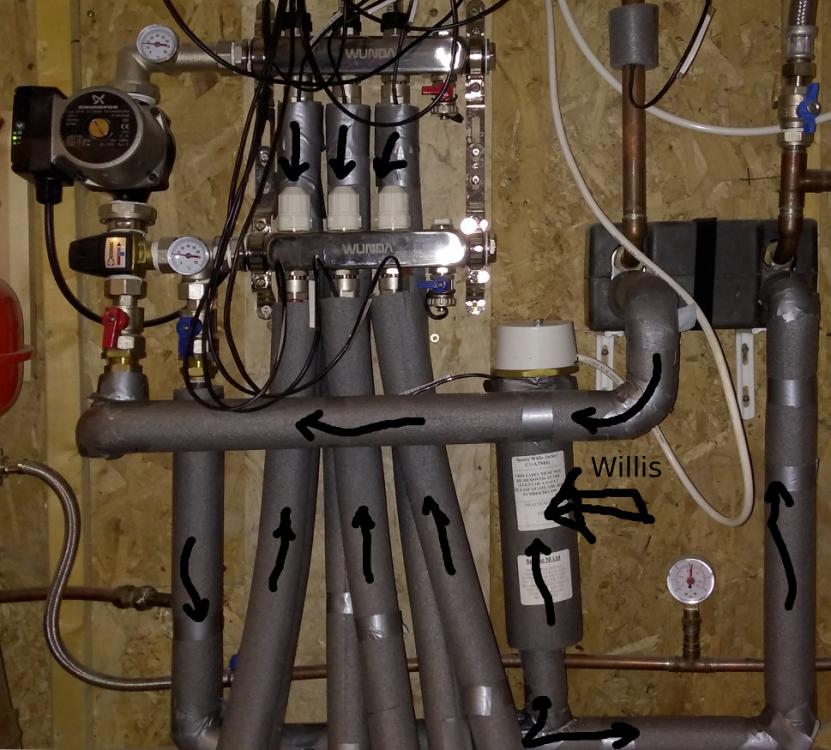
Sorry, thought that you'd see it. Your arrow is pointing to the TMV mixing PHE heated cold + SunAmp hot into the DWH manifold box. This is what you are looking for. Apart from the UFH pipework in the slab, this is my entire central heating system: Now that I've got DS18B20 themos on 3 × out and 3 × return and on the willis (and a couple on the DCW in and out of the PHE). You don't need thermos in the slab. Just run the pump for 5 mins and take the average temp of the water coming back in the returns.
-
Yes, paralleling up the SunAmps has a lot of advantages, though at the moment (before moving in) I only have one on at a time. But the biggest throttle on my flow rate is my water softener which drops the pressure almost 1 bar if we have two high flow taps (e.g. two showers) on the go together. Our mains is pretty steady at 3.2 bar, so one of the possible "to do" items is to add a PRedV in parallel across the Harvey, set at 2.4 bar say, which will allow water to bypass the Harvey in these rare high-demand cases so we might end up with a 50:50 hard/soft mix, very occasionally. Yes this will allow some hard water into the system, but given that under normal circumstances the PReV won't cut in and the system will be being flushed with softened water, this shouldn't be a problem. But that is better than no being able to have two decent showers going when the occasion demands. But I am waiting to do full load commissioning tests before considering this any further.
-
Yup, but they didn't sell the expansion module when I bought mine. I also like the redundancy, anyway.
-
Sorry I took 2, 200 as 2,200 not 2×200


