Spinny
-
Posts
923 -
Joined
-
Last visited
-
Days Won
1
Everything posted by Spinny
-
Thinking about getting a couple of sliding doors fitted across a recess to form a cupboard area, potentially up to ceiling height or near ceiling height - say 2.4m. Kind of like wardrobe doors - doors sliding past each other and top hung. Ideally any bottom track just a groove or pair of grooves/channels set into the finished floor for a seamless walk in look. Any suggestions of suitable slding/cupboard door systems or suppliers ? Anyone done this sort of thing ?
-
What size electrical cable for oven and hob?
Spinny replied to Great_scot_selfbuild's topic in Electrics - Kitchen & Bathroom
Been wondering whether putting a couple of these in the end panel one above the other would do it ? (TBH I would have hoped the kitchen people would have some recommendations but that seems too much for them) https://www.amazon.co.uk/dp/B0F2FM14NW/?coliid=I2XH8Y6VFB51BY&colid=3RAUVXUPTJ827&ref_=list_c_wl_lv_ov_lig_dp_it&th=1 -
What size electrical cable for oven and hob?
Spinny replied to Great_scot_selfbuild's topic in Electrics - Kitchen & Bathroom
The radial is on the other side of the open plan room, it doesn't serve the kitchen area, just the other dining/sitting areas. Wall sockets to power TV, sound bar, lamps, hoover, laptop type stuff. It is a radial as I specifically asked and queried it when it was put in. I was told that things had changed since I put some ring mains in myself 35 years ago, and these days radial circuits were favoured. Sure seems to be 2.5mm. There is an actual ring main on the kitchen side running around between wall side and island. Will just be for kitchen sockets, dishwasher, fridge, wine cooler, and electric rooflight. There is separate cable to the island labelled TAP -
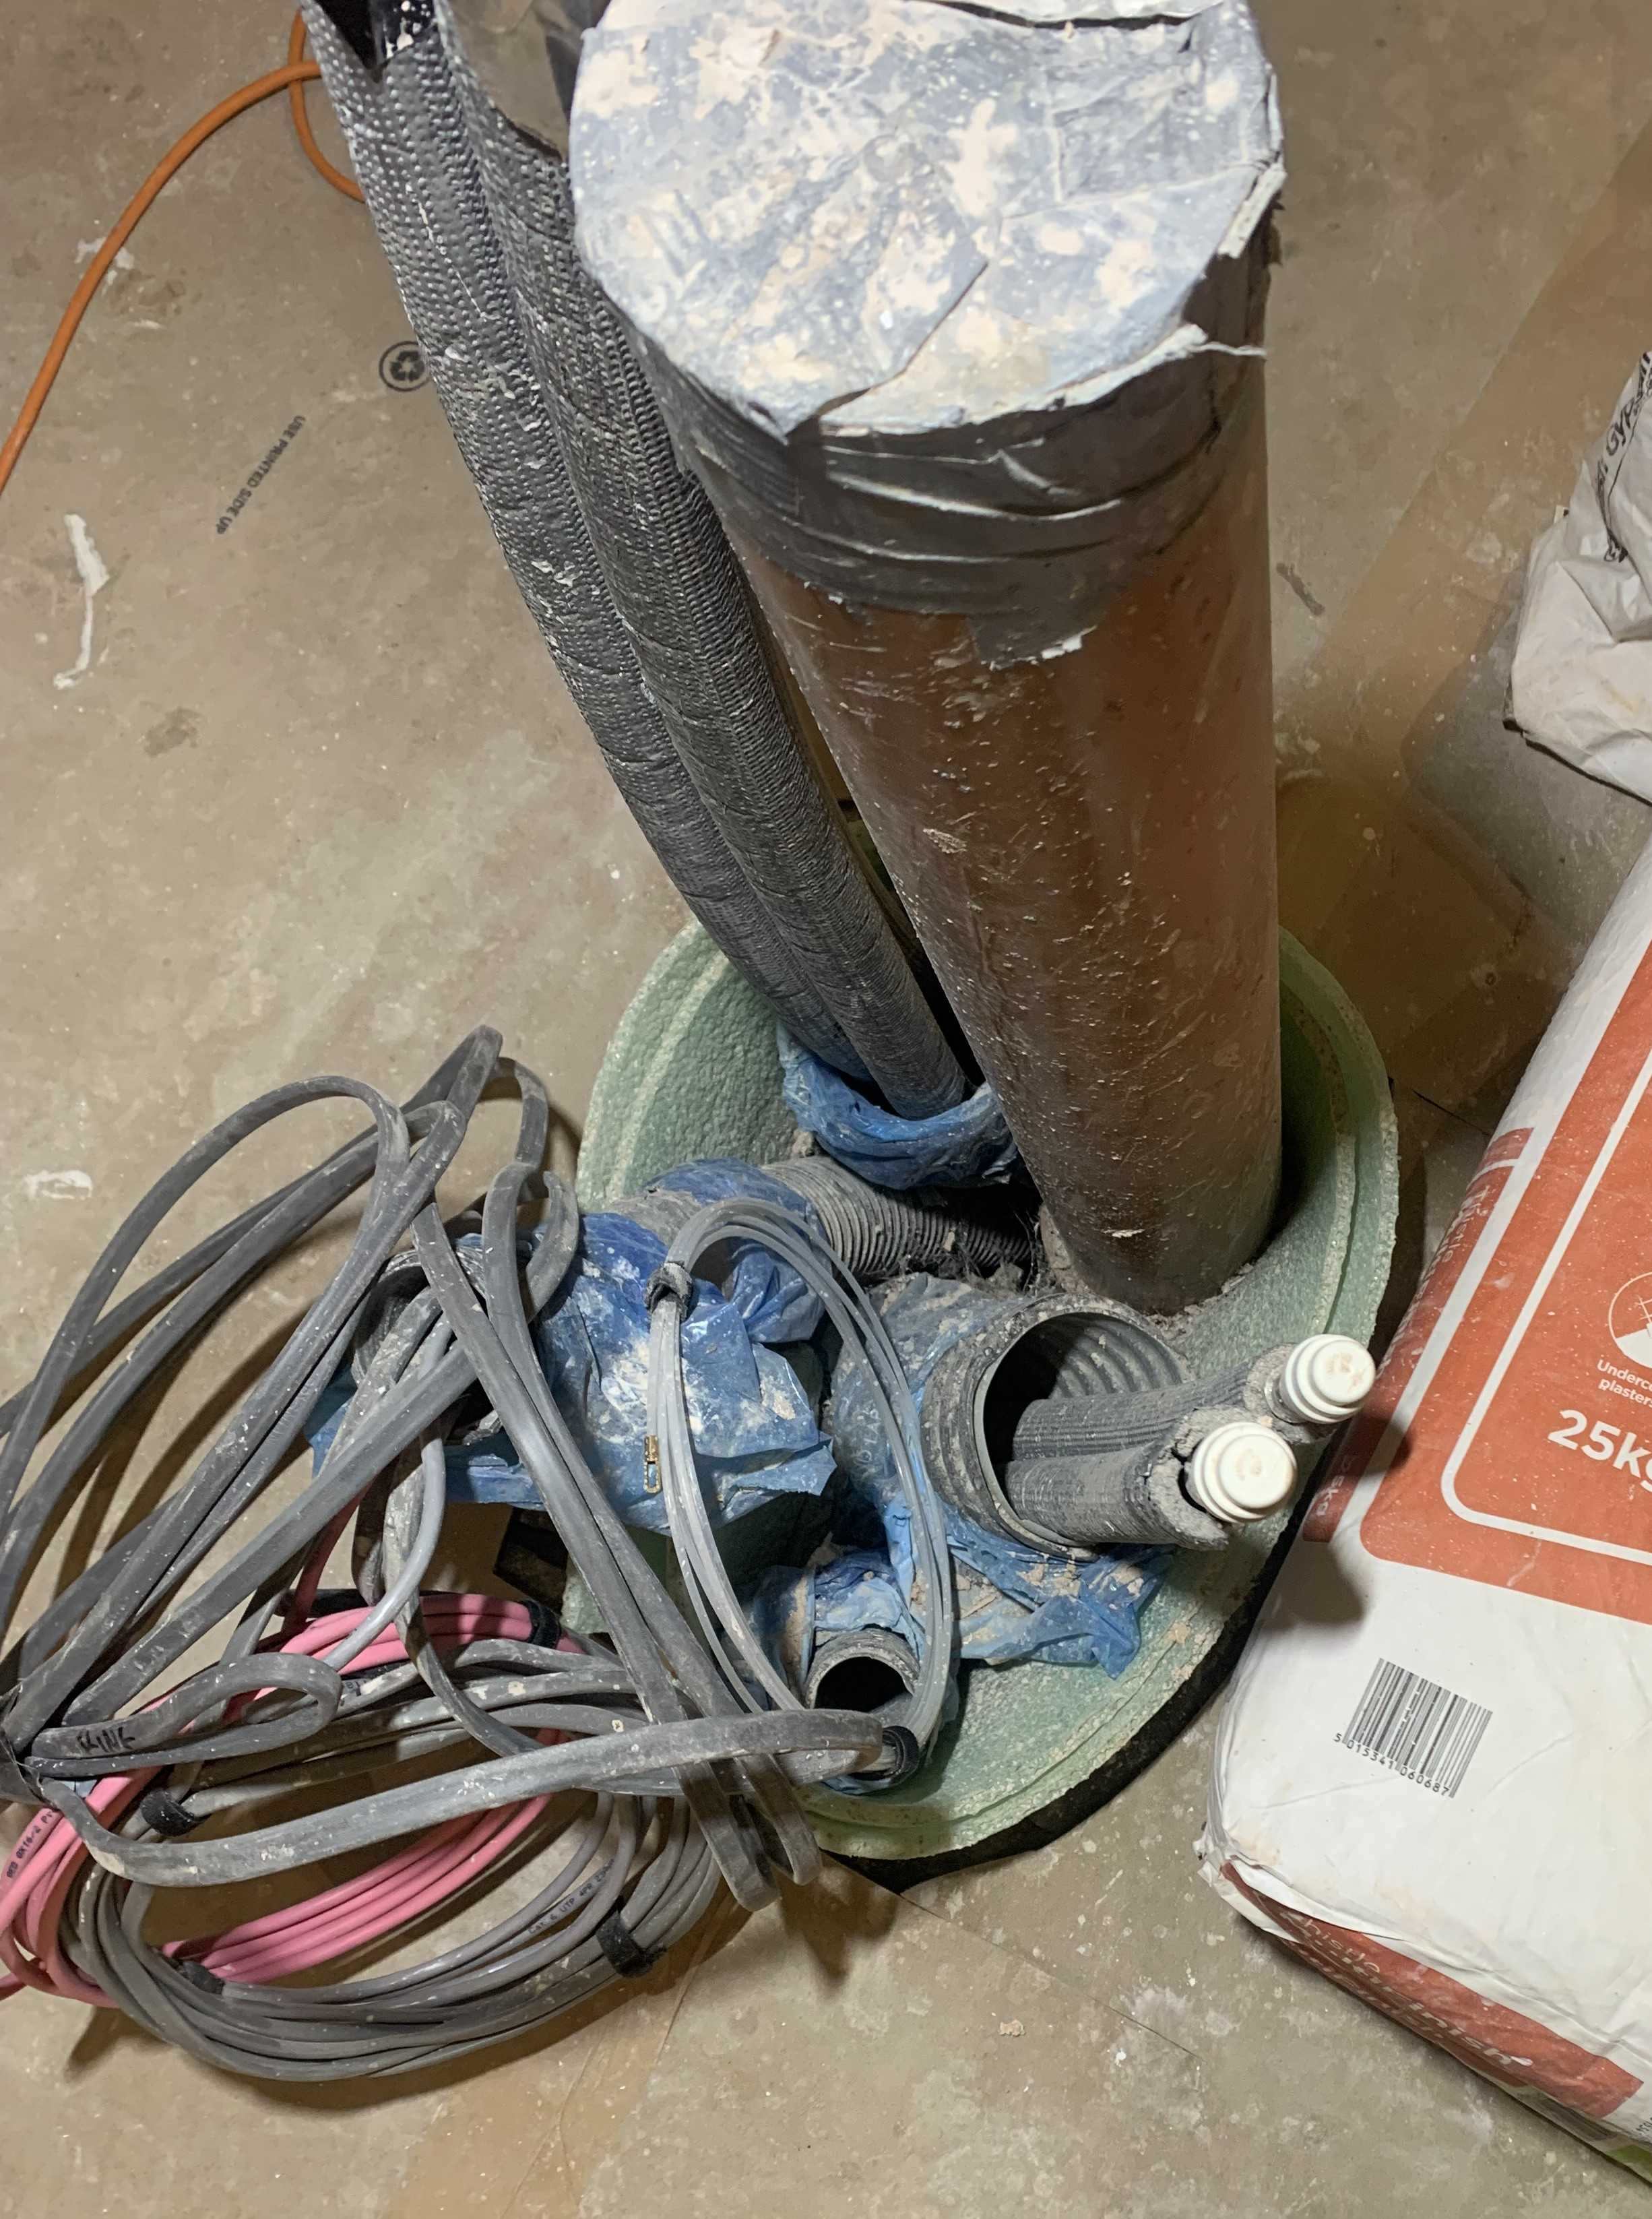
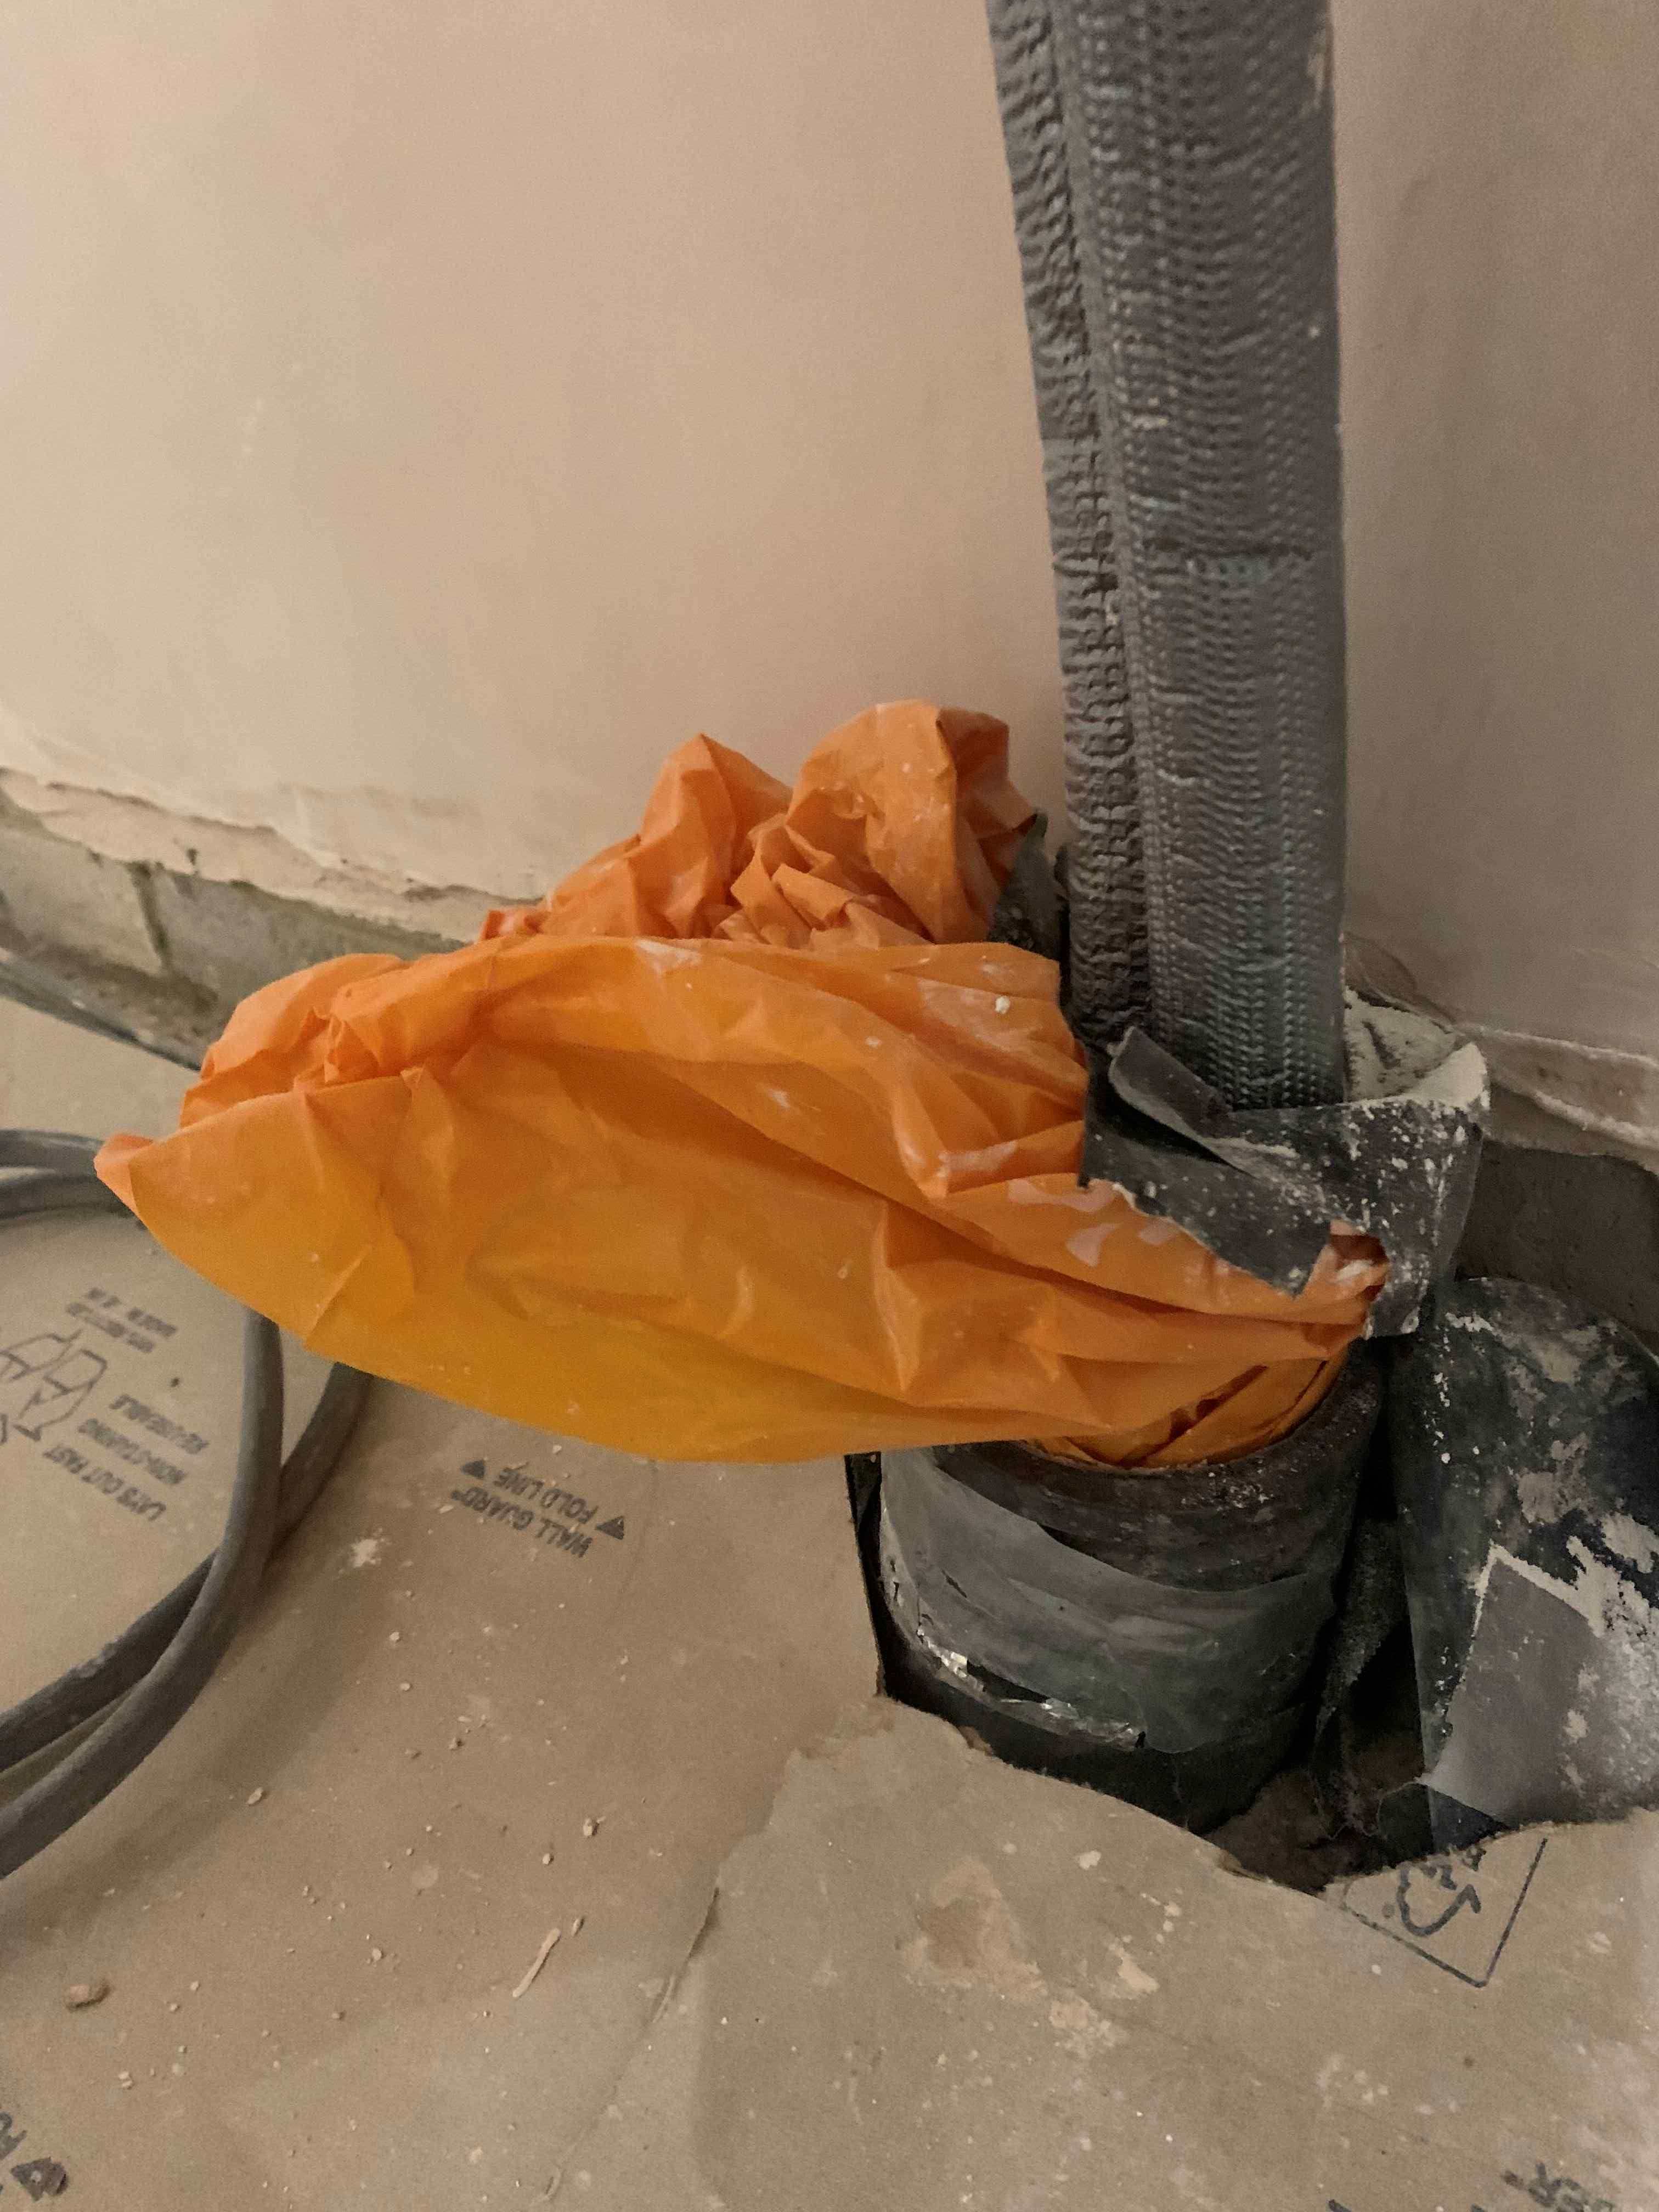
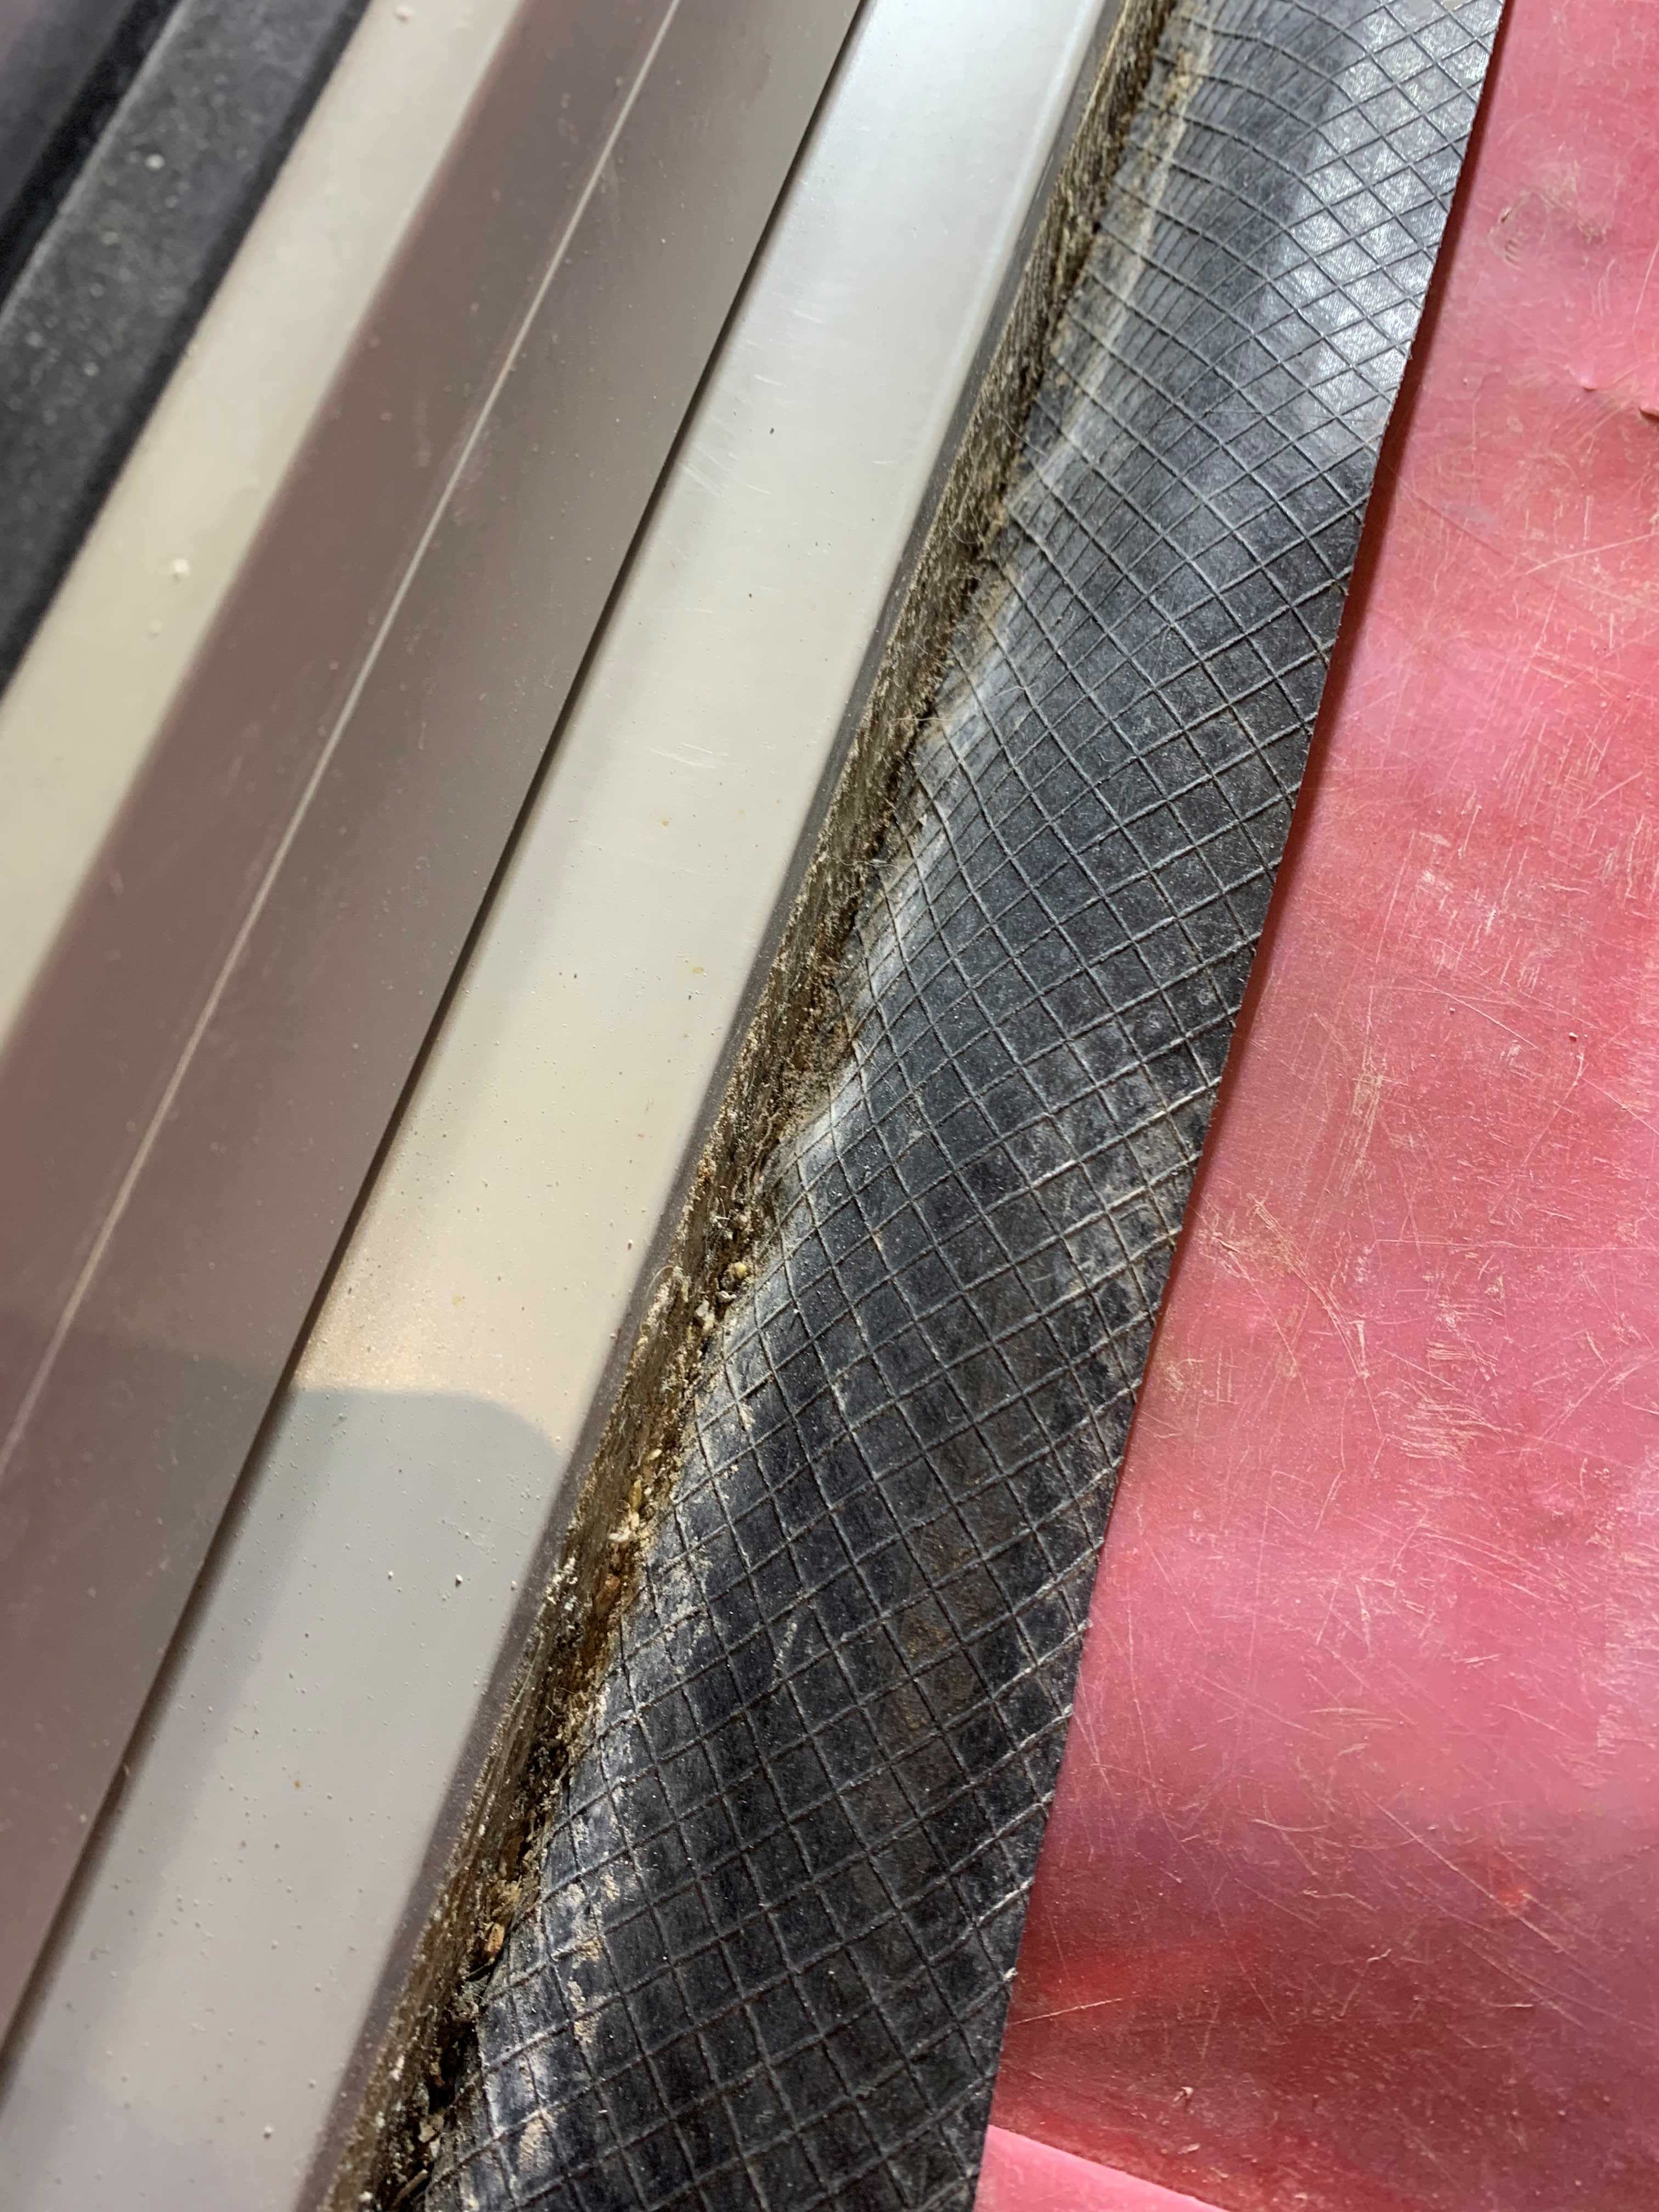
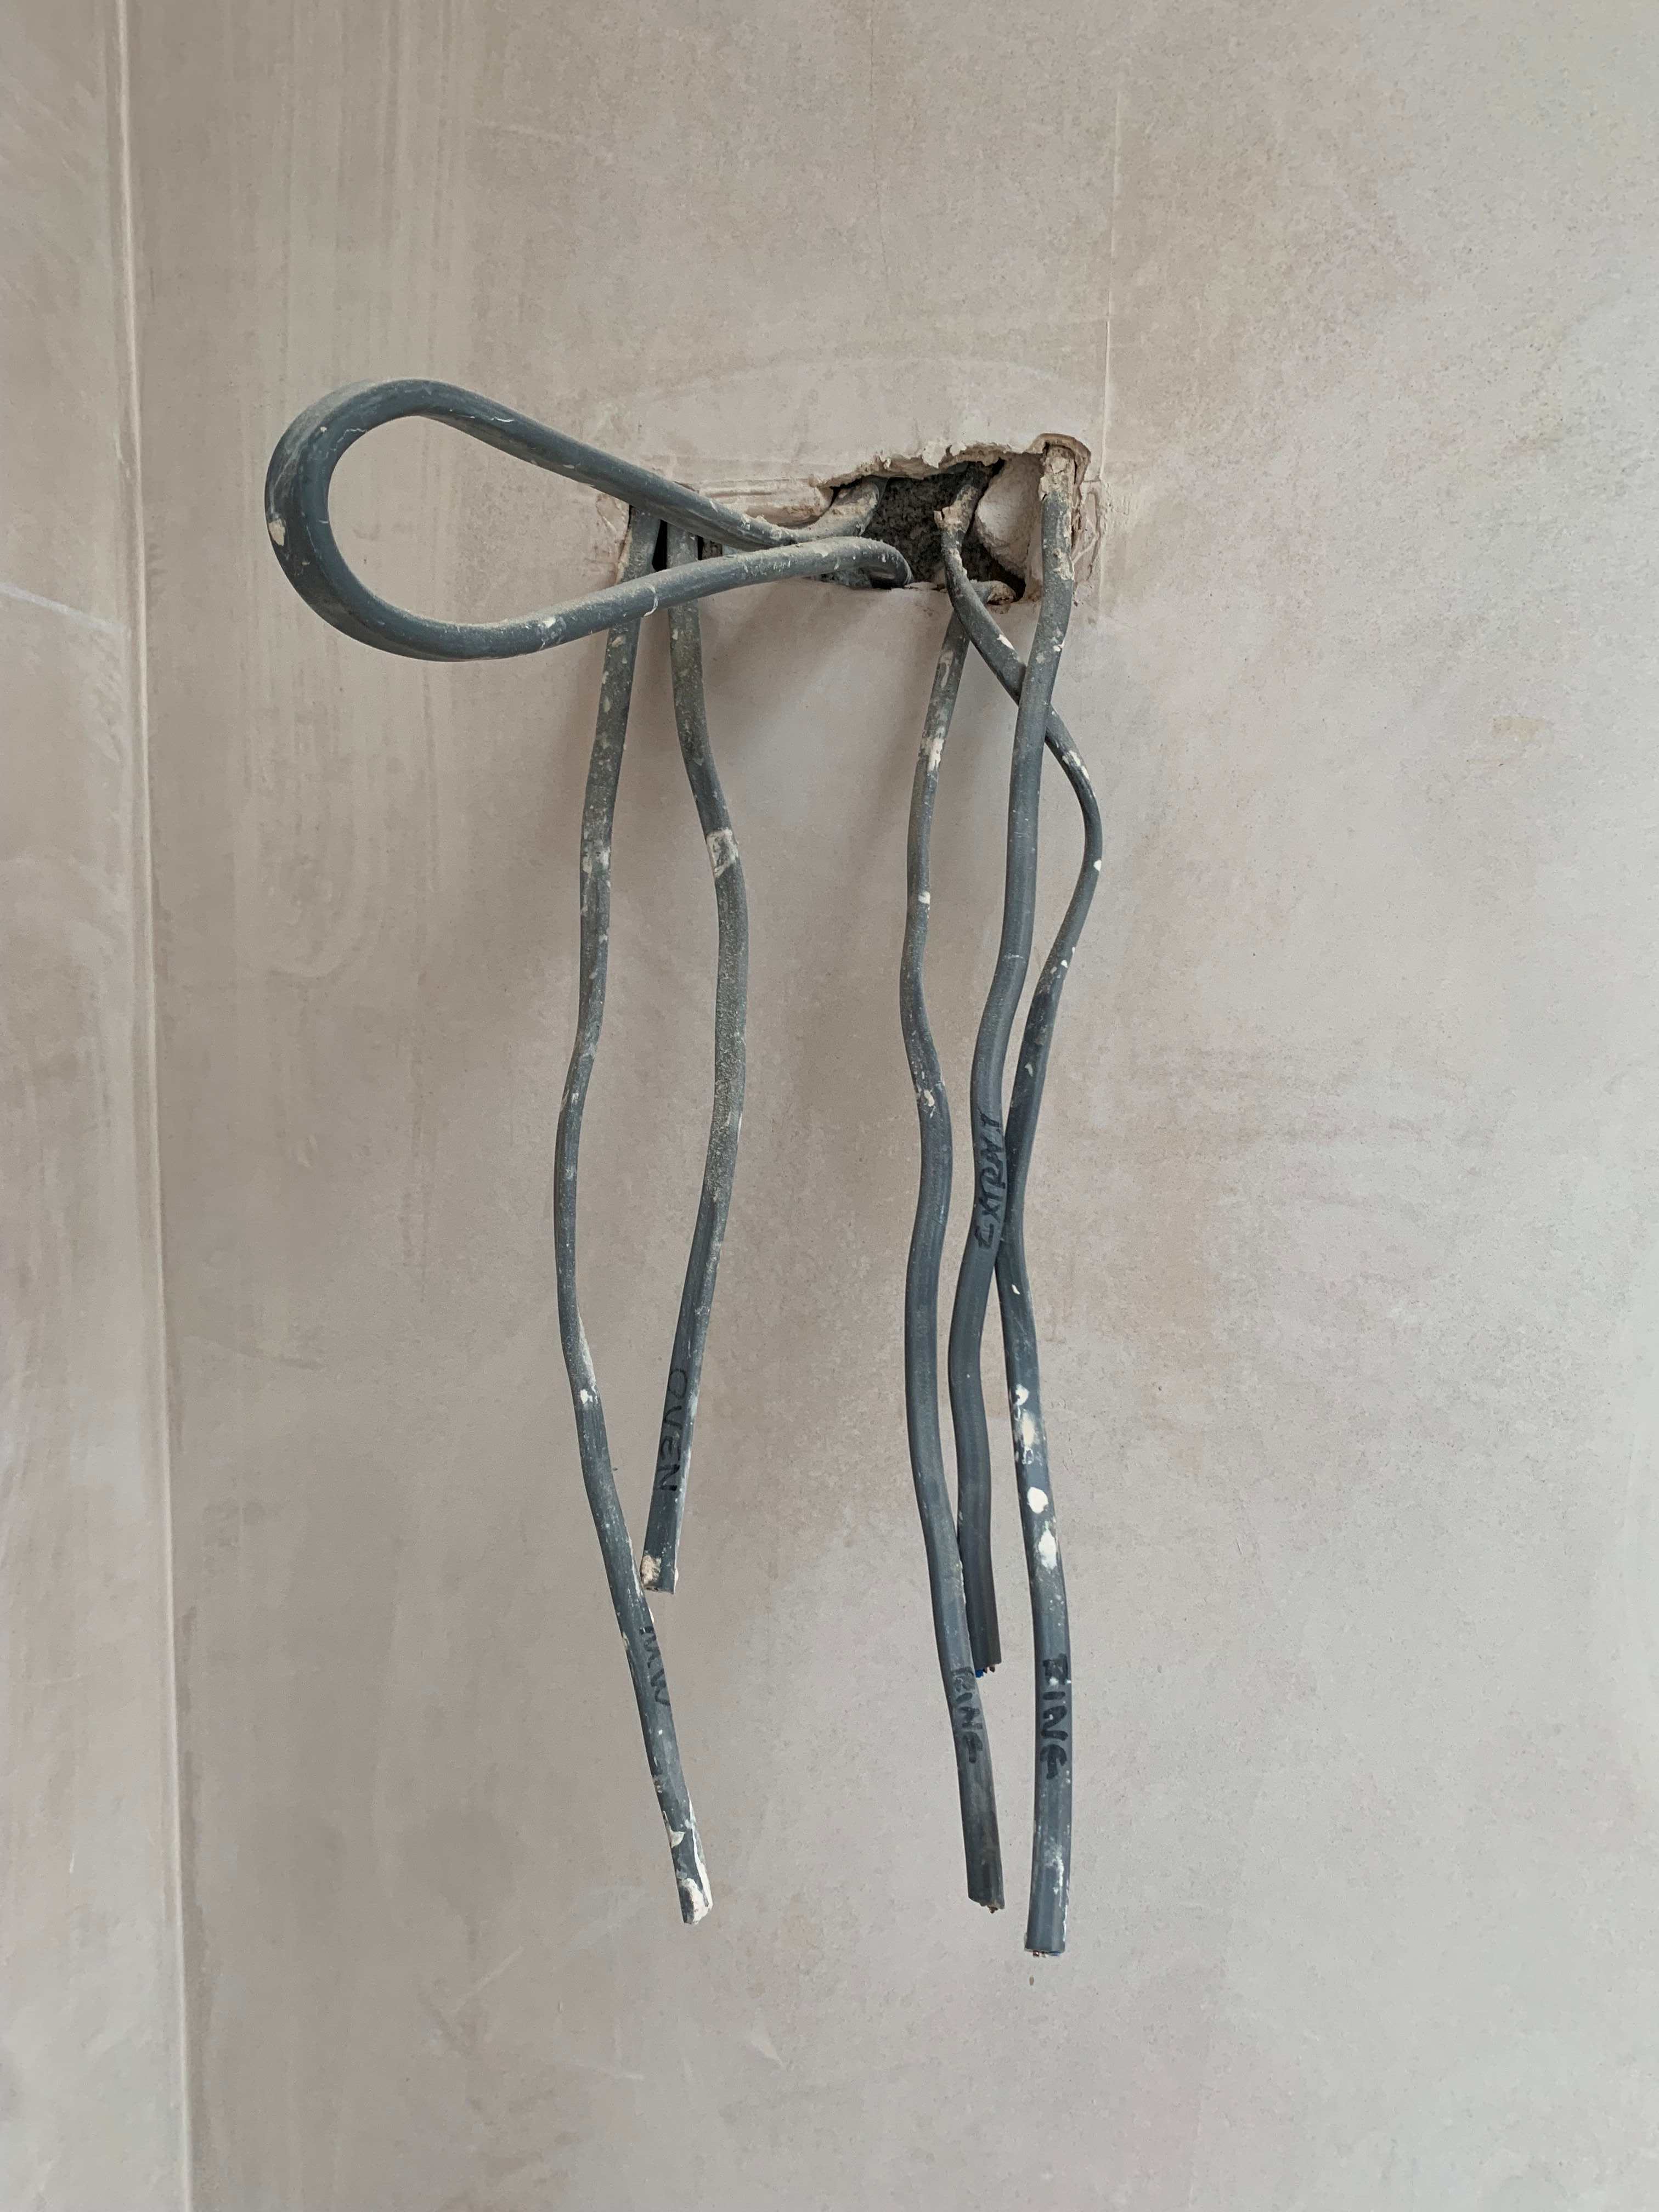
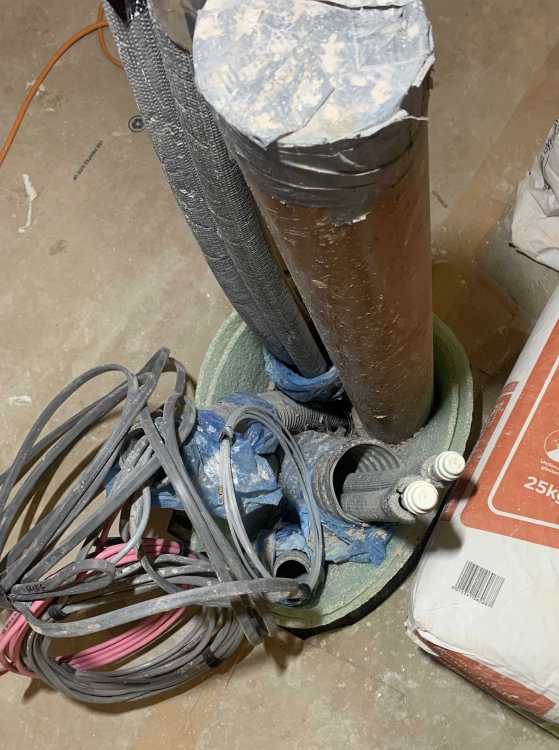
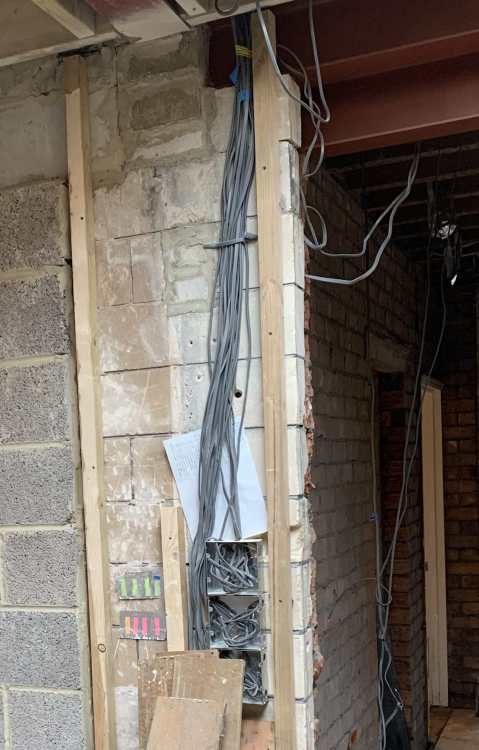
oh sorry Craig or others, just thought of another question(s)... I have a set of twinwall flexible conduits and a 110 drain pipe coming up under the kitchen island position carrying insulated water pipes and cables etc. Therefore these come up through the concrete. Is there something I should do to try and seal up the top of the surrounding hole around the conduits. I can't say how well membranes were cut and sealed to the conduits - knowing our builder probably not perfectly. Q5 I guess definitely not a good idea to use floor leveller there for fear it all runs down the hole into the insulation layer ?! Maybe try and practice my insulation carving again and try and cut some 30mm XPS slab to fit around the pipes ? What do people usually do for this ? Q6 Re conduits themselves with pipes/wire coming out under kitchen units etc - any need to seal the ends around the pipes/wires to stop air moving along the pipe from colder levels ? See pics

-
OK. Around half of the room/extension perimeter one of the builders cut off the vapour barrier to slab level as soon as the concrete slab had set. I caught him before he could do the other half. The Architects drawing was for it to run to the wall behind the skirting and get plastered onto the wall, although the plasterers thought that daft. The 25mm edge PIR is inevitably tightly pushed against the inner leaf blockwork by the weight of the concrete pour, so I guess not much chance of any colder air from below the concrete making it through to the room anyway. Certainly over 2 years of of it being in place we have had no sign of any such issue or condensation or anything. Fortunately the radon barrier was run into the cavity wall and up to join the wall DPM so no-one could cut that off. Just googled whether PIR is vapour permeable and got this AI response... So I guess slightly better to do as you say, but if the flooring people want to cut it off it shouldn't be a problem ?
-
Thankyou. Any input on Q3 ? I am relieved to see stickslike***t doesn't come in brown.
-
What size electrical cable for oven and hob?
Spinny replied to Great_scot_selfbuild's topic in Electrics - Kitchen & Bathroom
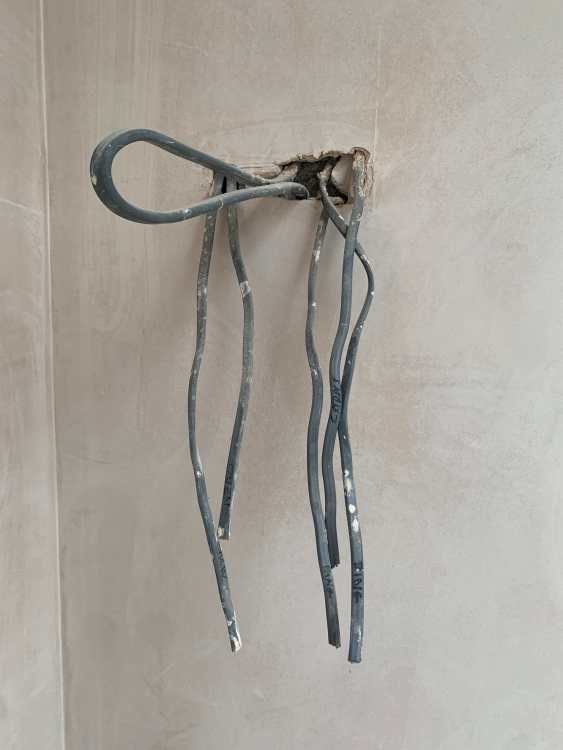
OK looks like I have a 10mm for the hob, two 4mm for the ovens, 2.5mm ring main tails, and a 2.5mm spur to the extractor. (Had thought the oven cables might be 2.5mm as the labelling is obscured and 4mm is only 1mm thicker than 2.5mm externally) Can't find the consumer unit ends for the ovens at the moment but they must be tucked up somewhere. Island has ring main, and a seperate 4mm for the quooker tap, plus a lighting cable for the LEDs. I have a kitchen radial with 9 double sockets and a single on it, as they seem to have moved away from ring circuits everywhere. Ideally I need to find a vertical double socket because of limited room to recess into the kitchen island end panel, if anyone has seen any ? -
Any thoughts on this one folks ?
-
What size electrical cable for oven and hob?
Spinny replied to Great_scot_selfbuild's topic in Electrics - Kitchen & Bathroom
I posted an overlapping topic here where same points were raised. I started by using an online cable size calculator of which there are several, for example... https://www.tlc-direct.co.uk/Technical/Charts/VoltageDrop.html?ad_position=&source=adwords&ad_id=756345223846&placement=&kw=cable size calculator uk&network=g&matchtype=p&ad_type=&product_id=&product_partition_id=&campaign=ROAS_Cable&version=finalurl_v3&gad_source=1&gad_campaignid=22639595510&gbraid=0AAAAAD-6GhlR4kPPUV4W9EpyDAKmslWFR&gclid=EAIaIQobChMIjbnsqKXgkwMVDJNQBh3_pS37EAAYAiAAEgKbAPD_BwE Obviously these cable calculators are misleading/wrong because they completely omit the diversity allowance in the regs. (Not sure whether this is a deliberate play to sell more cable ?) In reality I suspect most cables run through a mixed route e.g. mine go through a sound insulated wall cavity, a ceiling void, and through a channel in a chased and plastered wall. A domestic kettle is 3kw or 13A of course, and presumably draws that continuously until the water boils. Commonly used on any power socket on a 30A ring main using 2.5mm. Interesting to reflect that 3kw is the same as my single oven which will commonly be used to cook at 160-220C, so I imagine would draw full power until that temperature is reached - I guess perhaps 10-20mins. I guess for two ovens or a double oven you could have around 6kw or 26A whilst both on so would justify a dedicated circuit and may debatably be 4mm ? A single oven would seem to be more than fine on a dedicated 2.5mm ? -
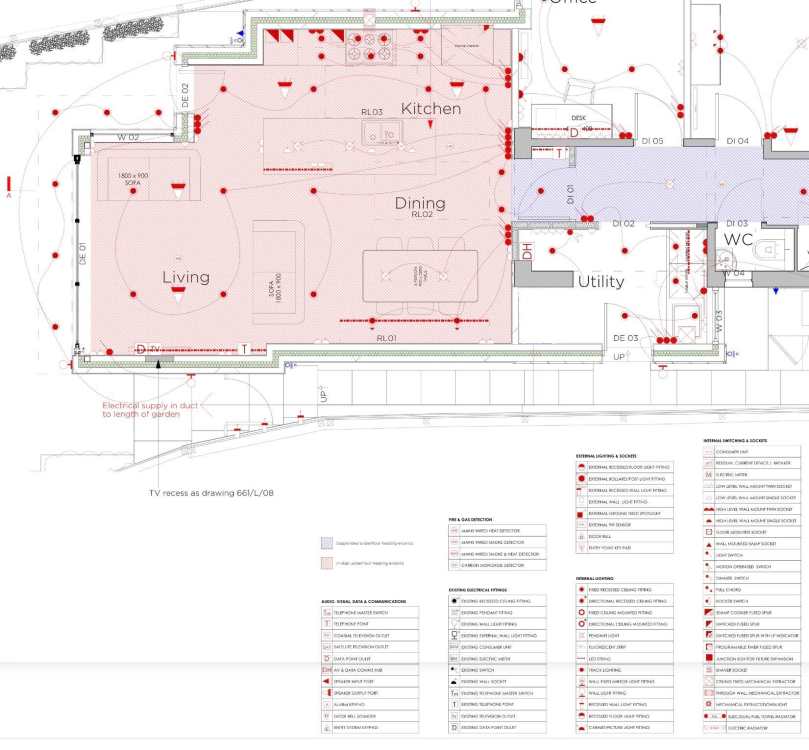
Extract from a tender drawing attached. Not sure where the list of symbols comes from. We marked up a drawing ourselves with what we thought we wanted having been told there would need to be an electrical plan to quote against. Our architect, and I guess many, did not offer any kind of lighting design service. Architect did put us in touch with an M&E specialist that I had a chat with but ultimately decided to do without. He seemed to cover the full monty of building M&E from a full life cycle perspective, i.e. considering maintenance as well as design and install. e.g. How are you going to clean your rooflights if you have a roof you cannot stand on, and no window to climb out onto the roof from ? As said above the plan tends to change with first contact with the enemy, but as with the military only a fool has no plan and it is the planning process that counts and helps as you see the shell and make changes. We ended up with our own directly contracted sparky and his quote had a cost per switch/socket type breakdown, but in the end it got messy and we just paid him as we went on a time and materials basis. BIG TIP - Make sure you marry up your lighting plan with the structural engineers beam and joist plan. I think almost no-one does this, we didn't. But you can't put a downlight into a steel beam, or a ceiling speaker into a joist etc. Can get bloody complicated staring up at the actual beam and joist layout and trying to work out how the hell you can distribute your lights sensibly. Got the chippy to modify some joist work to make room for lights over the worktop. Had a LOT of seperate lighting circuits and switches and roughly twice as many downlights as attached. Made my own numbered list of lighting circuits and stuck a square or oblong of alu tape on the wall where we wanted them with circuit number for each switch. I think lighting is difficult - lumens/sqm, beam angle, colour temperature, CRI, circuits, layout, dimming, CCT, baffles, plaster-in, led tape. PS don't forget garden lighting.

-
Grand designs: off site construction
Spinny replied to Post and beam's topic in Property TV Programmes
I suspect that someone like Elon Musk could be capable of changing house building. Would seem to require an awful lot of careful engineering work to define a modular construction system and automate the production of modules at scale. Compare a car production line or modern automated manufacturing plant to what you describe and there is a vast gulf. It would take a massive investment, and while Americans were willing to provide Musk, Bezos etc with huge unlimited funding and a licence to make losses for a decade or more to get electric cars, and Amazon, I doubt such a tech investment mania could ever be created for automating housebuilding. I think there are many ridiculous things about housebuilding including the complete absence of service void planning. If you see what goes on today in say aerospace engineering design, it makes domestic architectural design look like it is in the dark ages. The only thing which I guess comes close is in mass building where companies throw up steel frame and modular concrete panel multi-storey blocks of student accomodation or tiny flats for rent. It is a strange world where people knocked down 60's tower blocks that became slums, but now build modern equivalents that will also likely become slums down the line, and where houses built 100 years ago give people more space to live than they do today. -
I had to have a stone block replaced at a corner after the builder broke it with an SDS drill. The load on the steel lintel above was propped and then the stone block removed and replaced. It sounds like you have different answers from different pros. On another issue I had the builder, structural engineer, and architect all giving different guidance with an issue - it is very annoying as a customer. As it was a new build issue I wrote to the architect setting out the different viewpoints and defining the different options proposed. I also stated my priorities - in my case certainty over the builder being able to do it successfully, and structural strength over loss of insulation. The architect then replied agreeing to compromise the insulation and proposing some insulation on the outside. So we had a documented way forward. As your issue is NOT new build, I'd suggest a formal written statement/agreement from your structural engineer is needed covered by their insurance. What you don't want is a structural issue later and no recourse because it wasn't signed off by a qualified structural engineer. I am not saying it is happening here, but sometimes tradies just talk their own book e.g. quick and easy job to fill, PITA costly and delaying job to replace blocks. Obviously it is standard practice to insert lintels to create whole new openings underneath. Yes there can be some shims involved, and someone who is a builder can comment on how well blocks bed down onto the top of the lintel. I think there can be some settlement ? Has the structural engineer considered the insertion of a lintel or two into the wall to bridge the compromised blockwork ? PS I aint a builder or structural engineer, just one builders mug = customer. Make sure you get a solution that should stand up for an insurer with an SE's name on it.
-
Fix something else in place above the doors that disguises, draws the eye away from, or covers the weep holes (heaven forbid) - a canopy or brise soleil, a light or lights, a whispy climbing plant, trellis, a hook(s) for a patio sail, a hanging basket, a rod, an ornamental bird, a plaque etc
-
Well I tried Geocel painters mate on a junction between plaster and rooflight frame. Didn't like it, I might have to try and pull it off again. Kind of like a bath sealant that goes off 3 times faster - might be ok for an internal corner, but bit of a nightmare to smooth out with a finger on a flat junction. As for plaster against glass on the other rooflight - think it will have to be painted as is, but not sure about my cutting in on that.
-
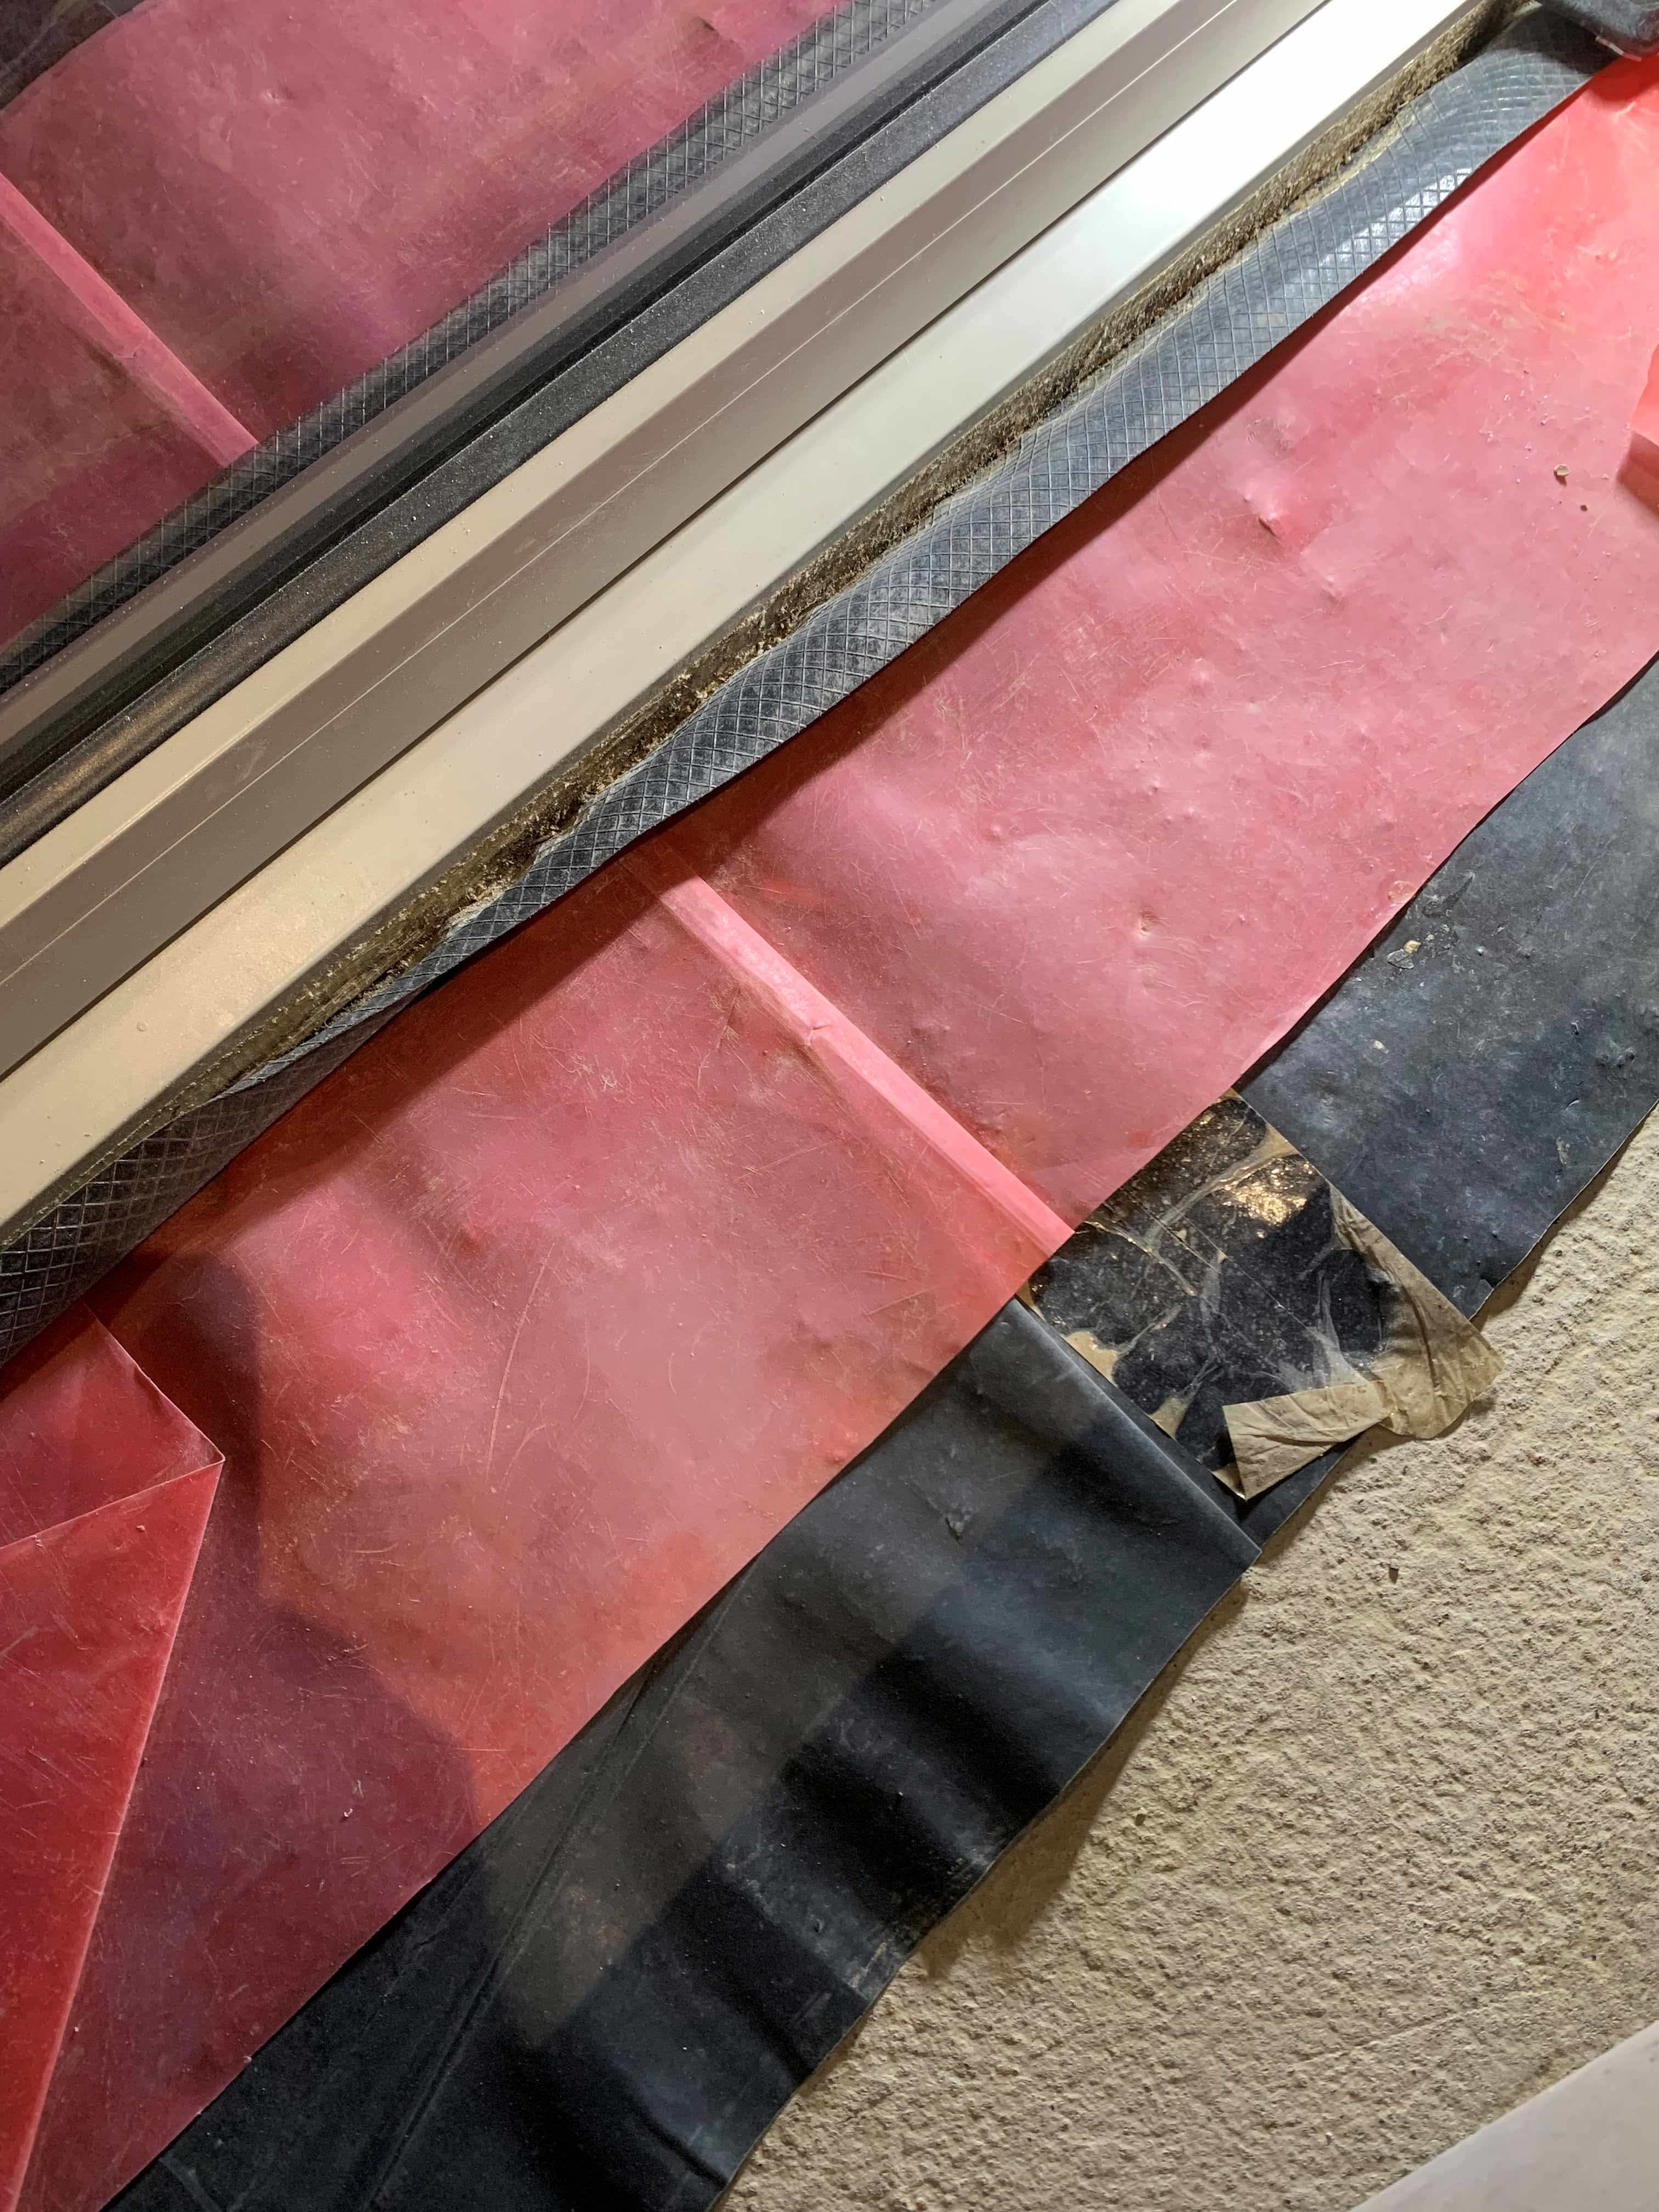
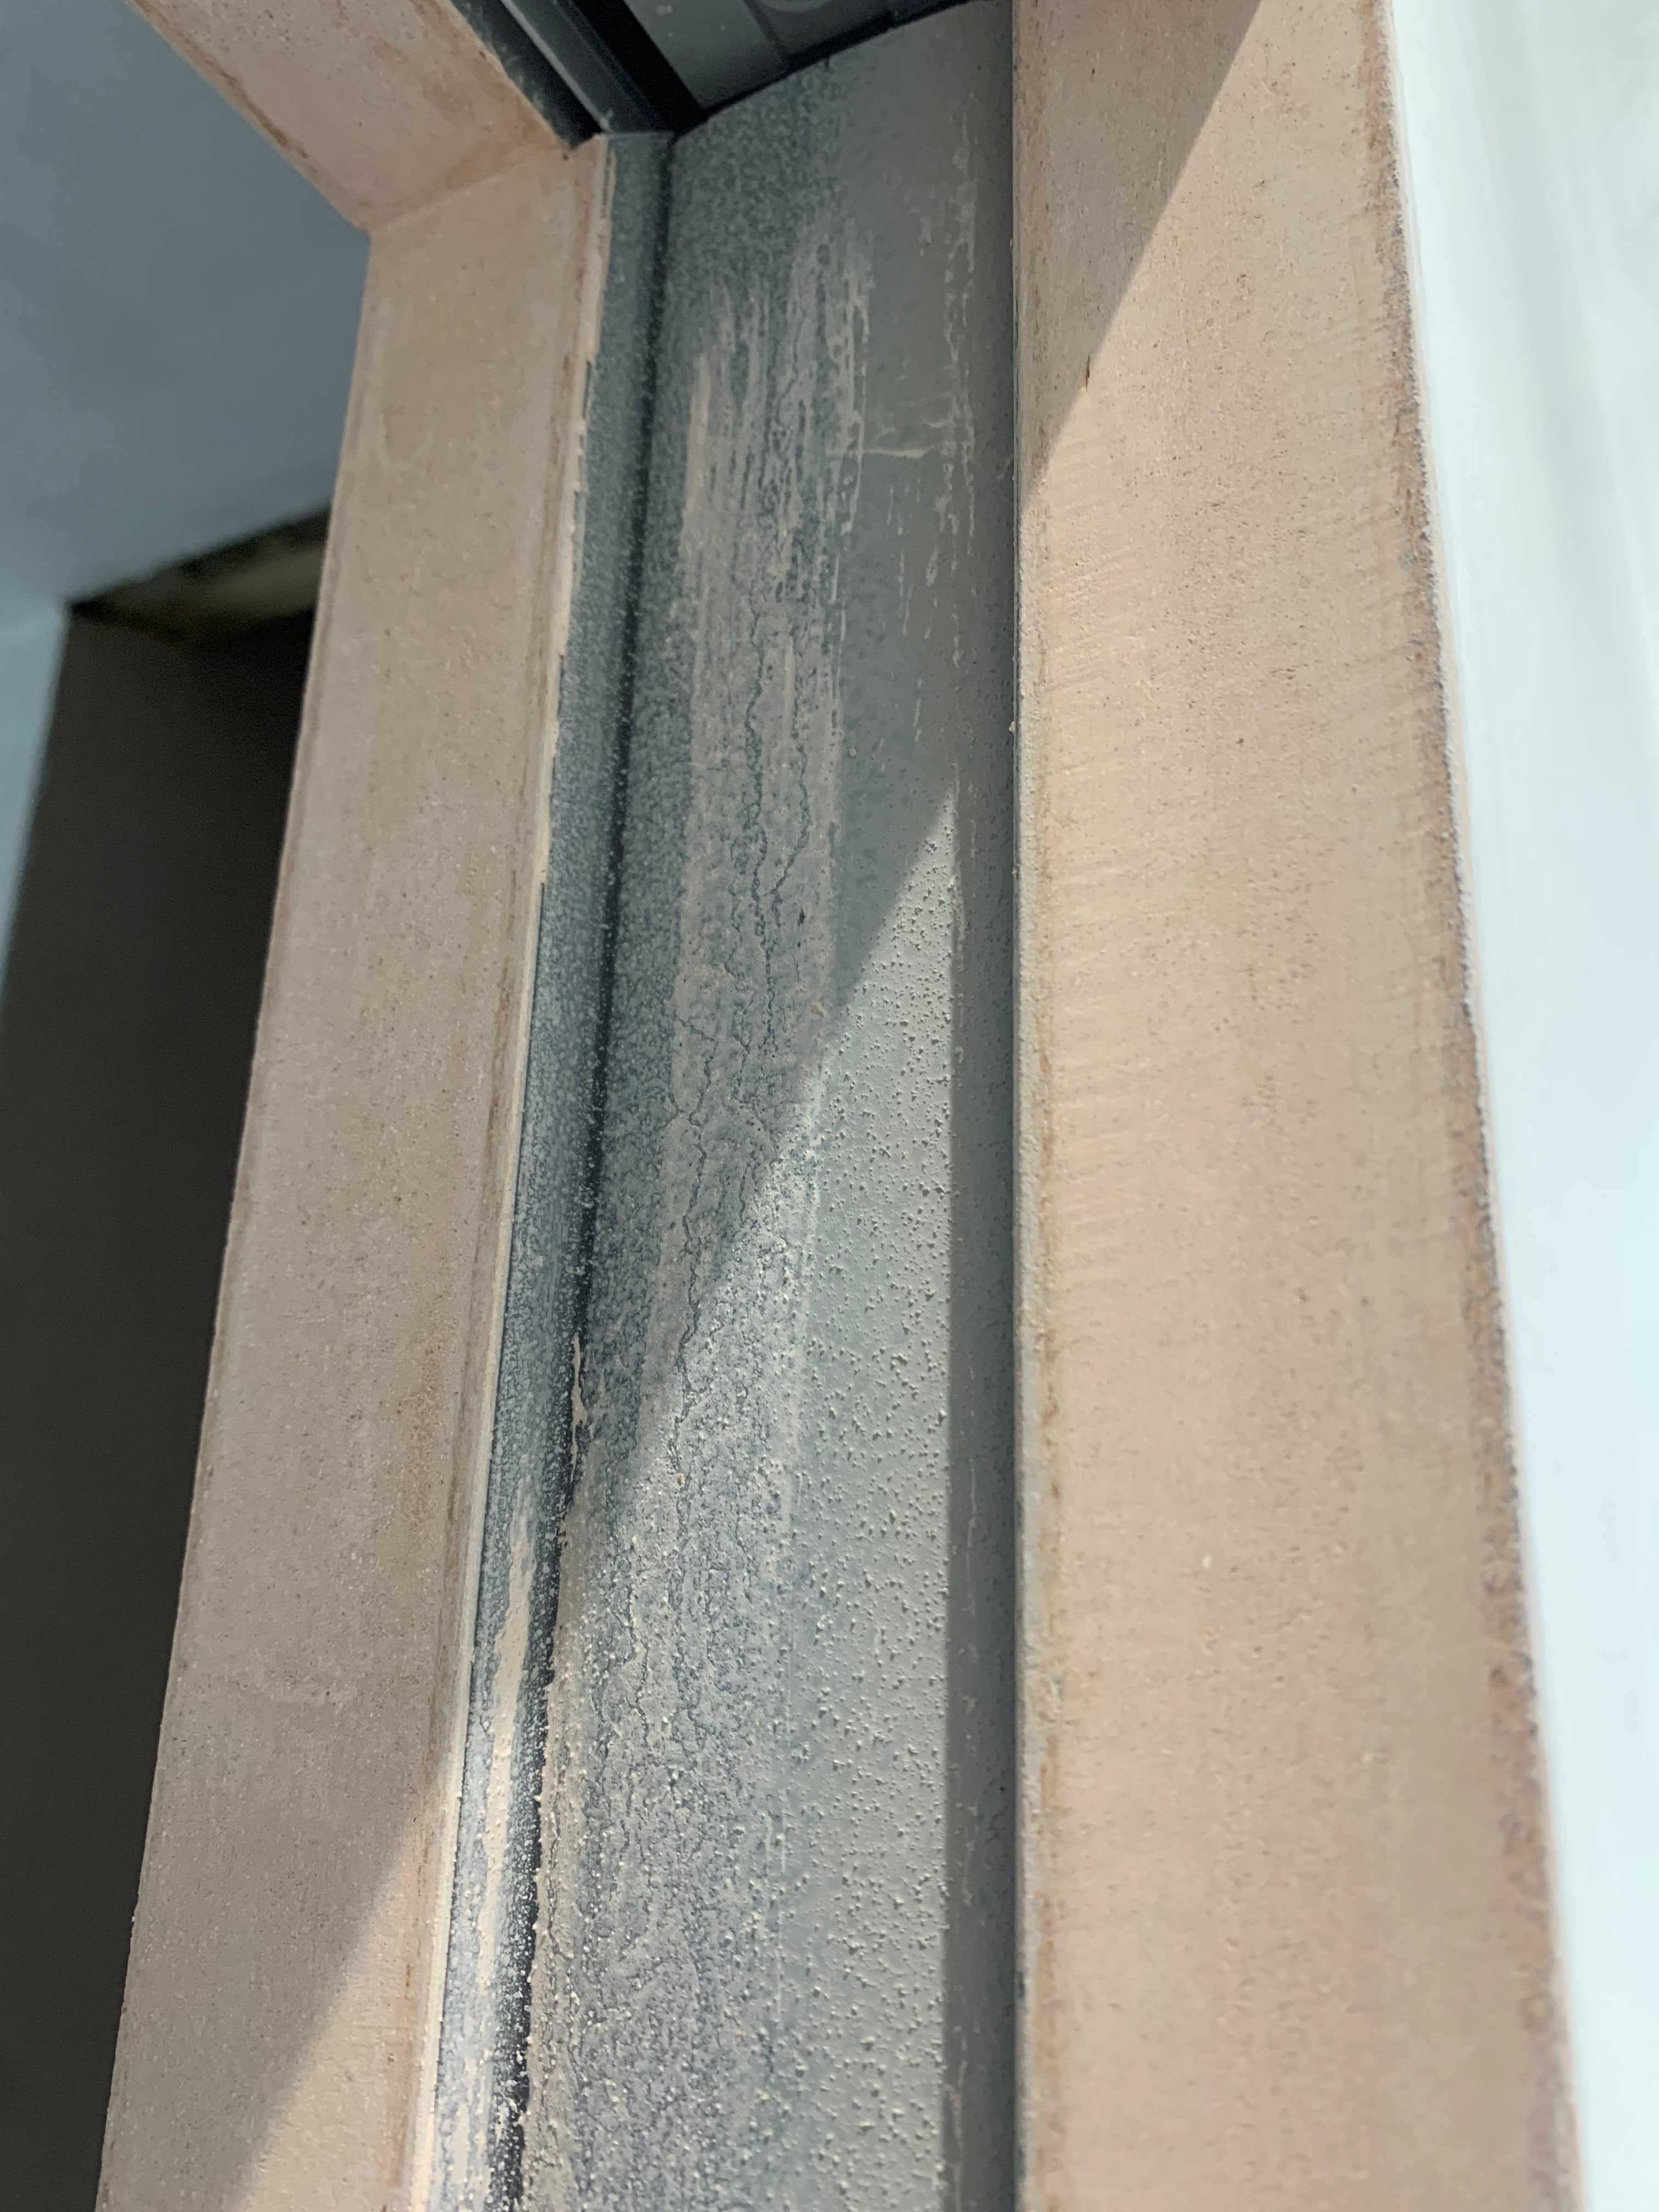
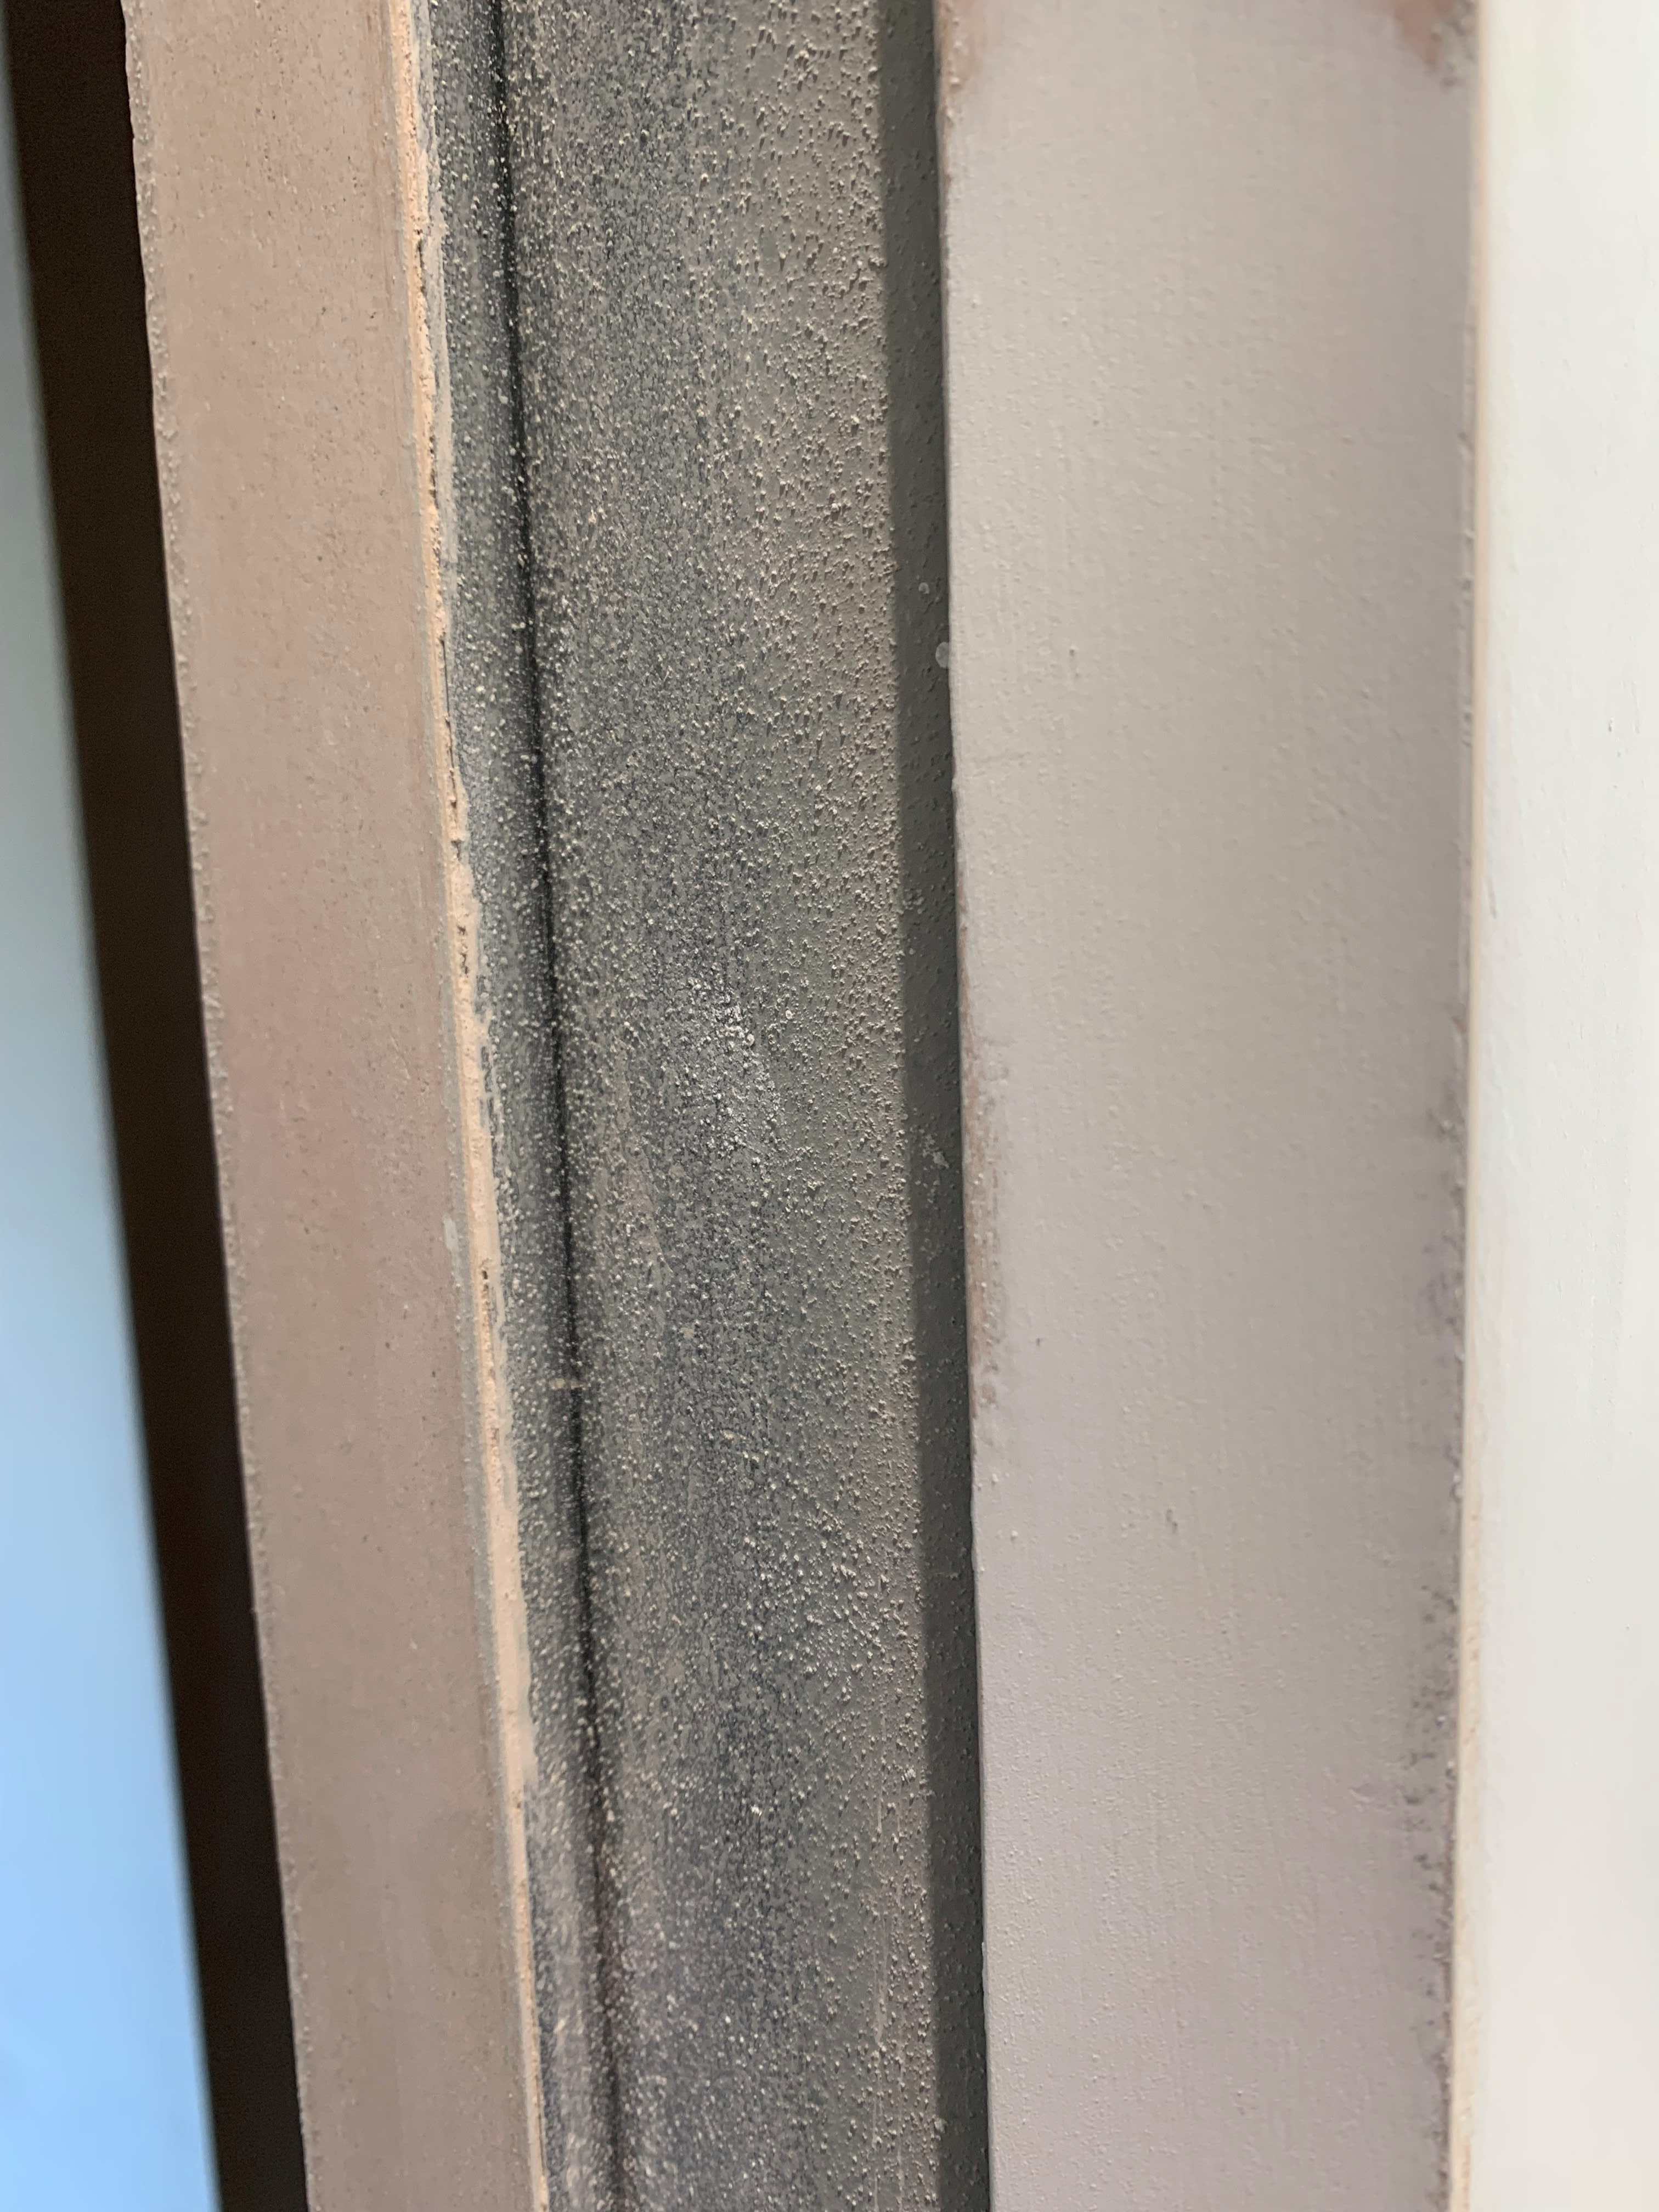
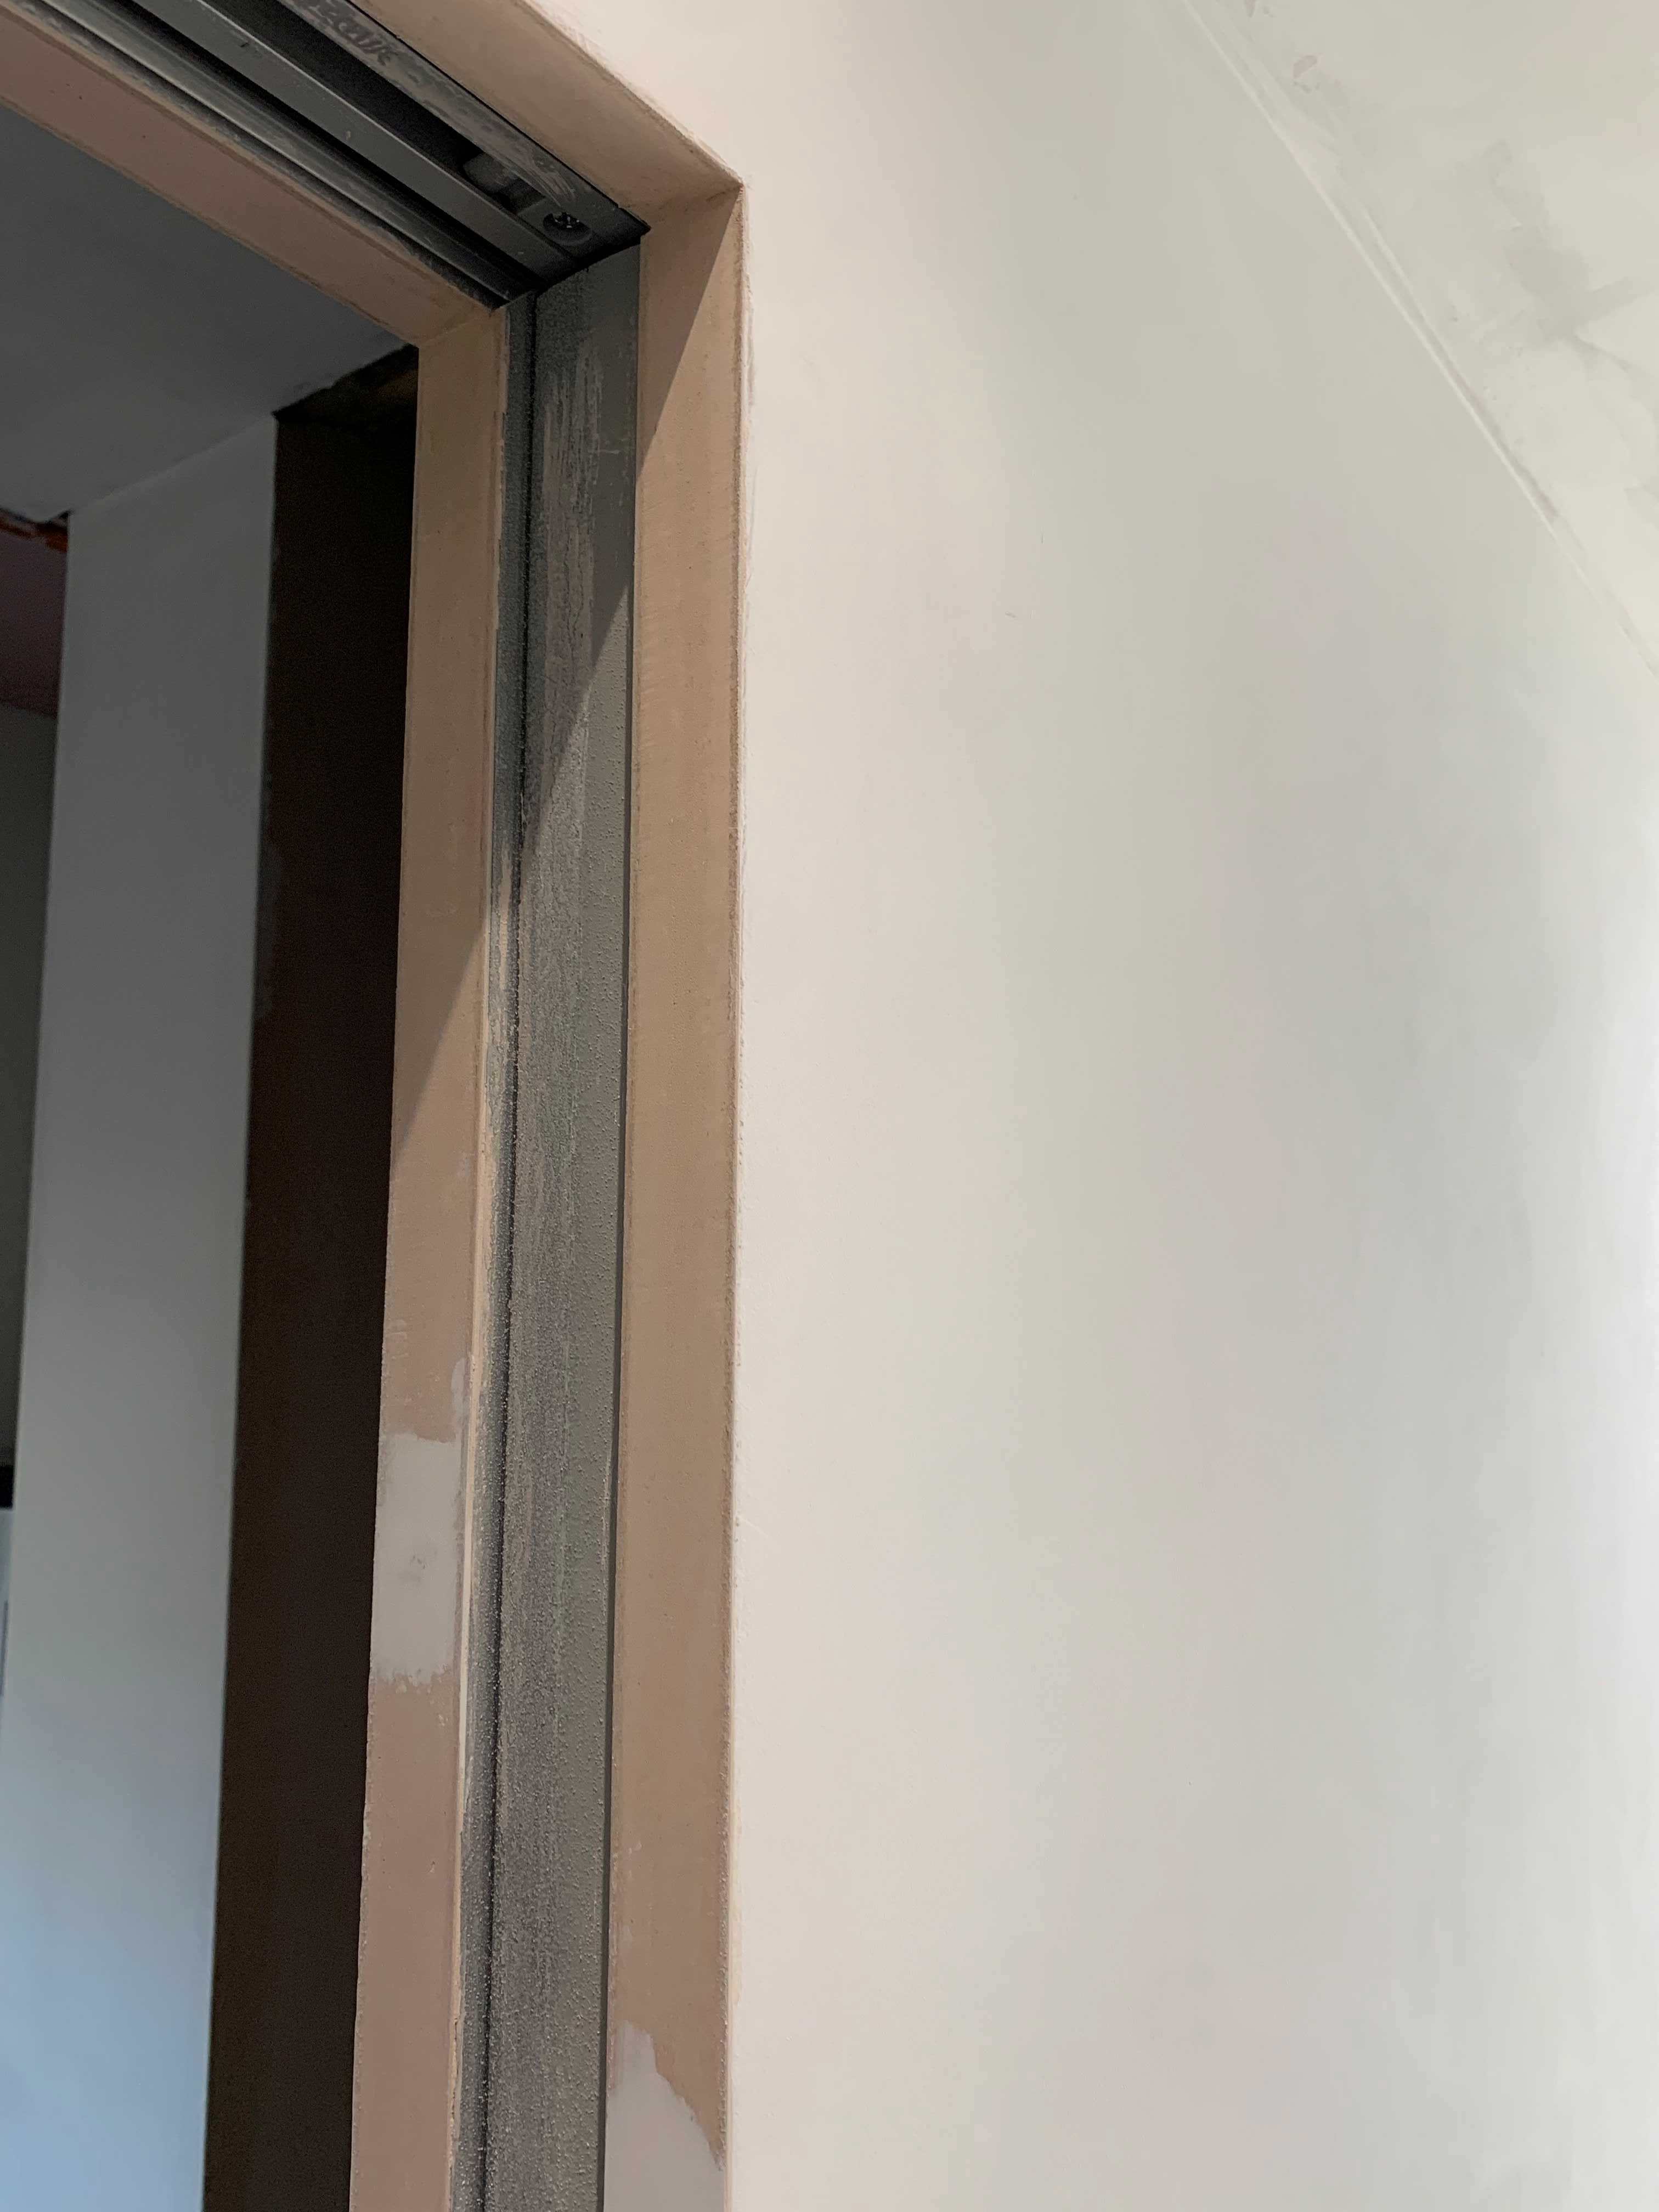
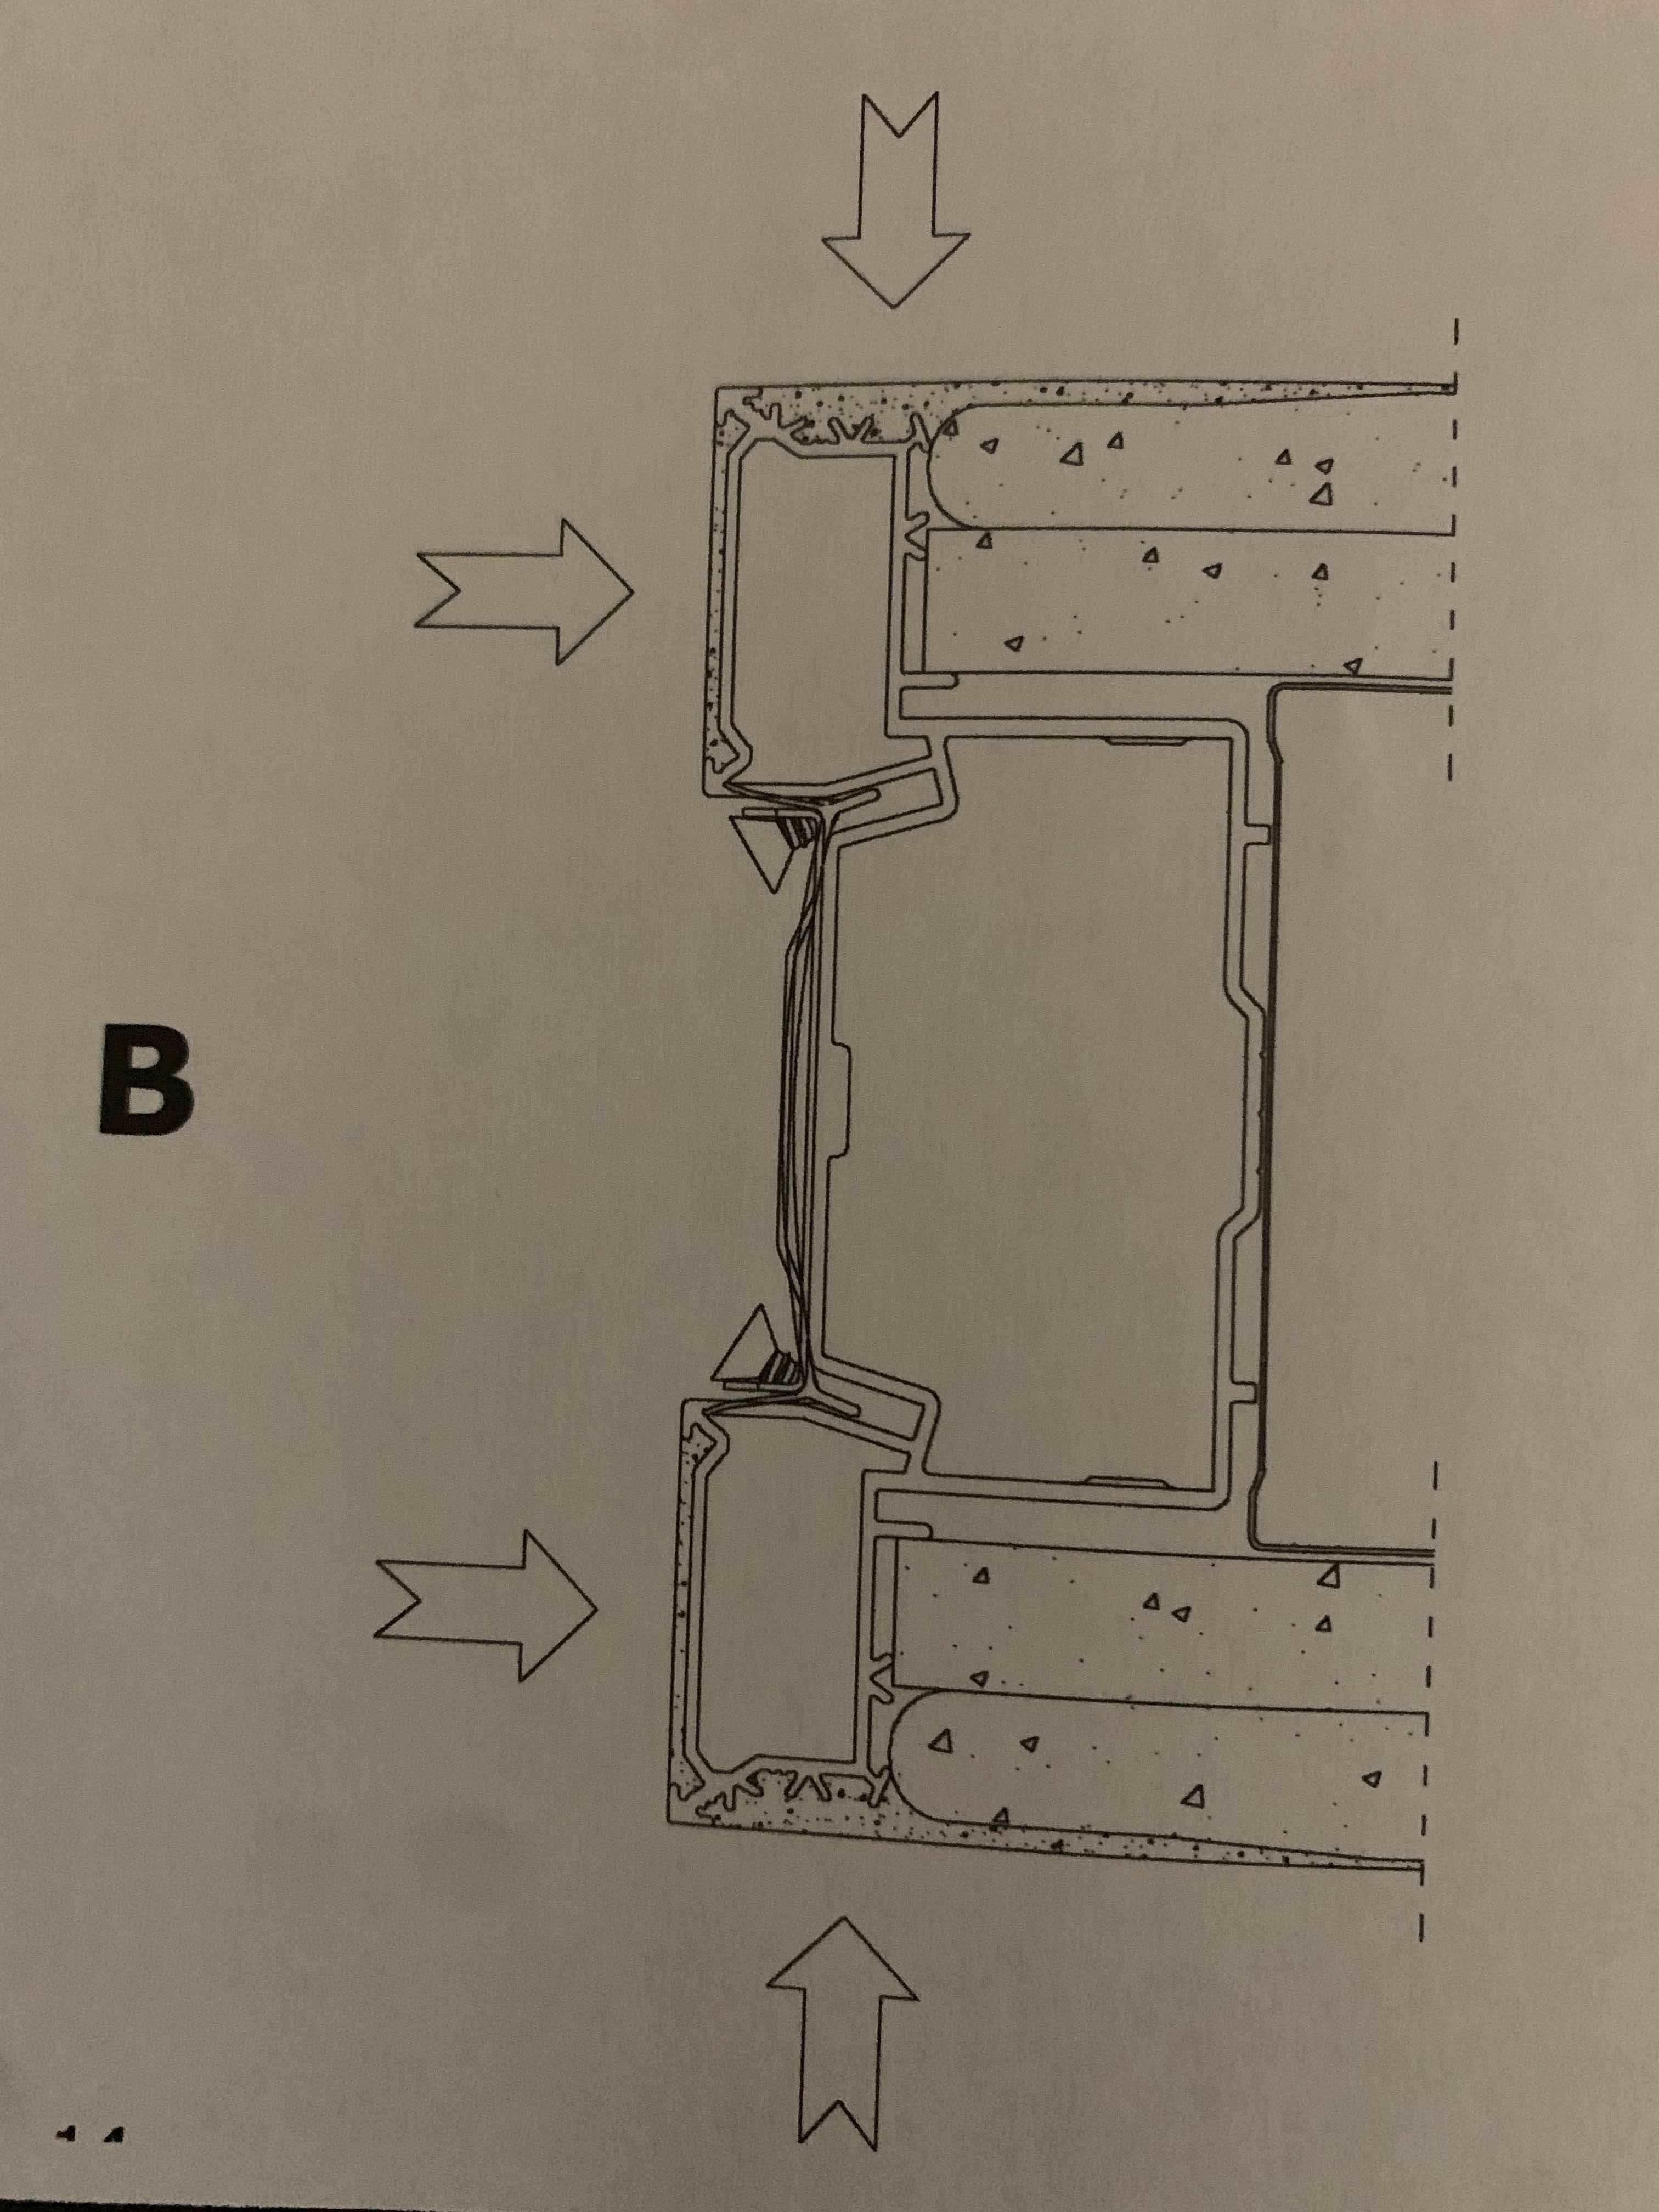
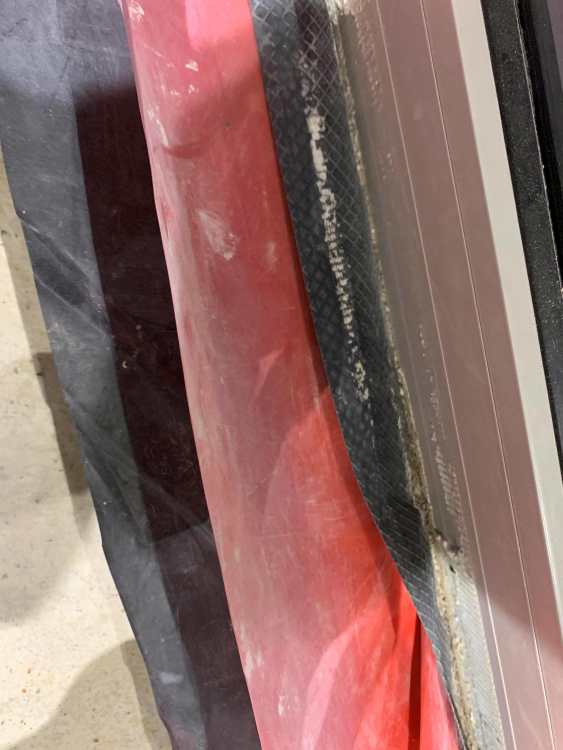
Hoping to have the flooring peeps in soon. Wondering how I should prepare the various membranes poking out at the windows and bifolds. (See pics) 1. The window people put a piece of DPM under the bifolds and floor length window. They used double sided tape to stick it upwards against the inside edge of the frame/threshold on the inside. Naturally the DPM has pulled away from the tape and the tape has become gummed up with dust and crap and is no longer sticky. Should I scrape and cut the tape off the frame/threshold, and then what should be used to restick it ? 2. The floors radon/dpm membrane is directly alongside the window DPM. Thinking of sticking this to the window DPM, and then the floor levelling compound should run up against it when they pour it. 3. The black vapour barrier is then on the inside of the 25mm PIR edge insulation. Either I cut this off at the current floor level and it gets covered along with the edge insulation by the floor leveller. Or I try and cut it down to fold over the top of the edge insulation and then get covered, possibly sticking it too to the radon/dpm. 4. The window DPM has got a short 20mm cut in it just outside the window - how do I repair this ? Many thanks.


-
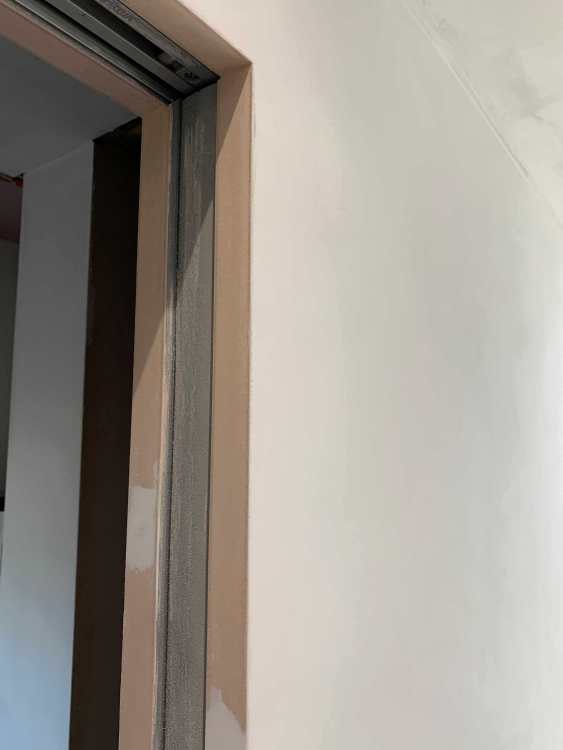
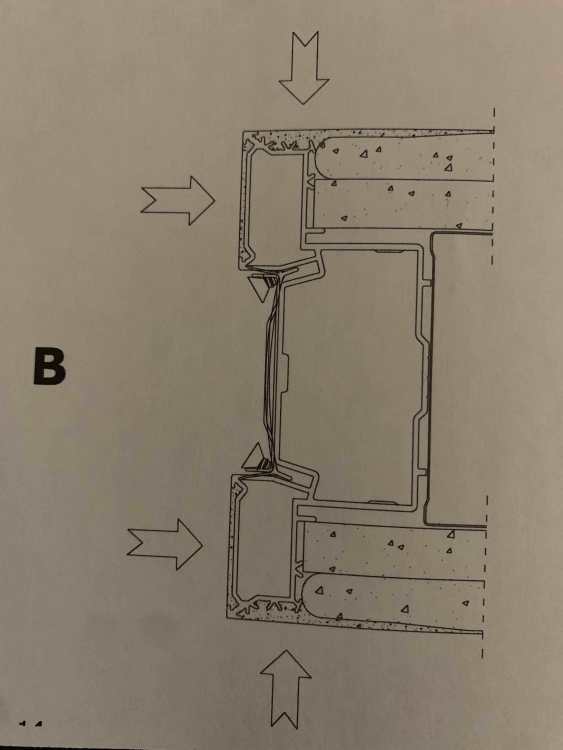
Any ideas on how the closing recess on my Eclisse Syntesis Architrave less pocket door is supposed to be finished ? The diagram in the instructions appears to have some kind of corner buffer in it - but absolutely nothing to say what or how this is installed in my instructions. And the recess is just a textured metal finish - is the inside supposed to be plastered too ? How would it work if you wanted to install a lock in the door with one of those hooks that drop down ? See Pics.


-
Good point. Does anyone ever turn off the power and water when they go away these days ?
-
Thanks. Unfortunately my experience has made me rather paranoid. Builder's plumber left me with plumbing problems, builder's brickie built in an arc under the bifolds, builder's plasterer couldn't hardwall, builder's timbers were bent, builder's roofer couldn't roof, builder had wrong 3.6N blocks delivered, builder's groundworker dug part of the foundation in the wrong place, etc etc etc. 100% 'Trust a trader' left the room a long time ago. Fortunately I have always had my own sparky. I do appreciate there are plenty of good uns out there too, as shown by the stuff you see built. But the paranoia won't leave me. Never-the-less tea, cakes, and eternal goodwill endure.
-
OK, not sure what regs say about peak loads vs continuous ? Not keen for a family Christmas meal to trip out the circuit.
-
The main cable is 10mm. I am actually wondering whether this is sufficient - i.e. for an everything on scenario. Hob 11kw, Oven 3kw, Mic Oven 3.6kw, Warming Drawer 0.8kw - Total 18.4kw or a massive 80Amps at 230V. Now the warming Drawer and the Mic could go on the ring main I guess but still leaves 14kw peak power, albeit only with all hob boost zones on - very unlikely but would still be 61A. Fortunately I do have underfloor conduit coming up in that area. Think I am going to have to question the sparky.
-
Anyone recommend a good flexible decorating sealant tha takes emulsion paints e.g. to use at junctions such as plaster and rooflight, skirting/architrave and wall etc etc
-
Yes it is massive. The induction hob has mutiple boost zones on it = max 11 kw. Unfortunately it is looking like the cables come out of the wall at the bottom of the cupboard position, so the switches will have to be behind whatever we put in the cupboard. Don't suppose you can get smart home grid switch modules that you can turn off remotely ? Switch Bot maybe ?
-
I was kind of expecting that kitchen companies would have this nailed. If they are installing maybe 100 kitchens a year you would think they would have a neat, tidy, ultra aesthetic solution. I may be pedantic but I was expecting there would be some approach where we would end up with a neat labelled brushed steel grid switch flush with the back or side of the cupboard. Time to get the kitchen drawings out again. I think there is a 15mm service gap behind the cupboards. So by chiselling off some plaster I guess we might possibly get 33mm to recess most of a back box ?
-
As it 'threatens' the sub station, maybe with a suitable bit of blarney the electricity utility company might take them down for you ? Also check with council that you can cut and remove them - sometimes you need permission granted which avoids any friction if someone were to complain about your unapproved tree work. Some places are conservation areas where you can't just cut trees down, also there can be tree protection orders. (Warstory: We had a beautiful mature and healthy tree at the bottom of our garden on the edge of a nursing home property. Provided screening and looked fantastic. One day I came back from work to hear chain saws buzzing - thing had been chopped down. Some old bloke in the nursing home kept complaining to the warden about the tree, eventually they got a tree surgeon in that proclaimed dangerous fungus found at base and chopped it down for a large fee. After local complaints the LA have now put tree protection orders on all the nursing home trees.)
-
Now, had you used habito plasterboard...