Spinny
-
Posts
923 -
Joined
-
Last visited
-
Days Won
1
Everything posted by Spinny
-
Thanks All. The main achievement of the last 3 years has been to transform a domestic house into a small building merchants ;0)
-
Have a load of offcuts of PIR insulation to be disposed of - can I just bag it and take it to the local tip ? (can't see any instructions on their website, and I know they get funny about plasterboard etc.)
-
Plasterboard Fixing Failure at Window Reveal
Spinny replied to Spinny's topic in Plastering & Rendering
Thanks for that. Present thoughts from the guy on site is to use metal frame ties, bond one end (the bent end) to the block wall with resin, and screw the other end into the vertical corner timber. Then fix the plasterboard to that. https://www.toolstation.com/stainless-steel-frame-cramp/p13331 Could do with 120mm length though. And something similar but wider might be easier to resin. (Yes a minor thermal bridge I suppose) Let me know what you think... -
Plasterboard Fixing Failure at Window Reveal
Spinny replied to Spinny's topic in Plastering & Rendering
TBH it started with the builder. I think they just automatically see steels and think fireboard. BC's (often ex builders) can do the same. Seemed harmless enough to do it and save having the conversation. However some places we are using habito which in any case has a decent fire rating. -
Plasterboard Fixing Failure at Window Reveal
Spinny replied to Spinny's topic in Plastering & Rendering
All done with free and open discussion with the architect. I just asked the question and he came up with a way to do it. Yes it was all done with the SE fully in the loop and part of the SE spec and report from the outset. It did require a modest extra steel in the roof structure. It wasn't done throughout, just on one reveal. The brickie's brain nearly melted though. I talk to all the pro's/trades and listen carefully to what they say. Sometimes we go their way, sometimes not. Try speaking to 6 plumbers - you'll get six different answers. Some trades just want quick and easy, they are not going to live there. (Yet strangely some trades will show you photos of their own house with elaborate slow and hard features.) We spent a lot of time over the design because we wanted to minimise any change during the build. -
Plasterboard Fixing Failure at Window Reveal
Spinny replied to Spinny's topic in Plastering & Rendering
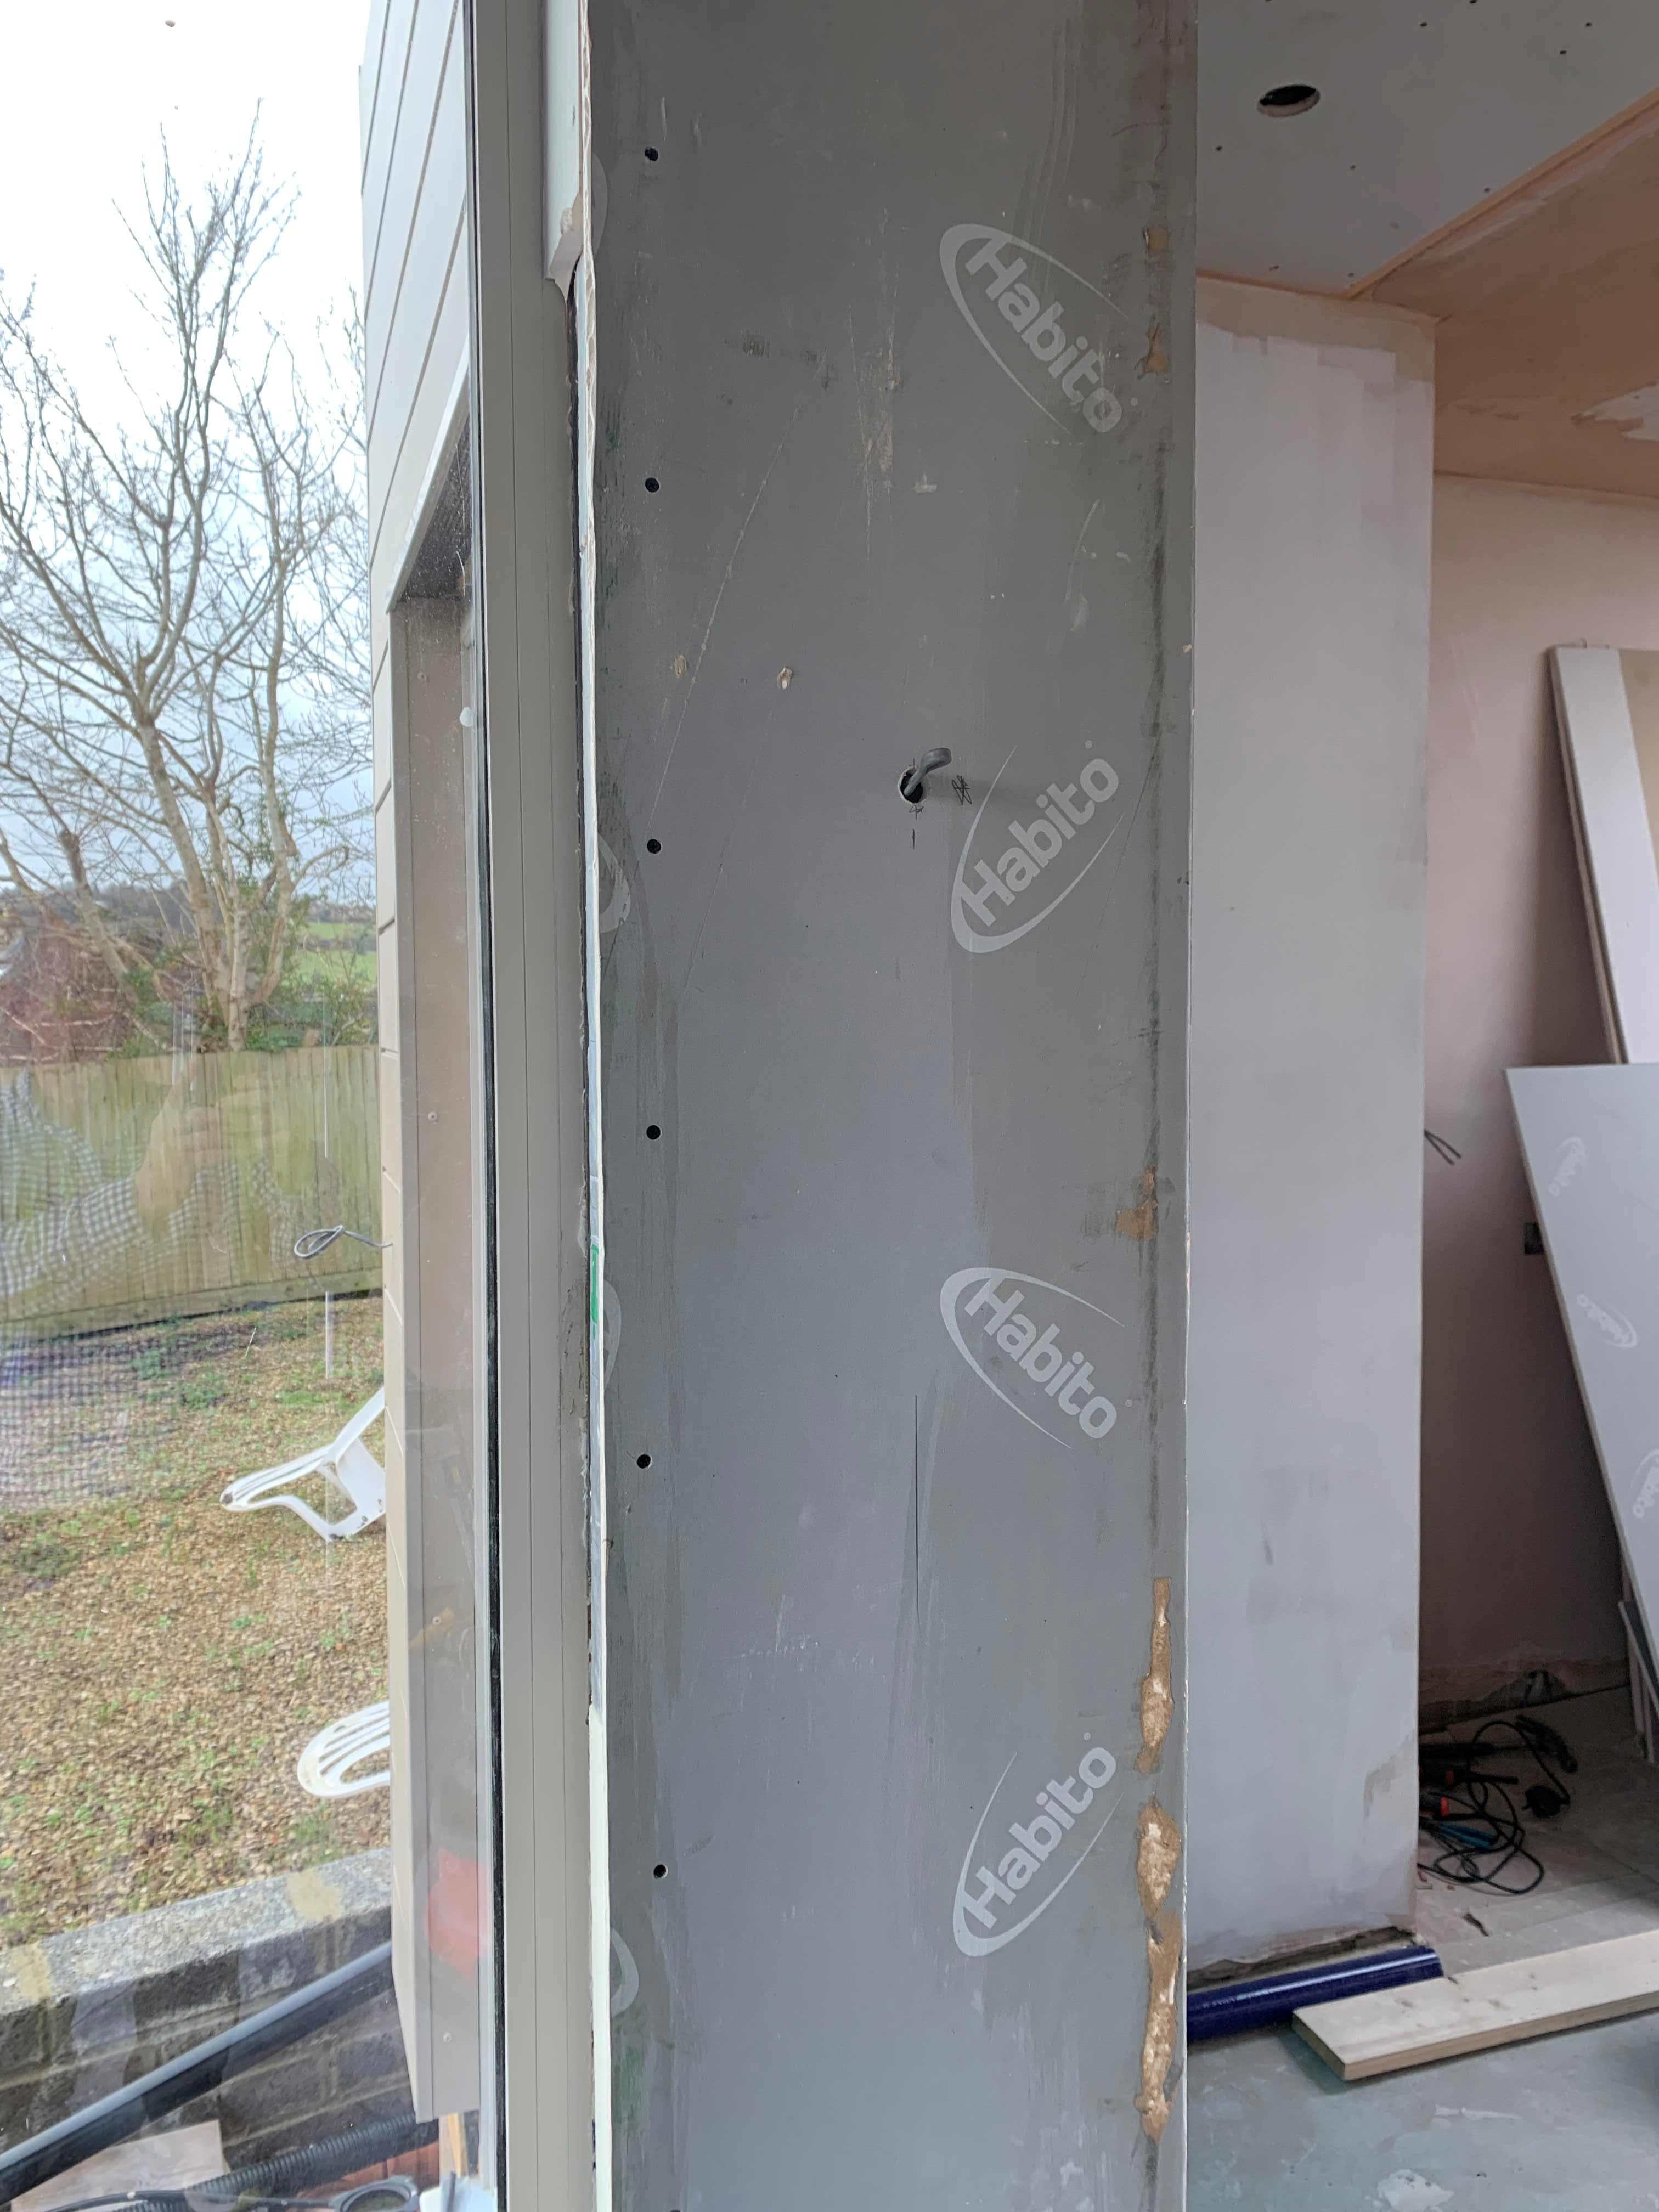
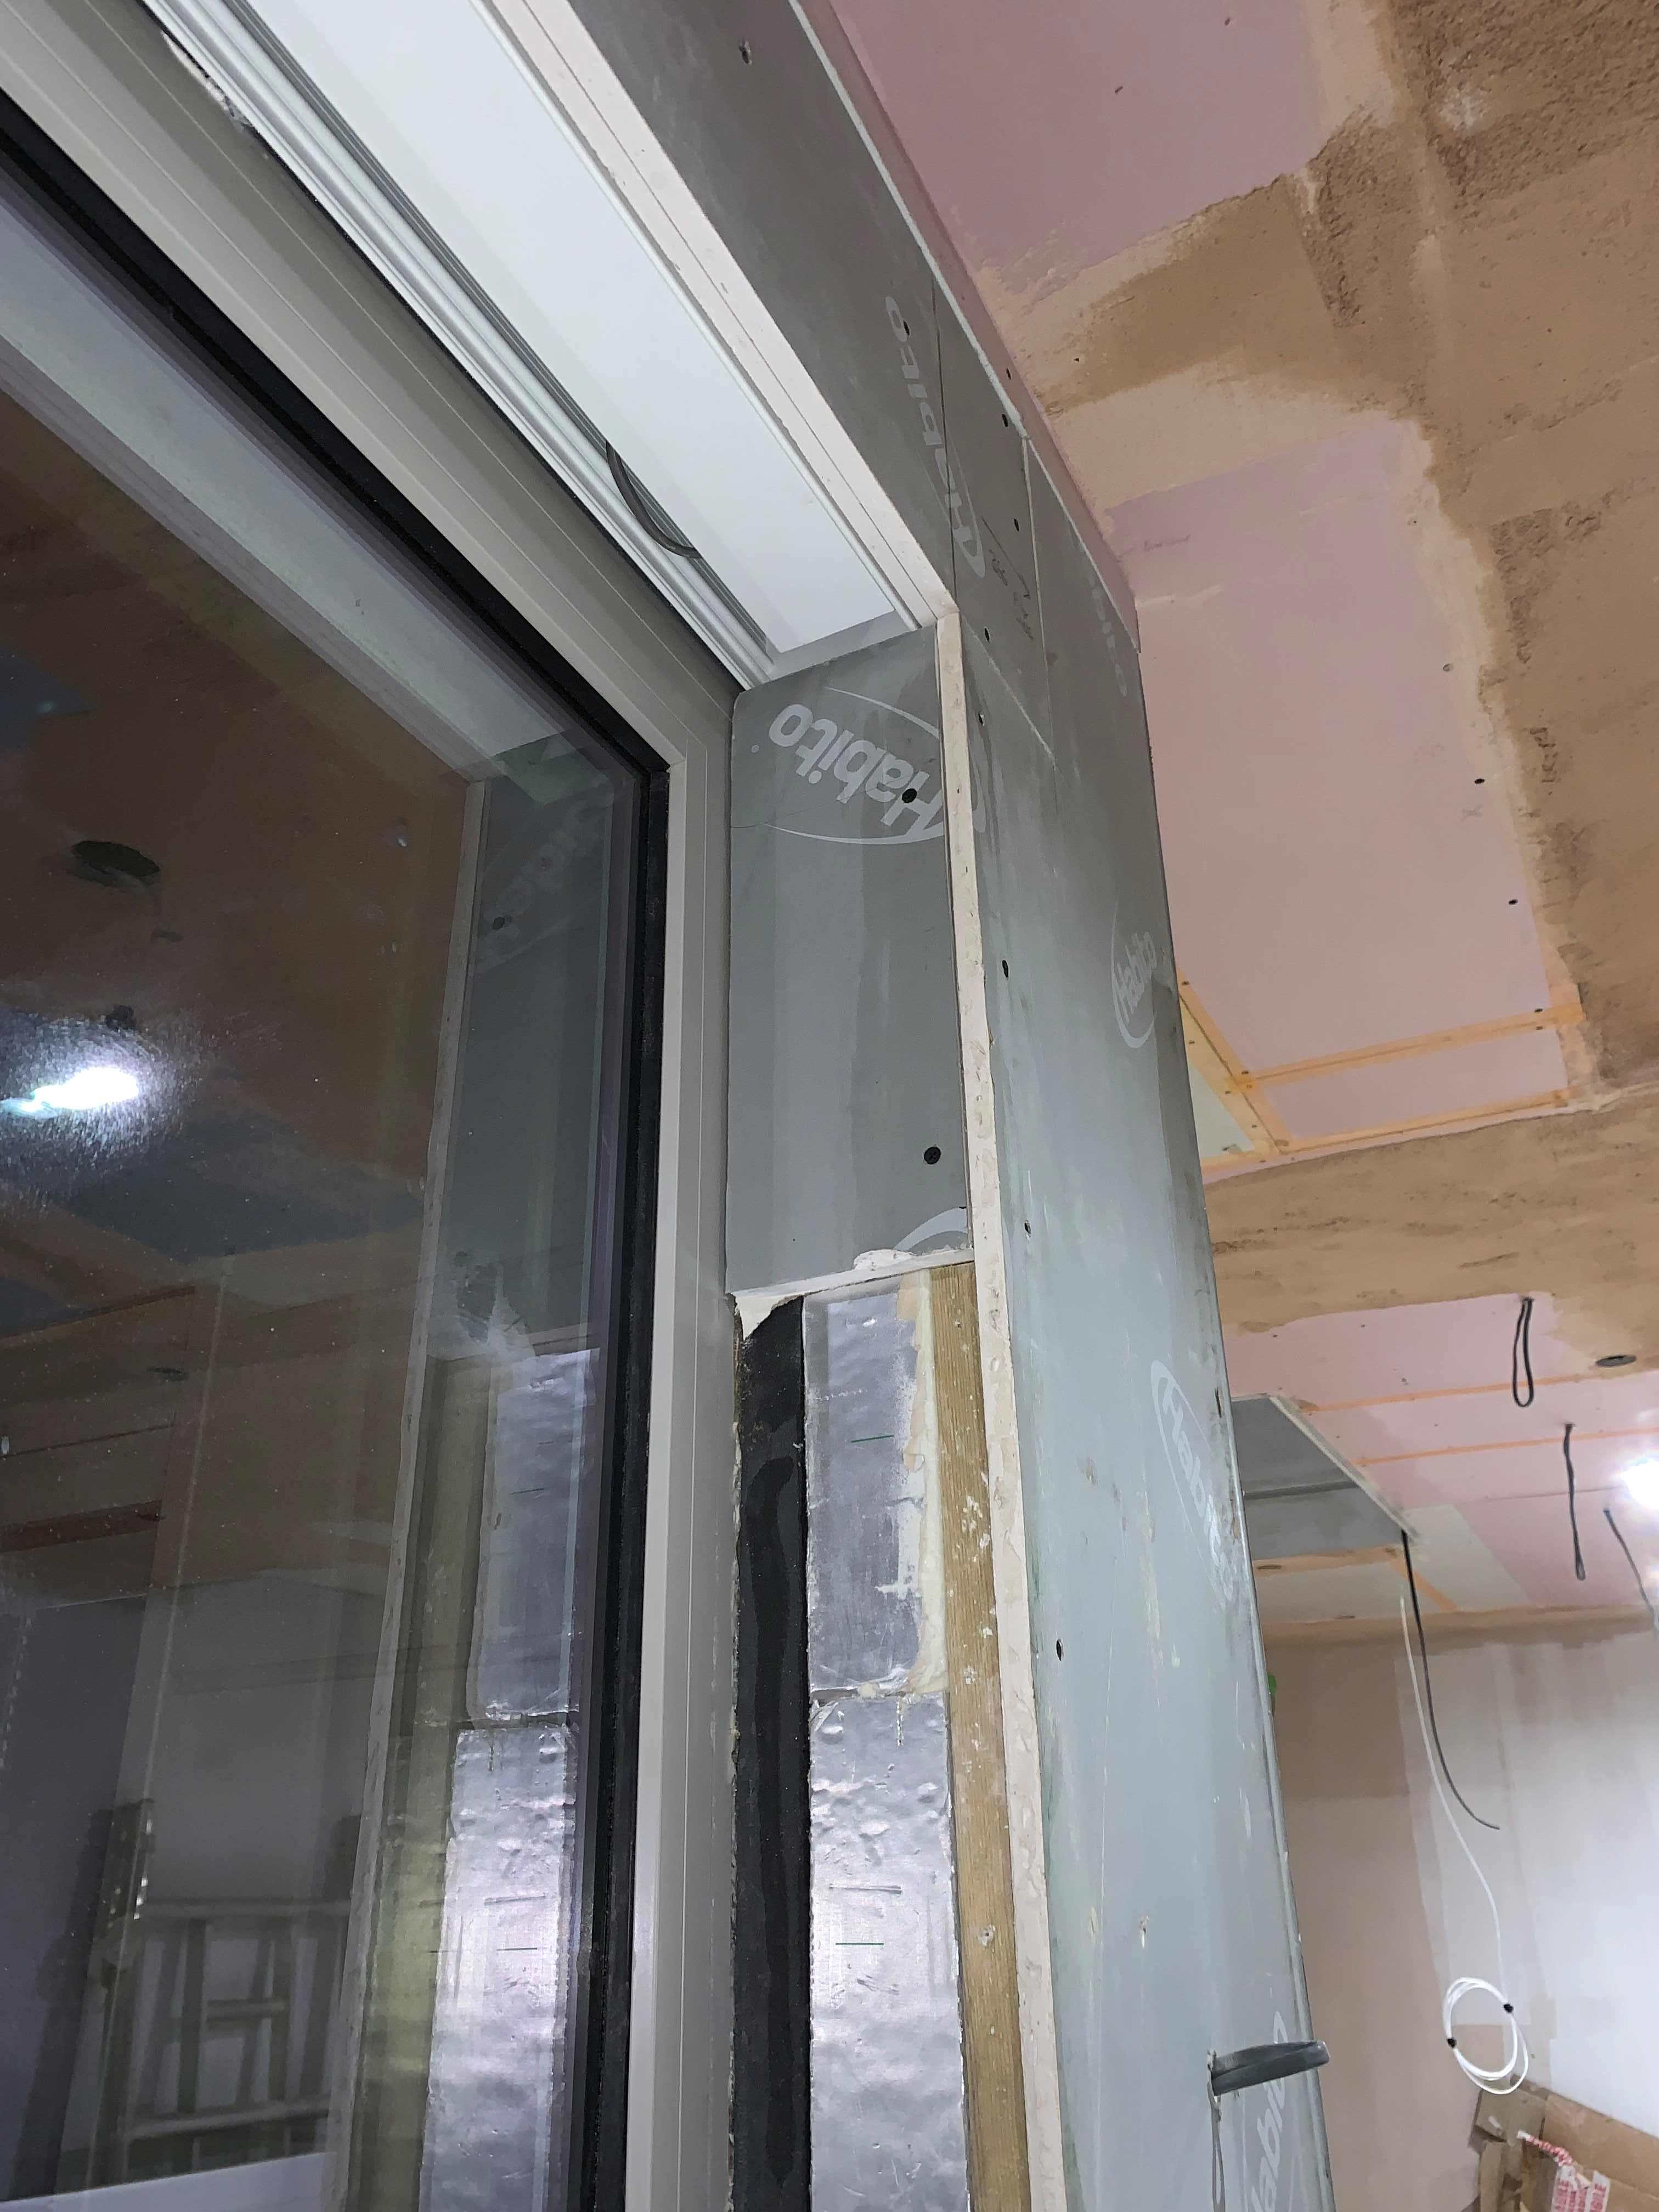
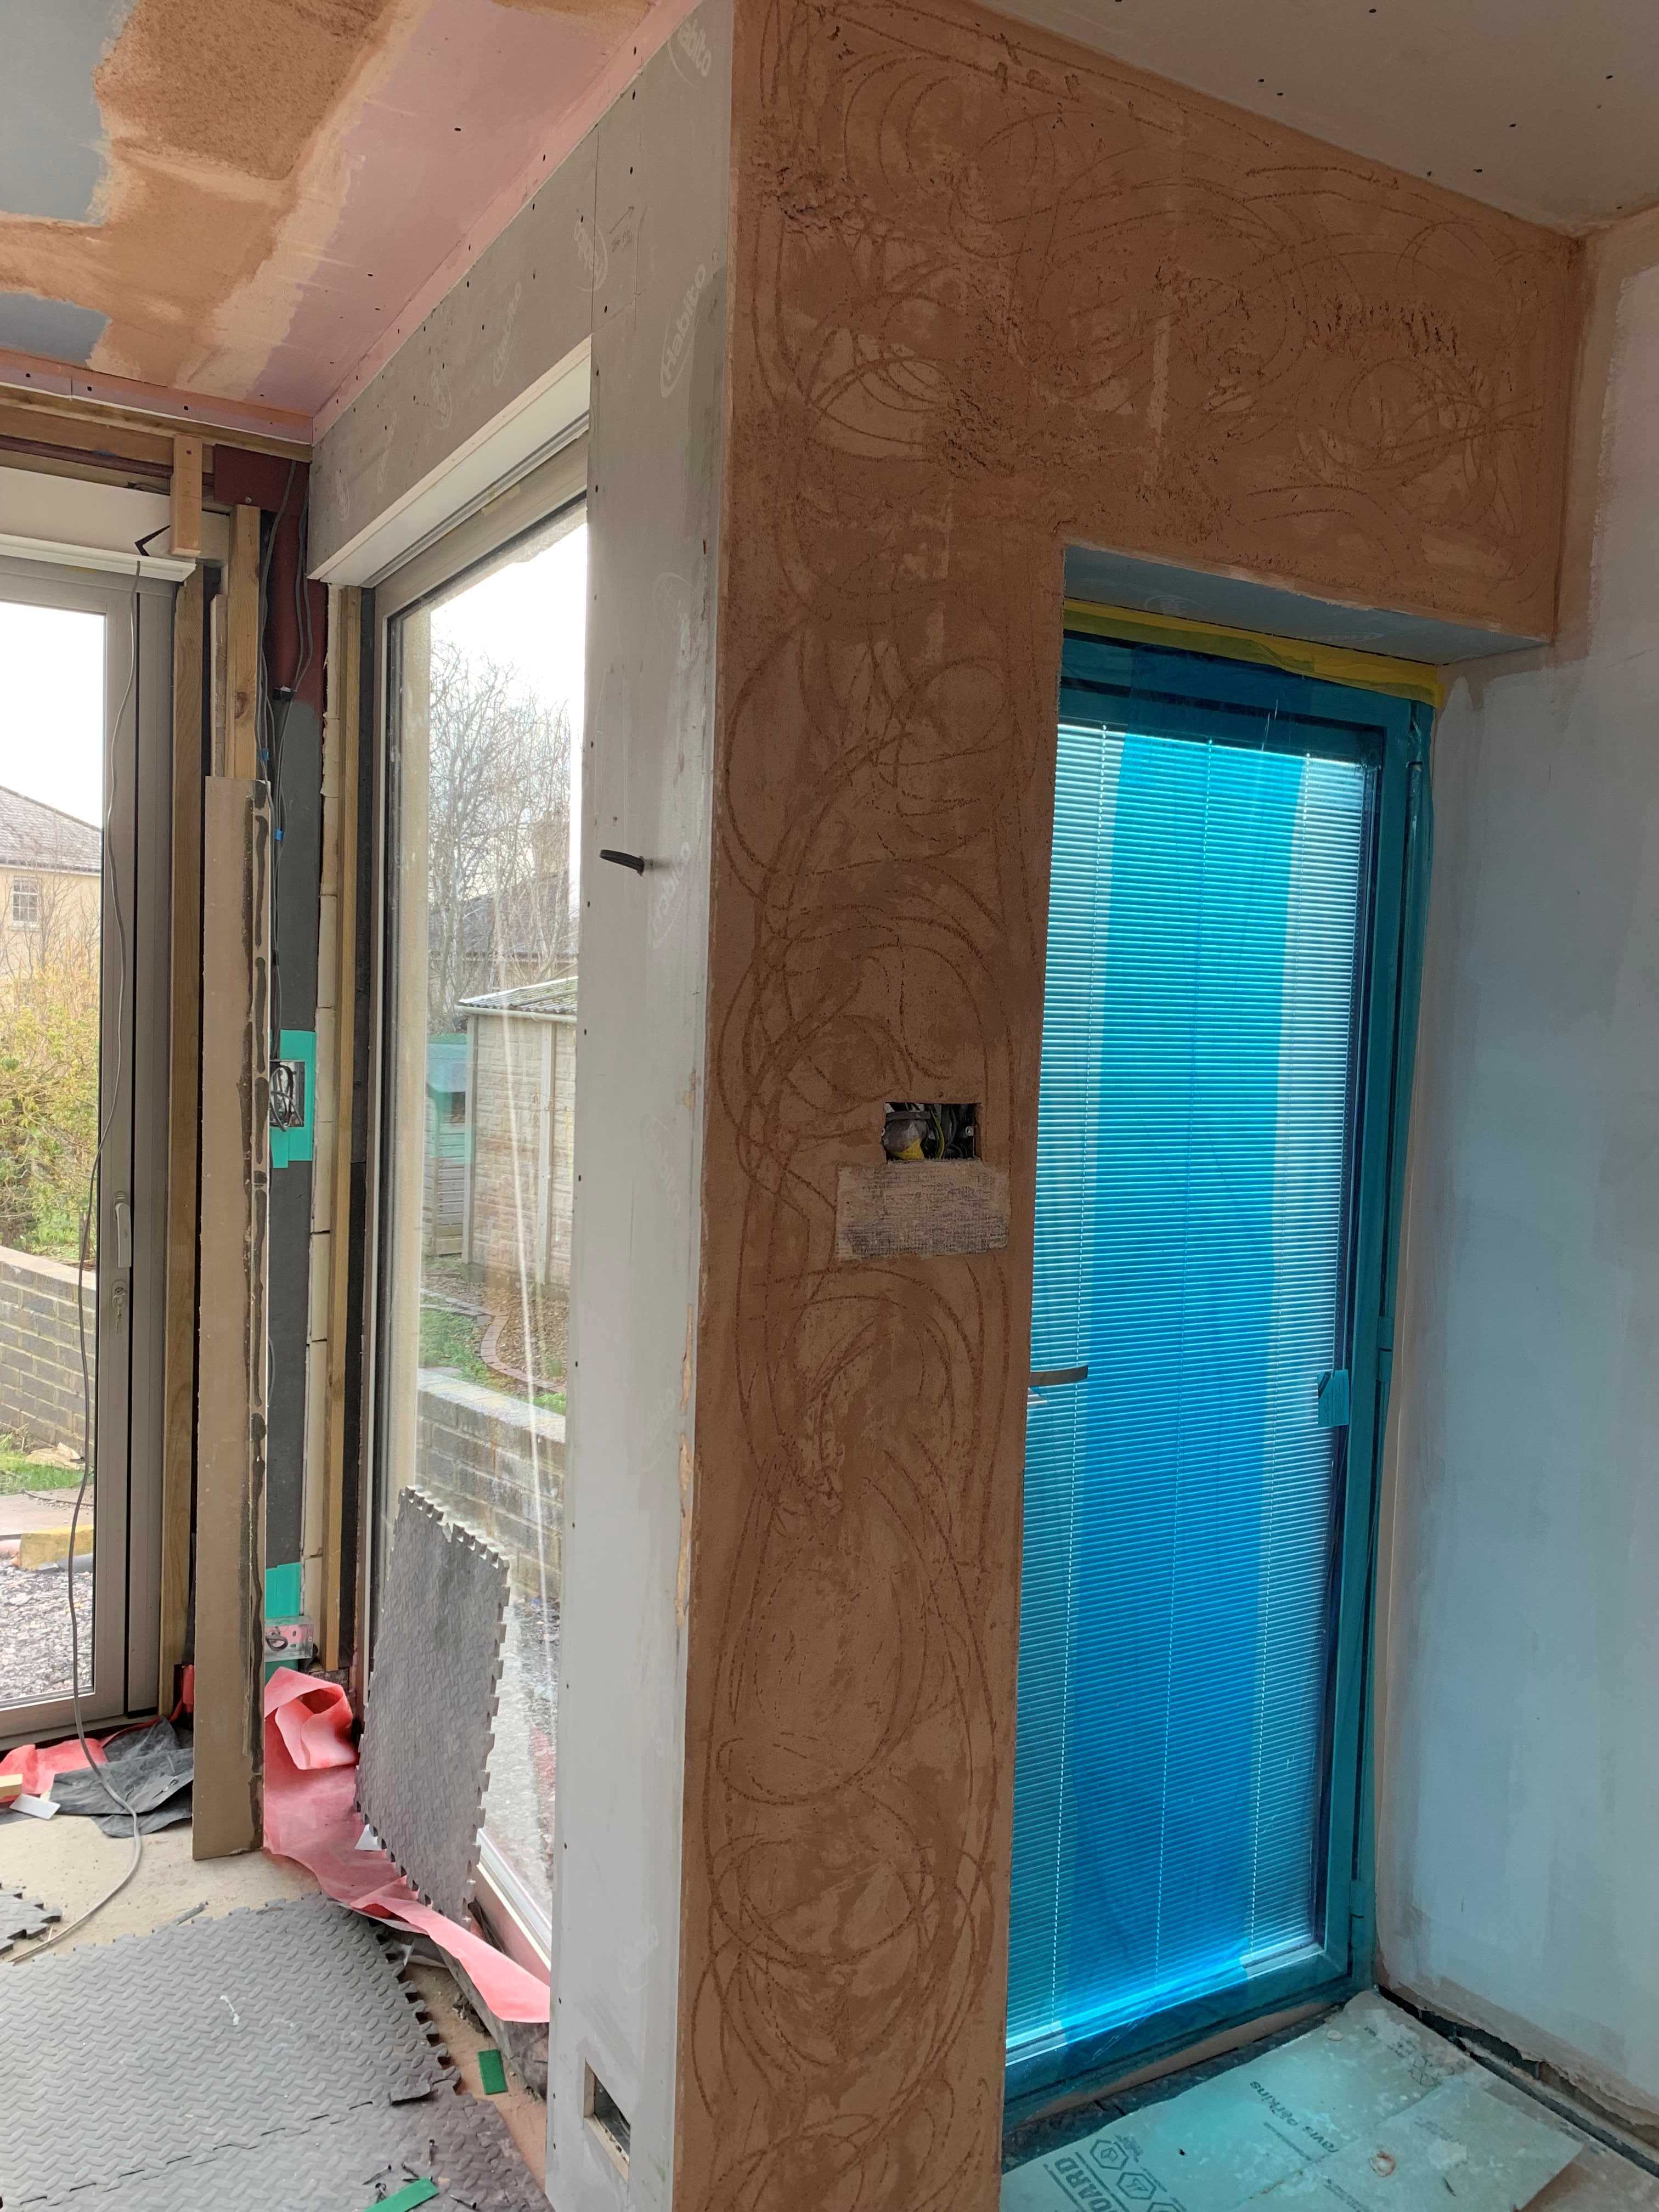
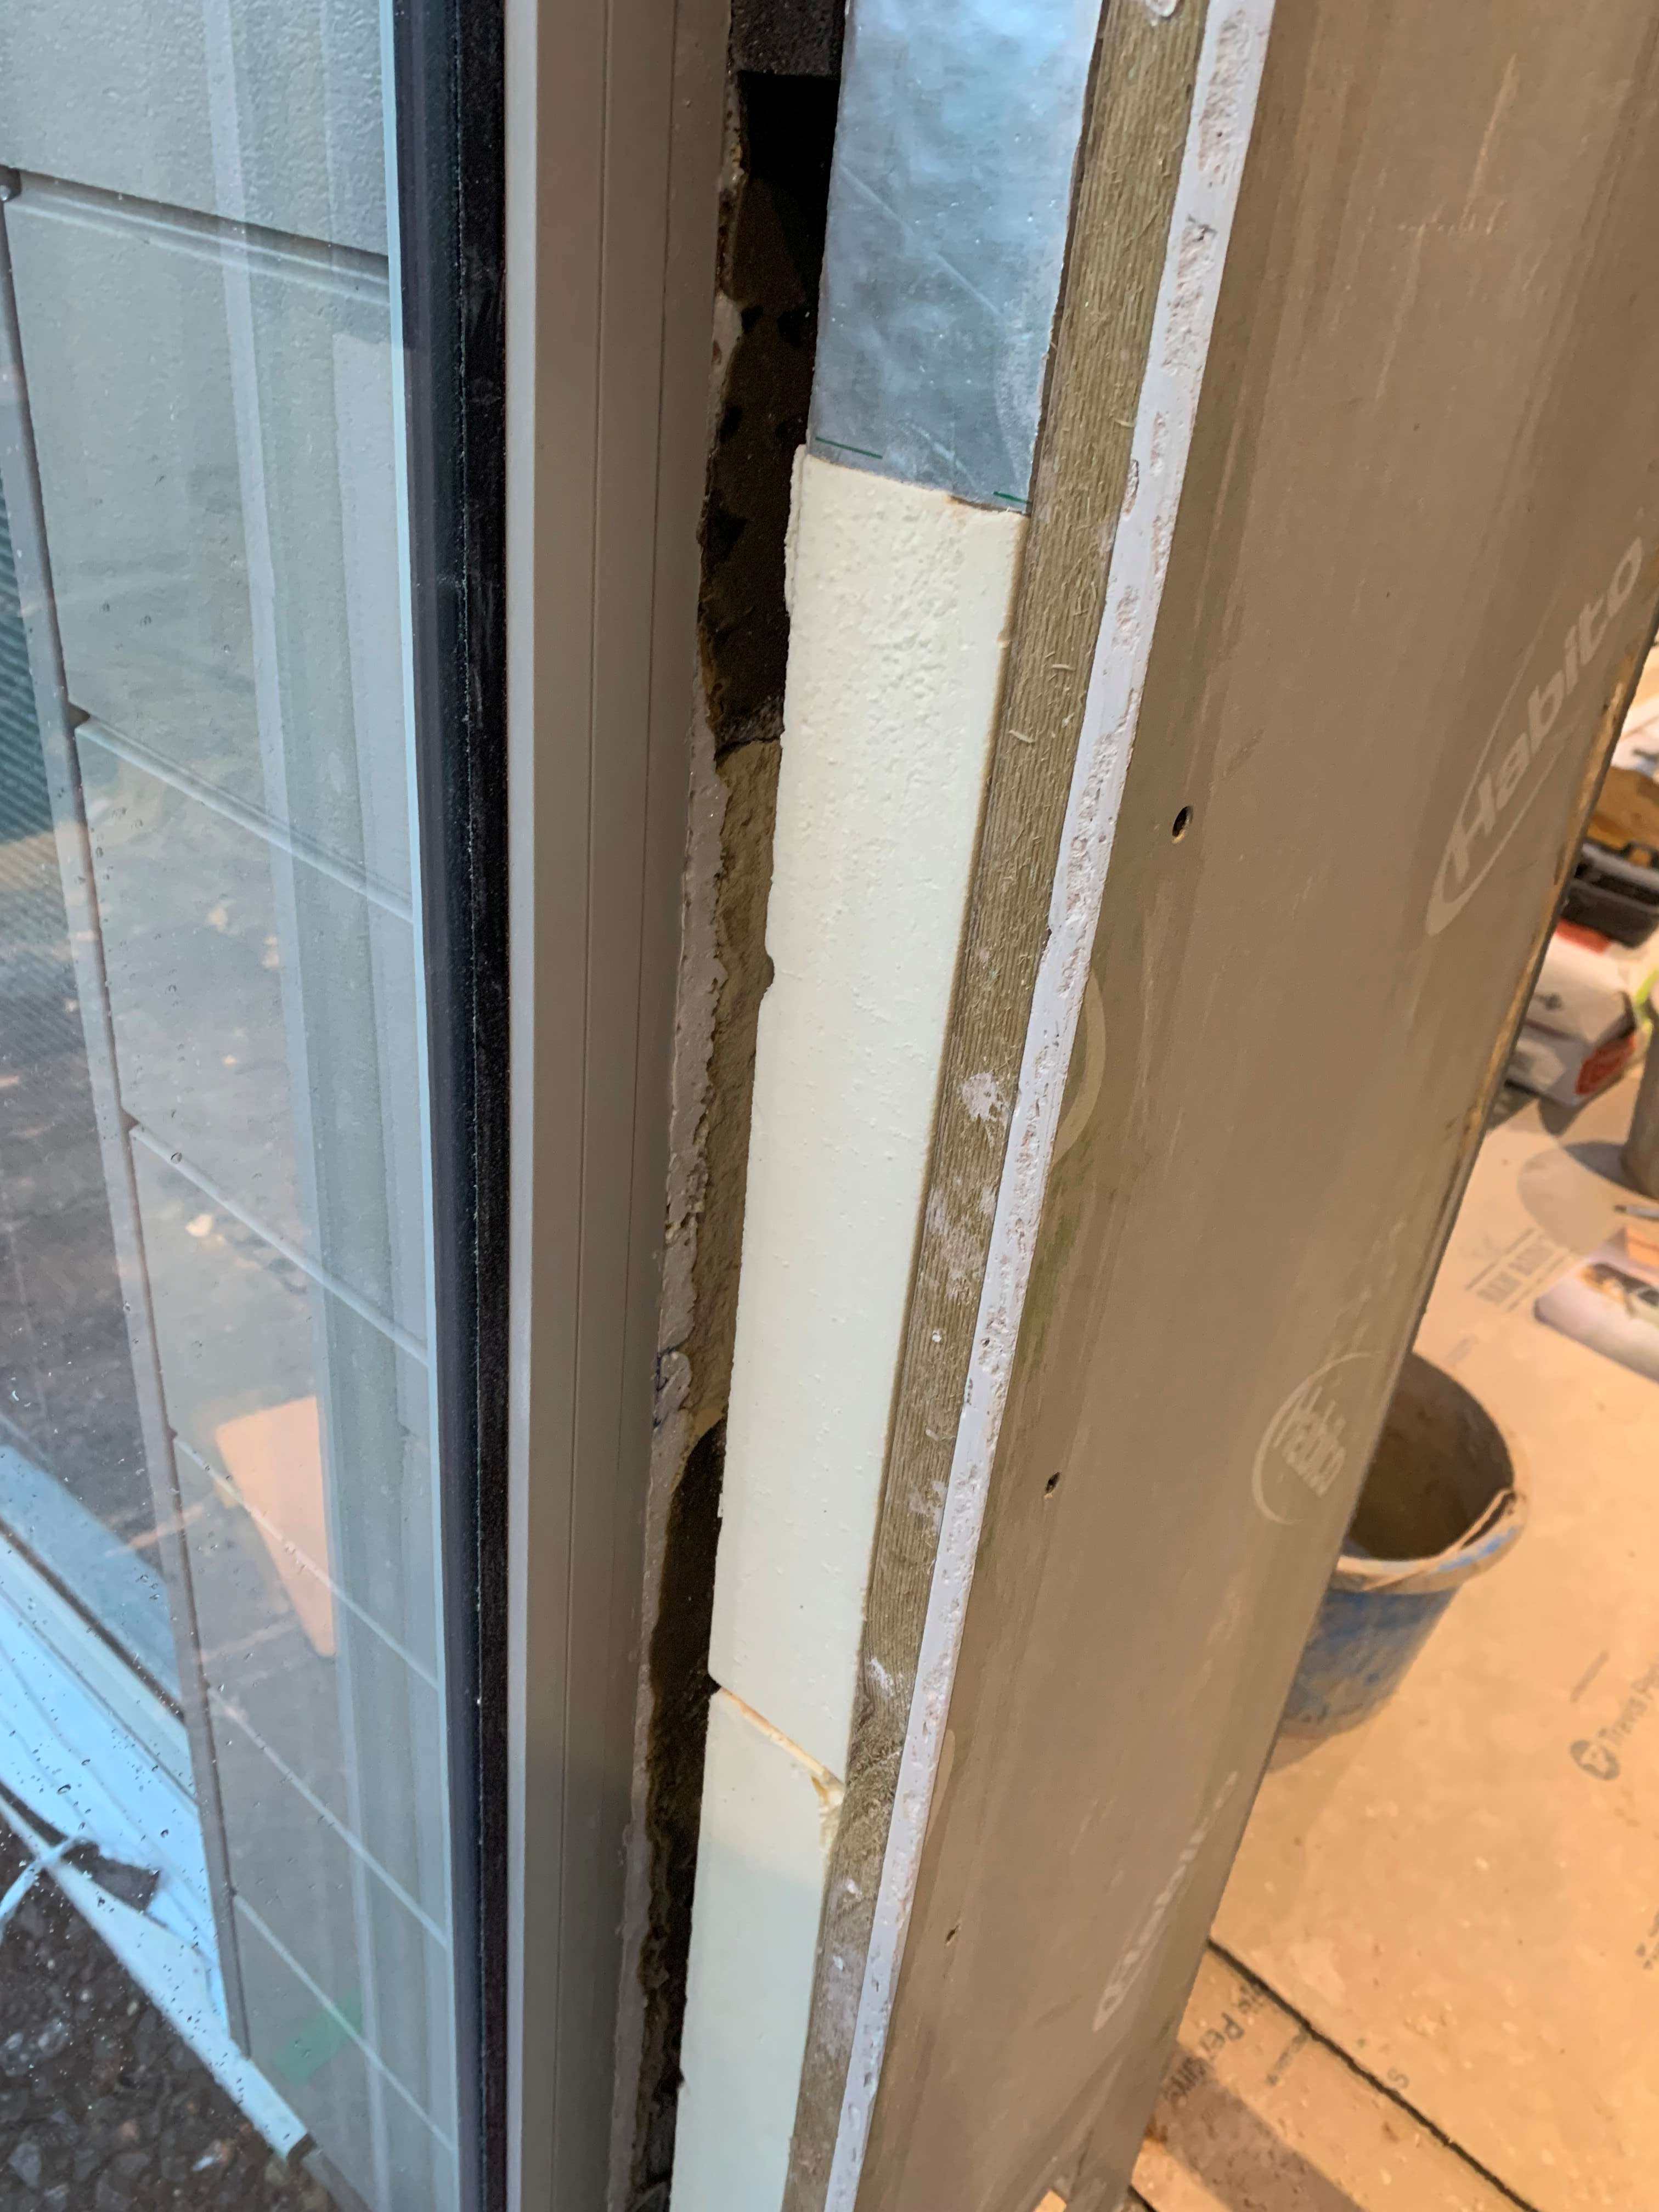
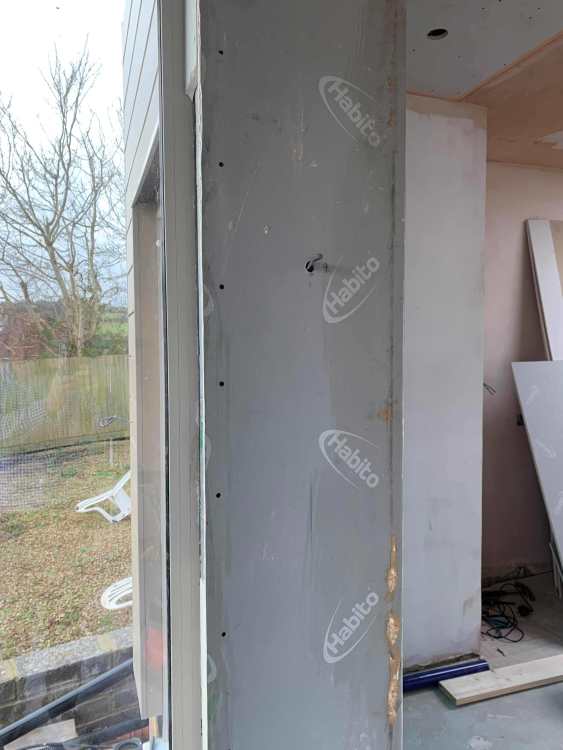
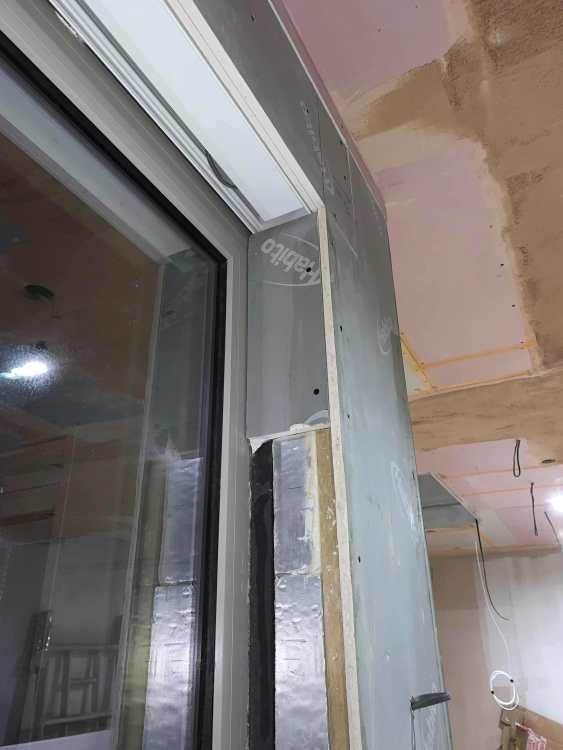
@Iceverge @Nickfromwales @crispy_wafer or anyone The habito face of the adjacent wall section is screwed into the vertical timber at that corner, but on the other side has been fixed to the end of the inner leaf blockwork using PU010 panel adhesive, and the other side/corner just bonded out ready for skimming. We did have access from that side before that which we used to put PIR insulation in the void behind. So it would be gutting to rip that all off again, likely require new board to be cut to size with apertures etc. I was reluctant to put timber against the inside of the outside leaf originally on the basis it would have a lower insulation value, and if by any chance moisture ever made it through the block onto the timber it might rot or mold etc. XPS is strong in compression, but clearly not if you put it in tension. Unfortunately we did the same on another two reveals, so now concerned we will have to redo those with a different solution too. The outer blocks are rendered on the outside face so there is reluctance to start drilling into the back face close to the edge by the window opening for fear of the block breaking out. I don't know if there is another adhesive that would work better. The plasterboard piece to close the reveal seems to need pulling in tight somewhat to stop it bowing out towards the window in the centre. More photos attached.


-
Plasterboard Fixing Failure at Window Reveal
Spinny replied to Spinny's topic in Plastering & Rendering
The pencil line shows the chosen plaster line to be achieved, so the plaster board edge will cover the edge of the frame and the 25mm angle would need to be fixed to the concrete rather than the frame. How would I attach the 25mm angle to the concrete block ? It would be adjacent to the edge of the concrete block so screws would be likely to break out. Is there some other adhesive that could be used and be stronger than the resin ? -
@Nickfromwales Here you go... (Looks like carpenter/plasterer guy has a jigsaw blade that will cut the pipe. If we can get the plaster board problem I just posted solved first)

-
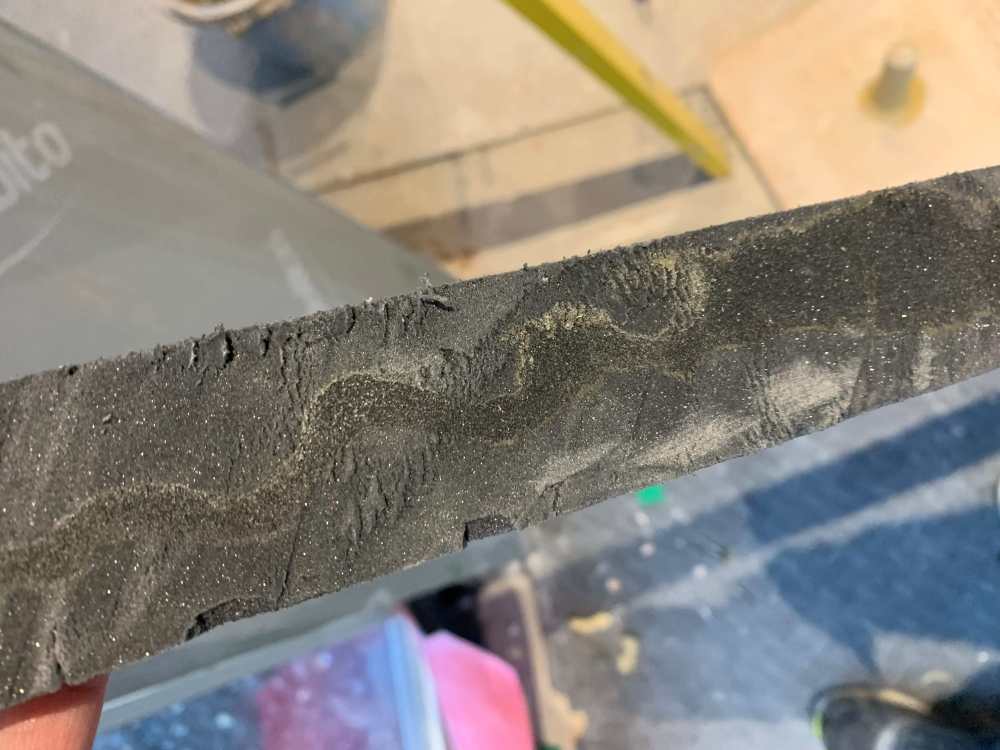
Could do with some suggestions on how to fix a problem boarding up a window reveal. The window is 2.4m high running up from floor level. The window has been fixed to the inside of the outside blockwork leaf so that the inside frame is level with the inside edge of the outer leaf. It is an unusual detail as we had the architect remove the inner blockwork leaf so we could have a narrower window reveal. Hence there is no conventional cavity closer. In insulating and boarding the area we decided to fix some 30mm XPS to the inside of the outer block and then also fix the reveal board to this. So we used resin to fix the XPS to the concrete block and resin to fix the plasterboard to the orthogonal edge of the XPS. We used the XPS as it is a good insulator, rather than fix a strip of timber against the outside leaf. The plaster board fixing to the XPS has just failed. And so has the XPS fixing to the concrete block. What seems to have happened with the plasterboard resin fixing is that XPS itself has failed in tension so the resin is still stuck to the board along with a thin layer of the XPS. What seems to have happened with the XPS resin fixing to the concrete blockwork is that it has failed to bond well to the blockwork possibly not helped by some mortar residue on the block. Now the problem is how can we redo this reveal to get secure fixings ? (Especially since the front face has now been insulated and boarded limiting options.) See the attached pics...


-
I am no expert, just a punter like you, and do agree it needs to be re boarded/plastered. It may indeed be revealing to see what lies behind the plasterboard - do take photographs when it is removed. You could consider speaking to your insurers - perhaps you already have. Clearly an insurer will not cover new build building defects. However you would expect them to insist any rectification/repair work is carried out fully and properly including replacing damaged plasterboard etc and replastering/painting. So you could then approach the builder firmly yourself and in addition point out your insurer will also not accept anything else. You should also be asking for the rectification/repair work to be guaranteed by the builder. I would be looking to make sure you have written/email communications between yourself and the builder documenting the problem, the cause, the necessary rectifications and repairs, and the further period for which these are covered by the builder. It may be helpful to have a friend or relative around with more building experience. I have found some builders try to ignore what owners say - I sometimes had to pay our structural engineer to basically say exactly the same thing I had already said to the builder, before the builder would act. (PS If you were selling you might possibly be asked about build defects in a buyers questionnaire or survey, and should be able to give them the guarantee for the rectification work etc.)
-
Could this not be down to the internal circuit design of the light. Some Smart home modules are designed to work without a neutral and others require a neutral for example. Some devices may be looking to draw a very low continuous trickle current to power the PCB and detectors, and direct a larger current or even different voltage to the bulb ?
-
Tad more sun in Pakistan. Must lower the cost per unit of solar power. You are going to aspire to a fridge, a washing machine, and even some air con.
-
Presumably the switch will need to be on all the time to power the PIR detector. The other route these days is to separate the light and the detector wireless smart home fashion. I see there is even a Quinetic PIR detector (battery powered) with adjustable lux level too - Quinetic PIR Link (Not to mention mm wave radar detectors - not sure how well they go outdoors though)
-
Yes. It is coming through the wall behind a built in kitchen appliance, so needs to run down the wall before making another turn to run along behind the kitchen plinths. (I am presuming there is no need for the pipe 'circuit' they show) instruction drawings also show a swept 90 bend, but presumably no real need for that. (mains pressure 3.5 bar and 37l/min)
-
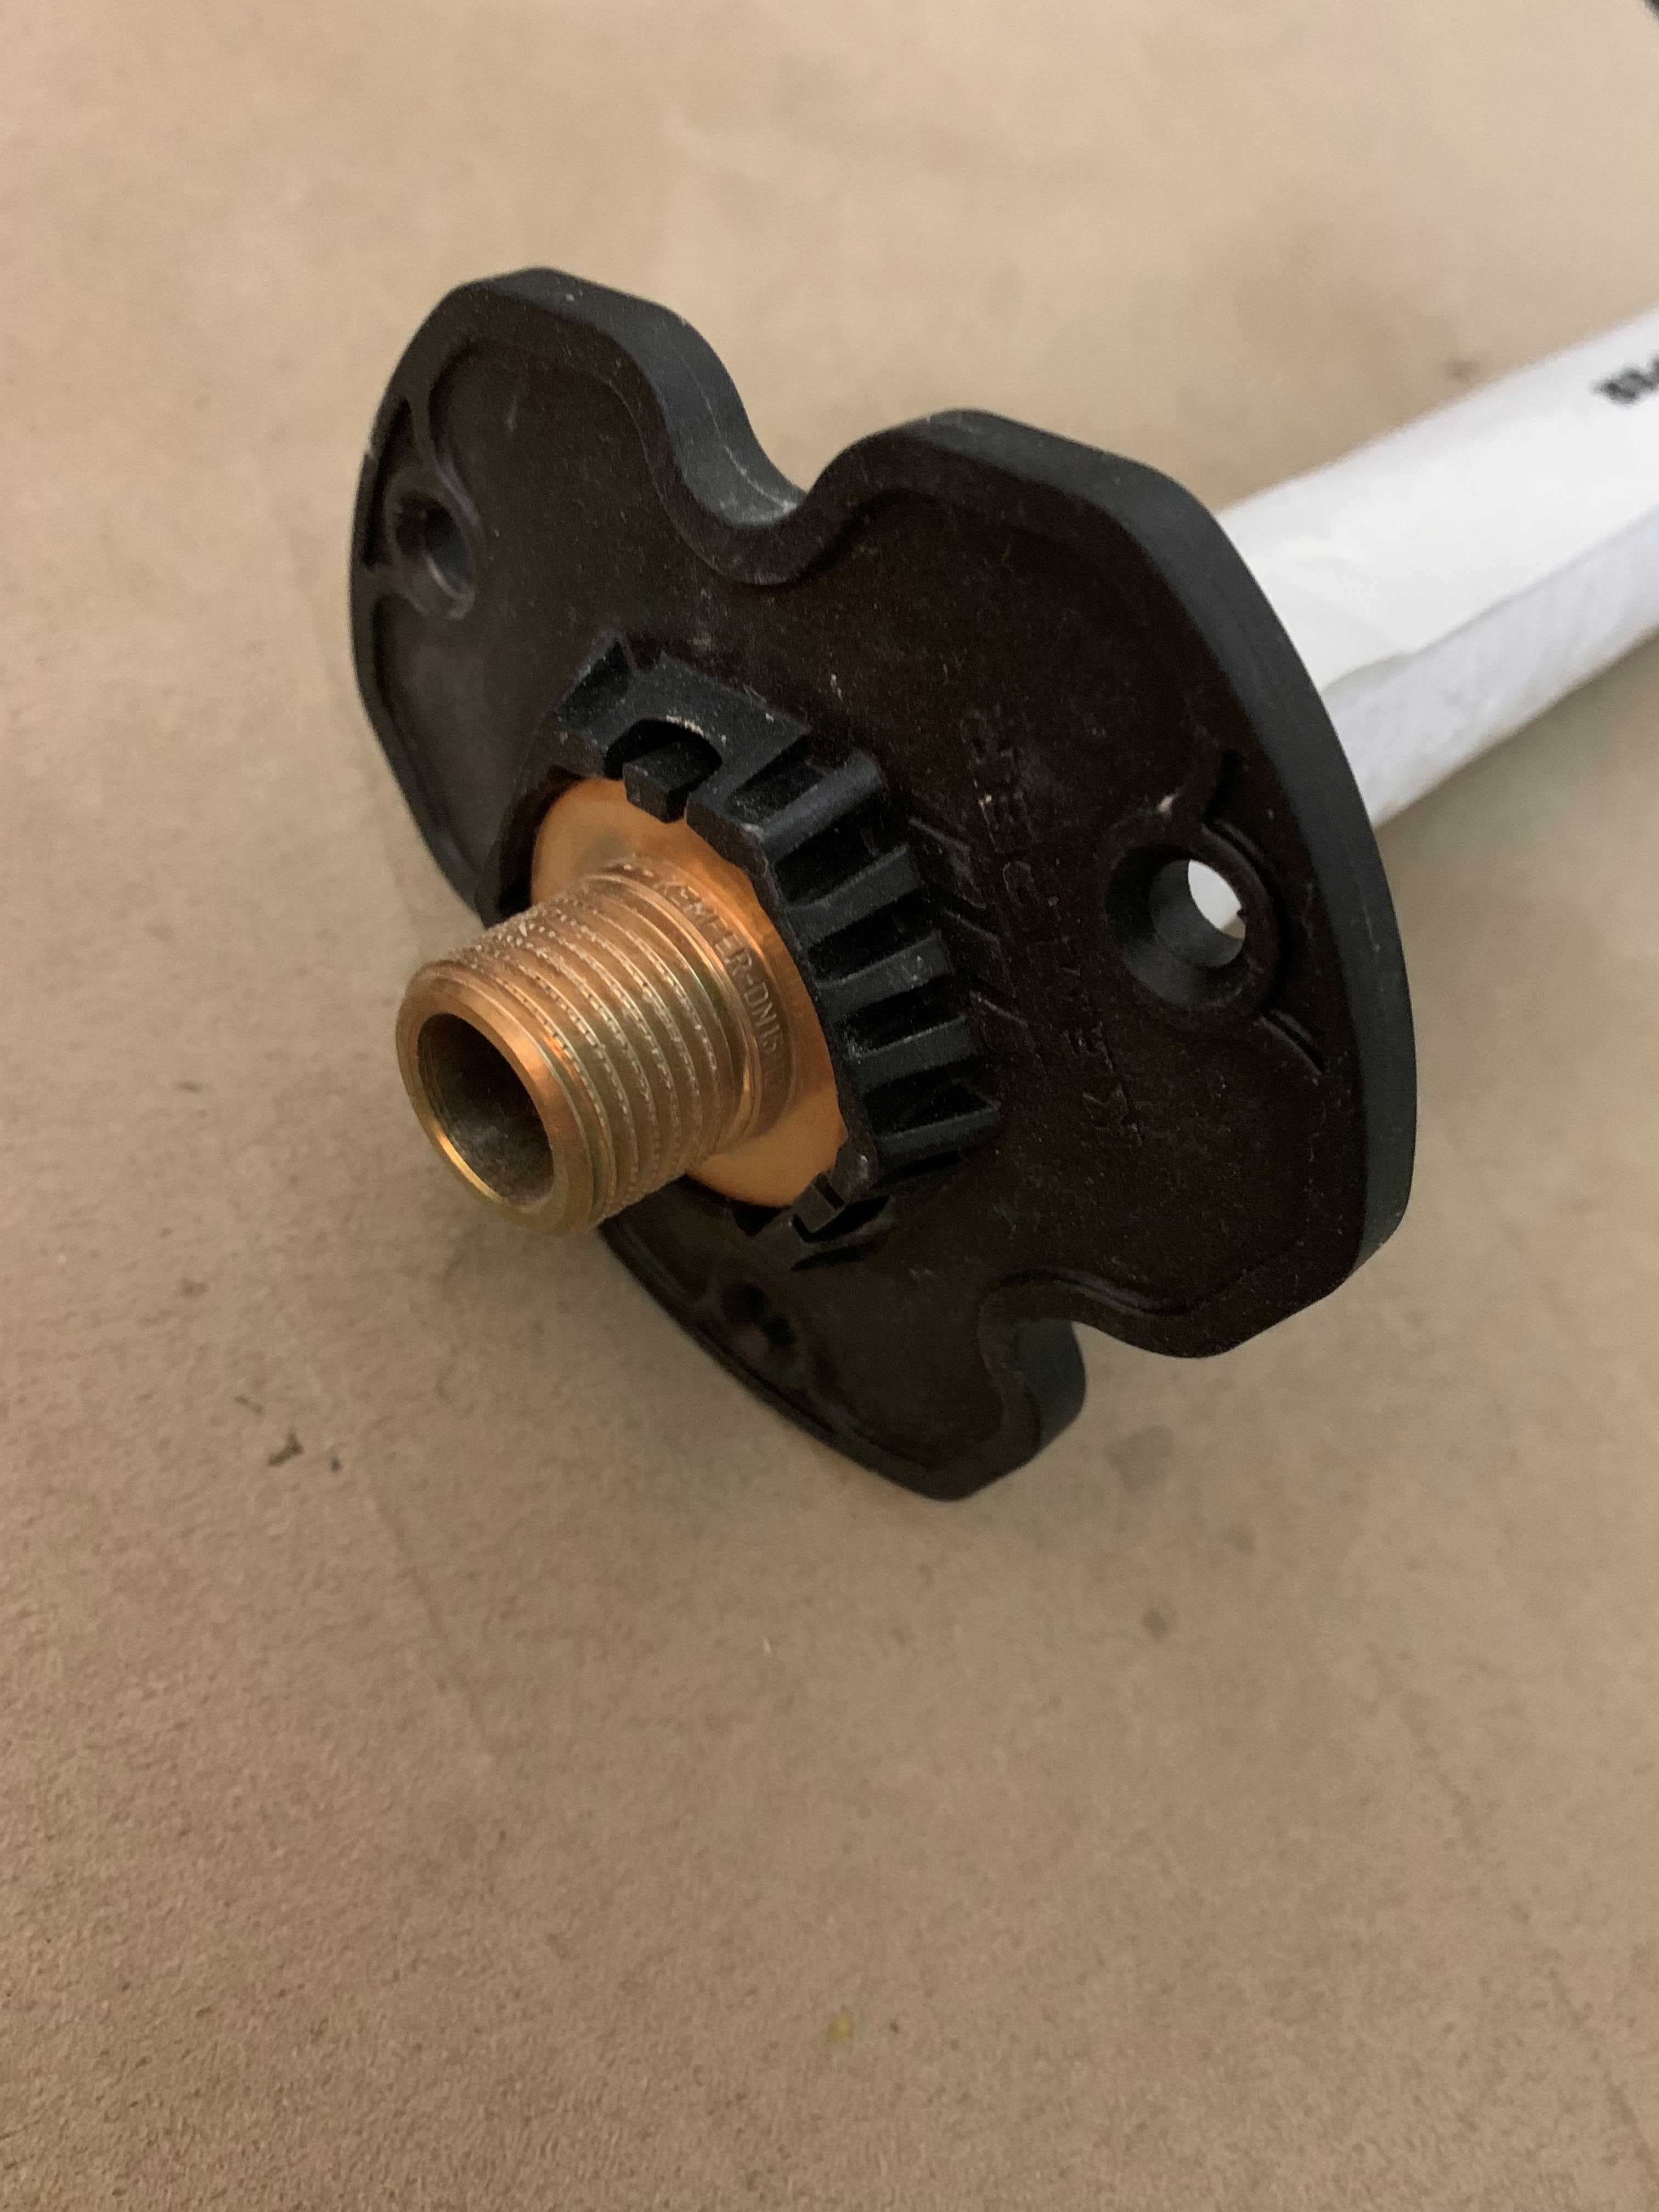
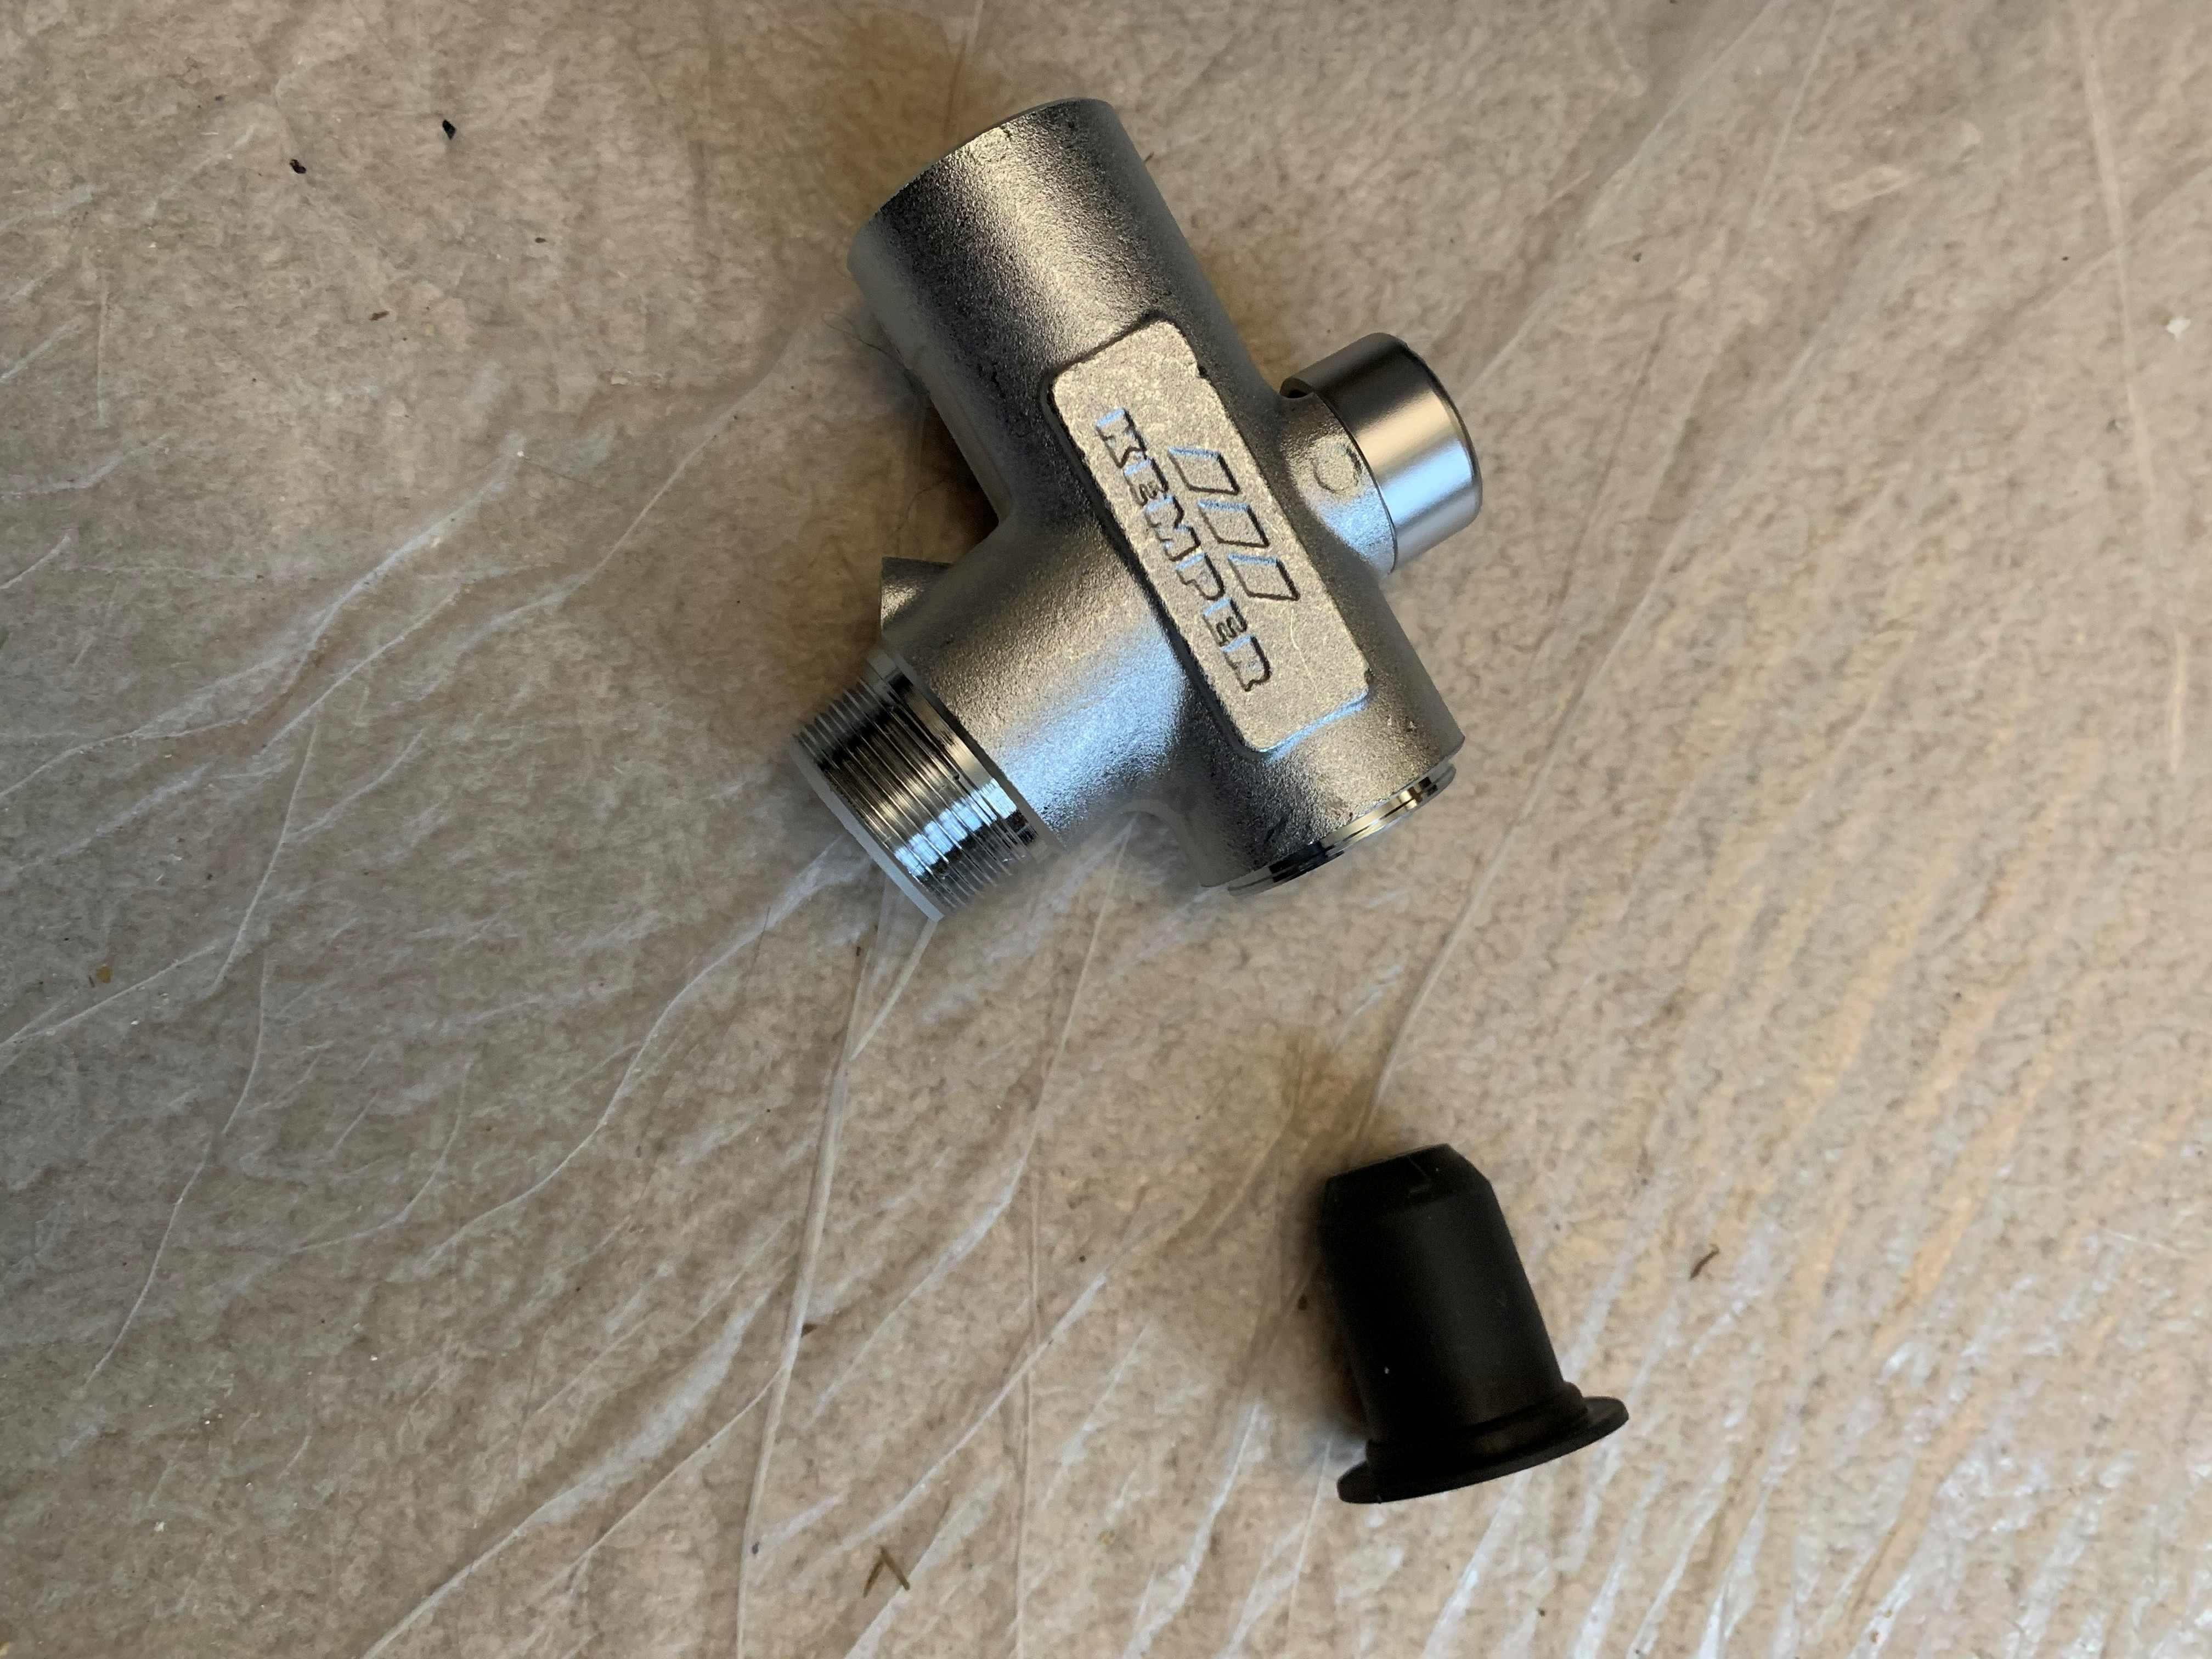
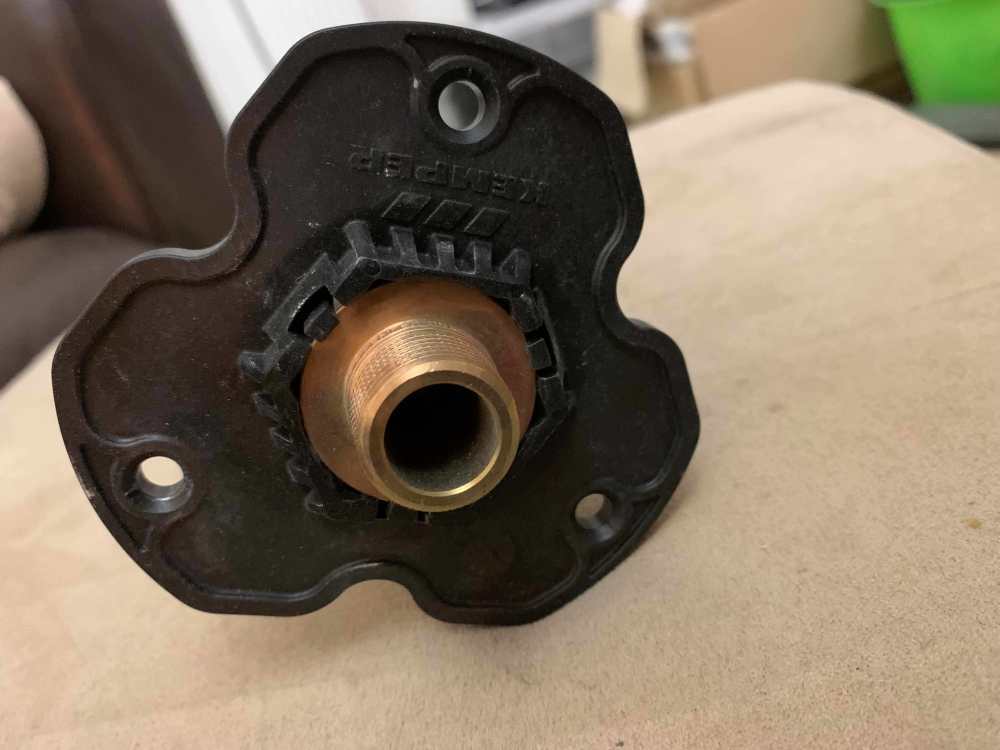
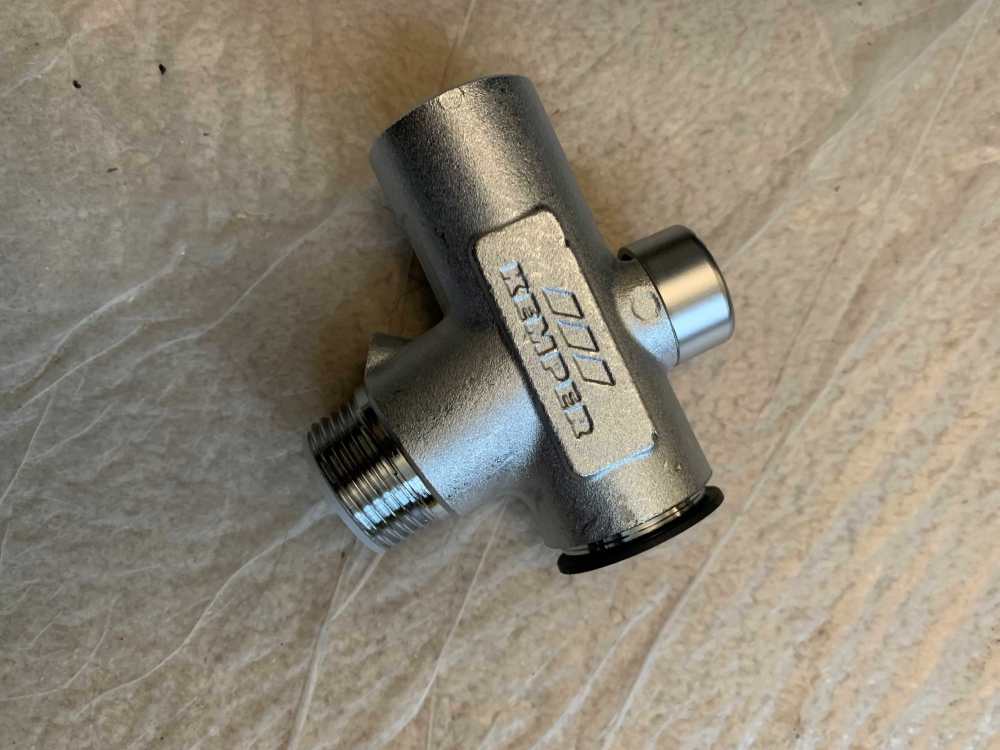
This is the kit I bought from Amazon Germany...Frosti Tap Photo attached. I now notice the box says it is made of gunmetal - which appears to be a type of bronze or 'red brass' which can be used for canons. (Tempting as it might be to hammer dance, I fear it's effect on my joints. And the last time I danced a Conga a 'friend' posted it on tinternet. My spouse was once my dance teacher though.) Hey I'm not in the old people's home yet - pardon.

-
It would have to be hammer time. I think it would be better to drill or twist out the hole very slightly TBH. What are those German's up to though ?
-
@Nickfromwales Also any other tips from your experience of fitting them, in particular... (a) Wondering what the main tube is made of. It looks quite thickish and when I ran a junior hacksaw across it (admittedly probably a blunt blade) I couldn't even mark it. Planning to get the plasterer/carpenter guy to machine cut it to the length I mark for me, but not sure what blade it might require. (b) The instructions show fitting the 90 degree pipe bend fitting onto the inside end before fitting the outside tap end. So do I defo need to do this first - I am guessing maybe trying to tighten the 90 degree fitting would be tricky if done last as the tap end will want to rotate ? (c) Thinking of using a 90 degree isolating valve on the inside end, and probably another one further along the pipe for ease of access as the inside end will be hidden behind kitchen appliances so rather inaccessible. (c) Any issues when tightening up the outside against a vertical surface given the tube runs at a slight downward angle ?
-
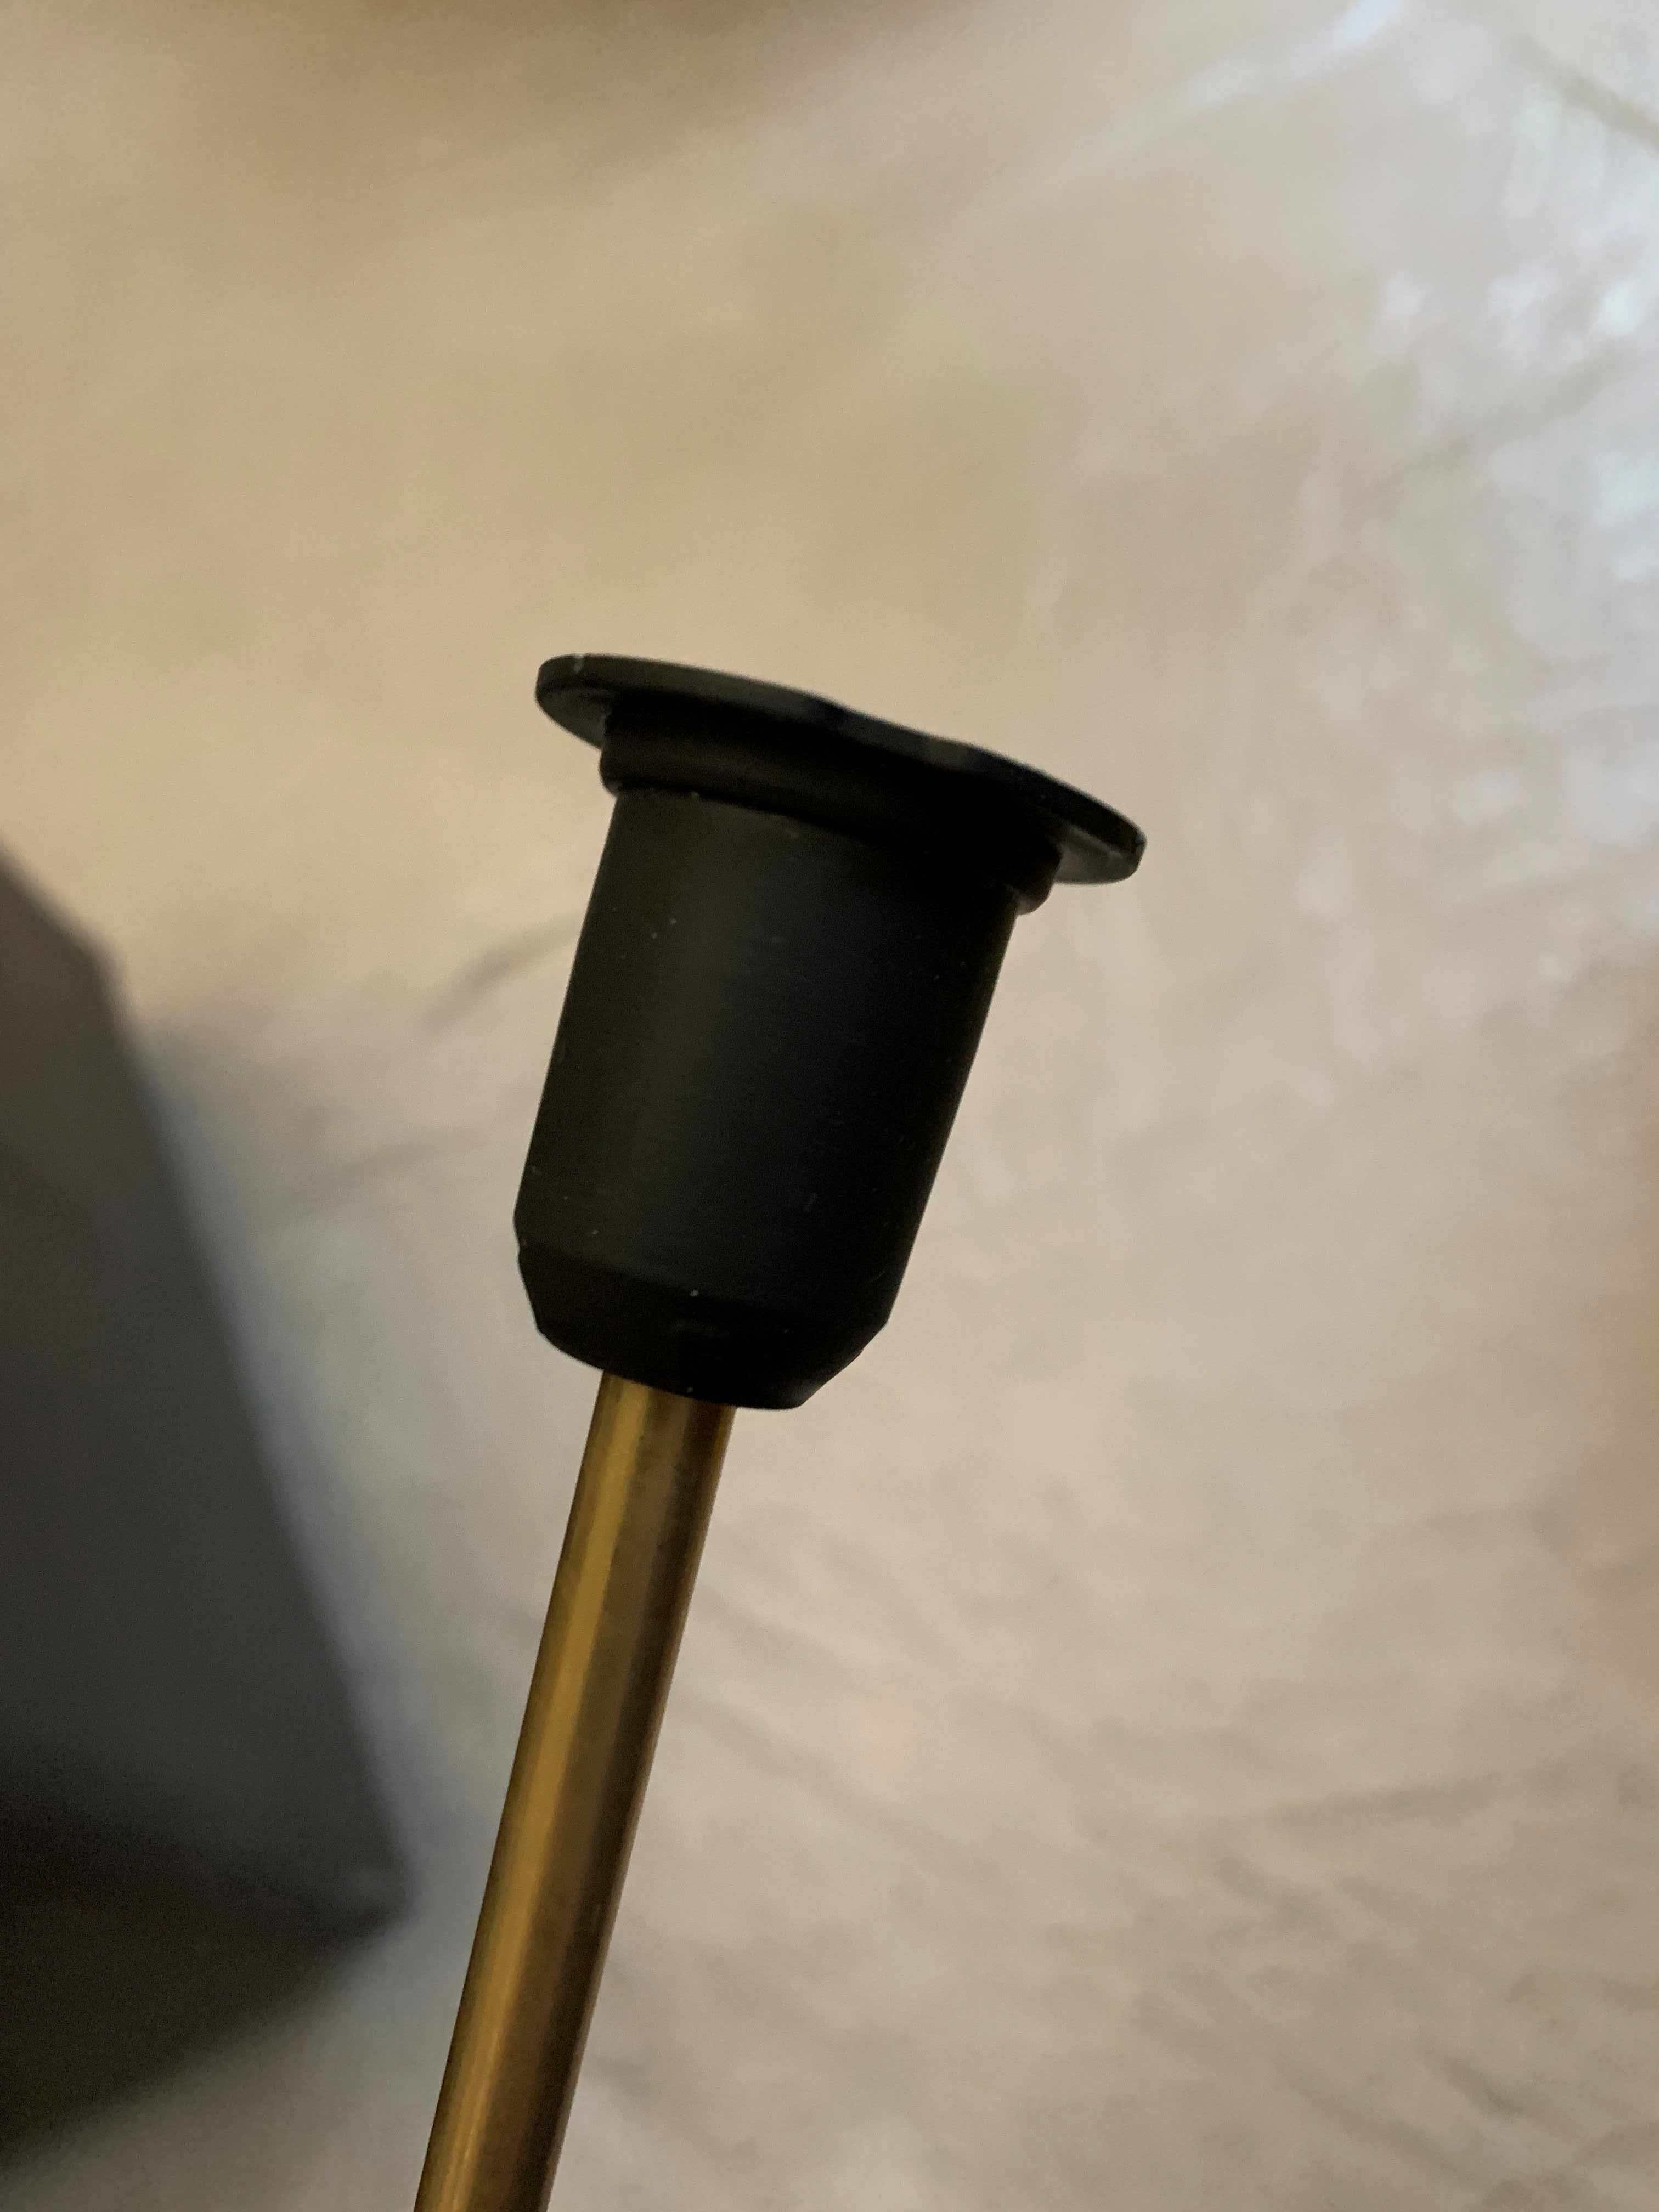
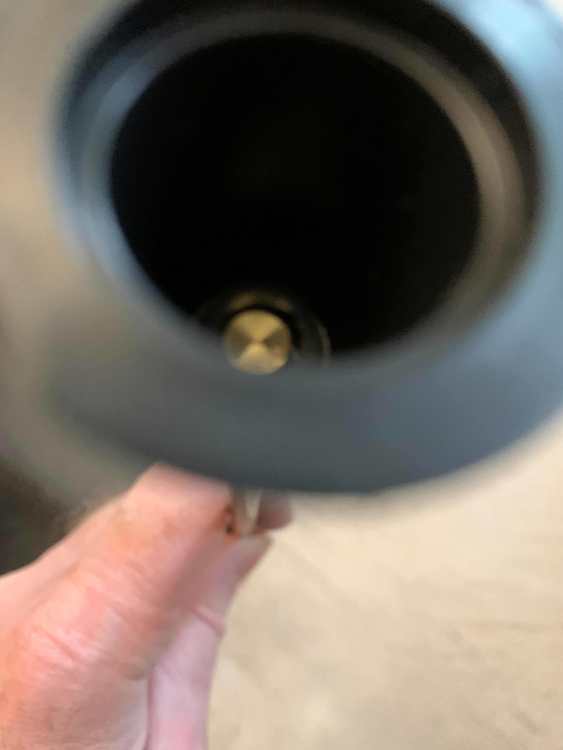
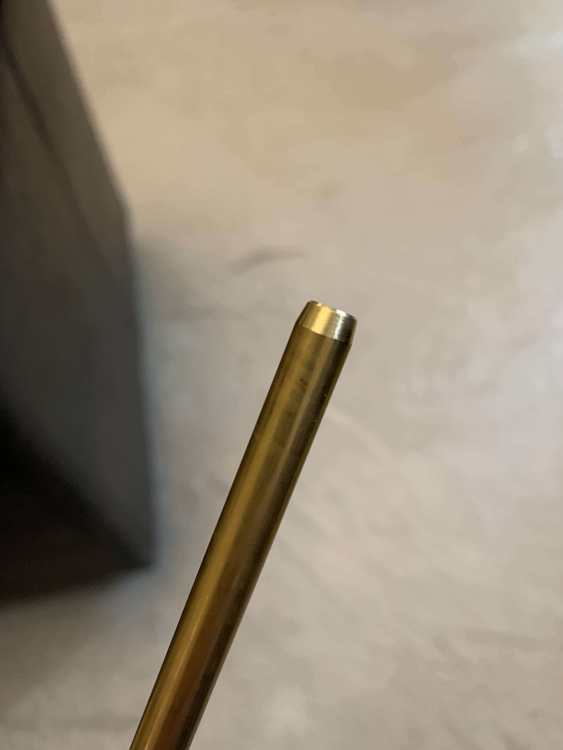
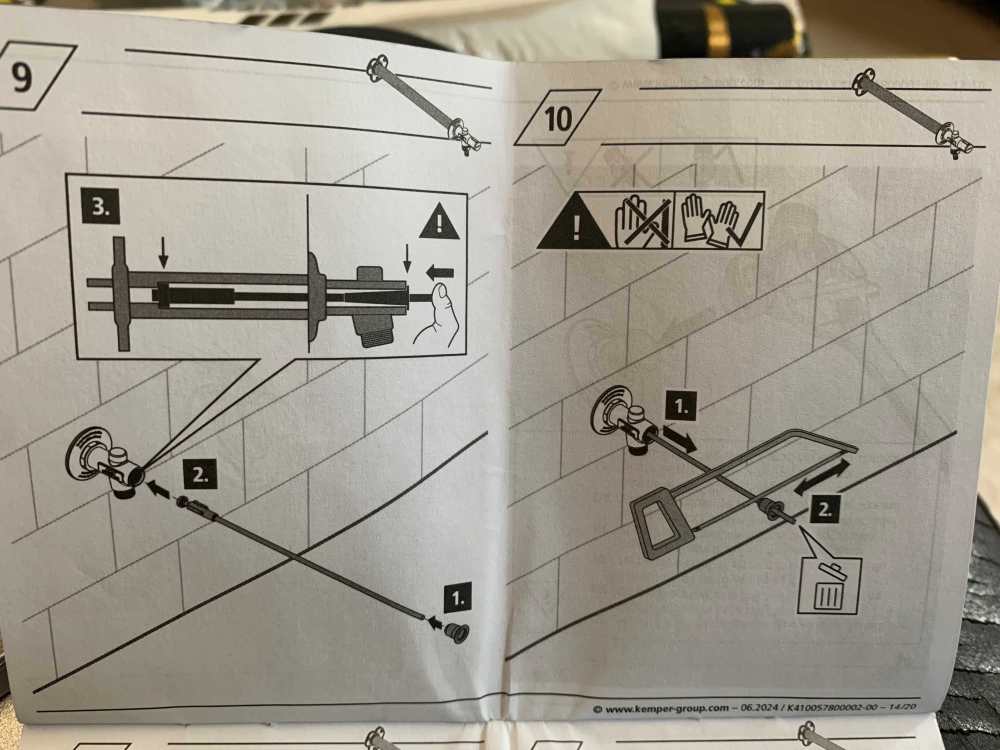
Not sure I follow because the black bit will not fit on the end of the rod and slide down it - as shown in this video... Yes I can measure the length of the black bit (which is designed to to seat against the outside edge of the tap block), then mark the position of the outside edge of the tap block onto the rod, then measure down the rod by the length of the black bit. Or I could widen the hole in the black bit so it will fit over the rod. The measurement option is prone to measurement errors. It seems odd that they would supply a thing to make sure you can measure the rod length precisely, but then not have it actually fit the rod. The rest of it all seems to go together very well and is carefully engineered. So makes you wonder a lot when something like that just doesn't fit. There is a small chamfer on the end of the rod which fits the hole in the black bit, but it won't slide down beyond that. You can't achieve what is shown in the inset diagram labelled 3 or on the video. I notice the valve end is spring loaded, so I suppose there is room for error perhaps, but getting the length spot on presumably maximises the spring compression and the strength of the seal.


-
Low points: and how to get out of them
Spinny replied to ToughButterCup's topic in General Self Build & DIY Discussion
Never enjoyed this time of year. The festive period is over but still a long drag until warmth and daylight comes - UK can sometimes be getting snow in early April. The constant flow of problems can seem overbearing - one of our plasterers cut his hand badly before Xmas - now the other one has badly sprained his right hand/thumb on scaffolding. Not on our job, but just stops them working on ours. FIL just diagnosed with dementia. Spouse is really struggling. At my time of life I have concluded the only approach is the stoic one - keep pushing the rock up the mountain however little gain you make and however much it keeps rolling back down... https://youtu.be/i-GD7R82y9Q?si=S_YVPJ3poHzILnbK I like to keep thinking of each day having more daylight than the last. -
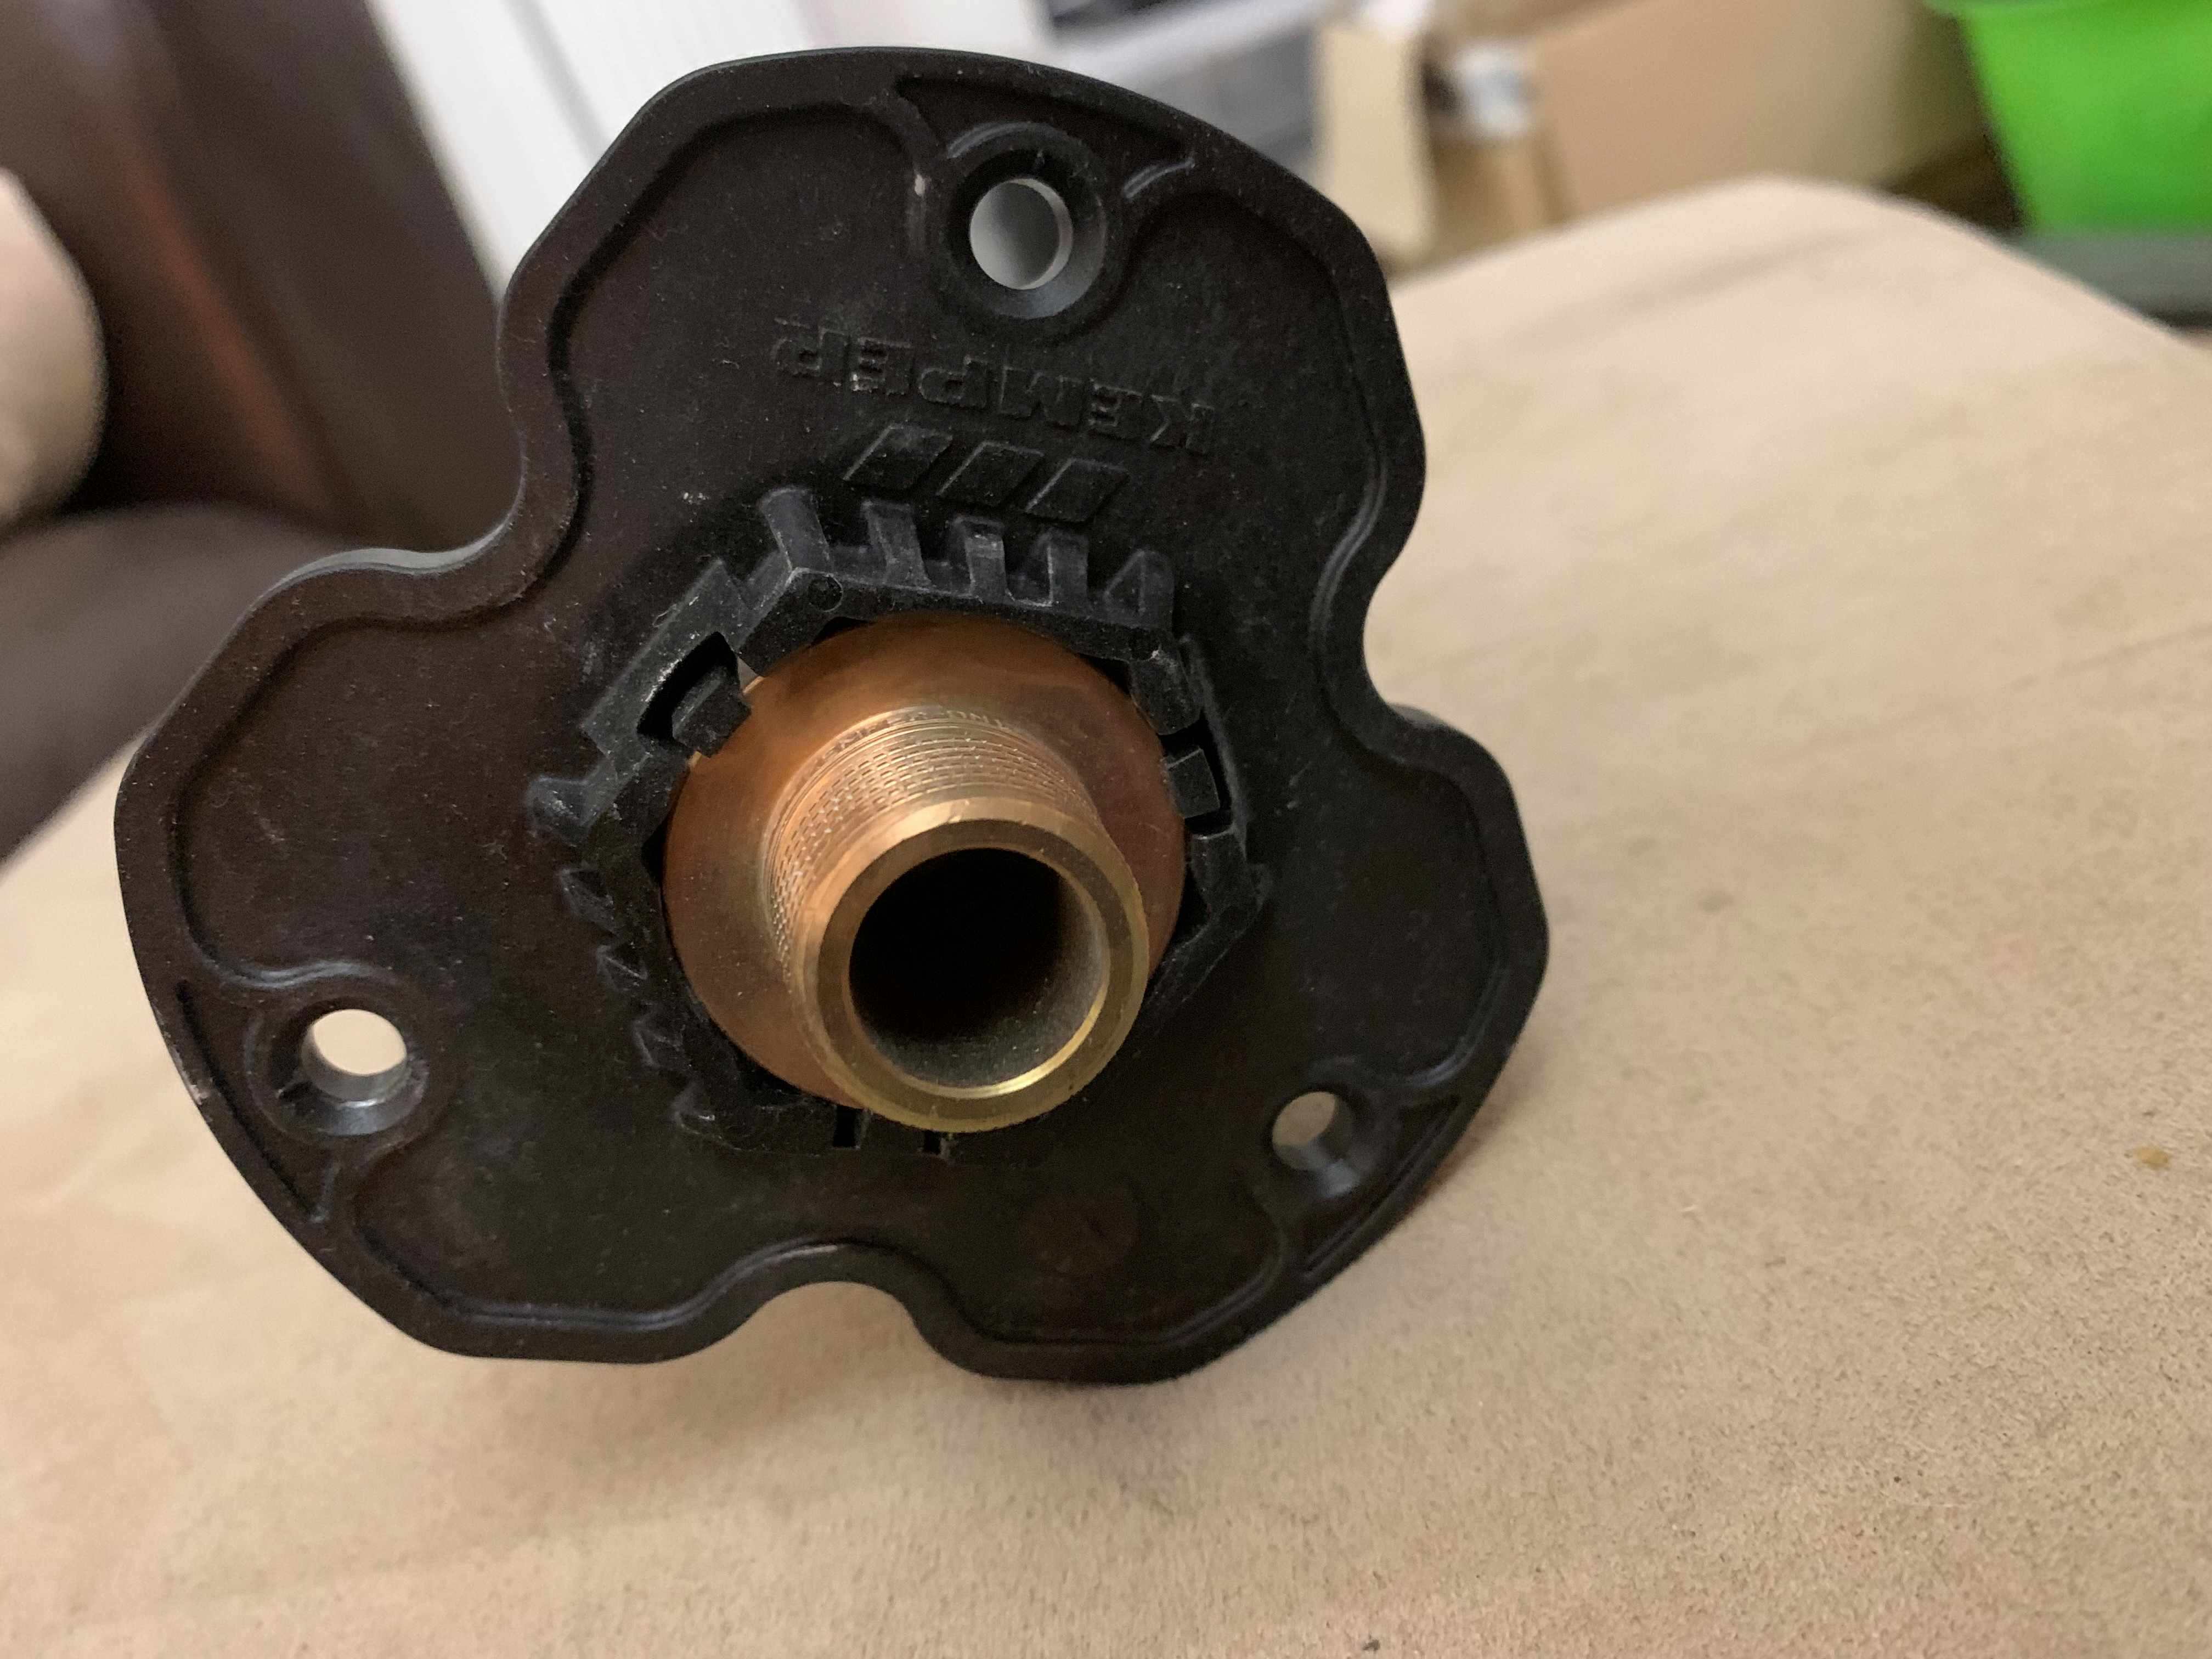
@Russell griffiths and all So I am cutting my Kemper Frosti tap down to the correct length. On the instruction leaflet it implies that a black plastic piece can be slid over and down the inner valve rod in order to mark the correct cutting point for the valve rod. However the black plastic piece does not seem to fit over the rod because the hole in the center is too small to slide over the rod. Anyone else that has fitted a Kemper Frosti had this problem ?
-
So every time the heating comes on we get pipes creaking under the landing and bathroom. Doubtless this is the copper pipes used in this part of the house expanding as the hot water heats them up. So what is the best fix for this ? I think maybe there is some kind of plumbers felt which can be slid under the pipes where they contact the joists to take away the friction ?
-
New technology is always the big hope. If we imagine a world with abundant energy from fusion, and a world where we are able to manufacture and reprocess materials new and old, things could look very different. When we think of the astonishing technological achievements of the last 100 years, and the accelerating pace of change, mankind will hopefully be in a different place in another 100 years - the blink of an eye in climate change terms. This video shows the astonishing developments now to come in bio technology and man made protein design for example... https://youtu.be/KbDvQgsOI-E?si=eW3ukpS1dLkhsGvA
-
Looks like the sparky has left us with a lighting cable for a locally switched wall light which is too short for where we want to site it. How can the cable be extended these days ? Is it acceptable to use some form of in-line connector buried in the wall ? (in the safe zone of course)
-
Except the other major issues are (1) cost, (2) environmental impact, and (3) intermittancy. 1. There is huge disagreement on the actual costs of renewable energy with people using different calculation methods and huge tax payer subsidies in place now. Subsidies not only being direct but also via paying producers to turn off wind turbines and cut off power feeds - effectively paying for no power. So we then have energy storage costs. We also have the cost of power cabling. 2. Environmental impacts extend from being a blot on the landscape, to killing wildlife, to felling rainforests, to catching fire, to falling over, to child labour in cobalt and lithium extraction, to interfering with radar, to loss of farm land. 3. Intermittancy means no energy security without huge scale energy storage, either centrally, or in a distributed fashion where everyone has to install a battery in their house. Renewables is not a free lunch or without very real issues.
-
I believe we will be very soon on range, cost and fire safety - I guess you are not following the developments in battery technology - try youtubing sodium batteries.