Spinny
-
Posts
923 -
Joined
-
Last visited
-
Days Won
1
Everything posted by Spinny
-
Under-house rusting beams and new support piers
Spinny replied to WiltshirePaul's topic in RSJs, Lintels & Steelwork
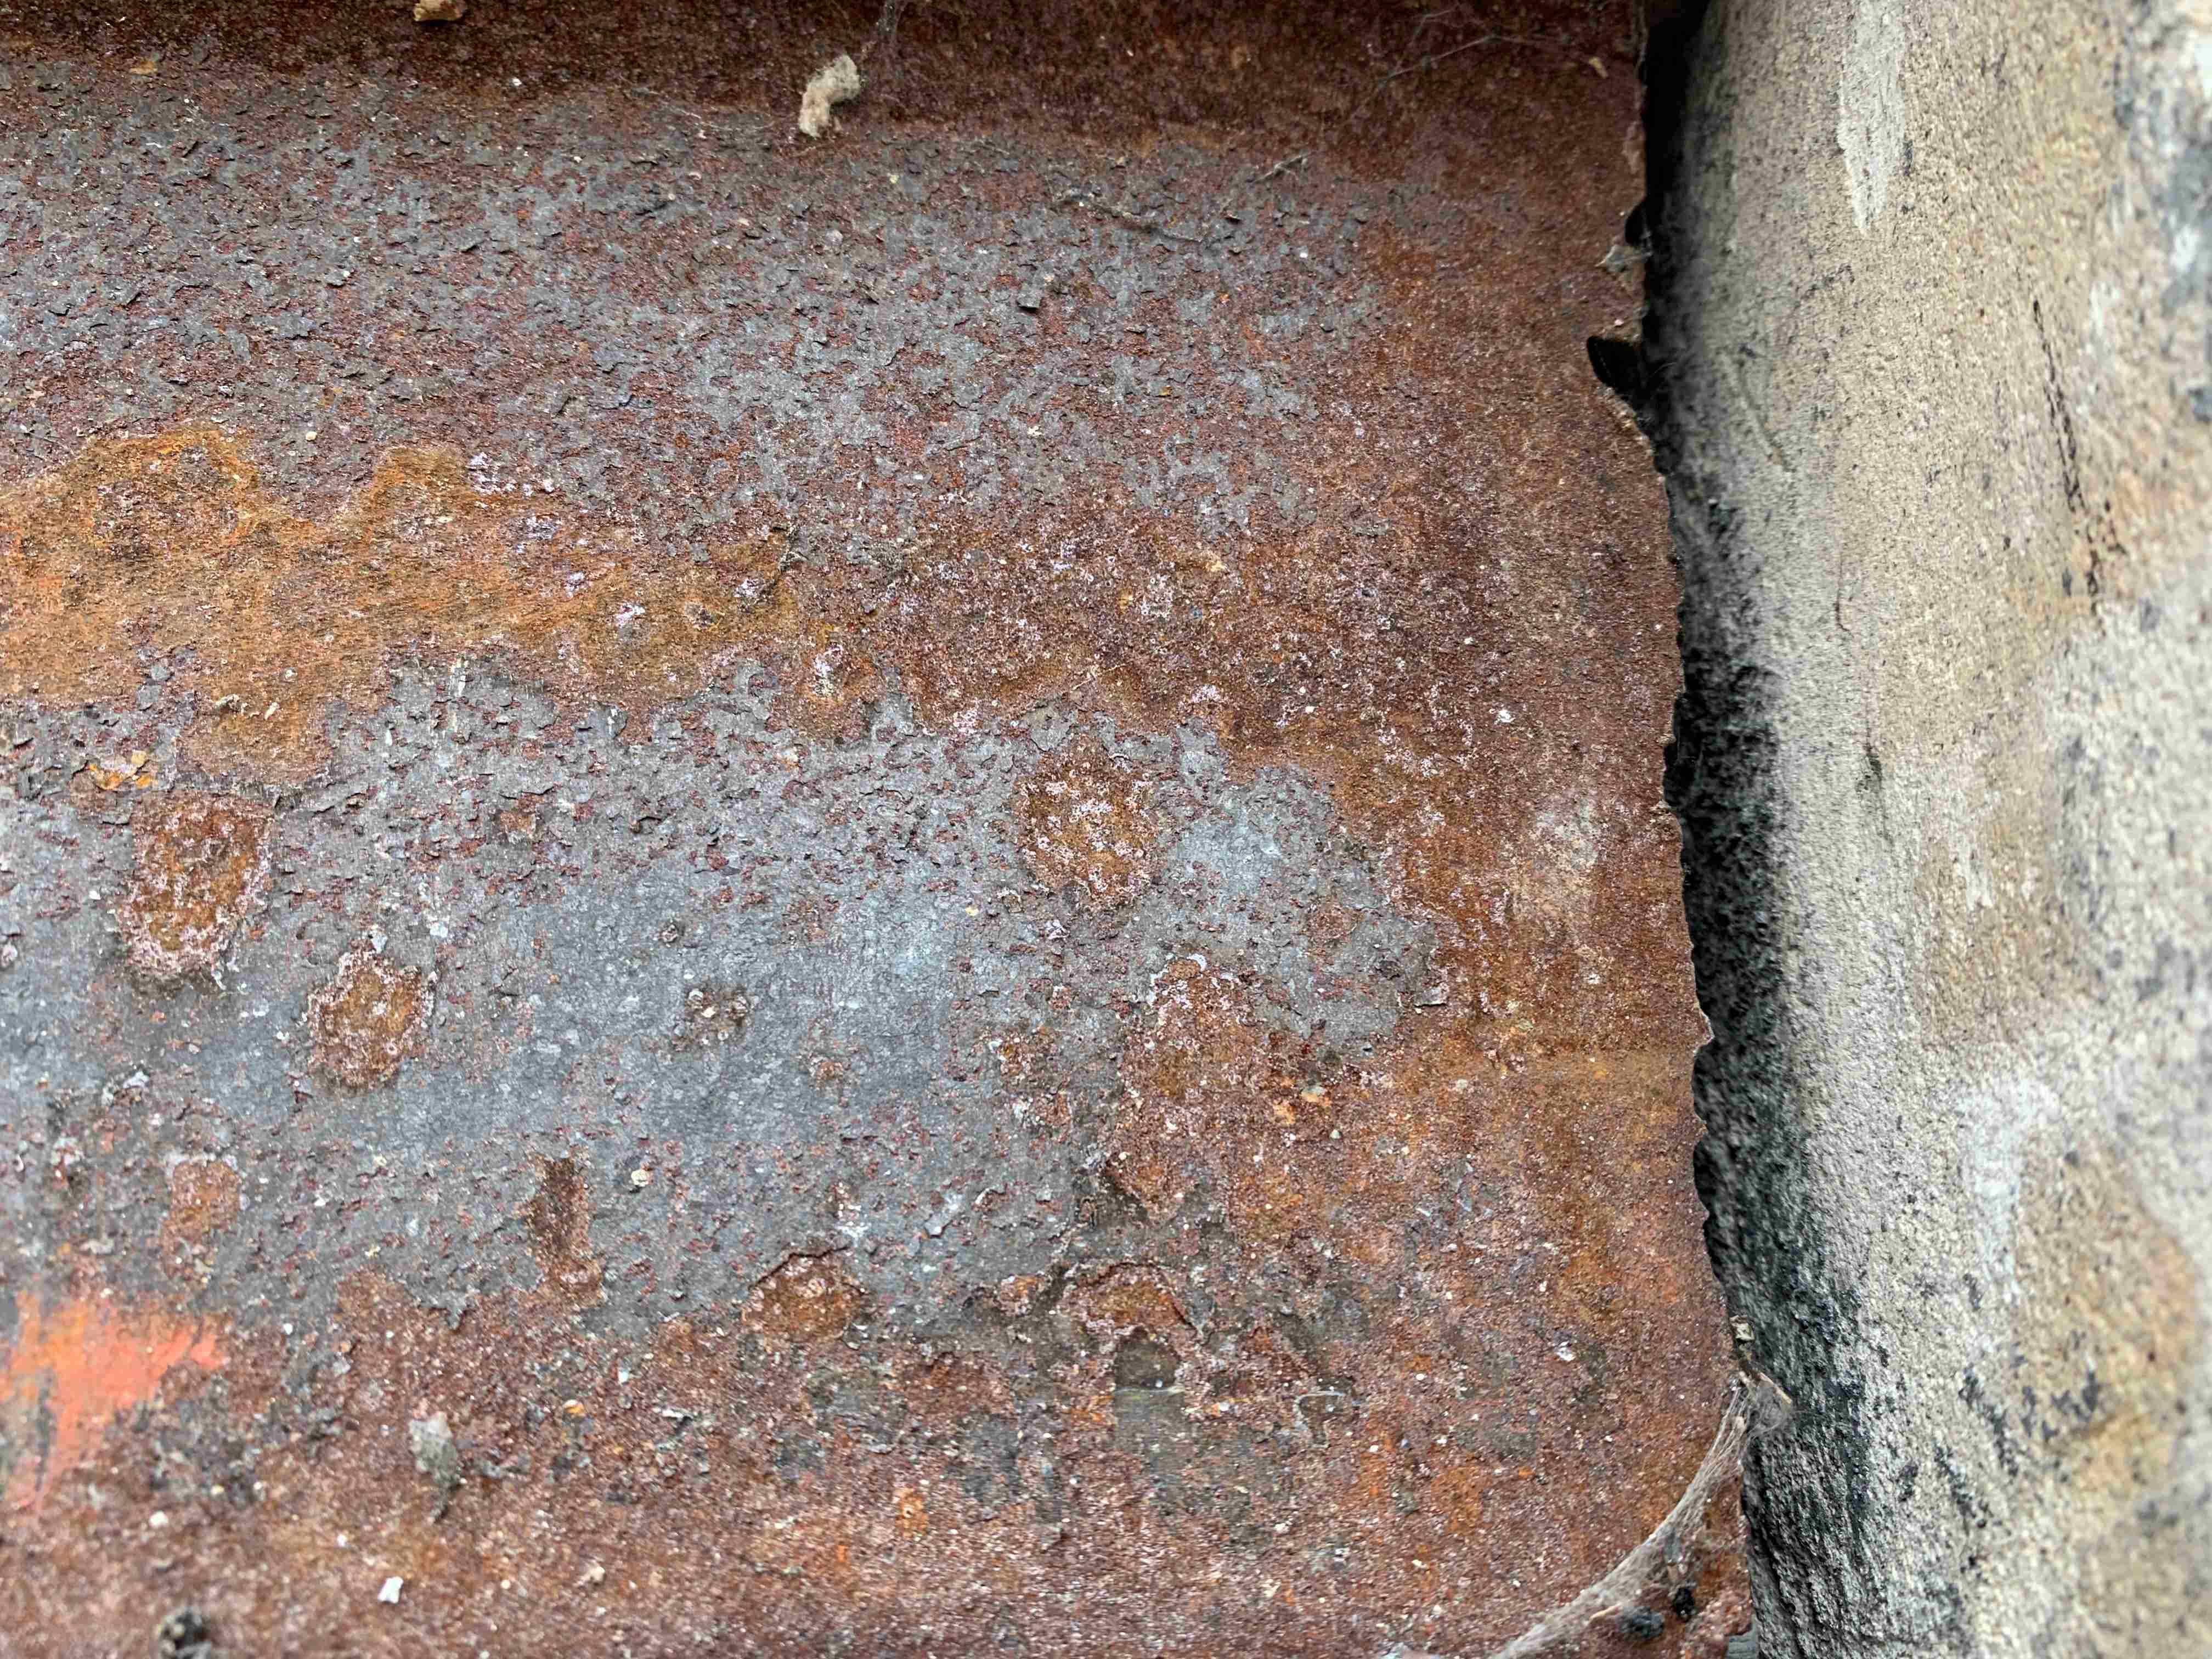
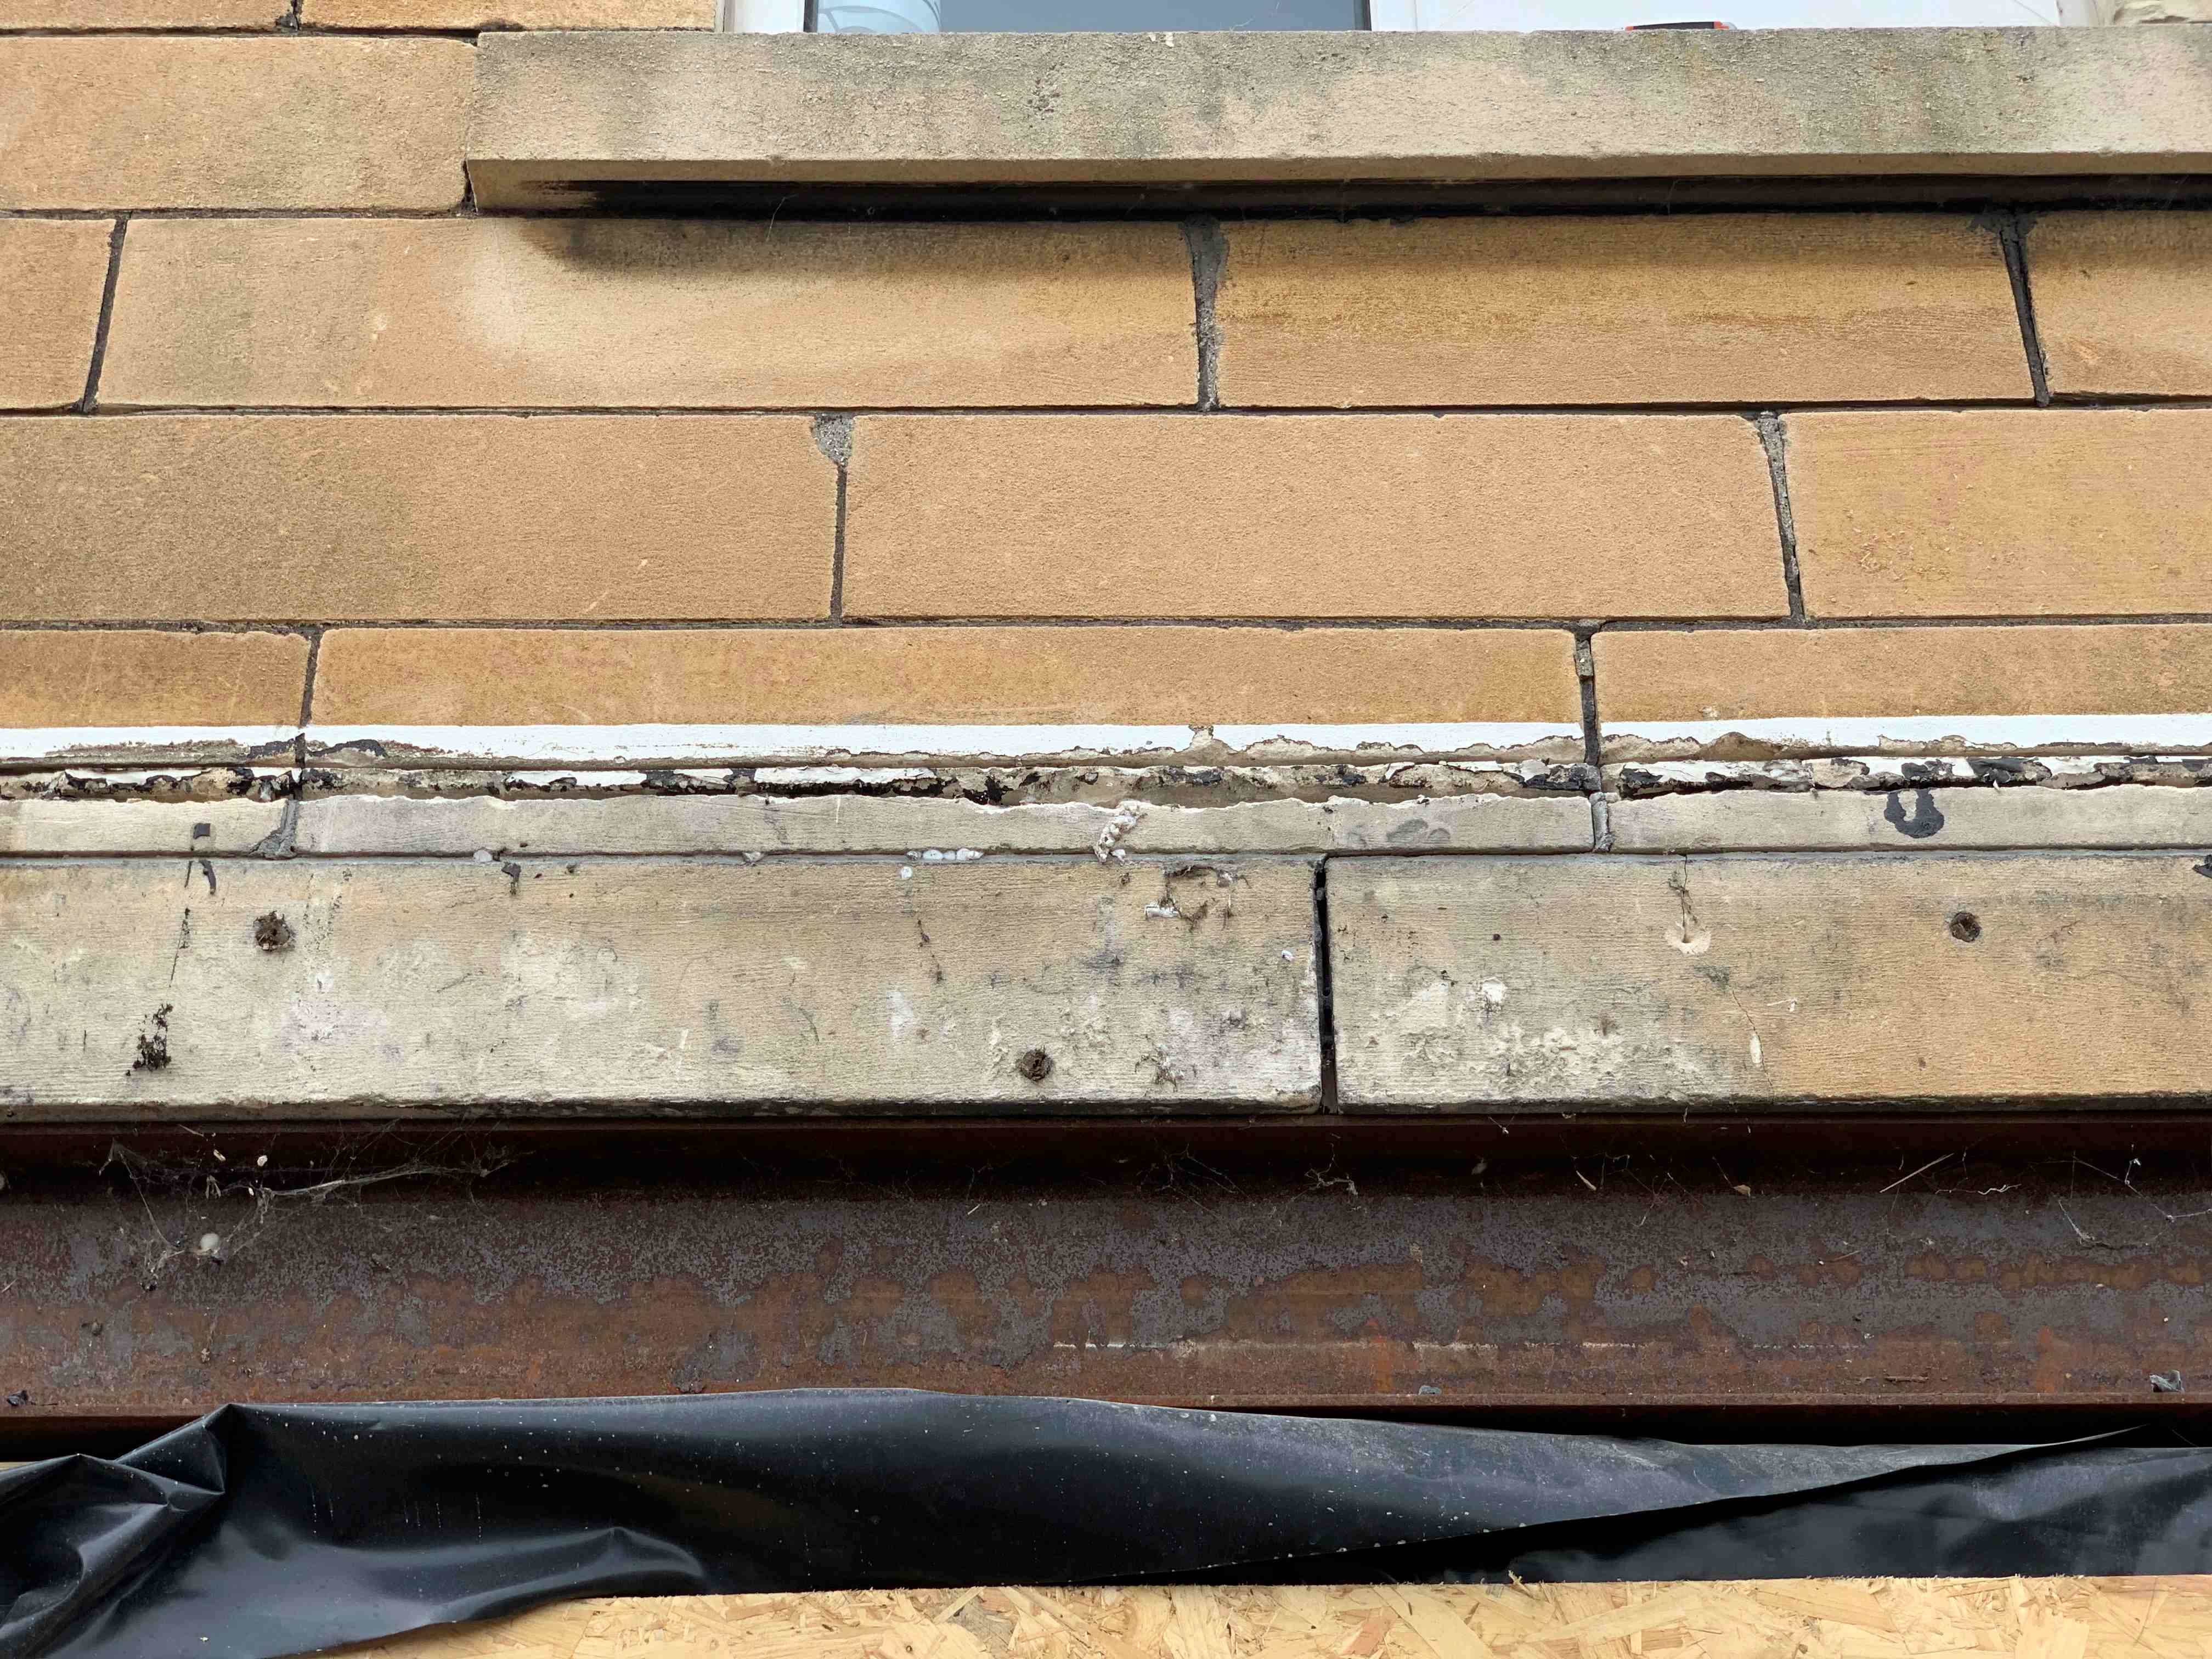
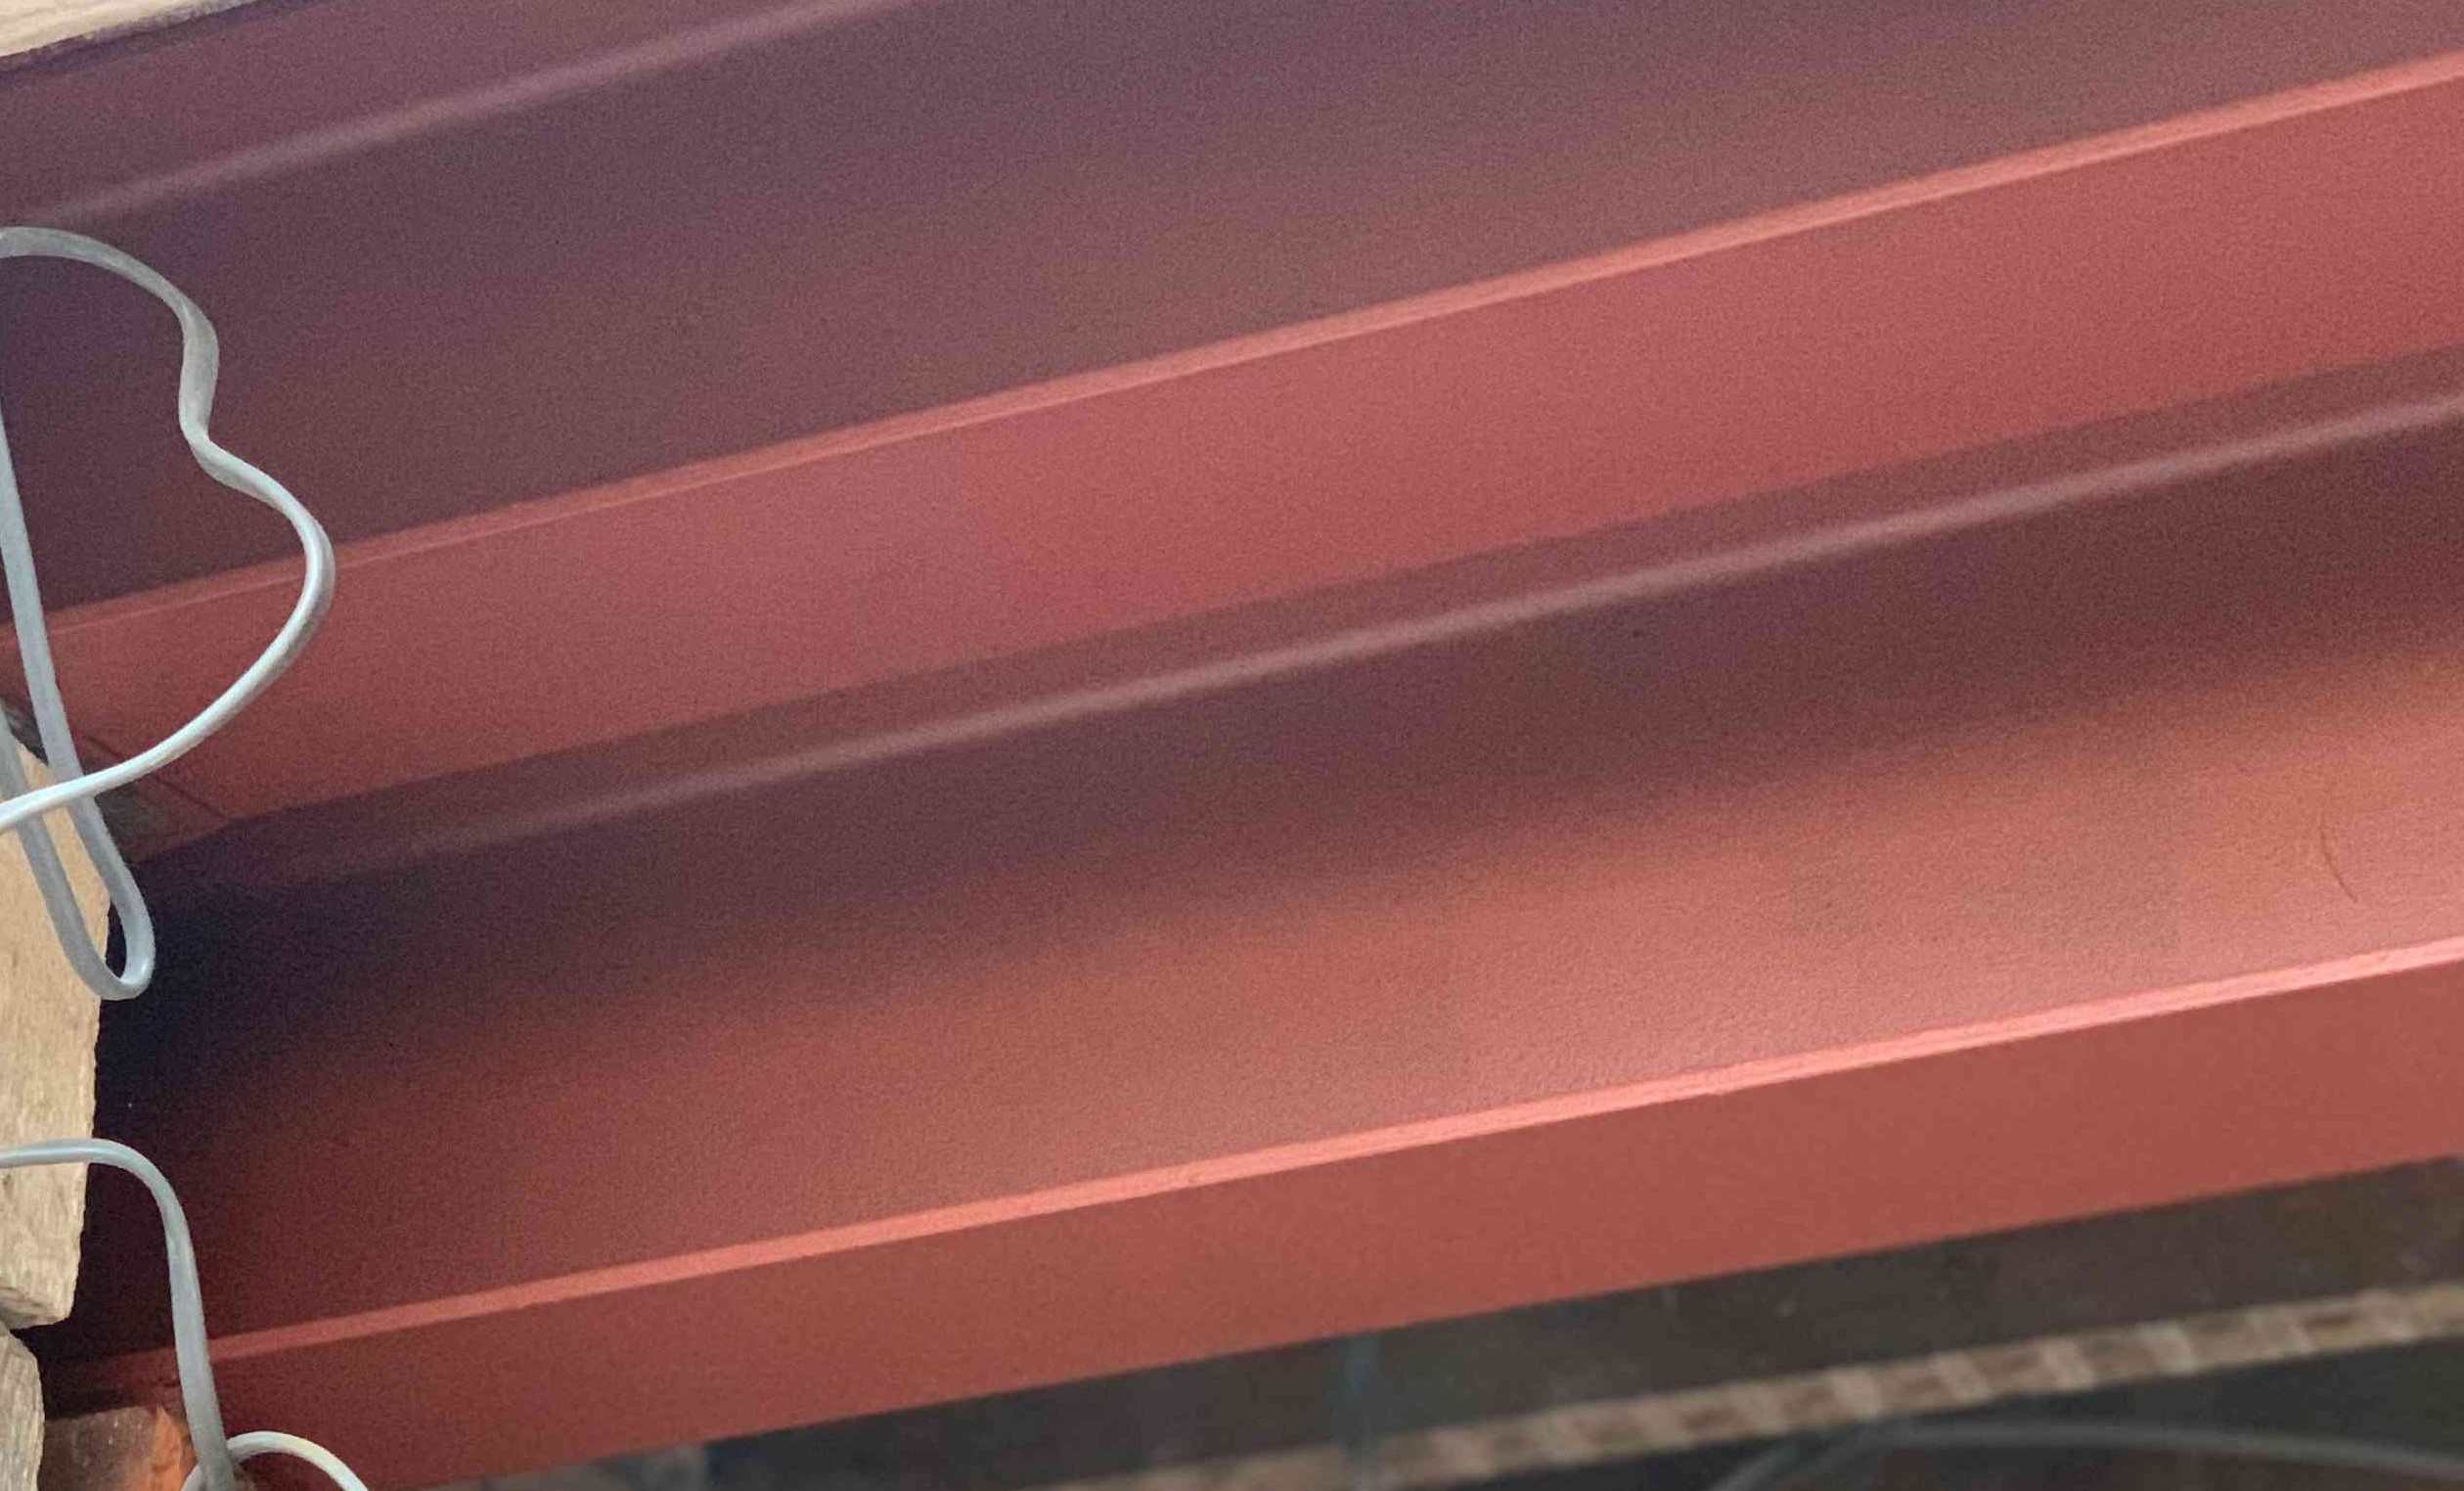
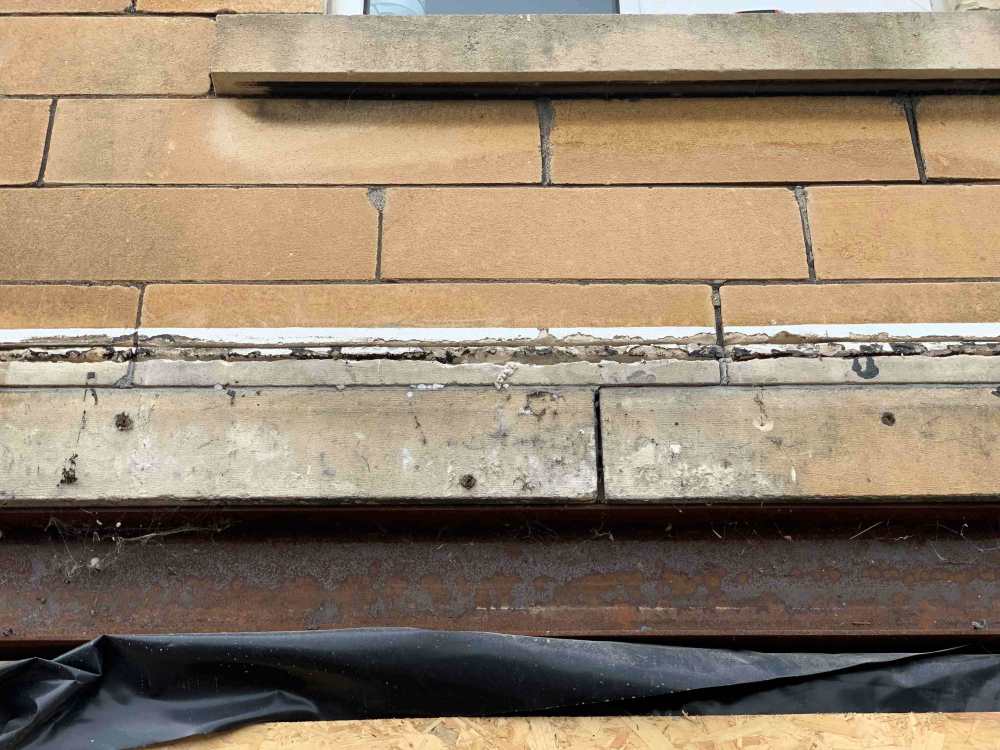
When you say 'old boy surveying engineer' do you mean a qualified professional structural engineer with professional insurance providing a paid for written SE report to you as customer ? Why exactly do you believe something has to be done with the steels ? Do you have any movement or cracking anywhere around the house and garage ? Is it just your personal concern over the appearance of rust and concern to do the right thing for the next 50 plus years ? Rust on steels is common. We had a much smaller pair of steels exposed during our extension work that had been in place since the 1980's and had plenty of rust (see photo). I asked our structural engineer whether they should be replaced or anything. He came and poked them hard with a screw driver looking for anything more than surface type rusting then said they were good for at least another 50 years. So I wire brushed as much rust off as possible by hand and using drill attachment, then used Neutrarust 661 liberally, then 2-3 coats of an iron oxide paint. See Pics. Not saying your situation is the same, but before embarking on costly structural works - presumably to make sure the house is fit for the next 50 plus years - you really want to base it on proper written professional advice. I am sure your house insurer would expect the same. (PS I am not a builder, engineer, etc, just joe public)

-
Thanks Nick that makes sense, (Though I still prefer to avoid the rubber bungs just because I have had mutiple blockages and back ups. I'd guess likely 95% of people never ever have a blocked drain or backup in their lives. And it is not just me, but also my neighbour that can/has blocked my drain, and I am downhill from him.) With the plumbers I have had it always seems to be impossible to have a conversation and get a shared agreement - before you know it they have gone off and done something and just missed out the planning stage altogether, and then you look at it thinking oh dear, why have you just put loads of elbows in and strangled my water flow or whatever.
-
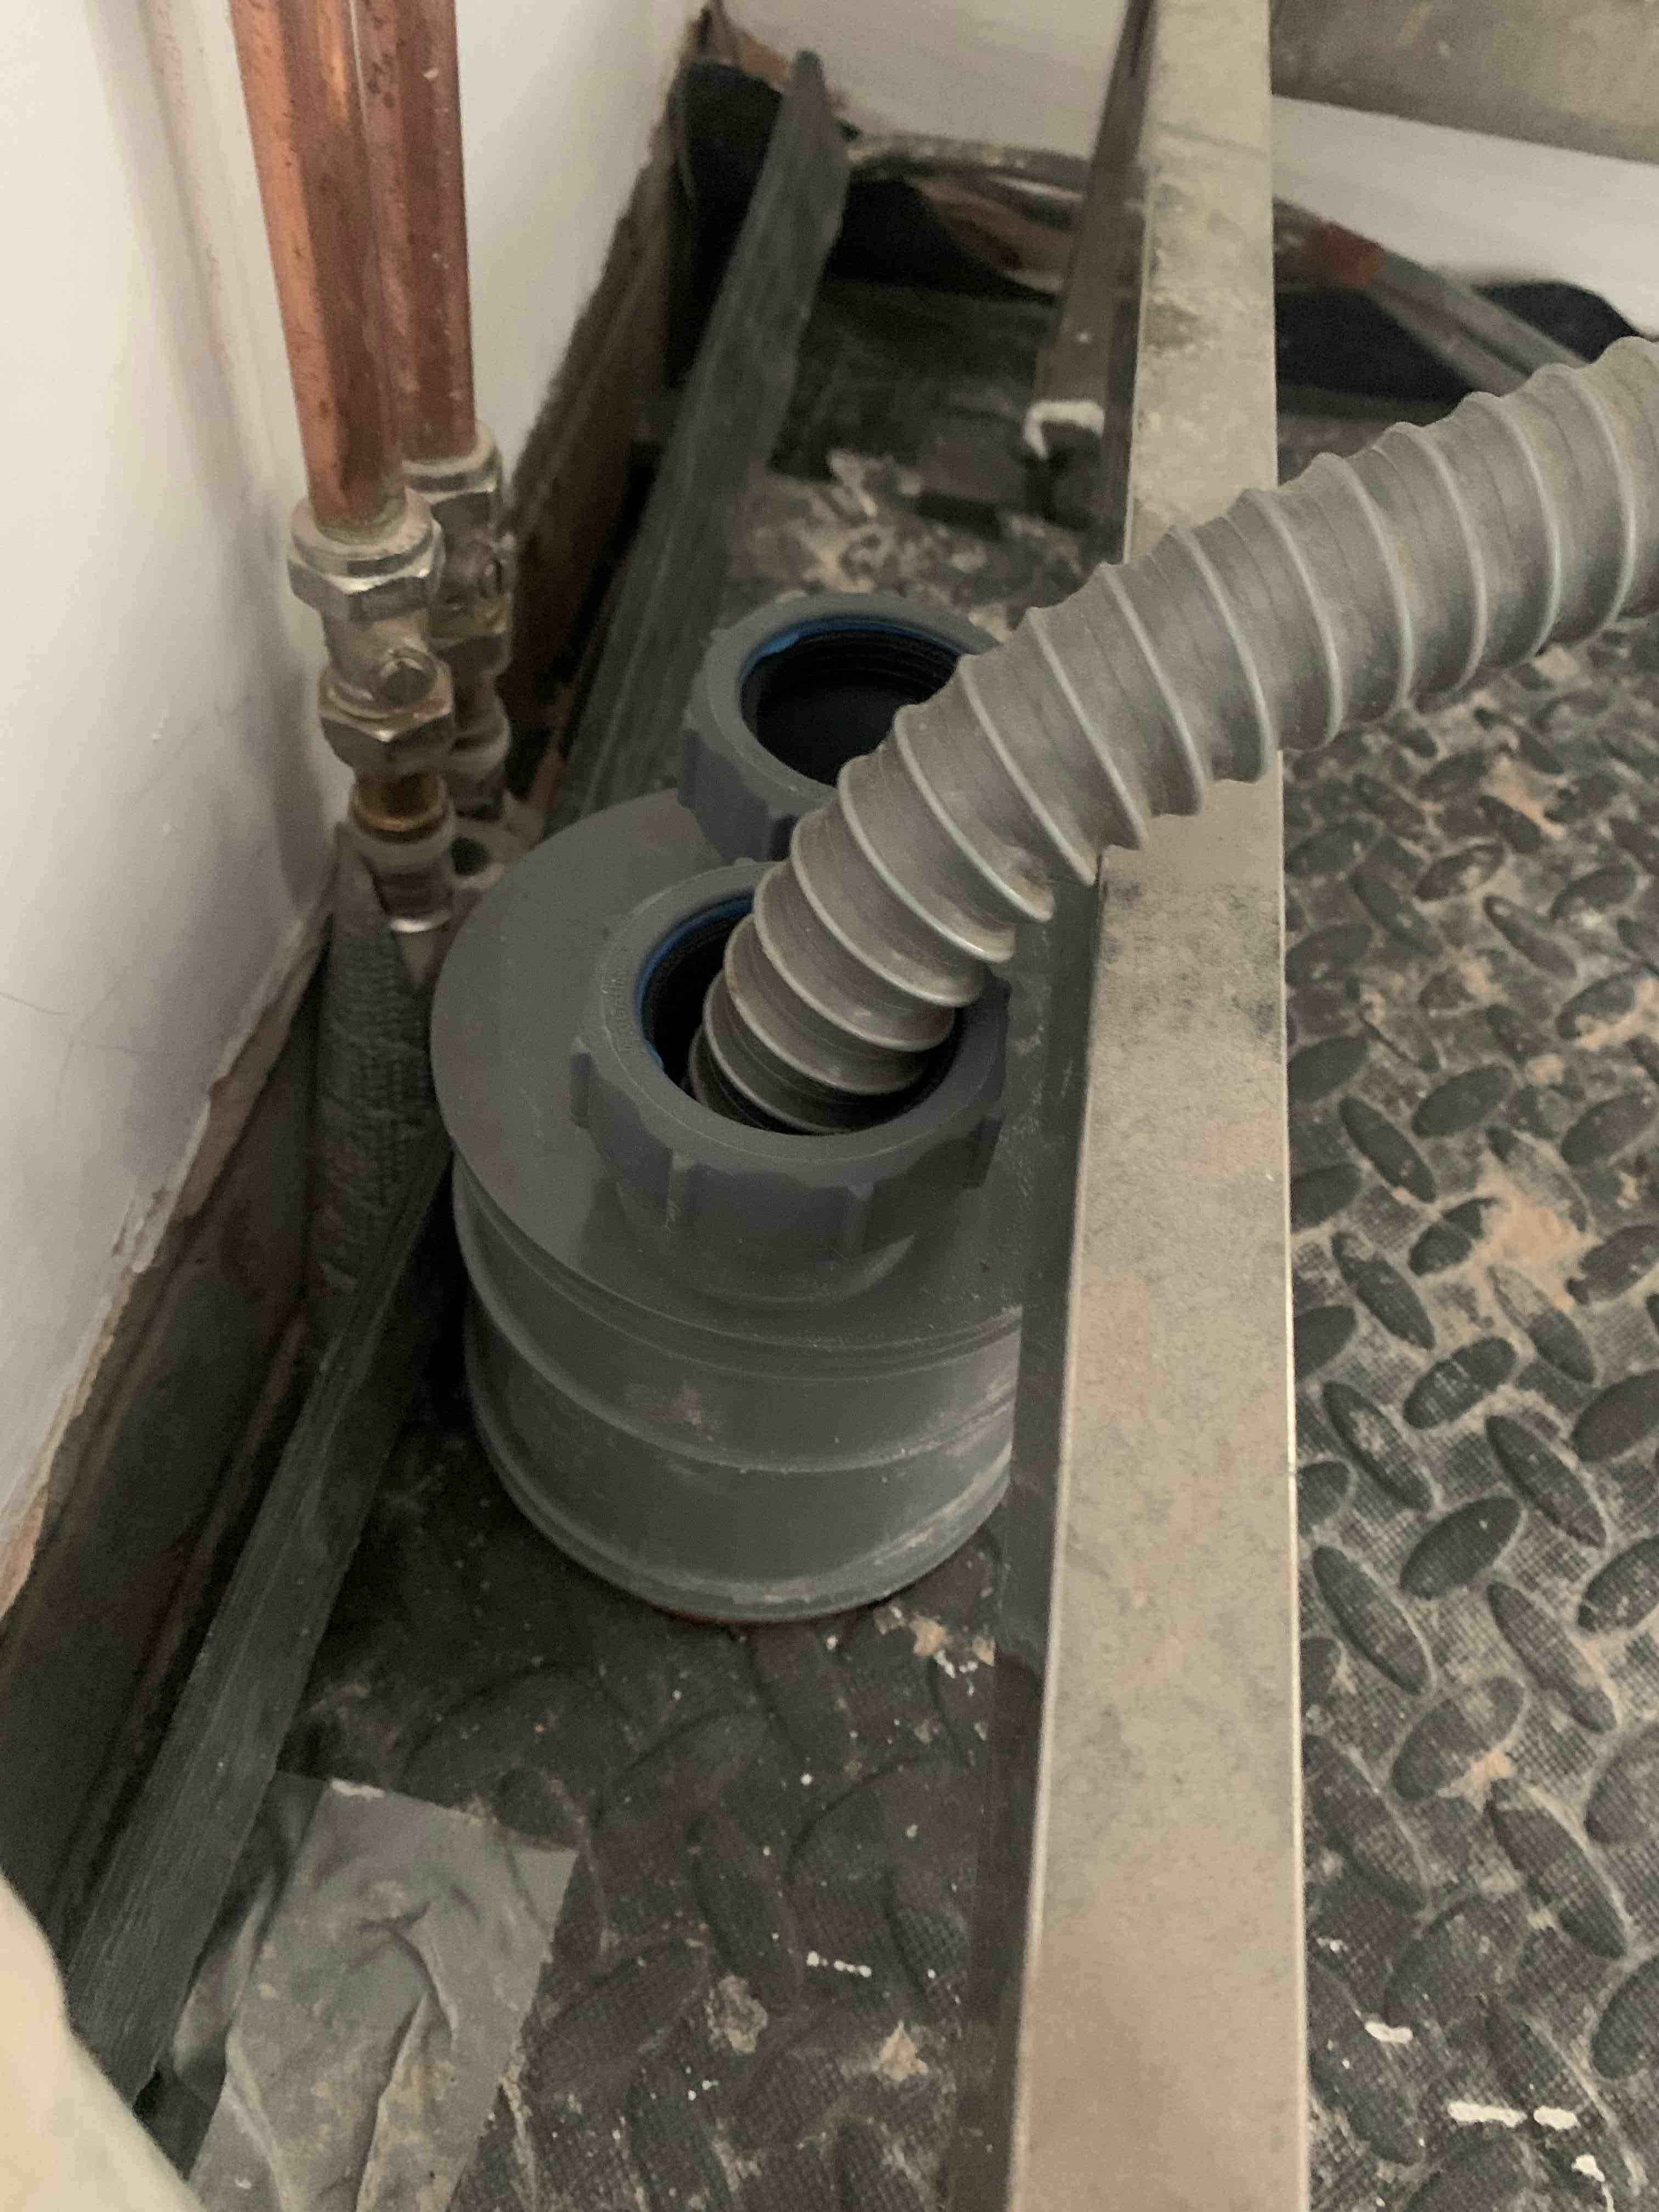
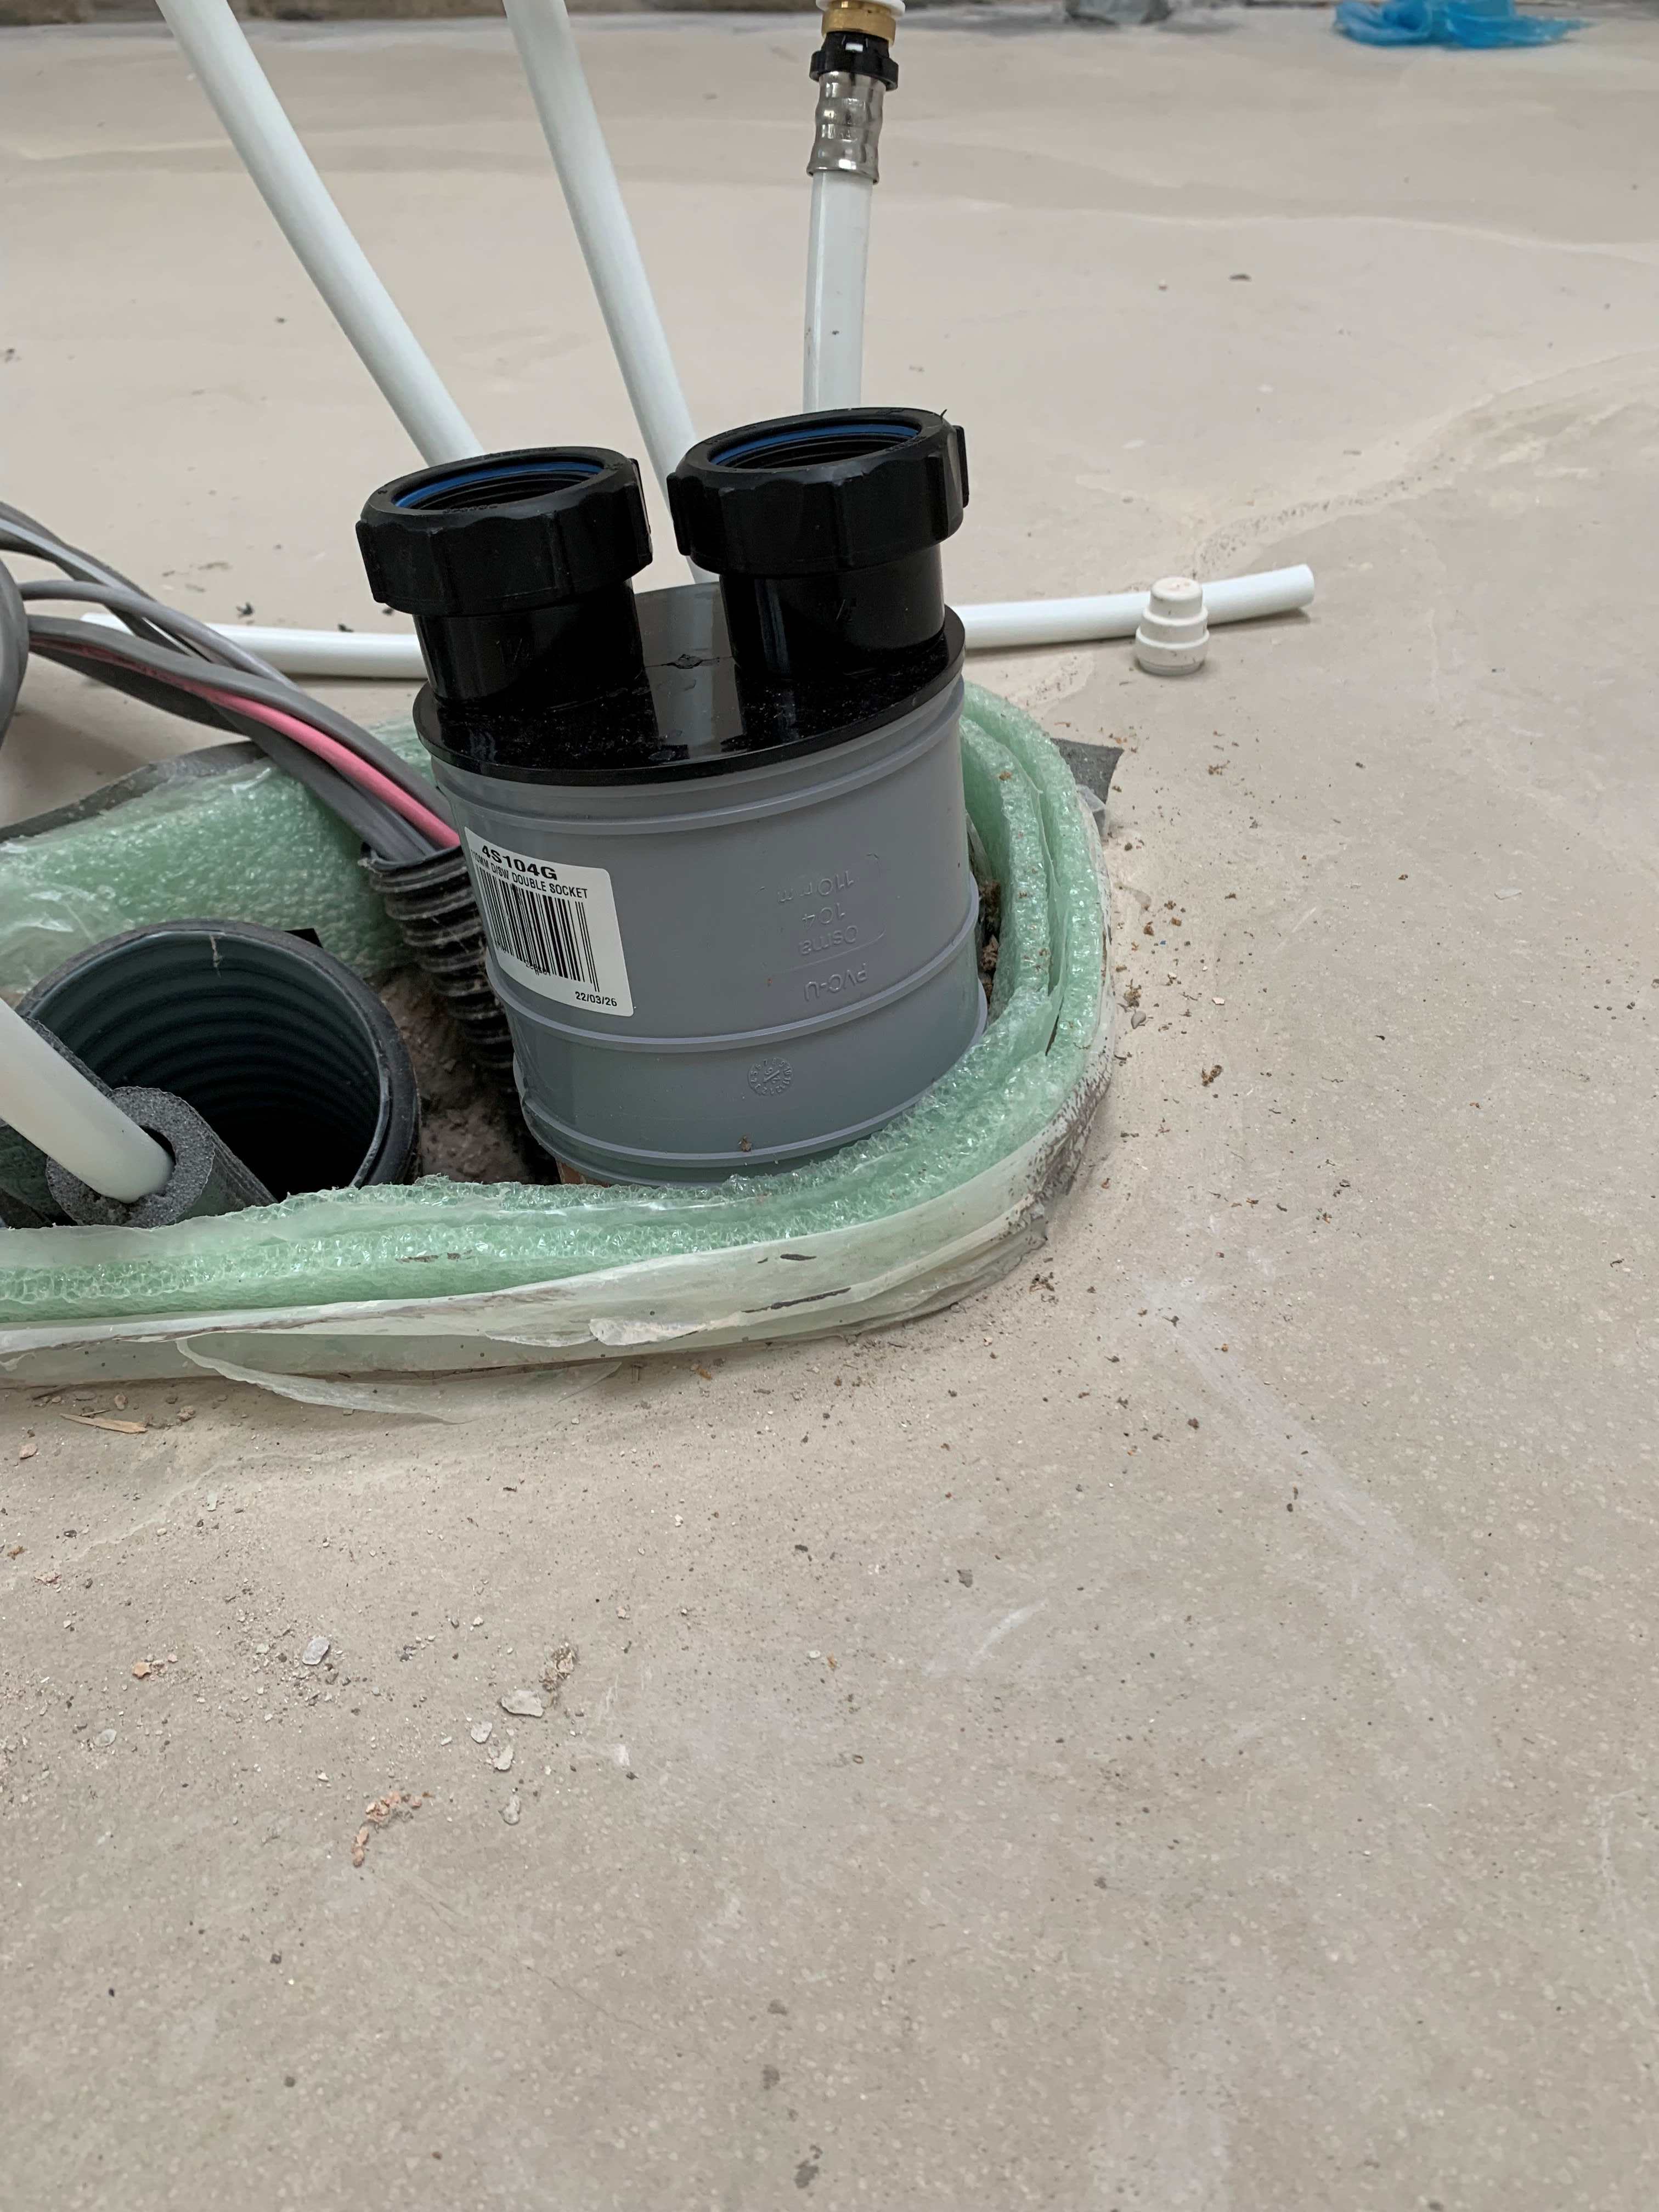
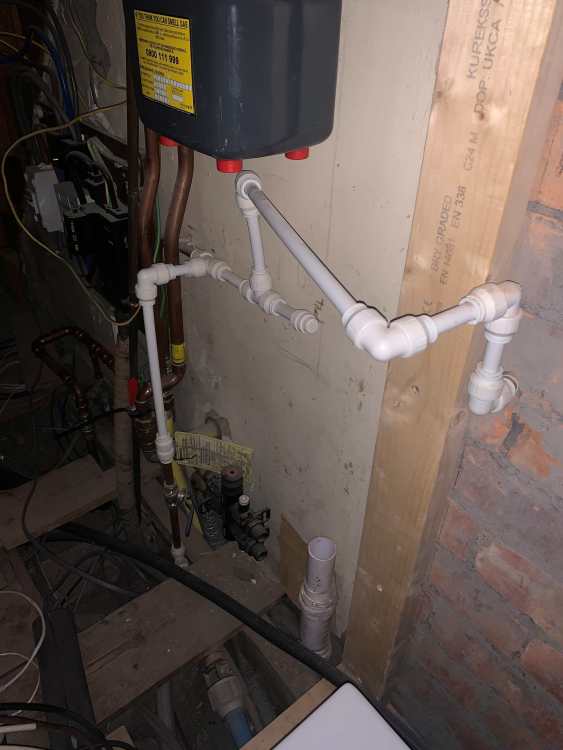
Thanks again. TBH I don't really fancy those bung type connectors. Our drains have been blocked a few times creating some backup. Most recently by our neighbour, whose drain feeds into our manhole - and he has two extensions and no soakaway. So if the drains backed up I wouldn't want a leak at or under floor level. Seems better to me to have a leak at a manhole cover or surface drain at ground level outside. To effectively ensure any back up would rise up the waste pipe rather than leak out. A plumber fitted a bung but it seemed loose and potentially prone to leaking. Also might an enterprising stray rat disturb it. I have now seen there seem to be some small pipe angles - could I somehow put a 15 degree or 11 degree bend on the 110 pipe to try and get it vertical ? Also can I ask what the form is for drains and wastes in kitchen cupboards. It seems to be common to keep the 110 drain under the base board of the cupboard and convert to smaller waste pipe size below the baseboard and just bring 40mm through the base board. But am wondering whether this is ideal because... 1. If there is a leak at the 110 to 40 join (including by a backup) then you won't know because it is hidden. 2. If you want to clear the 110 pipe of a blockage, you can't access it to rod it except through the 40mm waste pipe, or from the other direction. 3. If you want to take the waste pipe and traps apart to clean them all out, then you can't remove the lower 40mm waste pipe because the join to 110 is below the baseboard. Your trap door partly addresses this although seems to be rather fixed in place by water pipes also going through it. Is it just nuts to bring the top edge of the 110 pipe through the baseboard ? I am possibly over thinking I guess. Poor trades people make you paranoid. Pic show what is currently in place in my utility - will place two 40mm connections through the base board - is this madder than a mad thing - should I get it reworked before the kitchen fitters come ?

-
See photo. The drain pipe running to our kitchen island sink unit does not come vertically up from the floor. It runs at a jaunty angle both front/rear and side/side relative to the kitchen sink cupboard that will sit above it. So how is this best dealt with so that the waste pipe/traps etc inside the cupboard can be kept neat and vertical ? (PS Any photos showing how drains are normally brought up into a kitchen cupboard ?)

-
Drain in wrong place. Can this be fixed somehow ?
Spinny replied to Spinny's topic in Waste & Sewerage
Thanks. It is a rainwater downpipe, but it is feeding into the foul drain/sewer and not into a soakaway. It only drains a small portion of the extension roof and one of the downpipes for the original house roof drains down onto it. So was acceptable to BC - almost all of the extension roof water will go to a rear soakaway. It is also the only surface drain in that area, so would like to retain that. -
Drain in wrong place. Can this be fixed somehow ?
Spinny replied to Spinny's topic in Waste & Sewerage
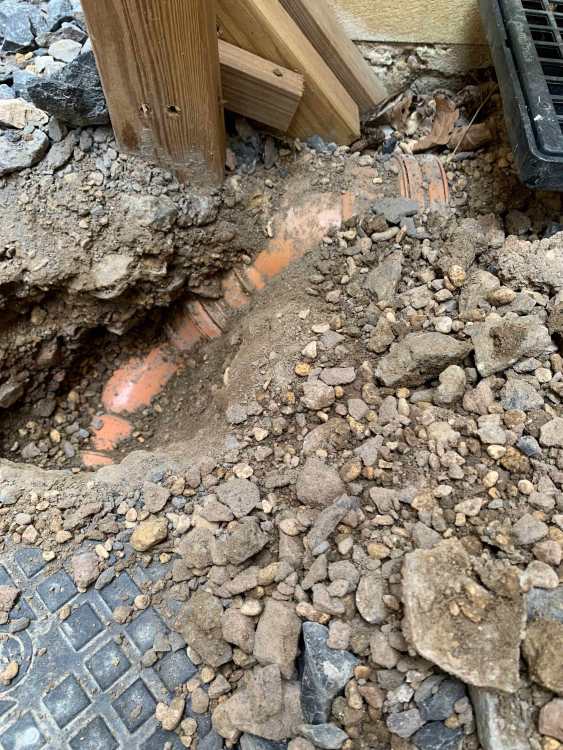
Coming back to this one now. Have cleared out some hard core to show the drain pipes that are there - looks like two 45 degree bends connected together. What pieces can I use to move this drain about 6 inches to the left ? (without moving the wavin chamber) (PS might there be any way to connect a small shallow drain/waste pipe into this gully to carry discharge from a water softener inside an adjacent wall about 1m away ? For example by attaching a 40mm pipe into the side bush somehow ?)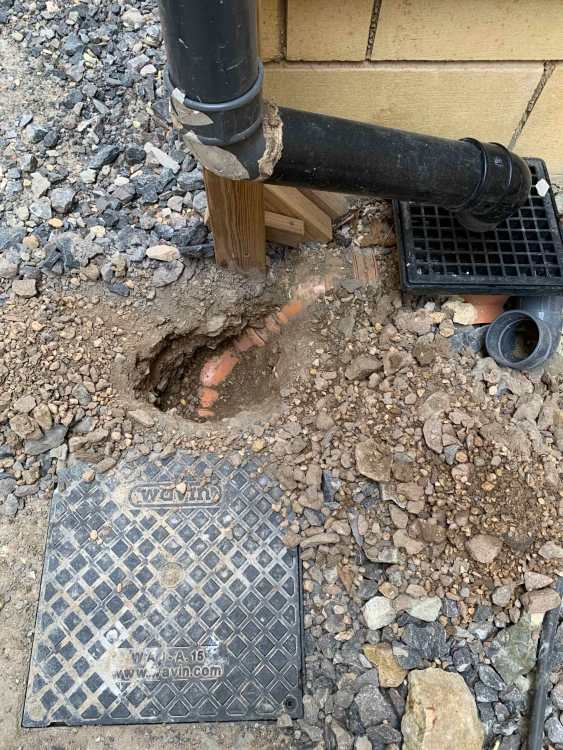
-
OK thanks for comments. The supply pipework is 32mm MDPE mains in, connected into 22mm copper (16mm MLCP tee to kitchen, 15mm copper tee to outside tap) through water softener (currently on bypass), then approx 5m of 25mm MLCP pipe to the cylinder location, final 1m in 22mm copper to the reducing combination valve. I was getting 37 l/m from the outside tap, so I know the mains supply is capable of providing a continuous 37l/m through 15mm copper. So the main supply through the 22mm copper and 25mm MLCP should be providing at least that and one would think 40l/m + into the combination valve. Mains pressure 3.5 bar. Unfortunately I can't change the 5m of 25mm MLCP with its press fit connector at each end, because it runs under the suspended floor which now has underfloor heating installed. Had I seen the MLCP connector bore reduction at the time I would have insisted the plumber put in 32mm MLCP. But that is the big unspeakable secret with MLCP and press fittings. I have seen some Wavin Tigris M5 / K5 press fit MLCP connectors which claim ''The new Wavin Tigris K5/M5 with Opti Flow reduces the pressure loss in the installation due to the up to 50% larger orifice..''. Mentioned them to my plumber who promptly claimed they would make no difference, and proceeded to fit cheaper ones he uses. A lot of trade are not interested in using anything except what is available off the shelf at their chosen merchant. System performance for the customer doesn't come into it - in fact I have never seen a plumber measure a flow rate.
-
I am talking total combined output there - that is Hot Flow + Cold Flow. If it is Christmas and I have family staying - say every year for the next 15 years. Then you have 6 adults in the house, maybe 2 or 3 grandchildren. You want to run 2 showers at the same time. Someone is running taps in the kitchen making breakfast, someone just put the washer on, and someone flushes the loo. So if the system can't handle it, someone is getting a bad shower, and you are into shouting round the house about who can use a bathroom or ensuite. At present the highest simultaneous output I am getting is 34 l/m combined hot and cold downstairs - that is 17 l/m each for hot and cold. Hot flow and cold flow are not separate, they all come through one input pipe and combination valve. I am only getting more like 20-24 l/m simultaneous combined on other outlets. I don't think this is unusual, part of the selling point of UVC vs gravity fed is the ability to run two bathrooms etc. My mains supply should be capable of 40 l/m+. Are we really saying there is no-one here that has ever seen flow problems with a domestic system regardless of how it is plumbed.
-
I mentioned on another topic, plumber is planning to replace my Caleffi pressure reducing combination valve with a 28mm valve to improve flow (my pipework is 22mm). I am reading some stuff about pressure reducing valves having to be sized correctly for expected flows, and sometimes 2 valves plumbed in parallel may be required - one for low flow, one for higher flow. (I guess I expect flows from say 5/6 l/m with one tap on through to say 35-40 l/m - 2 showers, couple of taps, kitchen appliance all going.) (Seems unfortunate that someone can't design a pressure reducing valve that works well without restricting flow over a wide flow range) PS Do you actually need to have a balanced cold ? What experience and advice can people offer re combination valves for domestic UVC systems and maximising flow ?
-
Didn't you say on another thread that you were putting traps out for rats ? And had tried poison ? You could perhaps have dead rats somewhere. Got any flies ? What happened with us years ago - rats came up a drain - got into some house voids/cavities/subfloor - wife claimed she could smell something - rat man put down poison - also blocked drain aperture - rats slowly disappear - 2-3 weeks later a plague of flies in the house. When our old extension was demolished - builders found some rat carcases under the floor. (PS Someone I once knew had a distant relative die in their house - body not found for 6 months - had to be identified by DNA. OMG)
-
Novice questions regarding wall chasing
Spinny replied to Ajay Gupta's topic in General Self Build & DIY Discussion
Should always chase horizontally or vertically between wall plates/entry/exit points - you will find the electrical safe zones defined on line. That way there is half a chance others won't drill into the cable. Even if it is safe, not actually power, as just a signal cable, nobody wants a severed aerial cable etc. How come you are not just going straight up the wall from subfloor ? What cable is it - Coax, HDMI, Network ? -
This seems to me the sort of system plumbers should be using
-
DIY - nope too busy playing wack-a-mole with various other things. I do just have a plumber currently, maybe ok tbh, but a little frustrated with flow from a different tap he has plumbed in. It is a general problem with trades and differences of objectives between the trade and the customer. Many trades want to be in and out job done - pay me mucho money instantly etc. Most customers have no idea what the plumber is doing. Plumbing should last up to 50 years - that's a lot of people cursing a limited flow rate because a plumber couldn't be bothered to bend pipe etc. One came for a look, as soon as I said a few things about MLCP and connectors and flow rates I had measured, he said, you sound technical, I'll decide whether I want to quote, never seen again. Clearly that type like ignorant customers that never ask a question. Good people want to do a proper job, welcome questions, take some trouble - measure the system performance - leave things right - call customers up to come and fix anything temporary they do etc.
-
Could it be the drains ? Maybe lift the drain covers and check everything is free flowing. Have all the waste traps in the house got water in them ?
-
OK Garry, I see you are referring to the white plastic pipe to the outside tap. Sure that bit can be simplified, but really the whole caboodle from the mains pipe coming in forward needs to be reworked. I am wondering whether having the bypass valve mounted vertically would help.
-
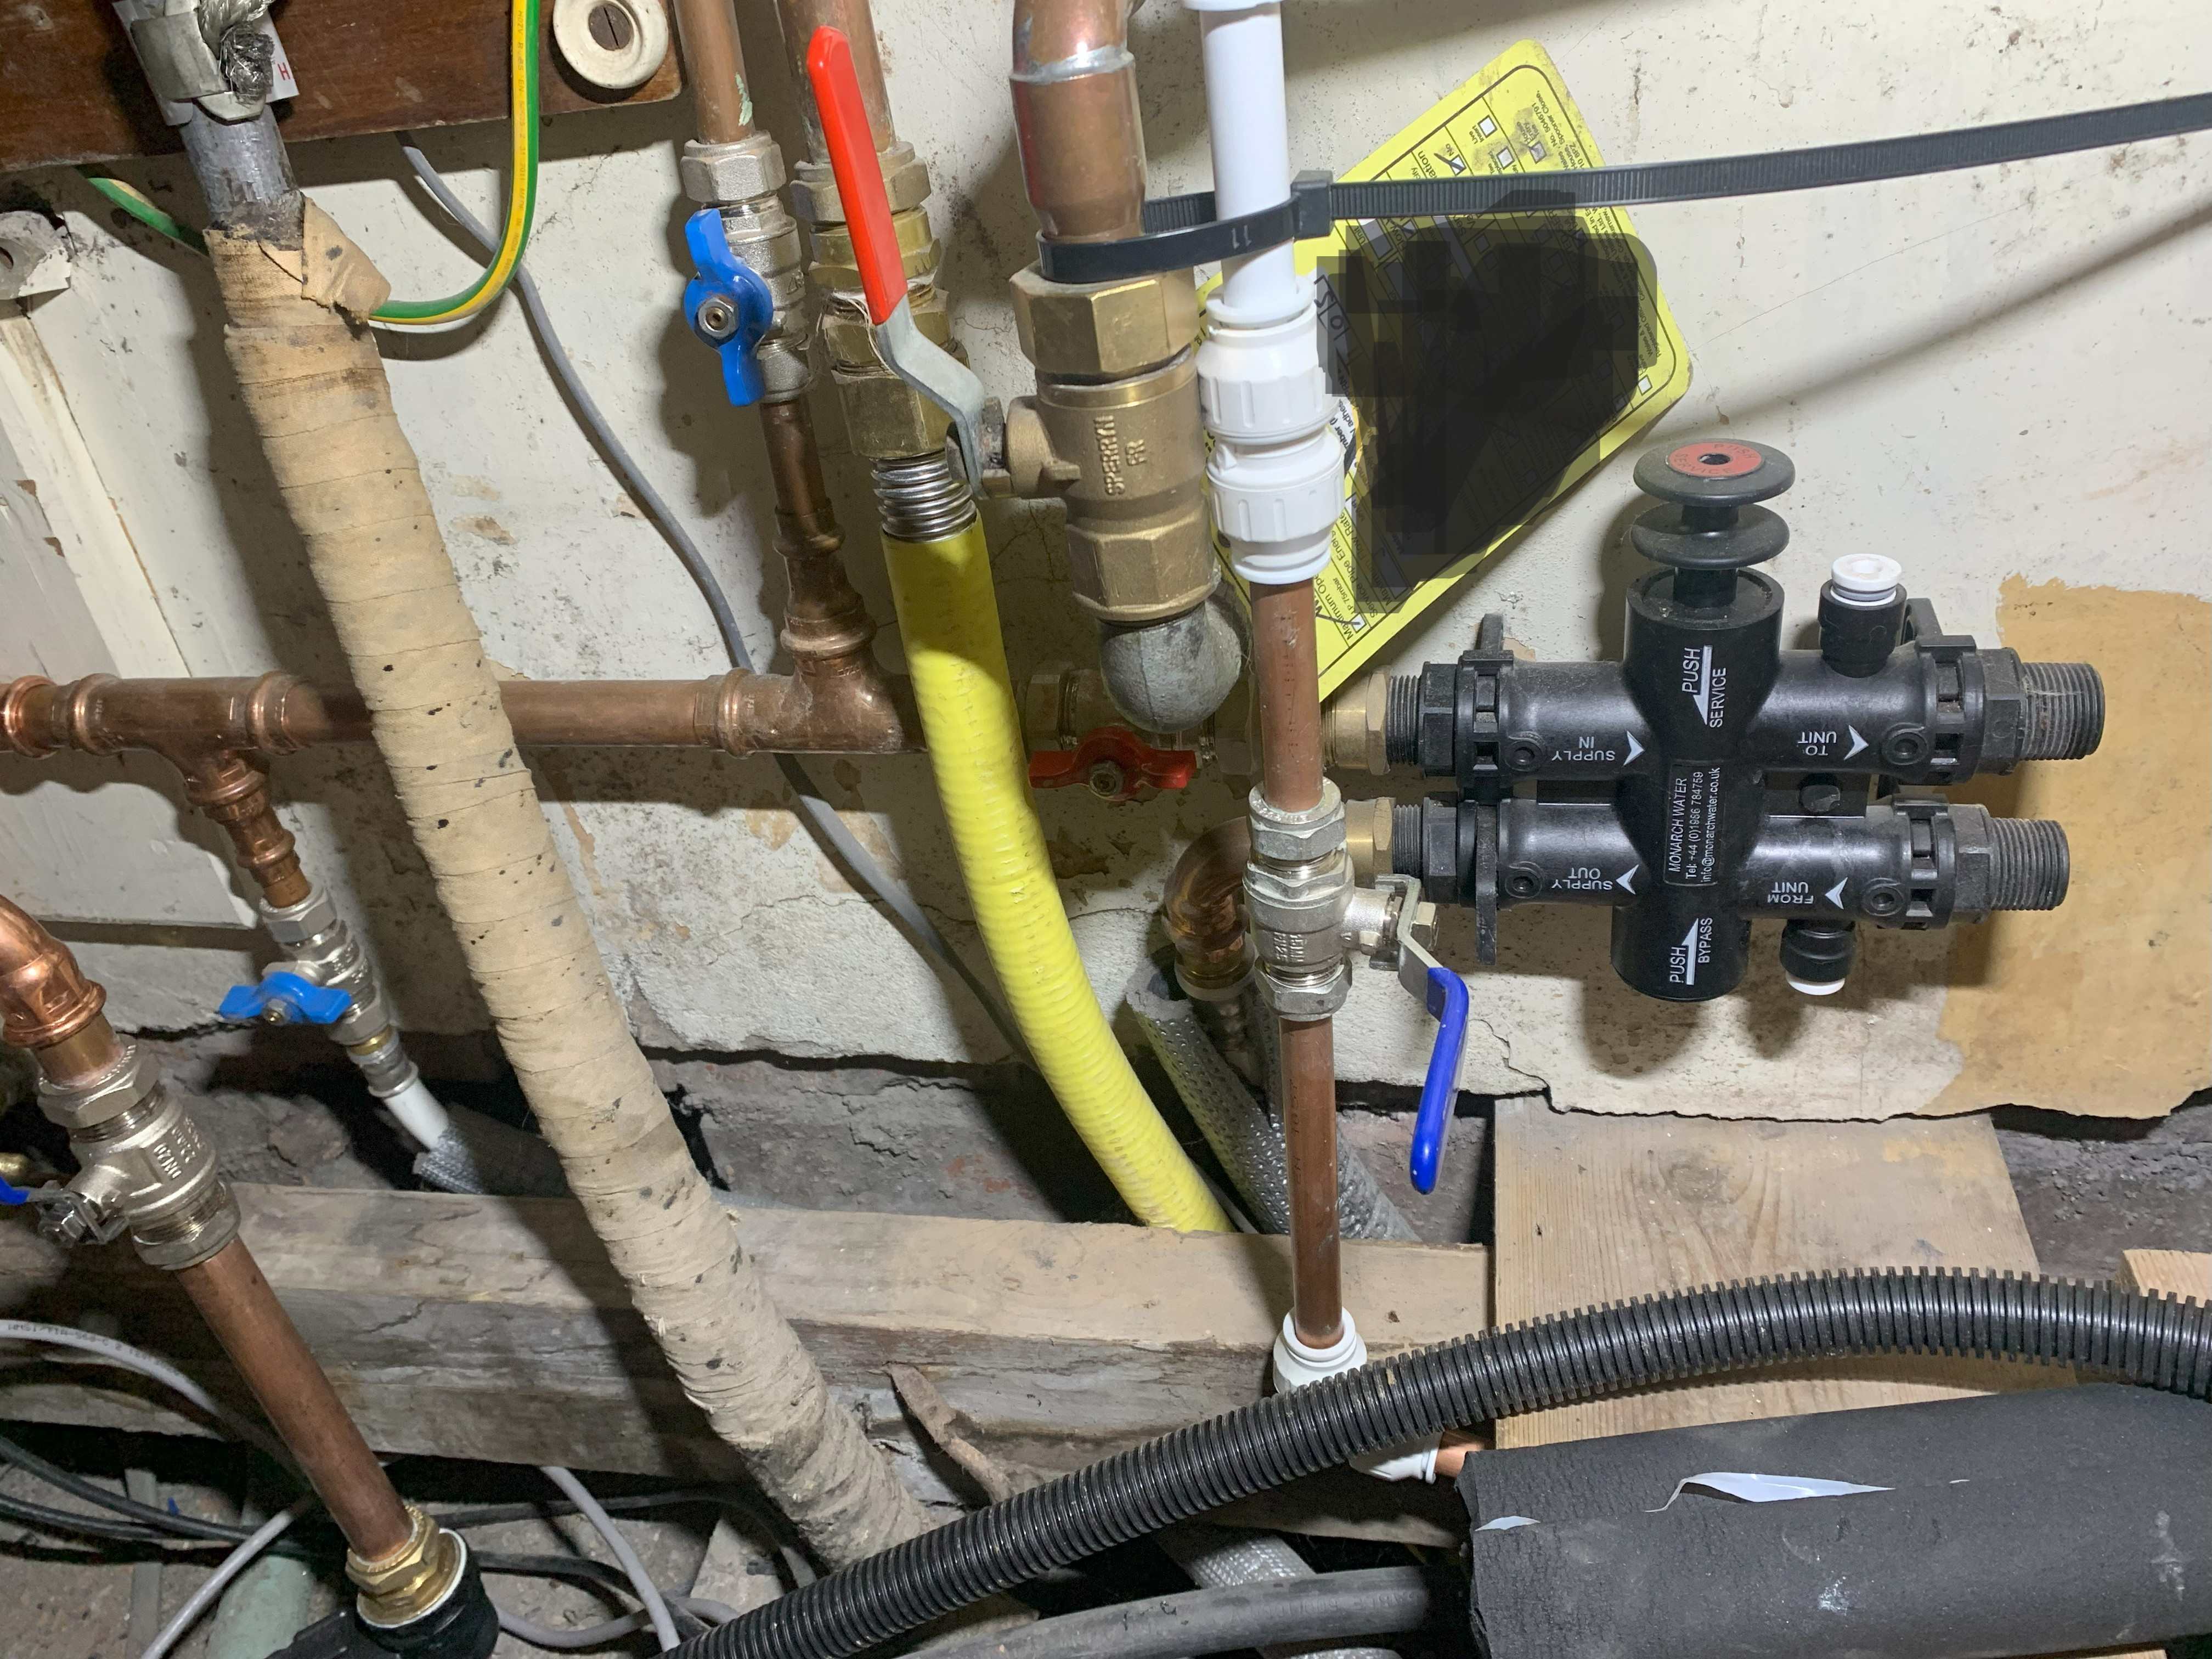
It is actually a right bu***** muddle at the moment under my stairs. (I have had a constant nightmare with plumbers that say they will quote but don't, say they will come but don't, pop in to do something temporary and then never come back, only seem interested in doing the fastest possible rush job using only what is on site/in the van, don't really seem to want to solve issues, and/or want to bill criminal charges.) See photo. If anyone can offer any suggestions for how this should be sorted I would be very grateful. (Sadly I have the electricity main, the gas main & meter, and the water main all coming into an understairs cupboard.) On the left front you can see a 32mm MDPE water main at sub floor ground level, which has been connected to 22mm copper. This runs around in a 90 degree arc out of picture to the left because it still connects to the out of use lead pipe with a stop tap there. Left middle in the photo there is then a 15mm tee down into a blue valve (off) and connector to 16mm MLCP - this MLCP runs as a mains water feed to my kitchen sink location. Next along another 15mm copper tee with blue valve (on) that feeds (1) the outside tap and (2) an MDPE pipe under the floor that runs down to the end of the garden 40m away. The connection to the garden MDPE pipe was made temporarily just to test for leaks - comes vertically down in copper with a blue lever valve (off). Then a bypass valve for a monarch water softener (never yet installed) - bypass valve badly needs moving to the left to make proper room to connect flexihoses to the water softener. Out of the bypass valve into a 25mm MLCP to the cylinder location 5m away (where it connects to 22mm copper to feed the pressure reducing valve). You can also see the mains cable front left, middle is the gas enters through the wall and feeds upward in copper through the meter above and back down to join the yellow gas feed off to the boiler. (Meter man can't touch the gas feed pipe, plumber can't touch the meter etc) Answer welcome for a beer should we ever meet and a donation to the forum.


-
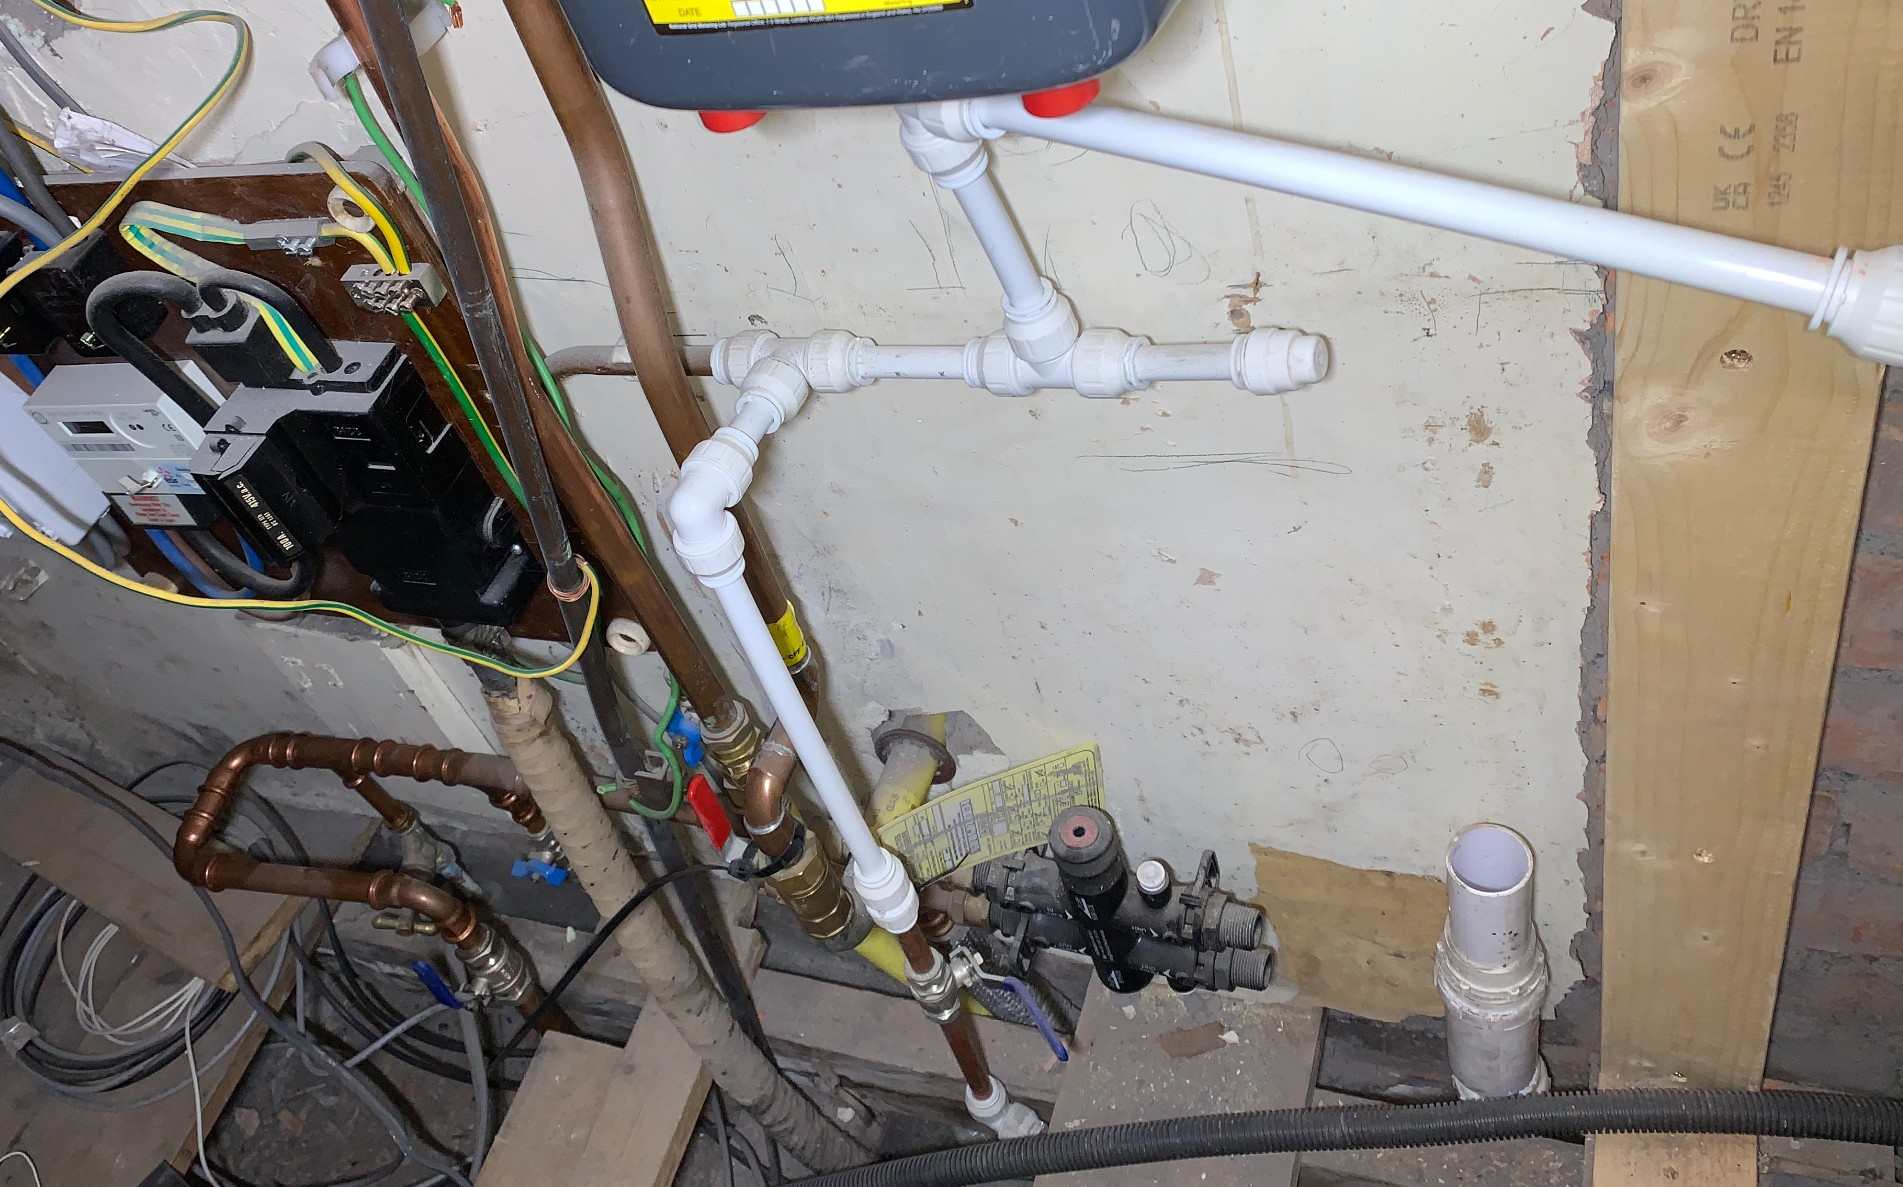
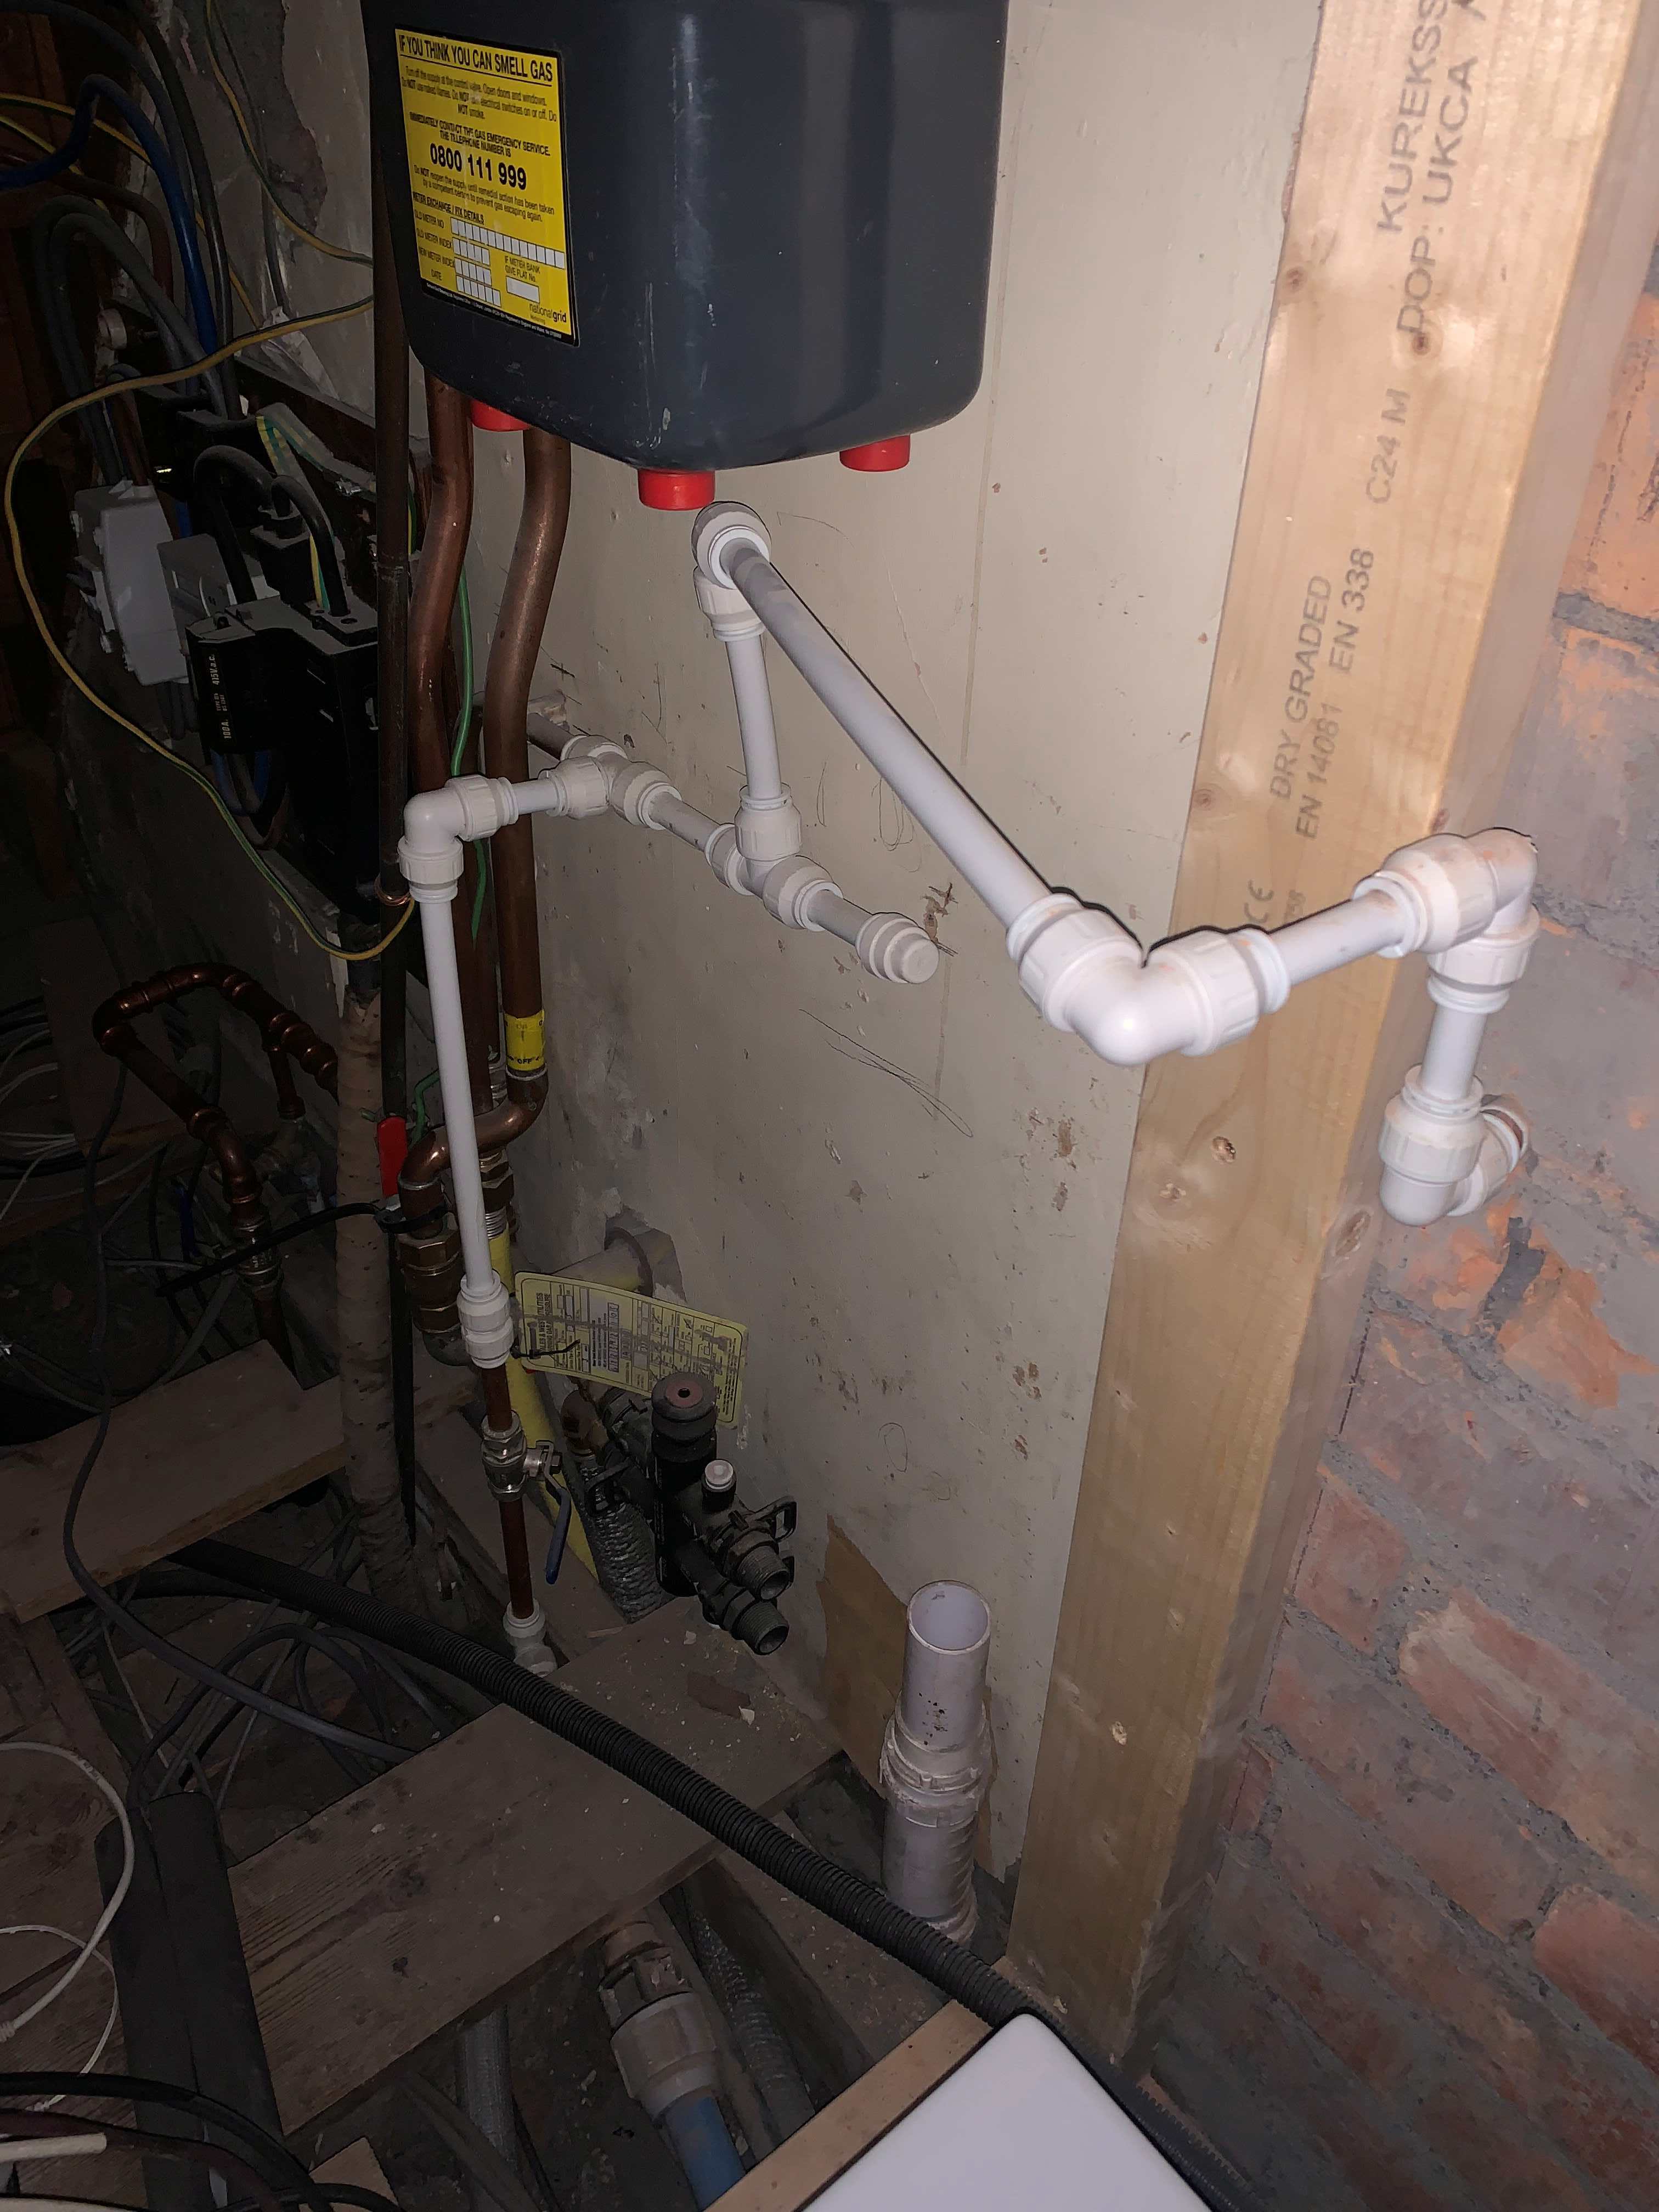
About a year ago we replaced our lead water pipe with a new 32mm MDPE connection. This resulted in the flow through our outside tap being good at 37 l/m - tap connected off the internal 22mm mains copper pipe using 15mm copper pipe. Since then the piping to the tap was changed as a temporary measure to plastic with various connectors. It now has 5 right angle elbows on the temporary pipe run (see pic). When I measure the water flow it is now 27 l/m - a 27% flow reduction. I therefore conclude that each elbow is reducing flow by about 2 l/m. My plumber has already fitted one 90 degree press fit elbow on another pipe run and the flow there seems lower than other internal taps. I presume I need to tell my plumber to stop using 90 elbows and to use only swept bends if I want to maximise flow ?
-
Thanks for response John. Yes this is the first creaking/groaning problem. Did the plumber de pressurise the UVC ? Not sure. I think the water was turned off at one point though, so perhaps. The UVC is Gledhill Stainless ES 250L, the expansion vessel is a Zilmet, nominal volume 22. The plumber's colleague has since returned. Said the noises were because of some kind of flutter/oscillation from the pressure reduction valve. He let some air out of the expansion vessel to reduce the pressure in it somewhat - didn't have a pressure meter - so not sure of expansion vessel pressure now. This has stopped the loud creaking/groaning noises whenever we ran the hot water. The system has had release through the tun dish on a regular basis over 3 months or so, relieved by running off hot water through the taps when spotted. The plumber is proposing to replace the pressure reduction valve (currently a Caleffi) with a new 28mm pressure reduction valve, having suggested this may help improve flow through the system. Mains pressure is about 3.5 bar.
-
Shocking Snagging Inspection Finds at NEW BUILD HOMES....
Spinny replied to MAB's topic in Housing Politics
Yes, all government schemes seem to get defrauded. Horrendous during covid. Imagine spending £500 Billion to no good effect, and actually doing so much longer term damage. And it is our money not theirs, the politicians waste it like water. -
Shocking Snagging Inspection Finds at NEW BUILD HOMES....
Spinny replied to MAB's topic in Housing Politics
Builder from hell... https://www.bbc.co.uk/news/articles/cvg09n7gj3lo Customer from hell... https://www.dailymail.com/news/article-15761579/Plumber-broken-radiator-row-suing-employers.html -
Concealed cistern recommendations
Spinny replied to Carrerahill's topic in Bathrooms, Ensuites & Wetrooms
Have a TECE concealed cistern waiting to be fitted so can't comment on any direct experience of it. But on paper looks good and allows the flush volume to be adjusted and provides for a double flush. Cant recall the price but not likely a budget option. Full maintenance through the flush cover plate. Depends what features you want, and on ease of maintenance through the flush plate I guess. I do have a simple cheap plastic cistern on one toilet which is easily maintained by scoring through the right secret grout lines to then remove the worktop above for full access to maintain. -
I have had a plumber here today who has repressurised my expansion vessel on an UVC system back up to 3bar. Unfortuately he left for the day and is now uncontactable but we have a problem. Every time we run off hot water we are getting a very loud creaking noise from the system. Any help or advice on what may be going on and how to resolve it ?
-
Yes really good design aimed at the full lifecycle and all stakeholders is rare. I do think that much building stuff is bought by the trades, and therefore gets targeted at the trades. Very few of the public care to know anything about what their house is made of unfortunately. Self builders are a godsend becauise they do care and will go out of their way to buy more innovative products. Problematic things in building... Cavity closers made of plastic - ill fitting, loose, plaster over like cardboard, tacked in with clout nails that fall out The absence of any ready made solution for 'the door threshold problem' in cavity wall construction Flexible plumbing connectors that speed up install but have limited life Roof ties that don't fit into the plasterline Joist hangers that protrude below the joist with no tool to rebate the joist or the plasterboard. Membranes in limited widths connectors from 80mm roof outflow pipes to 68mm downpipes press fit connectors that throttle pipe bore ...
-
You may be under the misapprehension that plumbing and building items are designed for the benefit of the end customer, whereas they are actually designed solely for the benefit of the installer. They only need to last long enough for you to lose the telephone number of the original plumber. You could call another plumber out at emergency rates - err oh gosh. Cui bono.
-
I am just so hacked off now. Just 4 weeks until the kitchen is supposed to be delivered, and something I thought straight forward is now in danger of messing the whole thing up. The guy told me he is doing a prestigious hotel now on a time penalty contract, so unlikely to reappear to fix anything for 2-3 weeks. Looking like I will have to postpone the kitchen yet again, with the kitchen company telling me they have no fitters in June. Spouse already on anti-depressants, having no kitchen and going to the launderette every weekend for over 3 years. It has just taken me 3 weeks to get another trade to answer his phone, despite telling me he would be back over 2 weeks ago to fix some loose ends. Rant over.