


Iceverge
-
Posts
4381 -
Joined
-
Last visited
-
Days Won
31
Everything posted by Iceverge
-

insulation of old barn roof polyurethane foam vs wool
Iceverge replied to Jon H's topic in Heat Insulation
You might be confident that you won't be making moisture in there but I wouldn't rule out the possibility someone else might in future. Most of the unwanted moisture inside wall and roof buildups gets there from bulk air movement, very little through diffusion. Although you are rightly planning a ventilation gap above the insulation and below the felt I'd be keen to see that area well sealed from the "room air" as it were. When insulated it will make the rafters colder increasing the lightly hood of condensation if moist room air gets up there. Use a dedicated ventilation elsewhere to make sure the moisture inside the workshop is taken outside. The trouble is it's difficult to create a good air sealing barrier with those lovely scissor trusses. After some pondering my suggested roof buildup would be the following. 1. Slates. 2. Slate battens 3. Rafters. 4.100mm Woodfiber board screwed directly to the rafters. Maybe in 2 layers with joints staggered. 5. Strips of breather membrane sealed to the side of the trusses with flexible airtight sealant and staples folded over the face of the woodfiber. Then mesh stapled over to provide a key. 6.lime rendered over the woodfiber. Note only the outer edges of the woodfiber would be covered in membrane . You could return the membrane to the top of the walls . Mesh and lime plaster over too to provide a good airtight layer. Just my thoughts as it's tricky to provide a balance of materials that'll flex with the structure and not crack leading to a very air leaky ceiling.
-
How airtight are the blocks themselves? Out of curiosity I just went out to a medium density concrete block and poured an entire litre of water through it with none spilling over the edges. A wall of these would be plenty drafty. How much better do you expect celcon to be?
-
Have you discounted a parge coat?
-
Hello @BML and welcome. A couple of questions. 1.Do you have any sketch or picture of the loft as it is at the moment? 2.Does the flooring cover the entire surface or just an area in the middle? 3.Is there lots of structural timbers everywhere or is it a proper attic space?
-
insulation of old barn roof polyurethane foam vs wool
Iceverge replied to Jon H's topic in Heat Insulation
I think your instincts are good here. Those timbers will be mush in short order if you trap moisture in there. PIR is not breathable and will trap moisture. However the predicament is that unless you create an unbroken layer of insulation that the air can't get around it'll all count for naught. Is it really worth insulting when you've open windows etc? The felt will take care of any drips from the slates. A beautiful building by the way. Nice to see it being taken care of. -
Drying out a new house - dehumidifiers vs heating & MVHR
Iceverge replied to Conor's topic in General Construction Issues
No buckets. It was over a year ago. We were in no panic to dry out this happy to take our time as apparently it's better for avoiding concrete cracks. For a good while we just had the windows ajar 24/7. For experiment I did try leaving the windows closed overnight before the MVHR was running. The result in the morning was everything was saturated. -
Drying out a new house - dehumidifiers vs heating & MVHR
Iceverge replied to Conor's topic in General Construction Issues
Don't forget that outside air at 10deg contains about half as much water at 100%RH than internal air at 20deg and 100% RH. Using a humidity meter as soon as internal RH gets too high say >80% at a sensible temp >15deg, you could open all the windows and doors briefly and let all the internal air blow through. The incoming air will be quickly heated by the heat in the structure if you close the windows again. It will be able to soak up more moisture. We used a mixture of fan heaters, the MVHR and intermittent window opening to dry our house out. The biggest annoyance was trades arriving at 9am and leaving the door open until 4pm. The temperature drops and the RH increases to >90% and all drying stops. -
Siga have a lot of confidence in their compact roof. https://shop.siga.swiss/gb-en/blog/how-to-build-a-moisture-safe-flat-roof “In a compact roof assembly featuring Majrex®200, and using a high quality rigid insulation with a lambda value of < 0.026 W/mK, you may only need as little as 60 mm of insulation above the roof deck to ensure a safe construction. We see this as a safe solution, and are happy to write a warranty for our product, and to perform condensation risk calculations for our customers.” “All of our calculations even assume that the membrane is installed much more poorly than it should be in practice — this means that even if in a worst case scenario, you can rest assured knowing that your compact roof construction is safe.”
-
I mixed mine too sloppy initially and it came out of solution. Maybe I was unlucky/did something wrong. Following the letter of the bagged instructions seemed to work out better for me. The floor needs to be properly clean first. Vacuuming it seems the best. While it is self levelling it isn't perfect. It's still possible to get slopes if applied in thin layers that don't flow properly <5mm . If you have a wavy floor that undulates by a few mm gradually the self levelling won't do much to help. If used to fill large holes >20mm it will shrink when it dries . Maybe thicker layers would flow and level better ~15mm+. If you're covering a large area you'd best have help as it'll dry before you can mix and return with a second batch. A squeegee and spiked roller help levelling. If the surface isn't too bad over all I'd opt for some tile adhesive, a straight edge and a trowel. You'll get it very good with far lower material costs and less pressure if working alone.
-
A good breather membrane would still help vastly with airtightness. You'd need to be careful of condensation on the inside of it though. The Pro Clima detail above really is the best solution. You could probably determine how much insulation was there from a test hole.
-
At 16 years old your extension should have some insulation. I have no idea how much. Probably not enough for UFH as your downward losses will be too high but maybe enough to avoid digging it up. Impossible to say unless you can track down the plans or someone who was involved in the building. Are radiators and a floor covering that is warm underfoot an option? Re the suspended floor. Theres no reason you can't push mineral wool up from below of you have access. Not pleasant job however! You'll find it more difficult to detail the edges of any membrane to guarantee airtightness without taking up the floor boards too.
-
Probably not even though if it's an old extension there may not be as much concrete as you fear. Maybe drill a few trial holes with a masonry bit to find out how thick it is? A day or two with a pneumatic breaker and a few men with barrows will see it through either way. Plenty of people here have tackled it. For the suspended floor this is the easiest and best way IMO.

-
The real deal won't break the bank if it's only a small area.

-
Semi-final plans --- feedback/critique welcome!
Iceverge replied to RK6's topic in New House & Self Build Design
Exciting! Very exciting...... I'm sure this is one we'll all be watching with interest. A couple of ideas, that I've had. The up and down steps to the Doocot will limit it's utility in everyday use. People just don't like steps. Everyone will turn up at your back door. For an entrance I would build a dramatic tunnel with an imposing concrete brutalist entrance. Leading through a dark curved hallway opening out to a expansive view of the garden. I would keep the Doocot but as an elevated office. Dramatically rebuilt half in stone with the jagged appearance of a ruin and the rest of the structure in modern glass and steel. Something like the below style. You would get there through a set of angular stairs behind a "blast" door rising from the main building. I'd be cautious about the lack of privacy of the main bedroom/ensuite from the living area, it doesn't suit everyone. I would push the Pantry into the hill too. A food cave as it were. Perhaps a small sung somewhere would be nice for entertaining as an alternative to the excitement of the main area. What fun it spending other peoples money. -
But my livestock would be over the hills and far away at that stage! Also unfortunately/fortunately they aren't allow in the pub so need borehole water to quench their thirst. Being rural, during hurricane ophelia we were without power for a almost two weeks. My parents were 16 days. I don't think people are aiming for the whole Banana here with electrical consumption, and as you stated and I proved yesterday it's completely impractical to heat stuff with a car battery and inverter. However running low wattage essentials seems to work ok. I dismantled the cheapo inverter from my Skoda today, attached it to ye olde tractor and plugged it into the electric fence energiser. After finding all the moomoos and cajoling them back to their designated grazing area I assessed the electric fence using the "stand on one leg and grab it really tight" method. It plused away at its regular 60 or so Hz but wierdly about one in 7 pluses disappeared. Not precisely 7 though, sometimes maybe only one in as many as 13. For periods the pluses were of regular strength then occasionally stronger and sometimes progressively weaker. Very unusual. Anyway I turned off the tractor after about 15mins and restarted 3hrs later with no issues to recharge the battery. That was about lunchtime. I might stroll over and have a look again later. I have a multimeter somewhere so I can look at the battery voltage before and after. I'm coming to the idea a pure sine wave inverter and a leisure battery may work very well. I'll keep updates coming on this voyage of electrical discovery.
-
I think it was 16mm2 about 8mm diameter for the DC cables. The whole experiment lasted about 5 minutes so no notable heat appeared in them. It's all beginning to make more sense. Thanks for your explanations. As far as I know everything survived to fight another day. It may have been my Mrs laptops power supply that made the burning smell in the other room come to think of it. I was just wondering what would happen, hence the kettle too. Perhaps an ill thought out plan. I much prefer the idea of just backing the car in bedside the change over switch and plugging in an Anderson connector. It's much cleaner and I'm pretty sure more fool proof than trying to get a small petrol generator going. Especially for the rest of the family if I'm not around on a dark and stormy night. However the trouble with buying a proper reputable pure sine wave generator is that they cost almost as much as a stand alone generator with greater advertised continuous load. The most reasonable I've been able to find one for sale in Ireland is pictured below. Would a simple 2800w AVR cheapo generator be more useful considering it might do our heating (1kw) too. Would it avoid all the funny business with the inverter? The items we have to power 24/7 are the following. 1. An electric fence energiser (50w) to prevent our beasties from escaping. 2. A borehole pump. Not sure of the power requirement of this, worst case 700w intermittent. 3. Internal lights, mostly LED's, say 150w total max. 4. 2 x laptops (90w each) 5. A TV (60W) to which we have handed over the duty of rearing our children! 6. Mobile phone chargers (10watts) 7. Internet router (5 watts) 8. MVHR (40 watts) 9. Fridge about 125W? Nothing hectic overall. Well below 1000w on average. We plan on getting solar at some stage and maybe a battery. Maybe this could be integrated. Now my head is becoming fried and disappointingly the mains power is still on despite our neighbours being in total darkness. I'll give more thought to it in the morning!

-
Yes, it's like driving on square wheels I've seen in some comment somewhere.
-
I very much doubt it. That makes sense. Maybe I'll return it and invest in a better unit now that the concept has been proven. Either that or offload it on my parents with their ancient electronics.

-
Right in anticipation of powercuts today I went and picked up a cheap 3000w continuous/6000w max inverter this morning. It came with nice thick 8mm core copper cables. I bolted it directly on to the battery of my car and backed my car into the garage beside the 32A generator input plug and changeover switch. I connected a normal 13a 3-pin plug to a 32A socket with a 2.5mm2 cable and plugged it in. Then I turned off everything at the CU which wasn't necessary. Immersion, Oven, biocycle unit and isolated the washing machine and dryer. I began experimenting in the house. Two LED bulbs were flickering, others were ok and the few Incandescent ones were all good too. The TV, the MVHR, laptops and fridge freezer were all good as was the water pump in our borehole. I tried the induction hob. It turned on and appeared to be working OK but was buzzing so I abandoned that. Then being an optimist I tried the kettle. To my amazement it began to boil as normal. However the 2 LED's that were previously flickering dimmed almost to nothing and in short order started to smell like burning. I abandoned my endeavours and shortly afterwards the smoke alarm sounded. Que running around the house pressing the silent button on each alarm until I found the offending room, I think it was another LED bulb in a desk light making the smell in there but not certain. I've been monitoring it but the smell hasn't returned. Anyway, I turned the mains back on and even thought there's a storm passing our power has stayed on so I can't add any more for now. What I can't figure is that only 2 pendant light LED's and one plug in LED lamp were misbehaving. The others were fine. Any insights?
-
@markocosic I'm intrigued by this idea as I've destroyed two cheap Chinese generators already on the build They certainly don't match what they say on the tin. However I don't want to destroy the 180A alternator in the car. What will prevent the big ball of smoke if someone flicks on the 6kw immersion? We already have a generator change over switch and a 32A input socket in the garage so your plan would work perfectly.
-
It depends on what you want to call "finished". For most it's determined finished when all the money has run out so, the short answer is that it'll cost all your money. We were €1161/m2 towards the builder for a very straightforward house. (A rectangular concrete block with PVC windows) By the time we had finished it was €1610/m2 but I did about 1000hrs unpaid myself + another 1000hrs at least in research. We owned the site. I've always thought cost/m2 is too crude as it benefits large houses disproportionately. I'd say €1000/m2 + €100000 + € SiteValue is a good baseline. Increase to €1500/m2 for complex designs.
-
Warm LED's only. We have a super bright 1450lm spotlight over the prep area in the kitchen which is excellent for cooking. However it's very cold at 4000k. I plan to swap it for a 3000k unit. Maybe even brighter at 2000lm. Other than that it's single room pendants and a light switch by the door. Life is complicated enough without our lights going all Skynet and becoming self aware.
-
Unvented Cylinder Installation. Spot the Problem!
Iceverge replied to Iceverge's topic in Boilers & Hot Water Tanks
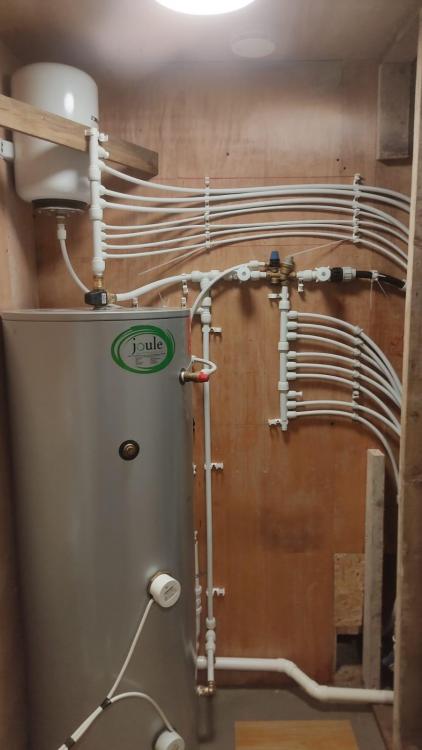
I tackled this last week. A lot of time with a pipe cutters chopping out all the old mlcp and replacing it with new Hep2o. I have a bucket of brass crimp fittings and two bin bags full of 9 month old pipes to show for my troubles. I asked the plumbers initially to plumb the house, direct UVC and DHW only as we have no wet CH. I wanted a manifold radial system with no pipe joints unless absolutely unavoidable and then to have them in accessible places like under sinks or in the hot press (Airing cupboard for the non hiberno-anglophonics amoungst you.) The result was less than satisfactory, initially with an unsafe UVC installation, followed with a less unsafe UVC installation after rectification (still not right however) and a very slow delivery of hot water to the downstairs kitchen tap and WC. Other mistakes happened including installing the bathtub, 2 shower trays + a toilet, loosing lots of expensive parts (toilet hinges at €75 a set), leaving half the taps rigged up backwards and dripping at joints and burying MCLP brass fittings in lots of inaccessible locations. Then charging €6k+VAT (via the builder) It's taken me the best part of a year to calm down! Anyhou here is the end result of the UVC layout Before and After. I've tried to follow my diagram I drew up in an earlier post. The "After" photo was taken before I was quite finished so ( no insulation, 2 pipes left to run), but please comment on any mistakes you can see. The other part I tackled was running balanced cold and a new hot water pipe to the kitchen tap. Previously it took 3.5 to 4 litres of cold flow ( about 35 seconds ) to get hot water at the kitchen tap. That was with the TMV already heated up from using another tap. The plumbers put 26mm MLCP to a manifold, buried behind some built in units and then ran 16mm to the tap. I put the TMV directly onto the tank with the manifold (as per @Nickfromwales the top tip ) on top as the second photo shows. I then poked a hole in the ceiling of our utility and ran the pipes behind the utility cupboards and under the kitchen units to the tap. Total distance 12.8m. (I marked the pipe to check). The end result was a wait time of 9 seconds from totally cold to totally hot at the kitchen tap. I was chuffed! Interestingly a good chunk of the water volume needed to pass through seems to be in the tap itself. Flow rate is between 5.2l/min compared to the cold in 15mm Hep2o at 8l/min. It is more than adequate. If you want, you can still have 10l/min. Just blend it from hot to very warm at the sink using the tap mixer. The cold has the same distance to run but not through the TMV which I gather looses a lot of pressure. I think the tap itself and flexi tails account for much of the restriction to flow, even over a long distance. I'm very pleased with the result. There were some lessons learnt along the way. 1. Hep20 is a excellent system. So long as you don't scratch the pipe it's idiot proof. My preschooler was able to make a connection. (Only 10mm thought, lol!) The fittings+stainless steel liners have a generous inner diameter compared to the MCLP brass fittings. Hep2o 10mm@5.95mm, 15mm@10.25mm 22mm@16.90mm compared to the MCLP 16mm@7.2mm 26mm@15.1mm and 32mm@19.4mm. (Plastic MCLP is even smaller) The only exception was these. I would only use if really necessary. 2. I tried to seal brass threaded fittings using only PTFE tape and had 6 very disappointing leaks. I dismantled it all again and discovered something called hemp and Boss White via the builders merchants. A little tricky at first and required roughening the brass thread to get the hemp to stick ( peel it like a apple with a hacksaw blade he said!). However I had a 100% hit rate on all my brass to brass connections there after. 3. I had a leak from the expansion vessel where the 3/4" pipe tail cut through he rubber washer on the 3/4" tap connector I used. Lesson learnt. To be replaced by a Hep2o to 3/4" brass connector. Thanks to all the help on this thread especially @Nickfromwales and @PeterW. Now just to repair the ceiling!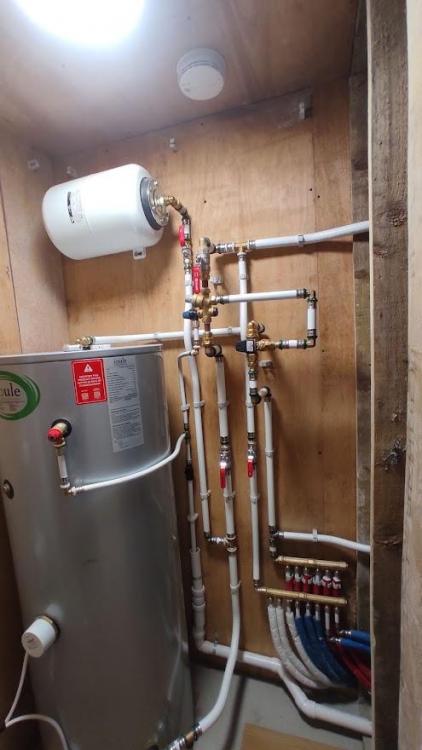


- 69 replies
-
- 1
-

-
- uvc ( unvented hot water cylinder )
- plumbing
- (and 1 more)
-
What kind of air test results have you seen from insulated plasterboard? Insulation is easily solved. Just widen the cavity. A 50mm insulated plasterboard is €11.30 more per m2 than plain plasterboard with lots of waste. Widen the cavity by 60mm and you're in the same place thermally for €5.60/m2 in EPS beads and zero waste.
-
A lot more expensive I'd have thought than wet plastering? Also poor for airtightness and hanging stuff from.


