Iceverge
-
Posts
4462 -
Joined
-
Last visited
-
Days Won
32
Everything posted by Iceverge
-
Whoever pays the electricity bill gets irradiation priority.
-

DIY MVHR - design, spec?
Iceverge replied to Andeh's topic in Mechanical Ventilation with Heat Recovery (MVHR)
Keep it simpler. No boost switches or other sensors on ours. The unit is in the utility room however and v easy to access to chance settings if needed. -
I've been thinking about this. ( DANGER DANGER) Mitsubishi have A2A units that track occupants movements in a room to avoid blowing them with air directly. Could the same technology be used in reverse to target them with focused IR heating. Maybe a parabolic dish with an IR heat source and a 3D gimble. It would heat your skin directly enhancing comfort without the expense and inconvenience of heating the air and structure of the hosue. Perhaps a catchy name like " Living room Radiation Ray blaster" would see it top the sales charts.
-
Delboy will just have to learn to reverse park !
-
Yes, it'll be the same as it is at the moment. With the bin ramp to one side it'd have been too tight.
-
Garage Loft Conversion Layout Advice Please
Iceverge replied to Iceverge's topic in New House & Self Build Design
Probably another plug in radiator. Heat loss should be pretty low. I'll try to pick up a cheap MVHR unit somewhere. U values 0.2W/m2K to 0.13. surface area 200m2. Airtight + Windtight. Maybe 600w peak or so. -
It all boils down to the dimensions of it. I had a good play around with resizing things. To have a wheel in the lane you'd need the other one in a planter or on the steps. Hopefully you'd notice before catastrophe struck and you became beached. I would echo @Ferdinands comment though. A robust method of not allowing the car end up in the living room is important. My idea was to make the last kerb from reinforced concrete. The car should bump off it to let you know to stop. And if it jumped the kerb it would only end up seesawing perilously over the ledge like the end of the Italian job.
-
Don't knock it until you try it. https://forum.buildhub.org.uk/topic/24988-ode-to-shattaf/
-
Garage Loft Conversion Layout Advice Please
Iceverge replied to Iceverge's topic in New House & Self Build Design
I like the idea of the desk under the eaves. I hadn't considered that . External staircase yes. I've been watching out for a concrete one on the cheap. Maybe one with a bridge to the door. Alternatively I'll keep the ladder and pull it up after me when I want to escape family ! -
@Conor The TLA is a very interesting concept. Would you recommend it? What is the surface of the screed like post pour, can it be trafficked OK or does it need protection? Was it cost comparable to EPS boards? I like the idea that ducting etc can easily be accommodated in there no cutting of boards or waste.
-
Garage Loft Conversion Layout Advice Please
Iceverge posted a topic in New House & Self Build Design
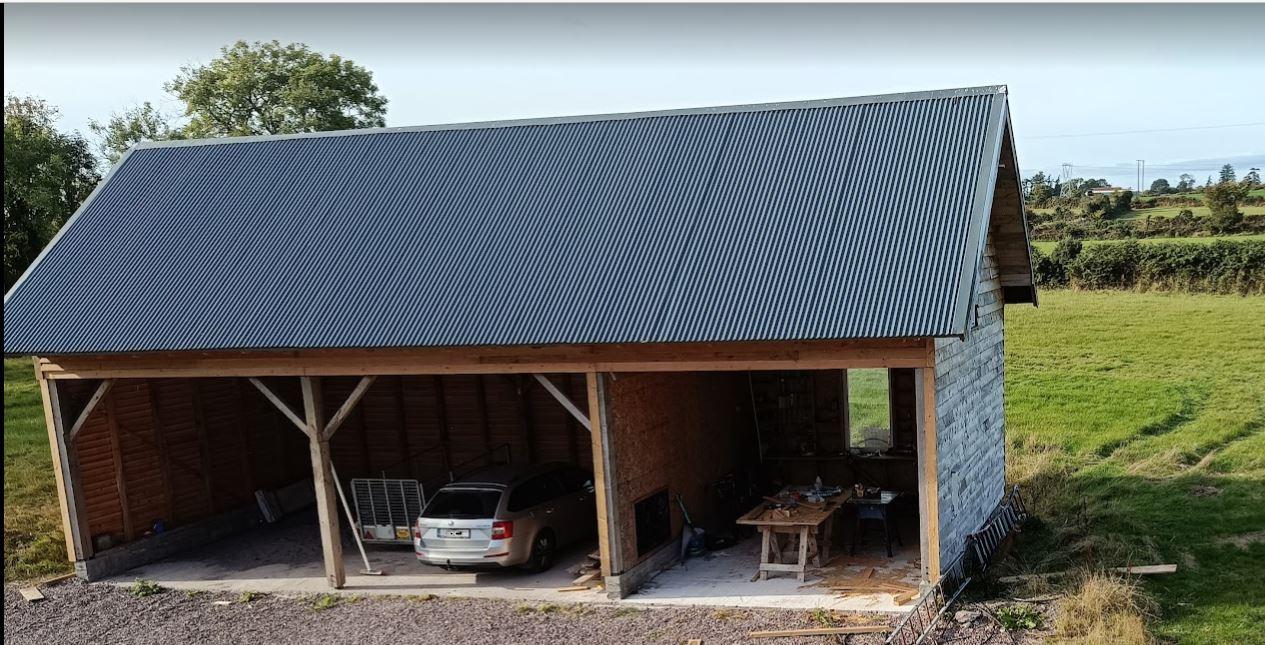
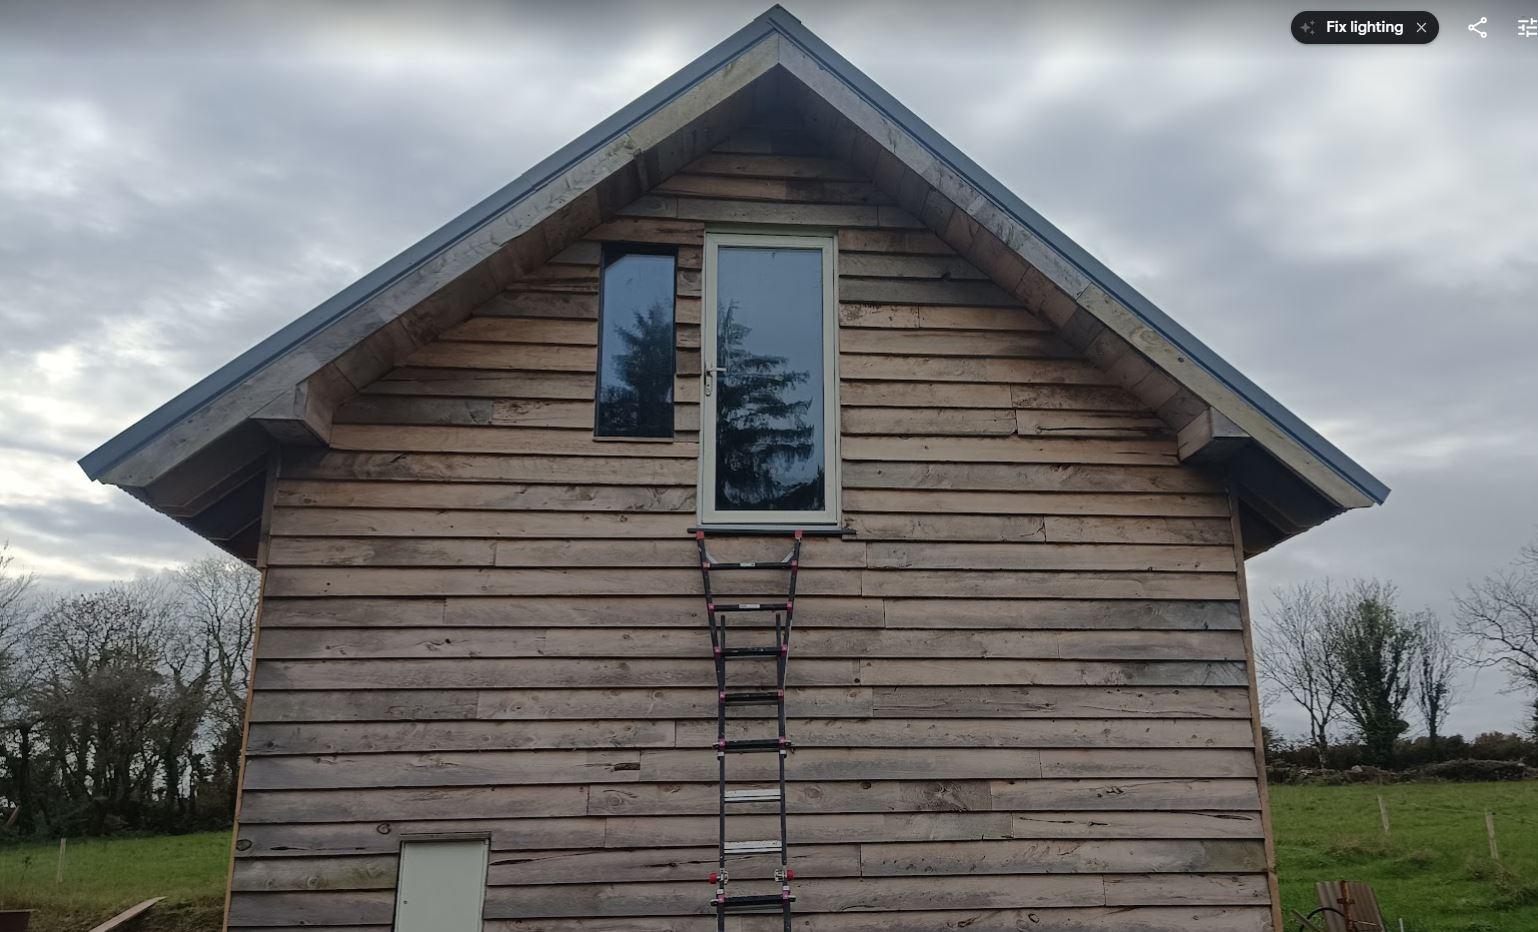
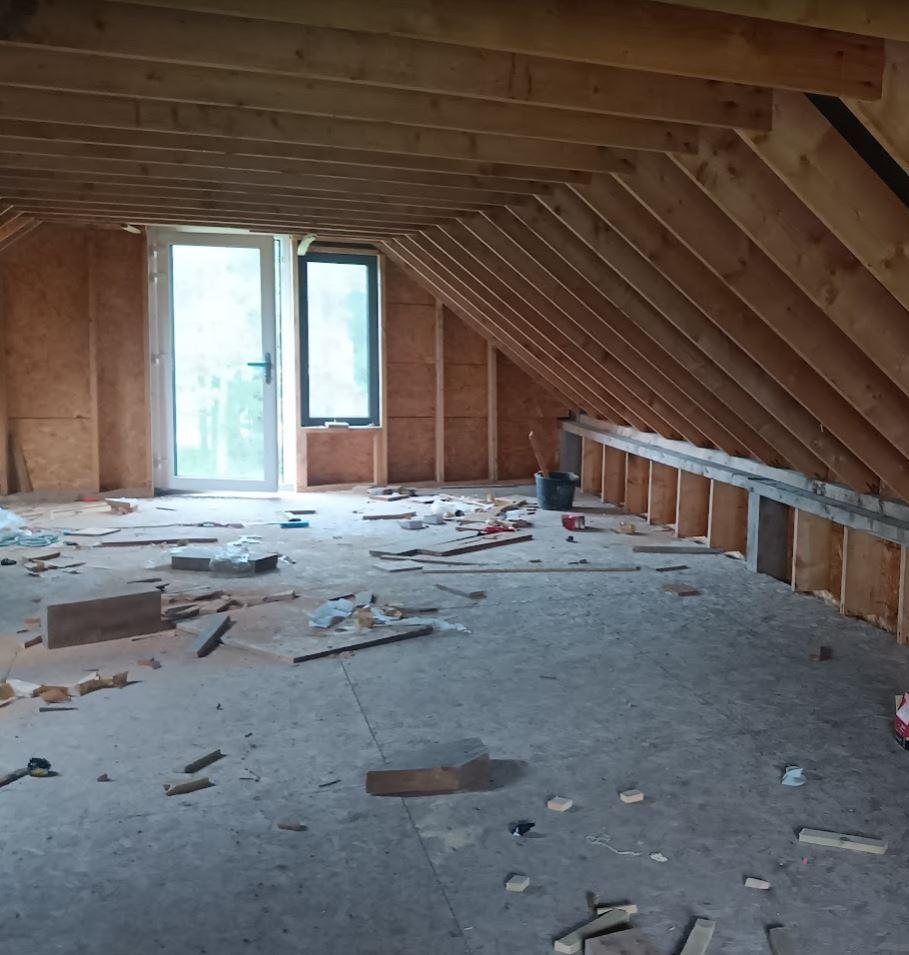
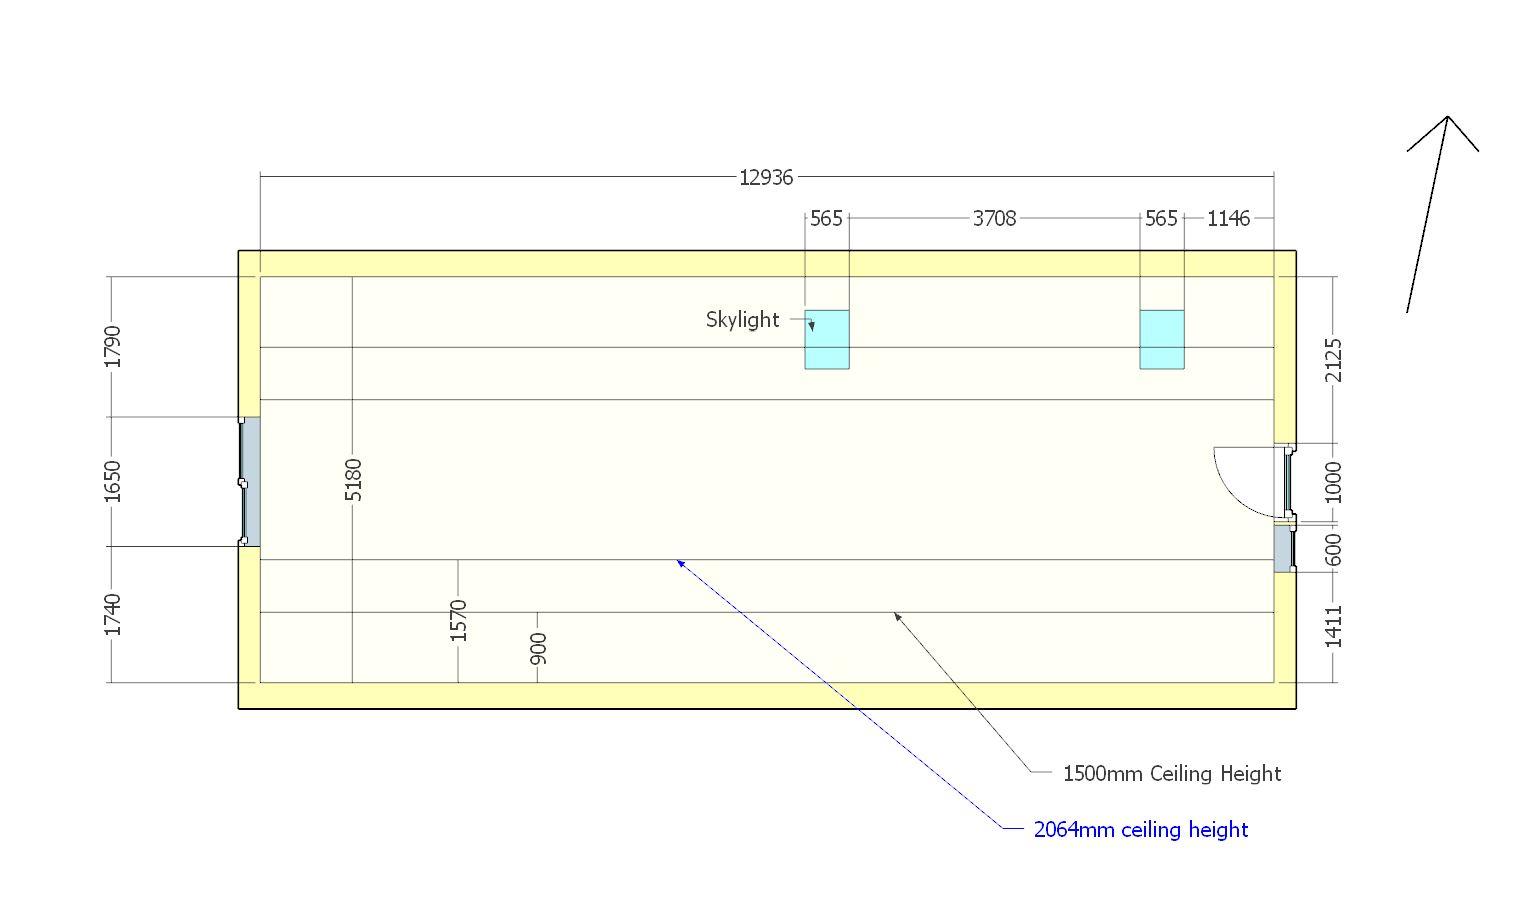
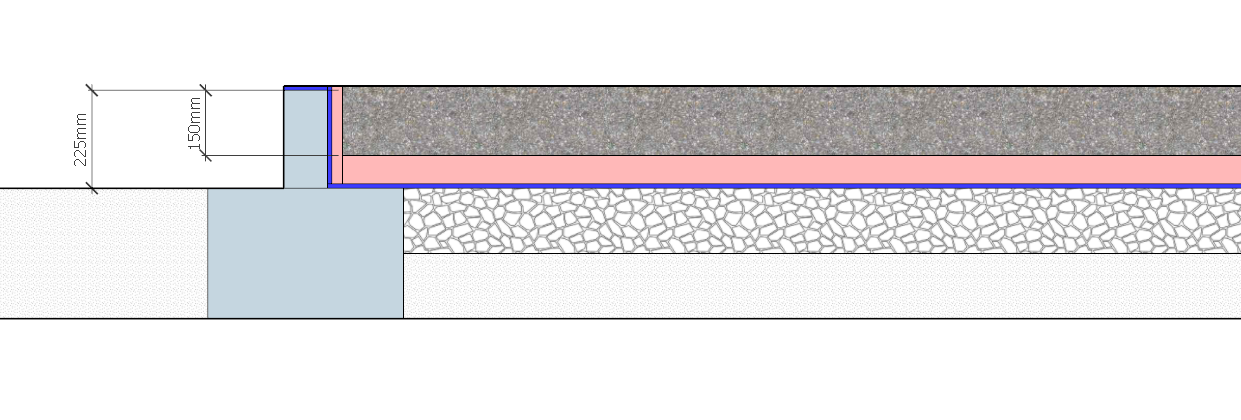
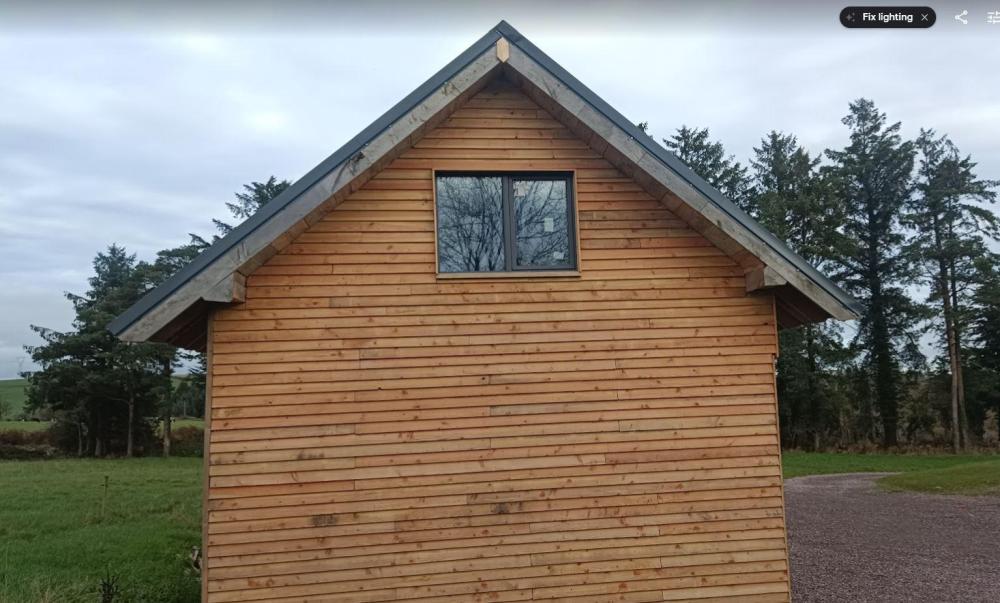
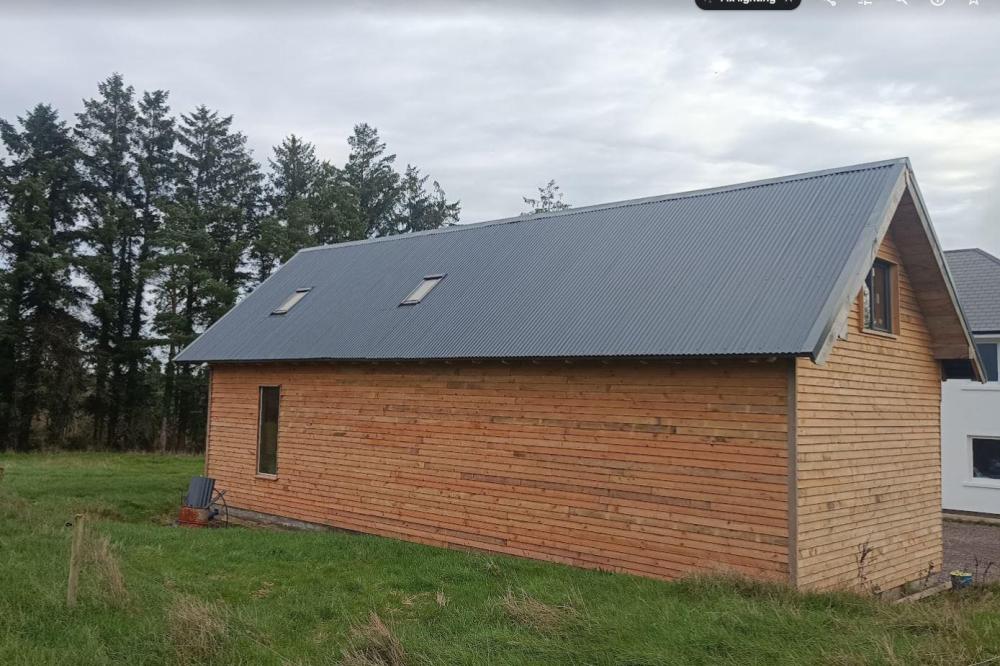
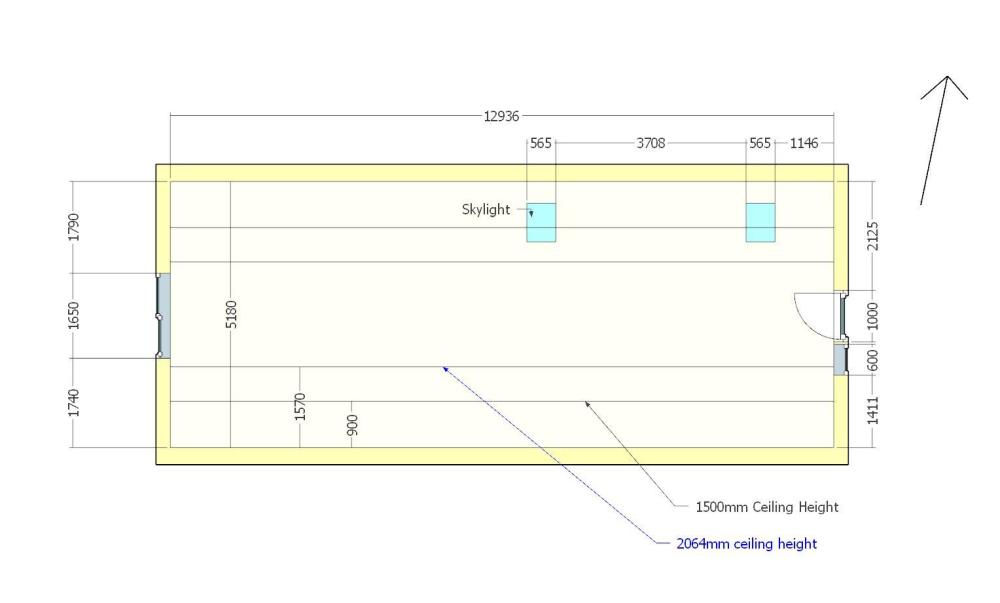
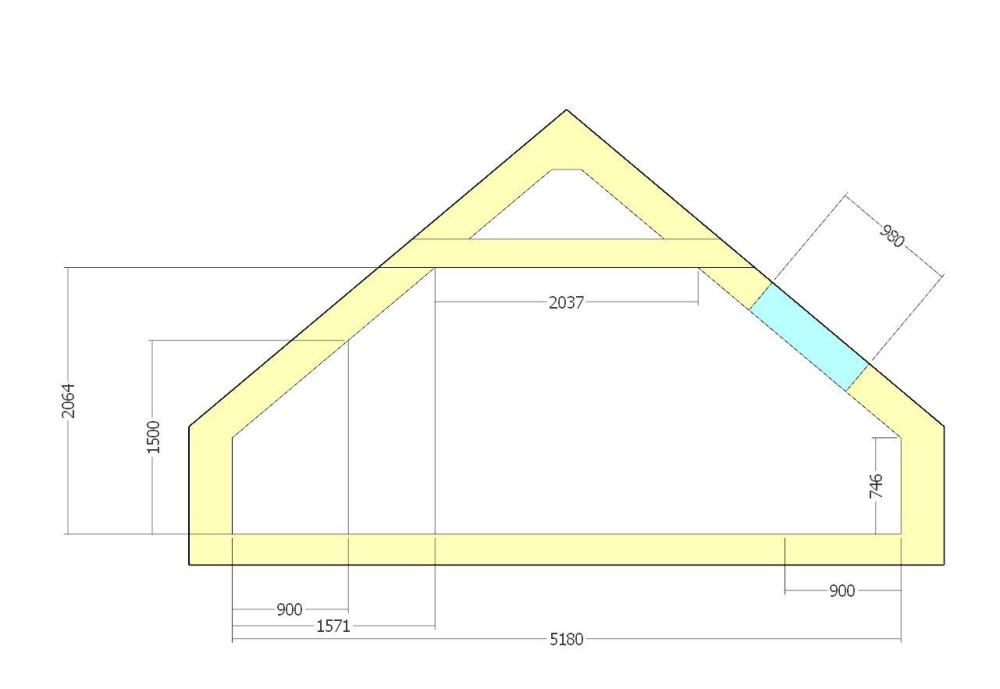
During Covid I took it upon myself to build a garage, mixed timber construction some post and beam, some stick frame. I made an upstairs room which I would now like to make useable. I would like. A WC and shower A Home office An openplan play area/lounge. A good boot and coat storage/drying area for wet clothes from the farm. Some organised storage for Xmas decorations + old files + other rarely used items. This will be a slow project in my spare time. I have a good idea of the insulation/ventilation strategy but want to get thinking on idea for the layout. The head height is limiting to the tie collar for the roof, but it will be vaulted to the apex above this. Here are some pics North EAST South WEST NORTH+WEST Looking out the West Window View of the EAST wall from inside. Apologies about the mess. Finally the plans And Section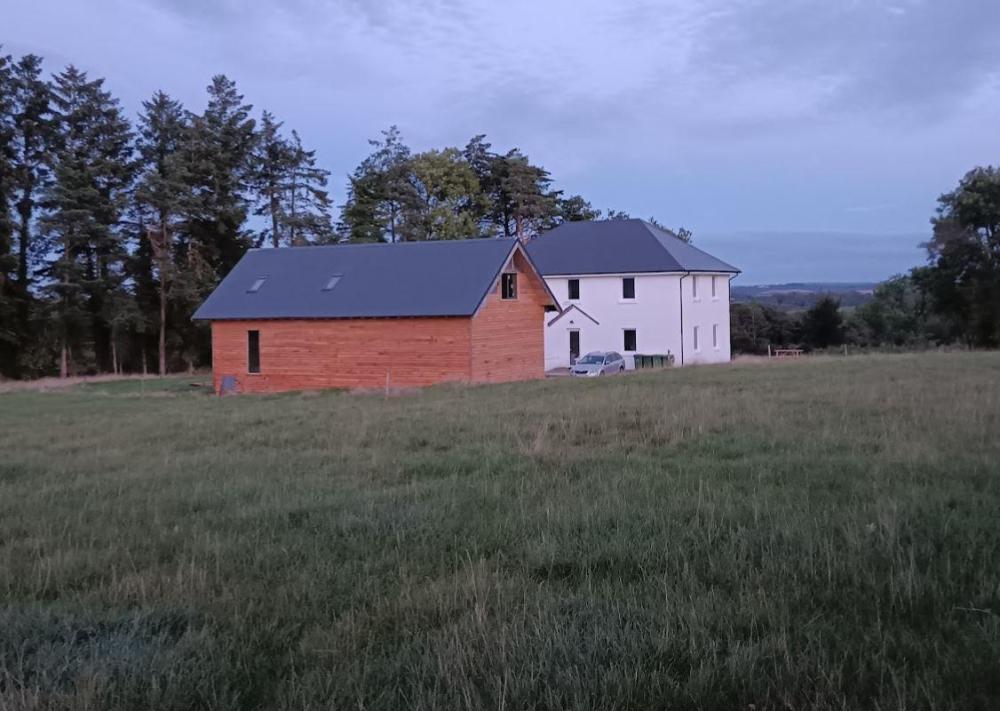


-
This sounds like a very good spec. Just a few questions How thick is the ICF? What are your airtightness targets? What is your glazing situation including number of windows and orientation? What is the shape of the house? A simple 360m2 box may have a surface area of 750m2 whilst an awkward series of interconnected bungalow's might be double.
-
How much extra EWI might I need on top of cavity wall insulation?
Iceverge replied to Cornish's topic in Heat Insulation
In a costal location it'll never get very cold but it'll be very windy. Ventilation losses are lightly a higher than average percentage of heat losses. It's important to deal with this. Closed cell foam in the cavity like Walltite would give you a U value of about 0.4-0.5 but importantly would provide a moisture proof barrier to prevent any wind driven rain crossing the insulation and an airtight layer too. It's not cheap and needs to be installed correctly. It would allow your external facade to remain unaltered. -
Congratulations. Have you considered sharing your plans with the forum. So much great experience here. I wish we had, I'm sure someone would have improved our layout etc. Re your partner's hesitance. I would agree with Ferdinand. It is very consuming and thoroughly frustrating at times. If you attempt to do too much you'll burn out yourself and your relationship. Avoiding time pressure is key. Also not tolerating any sloppiness from the beginning as it tends to compound with contractors. Best of luck.
-
To improve the roof or let it be for now
Iceverge replied to Garald's topic in Roofing, Tiling & Slating
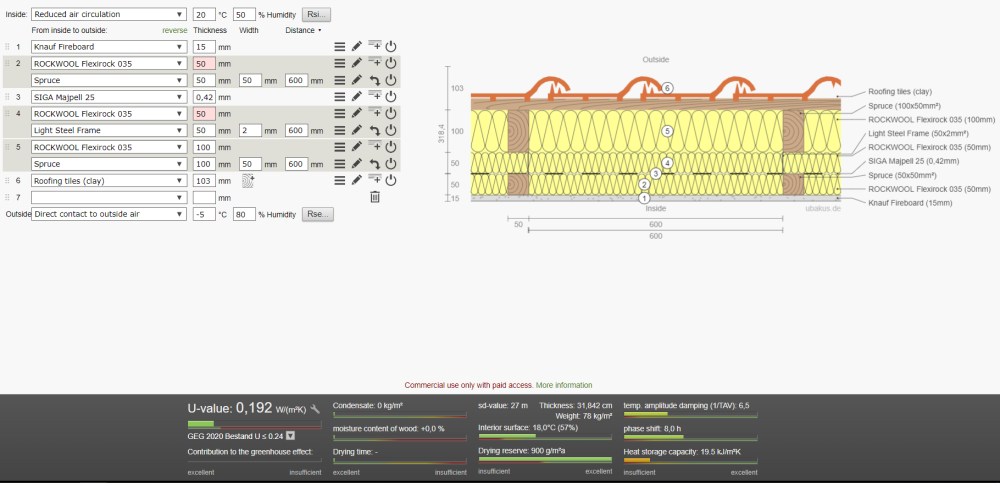
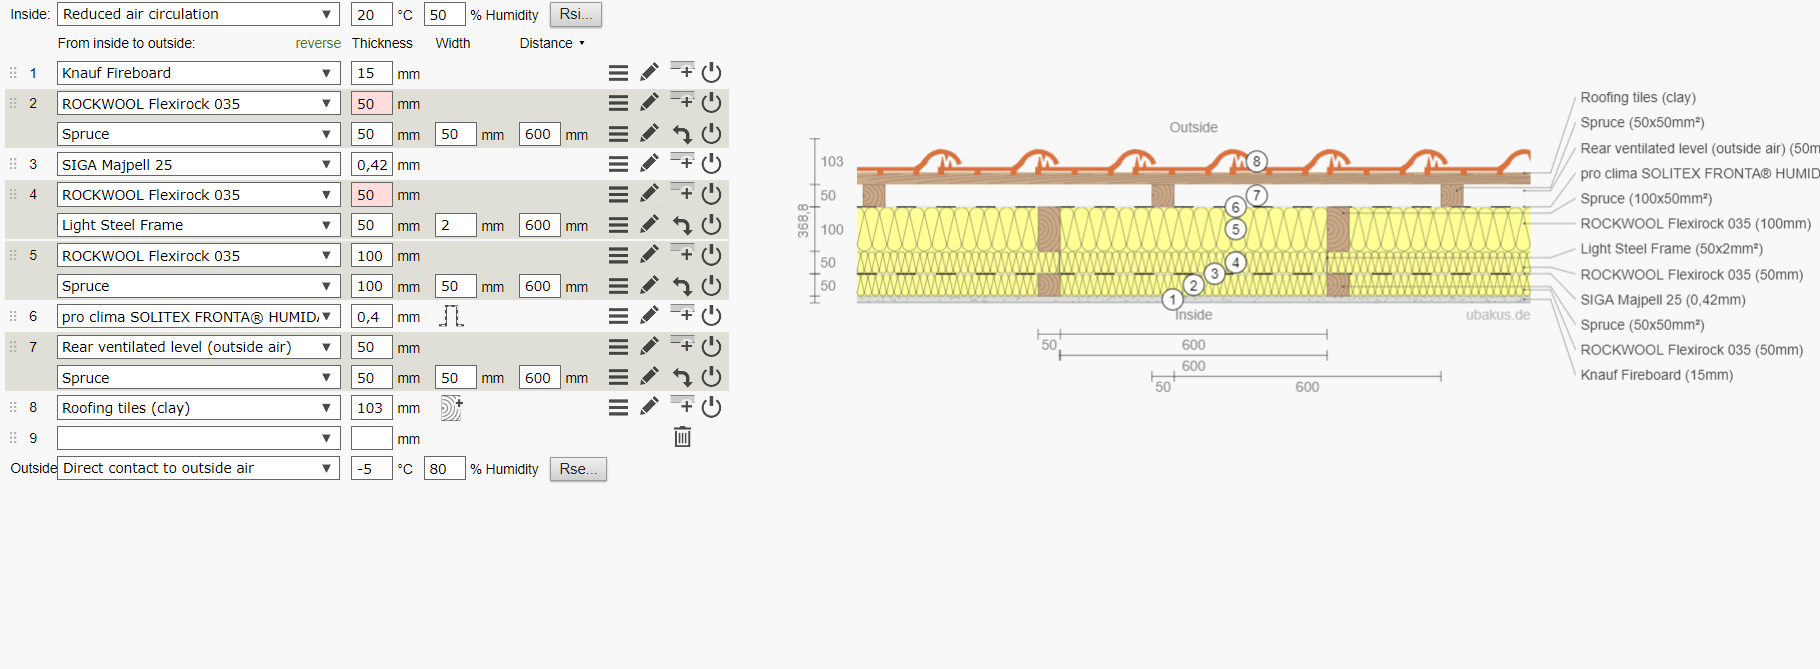
U-value calculator | ubakus.com You'll have to create an account but it's hours of fun. -
I don't think any council would waste resources and community good will by enforcing the removal of a ramp to prevent someone old getting into their own house. I would just build it and be done.
-
It might do as a urinal stall...... Alternatively put the bowl on the back wall and don't bother with the door. Just hope you don't live with anyone of delicate sensibilities.
-
Building a Block Workshop - ADVICE NEEDED!
Iceverge replied to stunotch's topic in General Self Build & DIY Discussion
Buy some 100x 100 blocks rather than do that . -
Building a Block Workshop - ADVICE NEEDED!
Iceverge replied to stunotch's topic in General Self Build & DIY Discussion
This is normal. It is covered by the skirting and plasterwork normally. -
Building a Block Workshop - ADVICE NEEDED!
Iceverge replied to stunotch's topic in General Self Build & DIY Discussion
You could use 150mm x 100mm x 440mm blocks and 75mm insulation plus 75mm concrete. It might be less work just to shutter and pour the floor and a ring beam all together. -
That's interesting, it is susceptible to poor installers. I think getting the required 60kg/M3 density ( from memory) is not a task for an amateur. Blowing it behind a semi transparent membrane as dense as possible and then allowing it to settle for a couple of weeks before topping up if needed before boarding seems to be a good technique. Cost at last check was €27/m2 +vat for a 200mm TF wall at 600mm cc. We have 450mm in our attic that was blown in at low density. It has settled somewhat. Maybe 50mm, I will check, but that was expected and allowed for. All of the best airtightness results I know of < 0.15ACH use cellulose with the exception of that archive building that used spray airtightness paint. I think when it's really properly packed it seals any tiny holes in the airtight layers. Longevity of actual insulation is an understudied area I think though. I'm going to have a good look at our blown bead walls when I pick up my thermal camera.
-
I was attracted to spray foam too when i began looking at this way back when. However, after lots of reading blown cellulose beats it in almost every regard. It will fill every gap. It is great for airtightness, it is cheaper, better decrement delay. Better fire resistance. No off gassing. No mess, no waste. The list is longer if you want me to continue.
-
Building a Block Workshop - ADVICE NEEDED!
Iceverge replied to stunotch's topic in General Self Build & DIY Discussion
Best practice would be to use some perimeter insulation as shown above. If you get another layer of insulation, you could put the DPM between the layers to avoid the need for sand binding. You'll need to tape the joints in the boards or lay a thin plastic sheet on top of the boards too before you pour the concrete to avoid them floating/concrete going between the boards. -
Building a Block Workshop - ADVICE NEEDED!
Iceverge replied to stunotch's topic in General Self Build & DIY Discussion
Normally as said above they foundations would be left a little lower to give you a few courses of blocks to take any imperfections out of the foundations. Not to worry if your foundations are pretty level however, just use a good thick bed of mortar and lay your 100mm blocks on edge to begin with. This will give you ~ 225mm to play with for you floor. Some sand binding to avoid puncturing the DPM. DPM. Insulation. Concrete. I suspect the reason your 150mm floor depth came up was it was handily 75mm insulation + 150mm insulation makes 225mm. I would buy more insulation and reduce the concrete to 75mm-125mm .
-
To improve the roof or let it be for now
Iceverge replied to Garald's topic in Roofing, Tiling & Slating
You need to consider moisture. 1. If rain blows up underneath your tiles it will drip onto the insulation and hopefully just dry to atmosphere eventually. There's a chance it'll make its way inside after a period if you get sustained bad weather. This is normally solved by having a waterproof membrane underneath the roof covering such than any errant drips make their way back to the outside of the house via gravity. To do this in a retrofit you'll need to strip the tiles to lay the membrane. In any case it's an old house and you might just have very well-fitting tiles that keep all the water out. Any tiny drips are probably caught by the mineral wool and later evaporated away without dripping inside. 2. Secondly any Inside air that makes its way outside will be carrying water vapour from your house (showers, breathing etc). As soon as it meets the cold it'll condensate and form water droplets on whatever it touches. You can see this when moist air hits a cool bathroom window. It's probably happening at the moment inside your insulation layer somewhere or on the back of the tiles. It'll cause mould and eventually rot in the timbers. This is solved by having a total and complete vapour control layer inside the insulation of your house. This prevents any moist air getting cold by passing to the outside, hence no problem with condensation. As a secondary precaution exterior air is allowed to ventilate above the insulation to take any condensation away. In your situation you have 3 options in my opinion. 1. Remove the tiles, fit a new breather membrane like solitex+ or siga majvest draped into the eve chutes , batten counterbatten (to create a ventilation gap) and then replace the tiles. Then inside insulate between the rafters with mineral wool (or blown cellulose) and under the rafters with more mineral wool or insulation boards. Then a vapour control layer and then plasterboard. 2. An option I don't particularly like but should work is to spray closed cell foam on the back of the tiles in situ. It'll stop any water blowing in, create a vapour barrier and insulate. However, it'll glue your roof together like chewing gum in a toddler's hair. It's expensive. If your supplier encases any timbers in it there's a risk they'll decay over time if they can't dry out/ regulate their humidity. 3. Similar to your architect's choice. I've said it before, but I think she knows her stuff and you've been lucky with her. A. Strip the roof of existing plasterboard and insulation. Really study the timbers to see if they're rotting. B. Looking at the tiles from the back use suitable historically sympathetic sealant to close any small holes between the tiles where rain may blow in. C. Fit mineral wool between the rafters. I wouldn't use anything impenetrable like PIR for 2 reasons. Any tiny rain drops that gets blown in will instantly run off and find its way inside rather than remaining in the wool and evaporating later. Secondly I suspect the roof has been drying to the inside and you really should not trap moisture in there. D. Add a good variable control layer. Intello plus or similar. Tape this extra dilligently. E. Cross batten and insulate with another layer for Rockwool for a service cavity. F Plasterboard. Fireboard or Silentboards are denser for sound protection.