Iceverge
-
Posts
4462 -
Joined
-
Last visited
-
Days Won
32
Everything posted by Iceverge
-

Insulated Slab Installers Northwest Ireland/ Northern Ireland
Iceverge replied to Shaun McD's topic in Foundations
You could easily get a 100mm pir upstand beside a 300mm EPS and 100mm concrete slab with a strip foundation. This gives an external psi value of -0.06W/mK. Better than the Passivhaus requirement of 0.01 W/mK. In fact with an insulated raft it would be tricky to join all the insulation together as your PIR is inboard of the loadbearing stud.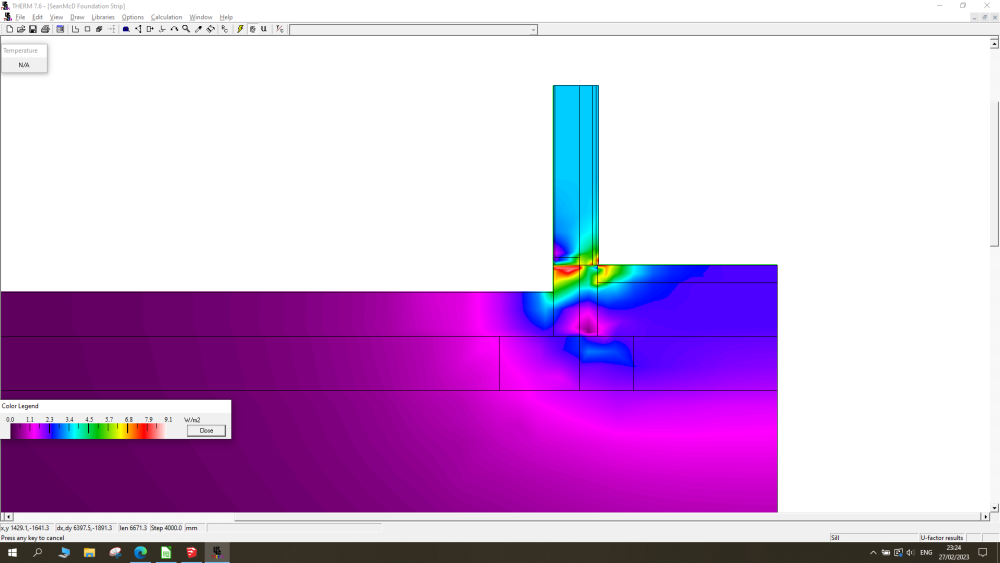
-
So 13 tonne digger coming next in 9 days
Iceverge replied to CalvinHobbes's topic in General Self Build & DIY Discussion
Congrats, it's very exciting to get started. Extend the cavity down at least 200mm/2 courses lower if you can. Should be zero cost. It'll fill up with mortar droppings/detritus and bridge the cavity otherwise. It looks like 150mm insulation. Can you bump it to 200mm PIR? -
Fixed that for you.
-
You should have your airtightness test before the walls and ceilings boarded out. This will mean you can remedy any bad leaks. It normally gets a little worse for the final test as invariably someone will have made a few small holes and not patched them up.
-
After would be easier.
-
Correct. I had to recess the membrane to fit them. Just make sure one hole = one pipe. Sub out the membrane where the ducts go through with a sheet of ply and use a 90mm hole saw to make a robust solution for sealing holes. Same story for wires.
-
Get a definition of that in litres/minute. In writing preferably 😁. Use a measuring jug and a known shower and time it to see how much "loads" of water qualifies. We have 10l/min showers from 15mm feeds direct from the hot and cold manifold. We have a bored well so water pressure is what ever we want it. Normally 3-5 bar. It is reduced to 3bar by the control block before the tank. My wife with her super thick hair only uses the shower on half throttle via the thermostatic mixer. I got the same result from the one I installed for my parents despite their well pump being nearer to 2 bar. For comparison the electric Triton shower they have is only 3.3l/min. Beware that if you do opt for a 20l/min flow head it'll empty a 300l 48deg UVC in about 8 mins. You would need a tremendous amount of storage or a 50kW boiler to keep up with such a behemoth. For the services I did a 2*44mm service cavity for the first floor so could put the MVHR ducts there. In hindsight 20mm just for wires would have been fine as I was the one who would have been taping the plenums in the membrane for airtightness and could have done a robust job.
-
Tricky detail. Important to get right. I would use the ply as the main air control layer. You could use the polythene above it but it's always easier to seal solid to solid materials You have 3 types of junctions. Ply to Ply = airtight tape. One suitable for external use like Siga wigluv. Ply to ICF.= Airtight tape as above. Alternatively mesh like you would use to tank a shower and then airtight paint over the top. Ply to concrete. Either an airtight expanding foam like FM330 or generous amounts of mastic squeezed between the boards and the top of the wall as they are laid. 120mm insulation is the bare minimum. U value about 0.18. I guess it is done to facilitate 200mm screws. Could you add another 50mm board (offset from the first) and use the pricier 250mm screws. Alternatively make a hybrid roof. 100mm of rockwool inside the ply should give a U value of 0.13 with no risk of condensation provided you get your Airtightness/ vapour control layer right.
-
New member in an old large and expensive to heat house..
Iceverge replied to BarumMike's topic in Introduce Yourself
After a little searching I found some research on this very subject. Smokeless coal comes in at 28000MJ/kg or 7.78kWh. At your price of £622/tonne that boils down to 62.2p/7.78kWh or 7.99p/kWh of raw coal. The study measured the stove running at 82.3% efficiency. 7.99p was buying you 82.3% of a kWh delivered into your house or 9.7p/kWh of delivered heat. As the tested stove seems to get it's published figure it seems fair to do the same for gas and oil. A Grant vortex Oil boiler at 92.2% efficiency gives a delivered heat unit cost of 8.6p/kWh. A Worcester Bosch boiler claims 94% efficiency. At your 3.45p/kWh gas price that's a very cheap 3.67p/kWh of delivered gas heat. A Panasonic Heatcharge has a SCOP of 5.9. at the price cap of 31.8p/kWh that ends up at 5.4p/kWh of delivered heat. TLDR. Price of delivered heat. Coal 9.7p/kWh Oil 8.6p/kWh Electric A2A 5.4p/kWh Gas 3.7p/kWh. I'll link to that report. V interesting regarding wood too. burning-wood-consult-bsria-report1.pdf -
New member - stuck for what to do next to warm the house
Iceverge replied to Sparrowhawk's topic in Introduce Yourself
Top Class. Keep up the good work. -
New member in an old large and expensive to heat house..
Iceverge replied to BarumMike's topic in Introduce Yourself
Sure thing. In December 22 your unit price for gas was 10.5p/kWh, up from 4p/kWh in 2021. How much are you paying for coal delivered? Do you know the calorific value of the coal you use? Do you have any register of the heating degree days in December 21 and December 22 ( you can find it easily here Heating & Cooling Degree Days – Free Worldwide Data Calculation). There's a fall off in gas usage from about the 20th of December 22, maybe due to warm weather or more use of the stove or less people in the house. Do you know how much coal you've used over the same periods? -
Removing outside piping that probably has asbestos in it
Iceverge replied to Garald's topic in Building Materials
Tasty -
Removing outside piping that probably has asbestos in it
Iceverge replied to Garald's topic in Building Materials
I suspect your architects caution is well advised from dealing with poor builders. Many would not be able to patch the roof and wall to a good standard. If you trust your builder ( I seem to remember them being very good) I would go for it. -
New member in an old large and expensive to heat house..
Iceverge replied to BarumMike's topic in Introduce Yourself
Coal is certainly cheap at about £600/tonne. At 8kWh/kg and say a very optimum efficiency of 65% (manufacturers figures are pie in the sky) gives a unit price of about 11.5p/kWh. Assuming a burn time of 4 hours and an output of 10kW and 30 minutes work per day at £10/hr that works out at 12.5p/kWh in wages. Total 23p/kWh in a total cost. Now take the case for gas, I assume the building already has a boiler but the cost of a good flue and stove is probably comparable anyway. Even at 15p/kWh ( uncapped) and 80% efficiency for a gas boiler that is 18.75p/kWh per unit of heat delivered as labour is zero. Similar story with oil at 87p/litre/11kWh or about 10p/kWh heat delivered. Now look at the case for an air to air heat pump running at a COP of 4. Cost would be less than the stove to install. Again with electricity at 50p (uncapped) the cost would only be 12.5p/kWh. In short , much like burning timber, the only economic case for having a stove is if you value your time as nothing. -
I did both. ( apart from the save money bit!) I pulled out the plumbers underperforming compression fit attempt after 6 months and redid it all in Hep2O myself with a radial layout. 25mm MDPE to the stopcock. 22mm Hep2O to the control block splitting to 22mm for the UVC and cold manifold. 15mm for all cold feeds except the basin and toilets in 10mm. 22mm manifold rising above the UVC to preheat the hot water via convection. 15mm pipe to the Showers/Baths and Utility 10mm pipe to the basins and kitchen tap. Kitchen tap should be 15mm really but a run of 13m (woops UVC in wrong location!) meant to have quick hot water delivery at the expense of less flow (6l/sec after 8-9 secs) I used 10mm. The plumber had left us with 10l/s after 35-45 secs which was infuriating. I have since done my parents heating and DHW with an oil boiler, solid fuel Rayburn and thermal store.
-
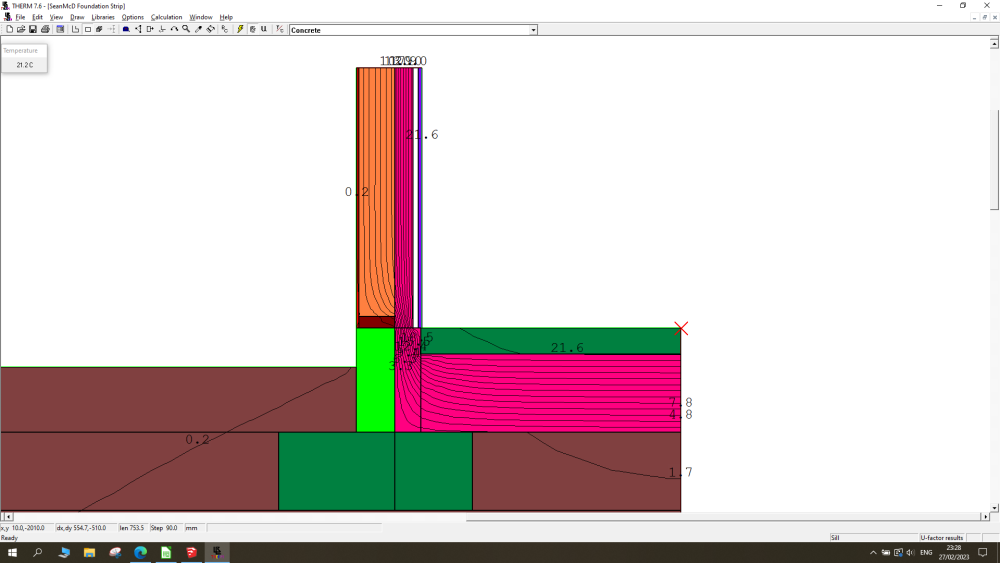
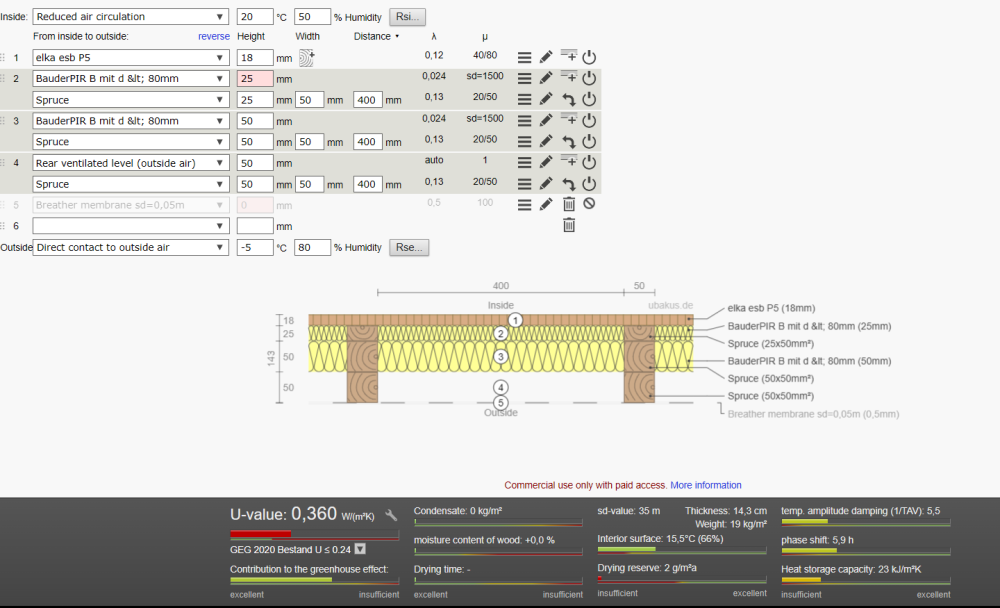
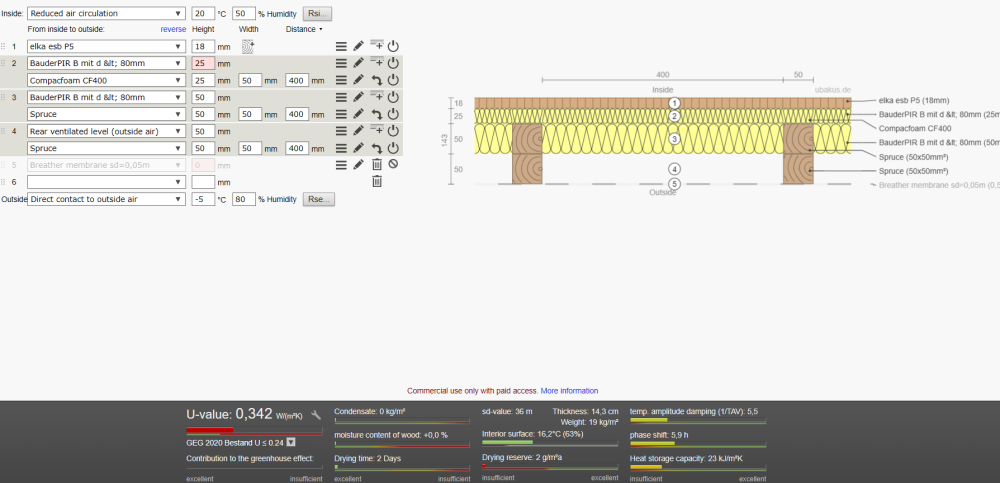
Good thinking @Nickfromwales but the compacfoam doesn't make much difference unfortunately vs timber at such insulative values. WITHOUT COMPACFOAM WITH COMPACFOAM
-
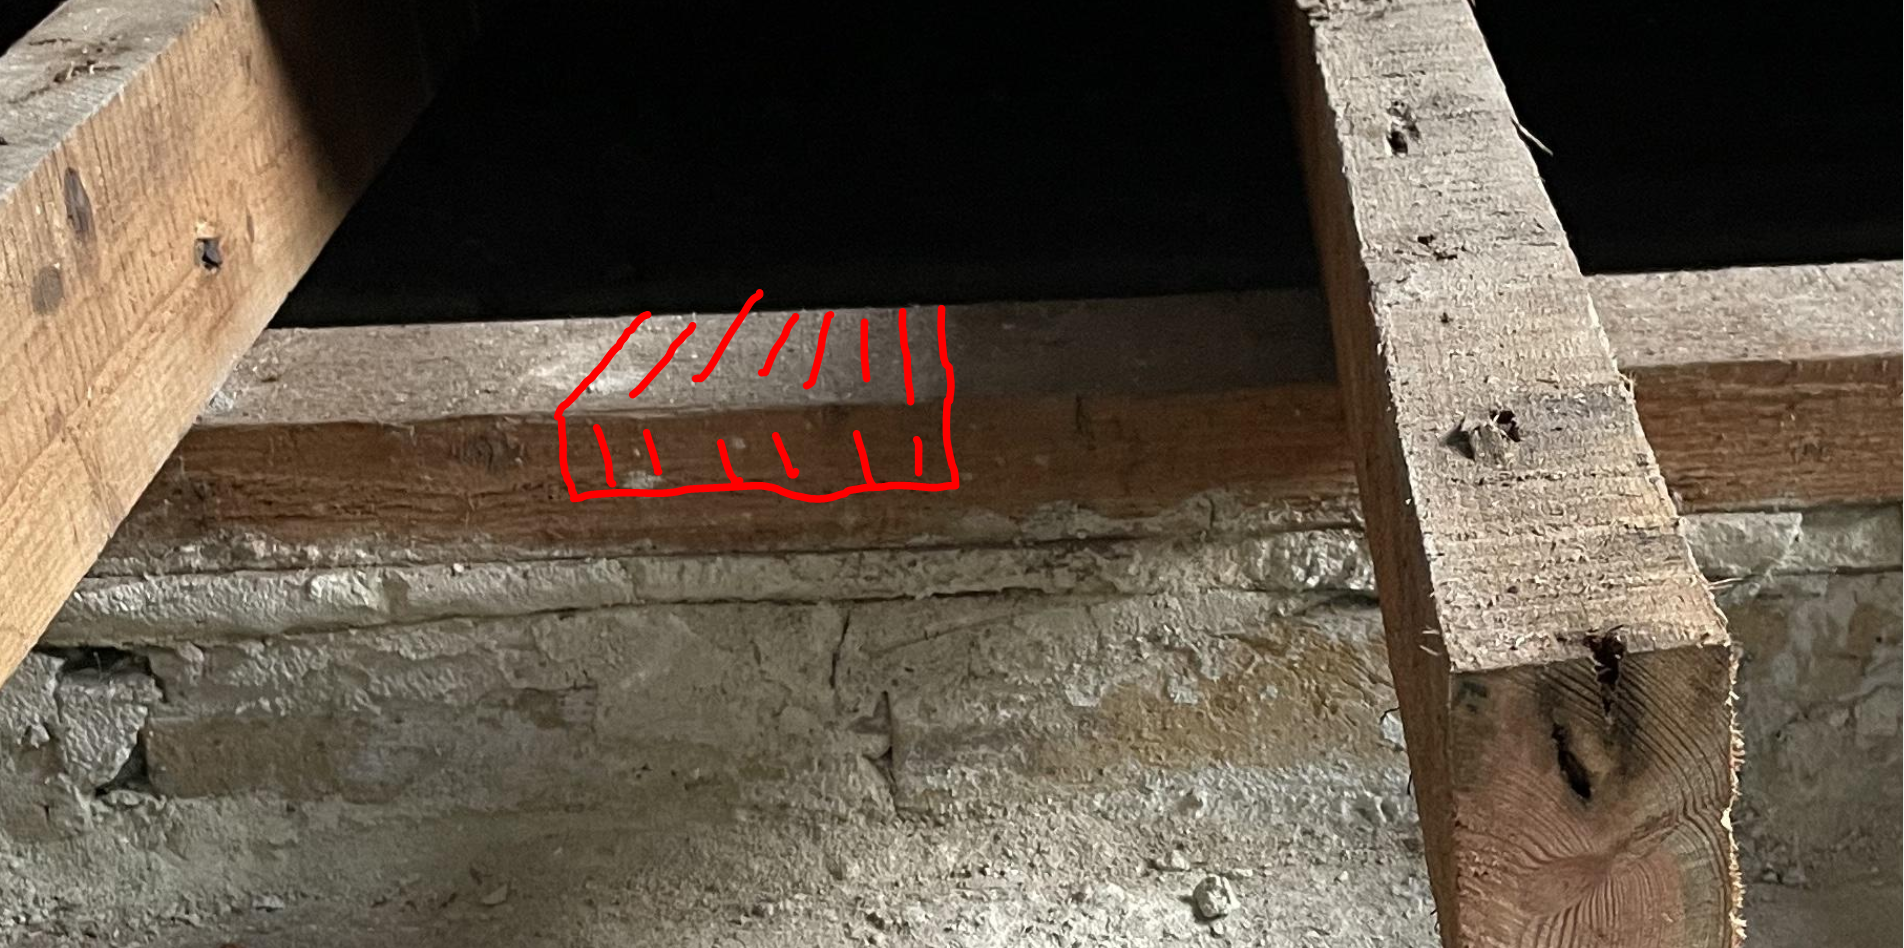
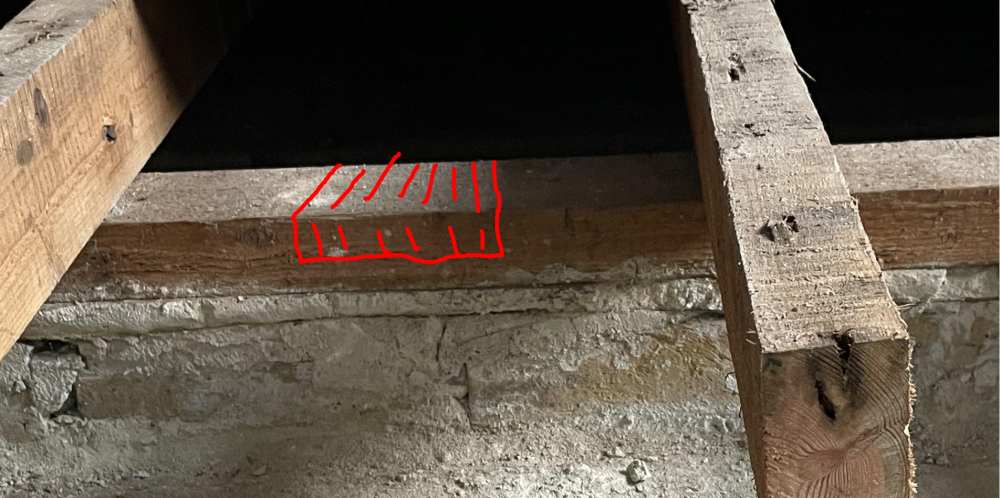
Assuming you have enough space for the P5(18mm) and floorboards (25mm) I would propose something like this. Notch out the wall plate as shown for ventilation. (Disclaimer------ I don't "think" the house will fall down!!) or drill a couple of 25mm holes. Follow ecological building systems approach with the two membranes keeping the drafts at bay. Both from an windtightness approach( thermal bypass) and airtightness. Return the membrane to the internal walls. Lay 25mm battens on top of the existing joists in lieu of the thickness of the floor boards ( you could even rip down some floor boards to do this). This will give you a insulative value of about 0.3W/m2K using a high performing mineral wool batt like If you want to substitute the mineral wool for the more painful and less robust process of PIR then the U value could drop to 0.25W/m2K.
-
Are these costs realistic for a 500m2 house
Iceverge replied to miike's topic in General Self Build & DIY Discussion
Lovely house. I would worry about the £780k +£500k together. There's a size point at which houses get more expensive per m2 again, I think about 350m2. -
Minimum height of insulation build up on concrete slab
Iceverge replied to seano's topic in Barn Conversions
No my area of expertise I'm afraid. Porcelain would certain need something solid. I imagine it would be much the same as tiling over floorboards. -
Minimum height of insulation build up on concrete slab
Iceverge replied to seano's topic in Barn Conversions
Not much I'm afraid. Even by their own (very optimistic) calculations you'd be better off replacing the 6mm+6mm of Superfoil with 12mm of PIR. Then you'd end up at about a U value of 0.025W/m2K without any shenanigans regarding ground conductivity and perimeter areas. There's no BBA cert for their floor products. From the BBA cert for their wall products if you squash it between studs and battens it has zero thermal resistance. It relies on stationary air (like most insulants) to give any thermal resistance. The low emissivity (shiny) foil may help in cold loft situations to keep temperatures lower under direct sunlight but it does almost nothing to keep the heat in. In short there's better places to put your money.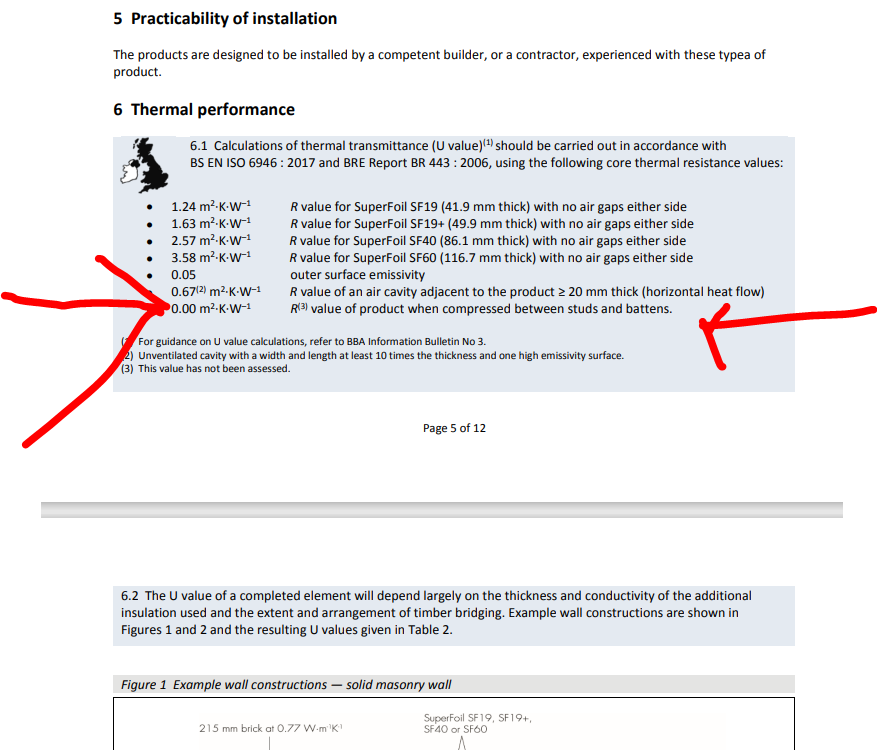
-
WiFi repeater over ethernet
Iceverge replied to Carrerahill's topic in Networks, AV, Security & Automation
We have the two of these. Very happy with them. I'm not that interested in such things, just wanted it to work so I blindly followed the advice of a mate. Easy to set up as far as I can remember. Haven't touched it in two years.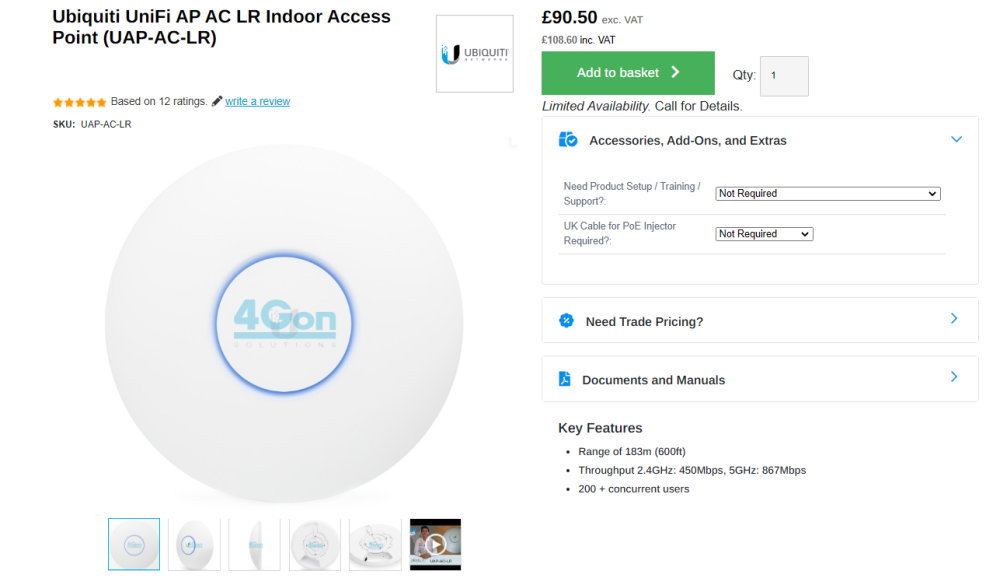

-
@Nickfromwales I'll refer you to a post of one of our fellow members .

-
Is there any merit to these in a bathroom ? Fick on for 5 mins after a shower while I dry my danglys for that instant blast of primal infrared and flick off again. Minimal heat up time so no wasted heating the bathroom to 24 all day everyday.
-
Is this a new build? You can go wider. It's very cheap to do now. Also bin the cavity insulation boards and use full fill mineral wool batts or EPS beads. None ideally. Separate concrete lintels for each leaf. Excellent case study here from green building store. https://youtu.be/gqxEUpBRNic
- 9 replies
-
- 1
-

-
- cavity wall
- window position
- (and 2 more)