Jeremy Harris
-
Posts
26430 -
Joined
-
Last visited
-
Days Won
360
Everything posted by Jeremy Harris
-

How do I know if CE mark is genuine?
Jeremy Harris replied to jamiehamy's topic in Regulations, Training & Qualifications
I hate to say it, but I suspect that the majority of CE marks on Chinese stuff are fake, particularly electrical goods. I've given examples here and on Ebuild of particularly bad stuff, like the LED floodlights, purchased from, and branded as coming from, a UK retailer, that had alloy cases with the protective earth lead just dangling loose inside. I've lost count of the number of 2 core cable items, marked as being double insulated (one square inside another mark) that had exposed metal that was part of the internal case, so again they were fraudulently marked and should have had a 3 core cable, with the exposed metal earthed. Even the big names get fooled. I bought some 230V GU10 LED downlights from a well-known DIY shed, only to find that they had exposed contacts on the front that, depending on the random way you fitted them, were either connected to the supply line or neutral - there was a 50% chance that the exposed metal on the front would be at 230V when turned on. To give the store credit, when I took the lamps back, and showed them the problem, they immediately took them all off the shelves. These lamps, and their packaging, all carried the CE mark, indicating that they had been approved as being safe under the LV Directive, and it was clearly fake. I make a point now of thoroughly checking any item of Chinese electrical equipment to make sure that, as far as I can tell, it complies with the LV Directive. It's harder to check if it also complies with the EMC Directive (another requirement for CE marking) but there are enough tales here and on Ebuild of radio interference from things like LED power supplies to convince me that many are non-compliant. If they are CE marked and non-compliant with the EMC Directive, then there is a good chance they are non-compliant with the LV Directive too, I think. -
You can't be sure that a water trap will stay wet with MVHR, as for several months of the year there won't be any condensate to keep it full of water. I fed mine to a drain that also takes the waste water from the softener, so I know that the trap will always have water in it.
-
It should be fine, as long as it doesn't get contaminated in the collection/pipe work, as it will just be distilled water, so should be free of anything that will mess up a battery (or a steam iron).
-
Treatment Plants - detergents / cleaners and toilet paper
Jeremy Harris replied to Stones's topic in Waste & Sewerage
Even some of the 3 ply stuff seems to be very easily broken down when wet. I can't recall what it is that SWMBO buys, but it's pretty thick when dry, but just seems to fall apart when wet, so my guess is that it will have broken up a fair bit before it even gets to the treatment plant. If all else fails, try this:- 1 reply
-
- 2
-

-
Space Saver Furniture
Jeremy Harris replied to Ferdinand's topic in General Self Build & DIY Discussion
Probably the best application, I think. I know that as a (sometimes randy...........) student the folding sofa/bed proved exceptionally frustrating in more than one way -
That's a good idea, as some of the online tutorials are out of date, or have errors. I took the time to write down everything I did to get the basic wireless access point running on the Pi Zero W, which is virtually the same as the online tutorial I linked to earlier, but with one significant difference, in that I couldn't get network address translation to work at first. Adding a reboot part way through setting up the Pi Zero W fixes this, although I'm not sure why. Attached are the instructions I've written up, less the extra steps to add TOR. I'm still working on that, as for some reason I can't seem to get TOR to connect, not sure why, I need to spend some more time looking at what's going on. Raspberry Pi Zero W as Wireless Access Point - no passwords.txt
-
Space Saver Furniture
Jeremy Harris replied to Ferdinand's topic in General Self Build & DIY Discussion
As a student I lived in a bedsit for a time that had one of those sofas that converts to a bed. All I can say is that it was PITA, it took ages to sort out the bedding to allow the thing to fold away and wasn't very comfortable either as a bed or a sofa. -
Key Health and Safety Lessons (Humour)
Jeremy Harris replied to Ferdinand's topic in Project & Site Management
Spotted these signs on a US web site and think they should be on sale over here: https://www.inkace.com/danger-not-operated-fuckwits-sign/- 11 replies
-
- 2
-
-
- healthy and safety
- work package plan
- (and 3 more)
-
Trapezium Door - Any Inventive Solutions?
Jeremy Harris replied to ThePoplars's topic in Windows & Glazing
We had a wide aluminium pivot door fitted to a new build lab as the outer door into a draught lobby. Both water and wind blew around the edges and we had the main contractor back snagging it around half a dozen times until in the end it was replaced with a pair of asymmetric aluminium double doors. The problem was that it was near-impossible to get the door seals to work, especially in the region around the pivot. I think they work well indoors, but I'd personally not want to use one as an external door. -
I fitted the widest towel rail I could find (1400mm wide, IIRC) that was also very short, top to bottom, so it can take towels side by side and won't overheat the bathroom too much. I also fitted the smallest element I could find, around 150W, and have it wired to a time switch outside the bathroom, so it only comes on for an hour or so morning and evening. The thermostats I used with the 0.1 degree hysteresis are these: https://thermostats4u.co.uk/products/computherm-q3rf
-
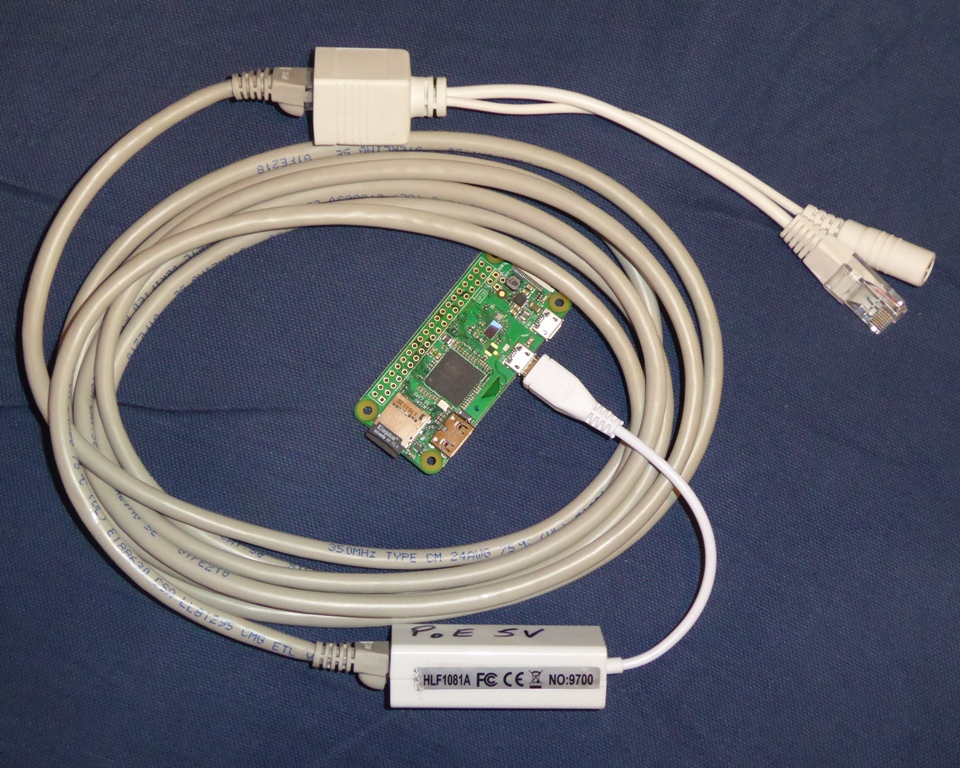
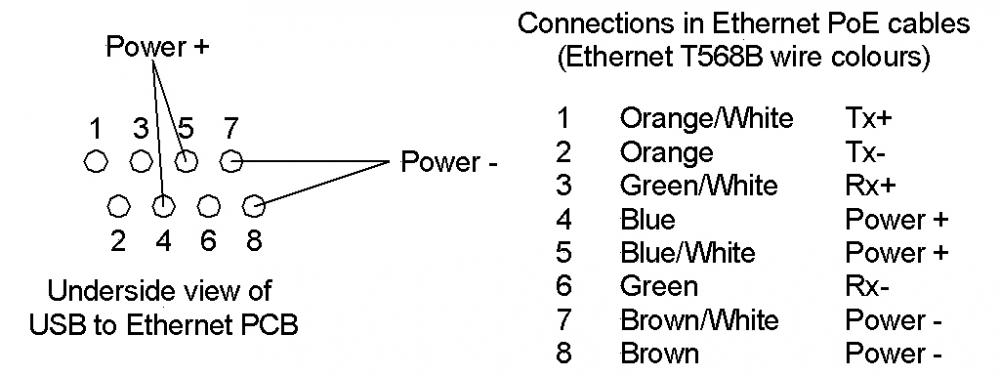
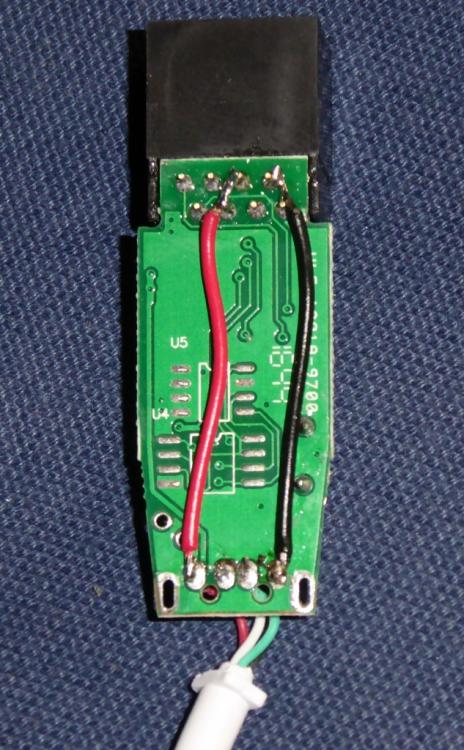
Here's a bit more info for anyone that wants to run this pretty crude form of power over Ethernet. Cat 5e/6 cable has four spare wires (two pairs) that aren't used, pins 4, 5, 7 and 8 at the connector. This sketch shows where these connections are on the cheap Chinese Ethernet to USB adaptors, together with the cable colours for the T568B Ethernet cable (there are two standards, T568A and T568B, but my whole house happens to be T568B - it makes no difference as far as PoE is concerned): To inject power to the unused pairs, I used a cheap Chinese PoE injector. These are sold as pairs on ebay, with a power socket on the power injection end and a power plug on the other end, to power equipment. I've not bothered with the equipment end adapter, as I just soldered link wires inside the Ethernet to USB adapter: Typical prices for a pair of these PoE adapters is less than £2 for a pair, including shipping from China. An ebay search for "Ethernet PoE adapter" will throw up hundreds of these things, I bought a bag of 5 pairs for a bit over £8. I should point out that this is a non-standard way of using PoE, and won't work over long distances. It depends on the amount of current the device at the end draws, but I've found that as long as the current is below about 500mA then there's very little voltage drop over up to around 15m of cable. More than that and you would be better looking at proper PoE systems, that use a higher voltage on the cable with a high efficiency voltage regulator at the equipment end. By increasing the voltage and regulating it at the equipment end, proper PoE gets around the cable voltage drop and runs a lower current down the cable. For home use, where you know what you're doing, the "Commando" style system of just running low voltage DC down the unused pairs works fine, though, you just need to remember what voltage any particular cable is running at, if you have more than one (I'm running 12V over a system like this to power our VDSL modem, which is mounted on the wall next to the master socket). Finally, this is the complete test setup from yesterday, with the Pi Zero W wireless AP hanging off the end of the cable: Note that I've marked the modified Ethernet to USB adapter to show that it has to run on 5V PoE, just in case I forget at some future date!


-
Indeed, I'm seriously impressed by how easy this was to do, especially as I'd not bought the parts with this in mind! It'd work just as well for a remote Pi Zero (rather than Pi Zero W) being used as a data collection hub. The greatest power consumption is the Ethernet to micro USB adapter, as the Pi Zero W is pretty low power (and the Pi Zero is cheaper and even lower power), and both can have their supply current reduced by around 25 mA by just turning off the HDMI port (not needed when it's running headless).
-
Trapezium Door - Any Inventive Solutions?
Jeremy Harris replied to ThePoplars's topic in Windows & Glazing
An alternative might be a pantograph hinge, as used in some marine applications: http://www.freemanmarine.com/Doors1400_PHinge.htm http://www.tecnoinox.eu/eng/page2/page8/page8.html There seem to be lots of variations of these, including commercial ones used on buses and some taxis. This video shows how they work: -
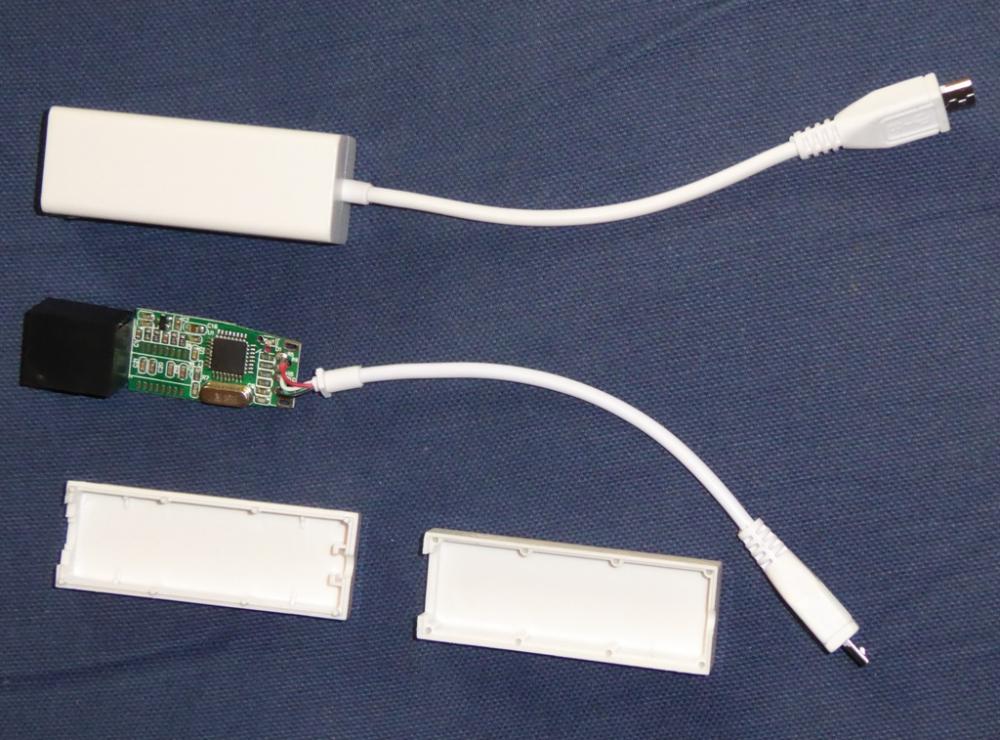
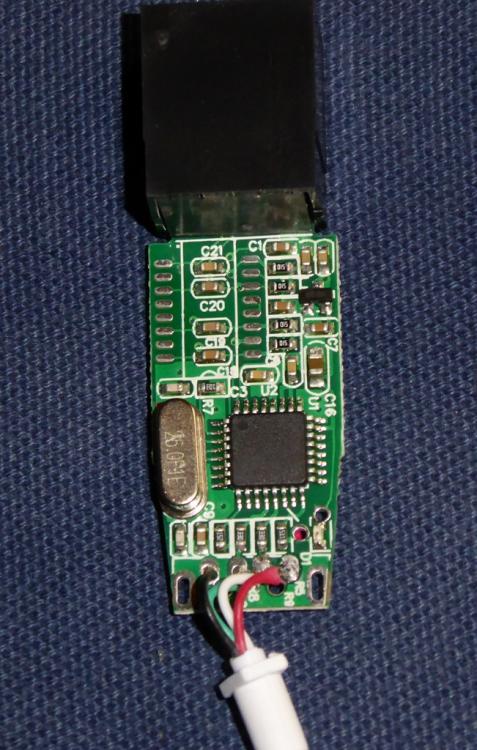
Made a bit of progress on making things smaller and simpler. I discovered that there is a direct power connection between the power micro USB and OTG micro USB on the Pi Zero W, which means that the Pi Zero W can be powered just as well through the OTG micro USB port as it can through the adjacent power micro USB port. Next, I decided to take one of the cheap Ethernet to micro USB adapters apart. Dead easy, the sticky labels on either side are all that hold the push together case in one piece. This is what they look like when apart (one is untouched, the other has been pulled apart): Here's a close up of the top of the module: Next I discovered that the pins for power over ethernet were there on the underside of the board, so it was dead easy to just add two wire links to connect 5V to the USB lead: I put the unit back in it's case, hooked it up to one of the cheap Chinese PoE injectors, plugged it into the Pi Zero W, plugged the PoE injector into a spare 5m Ethernet cable, with the opposite gender PoE adapter on the other end, which was plugged into a 5V power supply and the router, and lo and behold the Pi Zero W AP came to life, powered by the Ethernet cable alone. This is one of the simplest bodges I've done, yet will be very handy in terms of being able to run a single length of Ethernet cable to the place where I want to put the AP, and have it both power the thing and transfer data back to the network.
-
Trapezium Door - Any Inventive Solutions?
Jeremy Harris replied to ThePoplars's topic in Windows & Glazing
If you know an inventive local fabricator, then a double hinged arrangement like an aircraft door, hinged on the vertical side and with the bars between the hinges wide enough to allow the door to swing back against the wall when open (just like an aircraft door) would work. Fastening it would mean having two sets of latches, perhaps with two handles to make things cheaper, that latch and pull in to the seals both long sides (again, very much like an aircraft door). Worth having a close look at how aircraft doors work. They have a very neat geometry and are designed to be very airtight, as well as strong enough to withstand the forces from cabin pressurisation. They are also designed to open right out of the way and lie flat to the aircraft outer skin, so they aren't in the way of the airstair. Any aluminium or uPVC door/window fabricator could make the door itself, using standard extrusions and latches. The special bit would be the cranked double hinge bars, but these could be made to just bolt to the outside of the door and the wall alongside, and not look too out of place. If it were me, then I'd make up the cranked double hinges from stainless, using standard hinges at either end. Not a big job, maybe half a day's work at most to fabricate and polish two stainless cranks and fit the hinges. -
Design and cost of hot water heating system
Jeremy Harris replied to volcane's topic in Other Heating Systems
This is how I think you could add a supplementary 3kW electric heater: The non-return valve is there to allow the Willis and pump to work when the ASHP is off, and assumes that when off there is an open path through the ASHP secondary (there should be). In the electric boost mode, if the ASHP is running and the Willis is running all that will happen is that the flow temperature to the Stack will be hotter. If the ASHP is not running, and the Willis is running, it will be the only source of heat to the Stack. Not sure about being able to take heat from the house and store it in the Stack, to do that would need another heat pump to take heat from the house somehow and transfer it to the Stack. Not too easy to do, I suspect. Getting the Daikin to cool should be possible, as it will be capable of doing it, it's really a question of whether or not Daikin have built in the controls to allow this to work. I found that I had to reverse engineer the control system of our Carrier ASHP, as although it is designed to work in cooling, as well as heating, mode, there was very little information on how to get cooling mode to work. Cooling the UFH to a modest level is very effective, but care needs to be taken as to how cool the flow can get, in order to prevent condensation. I've found how to programme ours to give a minimum flow temperature of 12 deg C in cooling mode, and in practice that means the floor surface never drops below 18 deg C, which means there's a very low probability of condensation (the RH would need to be around 65% or more, which isn't very likely in UK hot weather).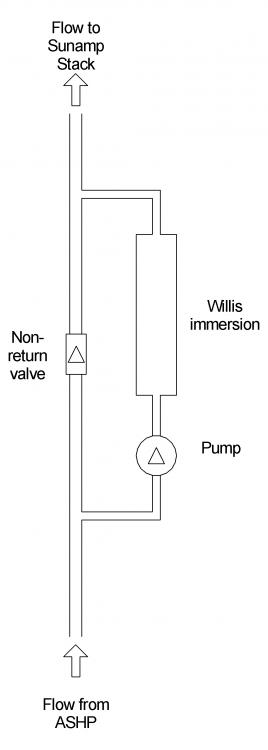
-
Redirect sub-domain to a fixed IP?
Jeremy Harris replied to Jeremy Harris's topic in Boffin's Corner
Thanks @richi, I've no plans to run a mailserver (yet!), I'm just trying to set up secure, private and encrypted file sharing, so that I can access files via the web that are hosted on a pretty secure home server. So far I seem to have most things working, thanks to some useful open source stuff, like Let's Encrypt, and Nextcloud. Bit of a steep learning curve for me, as I'm far more comfortable with hardware and machine code............... -
Appliances: brand new or brand name?
Jeremy Harris replied to Crofter's topic in Kitchen & Household Appliances
The secret with Freecycle seems to be to find a group in an affluent area. The Salisbury group often has rich pickings, whilst the one in nearby Andover definitely doesn't! -
Building Management Systems are very common in commercial builds, and have been around for a long time, certainly decades. They haven't really become that common in domestic builds, but some of the automation systems, like Loxone, come close to having the same functionality. The systems I'm familiar with in commercial buildings use a network infrastructure all around the building, for everything from light switches to a wide range of environment and occupancy sensors. Something like a light switch will really just be a device on a bus that sends a specific command to the BMS, and the BMS then activates power to whatever light the switch is supposed to control. It means that the switch can be over-ridden by occupancy sensors, alarms, timers etc in the BMS, to turn things on or off irrespective of the last switch command. Similarly, the BMS monitors and controls the environment in the building, by using the sensors to control heating, cooling and air handling systems, often including humidification. The big snag is that there is a range of proprietary network systems and data formats, so getting a BMS from one manufacturer to talk to components from another manufacturer is often a bit fraught. To make things more complex, the encoding and data formats each manufacturer uses are often kept pretty secret, making it even harder to "mix and match" system components. Some devices do offer a "vanilla" interface, often a serial bus type arrangement, perhaps to a known and agreed standard (something like RS422), in which case interfacing them can be reasonably striaghtforward. What you need to find out is the data format that's available and the controls or sensors that are connected to the bus. For example, our MVHR has a two wire data bus, that seems to use RS422, with a proprietary (and secret) data format. This allows the MVHR control unit to display lots of data from many sensors inside the MVHR, as well as send command to the MVHR to change the fan speed, target room temperature, hysteresis, cooling and heating options, control of external devices via a small bank of internal power relays, etc. In theory all of this could connect to a BMS, if the data format was known.
-
Appliances: brand new or brand name?
Jeremy Harris replied to Crofter's topic in Kitchen & Household Appliances
I'm also amazed at the nearly-new stuff that gets thrown out - Freecycle around here often has nearly brand new kitchens that are being binned because new owners buy a house and don't like the kitchen! A few months ago I saw what must have been a kitchen costing north of £30k being given away free................. -
Design and cost of hot water heating system
Jeremy Harris replied to volcane's topic in Other Heating Systems
Fit a Willis immersion in a branch off the ASHP flow to the Sunamp Stack. That gives you a 3Kw electrical input for little additional cost, that could be hooked up to a future PV installation if you wished. Not sure how the primary pump is arranged, if it's within the Daikin then you may need to add a second pump that's only inline with the Willis branch, fit the Willis in a branch from the flow pipe, with an NRV in the main leg between the branch with the Willis and pump in. That gives you redundancy if the ASHP fails and the ability to use excess PV. -
Appliances: brand new or brand name?
Jeremy Harris replied to Crofter's topic in Kitchen & Household Appliances
One of the best places we've stayed in (a converted dovecot in Cumbria) had really simple appliances, with some very brief laminated labels stuck on things with just enough info to get them working, things like a label on the washing machine with brief decode of the settings for a "normal" wash. Many places provide a book of instructions, usually with local information as well, but frankly it's a bit of a pain having to read through pages of stuff just to find out how to get the washing machine to work. One place we stayed in had practically every control locked down, even the room thermostat, which I thought was a bit OTT, as we ended up having to leave windows wide open to cool the place down when the heating was running. We tend to stay in out-of-the way self-catering a fair bit, and don't really need much in terms of conveniences. A very simple hob, oven, microwave, toaster, kettle, washing machine, radio and TV is more than enough, and arguably we could easily do without a TV, as we don't go on holiday to sit in front of the thing! We never cook anything complicated on holiday, it's always a mix of eating out and just simple meals if we're staying in. I'm not even really that fussed about having internet connectivity, but my other half is - if she can't use her iPad within ten minutes of walking in it's usually up to me to find a way to create a wifi hot spot for her, pronto, usually by tethering it to my Android tablet. -
Just back from doing some shopping, and re-reading the above I've realised it's not very clear! One of the better web tutorials on setting up a Pi as a wireless AP is this one by the inimitable Ladyada: https://learn.adafruit.com/setting-up-a-raspberry-pi-as-a-wifi-access-point/install-software She's demonstrated using an older RPi, but I can confirm that these instructions work fine with the RPi Zero and Zero W, with one slight tweak. There's no need to be explicit about the wifi device driver in hostapd.conf. as the newer kernel has drivers built in that work fine with the RPi3, Pi Zero fitted with many common USB wifi dongles and the Pi Zero W (which uses the same wifi chip as the RPi3). If you just comment out the line "driver=rtl871xdrv" (with a leading "#") in hostapd.conf it will work fine (I found this out with a bit of trial and error!).
-
The photos of our slab and UFH going down are in this entry: http://www.mayfly.eu/2013/10/part-sixteen-fun-and-games-in-the-mud/
-
The IP is static for the Ethernet port to the house LAN (the router just accepts devices with a static IP even though it's running DHCP, some don't, so you need to set the static IP in the router too). The second wifi LAN is dynamic, with DHCP being done by the Zero W. To set a static Ethernet IP you have to edit the eth0 entry (or probably add it at the end) in /etc/dhcpd.conf, via SSH, as there are no spare ports for a keyboard - save an empty file in the root of the µSD card called "ssh" (no suffix) to enable SSH on Jessie, as by default it's disabled now. You need to know your routers gateway IP (often something like 192.168.0.1), and a quick web search will give a few tutorials for editing the interfaces file to set a static IP. To make the AP sub-net work over a different local IP range to the main LAN, then you need to install a DHCP server on the Zero W and translate from the wireless LAN to the Ethernet LAN. Again there are tutorials on the web to show how to do this. In essence you install hostapd, isc-dhcp-server and an IP tables manager (iptables-persistent) then configure dhcp (by editing config files) to set the IP range for the AP wifi sub-net. Edit the hostapd config file to set the encryption, SSID, password etc for the AP, and set the lot to run from boot with daemon. I also set up network address translation (NAT) to allow translation from the wlan0 port to the eth0 port, saving this in iptables to make it permanent. All told it's around 20 minutes or so to get a blank copy of Jessie Lite configured as a wifi AP with a fixed Ethernet IP and a DHCP server on the wifi side. I've got into the habit of saving base images that make life a bit quicker, so I already had an image with Jessie Lite, with SSH enabled and hostapd and isc-dhcp-server loaded, with a base configuration. Setting it up is then just a matter of editing a few config files to set up IP ranges, NAT, the AP SSID, password, encryption etc.