
Construction Channel
-
Posts
4343 -
Joined
-
Last visited
-
Days Won
14
Everything posted by Construction Channel
-

Plastering Moisture Resistant Plasterboard
Construction Channel replied to Onoff's topic in Plastering & Rendering
We all know @Onoffhas got some broad shoulders otherwise he wouldn’t have made it this far. But this is verging on bullying. The poor guy just wants to have a go at some plastering. I for one fully support his decision. (Maybe not on the blue grit but on wanting to have a go himself) my advice would be to let the BIL do the ceiling for you first. Just labour on him and learn what you can. I say this because when Your sat it the bath you will be staring straight at it. Then have a go at a couple of walls yourself. Whats the worst that can happen? BIL has to go over them again, but at least he tried. -
Making stairs from scratch
Construction Channel replied to Construction Channel's topic in General Joinery
Yeah but he isn’t using a guide bush so it means making new jigs which I am trying to avoid if I can. -
Making stairs from scratch
Construction Channel replied to Construction Channel's topic in General Joinery
grrr even on the instruction manual for a shop bought one it shows a rounded corner under the nosing...... page 10 https://titman.co.uk/media/import/TSTAIR-Stair-Jig-Instructions.pdf it looks like I might be making some inserts after all. -
Making stairs from scratch
Construction Channel replied to Construction Channel's topic in General Joinery
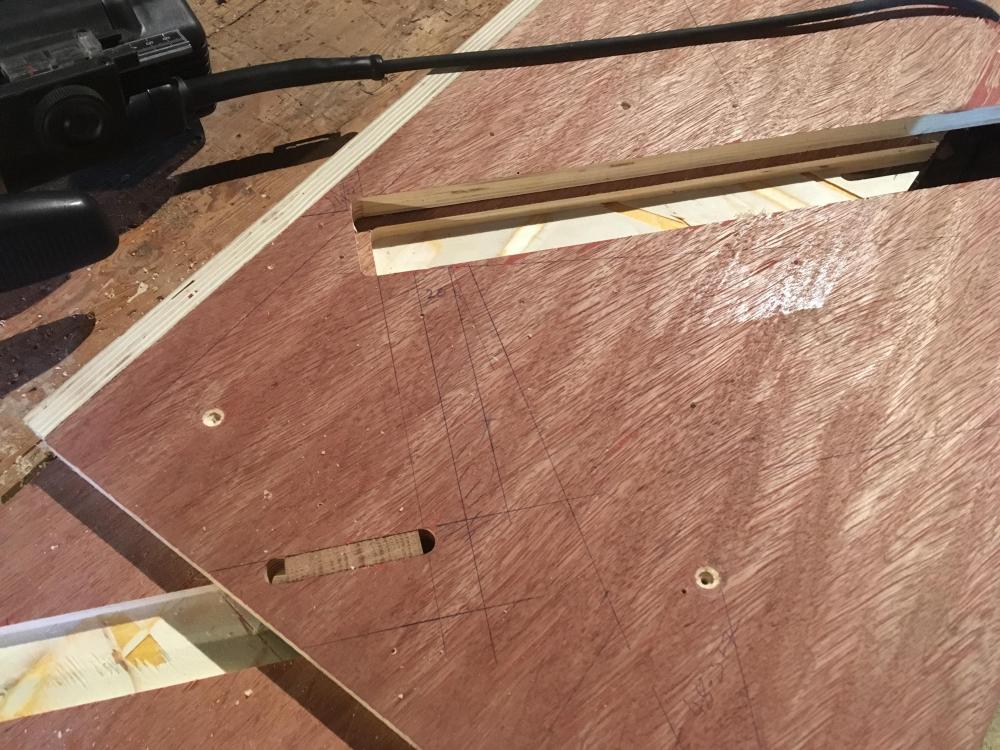
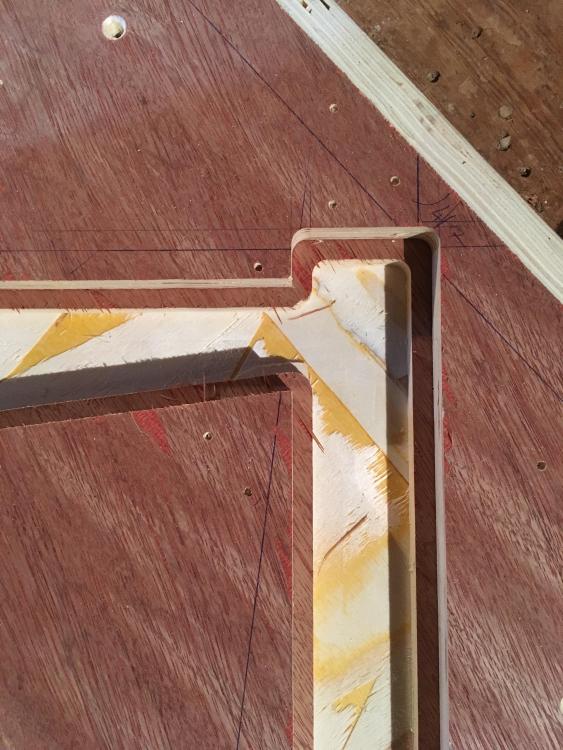
i have modelled the entire staircase in SketchUp, hence the test string fitting first time, when making the jig I just assumed using the guide bush would be fine. I'm a carpenter, not a joiner so my experience of jigs is limited to pretty much worktop and hinge jigs, although I did a layout for a stair jig in college I don't remember actually cutting it or using it. the more I think about the inserts to get over the problem, the less I like them, it looks like I will be starting afresh in the morning,also i cant see the need to use the flared router bit, as long as I don't put much if any glue on the front faces it should be fine with a straight cut, -
Making stairs from scratch
Construction Channel replied to Construction Channel's topic in General Joinery
have you seen the price of the trend ones.. https://www.ffx.co.uk/tools/product/Trend-Stair-A-5027654504628-Staircase-Jig-Complete-Closed-Riser -
Making stairs from scratch
Construction Channel replied to Construction Channel's topic in General Joinery
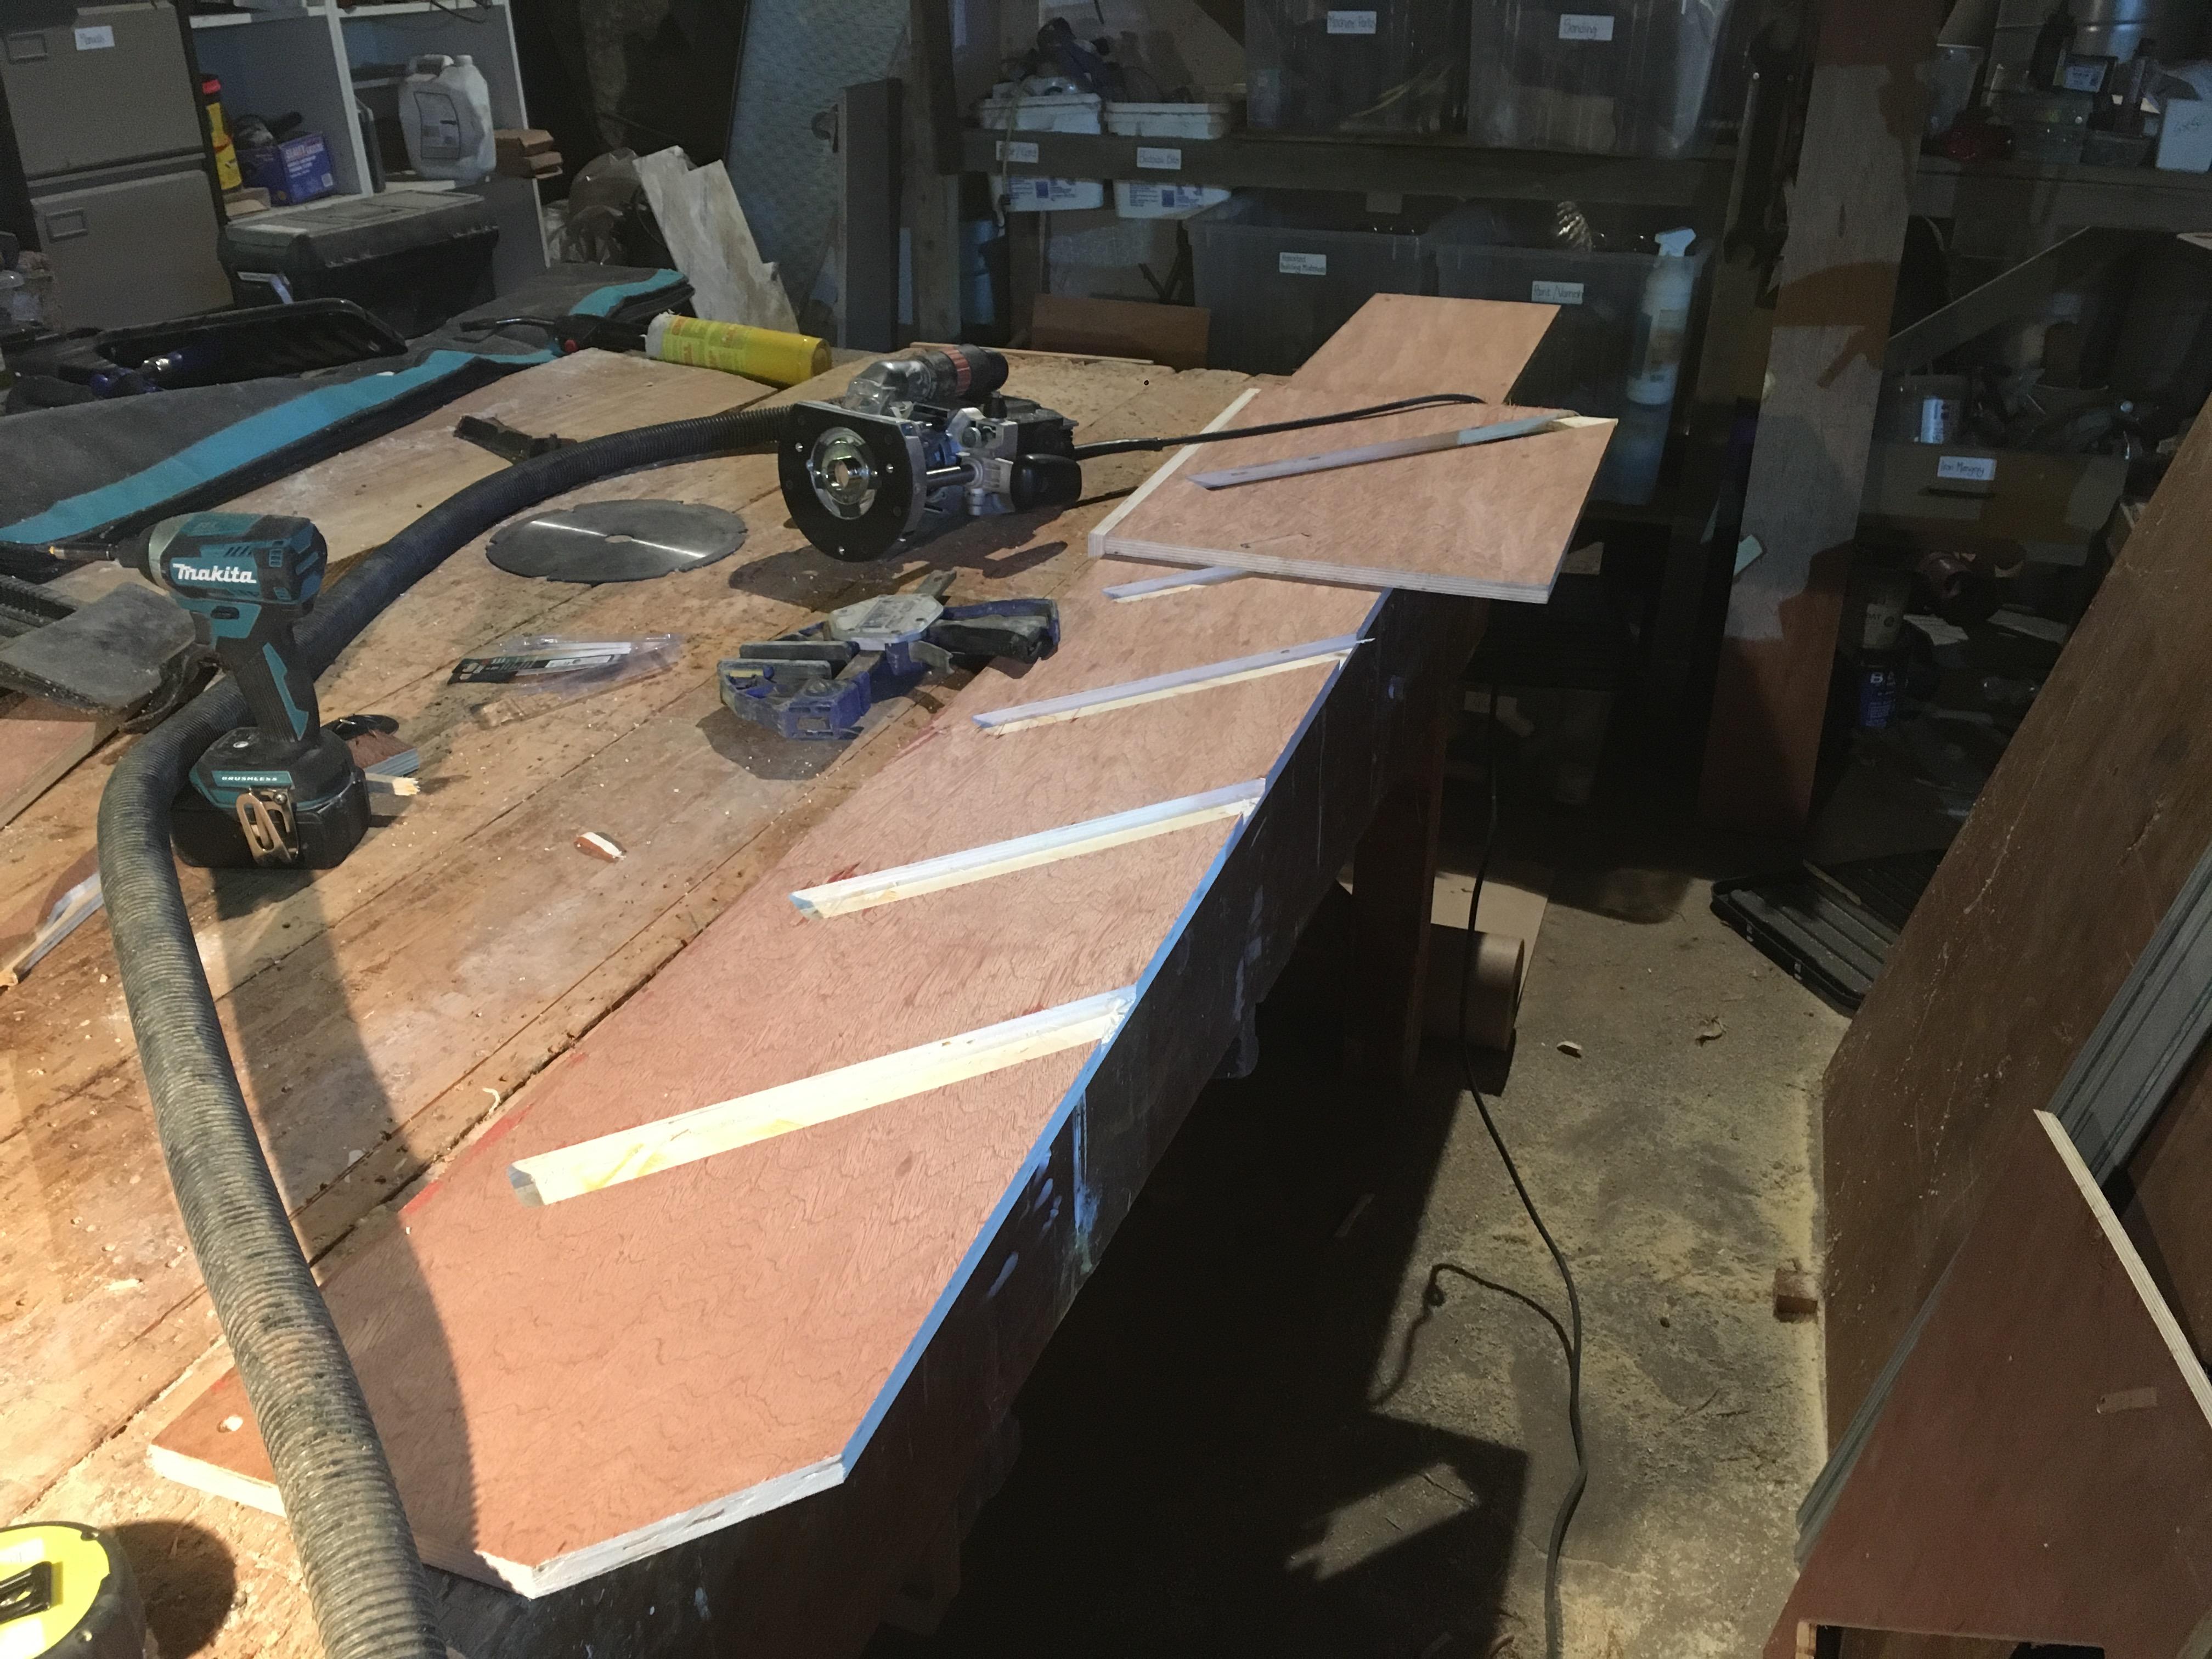
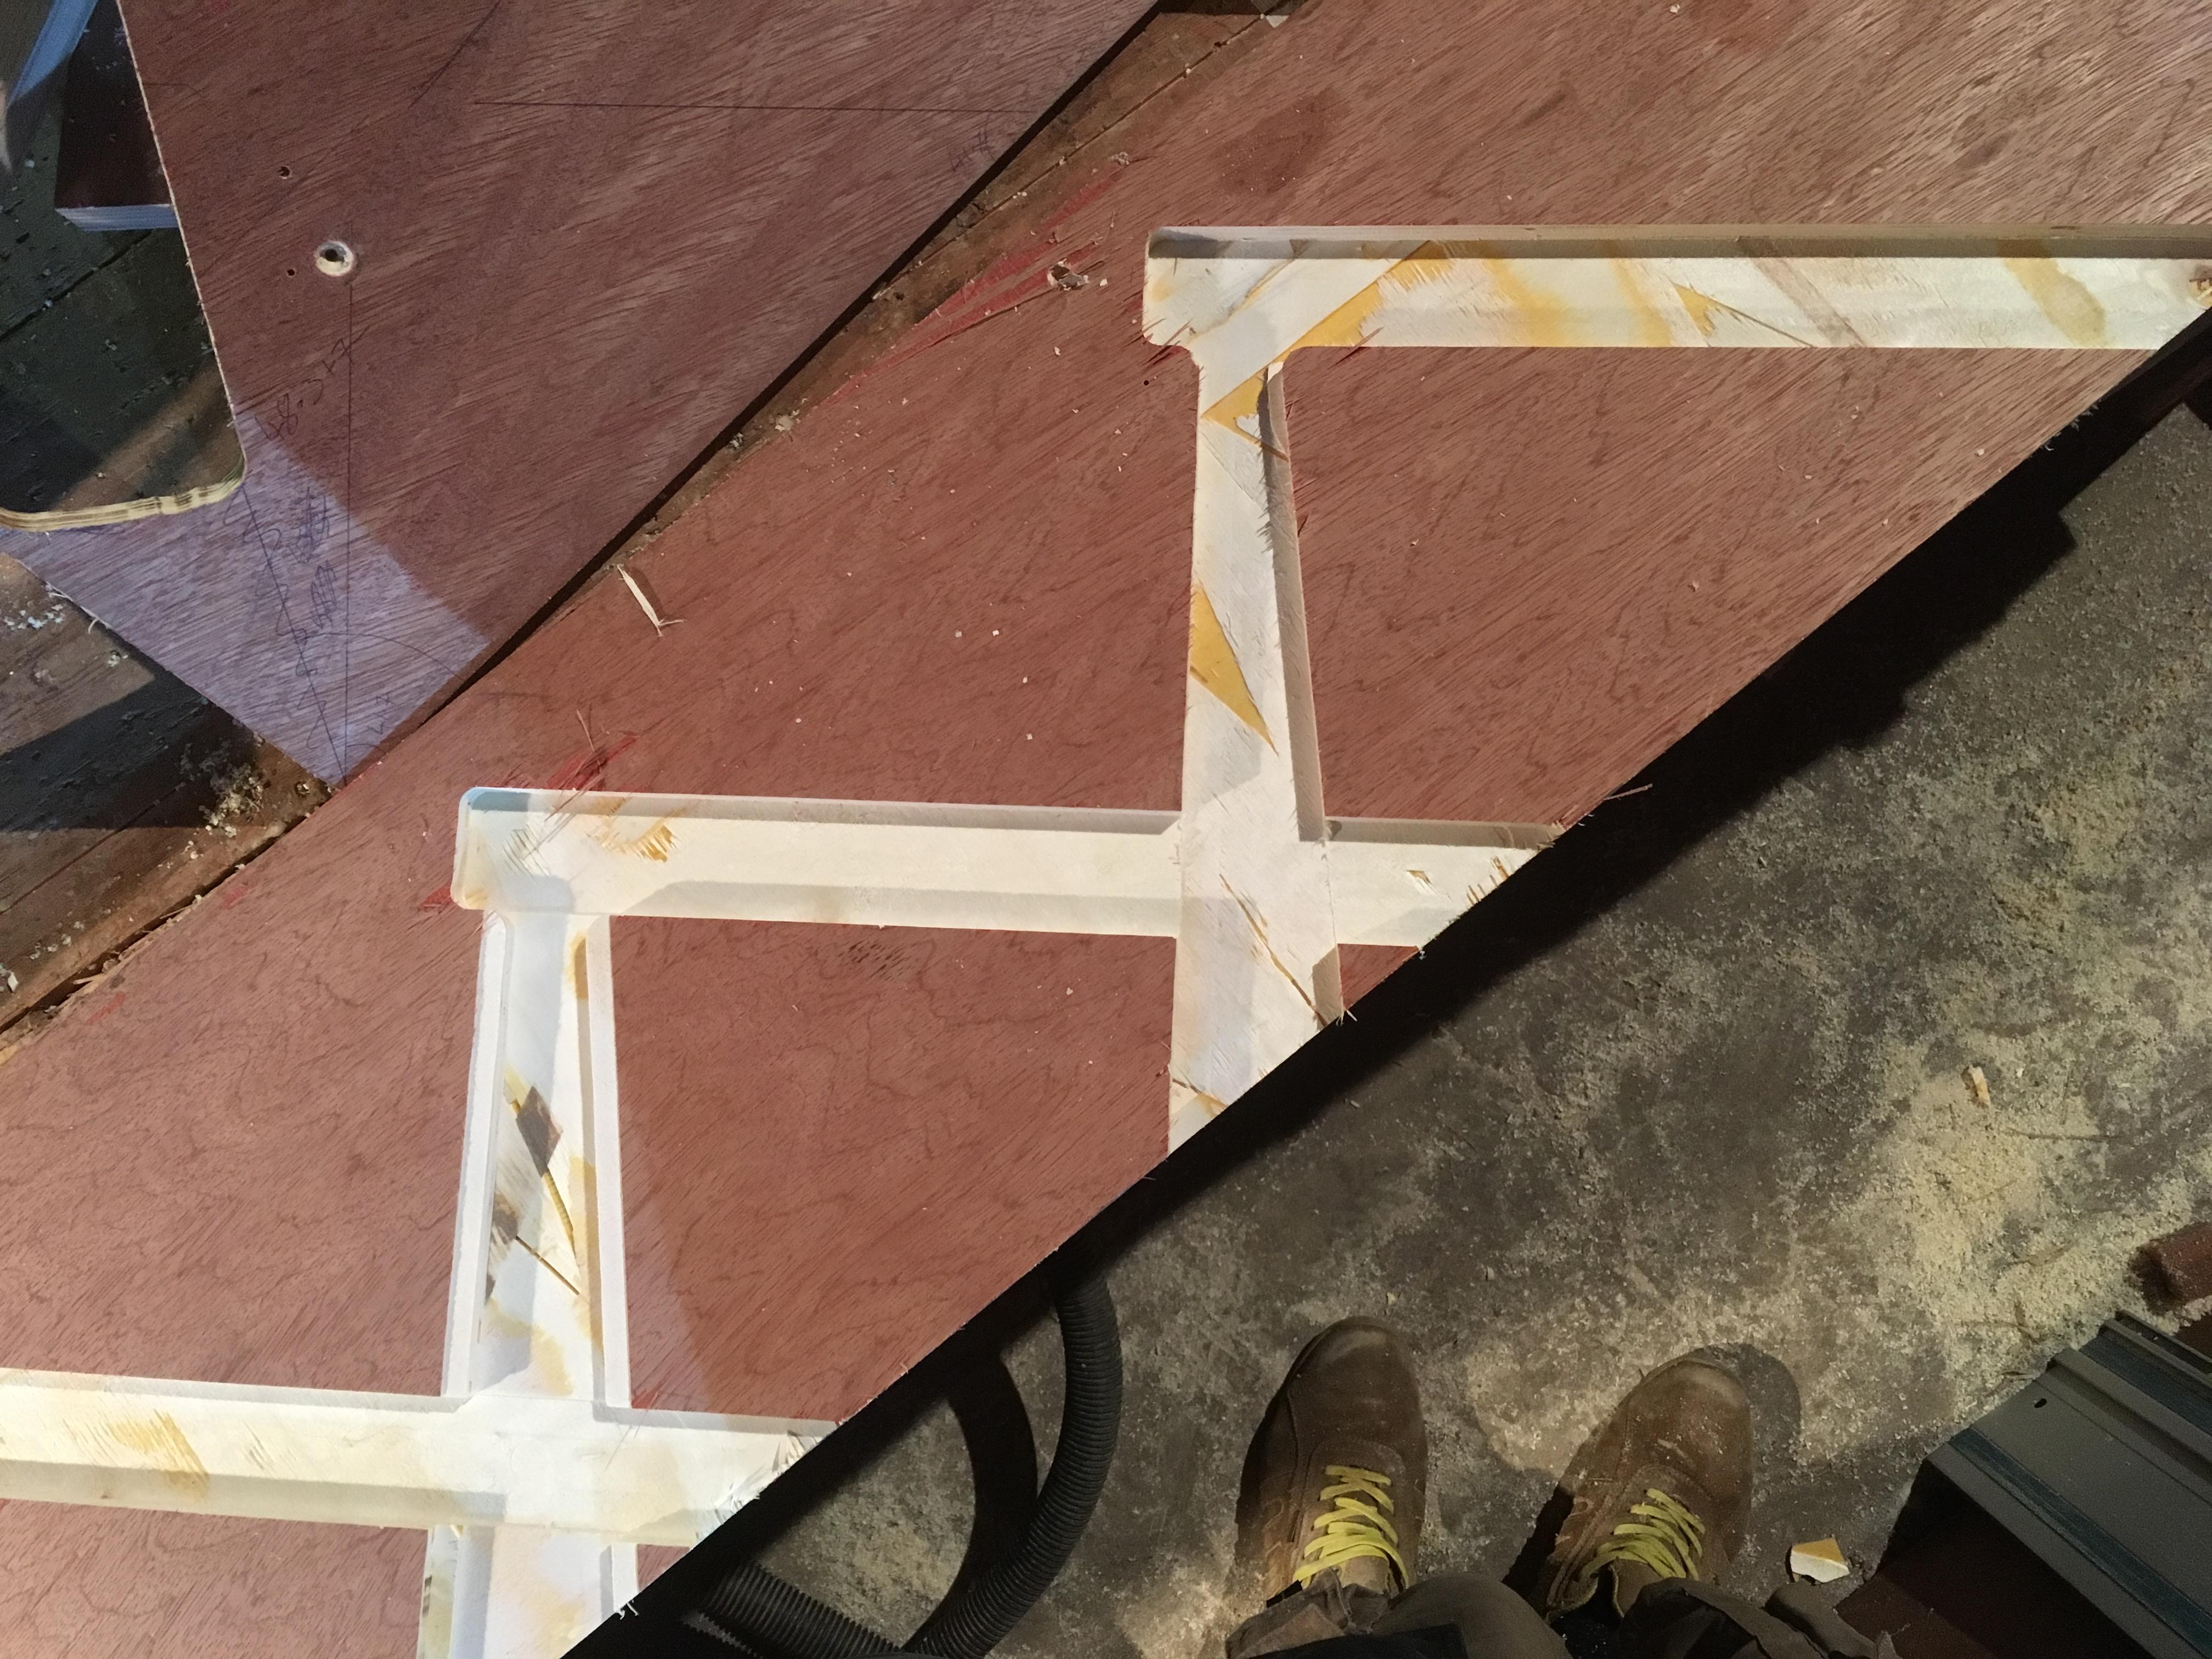
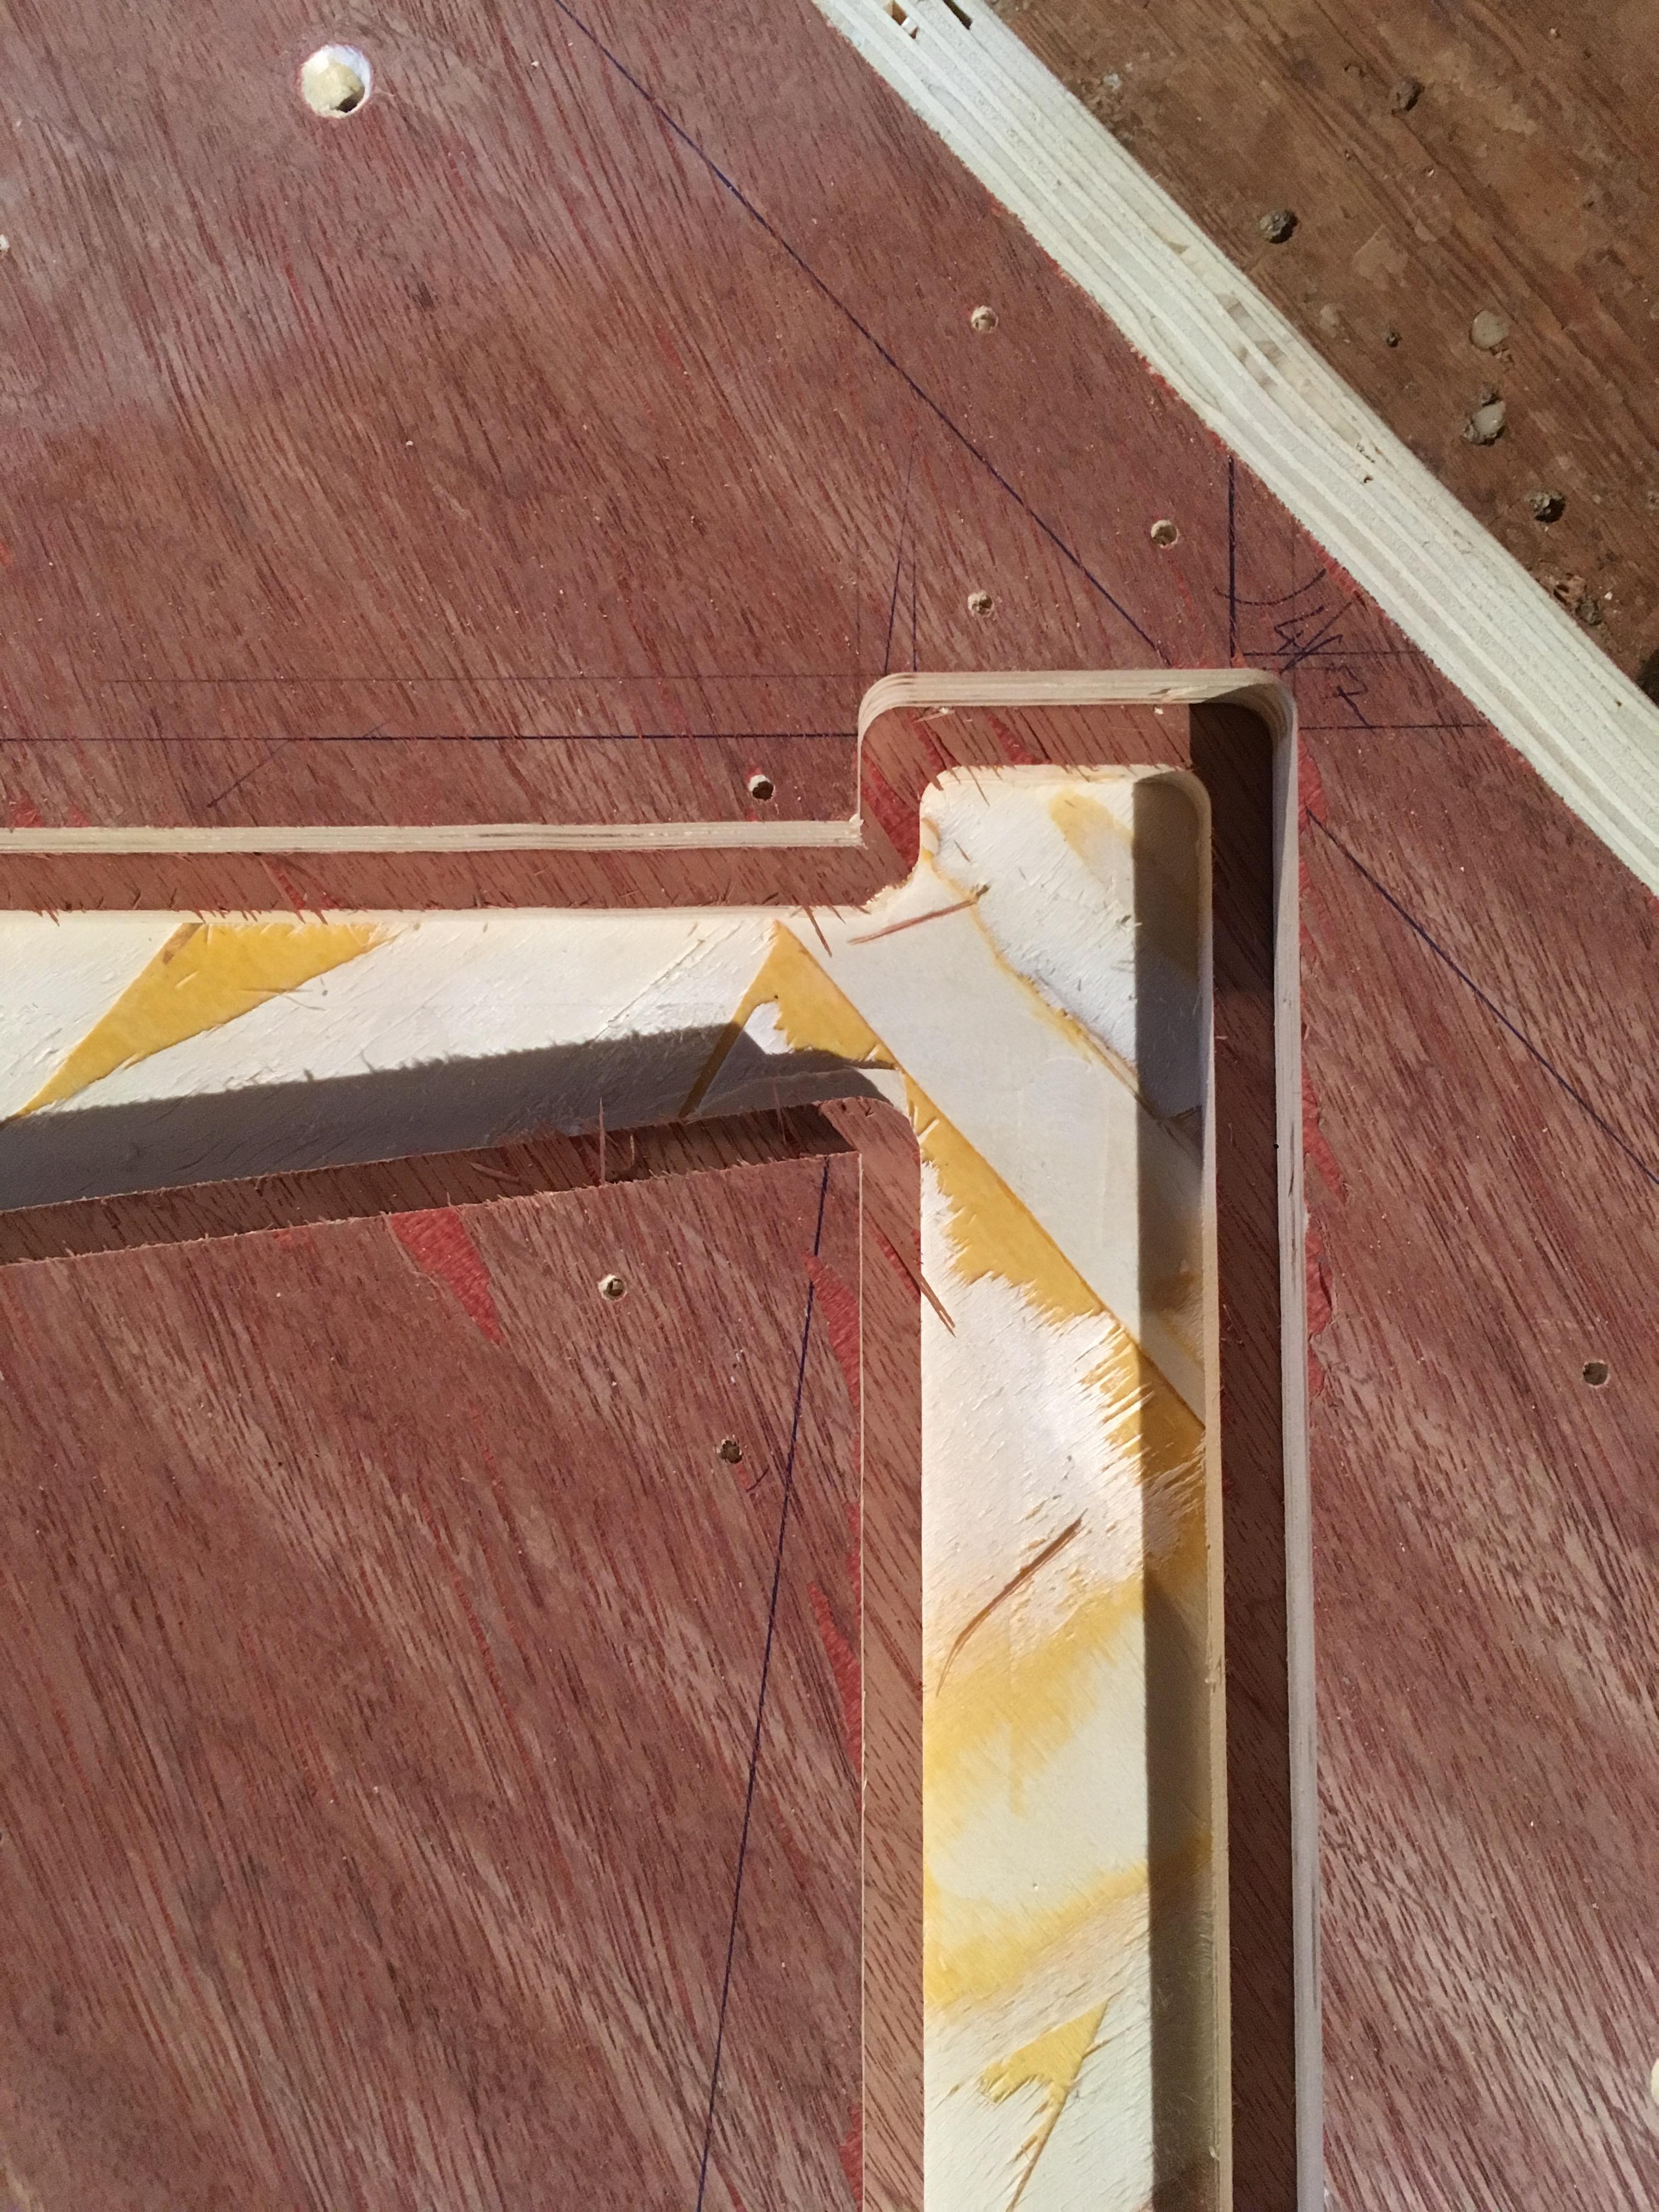
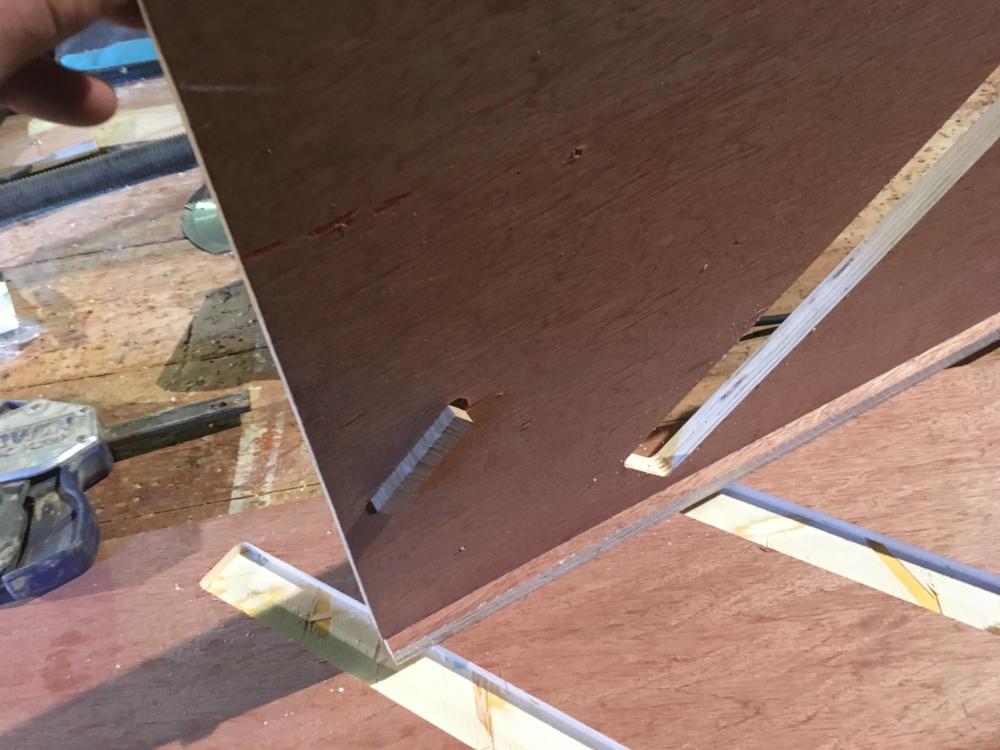
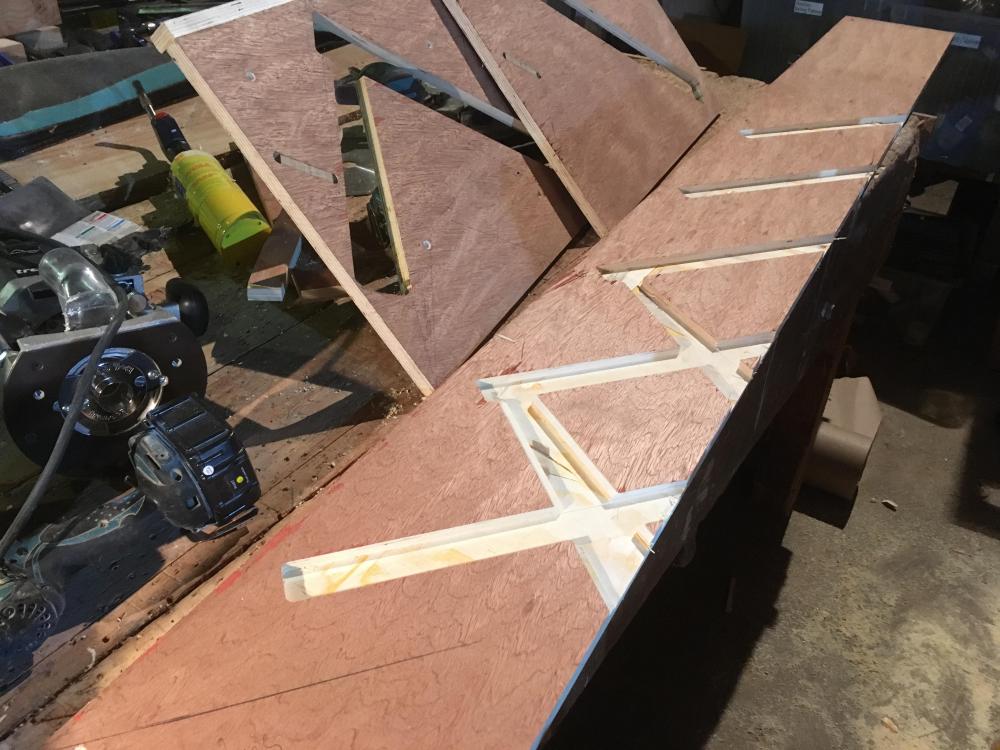
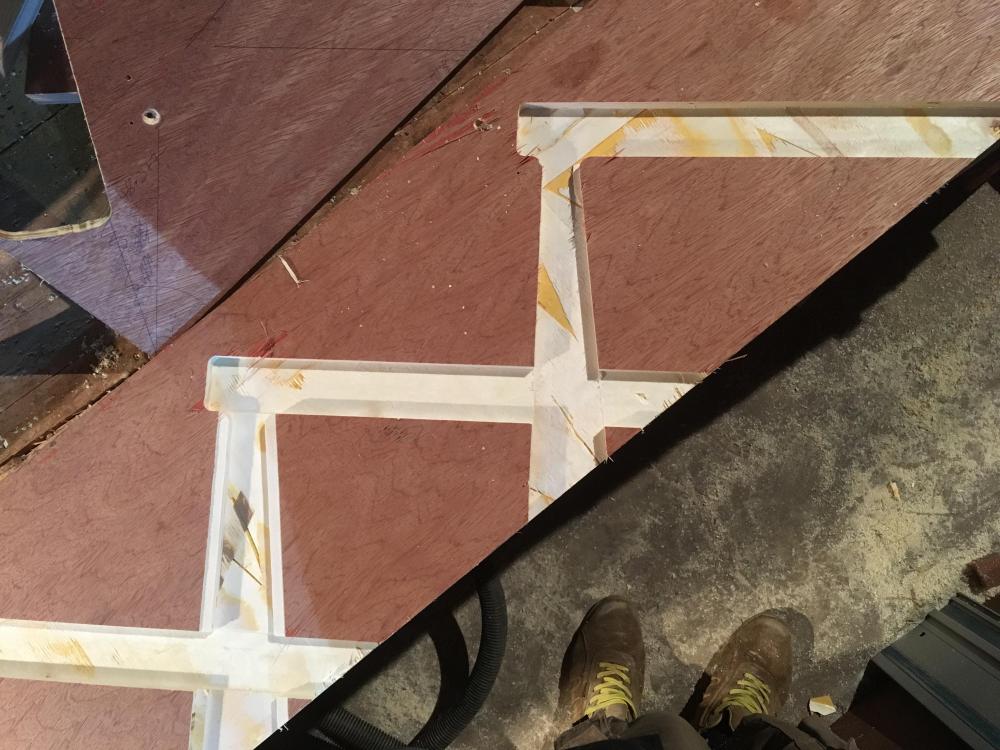
Ok we’re back! Not on film yet but the wedding venue has been cleared and the bar has been reinstated into the workshop so I spent this evening trying to carry on with the stair jigs...... oh it was all going so well... on a trend worktop jig you use a half inch cutter and a 30mm guide bush. This gives about a 8mm gap between the cutter and the jig. So after laying out my the actual hole I want on a piece of ply I went and expanded it all by 8mm before I routed it into a jig, (potentially the mistake) then i routed a location slot so it gauges the next tread from the previous one. (This bit works great) as its a perfectly square slot it means I can tap the little bit of oak through for the opposite string. I tested the open tread jig first and it worked a treat. I even practiced on some ply for the first string and offered it up to my quarter landing and everything fitted ( phew ) so carried on to make the closed tread jig by transferring the original one with a flush cutting router bit to another bit of ply. So then I tested the new jig and I was very happy as it also seemed to work very nicely. until I saw this Notice the bit routed out has rounded internal corners!!! so now I either make up a set of complicated inserts so that the 30mm guide doesn’t go around the top internal in the picture or remake both of them without expanding them by 8mm....... then it comes to weather or not I should use a stair trenching bit which are flared. https://www.trenddirectuk.com/c242x1-2tc?gclid=EAIaIQobChMI8e6ryIHZ2wIV6L3tCh1D0gv0EAQYASABEgLfgPD_BwE It sounds like I should use it but I can’t find any with a guide bearing so I assume they are just useing the shank as a guide. Or or use a straight cutter which I can get with a guide bearing. Hmmm,,, Iv got some research to be doing.
- 95 replies
-
- 1
-

-
- stairs
- homemade stairs
- (and 2 more)
-
Plastering Moisture Resistant Plasterboard
Construction Channel replied to Onoff's topic in Plastering & Rendering
That might be an issue. There’s a good chance I’ll need it back by then. -
Plastering Moisture Resistant Plasterboard
Construction Channel replied to Onoff's topic in Plastering & Rendering
I can lend you a pre worn in trowel if you want. When would you need it? -
Plastering Moisture Resistant Plasterboard
Construction Channel replied to Onoff's topic in Plastering & Rendering
Have you got the trowel out yet? -
Roofing Brackets: anyone used a pair?
Construction Channel replied to ToughButterCup's topic in Roofing, Tiling & Slating
I don't know the weight rating on the verticle channels but I reckon 4 of those rigged to a little platform could easily take Ian and a small load, I suppose as you know the gauge you could put a spreader bar at the bottom with maybe a small amount of padding somewhere you know the slates wont crack -
Roofing Brackets: anyone used a pair?
Construction Channel replied to ToughButterCup's topic in Roofing, Tiling & Slating
ahh, i really should have watched the install video before getting involved, as your not using a hammer it won't make much difference where you start, are you intending to put your seat on top of the laid tiles or not? if not im sure a capable man like yourself could knock up something similar to @iSelfBuild, if you are im not sure how you would get on with the system, as there are no nails to hang the special brackets on its going to get fairly complicated unless you use parts of the nulock system in your bracket, but even then i cant see how you would get it back out without leaving a hole -
Roofing Brackets: anyone used a pair?
Construction Channel replied to ToughButterCup's topic in Roofing, Tiling & Slating
before this goes any further, are you nailing directly to sarking or onto battens? if battens I fear these will break a lot of slates 25 deg is pretty shallow, have you tried just sitting on the roof and pretending to lay some slates, (if you are sitting instead of kneeling you would start in the bottom right assuming you are right handed) -
Roofing Brackets: anyone used a pair?
Construction Channel replied to ToughButterCup's topic in Roofing, Tiling & Slating
what pitch is the roof? -
Roofing Brackets: anyone used a pair?
Construction Channel replied to ToughButterCup's topic in Roofing, Tiling & Slating
I just walk around on the battens, but i seem to remember @iSelfBuild rigging up something similar for his build. ill have a dig around for you, in fairness what is shown there is made for felt shingles so i fear it may damage your slates, what you really want is just a little chair that you can hang off your battens and sit next to where you are working as you go up on the diagonal (assuming nulock are laid in the same patten as proper slating) alas i fear the twisting will end up being just as bad for you in the long run but im not against anyone trying it first. edit : this is what i was remembering but it looks like he used it to clad and fit windows for his dormers -
Plastering Moisture Resistant Plasterboard
Construction Channel replied to Onoff's topic in Plastering & Rendering
I will ? -
personally i would take the boards off above the strip and cut a few hundred mil off them, yes its more cutting but then you would at least have a 270mm strip that will have a bit more strength to it...
-
the smooth ones look like concrete blocks, but the rough ones look more like stone to me, i dont know what kind of stone but it would take a lot for a concrete block to blow its face and end up looking like that, as for the mortar, it looks very smooth to me so probably just building sand and cement, as for the pink mortar IDK, possibly they added a dye but from the look of the wall, i think its more likely they put some multi finish in it for some unknown reason
-
?
-
if only i had told you earlier
-
why can't you scribe the board to the floor? edit apart from the hole.
-
Get the brick acid out and see how it looks, from what I can see now the joint to the bottom left is huge and you have a random vent in the middle. Other than that they look fairly level and straight so it might not be as bad as it looks, ( no it’s not how it should be laid but stuffy blues are a bitch at the best of times so if it was wet and a rush they may look like that before they have been cleaned up)
-
its Sunday, surely you are the only person on site. why the Hi-Vis?
-
Personally I would cut the insulation like so. Still 2 bits but it should give a good chance of being tight against the wall plate. Also foam is your friend for this. You could piss arse about trimming every one but I would go for a standard size ( regularised 4x2 @ 400mm centres is usually about 355 iirc.) precut a bunch of strips then cut them to shape on the scaffold. With a roofing square it’s fairly quick to get plum and seatcuts marked, p.s welcome to my world ?
-
Come on baby, light my fire!
Construction Channel replied to vivienz's topic in General Self Build & DIY Discussion
Diesel and old oil mixed together is a family favourite. Petrol can be fun but it’s better to throw bags of it on from a distance if you want to speed things up. Starting it with petrol is a very dangerous game. -
Down pipe into slot drain
Construction Channel replied to Pocster's topic in Rainwater, Guttering & SuDS
Not really for rain water. But I meant at the other end. Normal downpipe into the ground, 4” pipe across the windows. Then the IC before it goes into the soak away or wherever it is planning to go.