LA3222
-
Posts
1185 -
Joined
-
Last visited
-
Days Won
11
Everything posted by LA3222
-
I am trying to get my head around the whole UVC/ASHP/UFH setup at the minute but before I get into that I have a query about how to splice multiple manifolds together. In my setup I have UFH on both the ground and first floors, heat will be provided via a buffer vessel, so there will be a manifold upstairs and another on the ground floor. I have seen low loss headers mentioned on a few threads but don't understand their application as such. With my setup what would be the ideal way of connecting the manifolds to the buffer? in parallel with each other or via a low loss header? Thanks
-
when I was cursing myself about what I'd done this was a thought that occurred to me.as to how I should have done it is put a 90 degree bend on the end with a stub poking up out the ground much like your timber example.
-
I wish I had taken pics, I seem to be doing a poor job of that lately as I keep checking stuff only to find i havent got a pic. The clutch on my car lost a few yrs that day, who knew it would be so hard. The best bit is that pulling it like that cut through my duct chamber like a hot knife through butter which then created an additional repair task for me! By full runs i mean put the whole lot in, pipes and Chambers all connected up. I wish i had done this at the time. I have a manhole on site to connect in to but I didn't lay any of it. I basically put the three downpipes in that go through/under the slab and then brought it out beyond where I thought my slab would be. The problem is that I misjudged where the slab would end and so had next to nothing coming out beyond the slab so I've spent the last couple of days trying to get to make them longer but at the same time not bring the house down by undermining it - not a fun game. I think my mistake happened because the lines I had sprayed on the hardcore at the time represented the outside of the timber frame/concrete slab but there was an additional 350mm on that for the cavity and toebeam which I didn't consider so it messed up where I'd put the pipes. I should have just put a good 2 or 3m on them. Another problem was finding the damn things. I had marked an x on the kore insulation where they were but still struggled to find the things. I've certainly made this far harder than it needed to have been. You can see in the pics how the trench started and how it ended - not good!
-
just a quick post to share some of my issues which in hindsight are entirely self inflicted, hopefully this will help others not to make the same mistakes. 1. Put your waterpipe in the duct from the outset, soo much easier than pulling it through later. (I did consider it but dismissed it as wasn't sure exactly where my duct was going to come up at the time) - don't be like me! I tried pushing 30 odd metres of mdpe through a 63mm duct, got 25m through then nothing. I dug two holes to find it, ended up having to attach rope to car - not gonna lie, it was a griz and I was hating life. 2. When laying your hardcore sub-base for an insulated slab do the foul drain runs at the same time. I was under time pressure to get ready for concrete so I just left stubs poking out to connect to later - dont do it, I've made life so much harder for myself having to dig through hardcore to do it. 3. If you ignore no.2 and just leave stubs make sure you leave a good length - i didn't! The stubs i left only just poke out from under the slab, god only knows why I did this. I have spent all day yesterday and today digging them out so I can put an extension length on to bring them out to roughly where the ICs will be. Digging through the hardcore really sucks ass. Yesterday wasnt too bad, today was on another level. The trench kept collapsing in on itself and my 600mm trench ended up about 1.5m wide - a very bad day today. Dont be a plonker like me. I've made other rookie errors so far but fairly painless. These have been a right PITA.
- 8 replies
-
- 11
-

-

-

-
@SuperJohnG they will.pretty much give you whatever you want, whenever you want provided it does not exceed 80% of the current value of what you have built. Myself, I drew down a third of what they would lend me (in Jan) initially in order to pay for frame, roof and windows deposit. Once house was up I drew down another 20% ish (in May) to get me through the next load of stuff. I won't need anymore till next year now as I'm plodding through stuff myself now - I've drawn just over 50% now. It is a quick/slick process, just tell them you want to draw down however much, they will get a valuer to confirm current valuation and then money will be transferred straight away. Even during lockdown, it only took a week for us to get the funds and it only took that long as valuation was done via email using photos/receipts of expenditure for big ticket items as evidence. Should only take a few days during normal times. First payment has to be done via solicitor. We drew down the max we could on first installment - 80% based on value of land with services.
-
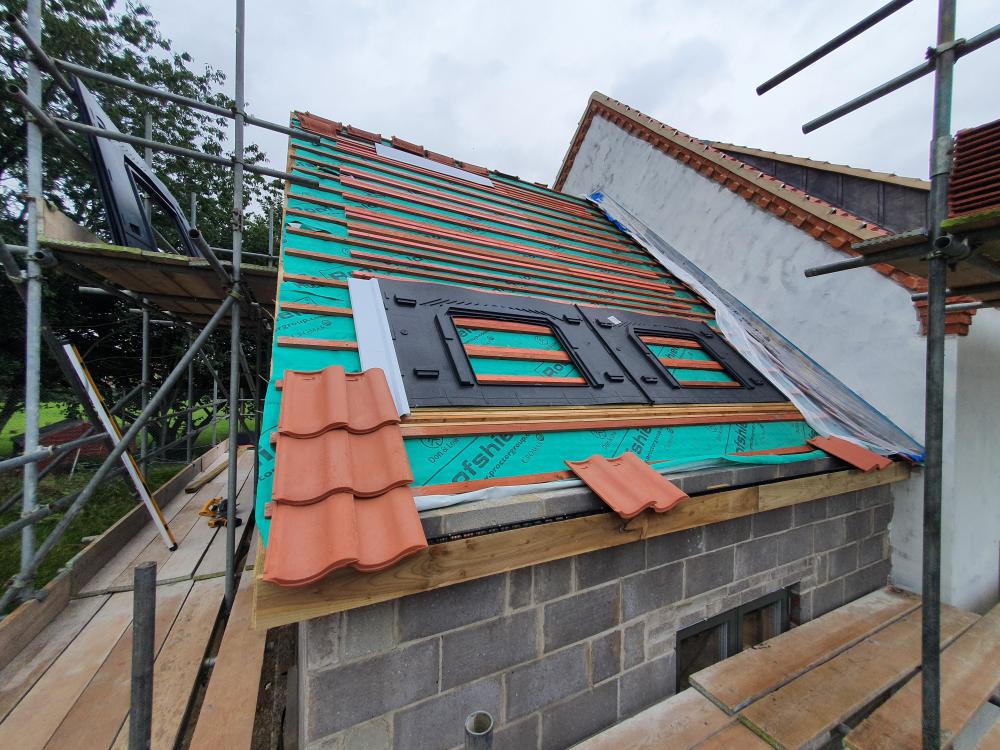
Breathable Membrane running down hill
LA3222 replied to GrantMcscott's topic in Roofing, Tiling & Slating
ha, still had time to edit it and correct my mistake luckily? -
Breathable Membrane running down hill
LA3222 replied to GrantMcscott's topic in Roofing, Tiling & Slating
I get what you mean when explaining the angle - its been laid on wonky?♂️ You mention that at the eaves there is OSB exposed on one side. Is this an issue, maybe if I envisage it correctly. The membrane should start at the eaves and work up, so that each subsequent layer laps over the one below it. Therefore any water will run from top to bottom over the membrane and not under it. If a corner is exposed how will that now be covered? As the membrane on that bit of exposed OSB should run under the piece of membrane that covers the rest of the roof at eaves level. Does that make sense? So in a nutshell, wonky is not an issue, just poor workmanship and a waste of materials. The important bit is making sure the laps are correct. -
I've heard more bad than good about them...a lot more to the point I didnt even bother speaking to them. I heard nothing but good things about Ecology and as it stands they were the only ones I approached. Remarkably easy to deal with, all done via email and a couple of Skype calls. There's a few options out there but for me, I can thoroughly recommend Ecology.
-
Yes. My frame is Kingspan Tek, supplied by one of their delivery partners. Not sure if I would go with a non BBA approved one, nor sure what that would affect later on down the line. I'm sure it is to the same standards as the one I used, but iirc I had to supply BBA paperwork to building control for it - not sure what would have been said if it wasn't BBA approved. You're north of the border so it may be different up there.
-
What do you mean by certifying? I had no trouble getting a warranty from Protek for my build, likewise I had no issue getting a self build mortgage for it. I have yet to seek a remortgage with a high street bank but maybe I'll hit some walls there?♂️ I have SIP with block outer skin - from what I've read (briefly!) leads me to believe its the amount of timber in a build which adversely affects lenders perceptions I.e. a TF clad in timber not good, TF with masonry outer skin much better perceived? Anyway, off topic slightly - @mattp22 I cant advise on the membrane but I think you've made the right choice to use block outer skin. I have wrapped my SIP build in rendered block. I do have a side abutment which I intend to clad with cedral click onto the blockwork buts it more straightforward than ypur job as i won't have shadow gaps to contend with. As suggested, battening and then wrapping sounds like the best way forward.
-
How can you know that? You are making some very broad brush assumptions to arrive at such a conclusion. Do you know what will happen to energy prices over that 15yr period as that will have a material impact on the repayment timeline? Or do you assume today's prices will apply in 15yrs time? Do you know how much they will generate or is this an assumption again? Do you know how much they will use out of what is generated? I'm not having a go at you, I'm taking aim at how this is not a binary decision. It is too complex to just divide the cost by the assumed energy produced and then compare that to todays energy prices to arrive at the answer. My own view is that the climate is going tits up, energy prices will most certainly rise - we are already scraping the barrel for being able to produce enough of it, power plants are getting older, new ones will cost a load of cash which will no doubt get passed on to the consumer. If the summer temperatures get more extreme will air con in the home become the norm for this country like others overseas? If so, the PV will pay the bill for that use. There are lots of tangential arguments as to why PV is worth doing but they tend to get overlooked/dominated by the financial argument. Yes its a high outlay, but if you're in the house for the long haul then at some point it will be worth that initial bank balance hit.
-
Why is freezing an issue? If the pipes have the right fall on them, any water within should flow out so any slight residual water within freezing would not be sufficient to damage or block the pipe?
-
How deep you putting the pipe? I am thinking of putting the start of the run at maube 100mm of cover so that when I get to the end I'm not having to go too deep. I know that a typing less than 600mm deep should be concrete covered but this is next to the house, ot going to be walked on, will have some plant pots at best on it so unless I'm missing a trick minimal cover shouldn't be an issue?
-
seeing @Temp post made me think why bother with gullys? Just put a 90 degree bend at the bottom? I'm running my rainwater to a harvesting tank which will have a silt trap and the gutters will have leaf protectors - food for thought. I think @Triassic it comes down to what you want the look at the bottom of your downpipes to be?♂️
-
Something I'm looking at now too. I intend on fitting the downpipes next week and want to run them into the ground so there no grids etc on show. From what I can see it looks like I need to use P trap gully as these can take a 110mm pipe in the top (i have a connector on the ottom of my down pipes that sits over a 110mm pipe). However p traps are not rodable so I'm putting rodding eyes in for each run. Bottle gullies look better in practical terms as they can be taken apart to clean but the you have the grids on show ?♂️ I may have missed something though - hopefully this thread will tease that out of more knowledgeable members.
-
@canalsiderenovation that quote structure looks similar to how midsummer wholesale structure their stuff - check out their site and you'll get a flavour for pricing. They have a link to an app on their site which spits out the material quantities for you based on your roof size. Very easy to use. Easy to get a 'trade' login with them too for slightly better pricing.
-
This is how mine ended up looking:

-
I used 38x50 - roofing battens!!
-
Ha, there's some wires crossed here - @nod is a plasterer I believe so he is referring to the plastering part of the build whilst you are talking air tightness. my build is SIP, I (the wife!) Is currently running a bead of silicone over every single seam that is an outside face of the house and then putting silver foil tape over it. Next layer is 70mm of kingspan which again will have the seams taped with foil tape (no silicone). Next layer is the airtight membrane, using Intello Pro Clima +. And i will probably use their tapes. No particular reason for this approach, like most of my build im making it up as I go along?♂️ My theory goes that each layer will make it slightly more airtight so the sum of the parts should give me a good airtightness score. Its not costing much in time to do this as I'm busy doing guttering and drainage whilst the missus plods away at it. Also, buy a scaff tower. I bought a zarges one for about £800 - a lot but with all the vaulted ceilings it will pay dividends to 'own' rather than hire.
-
On my own self build journey I have learned to mellow out a bit. There is the way you expect things to be done and then there is the way that things are done. The disconnect between the two caused me a lot of angst during the early stages. If it works, it works. Dont get too hung up on the how, let them do what they do, if the house stands then all is good with the world.
-
I had one done for exactly the reason you mentioned, so that the bearing capacity of the soil is known. As it stands I hit sandstone at approx 800mm down but there was a pocket of 'made ground' which one of the boreholes hit. Subsequently the recommendation was then made that the whole site was stripped down to 1.5m and then built back up again to the required depth. Very expensive. After discussion with the soil dude and BC it was agreed that I could stop at sandstone and only dig down any soft spots. It seems that the soft spots were where rubbish had been buried back in the day when bin men didn't exist. Found all sorts of glass bottles and broken crockery in there. Was a pita but luckily most of it was solid sandstone at 800mm depth.
-
My raft worked out about £170 per sqm of footprint. I also had alot of muckaway and extra stone costs involved as I had to put 800mm of stone in. I believe MBC only include the top 200mm of stone? anything below that is your problem. If you take out my additional groundworks it would be around £140 per sqm. I did most of the work myself - the only two jobs I didn't do were to operate the 20t excavator and to pour/powerfloat the slab. I looked at MBC but found them to be too expensive.
-
Warranty and Passive Slab Foundations
LA3222 replied to davidc's topic in New House & Structural Warranties
@SuperJohnG just checked the statement of facts on my policy and it definitely says SIP on there as the method of construction. I found getting a warranty/BC to be one of the more tedious tasks. A lot of work to either get a 'no' or a stupid premium - and I consider it to be worthless but a necessary evil for remortgaging purposes with made it all the more annoying I had to invest time in this charade!! -
Warranty and Passive Slab Foundations
LA3222 replied to davidc's topic in New House & Structural Warranties
@SuperJohnG Protek for me. I got Warranty & BC combined from them. -
The render bloke I went with used Johnstones stormshield - said he used to use K Rend but Johnstones is better ?♂️ Much of a muchness really, ask ten different people and you'll probably get ten different answers. KRend seems to be the 'known' brand associated with render. I had the Johnstones rep on site via the renderer but he then told me that the renderers work is good and johnstones warranty it once done - whether that means anything in practical terms I dunno. My house likewise pinches the 'look' of borderoak to a certain extent - my borderoak porches actually turn up next Friday ?