LA3222
-
Posts
1185 -
Joined
-
Last visited
-
Days Won
11
Everything posted by LA3222
-
"Would break my heart I think coming up in a wall." Its an achievable task without a doubt, check and double check your measurements and it will work out. Mine ended up exactly where intended, my grievance with the water pipe location stems from my failure to come up with a comprehensive plan of how I intend to install all the equipment in the plant room rather than getting the location wrong.


-
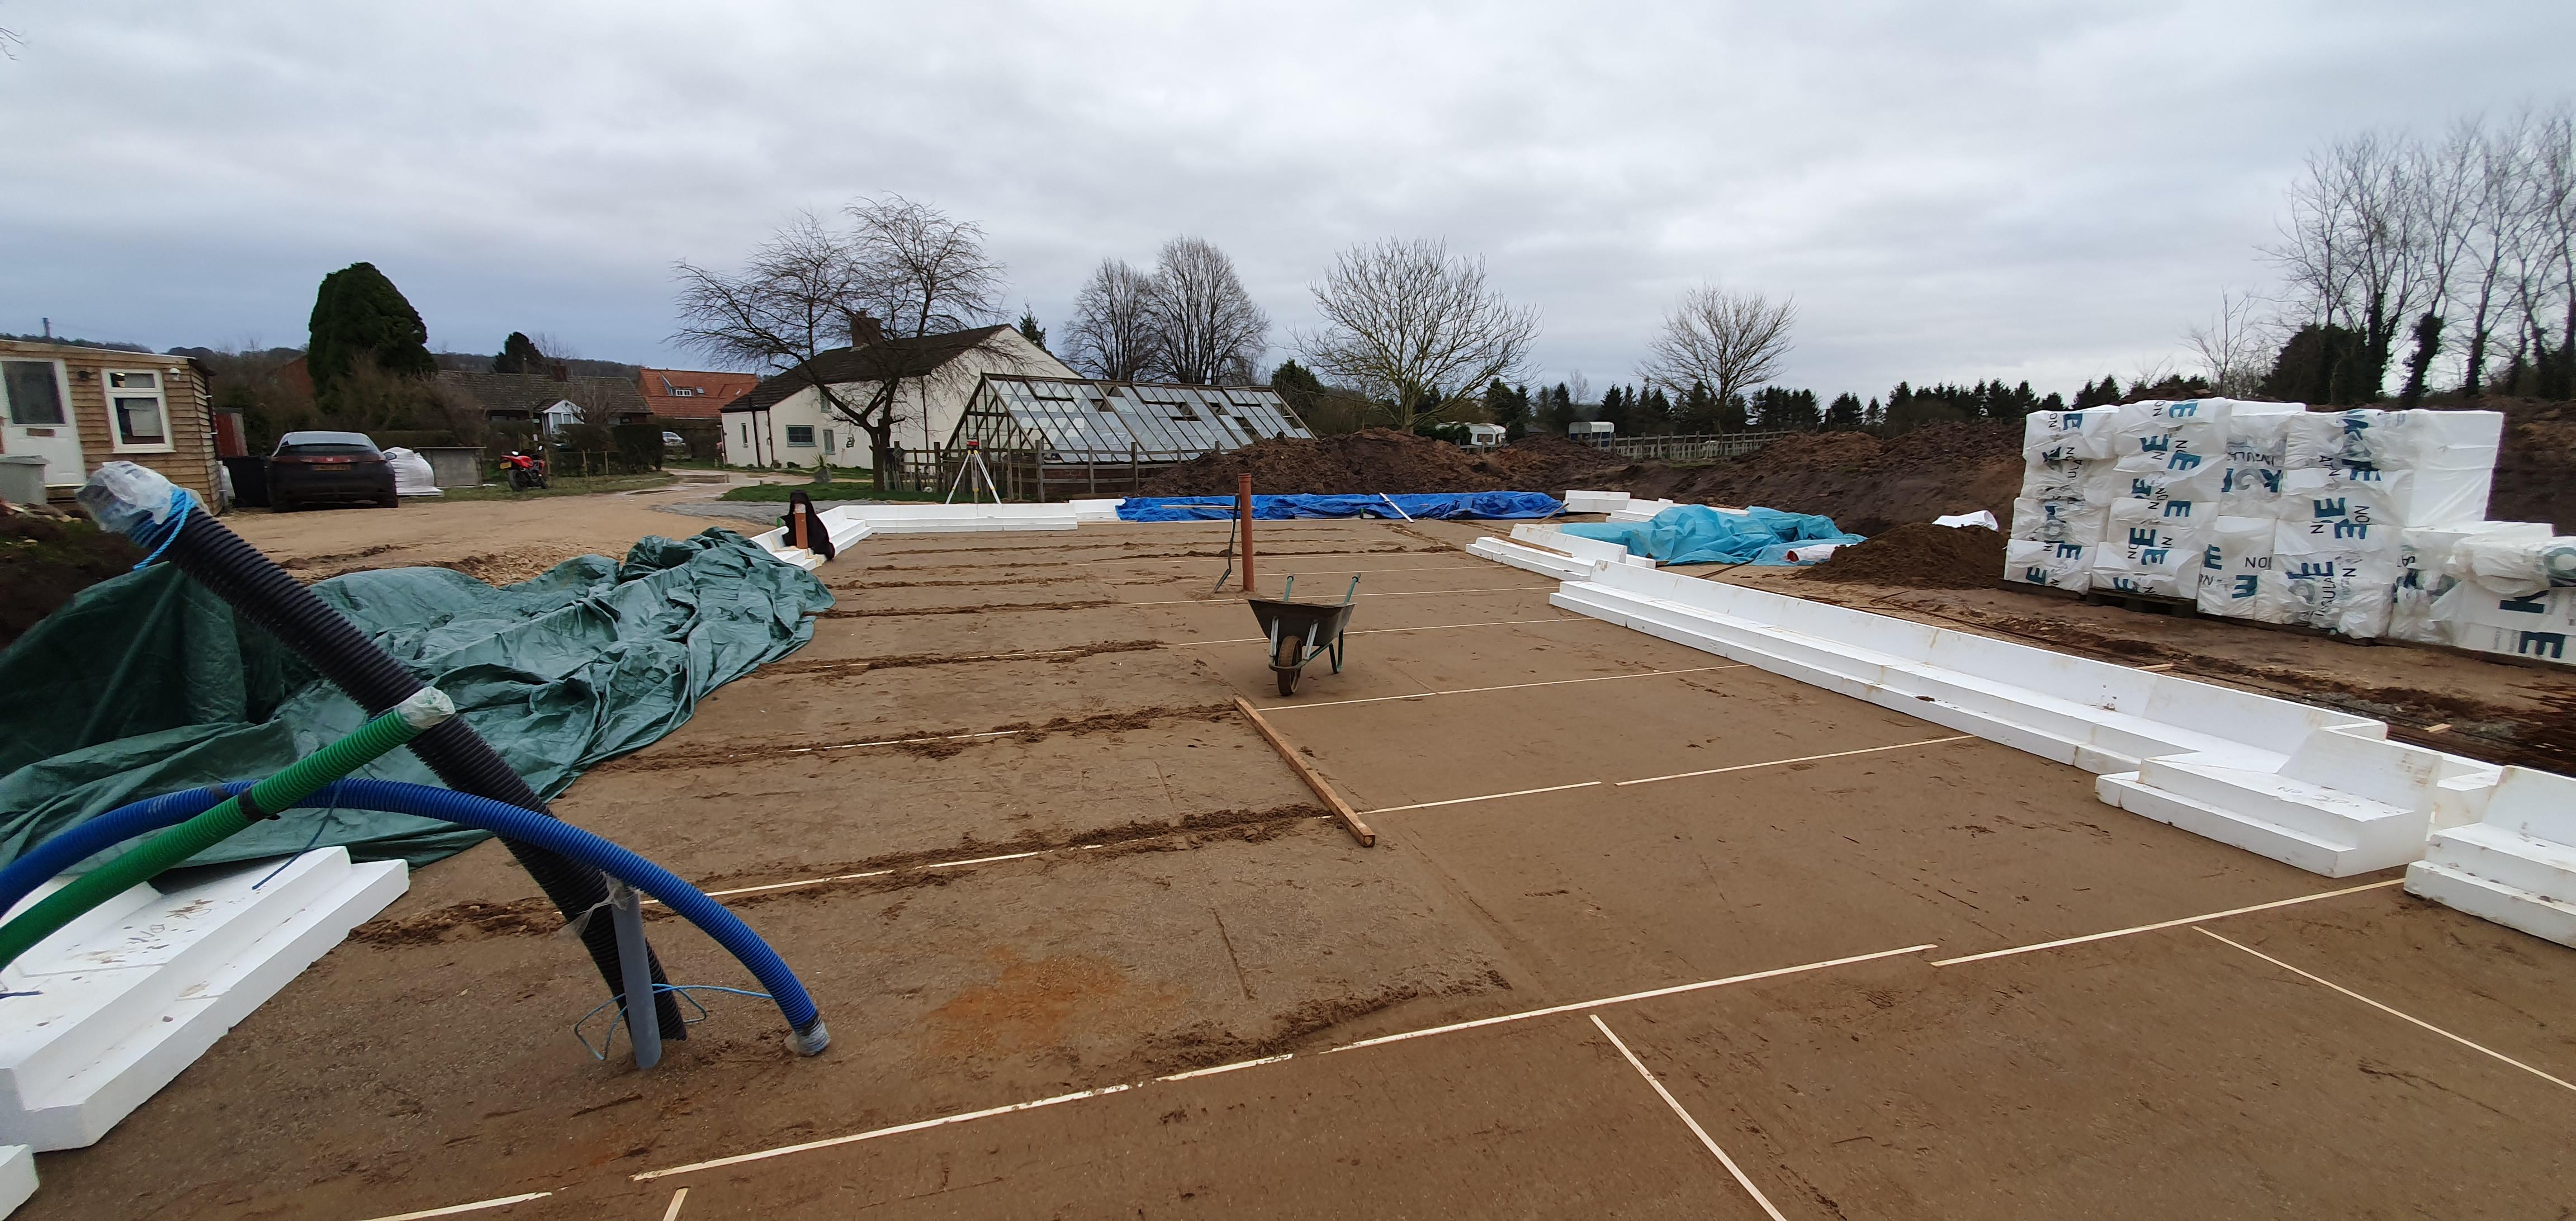
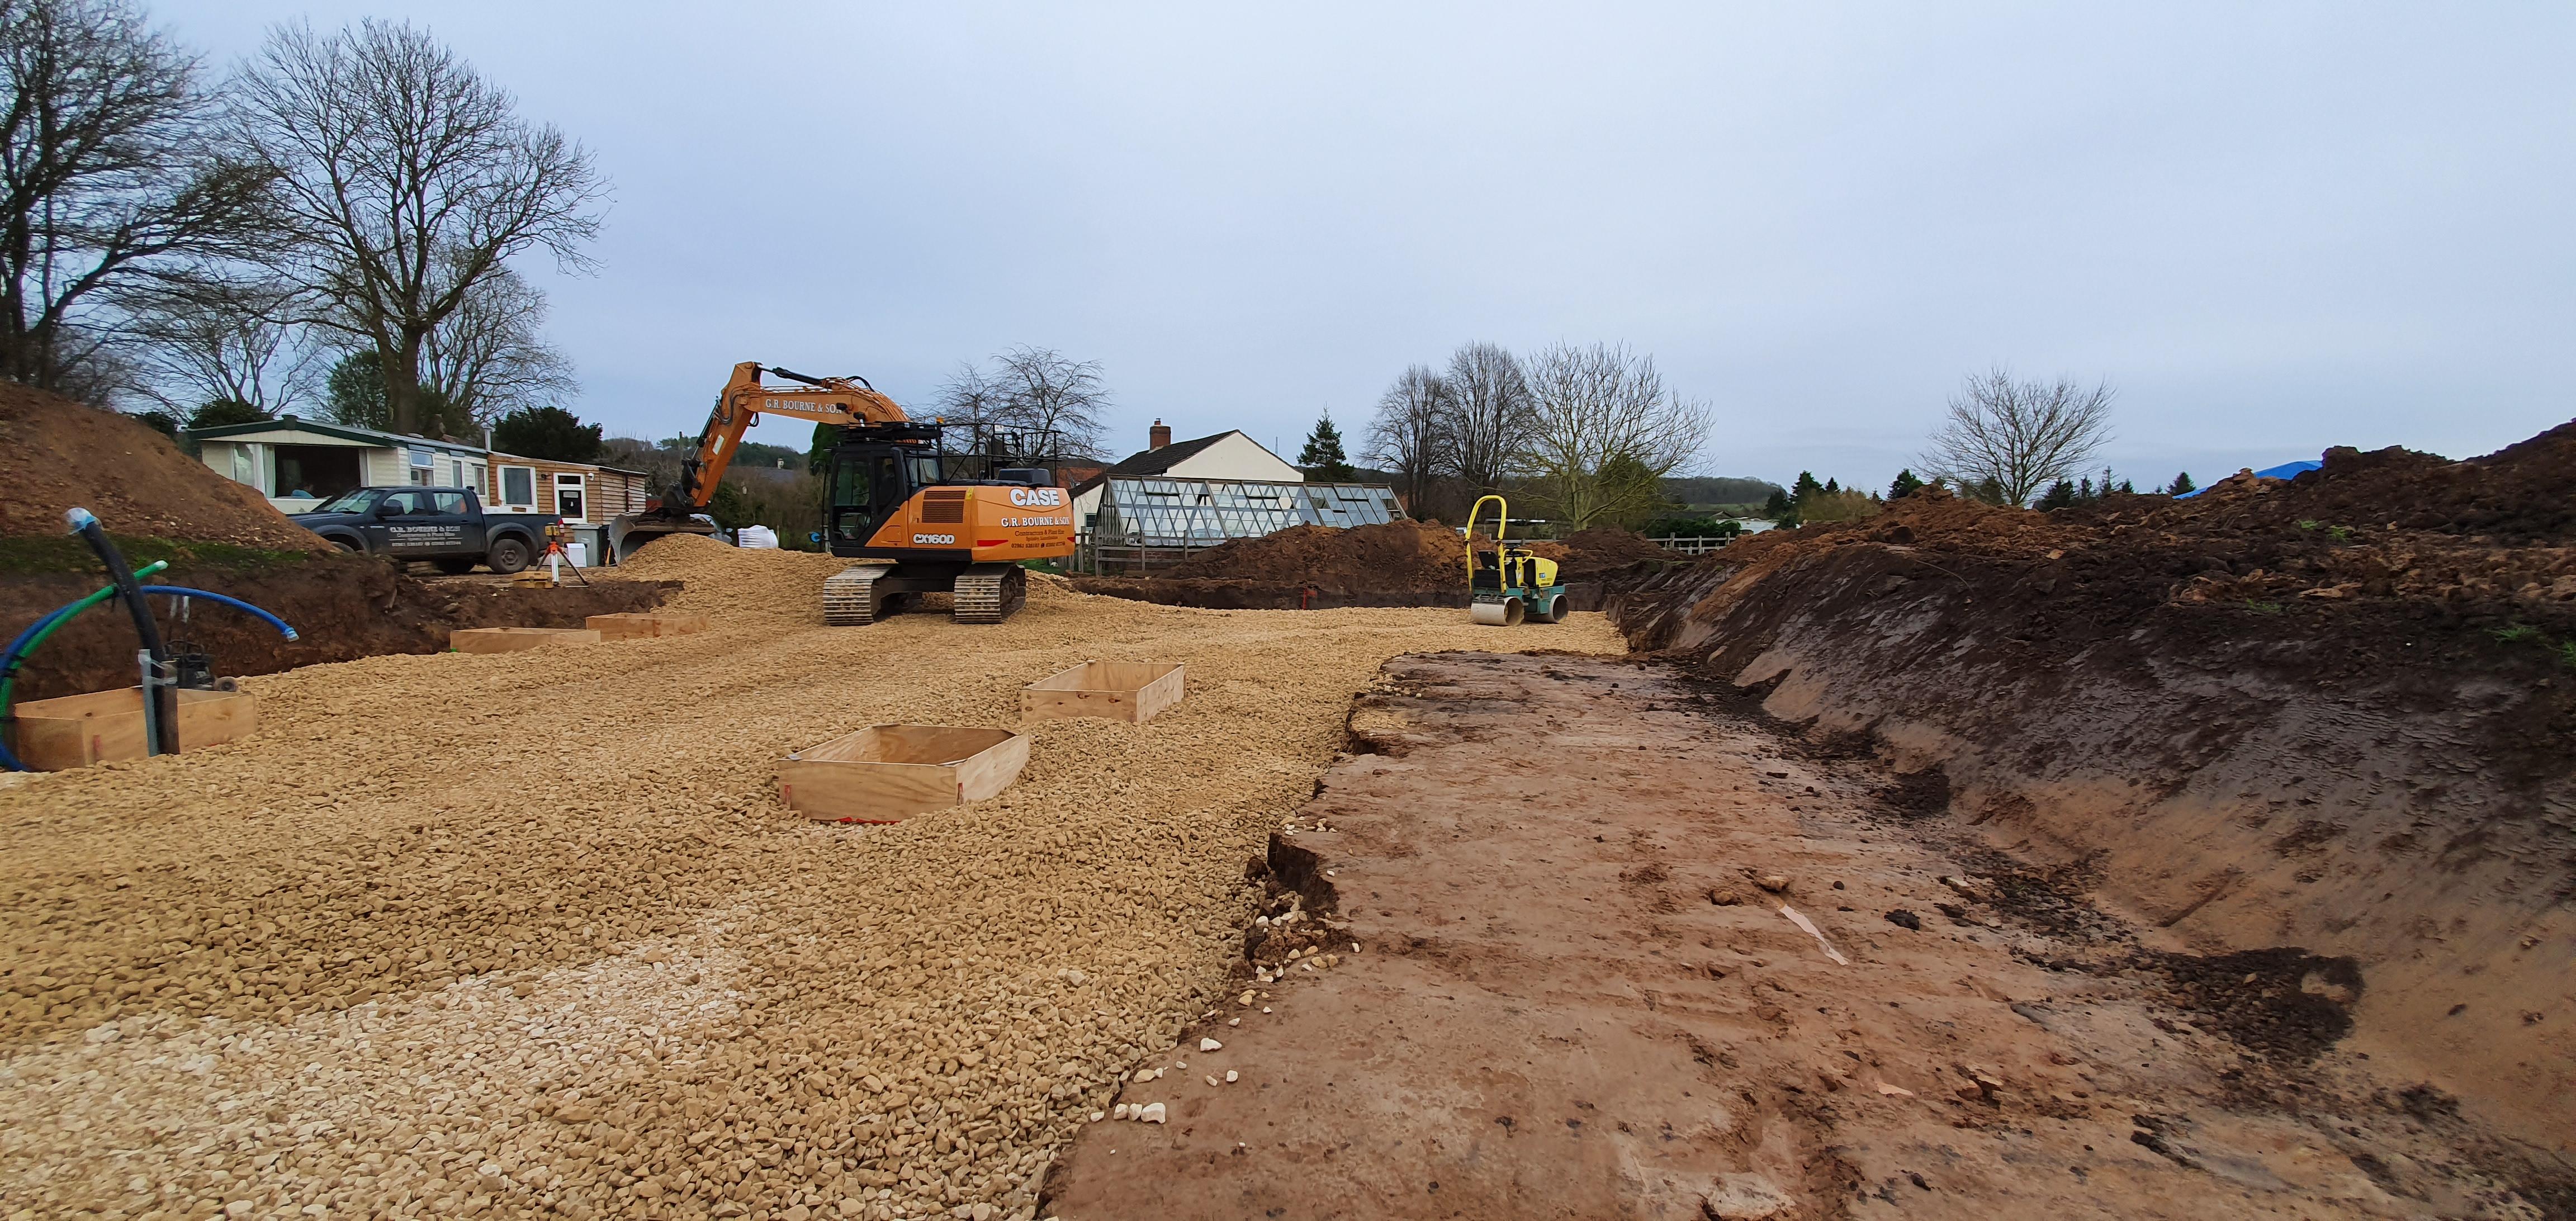
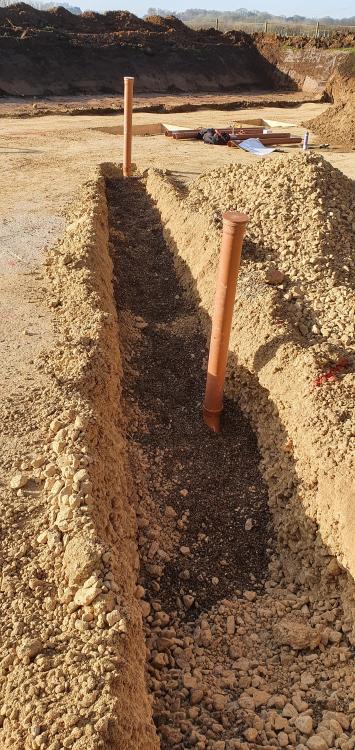
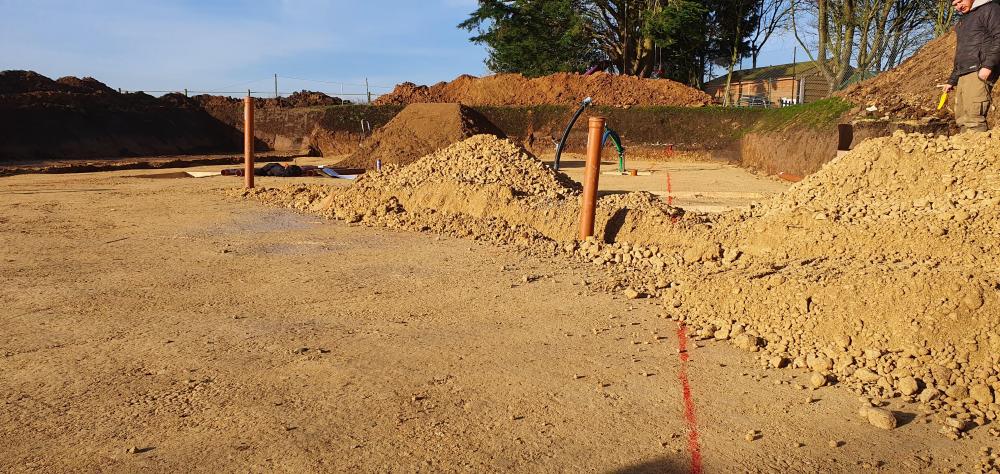
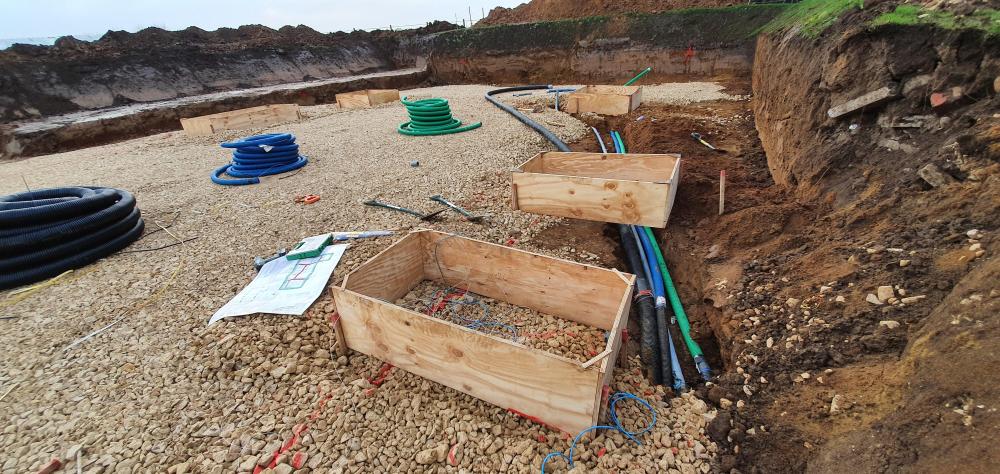
Drainage going in and sand blinding layer that followed. @SuperJohnG the sand blinding needs to be done to a tight tolerance otherwise the kore blocks just won't sit well against each other and you get gaps of a couple of mm between them, over an 18m run this soon added up so I had to take it all off and redo the sand. Much better second time around! Forgot to mention before, I hammered a wooden post in the ground to tie the ducts to so that as the stone went down they remained vertical. Be careful on your bend radius as they come through the slab, my electric duct caused me issues. I have a 5core 25mm2 cable in a 90mm duct, as I pulled the cable in it wouldn't follow the bend and just pulled into the sidewall of the duct. Tantalisingly close but I couldn't get a hand onto it, in the end I had to pull it all out and feed it out from the house end, other than a couple of wasted hours not a major drama but it could have been!


-
I used to think 12mths was feasible until I discovered this forum in 2017. A prompt revaluation and I ended up buying a plot 2 yrs before I initially planned. My target date for move in has always been before eldest starts senior school so I had to work back from that. I've got one Yr left which I hope to achieve. As you say, 'self' building is a whole different timescale to having a house built for you.
-
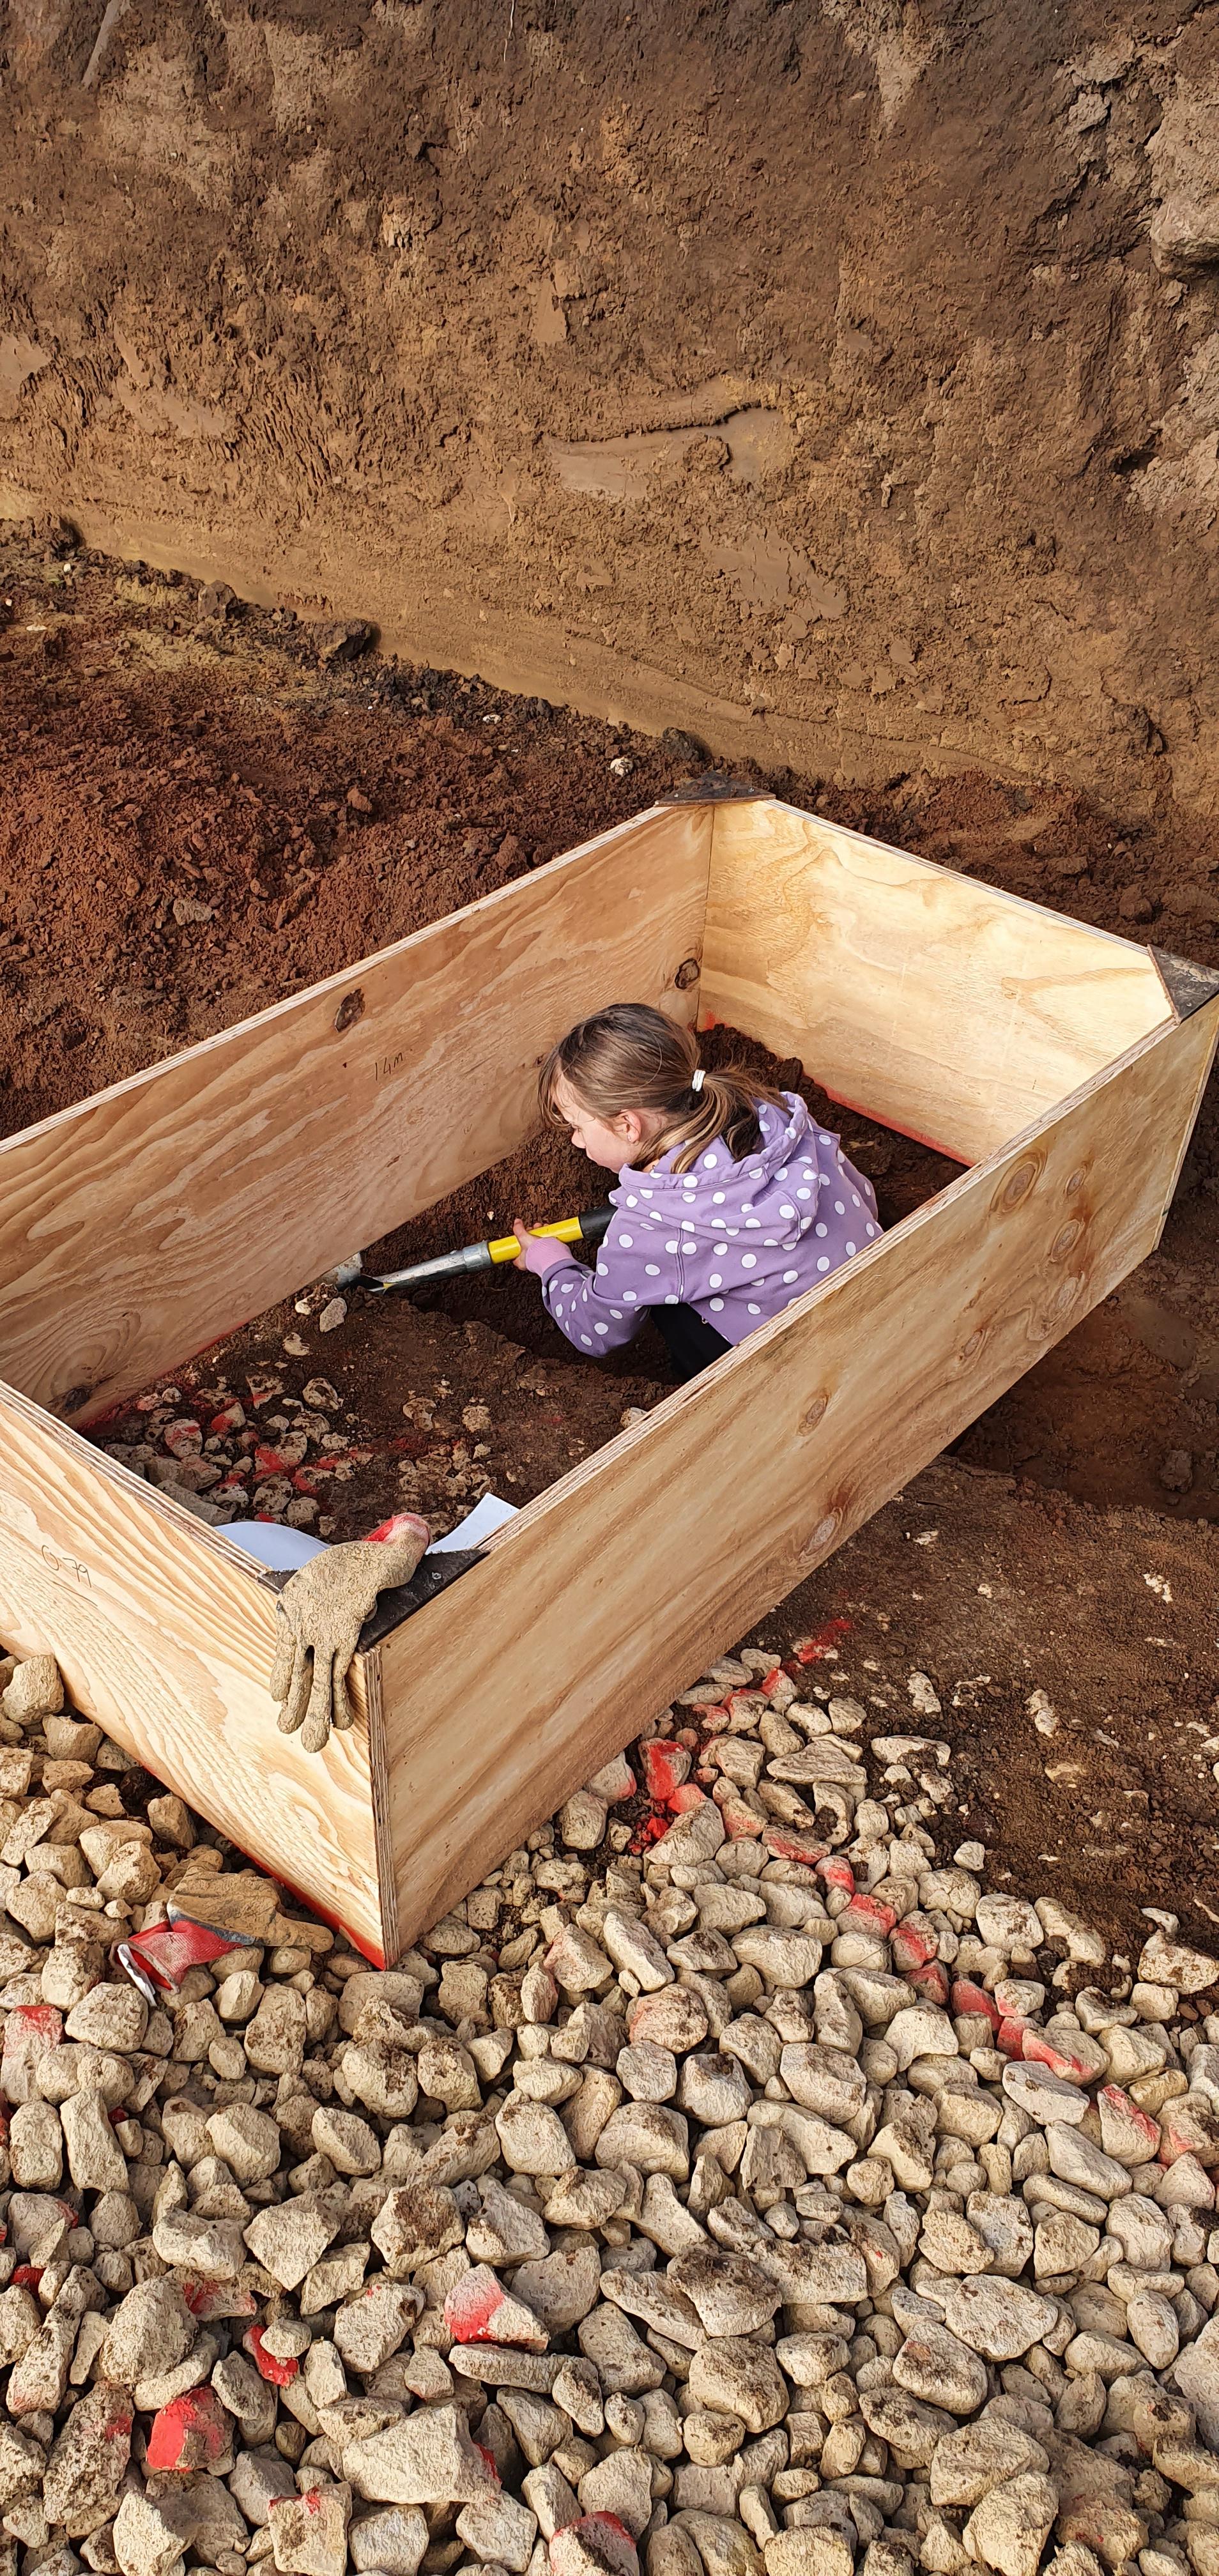
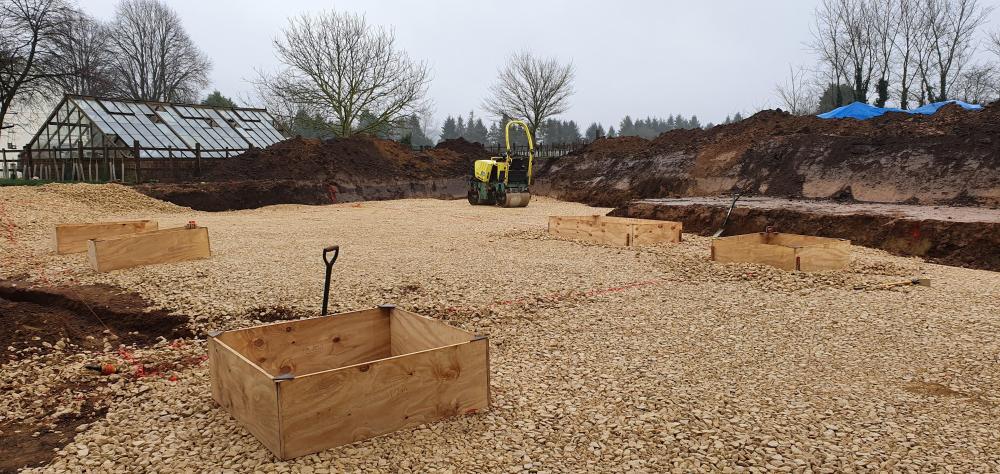
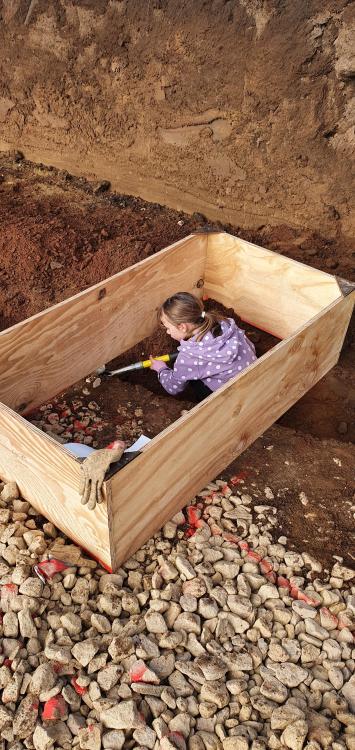
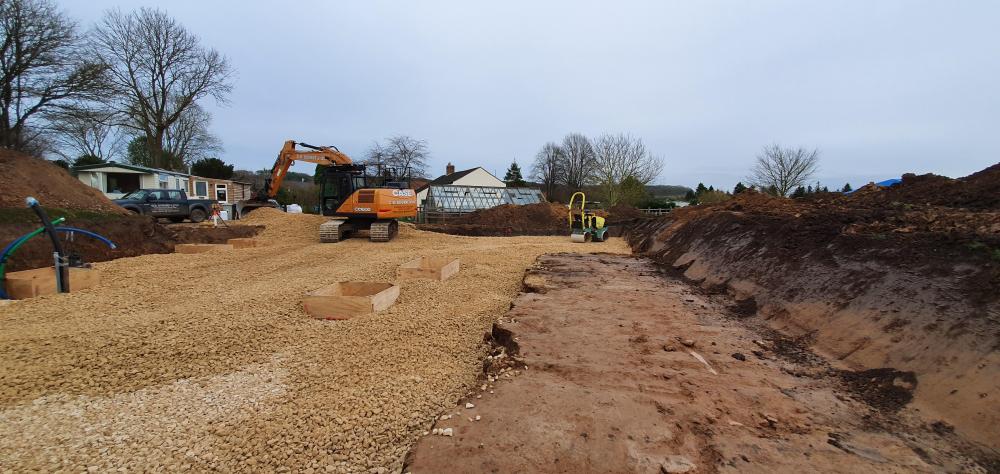
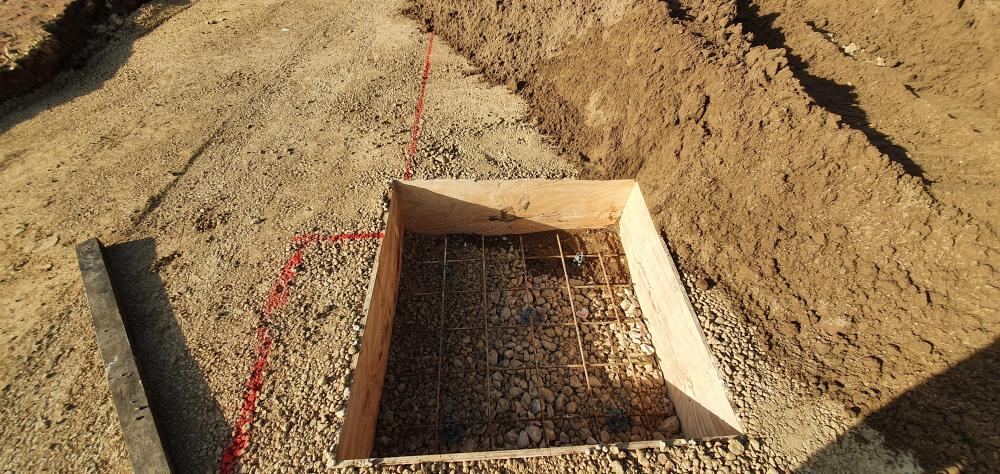
Got to put the kids to work every now and then? @SuperJohnG putting the ducts in was another PITA because I was worried I'd bring them up in the wrong place. If I'd got it wrong by 20/30mm they'd have been in the wall. As it is I'm not overly chuffed with where the water pipes are and its mainly a consequence of not having a fully planned out plant room. They are right next to where the UFH manifold now resides so I need to stick a 90 bend on it to bring it away and give me some working space. I still don't have my plant room planned out yet and MVHR is on my to do list soon. With the foul drainage, once the pad was all flattened I got the digger driver to nibble out a channel where they all needed to be. My biggest stress point with all of this stage was whether things would turn out to come up the slab in the right place. I was pretty much bob on for the most part but it was a worry throughout. I'll stick some pics on later of the drainage going in etc.
-
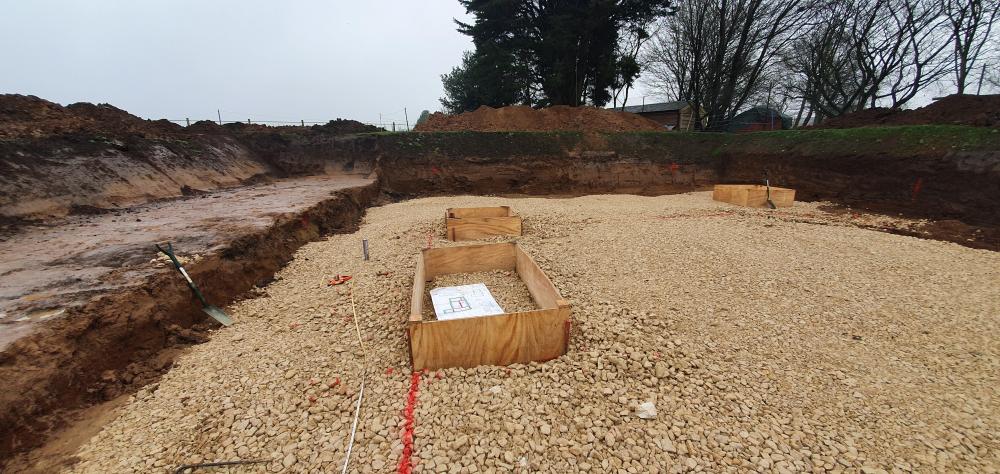
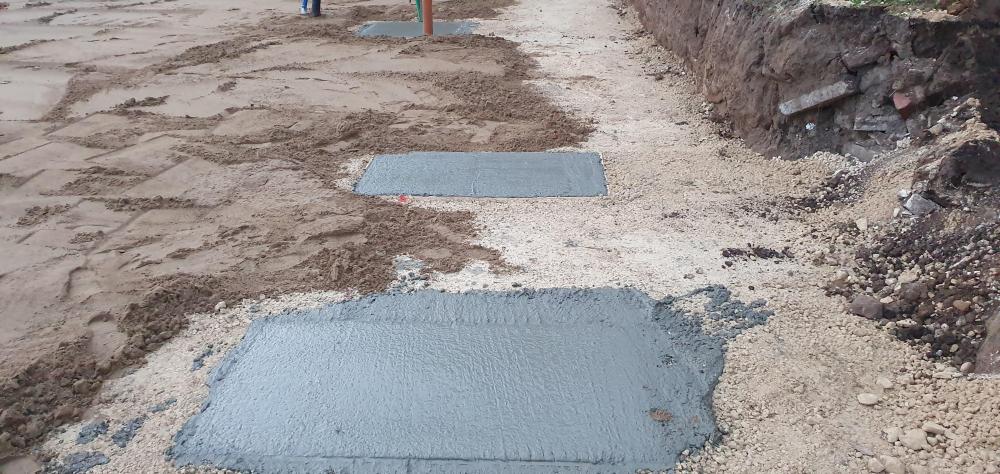
@SuperJohnG in the end I made some boxes up to size out of ply and put them in first. I screwed some stakes to the corners of them so could hammer them into the ground and use them to bring the boxes to the correct level. One they were at the right level I braced them internally so that as I whacked the stone around them it didn't cause the sides to bulge inwards. The biggest challenge was getting them in the right place. If you get some profiles set up it should be fairly straightforward for you. I took view that the pads are massive and there is likely some tolerance involved with regards to getting them exactly right so I got them within about 20mm which I felt was fine. I got the concrete into them one the pad was done as the lorry could drive right up to each box. A vibrating poker, a tamping stick and 0 mins later job done. I left the ply box in place. When I cut down through the insulation it was rather satisfying to see they were where I expected. Cutting down through 200mm of EPS 300 was hard going. I used one of those folding tree branch saws fir most of it. I made up a mortar mix, put a bed down, first layer of foamglass in another bed of mortar and put top layer in flush with the insulation. Any gaps around them from rough cutting I filled with foam. I'll add pictures once I'm on laptop.

-
Not sure what all the fuss is about, we have lived onsite in a static for 18mths now - missus, 10yr and 9yr old girls who share a pokey little room plus 2 cats. Nothing hard about it, its like being in a small flat. We have curtains across lounge entrance and leave heater on in there overnight so the lounge area is warm in morning. I built a side extension to house white goods. Worst bit of van life is the summer when it turns into a hot box - solution to that is go outside?♂️ Reckon we have another year to push living in it, will be strange moving into a house where the hallway is bigger than the van! Spent 4k on a 30ftx10ft two bedroom job straight off a site. Wouldnt spend more than that as it will be worthless when done. If you buy a van for 12k who do you intend to sell it to for that sort of price when done? There's no market for it other than self builders and you'd struggle to find one willing to spend more than 5k? Side note: my gas and electric is approx £1600 for the yr.
-
House is looking mighty fine @SimonD? Its always good to have a bit of a vent on here every now and then, its cathartic for the soul! Everyone on here has gone through/is going through similar emotions, its always good to read others mishaps on here too as it reminds you that these things happen to all of us!
-
I've got one you can have. PM your details and I'll get the missus to take it to post office.
-
Heating design, calcs and process - ASHP/UFH
LA3222 replied to SuperJohnG's topic in Underfloor Heating
The problem is that for a slow response heating system to work the house needs to be designed to work with it. If the house loses heat like it is going out of fashion then the heating system requires a rapid response time. Tightening up of building regs will eventually lead house builders to altering their thinking in terms of heat delivery but for now this is an area that self builders navigate alone. This is perhaps one of those areas where self builders struggle slightly as we are all raised and live in traditional houses that are cold, drafty and where you can flick a switch to get instant heat. The house a self builder creates will not be cold and drafty so the way in which we go about heating them requires a shift in thinking as the traditional way won't work well. That spreadsheet is a massive boon in understanding the heat losses of my build, I will now trust the numbers and proceed accordingly. -
Heating design, calcs and process - ASHP/UFH
LA3222 replied to SuperJohnG's topic in Underfloor Heating
Interesting numbers, confirms my understanding in so far as using the slab for heating is the long game. Zero point in trying to use it like a standard radiator. I expect that once my house is occupied it will take a period of adaption to get used to how to live with it as we tend to be used to instant heat when a dial is turned up. -
Heating design, calcs and process - ASHP/UFH
LA3222 replied to SuperJohnG's topic in Underfloor Heating
@dnb unless I am missing a trick John has not opted to 'just service' his calculated heat losses. His peak loss is estimated at 3.6kW for approximate dT of 20 degrees and 2ACH and opted to go for 8.5kW ASHP. I would say the estimation of heat loss is sound and the ACH which has a significant impact is, if anything, a conservative estimate. So there is scope for the losses to come down. An 8.5kW ASHP will be more than sufficient for the task at hand. The mean minimum temperature is 1.4 degrees for January, so you could argue a case for times when it goes sub zero. The model shows that even at -5degrees the loss is 5kW, so well within the capacity of an 8.5kW ASHP. Also it is unlikely to remain at -5degress for a 24hr period. Snails pace - my understanding of using the floor slab as a 'radiator' is that it does act at a snails pace. It will not react rapid the same way that pipes in a screed will do. It takes a long time to dump sufficient heat into it to reach your desired house temperature. Equally it will take a long time to lose that heat so it serves to iron out the peaks and troughs and maintain the house temp at constant levels, requiring periodic 'top ups' to maintain temp. One final comment ref the accuracy of the excel model used. Anecdotal evidence from members whom have completed their homes and modelled their energy usage suggest that the model is a very good starter for ten and is accurate enough to base your projected energy demand upon whilst designing your home. -
Heating design, calcs and process - ASHP/UFH
LA3222 replied to SuperJohnG's topic in Underfloor Heating
That's how I am working, feels a bit pie in the sky, however in the absence of an answer to the contrary from someone more experienced/qualified it is how i an rolling. That spreadsheet, coupled with various conversations littered throughout the forum lead me to believe that an 8.5kW ASHP should be more than sufficient for my needs, which in terms of heating are very similar to your own. -
I used 7n mediums for the blockwork on my house. 1450kg/m2.
-
Heating design, calcs and process - ASHP/UFH
LA3222 replied to SuperJohnG's topic in Underfloor Heating
It is surprising just how significant this can be. I played around with the spreadsheet a lot for my own house and additional insulation to the structure made little difference. Hence the argument can be made that the ROI for additional insulation is so long that it may not be worth it. Airtightness however does make a significant and tangible difference to heating loads and as such is well worth pursuing if one is that way inclined. -
Heating design, calcs and process - ASHP/UFH
LA3222 replied to SuperJohnG's topic in Underfloor Heating
I didn't give them a w/m2 value, just gave them the plans and left them to it. They came back with 150mm spacings at first iirc but I told them to drop it down to 200mm spacings as 150mm is OTT. Their plans say the 200mm spacings gives 70w/m2 O/P but they must be assuming a specific flow temperature for this value which they don't state. Just checked the docs they sent me and I see two temperatures mentioned, 35 degrees and 45 degrees. So 200mm centres will be more than sufficient with a flow temperature in the low 20s. As per most others on here I anticipate the flow temperature being down in the low 20s and I dont anticipate there being any issues at 200mm spacings. -
Heating design, calcs and process - ASHP/UFH
LA3222 replied to SuperJohnG's topic in Underfloor Heating
Have you considered giving the UFH design over to WundaTrade (as an example)? They will then draw it all up for you and give you a schedule of parts etc. On another note, (caveat, I am not an expert) I think with a well insulated house and the UFH pipes in the slab means that you don't need to get hung up on w/m2 O/P. I had a quick google last night and saw that max O/P in a screed is 100w/m2 which is well OTT. Having had a quick look at my UFH pipe layout Wunda designed it for 200mm spacings and a 70w/m2 O/P. Again this is well OTT and using the slab as a massive heat store means that the UFH will be run at a much lower temperature than the industry norm. The O/P of the UFH doesn't matter as such because that doesn't heat the house directly, it is the O/P of the slab which matters as that provides a continuous source of heat, the job of the UFH is to dump sufficient heat into the slab. -
Cold water manifold, how big is toooo big
LA3222 replied to Russell griffiths's topic in General Plumbing
Don't suppose you've drawn a schematic that we can have a nosy at? Everyone loves a good drawing to plagarise?? -
Nov 4th - It's not good being a woman at times
LA3222 commented on LSB's blog entry in Little Stud Barn
"the reptile", this tickled me? You owe local trades nothing, if you are able to and want to use local trades thats great but at the end of the day the priority is who you are happy working with. If they are a bunch of cretins as these appear to be simply tell them to Rod off and move onto the next one. I went with a more expensive timber frame supplier simply because the cheaper company were a bunch of turds who I couldn't communicate with. Cost me slightly more but a far more professional outfit to deal with. Keep fighting through. -
I have one like this on my manifold and I seem to recall looking it this a while back. I'm sure I saw somewhere that they can be disassembled to sort out however I havent gotten around to doing so yet. I think I was looking at the Wunda site for docs on how to do this.
-
I think Tanners foundation drawings are standard and everything's in, until its not. There is nothing to lose by using a radon barrier rather than a standard DPM. Pennies difference. I think radon measures as referred to in levels, I.e. level 1 protection required = install a radon barrier. Level 2 = radon barrier and sump pump. It looks like you don't need the sump pump, and chump change to use a radon barrier as belts and braces if you are so inclined.
-
Please help! Would you say this drainage stone is clean / washed?
LA3222 replied to Oxbow16's topic in Building Materials
Looks clean to me, when they say clean they means fines/dust. That stuff looks alright. -
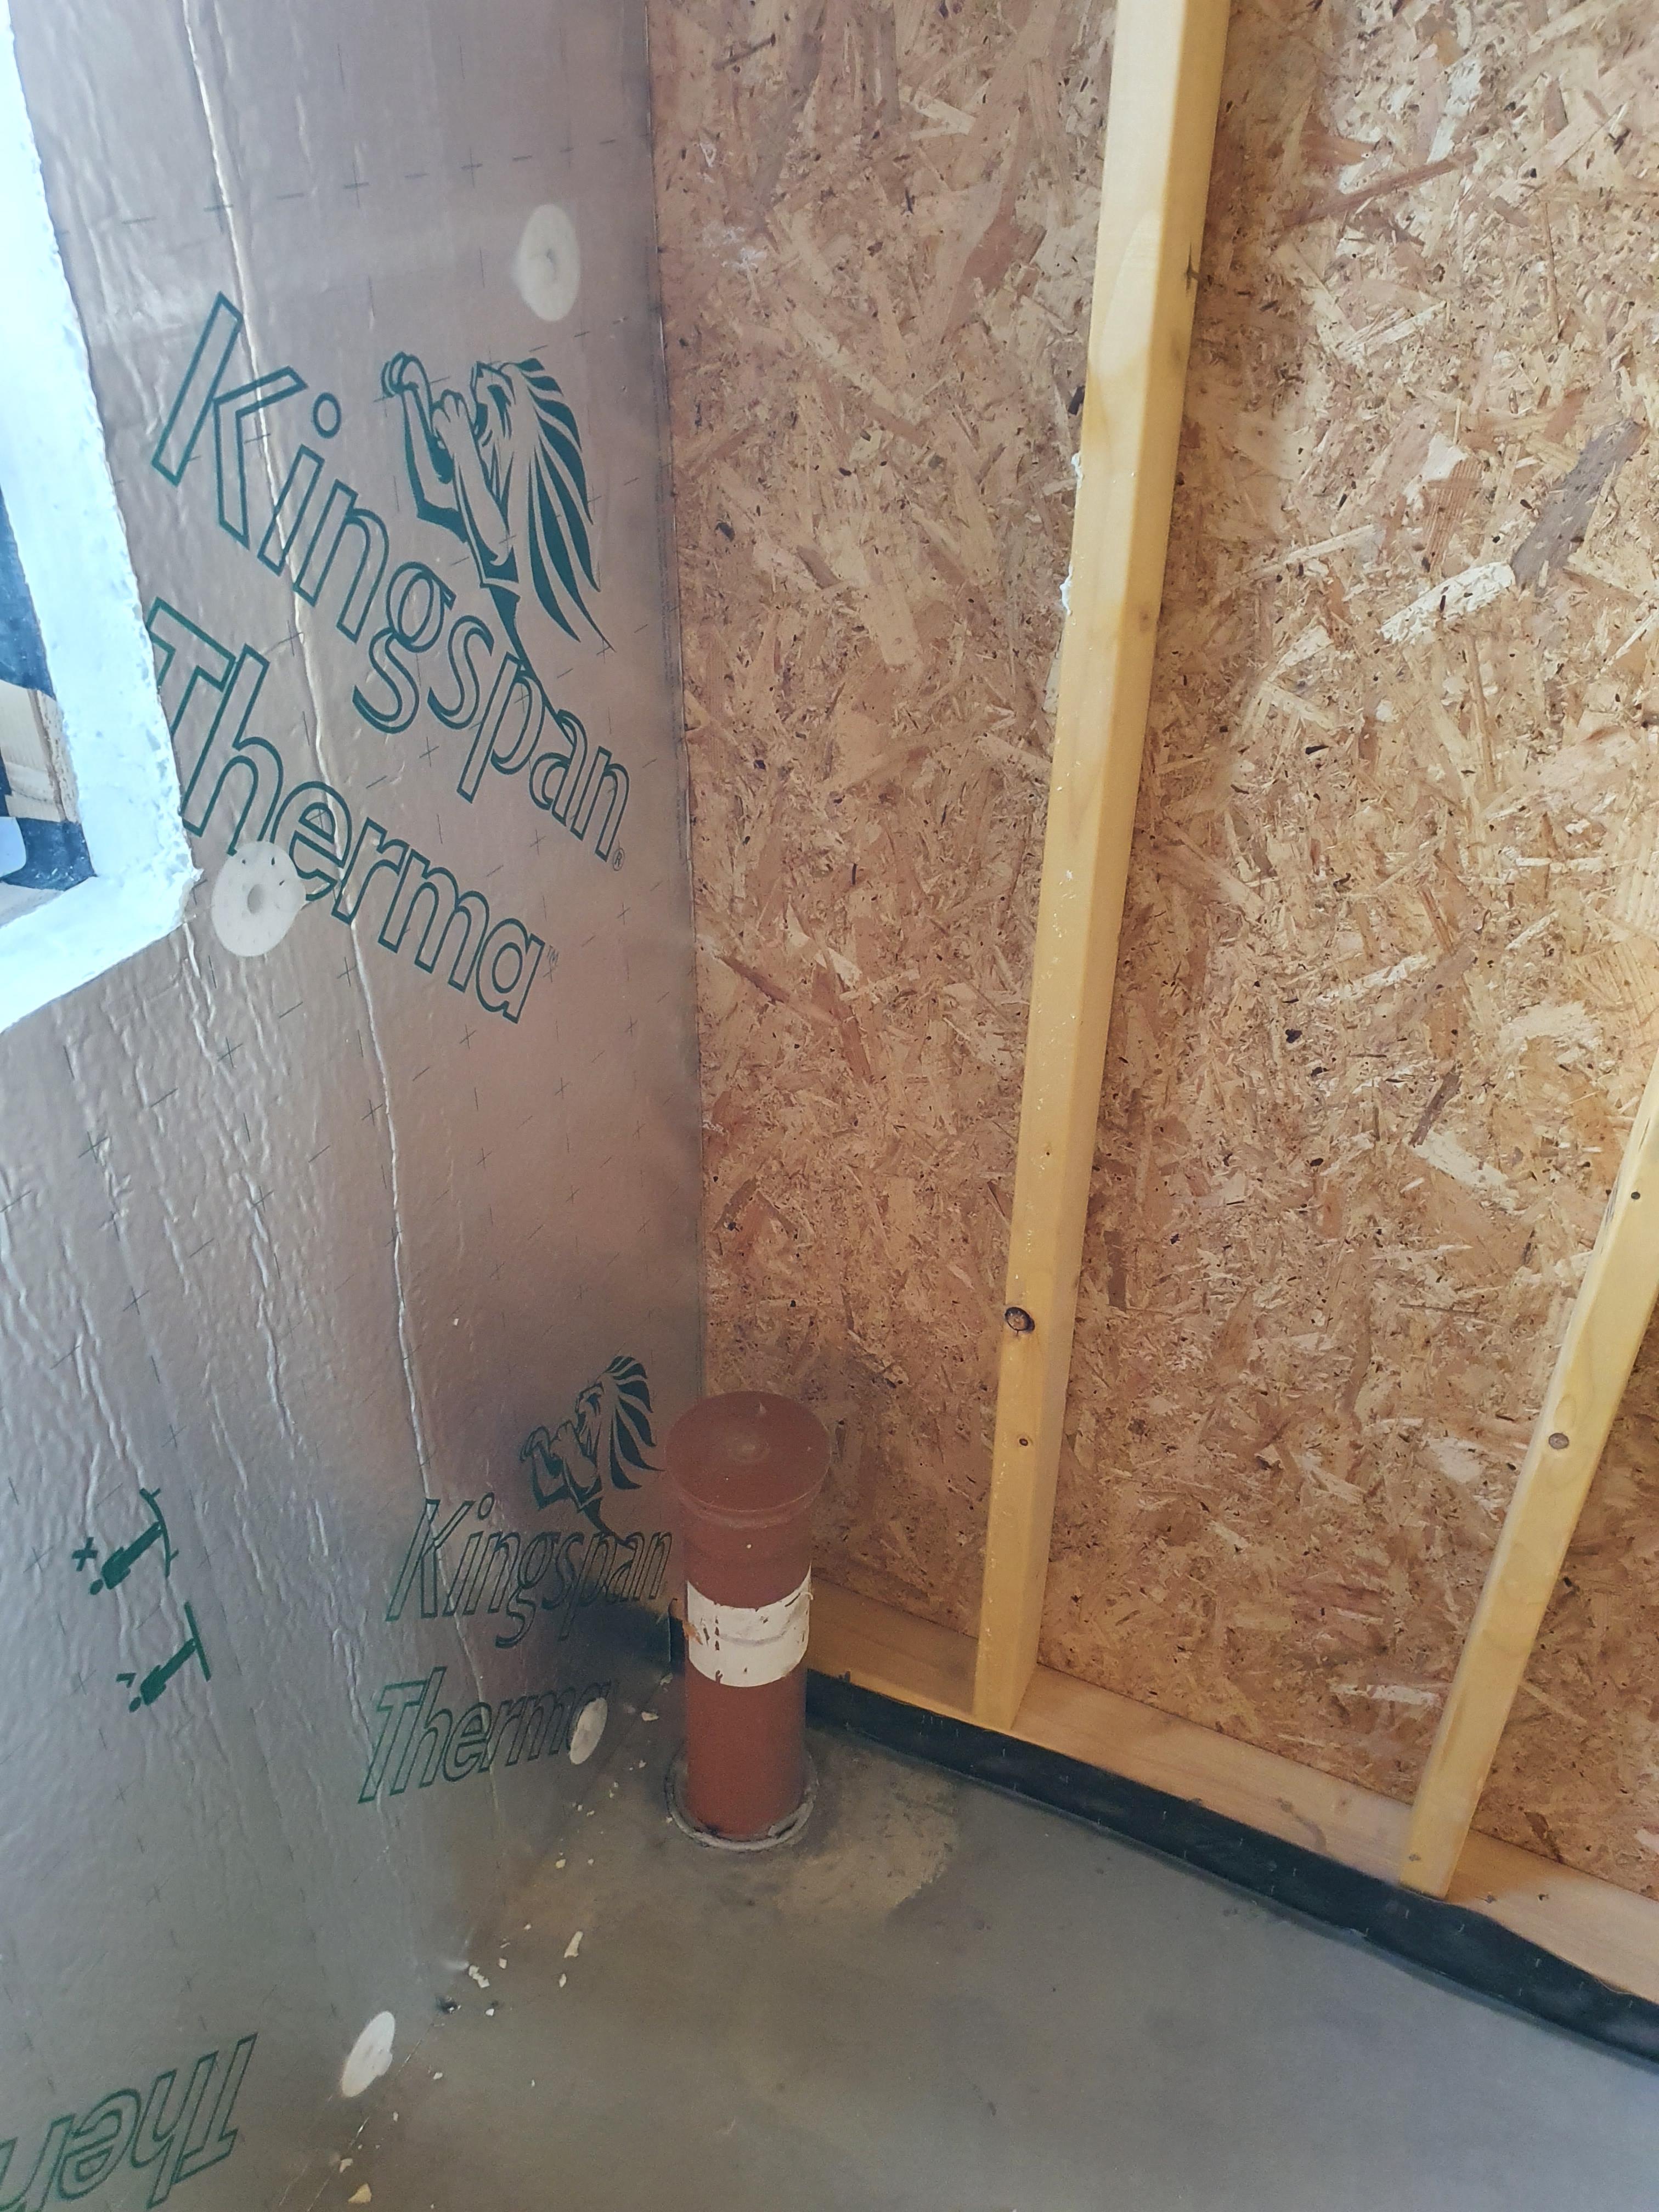
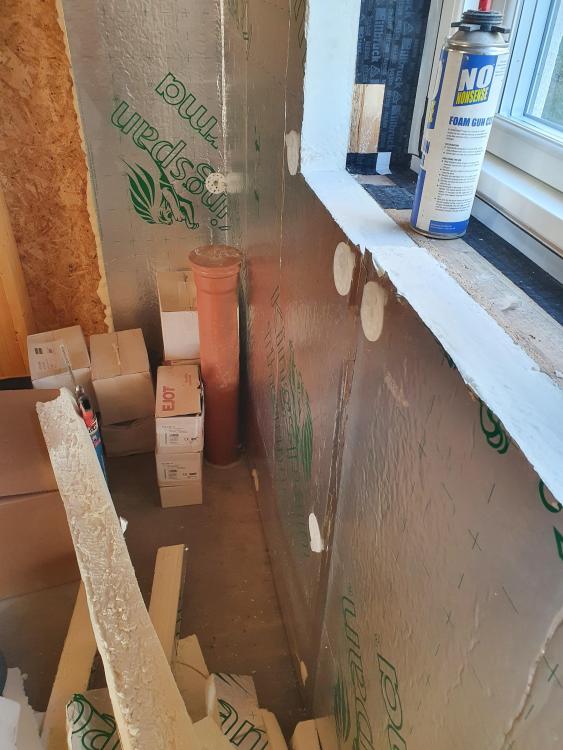
That's the stuff I have bud ? I got 3 tubes to do the window/door fixing brackets with so I should have enough to do under the door/floor junctions too. On another note, if anyone else looks at the i3 system and buys the spray primer get the tinned stuff instead. The spray cans go in no time at all and are around a tenner each, I got the canned version (pretty sure its same stuff) for four quid each and lasting longer. Just a bit more work as jave to apply it with a paint brush.
-
I think everyone is getting hyper focused on the word 'insulation' in this thread. I suspect that the comment is more a general observation about diminishing returns pertaining to a self buildnin general with insulation referred to as an example. Self builders tend to be a more fussy lot, particularly the ones whom carry out alot of the work themselves, as such, self builders tend to go above and beyond with everything when it comes to build standards applied and material choices made. I suspect diminishing returns is something that is individual to everyone and each of us will have our own limits as to what constitutes 'enough'. As an example, I have probably gone way OTT with regards to taping and sealing joints to get my air tightness down, its not what everyone would do but I was happy to do it. The way I approach my own build is to assess everything against if I dont do something what are the consequences if I want to do it later. Most things tend to fall into the 'do it now' category otherwise to do it retrospectively can be a massive problem. Thats probably also a factor as to why self builders go above and beyond, with the bare bones of a house to work with it is very easy to implement things now rather than in the future.
-
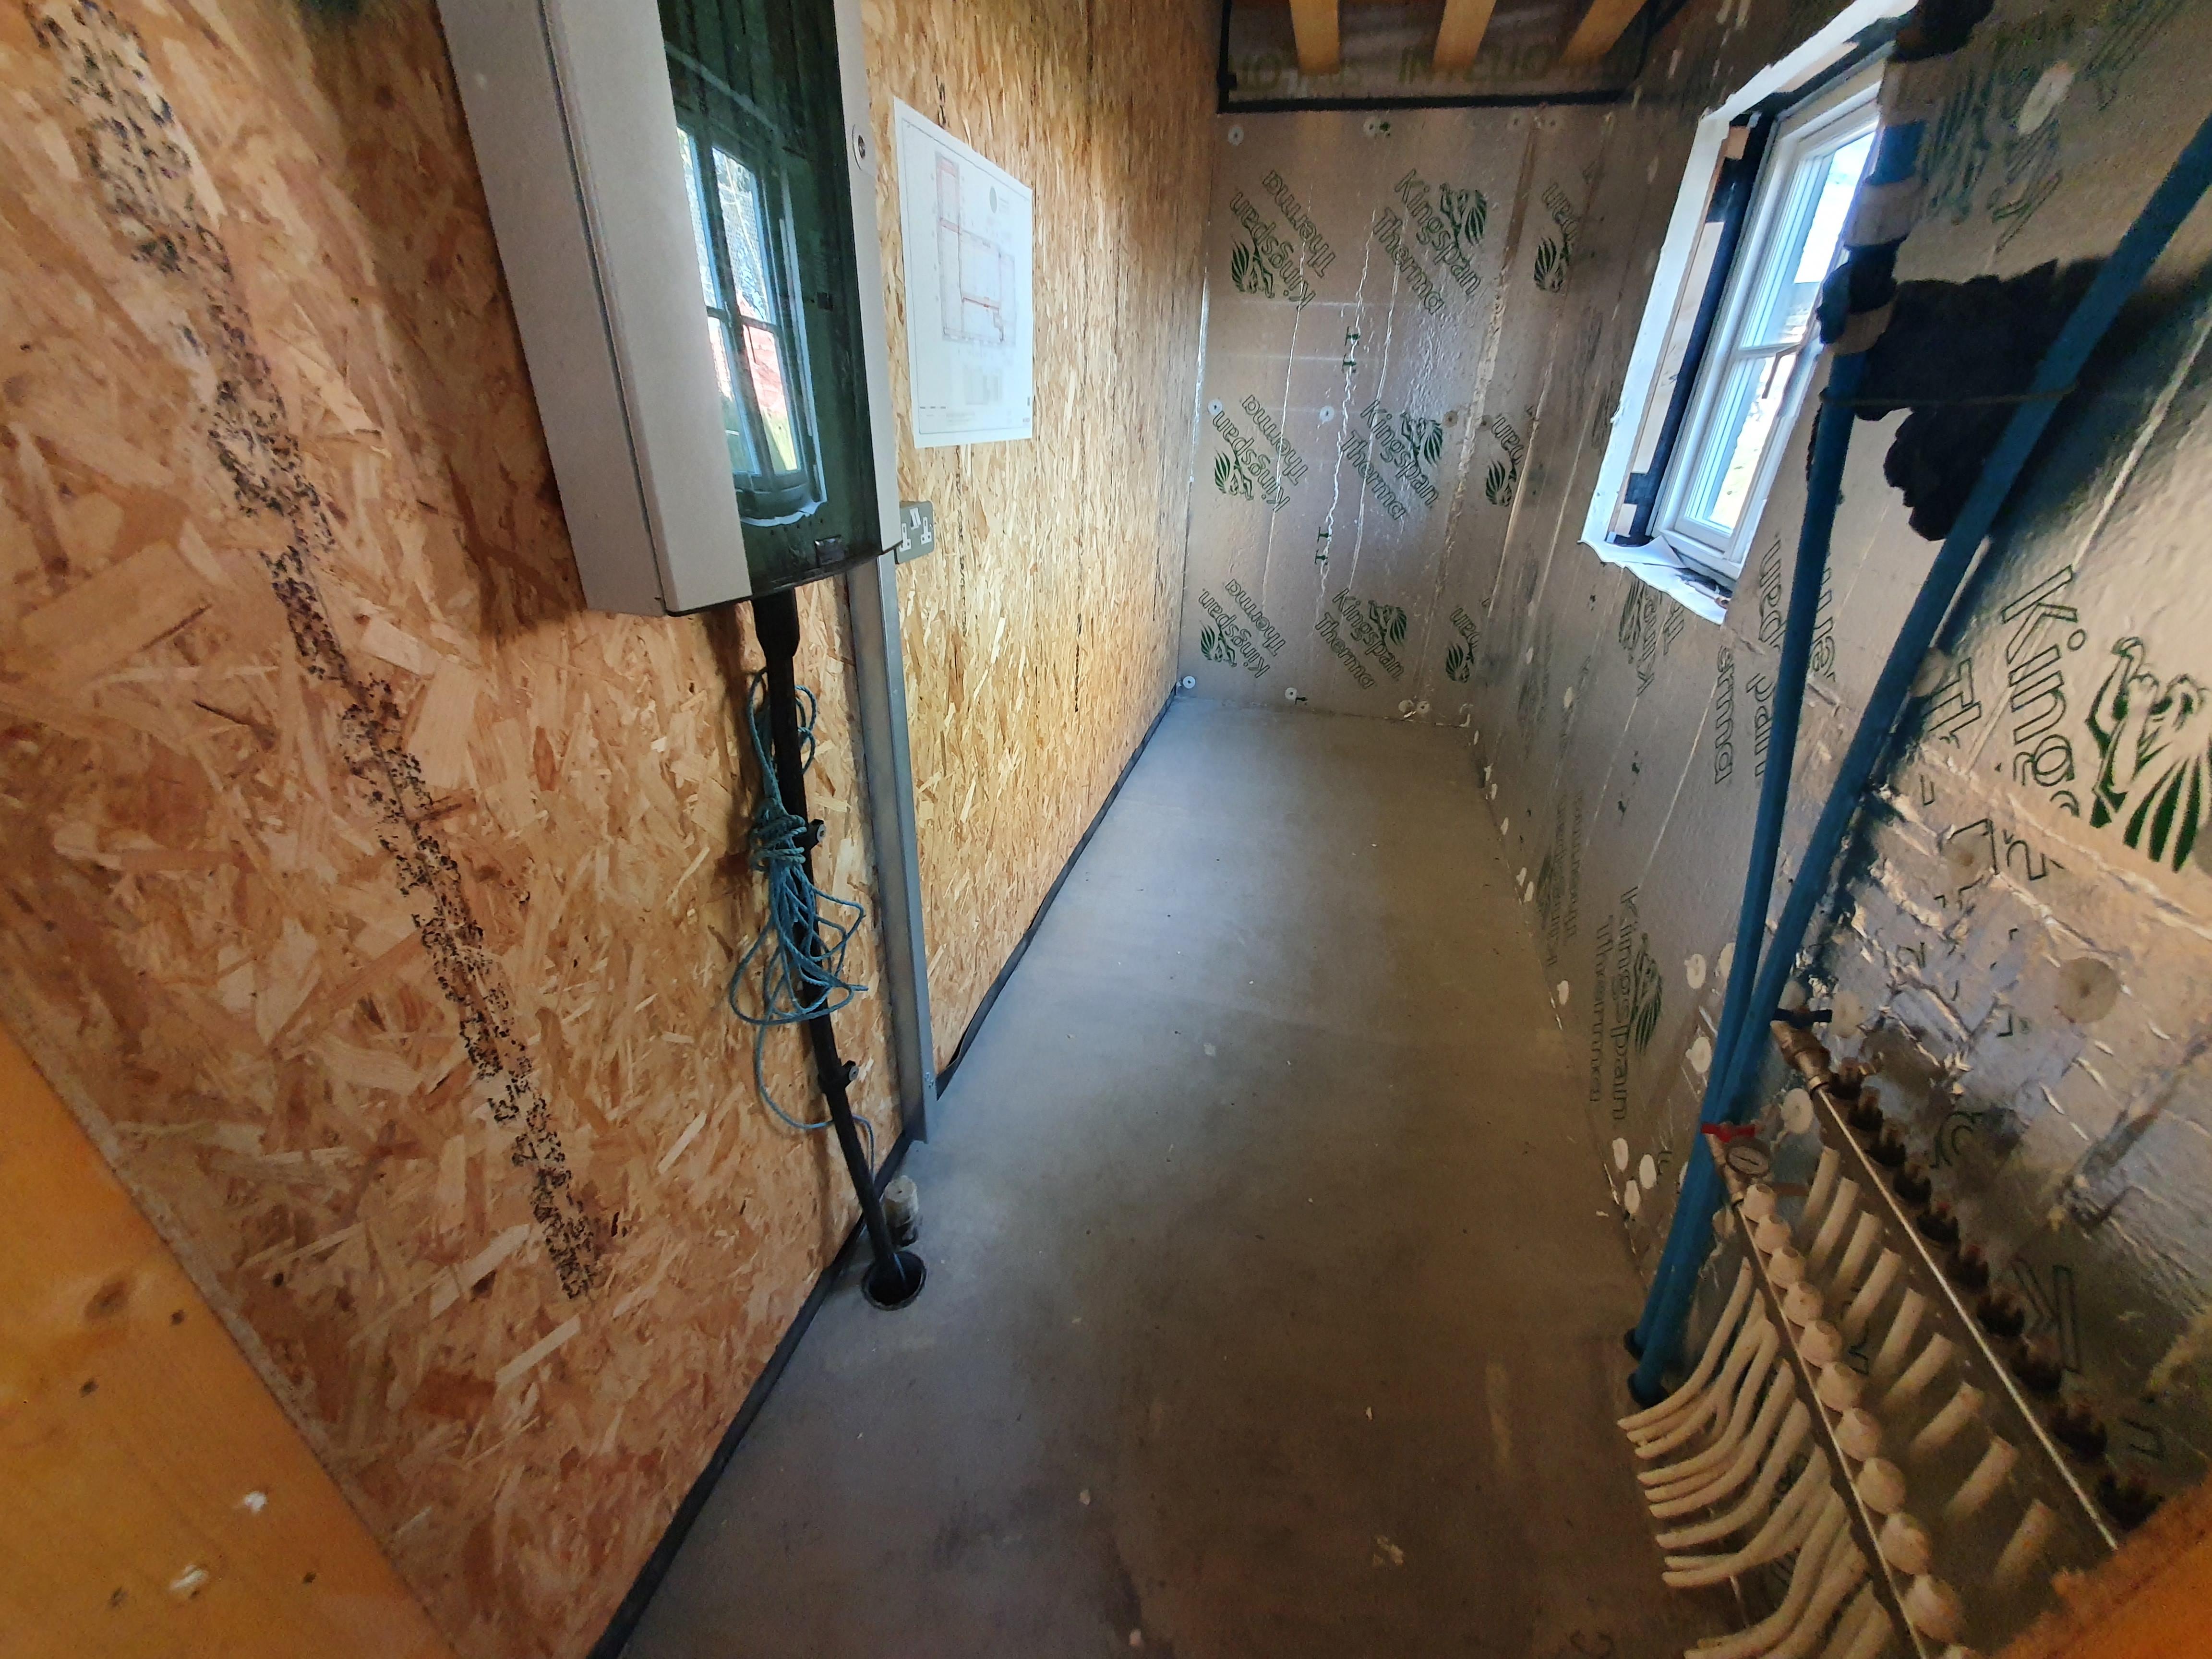
I'll second Illbruck - following the i3 system and using their compriband, foam and tape. Just the door threshold im scratching my head at a bit, as it goes back in under itself slightly, I may just fill that gap with the illbruck silicon I have so that I have a square edge to run the tape down and then tape to floor in the same way that the windows are taped to the reveals.
-
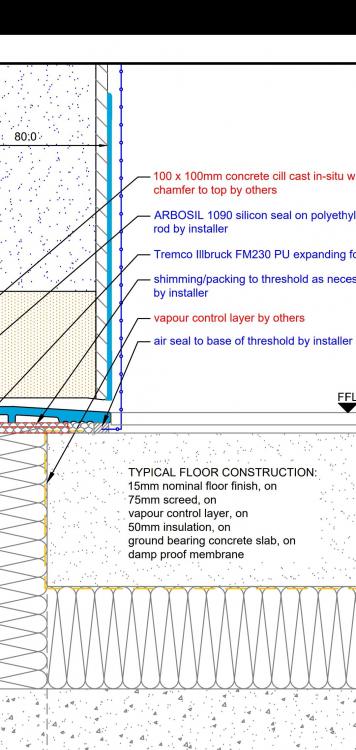
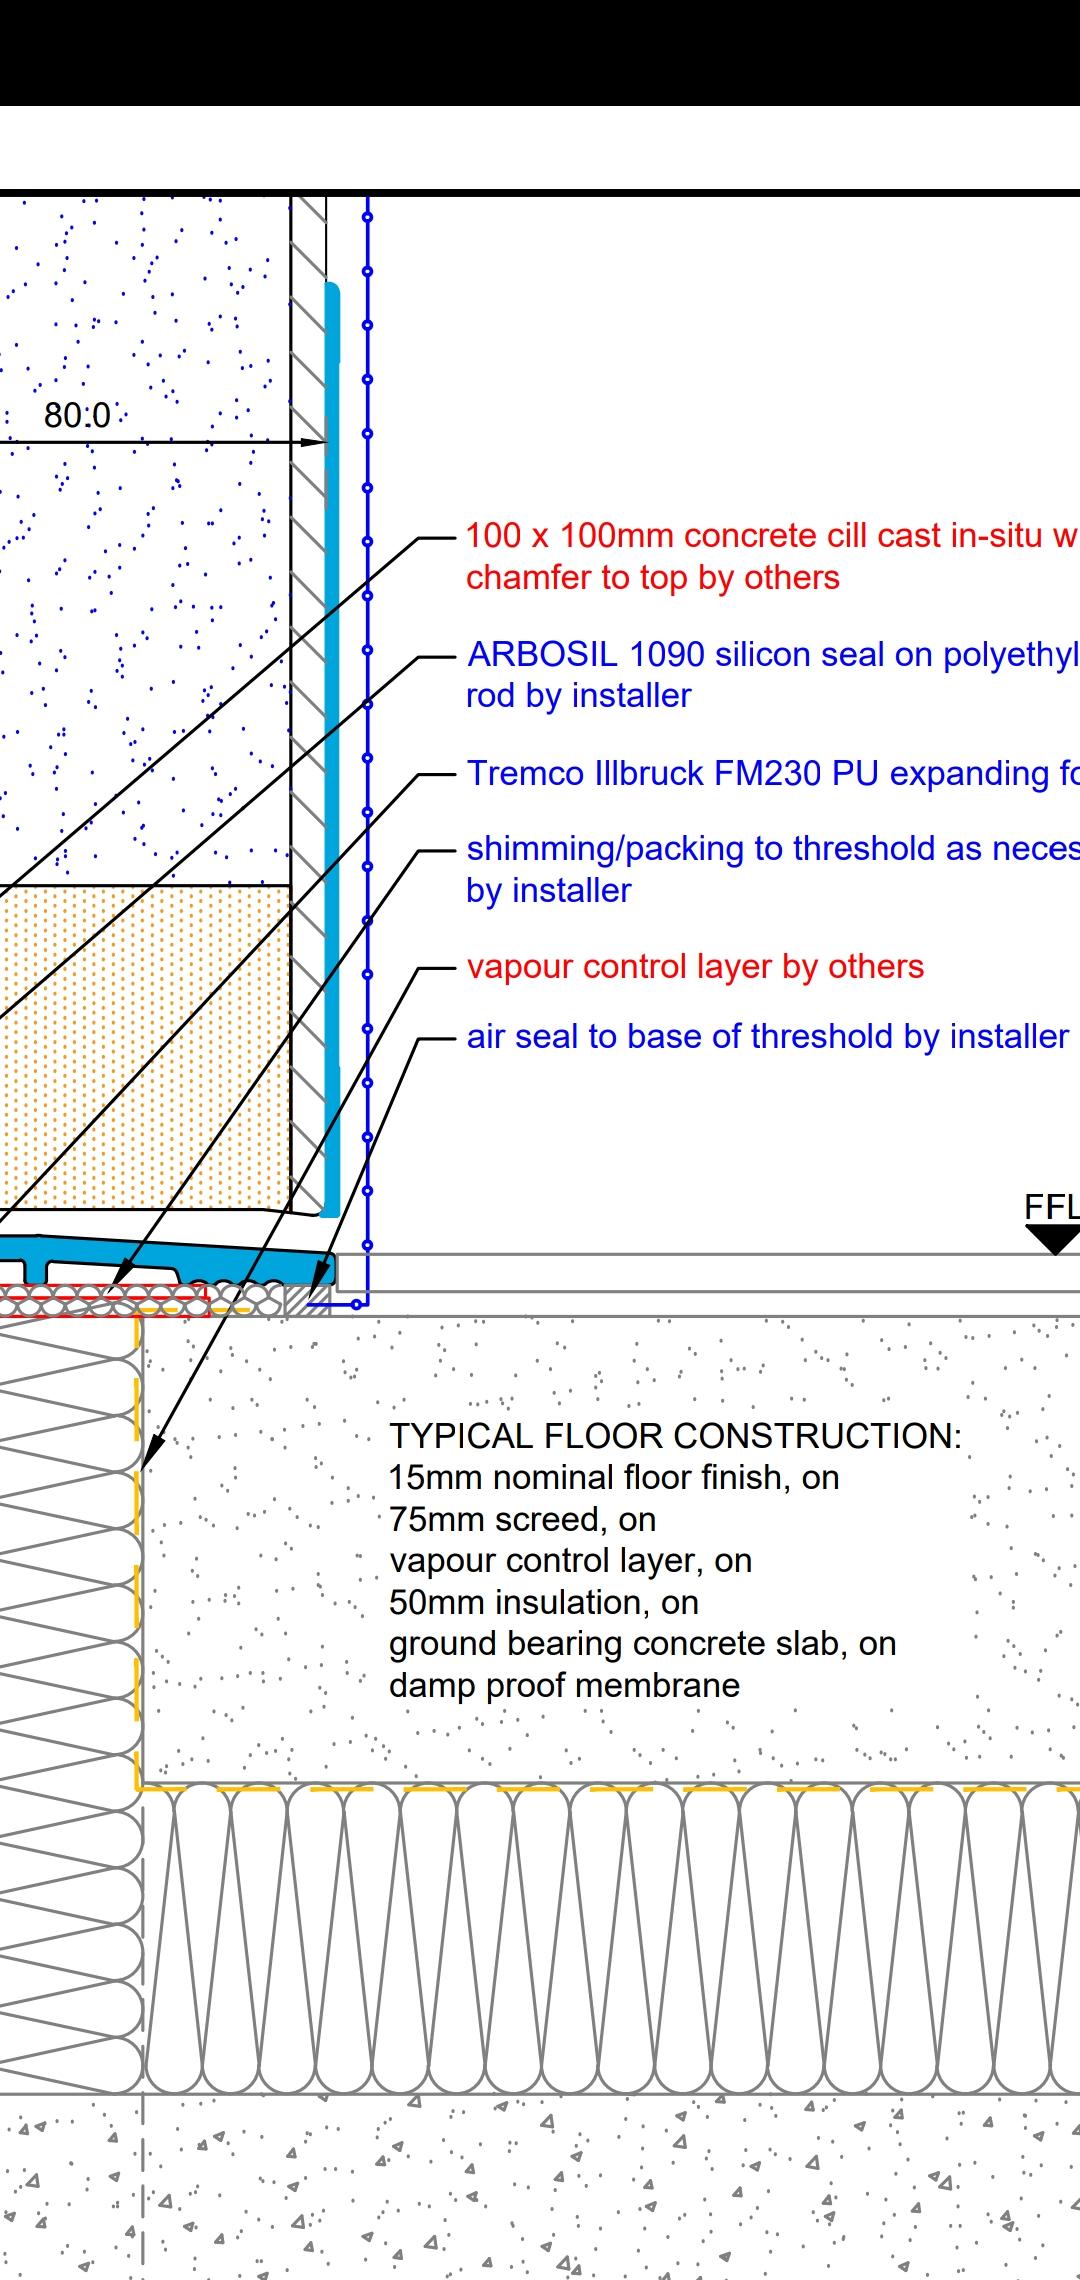
What did everyone else do with regards to sealing the bottom of the door for airtightness? I am currently taping all the windows and doors to the surrounding frame which is easy enough, just pondering whether people do the same thing for the door threshold? I have this detail from Rationel which suggests not to tape but seal via another means: