Nickfromwales
-
Posts
30328 -
Joined
-
Last visited
-
Days Won
296
Everything posted by Nickfromwales
-

Sorting out expansion vessel and overtemperature valve
Nickfromwales replied to jack's topic in Boilers & Hot Water Tanks
One big one obvs if you have space. -
Sorting out expansion vessel and overtemperature valve
Nickfromwales replied to jack's topic in Boilers & Hot Water Tanks
I’d double the amount of volume, by adding to it with a second vessel plumbed in in parallel. That’ll give you ample headroom for immersion higher temp top ups, as tbh you don’t want to lose out on those really. TBH x2, I’d just install 2 new matching units and draw a line under it, in case the existing has become fractured. -
Sorting out expansion vessel and overtemperature valve
Nickfromwales replied to jack's topic in Boilers & Hot Water Tanks
Give it a dozen cracks open, and slammed shut. See if that clears any debris which is what is usually the issue. Give that a whizz and report back. Immersion very likely the culprit, or not enough expansion volume. Do you have an HRC circuit on the DHW? -
Parapet looks better than an upstand?! And far more robust for directing runoff, also hides the slope. Is this really a bank breaker? Not a lot of insulation here, and if I was going to pay to install poor insulation or the same labour / time to fit much better insulation…..🤔
-
I’m on my way.
-
Just install a 22mm gate valve across the flow and return for these rads and open it 1 revolution, test, and then go 1/4 revolution open and test again until happy.
-
Sorry to interrupt. Where do I go to collect my pie, exactly?
-
Wall for floating staircase?
Nickfromwales replied to flanagaj's topic in General Self Build & DIY Discussion
If anyone wants the details of a fantastic mobile fab / welder who travels nationwide, pm me. Been a great few days with this chap and he’s proper old school (let’s get it done) with 35+ years on the stick. -
Wall for floating staircase?
Nickfromwales replied to flanagaj's topic in General Self Build & DIY Discussion
Defo 120x 50mm steel box section uprights into a 5” ‘stud’ wall, with same for header and footer, if you want longer treads and for it to be bombproof. Glulam or 3” trimmer for head of stairs can be swapped out for a steel, if it isn’t already spec’d in steel for eg, to allow this to all be welded / mechanically connected so the best result of all. We’ve had an excellent steel fabricator and welder on site this week sorting a knackered roof out, and the results are fantastic and quite cheap for what you get. Day rates for a welder vs chippy aren’t wildly far apart (max £100 a day difference) and they get a lot done quite quickly by getting stuff cut and made up off site, then it’s just install / clamp / weld / bingo bango. Steel is not super expensive, so worth finding out what it would cost to do this in metal afaic, and then know you never need to worry / revisit ever again. Steel opens up an entire new world of possibilities, where’s other materials such as wood have huge limitations; a lot of wood finished stairs need metal spines anyways. -
Not if you're a carpenter. Point being, any element of this budget self-build can be a cost saving.....if you don't work 9-5 and are a competent multi-disciplinary DIY'er. If not, I just cannot see this being a sensible pursuit. Prepare yourself to begin this journey, and to then have to borrow funds to complete. FYI, that's not me being a negative dick, it's my honest reply after 30+ years of building stuff for people..
-
How best to cable for Washer and Dryer ?
Nickfromwales replied to Spinny's topic in Electrics - Kitchen & Bathroom
Not sure I’ve had that issue, but maybe we have and just nobody’s highlighted it or was bothered by it. I guess try it with the connection removed and with the discharge hose down to the bottom of the trap, so the end is submerged, and give it a test drive. -
…erm? Beside managing humidity, providing fresh tempered air to all habitable spaces, and recovering heat that’s normally lost to the clouds.
-
Options regarding an insulated garden room/workshop?
Nickfromwales replied to kentar's topic in Garages & Workshops
Nah. Gave up on the ground bearing option and it’s on stilts, and uninsulated as I knew it was on ‘borrowed time’. Outbuilding no.2 will be done better but a couple of fan heaters makes it perfectly comfortable tbh. I just make it very draughtproof so the wind doesn’t blow through it. -
Hold on to this chap with BOTH hands.
-
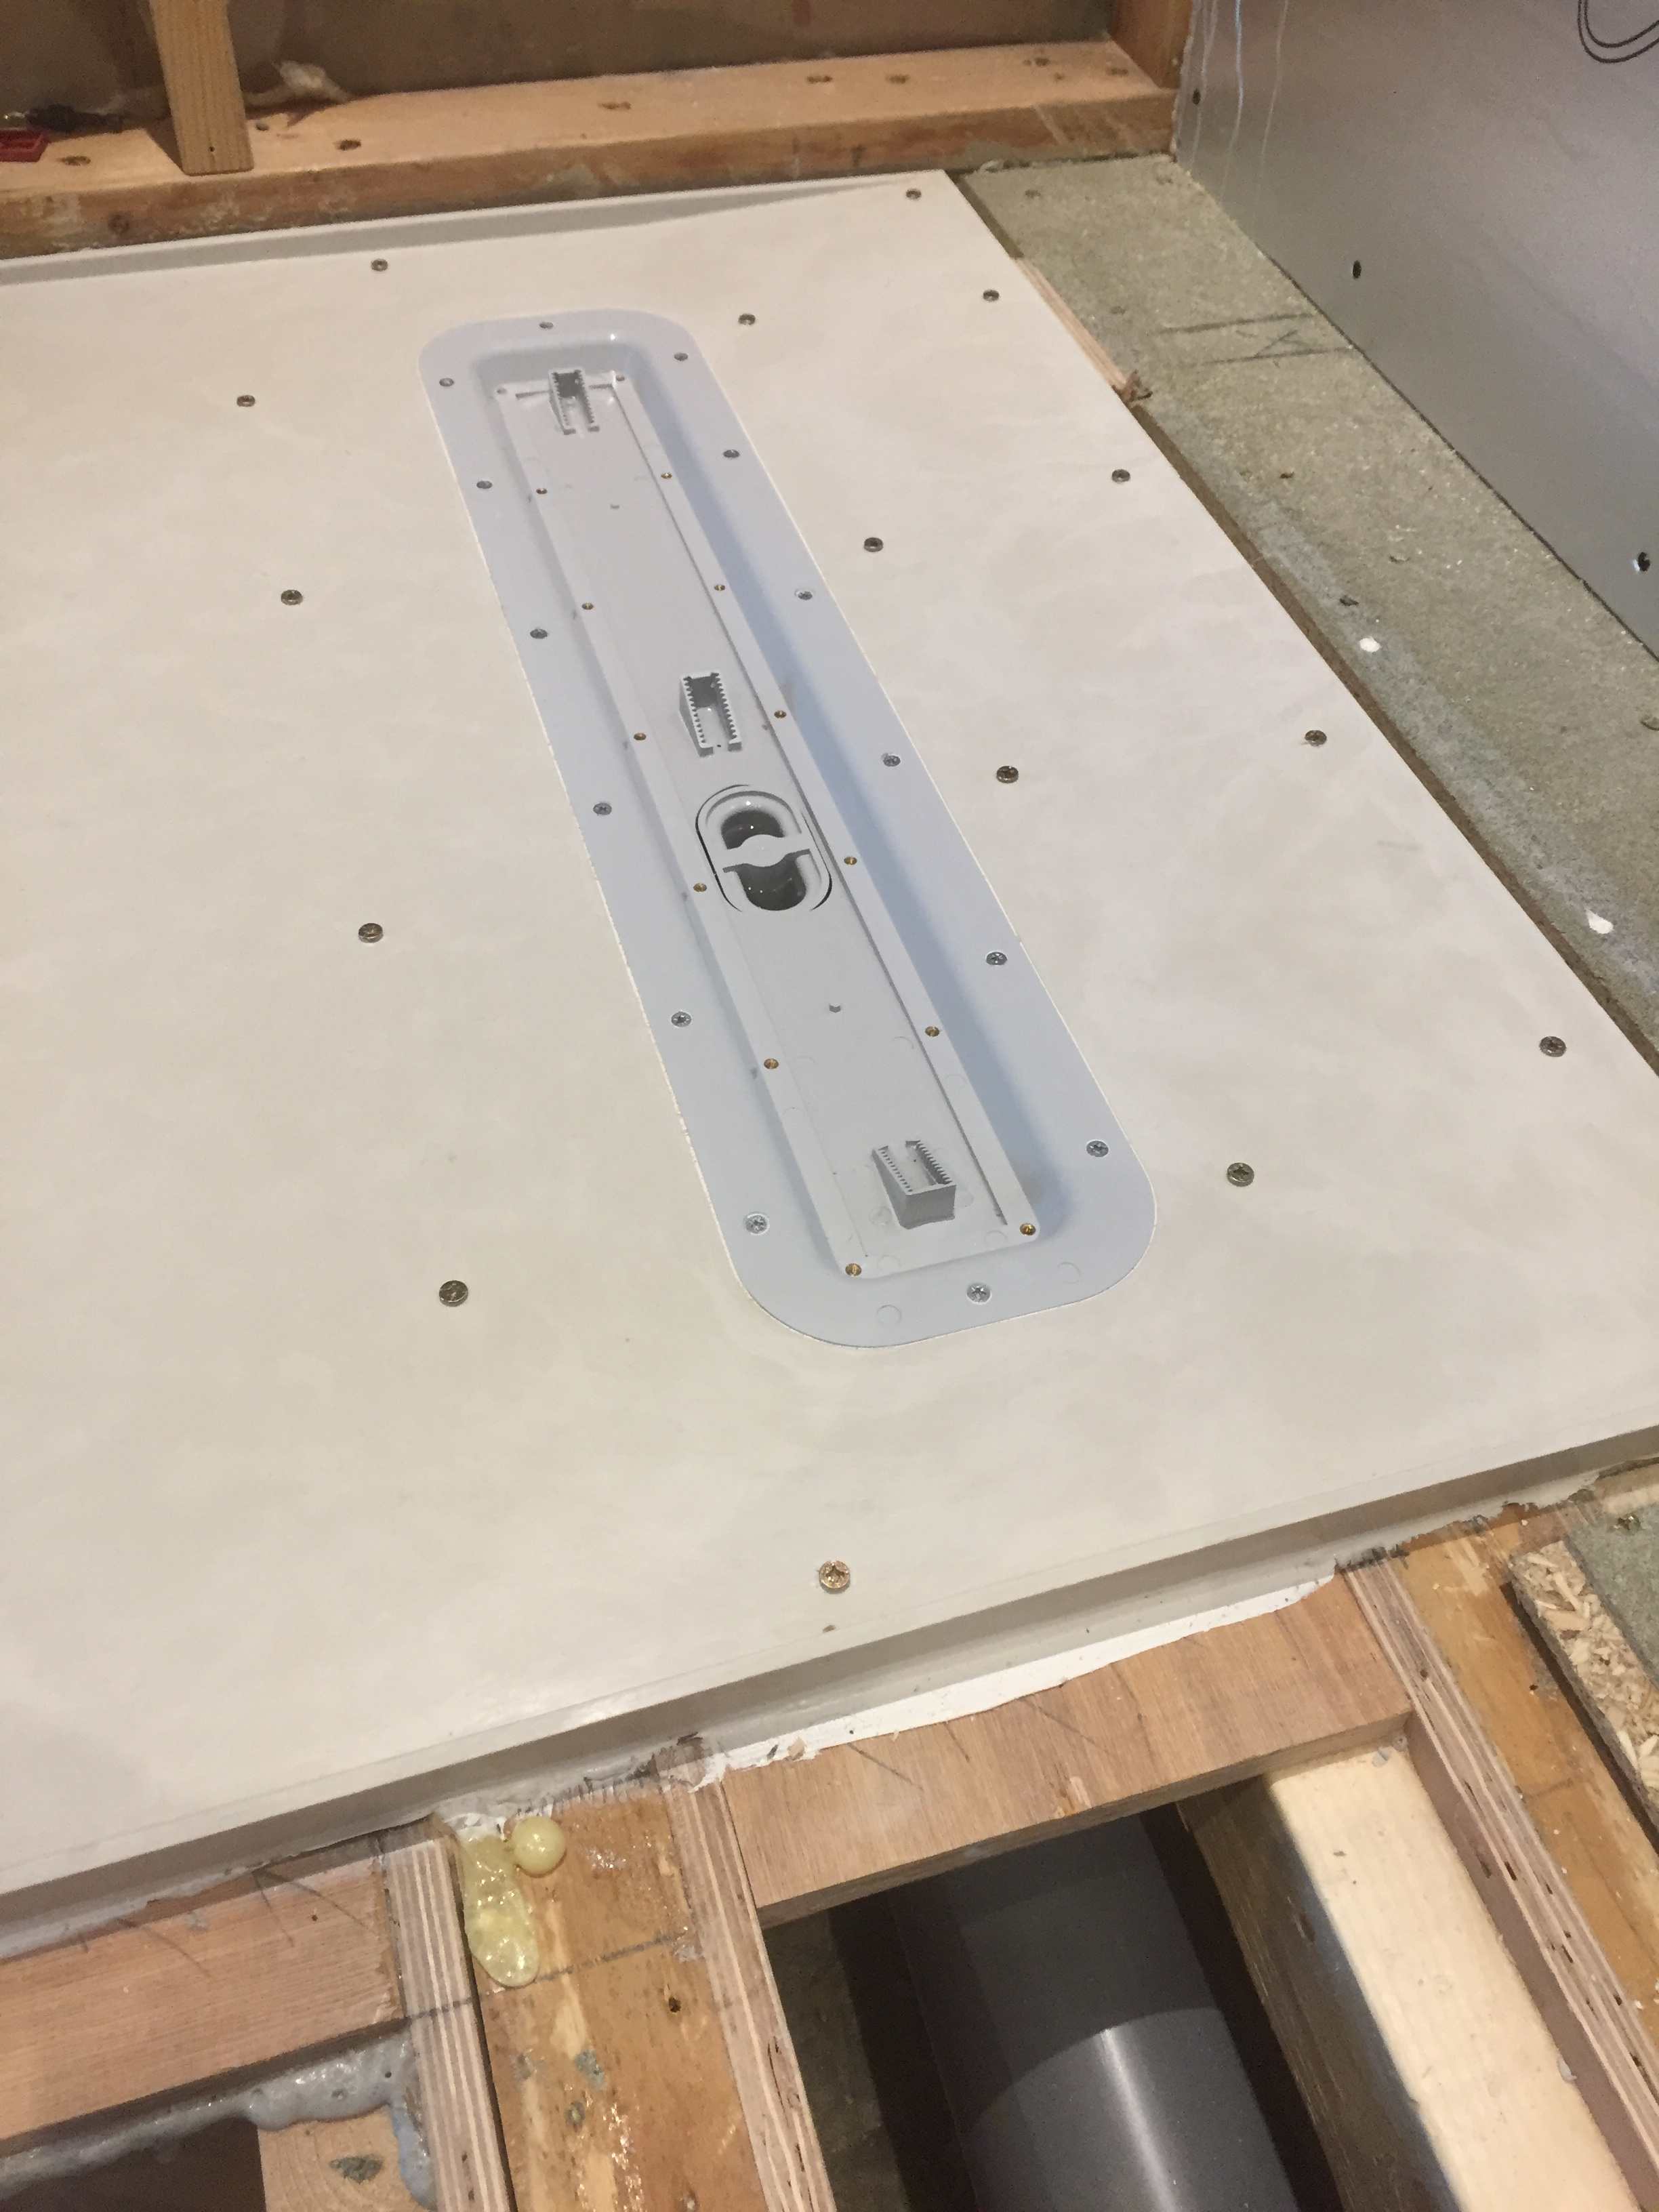
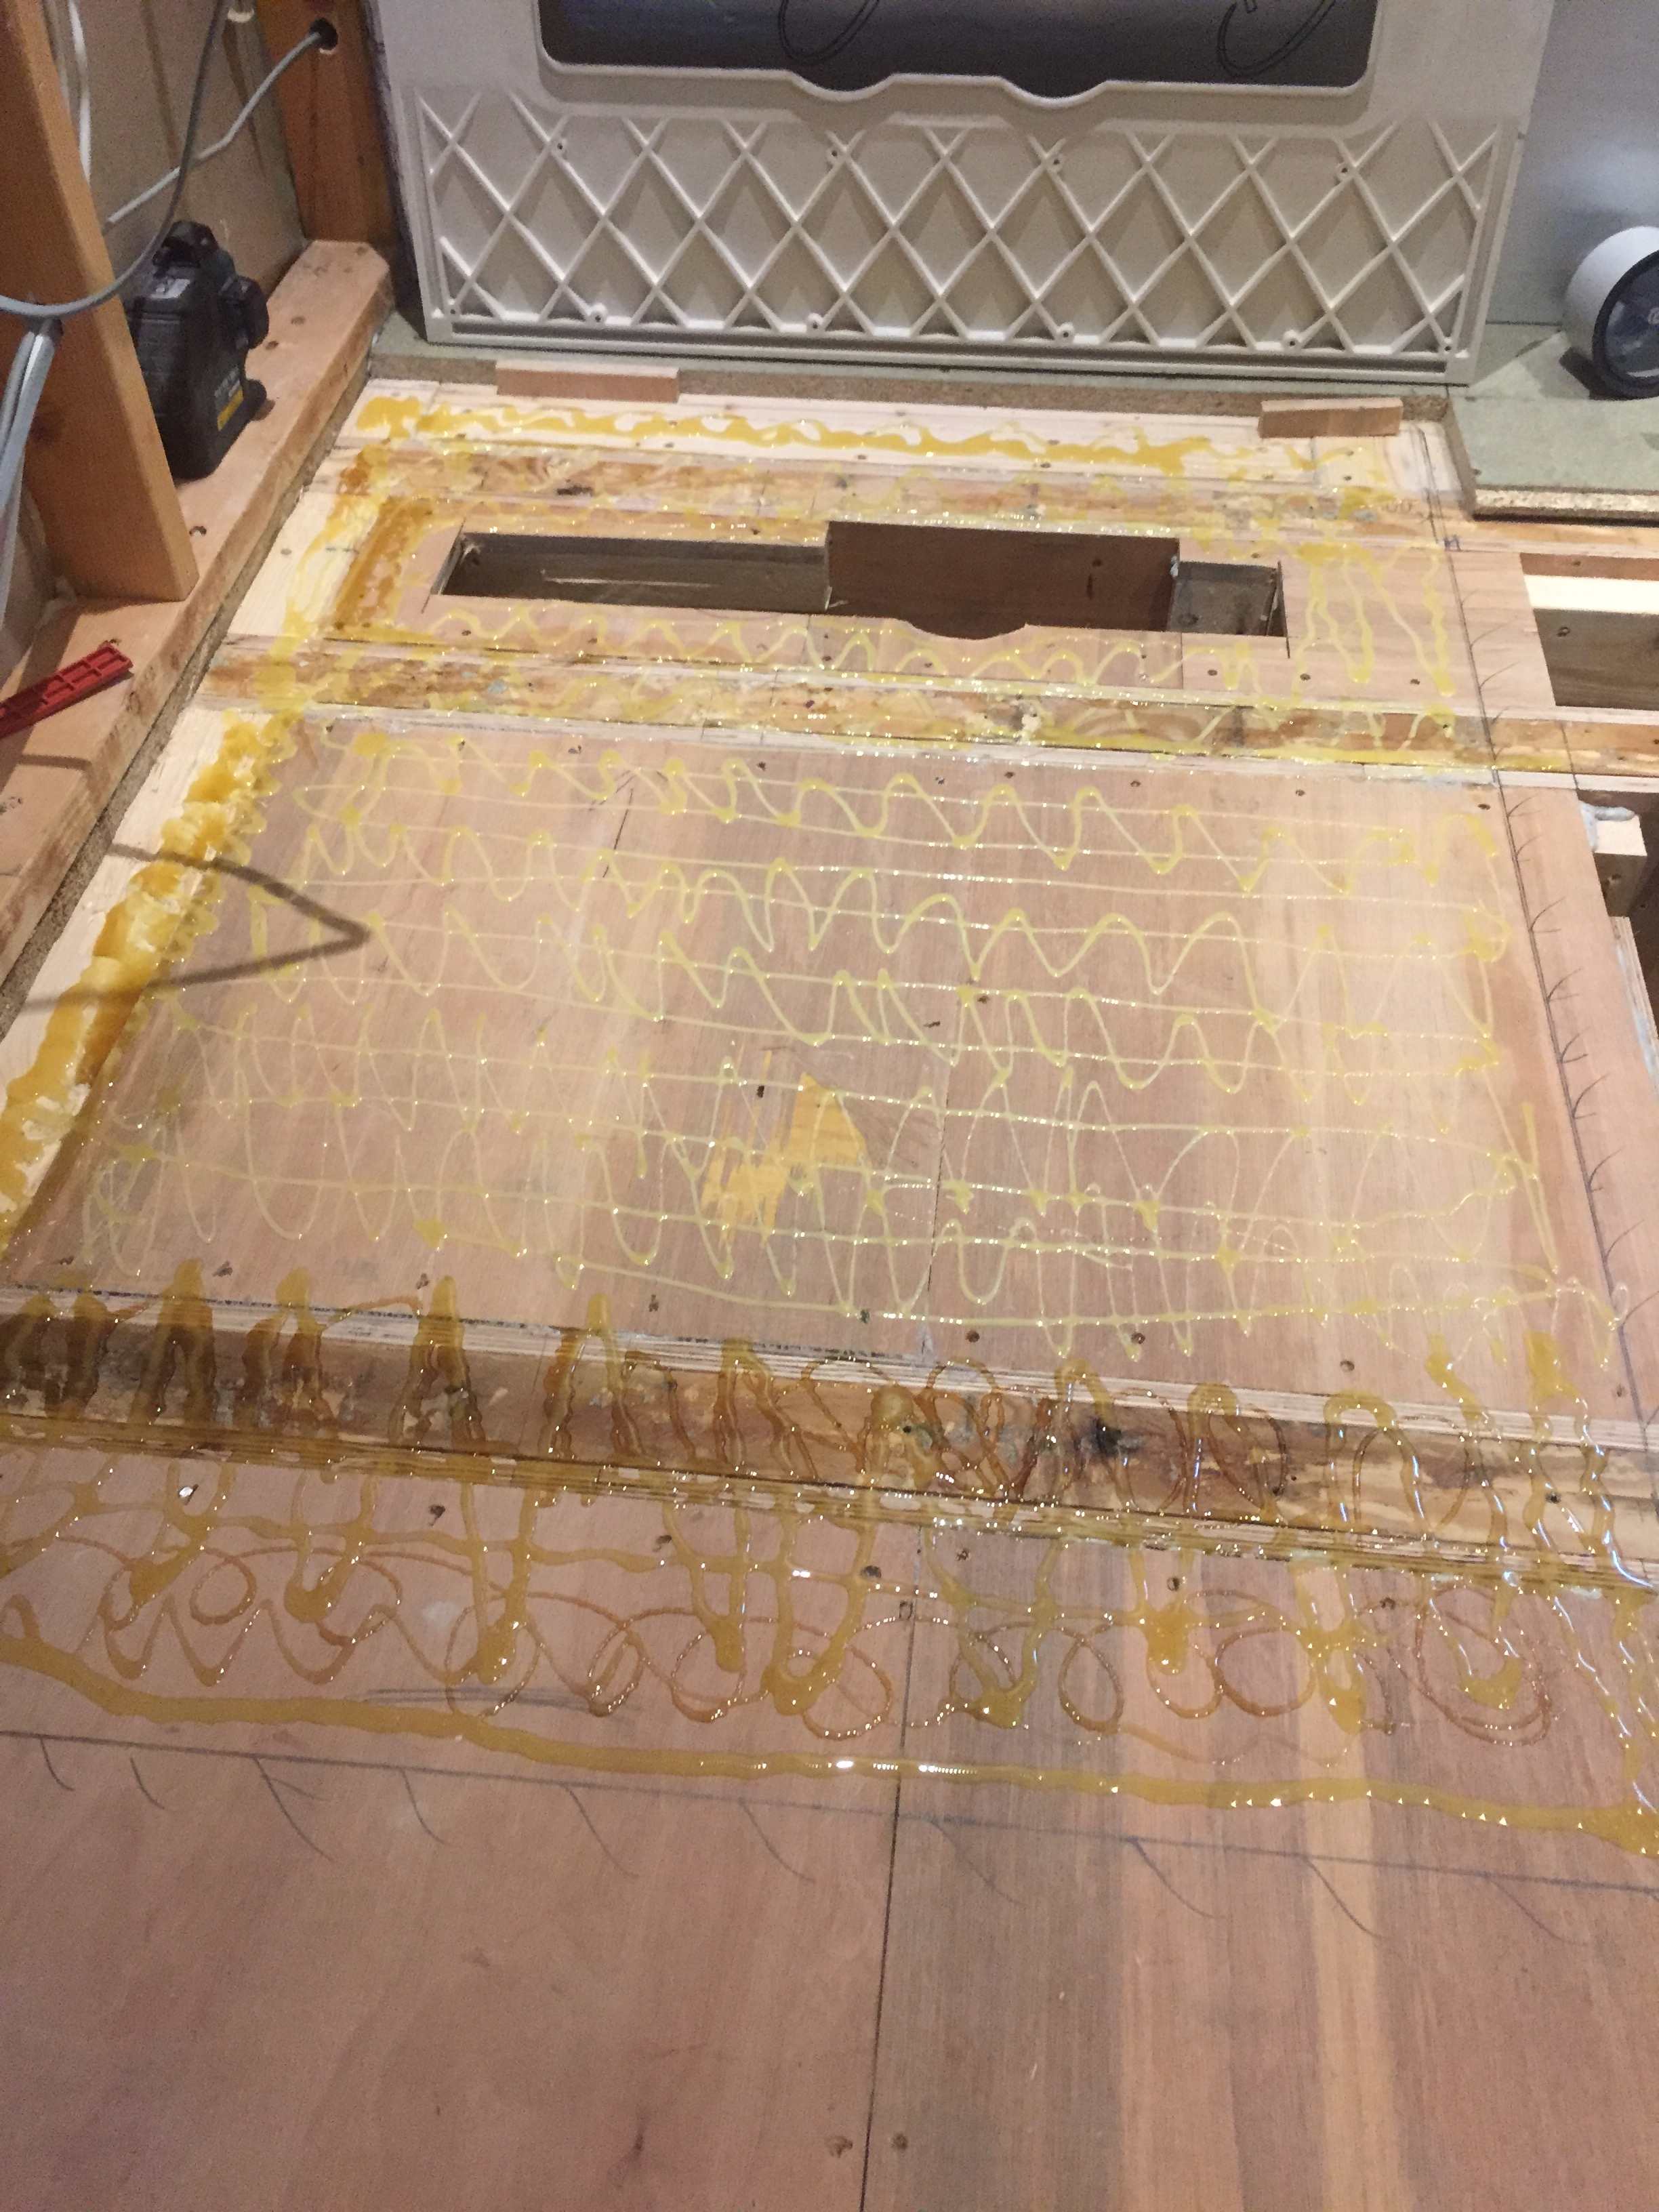
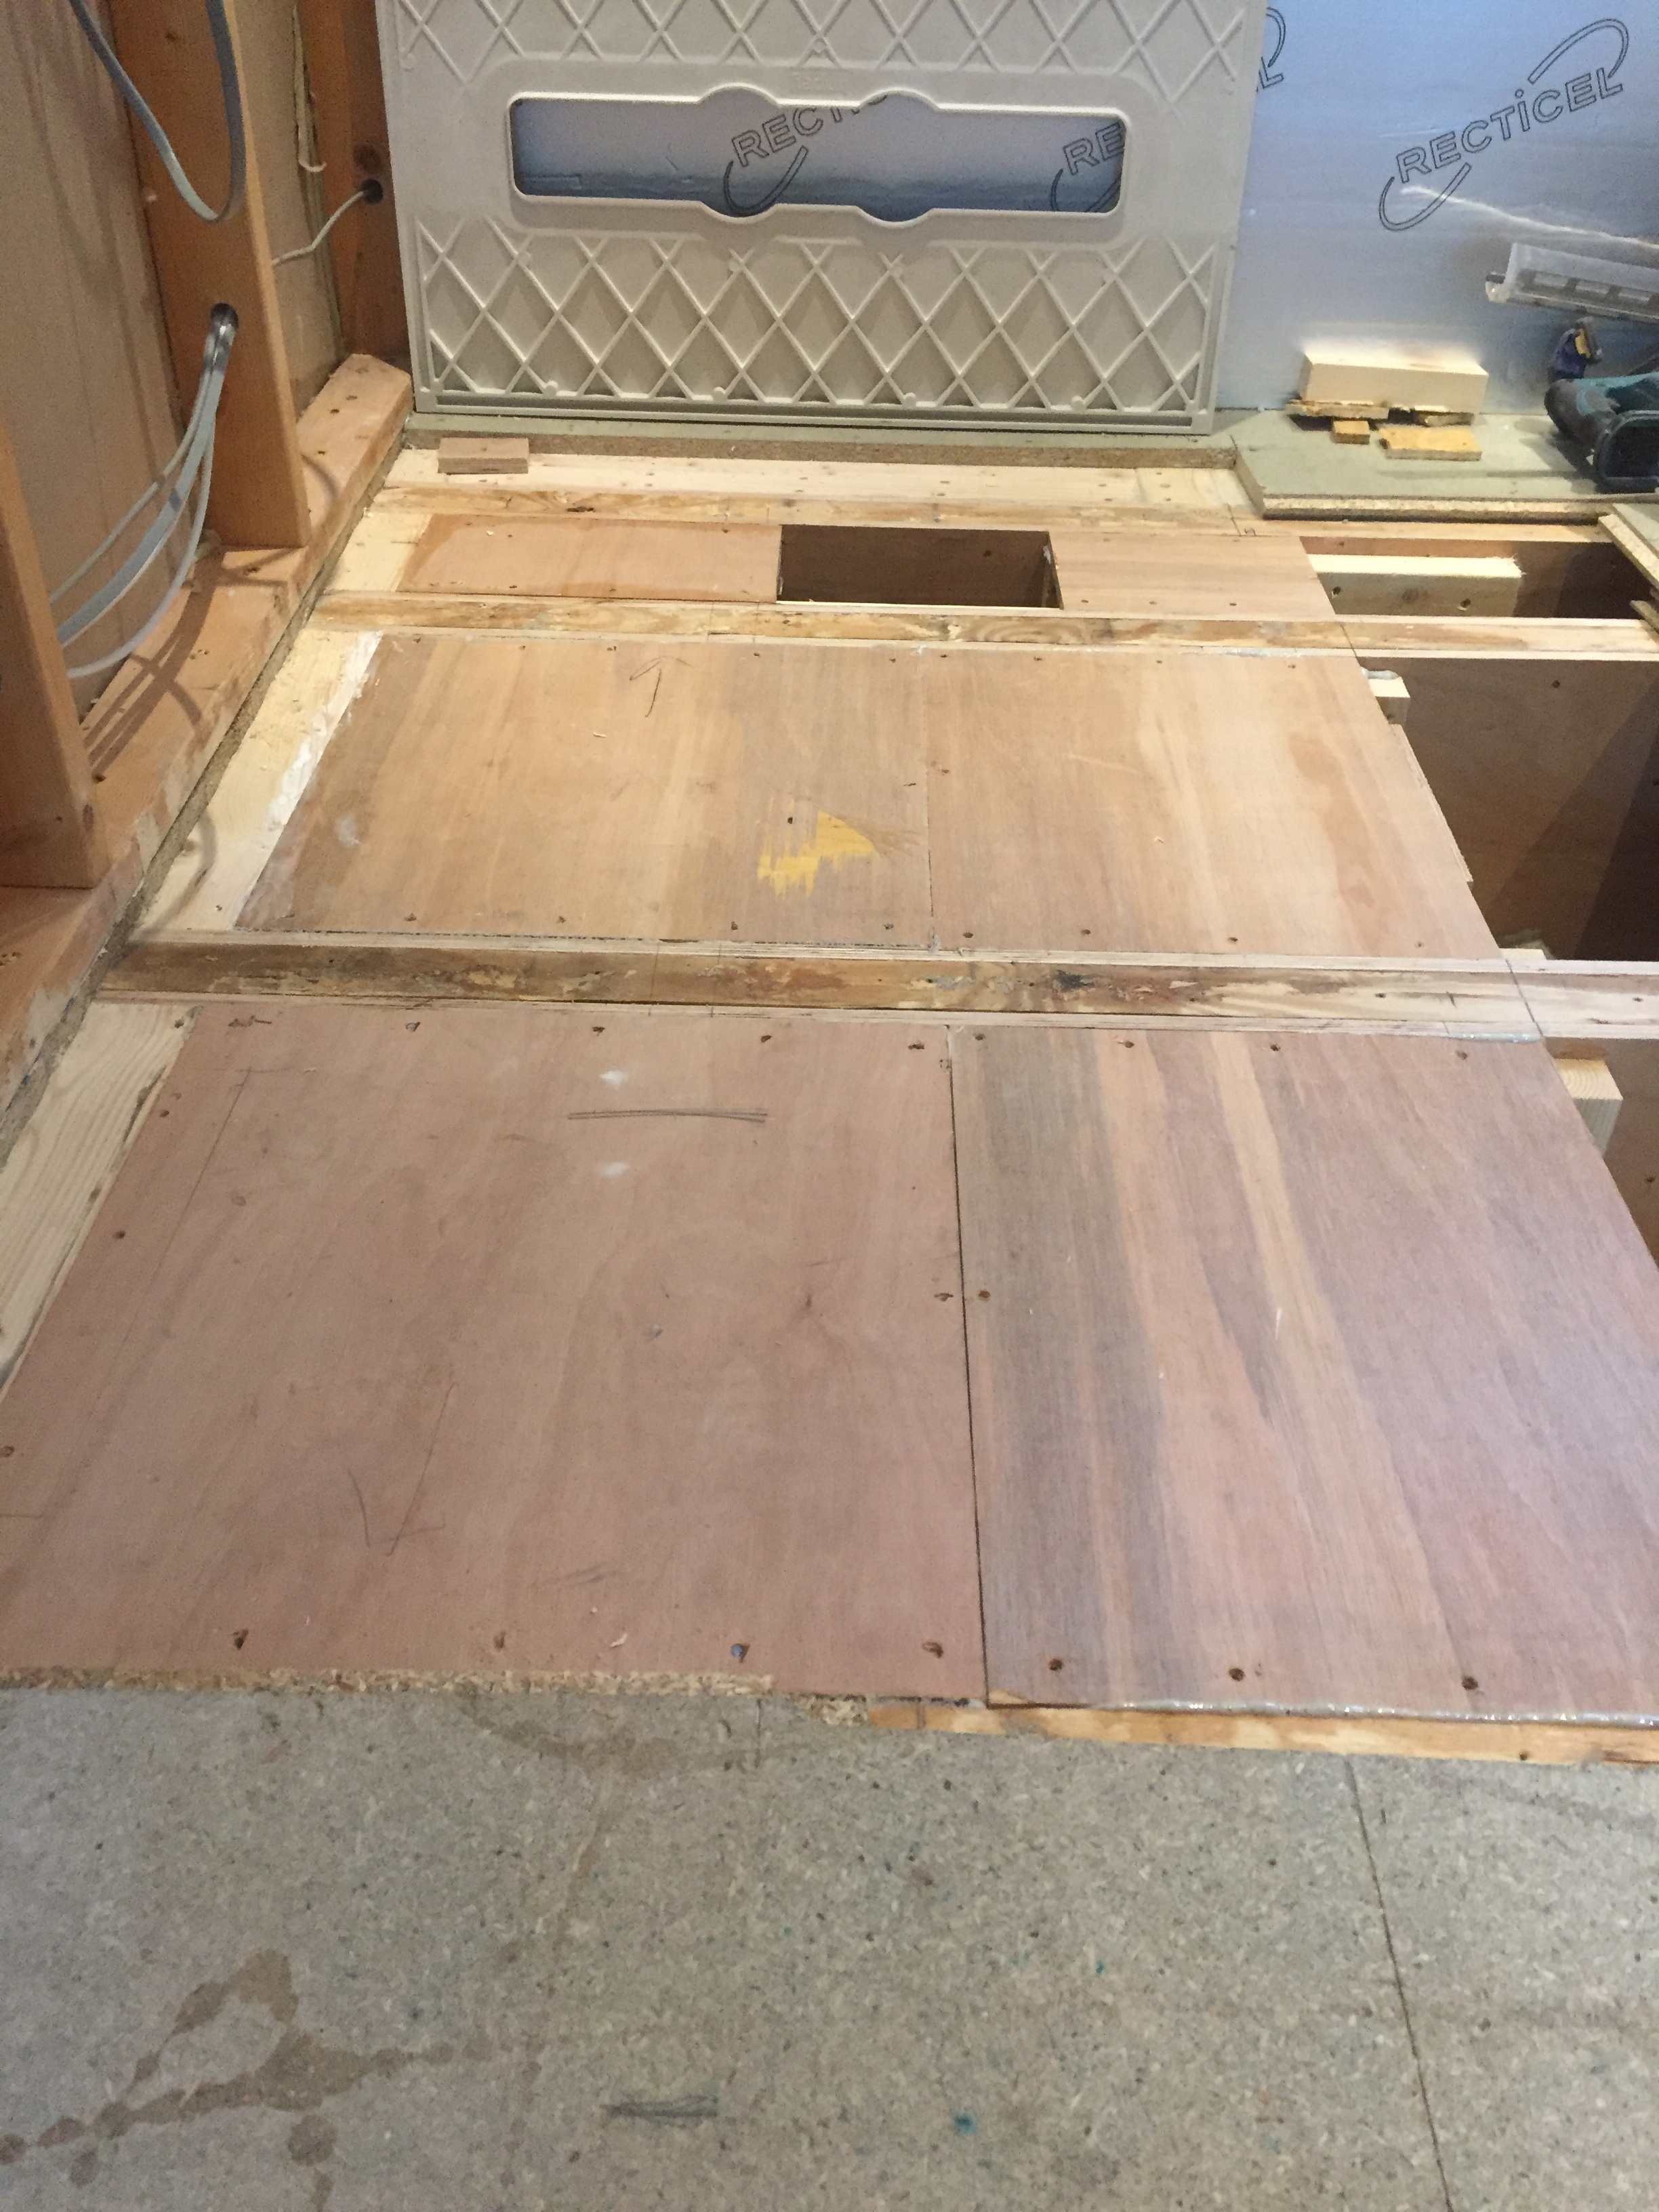
Advice to bed down SMC shower tray: options
Nickfromwales replied to Camran Ahmed's topic in Bathrooms, Ensuites & Wetrooms
Here’s an Impey one I did a while ago. Turns out I laid a load of D4 floorboard laying pu (expanding) glue down (yellow) and then CT1’d (white) afterwards.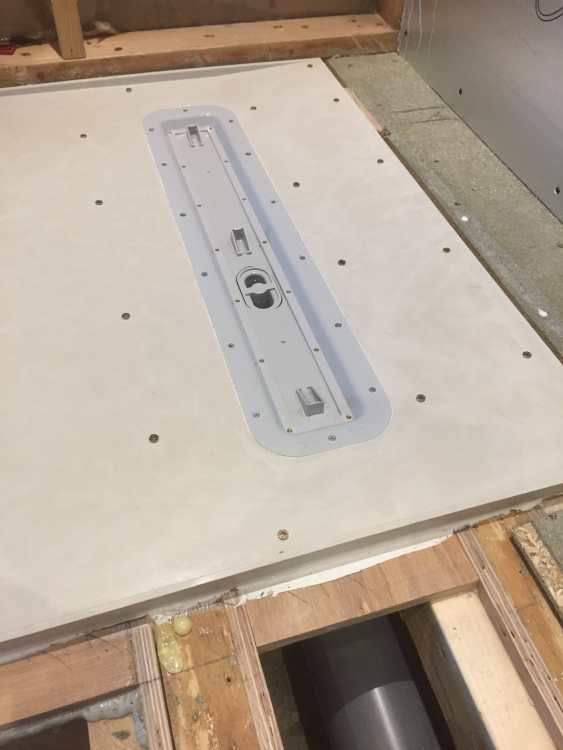

-
Advice to bed down SMC shower tray: options
Nickfromwales replied to Camran Ahmed's topic in Bathrooms, Ensuites & Wetrooms
This type of tray is a-la Impey, so you need a flat, supported piece of marine ply that this gets screwed down to the ply with stainless steel screws. You drill back through a load of those holes on the underside, and then fix back through from the top, sometimes you'll need to countersink the holes eg if you use 5.0 screws. You picked a PITA tray to fit....sorry. If the shower needs to be flat to the floor then you replace the floorboards with the ply, and then fix the tray to that. You need to go nuts with timber noggins etc to make sure this can't move a mm. The only place you need sealant (clear CT1) is around the perimeter and along the edges that meet the walls, then along the tray and to the wall. -
It's supposed to be something flexible.......
-
Yup. You'll not be altering that wall any time soon, unless you completely rebuild it from the foundation up. Brickwork is tied into the internal dwarf blockwork and the rising buttresses are structural to keep the wall supported. Timber 'barn' doors could work, with electric openers/closers.
-
Firstly, the info needed is the hole size, the dia of the thing going through the hole, and then the size/area/diameter of whatever it is that's getting affixed to the external rendered wall. Externally you just need to be weatherproof, and the only airtightness needs addressing at the AT layer internally; usually doing a job like this retrospectively commands the use of FM330 foam as the means to the end, as it insulates, is weathertight, and is airtight, plus it conforms to the gaps and voids left to complete the task. I've made a LOT of houses airtight, and then we've had the client "reconsider some options I gave them from day dot....." and then I've had to make new penetration(s) through a plastered, painted, AT wall, so I am quite familiar with doing this tbh. Just needs an eye on it or any 3rd party you entrust this to.
-
It's a cold space, eg outside of your thermal and heated envelope, so going for the insulated plasterboards will decouple you from the cold block wall. I'd choose this over batten and boards as you lose less internal space, but if you want to DIY then battening may be the way to go. You don't use plaster and skirting boards to become 'airtight' (draught-proof in this instance), as then air is already free-flowing behind the boards and insulation aka thermal tenting, so a bead of foam top/bottom/sides will work wonders. I'd say looking at the ceiling that needs dropping and stuffing full of rockwool too, but if there's a room over it it should already be there (and also be fire rated plasterboard?). If it has a leaky garage door then obvs there's got to be a point where you just accept this space will never be 'warm' tbh. In my man-shed/office I have not bothered and just flick on a fan heater (2kw) for instant heat but only when needed, cheap and easy. For ventilation, if you you'd probably be better off sucking air out of the house and forcing it into the garage, so it leaves via the garage door, as that air won't be freezing cold or have lots of moisture in it.
-
Multipipe Maxima FM 16-port manifold (..and 13, 14, & 15)
Nickfromwales replied to mikeysoft's topic in Underfloor Heating
A low loss header (LLH) is a mini buffer tank with 4 ports, vs a 2 port volumizer. The AHU is a fan coil basically. Better? -
That lot needs to come off. Do it properly, once, and it'll be good for the duration. I'd do insulated plasterboard, dot & dabbed, and seal every nook and cranny with closed cell expanding foam. Then you'll not need anywhere as much airflow (cold damp air btw) as you think you do.
-
Posi joist - This install feels rubbish, thoughts?
Nickfromwales replied to boxrick's topic in Roofing, Tiling & Slating
It's now all in hand -
Multipipe Maxima FM 16-port manifold (..and 13, 14, & 15)
Nickfromwales replied to mikeysoft's topic in Underfloor Heating
If you avoid doing DHW pulls when it's the arse of winter (and use Off-peak > immersion instead) you can pretty much dodge the freezing/defrost issues. A 7kW panasonic J series Aquerea I did in Oxford hasn't done one defrost since it was installed, service guy thought it was a fault, but we spoke and I confirmed my design 'ethos' and he said 'happy days'. Did a small LLH on that one as I had a pumped circuit going to the Brink Air Comfort AHU as well as flow to the UFH manifold. -
A face brick that is only say 10-15mm thick, that looks like a brick, or the types of tiles/mosaics I linked to.