Nickfromwales
-
Posts
30329 -
Joined
-
Last visited
-
Days Won
297
Everything posted by Nickfromwales
-
One for the ladies, sadly…. @Pocster, just use a wet and dry vac and ‘suck it up’ 🤢🤮
-
 For the cylinder, you could just say feck it and do your own annual inspection. To be clear here, the warranty on the cylinder is neither here nor there as the Telford stainless cylinder will outlive you. It’s the safety aspect and reliability you need to focus on, checks for functionality of safety devices, expansion vessel pre charge pressure, and so on. For the heat pump the monthly fee is just utter BS, but Midea aren’t a big player sadly so they’re just squeezing your nuts I’m afraid. Always best to check who you’re getting into bed with so there’s no shocks when you wake up next to them
 -
Maintain pressure prior to screed
Nickfromwales replied to Post and beam's topic in Underfloor Heating
Cool. 👌. Yes, anything north of 1bar is ample. -
Yes, set the laser to the current highest point. As for the pipes, these just add to the fun! You’ll be an expert by the time it’s all done 👍. You can use either side of the existing joist to make life easier. OCD not required here.
-
Maintain pressure prior to screed
Nickfromwales replied to Post and beam's topic in Underfloor Heating
Its just the water / pressure acclimatising, so no issue afaic. Theres supposed to be a duct cap on there to seal it off, when required, but also to prevent dust / crud getting in. The cap is only supposed to be opened until loose and then left in situ for life, vs removed completely. That vent would have come supplied with a metal cap, do you know where it is?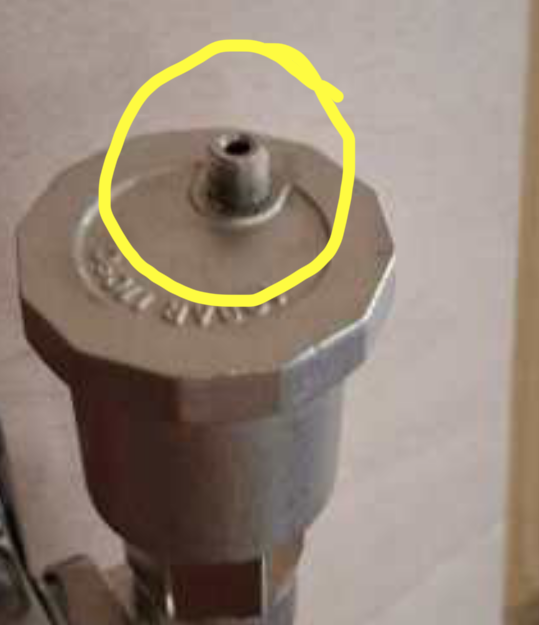
-
The originals stay put, no need to dig them out, that’s the reason for adding the new timbers alongside. When I say screw at the end, I mean so one end is fixed and the new timber can scissor up and down on that screw eg to allow it to be raised or lowered to meet the laser datum at the far end. Then you fix that new timber there at the end opposite where you screwed it. You then go back to the first screw you put in and remove it, then you raise that end of the timber to meet the laser datum, then you have a new bit of timber that is perfectly laser levelled both ends. Screw that along its length then for a permanent fix, and do the same process with the next, and the next. No need to joist hang the ends, just do the noggins as you say and then between those and the boards being glued and screwed down you’ll have no movement.
-
On these types of floors I just make the original as solid as possible and then install new timbers alongside the originals (sistering). You find the lowest point (use a laser is best) and work from there, screwing the very end of the new timbers alongside the original and then lifting it up to level it to the laser datum. Your new flooring gets fixed to the new timbers, the originals are just used for support.
-
Running hep2O in insulation below screed?
Nickfromwales replied to daunker's topic in General Plumbing
Everything after the control group is pressure balanced, and you need every single outlet fed from these, not just showers! Any mixer outlet or device where hot & cold meet each other needs to be off balanced feeds. If the kitchen sink cold is off raw hard water and the hot is via the control group then you need to fit a non return on the hot side. If your mains pressure is above 3.5-4 bar you should also fit a PRedV on the cold feed to that outlet too. Those 3 sets of manifolds are all hots (from left to right) 2x kitchen and utility sinks @55°, then all baths / showers / basins @45°, then 3x hot returns. Cold manifold out of shot but each cold outlet and each hot outlet is on its own run there. Why have cotton when you can have silk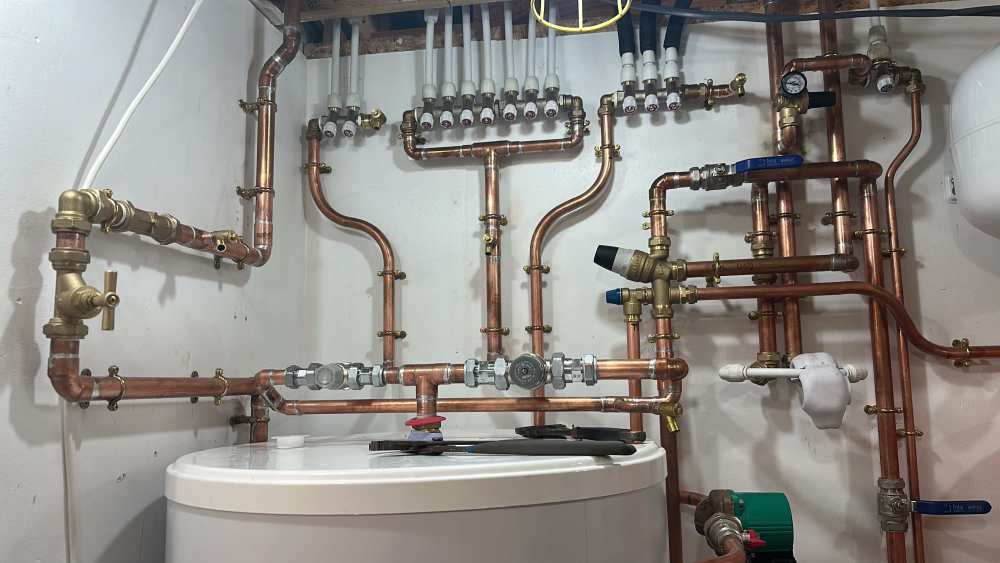

-
Maintain pressure prior to screed
Nickfromwales replied to Post and beam's topic in Underfloor Heating
That the stuff from Wunda? Yup, I let out the same amount of chocolate milkshake when I forgot this too, and chopped the end off to connect to the manifold lol. -
Plasterer will scrim over that and just flick a bit of skim into that joint before laying on. Chillax. All good 👍. You deserve a medal for that D&D work too, last company I saw D&D’ing were using about 6 dabs per board….. just truly shocking standards.
-
Running hep2O in insulation below screed?
Nickfromwales replied to daunker's topic in General Plumbing
Agreed, if a bigger house and you want to save on pipe work. But the whole point of radial is to not have multiples of satellite T’s / connections etc, just a continuous pipe from A>B. Where are the T connectors for each room? Wall / floor / access panels? Buried and forgotten about? I’ve no issue with joints btw, I’ve fitted thousand, and will continue to do so happily, just the beauty of manifolds and radial plumbing seems lost if you don’t go the whole hog, imho. -
Maintain pressure prior to screed
Nickfromwales replied to Post and beam's topic in Underfloor Heating
If you need scuba gear then I suggest no more plumbing for you! lol. 😜 -
Maintain pressure prior to screed
Nickfromwales replied to Post and beam's topic in Underfloor Heating
Watch your back -
Maintain pressure prior to screed
Nickfromwales replied to Post and beam's topic in Underfloor Heating
Monsieur ? -
Maintain pressure prior to screed
Nickfromwales replied to Post and beam's topic in Underfloor Heating
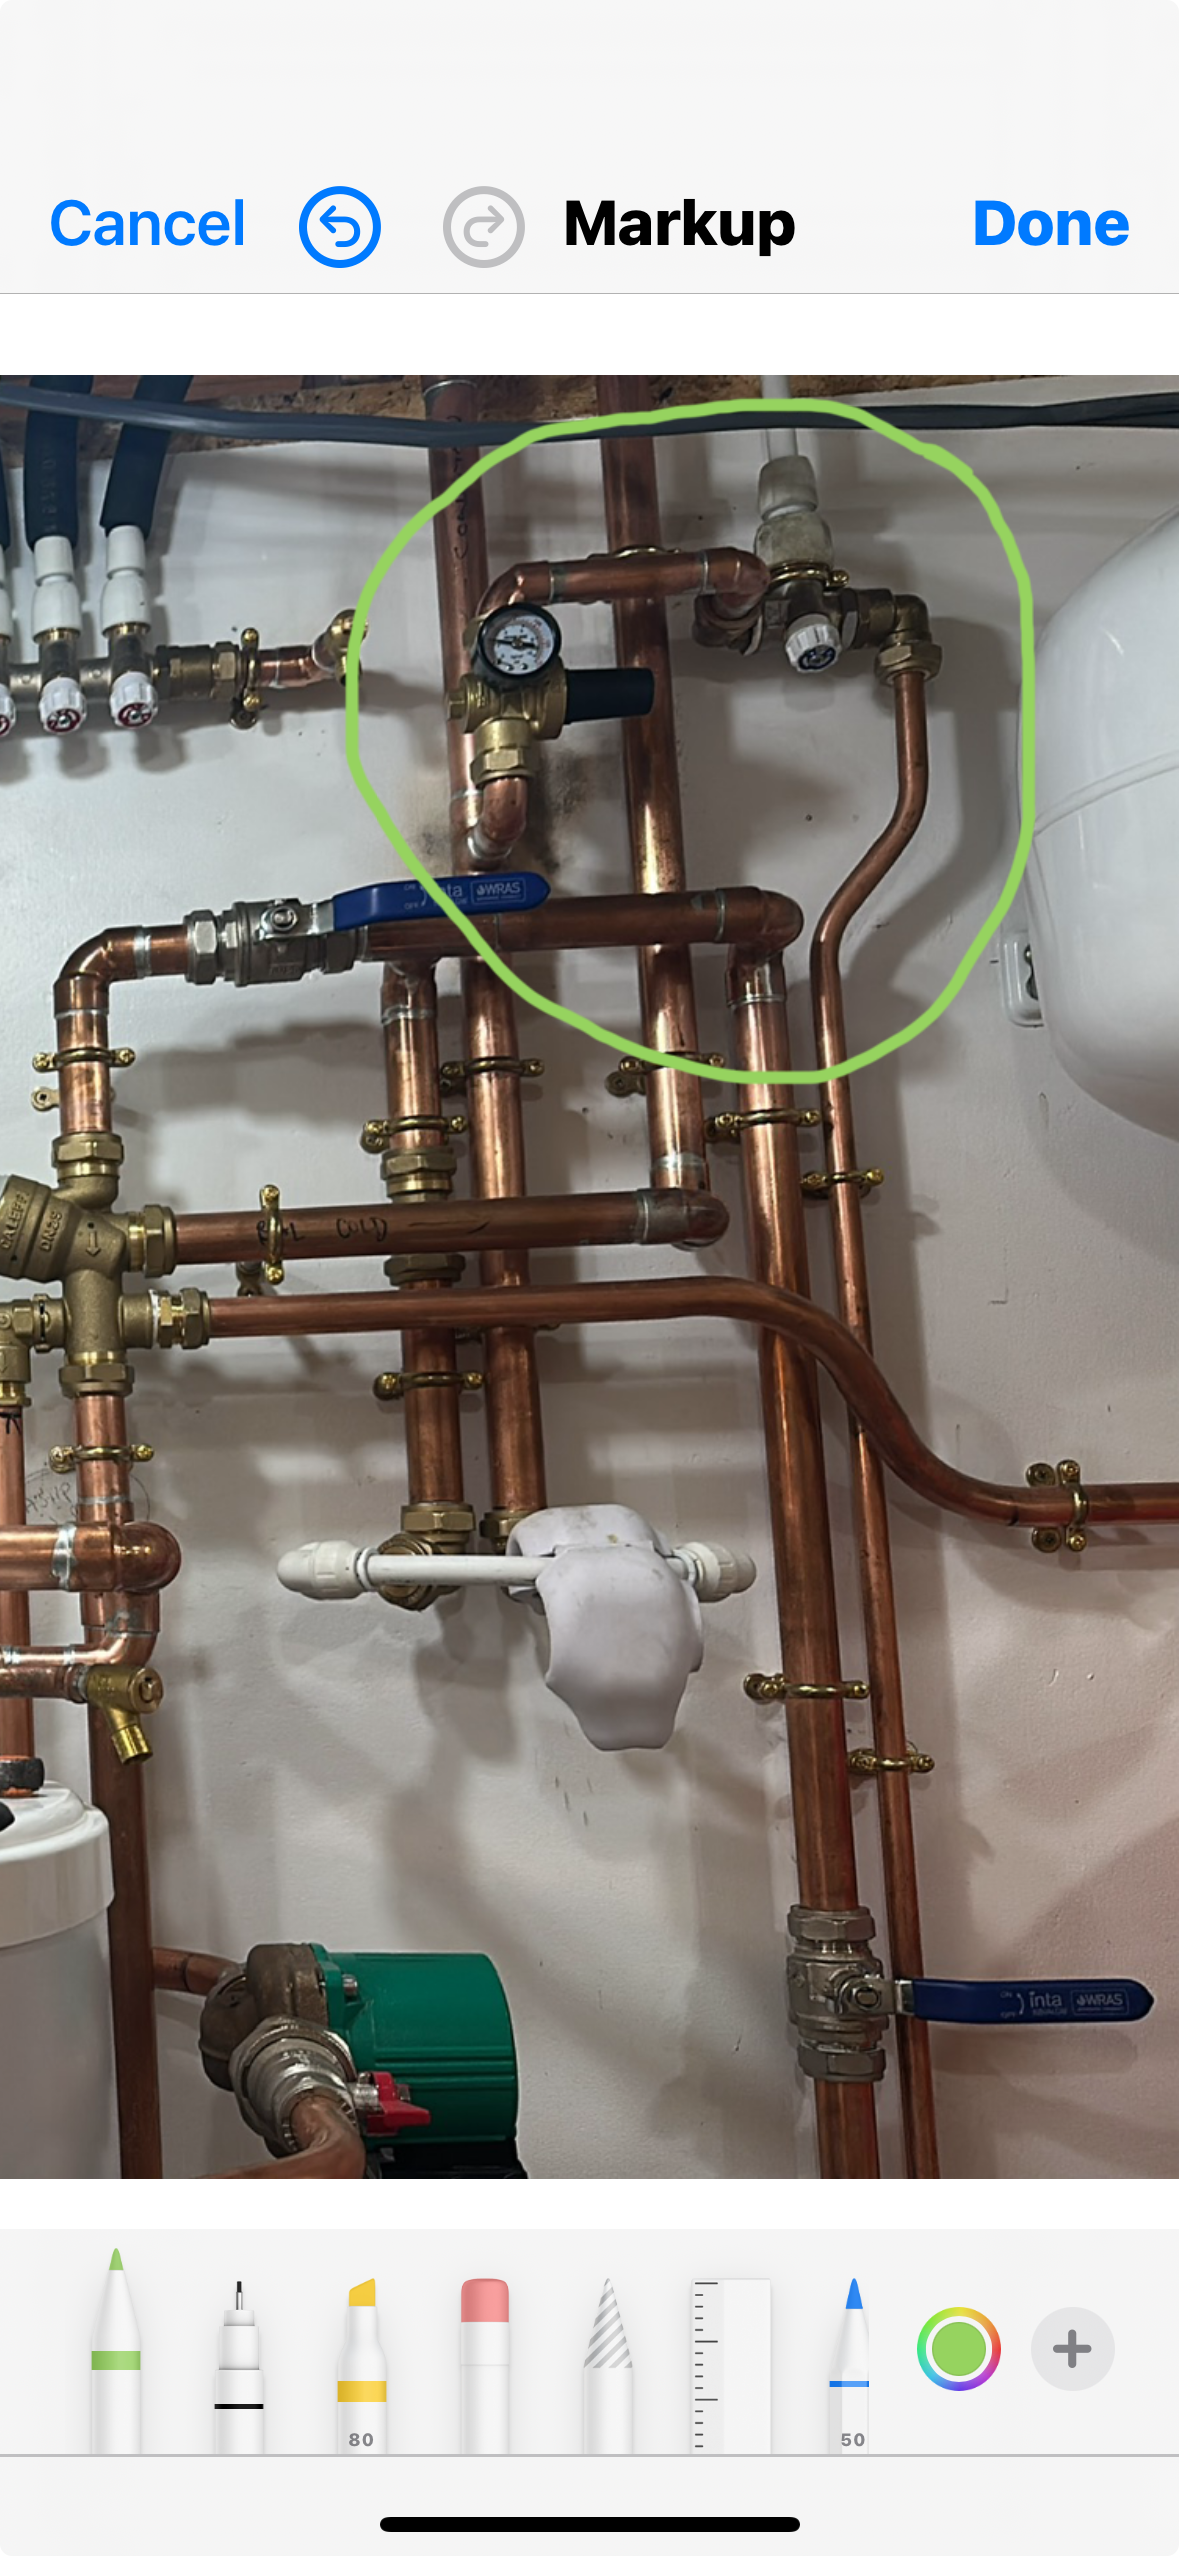
Me neither, I always take out the pressure gauge and fit a second bottle vent in the hole. Or extend a bit of push fit plastic pipe from the manifold to where you can access it without going full on Billy Elliot, with the gauge on the end of that, and a 1/4 turn tap to bleed off the rising pressure as the concrete cures. -
Maintain pressure prior to screed
Nickfromwales replied to Post and beam's topic in Underfloor Heating
I hardly ever pressure test tbh. The pipes (pert al pert) are pretty bombproof and you have to maliciously damage them to get one to leak. Been fitting UFH for a quarter century or more, never had an issue with getting pipe out of a box, on to a floor, and covered in the good stuff. MBC never bother either, iirc. It’s just bloody solid stuff and has an extraordinarily low failure rate (which is why it’s good to bury in the floor for the next 30+ years or more). -
Best way to attach wooden sill to timber frame house build
Nickfromwales replied to skeg0's topic in General Joinery
For eg Link We then bought 30mm oak stock and faced the 18mm stuff so that when installed it looked like 30mm thick oak sills were installed.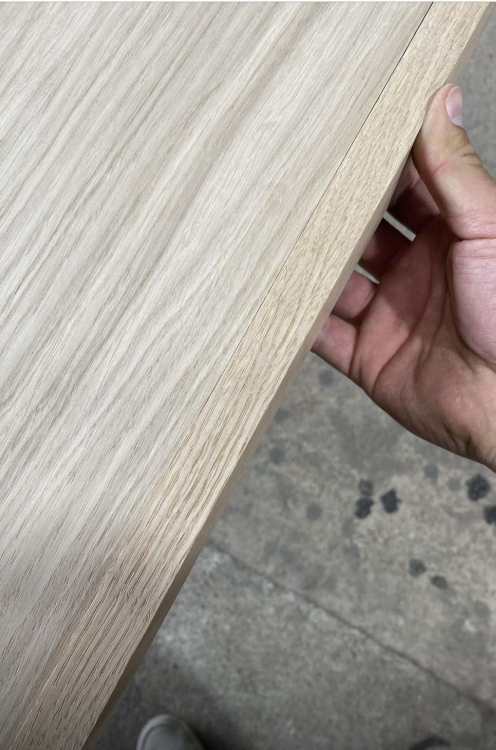
-
Best way to attach wooden sill to timber frame house build
Nickfromwales replied to skeg0's topic in General Joinery
If using those, not a hardwood, then defo seal the underside / sides as well, if not better, than you seal the faces. If not these will absorb moisture from the cavities. +1 for better bits of wood (sorry!). -
Maintain pressure prior to screed
Nickfromwales replied to Post and beam's topic in Underfloor Heating
The tester is the manifold gauge -
Maintain pressure prior to screed
Nickfromwales replied to Post and beam's topic in Underfloor Heating
Yup. Ideally you should be opening a pipe to atmosphere immediately prior to the screed going down, as when you’ve got a gauge installed it will usually meet its maker when the pressure exceeds its max set point and the needle snaps off. If you need it all pressurised for the pour then you can just accept the cost of a replacement gauge if that happens, a tenner or two at most. -
Maintain pressure prior to screed
Nickfromwales replied to Post and beam's topic in Underfloor Heating
Has it been wet or dry tested? Have the loops been purged through, eg so all the air got blasted out? You’ve not answered about the cap on the bottle vent. -
Maintain pressure prior to screed
Nickfromwales replied to Post and beam's topic in Underfloor Heating
Nobody will ever know Let's keep it between you and I. -
Maintain pressure prior to screed
Nickfromwales replied to Post and beam's topic in Underfloor Heating
We shall put that typo down to nerves -
Maintain pressure prior to screed
Nickfromwales replied to Post and beam's topic in Underfloor Heating
Let's be sure there's an actual problem first The biggest "oops" here will be a wet test done and then somebody simply forgot to pinch off the cap on the AAV. The air in the loops then rises to the manifold rail and ejects itself, resulting in a drop in pressure. If you had a significant leak there would be zero pressure on the gauge right now. -
Maintain pressure prior to screed
Nickfromwales replied to Post and beam's topic in Underfloor Heating
That's the best reply any stranger can offer to a random guy on the internet at this time of night. Is the cap on the automatic air vent open or closed? It's the thing that looks like the air cap on a car tyre. Can we have a better pic of the whole manifold?