Temp
-
Posts
10641 -
Joined
-
Last visited
-
Days Won
43
Everything posted by Temp
-
Can you put a regular switch on the wall outside? If the wiring is already done perhaps these wireless switches.. https://www.tlc-direct.co.uk/Manufacturers/Quinetic/index.html?ad_position=&source=adwords&ad_id=642283137569&placement=&kw=quinetic wireless switch&network=g&matchtype=b&ad_type=&product_id=&product_partition_id=&version=finalurl_v3&gad_source=1&gclid=Cj0KCQiA6vaqBhCbARIsACF9M6kiZcjq6JtX4GowmQxXTYmfY9EYOxW5HPzGHAg4qD98fqh93JnhLOsaAuP2EALw_wcB Powered by the force of your finger I believe.
-
https://www.nature.com/articles/d41586-023-03595-1 A prototype, described in a study published last week in Science1, uses electric fields and a special ceramic instead of alternately vaporizing a refrigerant fluid and condensing it with a compressor to warm or cool air. The technology combines a number of existing techniques and has “superlative performance”, says Neil Mathur, a materials scientist at the University of Cambridge, UK. Continues..
-
Remember to turn your level 180 and check again in case the kids have used it a baseball bat.
-
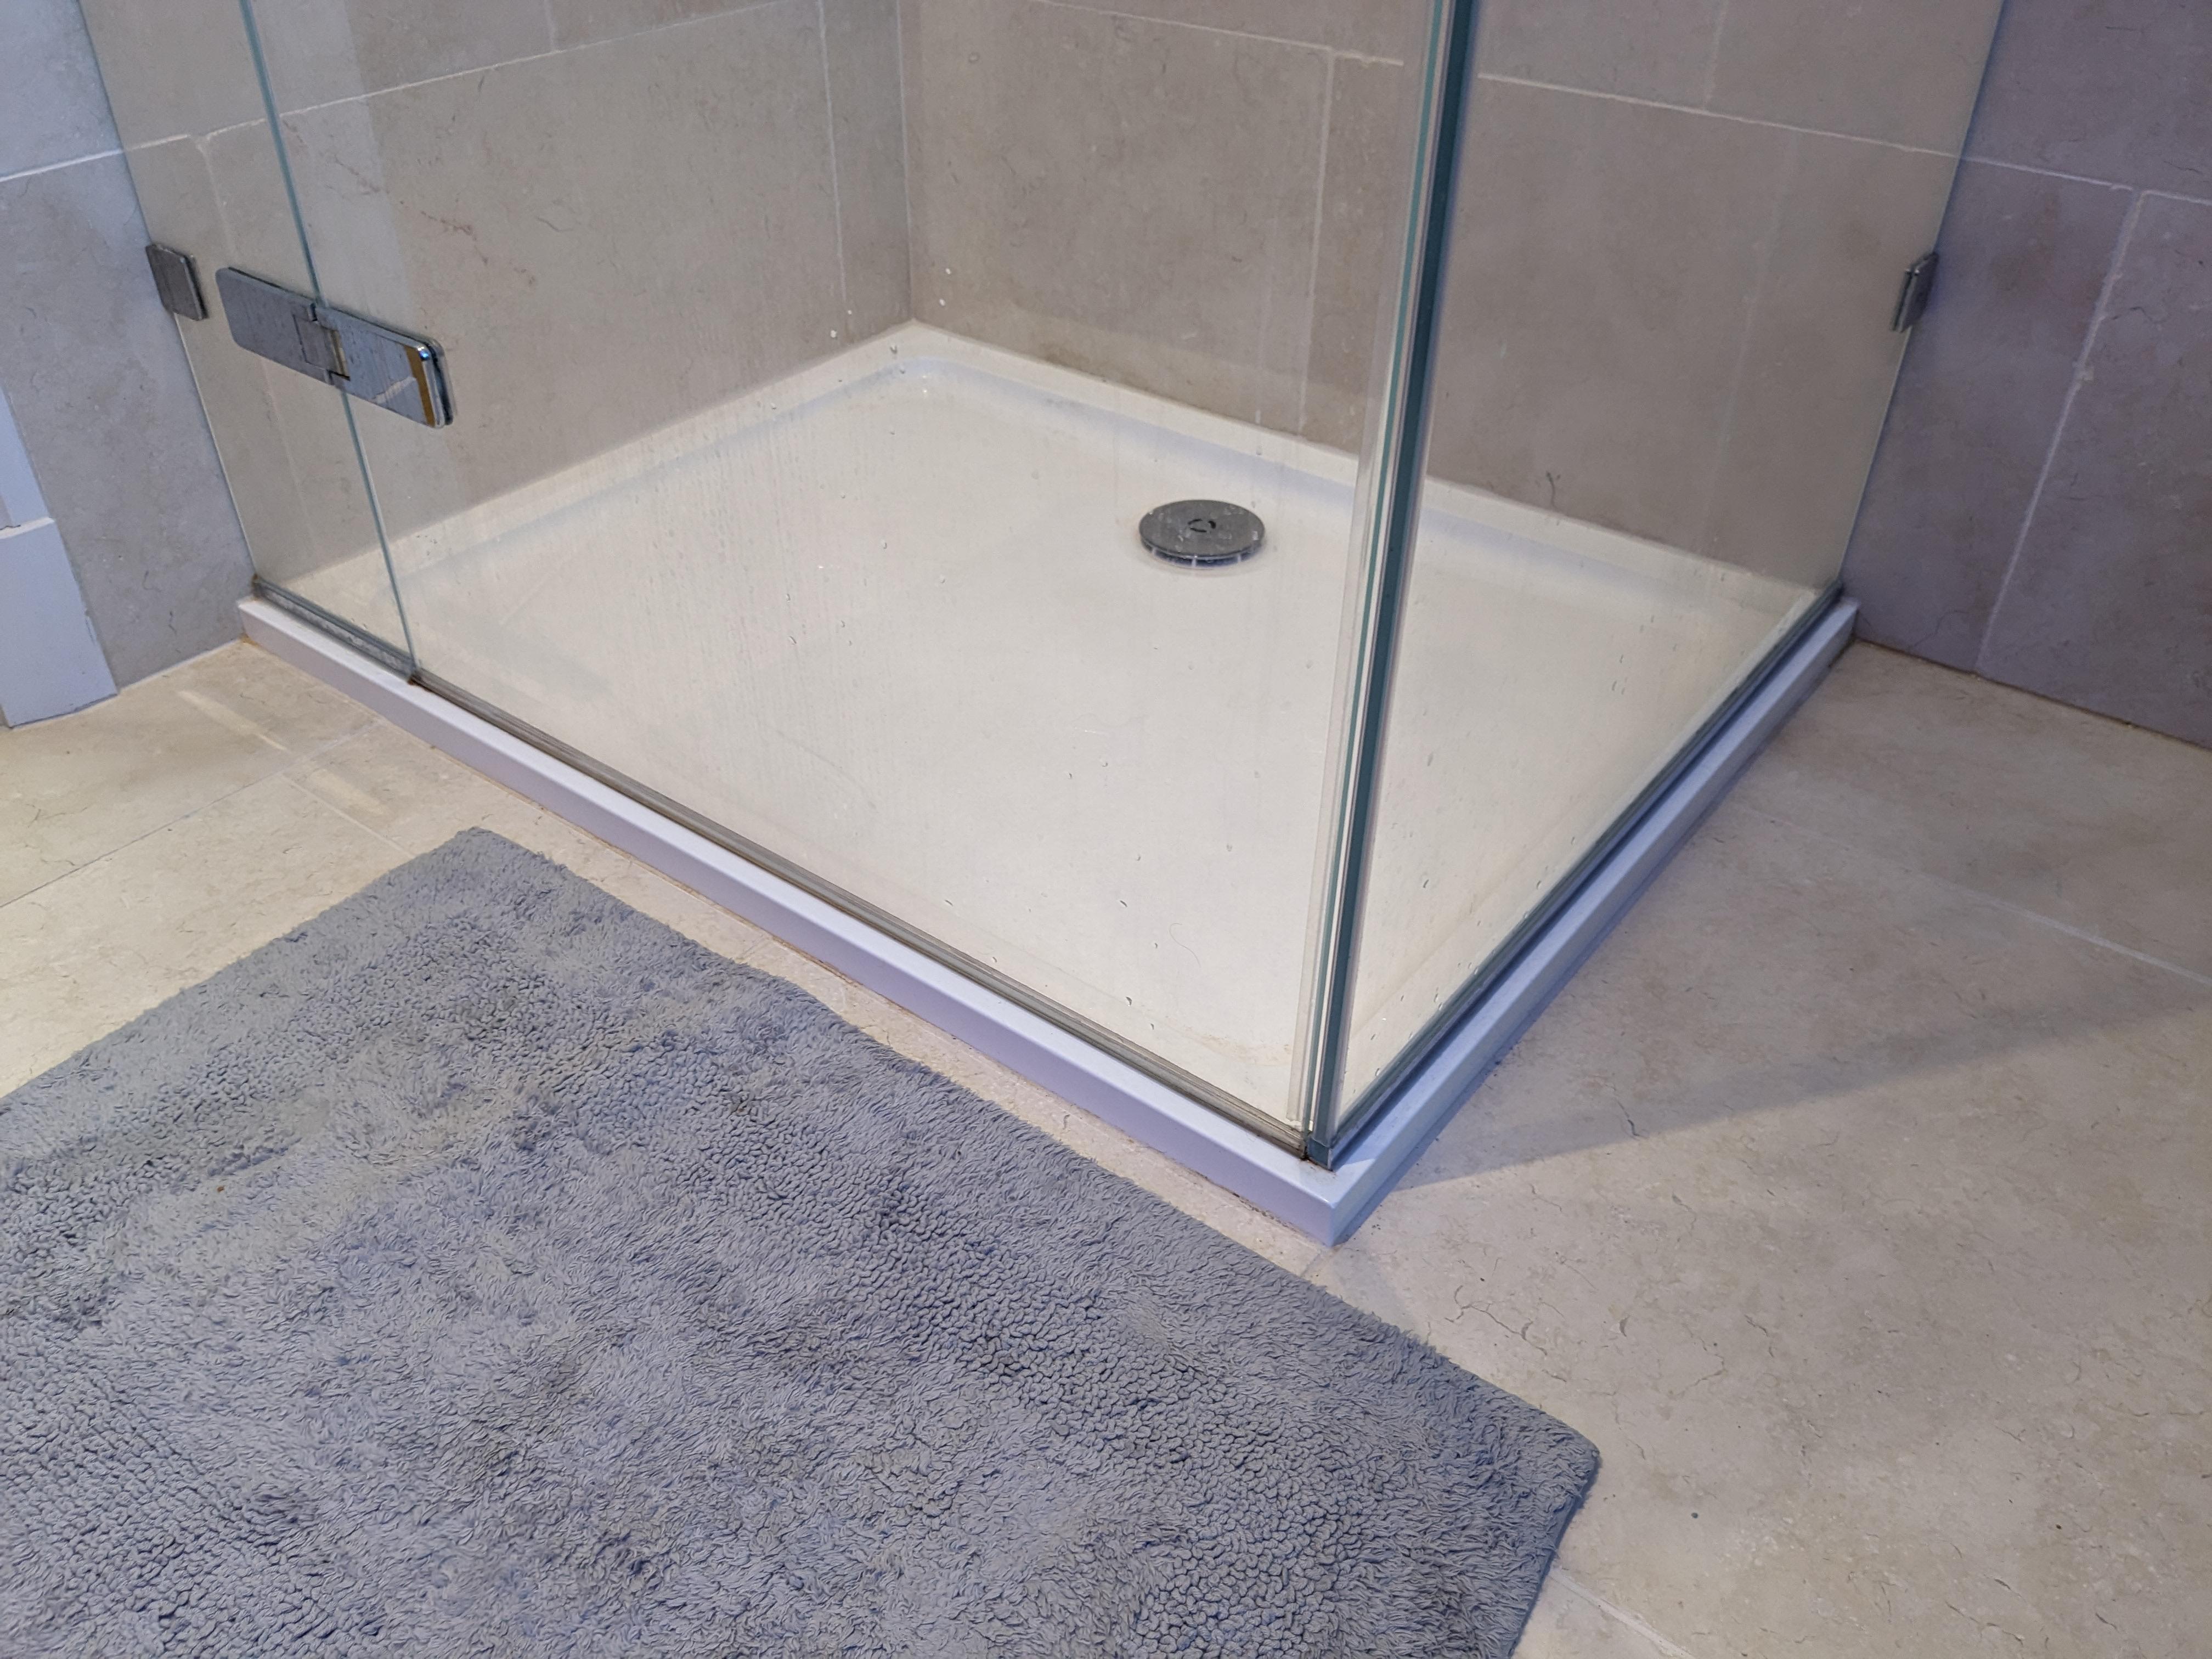
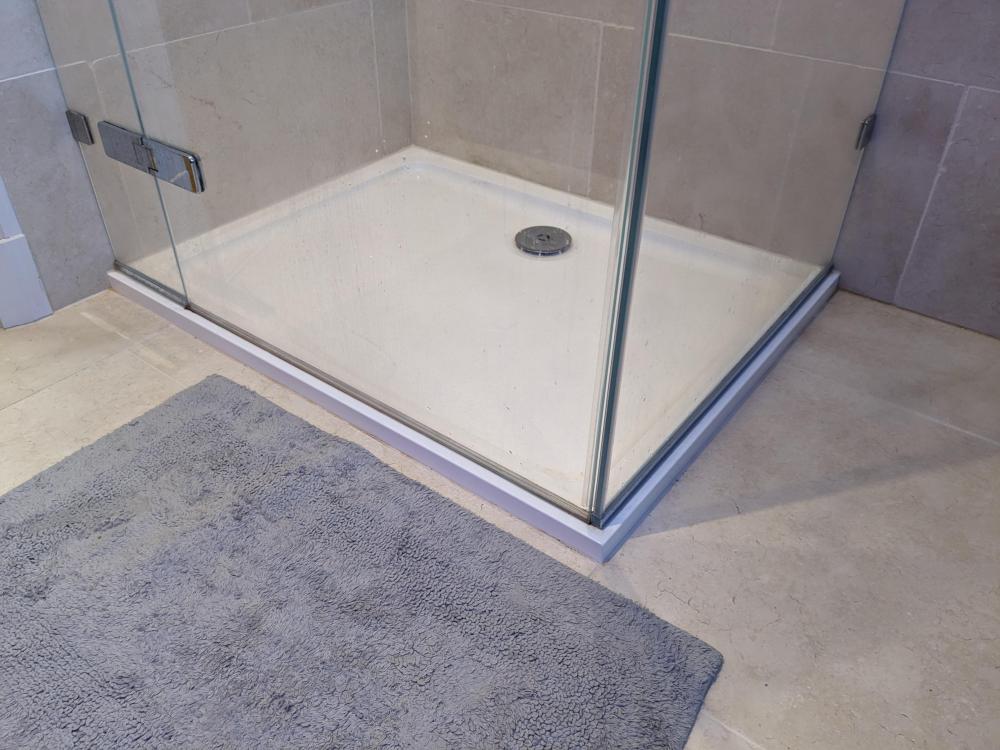
To fit our shower trays we removed a section of insulation under the tray. Then dry fitted the shower waste pipe and the lower part of the trap so it's in the right place. This was loosely supported in position at right height but in a way that allowed it to move vertically bit. Then fitted a frame of pressure treated 2*4 or similar and 18mm WBP ply to support the tray at the right height. The WBP had a clearance hole in it that allows the trap to sit at roughly the height of the top of the WBP/underside of tray. It should be possible to pull the trap up about 0.5" further to allow for the thickness of mortar/adhesive used to fix the tray down. Test you can fit the tray and screw the top part of the trap through the hole into the bottom part. Remove tray and plywood and glue up the pipes. Replace plywood and put rags in trap to stop debris getting in. Screed floor to top of plywood. Fix tray (with mortar/adhesive) and immediately screw in the top of the trap to be sure you can before adhesive sets. Check it level. The heights need to be planned carefully to take into account of the screed and tile thickness plus fall to the drain. It's a bit different for a linear drain but a similar amount of planning and prep is needed before screeding.
-
Our bathroom have some boxing along the wall below window sill for the concealed cistern. Either side we have an access hatch which houses isolation valves for basin/WC and shower. As that's where the split/joints are. Also has the "horizontal" 110mm run for WC to stack.
-
We also have B&B first floor but used 50mm insulation. You can run water supply pipes in the insulation but best sleeve them with conduit. Maintain insulation on hot pipes. Can also run them up walls in slots cut in block work, we did this for wall mounted basin taps. If you have lots of space you can even build a false wall/service void with battens and Hardi backer board or similar. Waste pipes need a fall on them which will mean they need to run in both insulation and screed. 50mm diameter pipe is recommended. If you want a wet room or low profile shower tray (eg walk in with no raised plinth) the waste pipe to the trap needs special planning and prep before screeding. It might even need to go through the floor and run to the stack in the ceiling of room below. Our's didn't... More info on request.
-
If it doesn't work I'd follow @Adrian Walker suggestion and use the reed to switch the power to the coil of a 230V relay. It says the reed should be enclosed so put both in one box.
-
Buffer tank on heat pump - element not heating
Temp replied to townlema's topic in Boilers & Hot Water Tanks
Darn it, arrested by the unit police. Guilty as charged your honour 😄 -
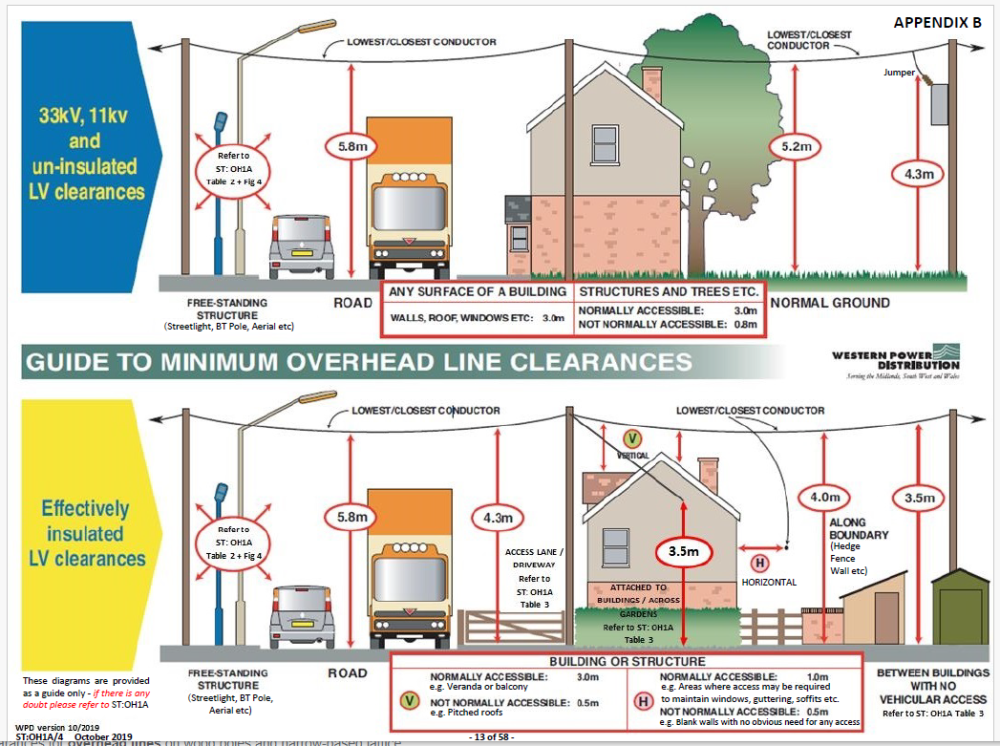
Not familiar myself but it could be they are correct. I found this which suggests 0.5m or 3m between cable and roof... 0.5m clearance for roofs not normally accessed. 3.0m for accessible areas like balconies Page 11 says "Solar panels should be treated as normally accessible objects as per Item 1 of Table 2 in ENATS 43-08 or, where WPD is building or refurbishing a line over an existing solar farm, Item 2.1 of Table WPD 2 in Section 4 of this document." https://www.nationalgrid.co.uk/downloads/63817
-
John Lewis sell a double dishwasher in a single unit. So you can take plates from one, use them and put them in the other. Probably ok for a single person in a small kitchen? Kids wont remember which is the clean/dirty half. https://www.johnlewis.com/fisher-paykel-double-dishdrawer-built-in-dishwasher/p3096098
-
https://www.voltimum.co.uk/articles/technical-guide-installing-cooker-circuit
-
I think two single runs in 10mm one to the hob and one to the oven area would be normal. The 10mm^2 would be terminated at the oven/hob end with a accessible Cooker(hob) switch and a Cooker Connection Unit (faceplate/junction box thing). Run a 2.5mm ring to sockets as well so you can choose later if you want to hard wire the oven to the 10mm^2 or just plug it into a socket.
-
Depends on the distances and load but yes the 10mm would be for an electric hob or combined oven and hob. Many Electric ovens (without rings/hobs) only need 2.5mm^2 and quite a few are supplied with a plug to suit standard socket.. 2.5mm is for sockets (ring mains effectively have two 2.5mm^2 in parallel as power flows both ways around the ring). The 1.0mm^2 is for lighting but some people prefer 1.5mm^2 as I think it can be covered with insulation without derating? However with LED lighting I don't think that's the issue it once was.
-
Buffer tank on heat pump - element not heating
Temp replied to townlema's topic in Boilers & Hot Water Tanks
If I've done my sums right.. 4.5kW = 4500J/S Water needs 4200J to raise 1L by 1C or 100L by 1/100th of a degree. So with no heat being removed/lost I would expect a temperature rise for the whole tank of about 1/100th of a degree per second. Perhaps a bit faster. So a 10C increase would take about 1000 seconds or 15-17 mins. A 50C increase from 10C to 60C would take about 75-85min. If any energy is being taken out at the same time that could extend the warm up time dramatically. -
Did the architect specify any straps linking the rafters on one side to the other over the top of the structural ridge? Perhaps not needed as you also have structural purlins as well but perhaps check. Edit: Ah I see @ProDave already raised this.
-
I think 70cm gap between island worktop and cabinets on right in the "photo" is a bit small?
-
Decoding information from, well, code between glass panes
Temp replied to Garald's topic in Windows & Glazing
Are all those numbered 24 the same size so they can go anywhere where that size is needed. Ditto the 25? -
Decoding information from, well, code between glass panes
Temp replied to Garald's topic in Windows & Glazing
Yes....This pdf in polish has similar format numbers at the bottom.. SAINT-GOBAIN GL.JAR 01/03/2019 SGG Climaplus 3190372/15 https://glassolutions.pl/sites/glassolutions.eu/files/2020-12/KARTA%20ODBIORU.pdf Zlecenie and Pozycja in the boxes translate as job and position. -
Decoding information from, well, code between glass panes
Temp replied to Garald's topic in Windows & Glazing
Since it's got dimensions the 3626391/24 could be an order number and pane number. Eg pane 24 and 25 of order 3626391 ? -
Drilling joists and other supporting structure.
Temp replied to andreas's topic in General Structural Issues
Google where to drill joists. Should find a drawing showing zones where you can drill from the ends and hole sizes...
-
Decoding information from, well, code between glass panes
Temp replied to Garald's topic in Windows & Glazing
Google found this pdf but I don't think it helps any. Not enough info on the lable you have? https://nl.saint-gobain-building-glass.com/sites/saint-gobain-building-glass.com/files/2019-10/CLIMAPLUS_BRO_BENL.pdf -
Yes that's correct. The membrane should drape/sag about 25mm between rafters leaving 25mm air gap. Should be ventilated at ridge and eaves. The drape is to stop water pooling above battens causing them to rot.
-
+1 It essentially just a capacitor. You wire it in parallel across any light fitting. Normally only need one even in a room full of down lights. 10 min job just don't pull all the wires out and forget where they go 🙂
-
Whatever it is it's crap. Looks like 2nd hand/used shuttering plywood. Should be at least 18mm thick but I prefer 21mm. Check the joists are the right dimensions for the span first.
-
In most cases it's caused by the capacitance between live and switched live in the drop from light or junction box down to the switch. Power effectively bypass the open switch to get to the light. With old incandescent filaments their resistance is low enough that the switched live is effectively shorted to neutral by the filament. With LED bulbs that's not the case. One solution is to put a resistor across the LED but that would burn power when the switch is ON. A capacitor in the same place still burns a little power but I don't think it's metered as it's reactive power? I might be wrong about that. I suspect there are folks on eBay selling magic capacitors to fix the problem but you can buy a general purpose capacitor more cheaply. If I remember correctly it's a 0.1uf class X2 but can't swear to that.