
ProDave
-
Posts
30861 -
Joined
-
Last visited
-
Days Won
427
Everything posted by ProDave
-

Water installation quote. Seems excessive.
ProDave replied to flanagaj's topic in General Self Build & DIY Discussion
That is more or less what I did with my electricity connection. -
Looking at that drawing above. What height difference if any is there between the treatment plant and the soakaway? Can you add to that drawing or produce another one showing what happens at the "output" of the soakaway, including levels of important features.
-
Two points here. The 2 houses feeding this with septic tanks should not do that any more. But sadly SEPA don't seem to care about old non compliant systems. So on the face of it you have a soakaway and rubble drain acting as a partial soakaway and ending up in a burn. So in theory this should never back up to the point of flooding the treatment plant. So something is wrong with the levels when it was installed that is causing the plant to flood, or something is blocked. THAT is what you need to concentrate on finding, what is the weak link in this that is making it possible to back up. Probably an unpleasant job of paddling about in wellies next time it does back up to work out where the problem is. It surely should not be hard to sort out when you have found it. With an eventual destination of the burn, it should not normally back up.
-
Bulk water needed, cost advice please
ProDave replied to Post and beam's topic in General Self Build & DIY Discussion
Fred Dibnah was on television several times filling his boiler from them and telling us it was illegal to do so. I wonder how many times he got fined? -
Can you post an actual model number of the thermostats, there must be something on them somewhere?
-
Renovating 1900 house. What keeps up this landing?
ProDave replied to Gina_Violet's topic in General Structural Issues
A friend of mine bought a house like that. He had a survey during the buying process and the surveyor warned the corner of the landing like that was cantilevered from the rest of the building and was a structural defect. My friend of course answered, well it has not fallen down or even moved in the last 60 years so I think it is okay. -
It sounds like an RF interference issue, or the non working stat has become faulty. Does the manual say what frequency they operate on?
-
Connecting up a static caravan basics!
ProDave replied to Amateur bob's topic in Self Build Mortgages
Yes I too fitted a pressure reducing valve to protect the (not fit for purpose) lousy plastic pipes and fittings used on my 'van. -
That has narrowed it down. Are the wireless stats mains or battery powered? If battery can you physically move it closer to the WB9? Have you checked the state of the battery? how far away is it? Any thick walls in the way? Any NEW equipment added like new wifi router?
-
Replace with your own system assumes you have enough land to do that. Often a shared system is because you don't, especially if they have bodged the soakaway. I am hoping @BigYin will come back and tell us more please.
-
If it is condensation, then I would expect it to have dried out completely over the summer as the walls will not be cold enough to be below the dew point. Do NOT invite a "damp specialist" around. I have yet to hear a good outcome from that.
-
How does that work? Do they fit a separate meter for the heat pump? It sounds like hark back to the "total control" tariff that gave cheap rate 24/7 for heating appliances but that had it's own meter for that.
-
Can you clarify is the floating corner the bottom string going down to the ground, or the upper string going upstairs? If the downstairs one as the drawing suggests to me, then the dod leg stringer joint will be in compression so the hidden fixing might be less difficult, but that will rely on the bottom of the stringer being properly fixed to the floor so it can't move and spread outwards.
-
First thing to check is on your WB9-RF when a zone calls for heat is the LED on the controller for that zone light up? If not the problem lies with the TF thermostat for that zone. If the LED is light up, the RF thermostat is working, next check is the manifold pump running? Is the 2 port valve for the UFH energised? Report back.
-
Fit another door frame inside the one that is there? Will the architrave cover both if you do that? Do NOT use the same joiner again. I would be asking why HE made a unilateral decision to fit non standard frames thus forcing you to buy non standard doors. and suggesting the easiest way to remedy HIS mistake is for him to come and convert them to standard size at his expense. 2040 is the tallest "normal size" That is what we have from XL Joinery, very good doors. It sounds to me like he did not think, he fitted door frames to fit the structural opening which is usually over sized, rather than fitting standard sized door frames with appropriate packing to fit the opening.
-
I suspect the only way is a steel structure hidden behind the stringers to give the strength. To me is seems a lot of extra work to avoid one newel post going down to the ground at that corner.
-
Post some pictures of your wiring centre and the UFH manifold and in particular did they install any 2 or 3 port motorised valves when fitting the system?
-
What type of render? That air brick needs cleaning off and the holes unblocking.
-
You can buy a complete air blower pump for not a huge amount, this one seems common in treatment plants https://www.ebay.co.uk/itm/296023440964 A new SWA cable will sort out your electrical woes, even laid on the surface until you can bury it. BUT until you solve the drainage field issue, it will continue to flood, and when it floods is when the raw sewage can float over the normal weir separating input and output. That is going to cost you money as you basically have to dig up a large area of land and re lay a proper drainage field separate to rainwater soakaway. Sorry to say you are picking up the fallout from the original builder that did not do it properly. It there a watercourse nearby? If there is seeking permission to discharge to that would be a much better solution. The people advising to change for a mechanical treatment plant are simply not understanding that the fundamental problem you have is a drainage field that cannot cope so it floods. Changing for a mechanical tank (not recommended) would only solve your problem if the drainage field was re laid properly as well. How old is the house? Did it come with any form of 10 year warranty? Is there a legal agreement to force the other house to share costs?
-
Connecting up a static caravan basics!
ProDave replied to Amateur bob's topic in Self Build Mortgages
I say you definitely need a plumber to sort this out for you, you don't want to be making a mistake and connecting water to the boiler gas supply, or worse, gas to the cold taps. There is probably a gas cooker as well. Following the pipe from that should confirm which is gas. If the WM tap is the gas pipe then the previous "plumber" is a cowboy. -
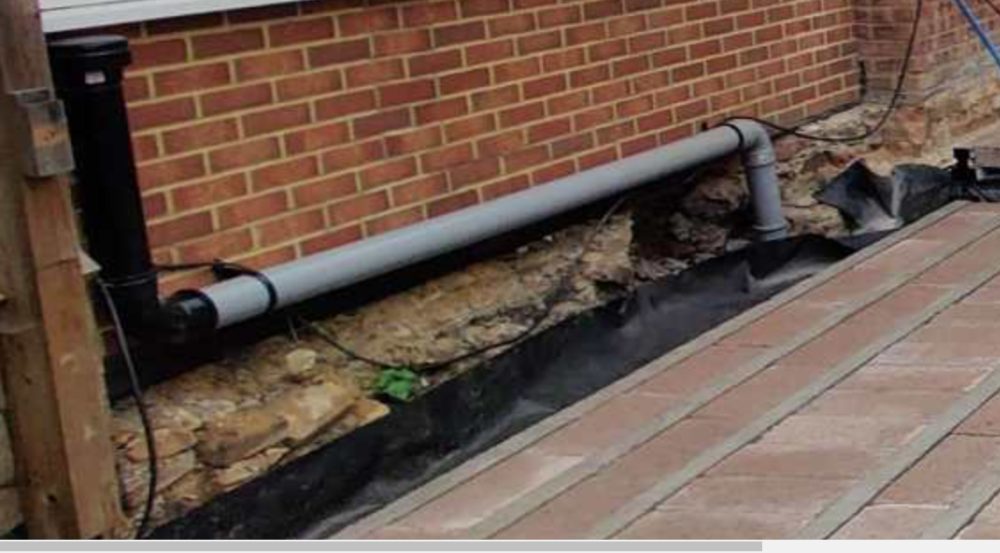
So just what is next doors conservatory sitting on? It looks like the remains of a dry stone wall or some rubble just piled up. Honestly that should have been sorted right at the start before you even laid your foundations. My suggestion is build some formwork and pour a concrete slab against all that rubble to stabilise it, but whatever you do it needs some prefessional input. Who's vent pipe and AAV is that? It will become inaccessible.
-
Legal Agreement to Self-Build
ProDave replied to Paul K's topic in Party Wall & Property Legal Issues
Or rather than argue the case, just pen a letter saying that you are self building and intend to live there for a very minimum of 3 years. It sounds like by sending this letter there will be no mention of CIL and all the hoops you have to go through for self builder exemption and none of the sully worry that if you do some "work" before the exemption is in place of having to pay the CIL. -
Connecting up a static caravan basics!
ProDave replied to Amateur bob's topic in Self Build Mortgages
A simple tap won't reduce the pressure, you need a pressure reducing valve for that. -
Connecting up a static caravan basics!
ProDave replied to Amateur bob's topic in Self Build Mortgages
Seeing your pipes makes me shudder. It is unbelievable where static caravan manufacturers source such horrible looking pipe fittings. The reason I shudder, on the first build I connected the water, and then one by one over the next few days each of those cheap and nasty plastic fittings burst as they could not stand our high water pressure. That van I completely re plumbed with all internal above floor pipes. If you last picture is the water connection your first task is find a fitting to join onto that as they have not even left you the nut. So more likely replace that tee. Bit it should be easy to check where the pipe going up through the floor comes out above and what it connects to. It is equally possible that is another drain off point. Your first picture also has a similar connector, also missing it's nut. You would not normally have two separate cold water feeds which makes me certain one is another drain off point. The waste water as well as the small pipe for sink drains you will have the larger pipe for the WC waste. A little waste water plumbing is needed here. If that is your gas connector, I would get a gas safe engineer to check it out. It looks like they had a hose from that to a regulator on a single bottle. The washing machine tap won't be gas that could well be the water in, though it would be unconventional. Do you know a friendly plumber, whoever disconnected it from the last site had no regard to anyone wanting to re connect it. -
MVHR for passive or do I need this?
ProDave replied to Nic's topic in Mechanical Ventilation with Heat Recovery (MVHR)
That spec appears to be the normal trickle vents and individual extract rates for a house without mvhr. Once you choose mvhr all those trickle vents and individual room extract rates do not apply and you design the mvhr to a different set of constant flow rates that are also listed in building regs.- 1 reply
-
- 1
-