MikeGrahamT21
-
Posts
1919 -
Joined
-
Last visited
-
Days Won
2
Everything posted by MikeGrahamT21
-
My personal preference is to wet plaster with bonding coat and then multi finish but it does take time to dry, I’ve never been a fan of dot and dab, too much that you can’t see can go wrong
-
So anything which has the potential to move and crack needs it, so think along the lines of wall plate timber against blockwork interface, this needs the liquid membrane as the materials will expand at different paces and inevitably crack, a stretchy liquid membrane will sort this permanently. Covering with airtight membrane from the roof could lead to air getting behind the membrane.
-
Liquid membrane on all junctions, parge coat on the rest
-
Assuming the downlights are LED and not halogen, there is no danger per se, from the wiring perspective, but the bulbs still get hot, and whilst not enough to burn it can shorten their lifespan. Loft Legs to a lid, a plastic housing which you put over the down light and silicone to the back of the plasterboard for this application, and also keeps things nice and airtight, if that’s what your going for
-
As I do, I know some of you use ModernUPVC for your windows since it seems the only place where you can spec yourself online. they’re running a free upgrade to triple glazing offer up to the end of the year, of absolute no use to me as I’ve already done all mine, but hopefully will be useful to someone https://www.modernupvcwindows.co.uk
-
https://www.bbc.co.uk/news/business-67708077
-
From memory i think its SBR bond you'd need in this case, sure someone will come along and confirm
-
Condensation in the unit
MikeGrahamT21 replied to Coanda's topic in Mechanical Ventilation with Heat Recovery (MVHR)
Drain goes in the extract chamber, which has the fan to suck the air in and blow it outside, so on the cold side of the heat exchanger, usually bottom left in most units. -
I was thinking more along the lines of this stuff: https://www.windowfilmsuk.com/product/sl50-osw-window-film/
-
MVHR can help, but it will only be slight, you can get units which fully bypass the heat exchanger to bring in the cooler air overnight, but as the air flow speeds are so low this is a minimal effect. I too have a bungalow and find it best if i can drag myself out of bed early enough, to open a bi folding door which is at the back of the property, and some velux windows which are at the front, even just a tiniest breeze and the house becomes like a wind tunnel, funnelling all of the heat back outside, then as soon as the temperature charts on my sensors level out and i've lost all the heat i can, everything gets shut again which keep things manageable. The problem is when we get consistently hot days and warm nights, thats when AC would come in very handy. Window shading is a very good option, all of my velux windows have awnings on them to limit the amount of heat coming in, and the window film i have had a sample of before, but make sure you get external window film (its rather expensive!) to stop the heat entering the pane altogether, and there is solar control glass too which is another option, neither of which should change your view too much
-
if it stops radon gas coming through it’ll definitely stop any water vapour passing through it. in what situation are you using this barrier? I’ve used radon barrier as above underneath oversite concrete, and everywhere else used a combined air and vapour control layer such as this https://www.roofingsuperstore.co.uk/product/barriair-vapour-control-layer-air-barrier-by-protect-15m-x-50m.html?gad_source=1&gclid=CjwKCAiApuCrBhAuEiwA8VJ6JjllfP_hI4URp9992b8XIkJ_q9BRbxq9iNkRywsDBMsJ5qNL4jbmPxoCjLoQAvD_BwE also seen this product in stock - https://insulationwholesale.co.uk/polythene-vapour-control-layer-1200g-4m-x-25m-green/ but definitely depends where it’s to be located
-
The biggest issue for me, is that they are working for themselves, they are building essentially without a customer. They are building the houses to their own spec, and hope that someone will buy it on completion, which of course they will. It could even be a case of voting with our pockets, if no one buys them, they won't build them that way anymore, but thats not going to happen either. I've worked on quite a few sites over the years, building new schools, and they are very strict on air testing, I remember one in the north east where they failed the air test, and it was a big big deal, it had to be sorted, because the contractors were employed to build for the local council (was one of the last local authority builds i did).
-
When you get to 1200ga thickness, it becomes known as a Radon Barrier and DPC in one: https://www.toolstation.com/radon-barrier-300mu-1200g-gauge/p78204
-
My BCO who is the head of the local authority department, didn’t even know what MVHR was. Pre plaster inspection and he said “what on earth are those pipes for!?”, followed by “oh yeah your doing that, what’s it called aren’t you”. he doesn’t even understand half the stuff I’ve done, just signs it off
-
Seen a fair few videos of mastic guys going on site, the site manager asking them to bodge something to pass the CML, only to afterwards rip out whatever it was and finish it properly with trims, but then they don't know whether its airtight or not. The fact new homes are built like this, especially one badged up to be super eco, unfortunately is of no surprise. It is seriously disappointing however. Big house builders have no desire to build eco homes, they just want max profit to please their shareholders and board.
-
yes, I forget which exact type I used but yeah it was just standard PEX pipe
-
Insulating 16mm Pex-Al-Pex pipes
MikeGrahamT21 replied to RichJ's topic in Central Heating (Radiators)
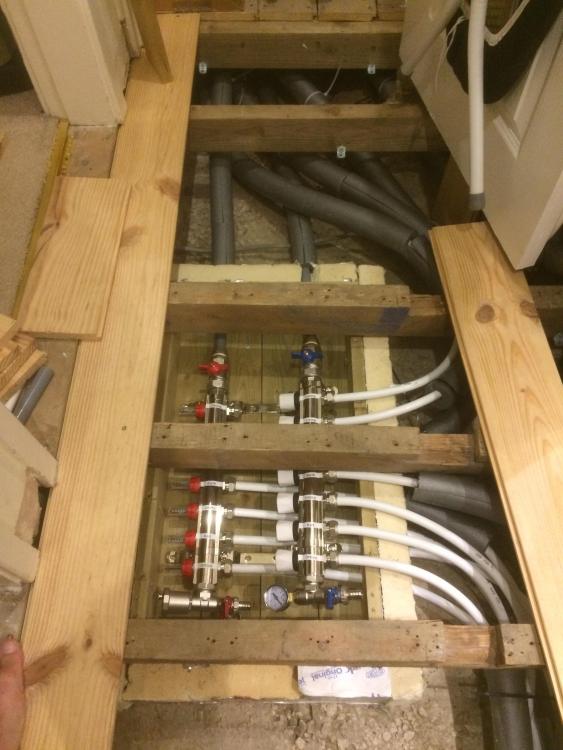
yeah, stainless steel, not had any issues, was easy enough to install even in the tight space I had for use (under the floor in a small hallway). Found this from an old PM: I found from the kit I used there were 2 types of cone, one which has a double seal on the opposite end to the 16mm connection and one which has a single seal, the single seal ones fit perfectly in a 15mm TRV thus converting it to 16mm without any hassle. some very old photos too before I finished the floor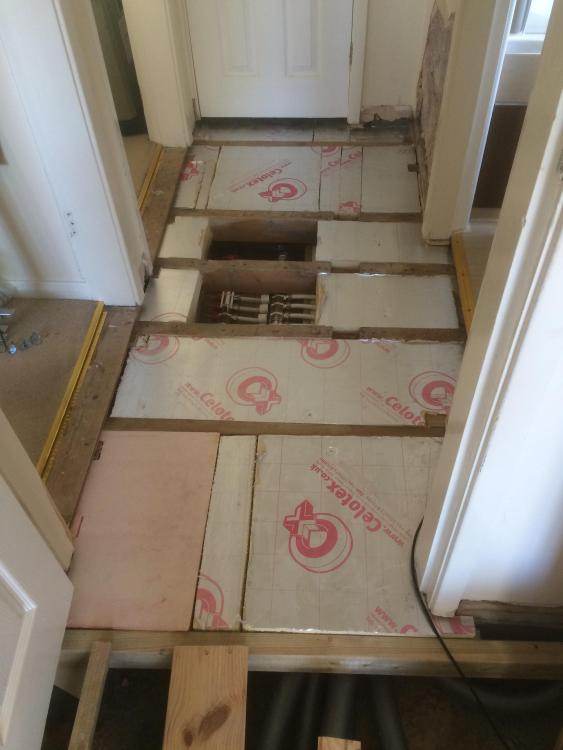
-
not had any issues though lowest pump speed I’ve set is 80%. yeah it’s all 16mm to rads, and then 22mm plastic both from and to boiler with the last 2m in 22mm copper. If you can make 25mm work, it wouldn’t be a bad thing with heat pumps in mind, and then just a brass converter to bring it down to 22mm to fit your boiler pipework
-
Insulating 16mm Pex-Al-Pex pipes
MikeGrahamT21 replied to RichJ's topic in Central Heating (Radiators)
I used cable ties at regular intervals to keep it a tight fit all along. all my stuff came from psw trade suppliers, the eurocones (brass coloured) have just one external sealing ring, making it a perfect fit for a TRV - https://pswtradesuppliers.co.uk/brass-compression-fittings/92-117-16mmx34-eurocone-adapter.html#/39-pack_of-1 another bonus is no press fit, it’s all compression but works an absolute dream. -
Insulating 16mm Pex-Al-Pex pipes
MikeGrahamT21 replied to RichJ's topic in Central Heating (Radiators)
If you get the right eurocones as I did after a few trial purchases, they fit directly in a normal TRV and lockshield, so no messy conversions -
Insulating 16mm Pex-Al-Pex pipes
MikeGrahamT21 replied to RichJ's topic in Central Heating (Radiators)
you posted just at the right time! 😂 -
Insulating 16mm Pex-Al-Pex pipes
MikeGrahamT21 replied to RichJ's topic in Central Heating (Radiators)
Just use the stuff for 15mm, it’s just a tighter fit, that’s all I used, thick walled 15mm ID climaflex 👍🏻 -
Consider taping a piece of VCL on the loft door hole to stop it going up, just as a temp measure, and get that heating on full whack, windows on vent, dehumidifiers running max, you’ll get there!!
-
Don’t forget to price in some form of flyscreen too, for the size you said could be upwards of £2k. not sure how big upvc ones go, but I have Liniar modlock, triple glazed, which cost me around £2800 8ish years ago
-
If it’s trapped in between the PB and VCL insulate as it’ll raise the temperature and allow the moisture to evaporate again, remember moisture will go for the coldest spot. have you determined the cause of the moisture making it into the loft itself? apologies for the panic, I think most of us have been there! At least as it is you have opportunity to rectify the situation, just needs fast action. drawing 5l per day is something but won’t get on top of it, there will be hundreds of litres to come out.