


Weebles
-
Posts
399 -
Joined
-
Last visited
-
Days Won
1
Everything posted by Weebles
-
Ply looks good and would be able to be finished nicely. I guess we could shove some insulation behind it in the gaps. I also found this bendy plasterboard: https://vcut.co.uk/services/flexiboard/ Anyone used this stuff?
-
Today our roof lights were installed. We are pleased with the finished product and how they fit. The blue sky and sunshine helps of course. Almost helped take the edge off the unexpected contract lift costs (£1380 in the end, but we have managed to avoid the additional VAT and we got him to lift some roof trusses off the scaffolding which saved a job). Their man on site today admitted that it had taken a long time to get to this point. Not wrong! The photos will hopefully do them justice. Already they make such a difference to the light inside the house. And the feature window (circular on the top, octagonal currently from inside) in the full height entrance hall is really fantastic. Any thoughts on how to get the internals finished on this octagonal light? I was wanting to make it circular (and the window company advises this so that we don't get any issues with condensation on the visible frame (which would be covered by the insulation if we did make it circular).
- 47 comments
-
- 4
-

-
- roof lights
- upstands
- (and 1 more)
-
Am digging up this old thread because we have now built the larder. It is a PIR insulated add on to our MBC timber frame and is outside the thermal envelope. Concrete slab is separated from the main house, no UFH. It will be accessed via a passive standard external door (from the kitchen) so it is genuinely "outside" and acts as an extra room added onto the kitchen. It has an internal square area of around 2.5m2. It is on the north side of the house, under and surrounded by very large trees and it never sees a ray of sunlight. We are using a gas boiler for heating the main house. No ASHP. There is no water supply to the larder. No MVHR extract in there. No plans to artificially cool the space. Planning on storing wine / beer, tins / jars, eggs, butter, fruit, veg and using the space to cool down leftovers / pastry / baked goods etc. If it does get too hot in the summer months we will revert to putting some foodstuffs in the fridge. Need to do something about ventilation (before our render people start next week we need to put any penetrations out of the house). My thoughts are 2 close-able vents (one high up, one low). Does this sound sensible?
-
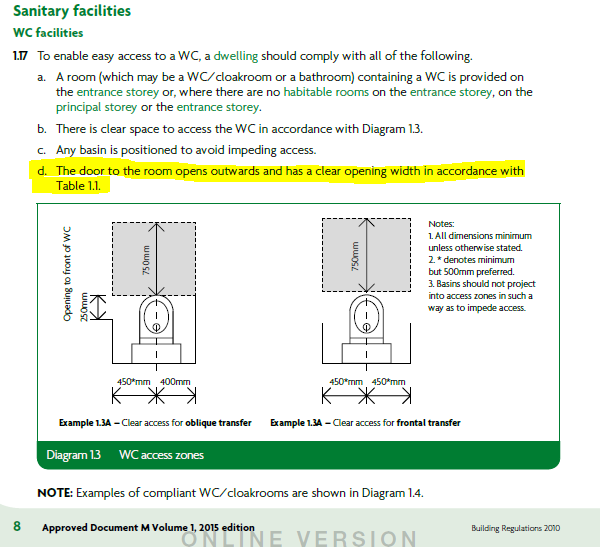
Thanks for flagging this. Our plans showed an outward opening door but we were thinking of opening it inwards to avoid hallway collisions. Regs copied below. Decision made - outward opening it is.
-
We paid £625 plus VAT for full tree survey at planning stage. About 13 -15 trees at the time. Had a guy come and cost up felling some of the large trees (20m plus height). £800 per tree to fell that size was his quote. 2 years ago. We cut down a 13-14m tree before we started building. Used a big ladder, some climbing harnesses and ropes, a block and tackle, a hand saw, a chain saw and it helped that the tree was half dead. 5 of us to do the job. Did it in a few stages over a day. Top section first, and as many branches as we could get at. Then middle 7m or so in one go leaving at least 1m sticking out of the ground. Then the rest. Got the stump out when we dug for foundations. That was massive and took some moving. It would probably have been worth £600 to have it all done quickly and all the stuff chipped and taken away. We spent weeks cutting up timber and offloading it to local friends and shipping the smaller stuff to the garden waste place. But so much fun was had by all involved - can't put a price on that?
-
Thanks for the VAT tip. Am on it. And we do have some spare MBC roof trusses on the top scaffolding that we could lift down rather than having to saw in half and throw off. So at least we can save a bit of time there. Thanks
-
Thanks all for the support. It helps.
-
The heavy one is 260kg and 2.2m diameter so that is the problem one. The others are around 90-135kg so not light either. With time now also being against us we are where we are. As has been said here, a series of trivial decisions (mistakes) accumulating into one big issue. Quite correct and interesting how it compounds. Will post again after installation. In the meantime off to work to keep the money coming in (not faster than we spend it at the mo!!)
-
@vivienz we have just paid for 5 pocket door systems from Door Supplies Online. Good knowledge (guy called Alan) and they do a lovely range of doors to go in them). And do the architrave and skirting if you want all that. Cheaper for Eclisse than ironmongery direct. Might be worth a look?
-
Our designed house has 5 rooflights. 3 rectangular, 1 small square one in a bathroom and a large circular one above a two storey entrance hall, making it, I guess, the "feature" of the house. Our plot is surrounded by trees on two sides so getting light into rooms is an issue, hence the rooflights. Here is our rooflight story (part 1) We got some quotes in from companies and decided on our roof light manufacturer based on price and reasonable service. MBC agreed to make the upstands as part of our contract. The rooflight company quoted for the upstands also. We opted to let MBC do the upstands as they were already paid for effectively. MBC couldn't make the circular upstand so designed an octagonal one. We thought that would be OK, and that we would get an octagonal rooflight or make a circular finish inside later. We didn't mention the octagonal upstand to the roof light company. Not deliberate. Just didn't think anything of it. BIG MISTAKE. MBC put the frame up. They did the upstands whilst we were on holiday. The upstand finish wasn't great. Our roofers came on site and said that the finish would need to be better, otherwise the roof membrane wouldn't sit well over the upstands. We decided to sort them out ourselves so didn't approach MBC. No complaints about MBC on this issue as it was our decision not to ask them. Hubby had acquired a multi-tool and was keen to use it. You can see on this image that the edge of the upstand is not vertical as there is a bit of board plus the blue membrane sitting proud of the top edge. So we ripped the outer board off, cut new bits to size and then planed and sanded for a level smooth finish. We then filled all the gaps so the roof membrane could fit nicely. So far so good. Then mid August the roof light people come out for the survey (paid for by us, having at this point put down a 50% deposit of the total expected cost on 26 July). They like to measure the actual upstands in situ to make sure the rooflights will fit. Makes sense. Whilst on site, the installation manager notes that the octagonal window will likely be a little more expensive and it will be included on a revised, final quote which adjusts for the as-measured dimensions. He also informs us that the installation fee does not include lifting the rooflights off the lorry, lifting the roof lights on to the roof and that there needs to be additional health and safety such as a roof man anchor set. We ask him to get the revised quote to us asap as the roofers are back on site to finish roofing over the upstands. Two weeks elapse. We chase the quote. The roofers finish. We chase the quote again. The quote arrives. The cost of the octagonal rooflight is 100% more than the cost of the circular one. Mmm, that's a bit more than a "little bit more expensive". We lose sleep. We speak to the roof light company and say that is unacceptable and what can they do about it. They suggest adjusting the upstand. We inform them that this solution would have been easy had they told us 2 days earlier but now our roofers have roofed it over and are off site so it can't easily be changed. If only they hadn't taken more than 2 weeks to update their quote..... The roof light company decides that they can come up with a design solution so a circular rooflight will fit on an octagonal upstand. We ask to see it. Several weeks pass. I chase them. The lady on the phone is rude. I explain our situation, again. They send the drawing. We approve them. No choice now. We are 50% paid up. Let's hope this works. We have to pay the remaining 50% for them to even start manufacturing them and get us in the delivery queue. We do that on 10th October. 2-3 weeks lead time apparently. All goes quiet. We chase them. A delivery date is arranged for next week (13th Nov). We contact their contract lift suggestion who visits to quote for the crane needed. We had been hoping to put these in with our other windows (sharing the crane) at the end of September. The delays have made it impossible to do that. This comes in at £1350 plus VAT. We are horrified. Unforeseen costs. Am trying to be pragmatic but I am hating these rooflights more and more and we haven't even got them yet. This has been our worst experience so far with a supplier. Really disappointing. Couldn't possibly recommend them. And there is rain forecast all weekend so those bloody holes in our roof are going to let more water into our house (the are covered in plastic but it always finds a way in). Part 2 (next week, after they are fitted) - are they worth it? (gosh I hope so)
-
Our flat roof guys have been great. Though they worked very short hours compared to MBC (doesn't everyone). With a flat roof you apparently need at least 18mm OSB to lay the roof membrane onto. The standard MBC spec is less than that for a flat roof so we had to stump up some money to upgrade the roof deck to 18mm. We have three different roof decks. Here is one roof deck with the roof lights (more on those in a separate post one day). The upper roof deck And a view of the lower roof deck and garage Some lessons learned: OSB is not weather proof despite assurances from MBC that it would be OK. It holds out for a short time and then water floods through the joins. It was a pretty sunny summer. But the downpours were bad. Wish we had plastic sheeted the whole roof. To be fair to MBC, the house is fine (as they said it would be) despite being flooded more than twice. However, the stress for us, and the clearing up, could have easily been avoided. We insect meshed all the gaps before the roofers started. The parapets are edged with this smart design. We drilled some drainage holes through the parapet walls for the roof drains. Burned out the drill. Got that as a wedding gift 18 years ago so him indoors was delighted to upgrade. This is the membrane going down, on a felt underlayer. And the finished look (though the front of the garage isn't finished and can't be until the render is done). Learned from the building inspector that we don't have a high enough upstand on this roof / door combination so it will likely not get included in our warranty. That was news to us and is one of the issues caused by not keeping on our architect. We have definitely missed stuff like this so could have probably avoided a few problems. So that's it. Probably one of the easiest bits of the build so far. However, we still made some cock ups like not allowing enough space to fit a window into an L shaped corner area. This is the view from above and the window has to sit on the OSB bit. Unfortunately that bit of roof sticks out a bit far. We had to trim it on site and the roofer guys are going to come back and fix it another day....... A big lesson for us has been the ability to fix things on site. Doesn't stop me losing sleep over them, but I think I am losing less sleep than I was over the "problems".
-
Sorry, life / build taken over recently. If you mean the cross section. It is this: What you see in the photos is the green airtight internal board and the blue external breather membrane on the other side.
-
I cried a few months back when rain was pouring through the unsealed roof deck, soaking through the first floor boards and then building up to over 2 inches deep on the whole first floor. I cut my scalp open on a scaffold bolt as I was desperately trying to bail out the first floor faster than the rain was falling. All this whilst trying to "work from home" that day. After throwing the bucket and the water out of the window opening, swearing alot, sobbing and yelling at my husband that I hated our house build I then pulled myself together and got on with the clearing up. A self build appears to be an endurance test of the highest order. You will survive and be stronger because of it. And caravan living has just taken on a bleak reality with the dark, cold mornings and the damp. I know how you feel. This will be our first (and only, hopefully) winter in the caravan. Already there have been days which have been depressing. If you can't get a weekend away then at least get an evening out of the caravan - some dinner at a pub / a trip to the cinema. Takes away reality for a few hours and that might be enough. Keep on going. You are nearly there.
-
I am just about to pay for our Eclisse pocket frames. Planning on fitting them ourselves - there is a you tube clip that makes it seem so quick and easy. I bet it isn't but by the time we get to the fifth one we ought to be alright at it. ?
-
I haven't got anything costed up yet so I honestly don't know. When I looked about 18m ago and got a rough quote it was around £2.5K total so a 2K extra bill sounds horrific. I need to measure our space and then go to both suppliers and see what I can get. The temporary ones will defer that purchase for a considerable time.
-
@CC45 They look mighty fine. I think I would be proud of them. Is your half way platform the permanent one or a temporary fix too? We have a similar stairwell so standard temporary staircases (straight ones) don't fit too well. You might just have inspired me to build some stairs......we have some timber kicking around.
-
How did you make your home made temporary one? Any photos?
-
When should the staircase be fitted? I was thinking it would be near the end but our scaffold stairs are getting in the way and will have to be gone at some point. I hope that ours will be an oak tread finish with glass balustrade and oak handrail. I was going to look at Stairbox and TK Stairs as recommended on this site. Won't it all get completely trashed if we fit it too early?
-
Stack of what exactly? We are at the same stage of looking at plasterboarding spec. Its a minefield. The list above is really useful - thanks @Moonshine 15mm acoustic on ceilings. But has anyone used acoustic on walls too? Anyone not used acoustic on walls and finding it noisy? Worth putting acoustic on the wall between the WC / utility and the lounge, for example?
-
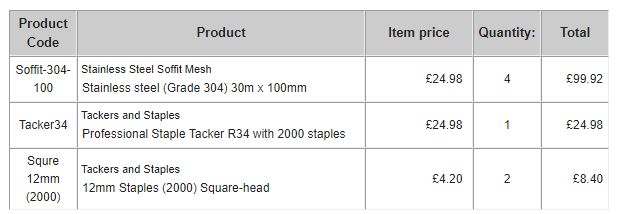
We got our insect mesh from Mesh Direct. Specification and costs below including the very handy staple gun. The mesh was quite mould-able so you could make a sort of inverted u shape. I managed to mould ours pretty well. There were times I wished I had ordered something slightly deeper than the 100mm because once you put the u shape in you don't have alot left to staple. Got some rat mesh from the same website to cover the EPS with at ground level. Not so easy to mould or fix, particularly if on your own trying to do it. So that's a job not done yet. Here's a pic of what we did on the insect mesh. Hope this helps.
-
Was going to use it as a cold frame for the veg patch but it is a non opening window so won’t work. Triple glazed might be overkill for a shed but it’s going on the market place......
-
So going on holiday in the middle of your build is not ideal. Best laid plans and all that. Holiday booked a year previously. With extended family so couldn't avoid it. House build delayed by lots of things. Resulting in our holiday being slap bang in the middle of the timber frame construction. Reluctantly we left for northern France, asking the build team at MBC to send photos. They didn't. [But a friend did, so we knew it was all going up] The problem is that we didn't see how much of the frame went up so had a lot of questions on our return. First day back and we spotted this. Actually this is a photo from the second day but we didn't spot the problem until the internal walls were up. The window isn't in the centre. This is our stair well which will have stairs that go up, along and back. It took me about 3 seconds to notice it once we got home from holiday and about 3 seconds to realise that OH wouldn't be able to stand it with the window off centre. Completely our fault. Should have spotted it on the MBC drawings about 6 months earlier. The MBC crew were great. We all set about solving the problem. Moving the opening was the obvious one but not easy due to a structural vertical support being to the left of the opening. You can see what we did in the next photo. Sadly, it wasn't possible to change our window order (already in manufacture) so we ended up ordering a new window....... Anyone need a window?
-
Using a timber frame company (such as MBC) made the frame erection stage of self building quite satisfying. It only took two weeks to build something that truly looked like a real house. We did spend more than 7 months in dialogue with MBC over all the little details. And still we made some quite clanging errors. More of that in my next post. It was glorious weather back in July. [How I wish we weren't in rainy autumn now - we are still not watertight......] Anyway, the first week passed by in a blur of unloading lorries and the ground floor going up. And then we went on holiday......
-
Shower screen sizes - advice please
Weebles replied to Weebles's topic in Bathrooms, Ensuites & Wetrooms
The space is about 1600mm but we have chosen a double basin unit that is only 1250mm so the towel rail etc can be on either side. There is space in a behind the wall void for all the pipework /waste. If gubbins means toiletries and the like, the basin is the inset bit so there is room round the outside for that. We did look at a large 1500mm double unit with huge basins but lack of space for gubbins was the main concern. @joe90 Wish we could fit 1200mm plus 300mm in but it won't give her any room to get into her shower. Can get a 1000mm screen in but could def extend to the full 1200mm with a flipper panel (but def adds cost....) Thanks @PeterW. Hadn't thought of that. We'll probably want to get them upstairs using our straight temporary stairs, before we fit the permanent ones that will turn half way. -
OK, that makes sense - fit to the structure. Thanks for the link. I found a more up to date download that has the exact door we want on it. https://www.thegaragedoorcentre.co.uk/userfiles/downloads/hormann_technical_sectional_2017_tgdc_25241.pdf The external finishes are 25mm batten and 25mm render. I was planning on using these in the reveal as well so I guess they just butt up against the tracks of the door when its fitted. That way the plasterboard won't touch the render..... I think all this means we can put some sheets of OSB up to secure the garage without worrying about boarding it out inside before the render people arrive on site. Saves a job today. Thank you. ?


