SuperPav
-
Posts
224 -
Joined
-
Last visited
Everything posted by SuperPav
-
Rather than start a new thread, I thought I'd post back here as it's still relevant to the same install So I've now taken up all the timber floors down to the original concrete oversite. I will through down some sand for a very thin layer of blinding, just to even out any bumps etc. but my question is: Is it OK to have steps due to a small variation of depth between different areas (e.g. 15mm or less)? Some rooms' oversite (where the dividing wall has also been removed) are at slightly different levels to each other (they clearly originally built the footings up to DPC and then filled the oversite to "approx" a consistent level throughout). I really can't be arsed blinding more sand unnecessarily to lift a 3rd of the footprint up just because one ex-closet area has a slightly higher oversite. (it's a faff barrowing it due to the site layout/restrictions) So in essence the insulation would be the same throughout, but my concrete slab on top would be 5-15mm deeper in some areas than others. I'll most likely be clipping the pipes to the mesh so the step shouldn't affect any UFH laying etc, and even if I was stapling to the celotex, I can't see how 10mm or so would make any real difference... Thoughts?
-
Cutting joist holes into concrete blocks
SuperPav replied to SuperPav's topic in General Construction Issues
Due to the orientation those straps won't work, I need some which bend 90 deg the other way (these joists fix to the face of a wall). I have however now found some Cullen masonry hangers which are rated to 2kN short term uplift if all nail holes are filled into the joist, so that could work. The dilemma now is it's an extra £50 for the joist hangers, £50 which could go towards the angle grinder.... I'm leaning towards the latter Thanks all! -
Cutting joist holes into concrete blocks
SuperPav replied to SuperPav's topic in General Construction Issues
An excuse for a new tool you say.... -
I need to cut about 8 holes for 8x2 timber joists into 100mm medium density concrete blocks. These may be subject to uplift sometimes so I can't/don't want to use masonry hangers. After marking out, just wondering what the best way of doing it is or how hard it's going to be? Theyr'e about 3.5m off the ground without scaffolding so if the answer is use a Stihl saw then I'll need to put up the mobile tower. a) Drill 8mm holes at 50mm spacing, then knock it all out with a bolster/hammer b) Drill 8mm holes at corners and along bottom and top edge and Stihl saw the sides c) Any other ideas?
-
You won't have any "rights" to attach to their wall if it's THEIR wall. If it's ON the boundary (i.e. the boundary runs down the middle of the wall rather than alongside the outer face of it), then it's a shared wall and then it's a different kettle of fish. I would always try to do a flat roof running down the length of the drive so there is no gutter/valley against either your or their house walls.
-
+1 to what's wrong with batteries? I always thought the most bulletproof mechanical system for this sort of thing was just a shaft with a big lump of concrete on a winch. Winch it up when you've got electricity, then let it fall down when you need it. A 3-phase motor + inverter and you're done. Or go big and build a dam and just pump 1000's of gallons of water into a lake and then use hydro. Maybe not so practical for a small house
-
Are Shower Tray Toleranced to be Undersized?
SuperPav replied to MortarThePoint's topic in General Plumbing
I wouldn't put PB in a shower enclosure personally when you can use cement board or marmoxboard. Another thing to bear in mind in terms of the width is the tiles you're planning on using. If you're using 300 or 600 tiles, don't make the back wall less than 1205-1210mm (tile that one first before the sides) as otherwise you'll need to be shaving off a couple of mm off every other course of tile to fit between the walls! -
Thanks Terry, our house is far from PH standards, although the insulation under the floor will be decent, therefore I suspect our flow temps will need to be much higher than the levels you're talking, but the 120mm concrete should still act as a decent buffer. In my head also the heat loss difference between sticking the pipes on the bottom of the slab rather than the middle are minimal, but putting them at the bottom of the slab should result in a (marginally) more uniform slab surface temperature with regards to flow and return legs.
-
How complex is it? Can you use stairbox (or similar) online builder to create the dimensions which will show all your widths/angles/goings/rises and clearances etc. if you need to make sure they're compliant, but it won't generate a Building Regs drawing as such!
-
Thanks everyone @jothThe existing floors do nothing - there are spine internal masonry walls which support everything above, the slab will only be for the ground floor and a few (non-structural) stud partitions. The plan is to give BC the proposed build up and then if they decide they want a SE assessment I'll send it to my SE (who is very good) and he can confirm. I don't think the proposed is a particularly unconventional construction for a slab, so don't anticipate too many issues. Worst case is we'll need to use chunkier mesh.. With regards to upstands, yes that's not on the detail as that section was quickly knocked up for the builders to know where to dig down to. We'll be laying all the insulation, and we'll have a 50mm PIR upstand all around the external perimeter (solid walls so we'll be using 52.5mm insulated PB for the walls, so can easily lose 50mm PIR thickness). For those that have tied to the mesh, what mesh did you use? I've used A393 in raft slabs before, and that's relatively sturdy, but as I'm hoping to get away with thinner 6mm or 7mm stuff here, I take it there's no real difference if the pipes are laid before the mesh is raised onto soldiers? With a 120mm slab, do heat up times really matter (in case we stapled the UFH to the PIR)? I half-expected this slab to have such a slow response time to almost make it irrelevant as it'll need to be timed to batch "charge" or just be on all the time at low flow temps anyway?
-
Welcome! First floor (not ground floor) you don't need to paint anything. You also don't need planning permission. Any of the T&G chipboard floors would do you fine, 22mm would be a bit more solid and what I'd choose, but wouldn't fix any deflection in the joists as such. Depending on access, plywood might be annoying to get up there in full sheets (and probably overkill as you're not doing a bathroom). The other option you might have (hard to tell from the photos) is to just overlay 6mm plywood over the existing floorboards if they're dry and structurally fine. You can then glue/nail the parquet as required. This would be cheaper and easier. Only thing to be mindful of when fixing anything is make sure you know exactly where your pipes and cables are, it's surprisingly easy to hit one! If you're doing the ground floor then I'd recommend to rip up the floorboards, and insulate underneath them, and then replace with chipboard.
-
That looks excellent, and I bet transforms the place in terms of "progress". Are they coming back to remove any laitance from the top? (Also, your basement looks larger and taller than our vaulted main rooms! )
-
So we're digging up the existing uninsulated slab (50sqm) to the same level as the oversite under the suspended timber floors (which are also coming up) approx 400mm below FFL. With some hardcore/blinding, we're looking at a build up of approx 225mm of insulation (100mm PIR with rest in EPS), on top of which we'll have about 100-125mm of SLC with a A193 or similar mesh in it. We're getting someone in to pump and lay the SLC, but will be doing the UFH and mesh ourselves. Plan was to lay the mesh on soldiers and then simply tie the UFH pipes to the mesh. Question is, could we staple the UFH down to the PIR, and then set the mesh above it on soldiers? Saw this on an episode of something recently (maybe an old Grand Designs or similar), and it occurred to me that it might be a better way to prevent any damage to the pipes from walking over, plus might make laying the pipe easier if I'm not having to navigate the mesh to clip to. Is there something obvious I'm missing here (like extra heat loss etc.) or is this an option? Bay window and internal floor dig out.pdf
-
Plans in for approval keep having to be changed
SuperPav replied to Deejay's topic in Planning Permission
Without seeing a site plan it's difficult to comment on the overall proposal, but that's not a "garage", that's basically a house! And for it to look like an ancillary building it really needs tweaking.. I know how I'd advise to proceed with this, but it does very much depend on what the planning officer has said with regards to it being too large - has height specifically been highlighted, or have they commented on other aspects? Also depends on how quickly you need to start building, as the advice would be different depending on if you're in an urgent rush. Edited to add: You can go back and forth with the planning officer till forever with unlimited revisions in theory. You can also ask them questions and get feedback proactively so emailing them is no problem. However, this isn't always the best approach! (Not least because some of them might take weeks to respond to an email). -
The good news is that the 60% threshold rule has been dropped (except for Northern Ireland) so what i'm doing is putting all the insulation works on our house through my (VAT registered) limited company as supply and fit. There's some corp tax to pay on the nominal labour element that I'll have to pay the company but it's still negligible compared to paying 20% VAT.
-
Insulation (supply only) is 20% not 5%. Reduced from 5% to 0% recently for Supply & Install , or just Install.
-
Raising up a freestanding bath
SuperPav replied to Happy Valley's topic in Bathrooms, Ensuites & Wetrooms
Of course it is, would be too easy otherwise! Just had a look at the tech drawings - it looks like there's probably about 30mm clearance under the bottom of the bath hole? If so, and you use the flattest trap (something like https://www.ukbathrooms.com/products/victoria-and-albert-intelli-waste-kit.html), you only need to find about 40mm clearance, even less if you can route a hole into the floor (5mm LVT + 22mm decking gets you close). So you really only need a small plinth, 20mm? If that's the case, then for it to look nice I think I'd be tempted to get a piece of white quartz/resinstone or white granite/marble cut (in two pieces to save on material) to follow the shape of the bath (+ say 10mm). You can template it yourself by just tracing around the bottom of the bath onto some ply/mdf and take it to a worktop manufacturer. It'll cost a couple hundred quid, but probably less than replacing the bath if you got a good deal on it!. Would also look good and not need any additional finishing. The other, probably cheaper, alternative would be to get some 20mm marble, granite or terrazzo tiles and cut/create a plinth yourself. (as long as they're solid stone/concrete, the edges will be finished, unlike porcelain/ceramic tiles). -
Raising up a freestanding bath
SuperPav replied to Happy Valley's topic in Bathrooms, Ensuites & Wetrooms
Daft question, is the trap in the centre or offset? If offset, can you spin it round 180 degrees? -
Can anybody recommend an alternative 100mm (400mm width) slabs to Knauf omnifit that may be available in stock? I'm now getting estimates of 4-12 weeks for this which, in addition to being too long, is also entirely unreasonable as 4 and 12 weeks are very far apart! It's for full rafter fill room in roof at 200mm depth.
-
Triple glazed makes sense if one or both of the following are true: 1) They are deeper frames (at least 40mm preferably) than the usual 24-28mm double glazed 2) You need additional noise protection There are 2G systems with a lower U-Value than some headline 3G offerings. I do think we're slowly getting to the point now though where by 2030, 3G will be expected by a big enough chunk of housebuyers that if you're replacing/buying windows now anyway and the uplift from 2G is <50%, it's probably a sensible investment almost regardless of the performance benefits.
-
Appreciate this is a very trivial thing, but how would you tackle the following: We have (in a couple of places) fresh block inner leaf (aerated), which will be dot and dabbed 12mm plasterboard. Where the wall ends (corner), we need to continue in line with it with an internal partition stud wall, but such that the wall is continuous. Where would you put the sole plate of the timber? 1) Face aligned with the block work? In which case if you screw PB onto the timber, it would not sit flush with the D&D PB on the block wall. 2) Face aligned with the block work, but then put PB off cuts or other spacers once the adjacent wall is D&D to pack out the PB from the stud? 3) Or do I bring the timber stud wall out by a nominal e.g. 10mm and then try and get the D&D PB to line up with it?
-
The window would not be structural by default. If you need it to be structural it needs specifying as such. Assume by solid brick wall you mean no cavity. Putting a window in where there isn't one already is slightly different than putting one in a replacement window (which has no lintel currently). The easiest way to deal with the inner leaf is to slide in a Catnic ANG section lintel (it's basically a piece of angle), the cheapest would be as you describe, to remove a course of bricks (while propping the course above with acrow props and needles or strongboys) and replace with a prestressed concrete lintel. The outer leaf is a bit trickier if there isn't a lintel or arch there, as you'd need an angle or inverted T section so that all you see is the flange.
-
Yes I've seen that and that's what's annoying. The contractor was the "local" contractor appointed by BASF when I enquired for a Walltite quote. He did say that if it was hardened lime mortar (i.e. 2 years old) then he'd chance it. The worst part is that i'm sure if you do it slowly and carefully, it would be fine, but we've got to this "computer says no" situation. I might try to ask BASF technical department directly.
-
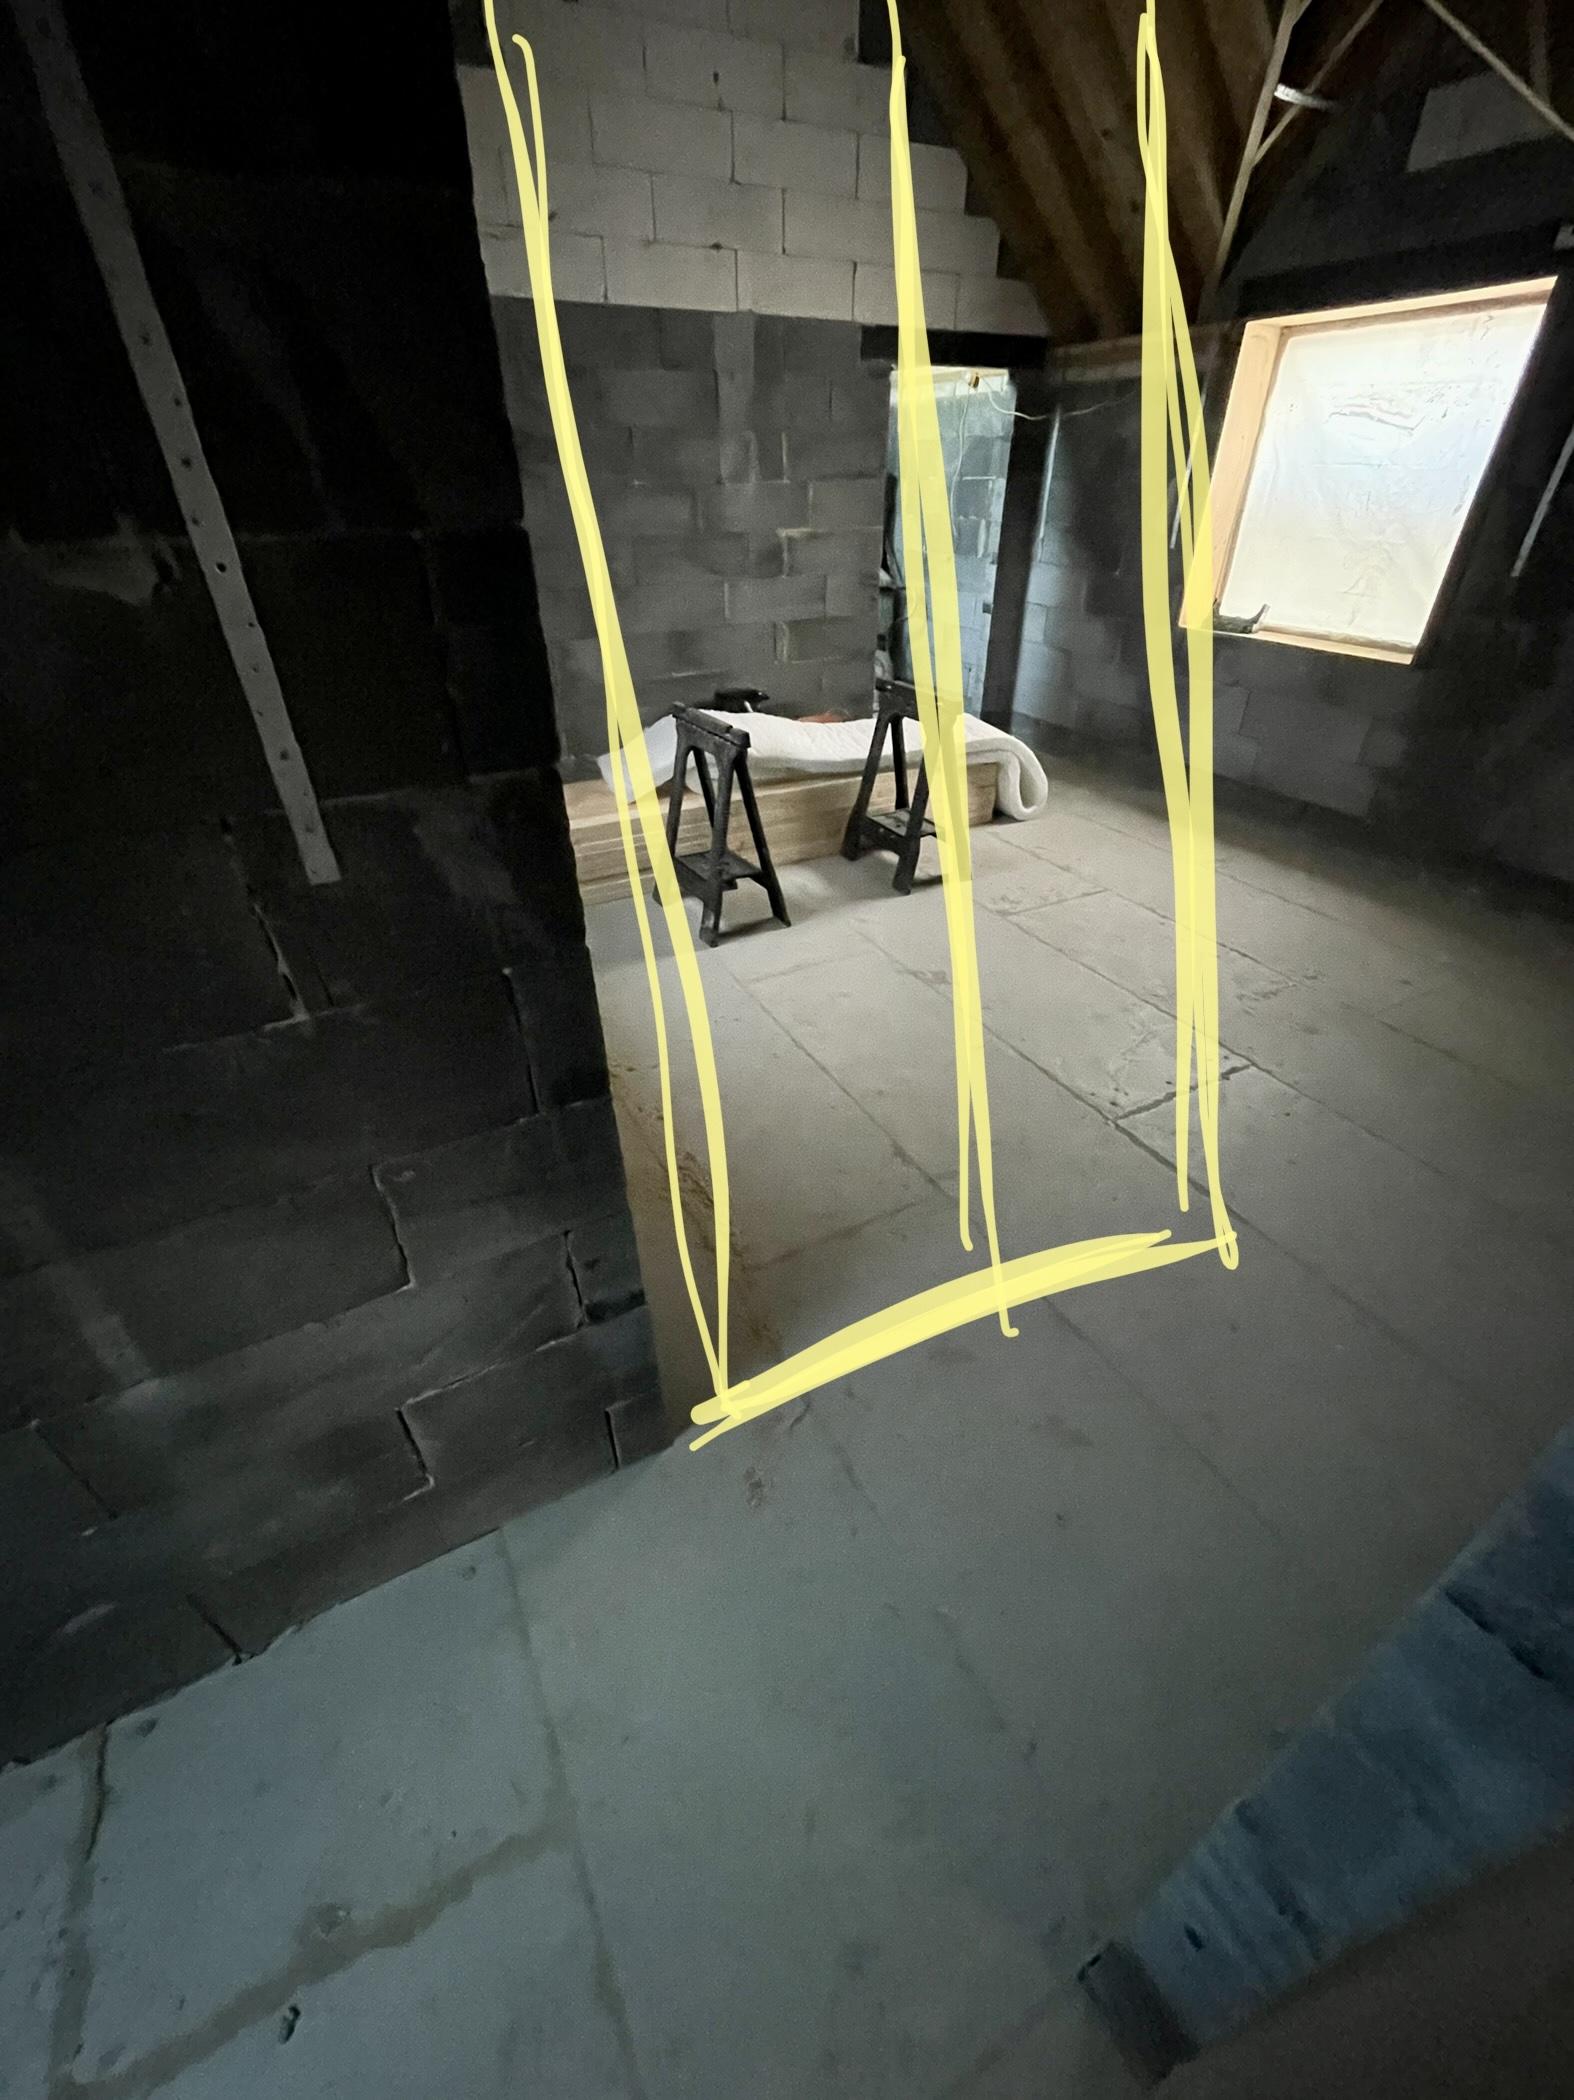
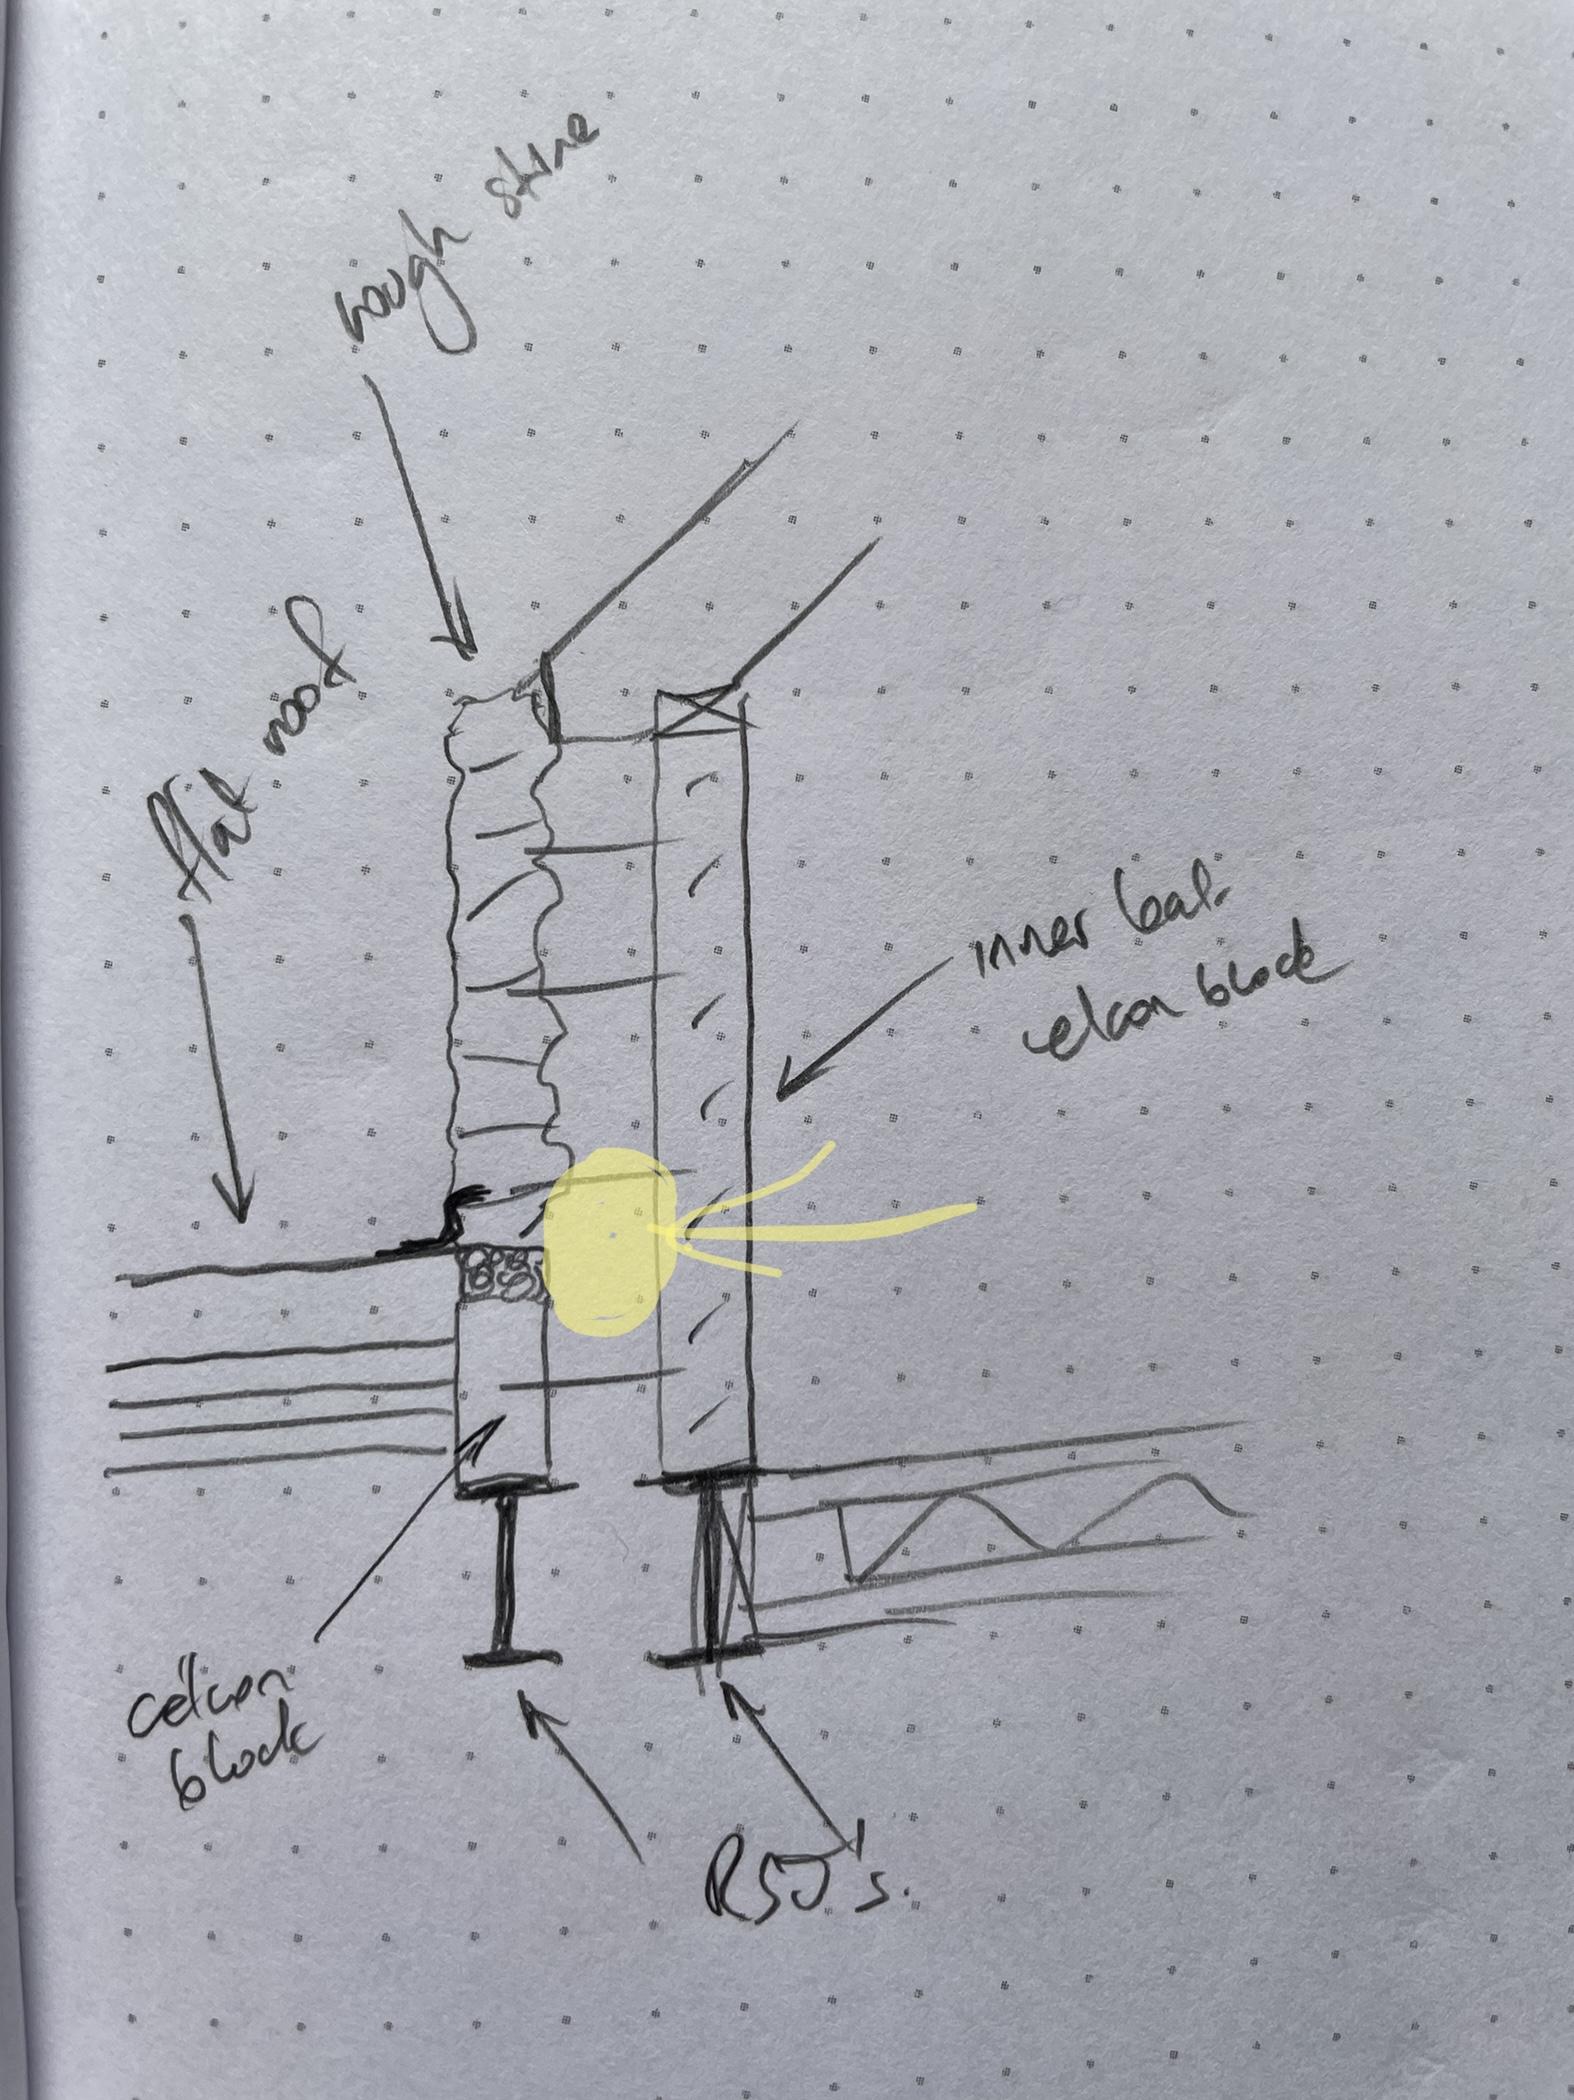
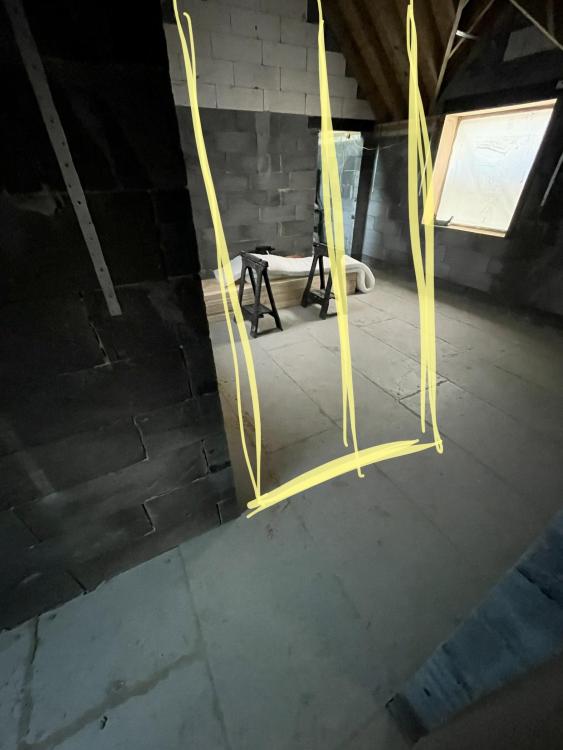
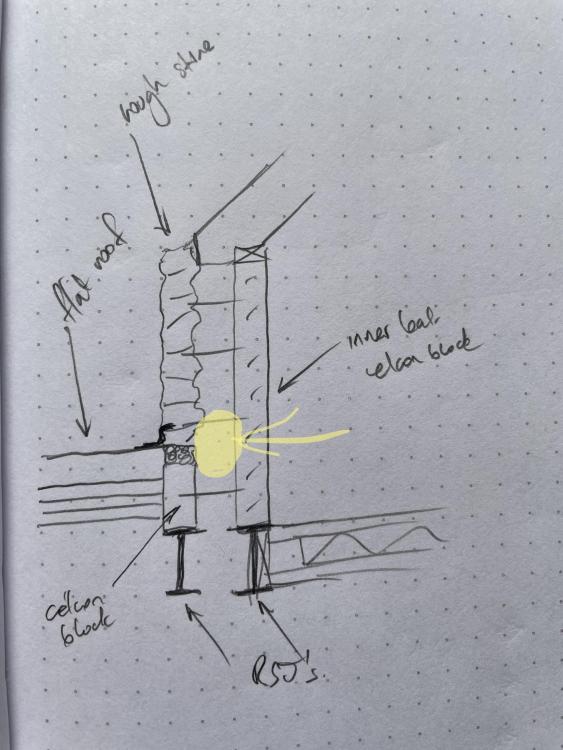
So I've just had the surveyor/estimator from the foam insulation company out to site today, and they say they can't do full fill foam injection because the outer leaf is stone with lime mortar, and the foam will cause cracks/bulges. They're now recommending bonded EPS beads. This is *very* frustrating, as they never mentioned this previously, and the whole build detail was based on the fact the cavity would be foam injected. Two issues arise from this: 1) Airtightness - the blockwork, cavity to rafters closure, and joist penetrations all have relatively poor detailing, and the foam would've fixed all of that. However, I can at least remedy this by foaming all the joists gaps and top of cavity, and parging the blockwork. 2) Cavity trays - this is the bit that I'm struggling with. The house is a U shape, and the inside of the U has a flat roof. The cavity extends down below the level of the flat roof, and there are no trays fitted. Now we could pump the whole lot down to internal ceiling with EPS beads, but I worry that some moisture will find its way through, and we'll end up with wet patches on the plaster. Retrofitting cavity trays at the bottom of the stone leaf is so time/cost prohibitive at the moment that it's off the table. I asked the company if they could foam fill up to the level of the flat roof, and then EPS, and they said absolutely not as they can't mix the two materials due to warranties etc. So it's up to me to sort out the prep/detailing. I'm now thinking of using 1-part expanding foam to essentially create a full-fill cavity plug at the level of the flat roof, to act as a barrier to any moisture, with the EPS beads above it. It might not be as 100% impermeable as a cavity tray, but if any little moisture does end up in the cavity, it should stop it draining all the way to the bottom? We are not in an exposed location at all, and the inside of the U part of the building is even more sheltered. Any clever thoughts?
-
Worth it for the information/detail/level of owrk you get out of it for your £500 or whatever fee? No. Worth it for the proactive engagement that it enables, for you to subsequently reference in your application and tweak the proposal with associated goodwill? Yes. Our pre-planning application was an utter joke and resulted in complaints and a refund as they were so useless. However, eventually I had a meeting with another planning officer and a conservation officer, both of who were very good, and went over a few options we'd laid out for the proposal. They expressed preference for some of the layout and details and materials in one or the other, and that basically meant that when we did the final submission, we did it in such a way that ticked all the boxes of what they wanted. This meant we had much less back and forth on contentious points throughout the actual planning application, and resulted in a straightforward approval. It does depend on the proposal though and how complex or contentious it is from a policy point of view. For small/easy schemes etc., it's cheaper and arguably easier to just whack in an application, and treat it as the "pre-application" if it gets rejected and you need to resubmit a freebie.