SuperPav
-
Posts
224 -
Joined
-
Last visited
Everything posted by SuperPav
-
Thanks all! The celotex is not the only insulation, there's 200mm of rockwool between the rafters, the 50mm celotex is underside (held with insulation washers with screws into rafters) Also to be clear I wasn't just going to rely on the adhesive for the plasterboard, it would get screwed in, the rationale for the adhesive was that I could use a thinner board bonded to the celotex for stiffness between the 400 c/c rafters. Consensus seems to be 12mm boards so will just get some of that and some more weetabix 👍 and will just chop it down if I find it too heavy to maneouvre. The batten approach as a ledge to rest on works well for the first board at the eaves, but that's the one that's easy to get up with the PB lifter anyway. Where it doesn't work well is the top board which needs to be tight into the corner between the ceiling and the ridge beam (which is exposed), so it needs to be slid up, rather than tipped into place, all at a height which make it all a bit awkward.
-
So we have vaulted ceilings upstairs up to an exposed ridge beam. Eaves approx 2.1m, ridge approx 3.6m, so approx 2.6m long on board from eaves to ridge Currently I've fitted the 50mm celotex under rafters and taped. So it's ready for plasterboard. Due to tricky access and ability to lift the boards into place etc, it will need to be "patched" rather than fitting 3m boards in a single length. I'll be glueing the plasterboard to the celotex with foam, and then a few 100mm PB screws through the celotex into the rafters - trying to limit the number of these due to cold spots. Any reason not to use 9mm here? as it would make my life installing them a hell of a lot easier (even considering using 1800x900 , it'l lbe worth the £100 extra cost, although I suppose I could just cut full boards down if cheaper before I take them upstairs)
-
Thanks nod! As it'll be a tanked room, presumably instead of SBR, just use paint-on-tanking? Or alternatively is there something like Everbuild 507 (effectively a waterproof blue grit as far as i can see) which will do both jobs?
-
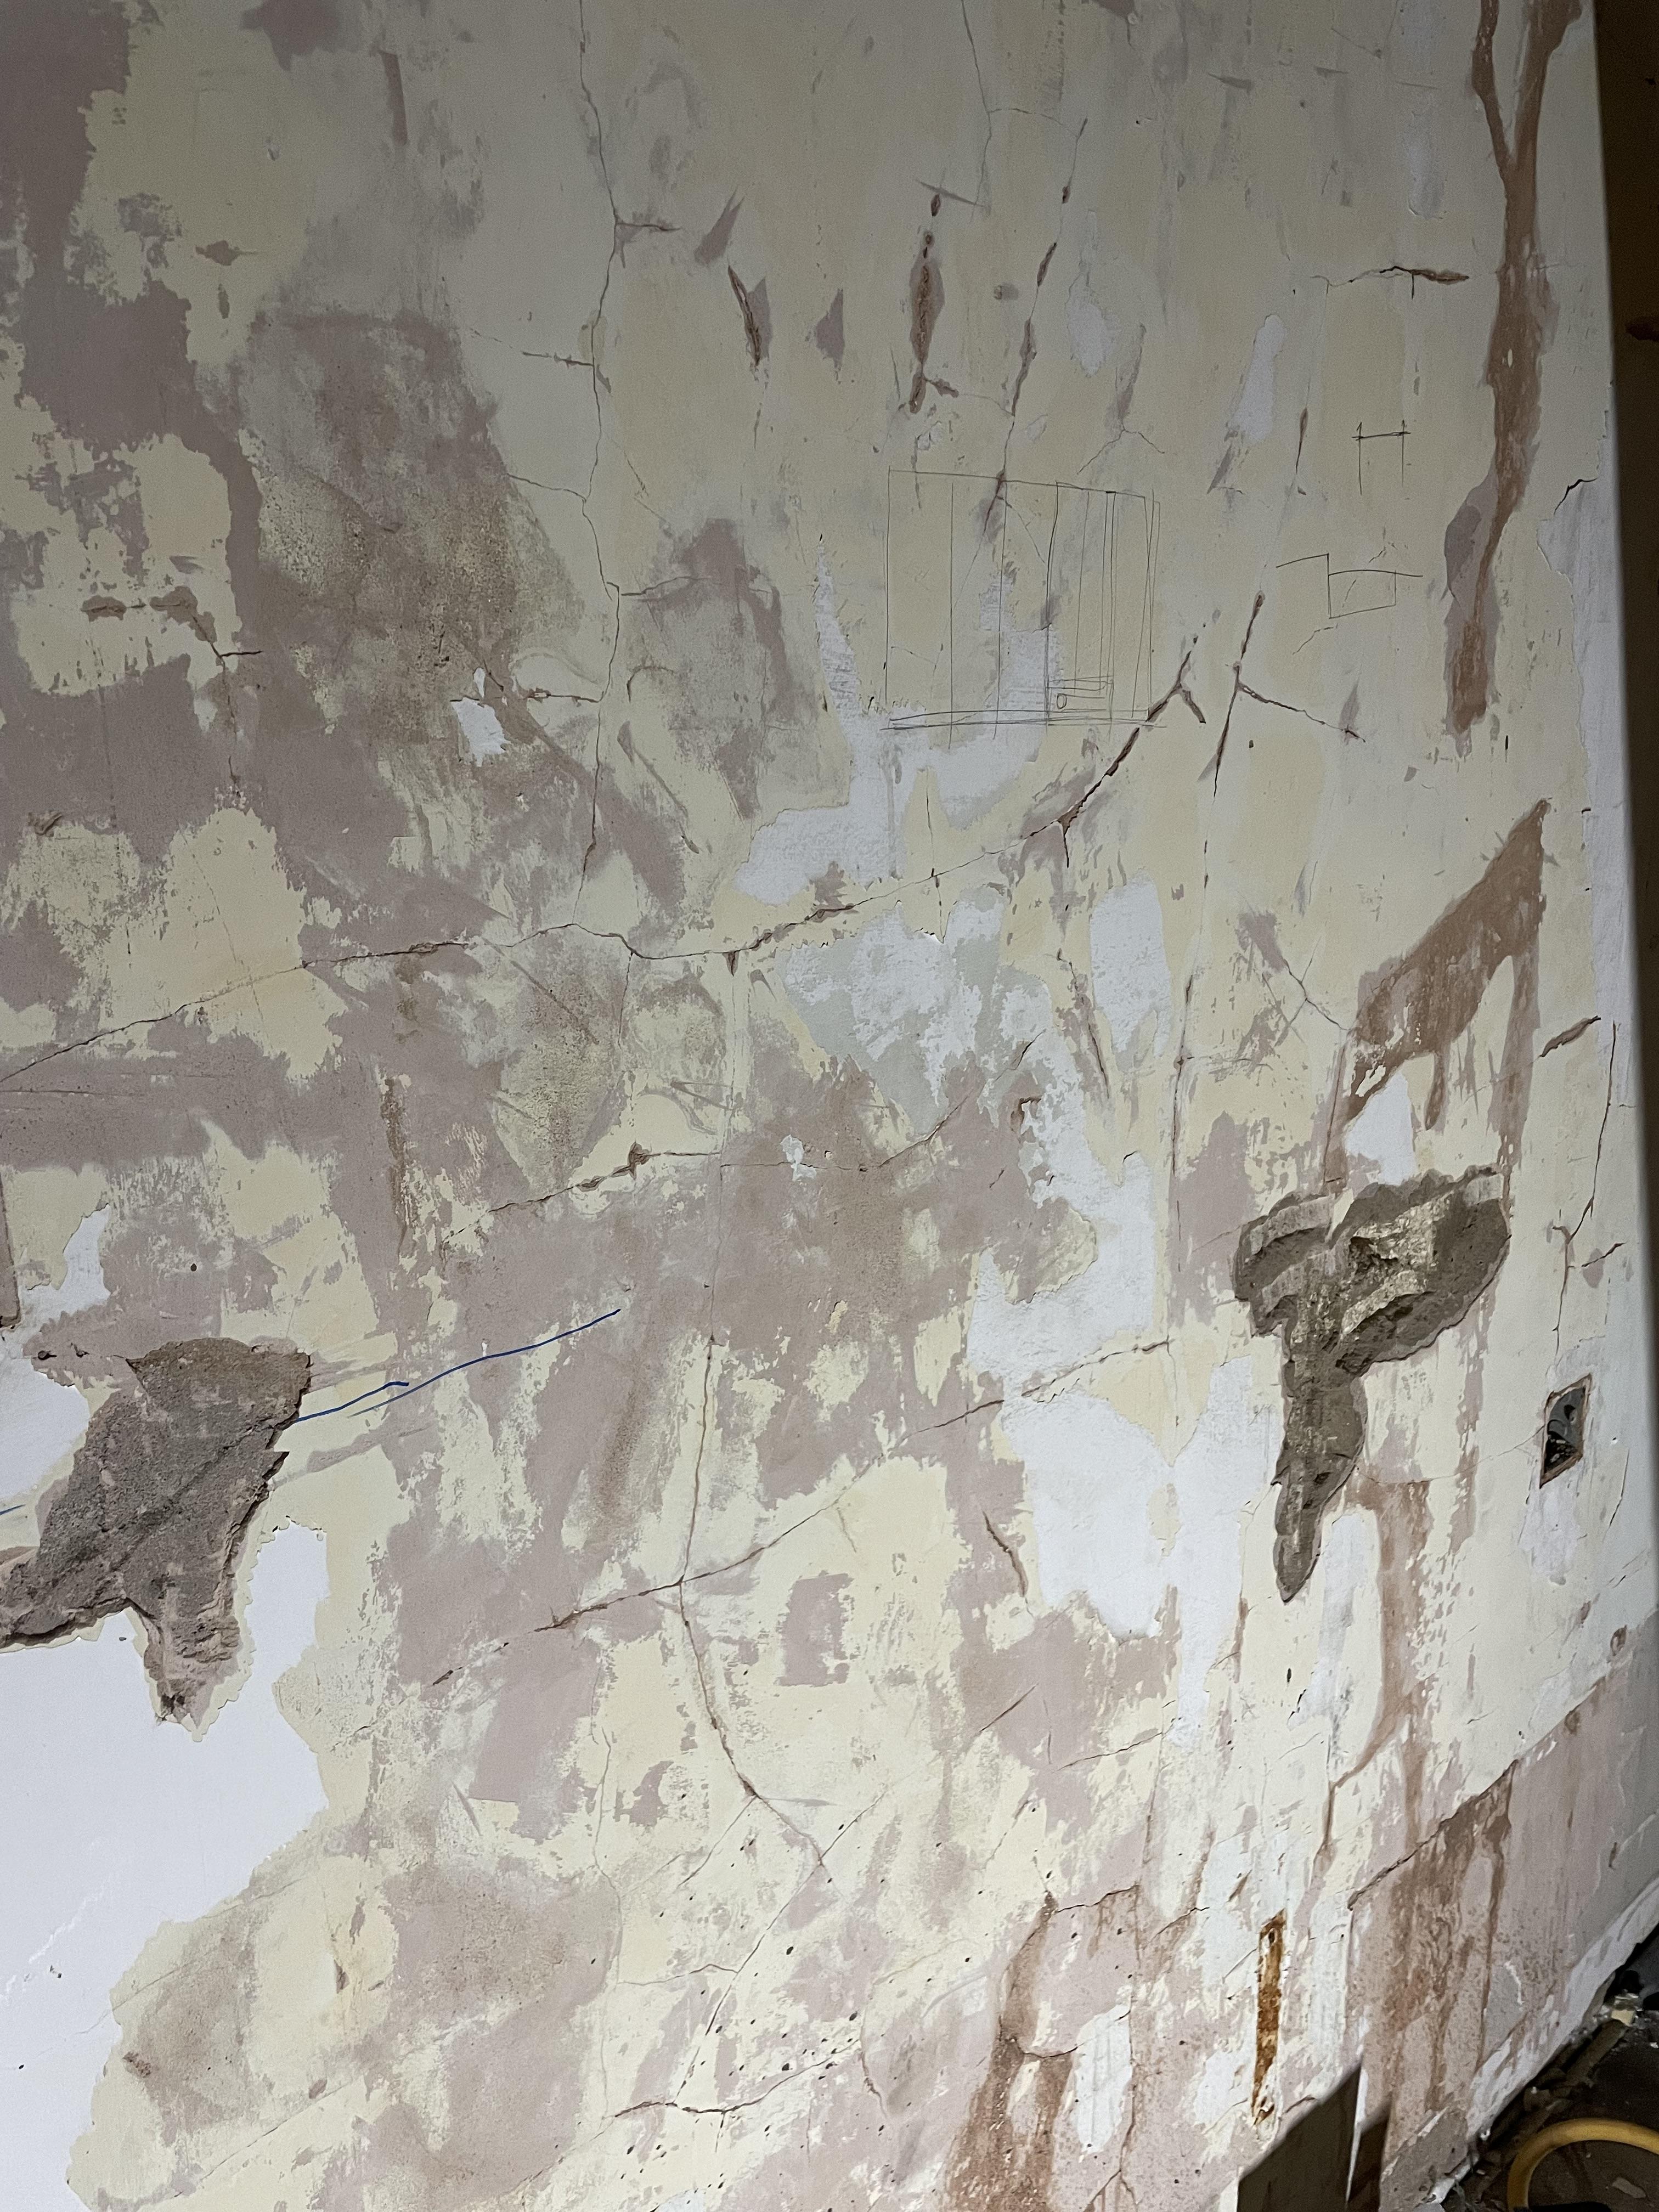
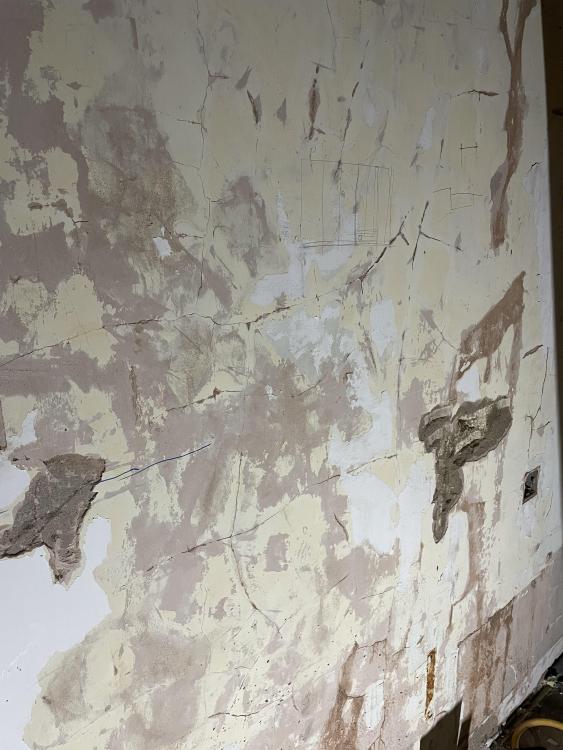
Could the experts here recommend how to prepare this wall for tiling (porcelain 10mm tiles, nothing mental)... It's old paint over plaster, on a cement scratch coat (i.e. it's like external render underneath, rather than loose plaster). It's very hard to chip off from the underlying brick/block and is very solid, so it's definitely not coming off (tried that in one of the other rooms already). The skim has some cracks but is otherwise sound ant not hollow anywhere, and I've had a go with the scraper to get the worst layers of lining paper/paint off and it looks like the photo below. This is going to be a downstairs bathroom (with some of the wall inside the shower) that is VERY tight on width, so I'd like to keep the build up as small as possible... Options: 1) Fill the few "big" holes e.g. where a backbox was, then coat the whole thing as is with a tanking coat, and tile straight on - best for thickness! 2) Glue 6mm backerboard with mechanical fixings into the brick, tile on that. Half way house. 3) Stick no more ply or STS backer board with tile adhesive + mechanical fixings, then tile on that. The worry with this is it's adding a further 15mm build up in adhesive and board that I really would prefer to avoid in a 1000mm space...
-
So time has come to start the ducts for MVHR and it's giving me a big headache as the runs need to cross over some beams and through some stone walls. Related to this - how much of a difference does 90mm vs 75mm make? I know 90mm semi-rigid is preferred - longest runs I've got are around 15m, one of which is to an en-suite, but using 75mm would be easier (but not if I have to double up lots of them). Also, I can't find much of an answer to this: - Walk-in wardrobe - supply? extract? Or neither - Hall (double height space with stairs so all the warm air in the house will collect at the top of this stairwell) - supply, extract or neither? - Utility room off kitchen, as walkthrough to garage, *without* washing machine/dryer - supply, extract, or neither? Kitchen will have 2 extracts in it. Thanks Pav
-
Thanks both, yes it's just to knock off the "crap" off the top for adhesion purposes, as tiling onto it will just cause the adhesive to fail/unstick from the slab. The slab is level to within 3mm across the whole place, (except one corner where it drops off over a square metre which I can latex SLC over) The slab will be 3 weeks old, and as it's self leveling concrete, the top layer is sort of half screed half concrete anyway, so it's nowhere near as hard as properly cured concrete, but I still might give the scrabbler a go first for the £70 it costs to hire (plus I can pick it up, unlike the 200kg grinder). Off until Monday but I'll report next week how I'm getting on! also I meant 150sqm in the OP, not 150mm! doh
-
So we've had the slab poured now (Agilia topflow self levelling concrete). In a few areas we've got a bit of crusty residue on the top, possibly where they sprayed too much activator. It's only about 1mm if that, but to scrape the whole 150mm by hand is too much. Going to get a machine in for the day to just go over the whole floor and knock off a 1mm skim off the top. The whole slab will be tiled, so don't need an aesthetic finish, but equally don't want it super rough. Do I get a scrabbler/scarifier (drum type thing with lots of teeth), or do I get floor grinder (round diamond pads that spin round)? Scrabblers seem cheaper, and lighter, but Ive never used either and don't know whether I'll just ned up with massive grooves all over the place? Thoughts?
-
Anybody here have a glazed Velfac RIBO door? We've just received our big order of glazing (velfac 200 energy) with a "matching" RIBO door for the corner return. All in black (black inside and out), however, the RIBO door has light grey gaskets on the glazing beads. Which frankly look absolutely shite, so we've kicked up a fuss. Supplier is saying Velfac don't do them in anything other than light grey. When buying we didn't specify it one way or another, it is not mentioned in any of the materials, we assumed it would be as per the "matching" energy 200 windows, on which we did specifically specify black glazing spacer bars and seals. (sorry for the shit photo of what arrived, it's under a tarp!) It's hard to tell as there's not a lot of images out there, and those that do exist are annoyingly low quality but these certainly don't look like there's a light grey seal.... So what I'm asking is does anybody here have a RIBO door that has DARK seals on the glazing beads, that they could share a photo of? Very frustrating at the moment as looks like no obvious route of resolution.

-
Thanks all, looks like blowing out/sucking out is preferred so will get that done this week. The roof is on, the walls are on and partly insulated, the garage door is on, and the garage is full of stuff and has a 900W dehumidifier going in it, so I don't think it's at any risk of getting to sub zero, but no point taking a chance. Will then leave it dry until we're ready to hook it up to the heating.
-
Piggybacking on this thread as similar situation - we did a wet-fill prior to pouring the slab. The slab in the garage is now poured, looks like no leaks/damage, so happy days. However, there's probably 250lm of ufh pipe full of water in the slab, and the earliest that will get any sort of heat through it is probably not until March at this rate. Do I need to somehow completely empty the water out of it (compressed air onto the inlet of the manifold?), or could we just leave it but open the manifold so it's vented/can overflow? I'm not sure the garage will freeze over (walls + roof in place), but it's certainly not impossible?
-
Where are you? I've got some steel and ally ramps, and some scaffold planks, but obviously this is only if you happen to be in a very short radius of my regular travel corridor!
-
Tried that, can't hear it. The proviso is we only have one outlet off the current supply inside (hooked up to a garden hose!), and it's quite restricted, so i'm not sure how much flow you need to be able to hear it through a big steel pipe. Sounds like i'll need to dig it further to see whether it joins the gas or the water inside....
-
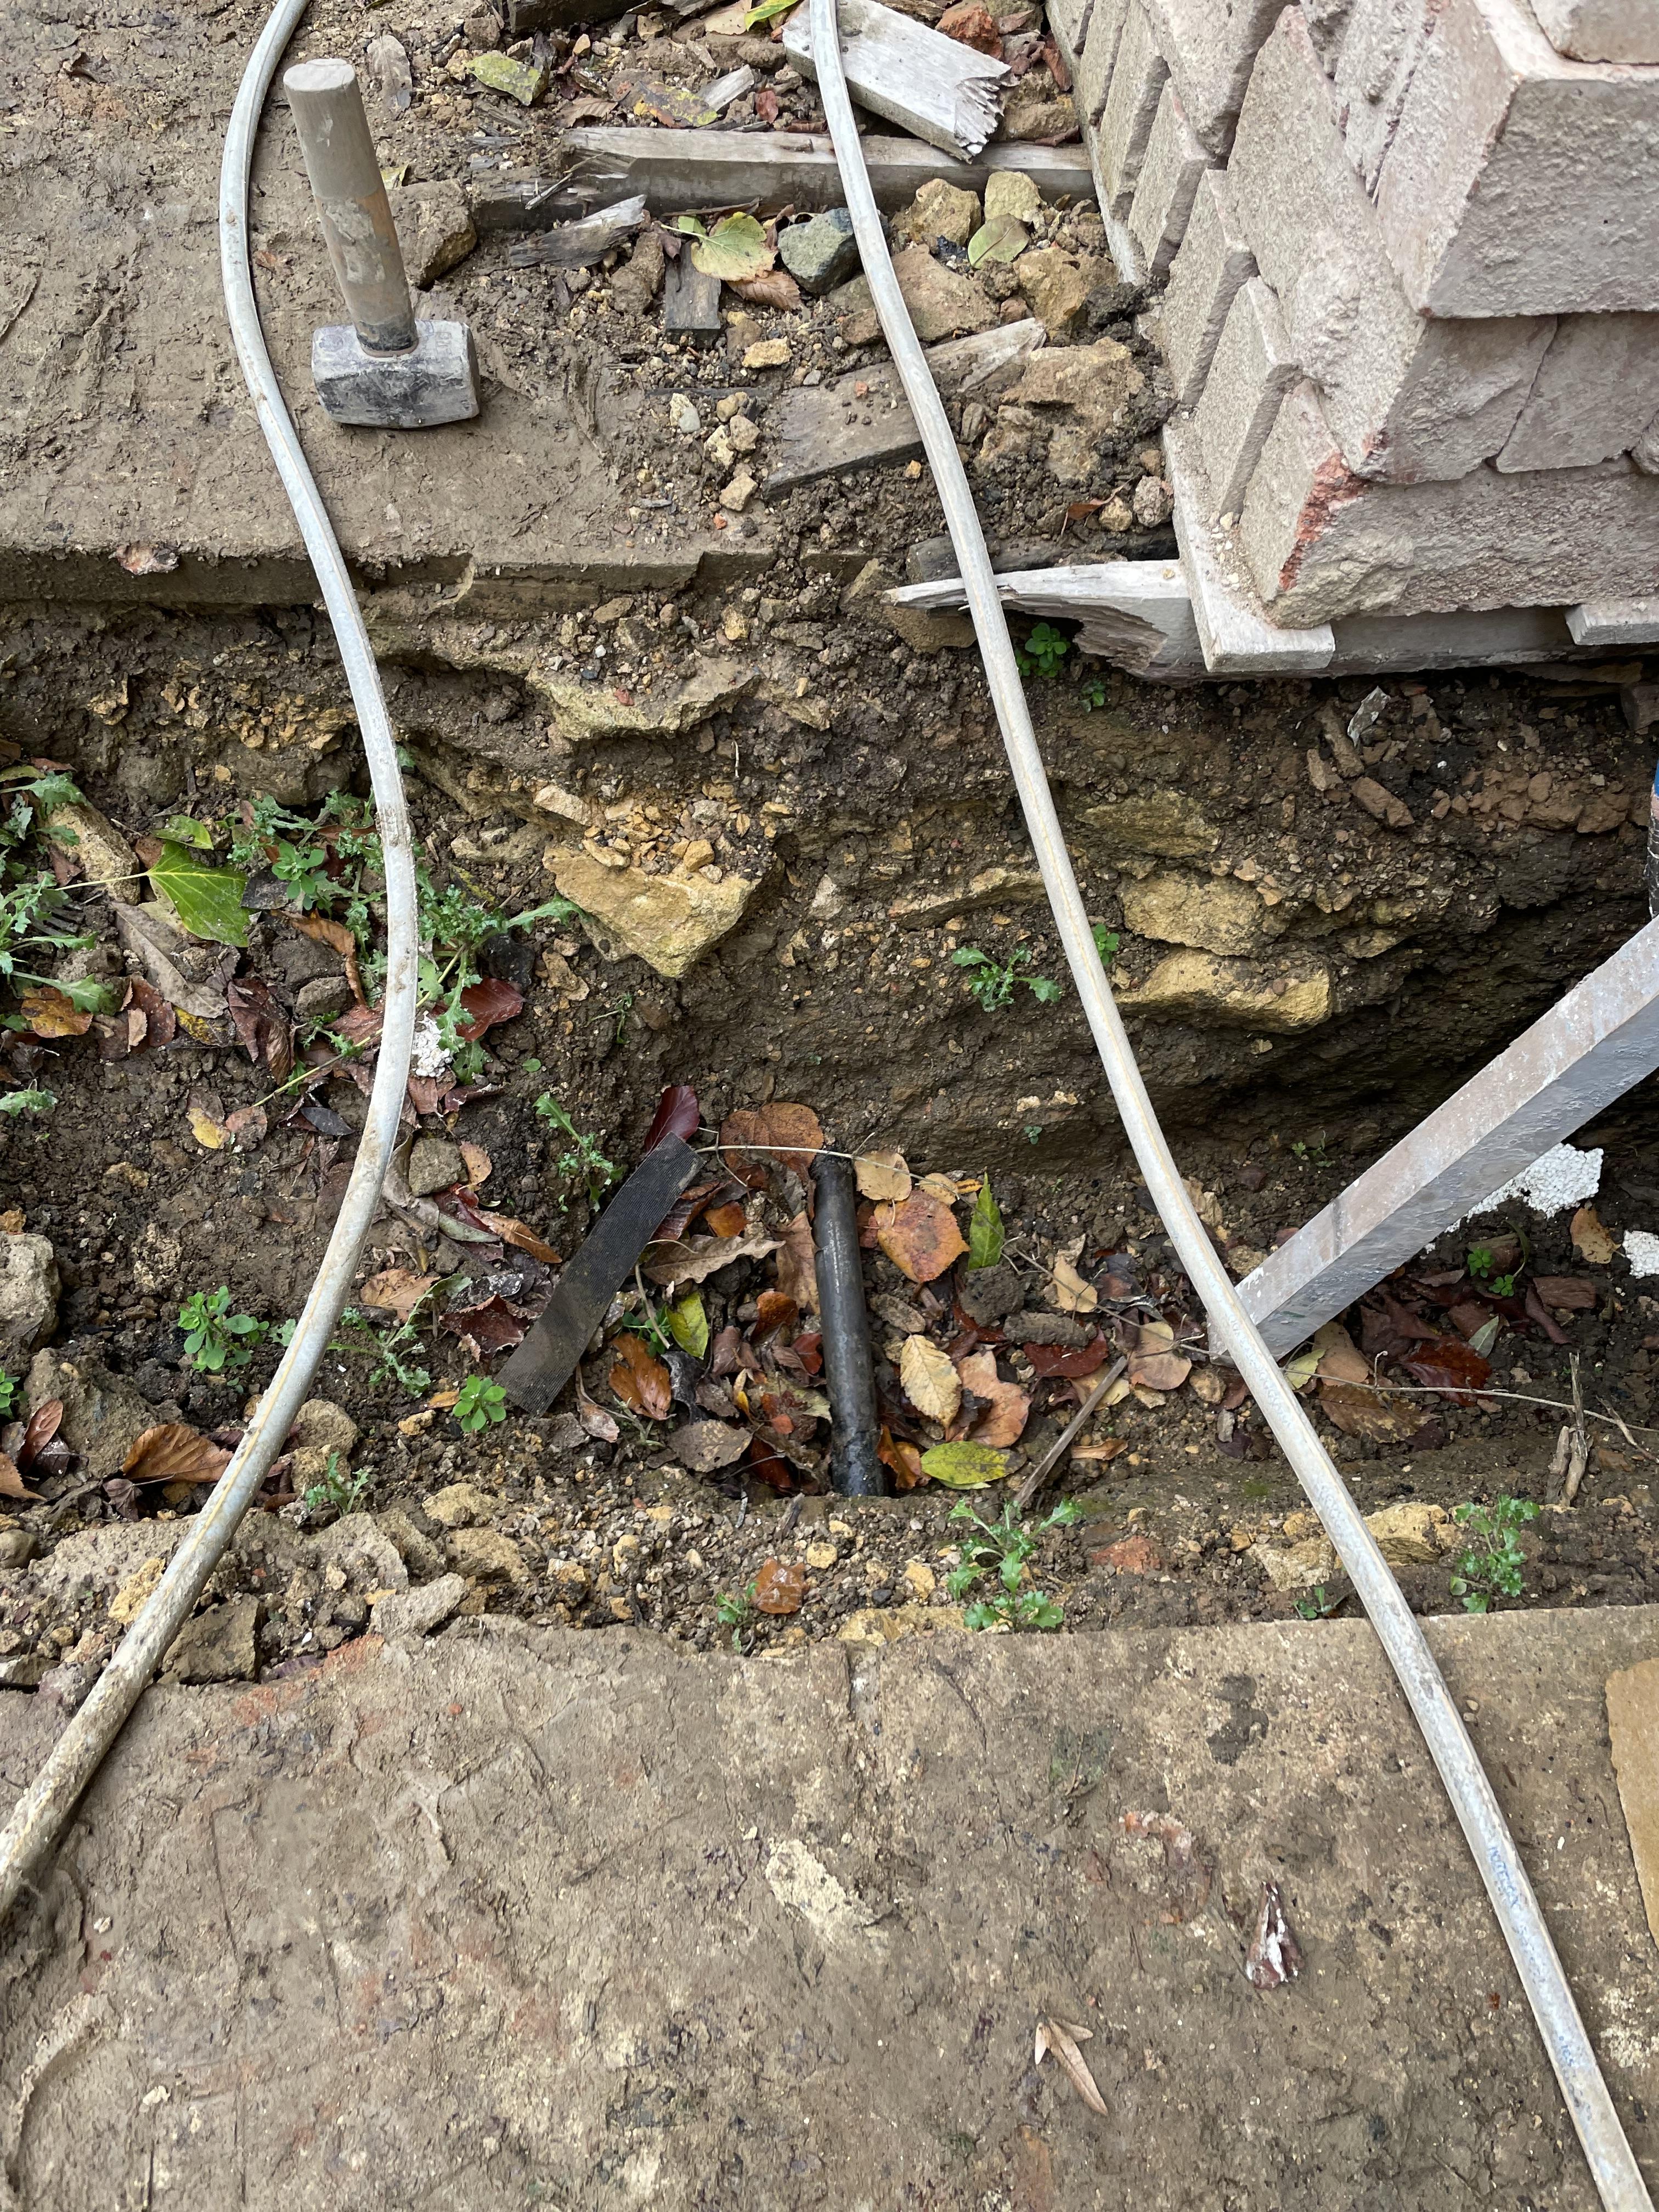
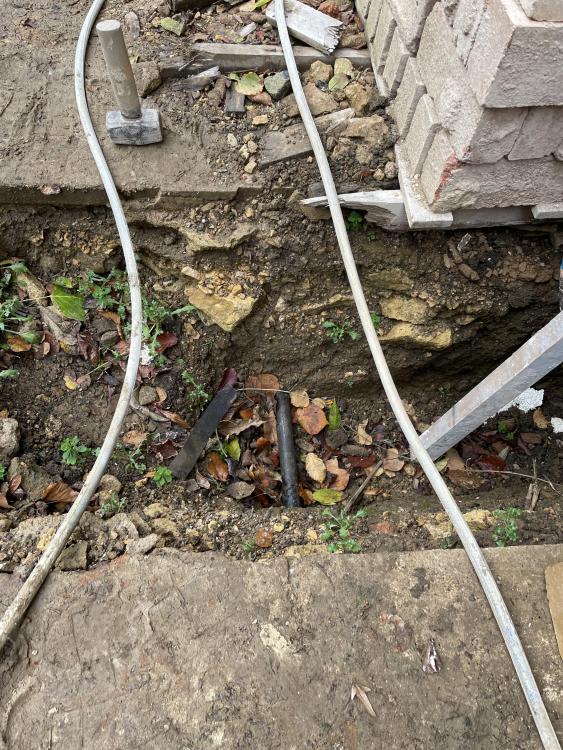
So... can anyone tell if this is (as I first assumed, and hope) a water pipe, or a gas pipe? Was just about to tap into this to re-route the internal stop cock to a new space in the house with MDPE, when I got concerned it might be a gas pipe instead of a water one, before i took the hacksaw to it. I've tried running the water and stopping/starting a hose to see if I get any hammering, but not sensing anything obvious, and it's such a big pipe I don't think that the flow in the hose is enough to create much of a disturbance. Based on its location on the property, it seems to be roughly pointing towards the Severn Trent stop cock in the road (approx 10m away, but under a wall/pavement so can't dig all the way to it), and is parallel to the wall, rather than perpendicular which is what I'd expect the gas main to be, taking the shortest route to the road (house is on a corner plot). It's approx 35mm in diameter, approx 450mm depth, and looks to be steel (or iron) coated in a black rubbery thing which i've scraped off. It's not lead. It's also not rusty but does oxidise where I've taken the rubber back. House is 1950's, current stop cock in the house rises up in lead, but is right near the gas entry point to so doesn't really help. I'd really want to avoid having to dig it the entire length to where it should enter the house, as that part of the site is a bit inaccessible, and could do with moving the water ASAP to crack on inside, but will do if there's no easy way to tell if it's gas or water.... Pav
-
Join the club! Hooked up the manifold for the garage loops last night at 11pm, fed via a daisy linked garden hose from a room inside the house with a dodgy connection. Cue running back and forth around the site (direct door blocked up), hopping over materials in the dark to turn the tap on, rush back to the garage to see if it's pissing everywhere from the fittings, back to the house to turn it off and so on. By the end of it, the system was kind of filled, no real way of telling if there are any leaks as everything was dripping wet - pressure seemed stable enough at 5 bar that i gave up at 12:30 and went to bed, ready for 7am start on the site for the guys to pour the garage slab. It was around ish 5 bar this morning, so guessing there's no MAJOR leaks... It was such a chaotic calamity that I've stopped worrying about it.
-
Any garage door pro's here? I will be asking the dealer I ordered the door from, and potentially Hormann as well, but is there anything obvious I've overlooked before they tell me "we didn't install it therefore we can't help you"? We've just finished installing and adjusting a Hormann up and over N500 door (for infill). It's 4250w x 2000h, hooked up to a Supramatic E (series 4) operator. Installation looks accurate, i.e. checking all levels/square etc. everything is fine. However, the door seems to "catch" quite a bit at the point where it hits the plastic frame guide at the closing end of the operation. This is enough of a "tight" spot that we cannot set up the electric operator as it abandons the learning cycle as it senses this as an "obstruction". Even on the couple of occasions where it did complete the learning cycle, it would stop and not operate at that point after, with the "03-obstruction detected" error. I cannot see ANYTHING that can be adjusted to make this better - the roller arms are fixed to the frame (no adjustment), the door is fixed to the arm and the rollers. I've double and triple checked the manuals start to finish on both the garage door and the operator, everything looks OK. The door currently just has some OSB on the outside, so certainly not a "over-weight" situation. Springs have been adjusted in line with the manual so the door sits half way up on its own. The rest of the opening/closing cycle I can do easily by hand, so it's well balanced, but just that bit that catches. The "guides" that it hits aren't adjustable, I tried loosening them and packing them out a bit to see if that makes any difference but it just moves the problem an inch further down the travel. Both sides of the door have even gaps, and both touch the stops at virtually the same time, so it's not uneven side-to-side. Attached is a video of a learning cycle, you can see it manages the first one just about, but on the second one aborts at the point it "snags". Sorry for the quality, had to compress it down to 5MB to attach... At wits end with this thing 🤬. I was expecting a bit more of a smooth operation on a £4k semi-commercial level door! 982803682_IMG_4251(1).mp4
-
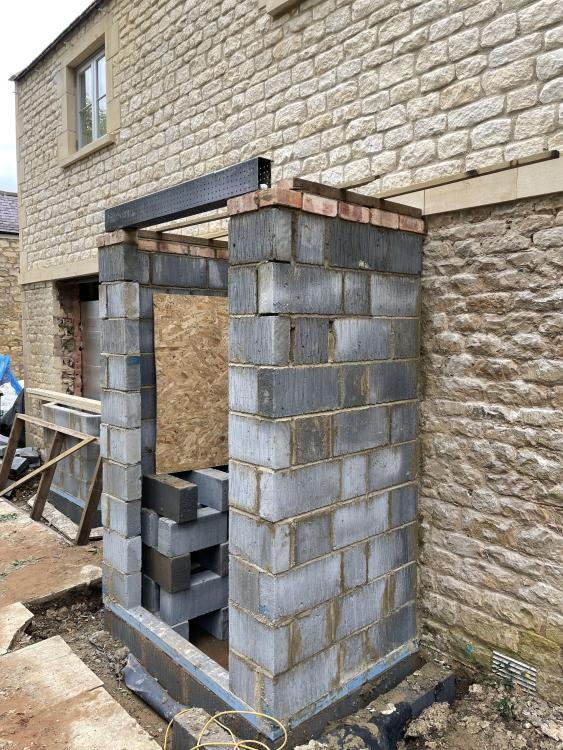
Just got to wall plate level on the new porch to the existing house. I want to get the rafters up, but wanted to check if for a porch this size (tied into the existing walls), any rafter ties are required, or if I can get away without them. The porch is only 1.2m deep, 1.5m between wall plates. so 3 pairs of 6x2 rafters. I'd prefer to have a pitched ceiling in the porch, so would omit the ties, but if required, I'll put some raised ties at 1/3 up the rafter.
-
Wrong insulation used, Small claims court or not ?
SuperPav replied to GaryM's topic in Party Wall & Property Legal Issues
I'd stick 25+12.5 insulated plasterboard underneath and stop worrying about it personally. I would've expected some underboarding with PIR anyway, so the 200mm full fill PIR with nothing underneath (if that's what was originally specified) is not a great design to start with! What's your build up within the roof (or rather above the roof)? Do you also know the spec of the wool, is it 32, 35, 40? - I can run you some basic U-value and CRA via Ubakus but done through my Ltd company's commercial license and on a proper letterhead - could satisfy BCO without having to get a full SAP/energy calc. I also agree that your architect is liable and shouldn't be let off the hook if they said "oh it's fine". At the very least they should pay for the energy calc. -
Thanks both. While I'm sure I'll figure out how many I need once I start doing it, that doesn't really help with ordering them to arrive with the mesh.. I've ordered 100 square bars for the 20 sheets, that should be enough I'd hope! When you break them up, presumably it's still into lengths greater than 200mm so it spans more than one rebar? If we start running low, the garage might be done using broken/cut up pavers - I've got a fair few of those kicking about too!
-
Hoping to get the blinding levelled, insulation down, mesh installed and UFH clipped next week ahead of concrete pour. Approx 110mm slab, so was going to use 50mm plastic supports for the A193 mesh, but just come across "mars bars" or concrete square bars, which seem like a much easier solution, but cost a lot more! 1) How many square bars per 4.8x2.4 sheet of mesh do I need? 2) How much easier/better are they in reality than lots of plastic chairs? If it saves me a day of labour, I'll pay the extra, if not, then I won't bother. There will be a lot of walking over the mesh to get the UFH tied to it, so needs to be relatively steady. Thanks!
-
You need to find a good and pragmatic bat "man" - the guy we used was excellent. Thorough and genuinely cared but not OTT. All solutions were pragmatic and open for discussion in terms of what would fit best with a proposal. It did help that our LA seemed to accept an expert's report and recommendations without questioning any of it. Whether this is commonplace or luck of the draw, I'm not sure.
-
So I've read enough from people sh**ing on aerated blocks as terrible because nothing sticks to them etc. However, our upstairs is built from celcon lightweight blocks and thin joint mortar. The plan originally was to just dot and dab boards on the walls, but before I commit, I thought I'd check, is wet-plastering (maybe with a sand-cement scratch coat) really that problematic on the lightweight blocks? I think I'd prefer wet plaster if possible... The original parts of the house downstairs had some bits built from the rice-crispies style aerated block from around 1990 and that had a cement coat on it (more like render than plaster, with just a gypsum skim), and to be honest it was pretty solid with very few cracks or any issues. So, have you successfully wet plastered any aerated blocks, and if so, would you do it again, and how?
-
Thanks all, I think this post has just made me realise there's probably another option that is "do both"! I'll run the "temporary" MDPE under the floor as I can knock that up in a few hours, and then just leave a duct from the outside on the garage side, so that I can run the "full" MDPE via the garden at a later date when time pressure isn't such an issue, and swap them over at the stopcock. That way I'll have the proper long-term solution, and means I won't be tripping over the surface laid MDPE in the meantime. @Russell I don't think they'll move the stop cock for free, they might replace the lead to its current location, which wouldn't really be much use to me... Also they have been quite incompetent so I'm not sure this is a dependable route anyway
-
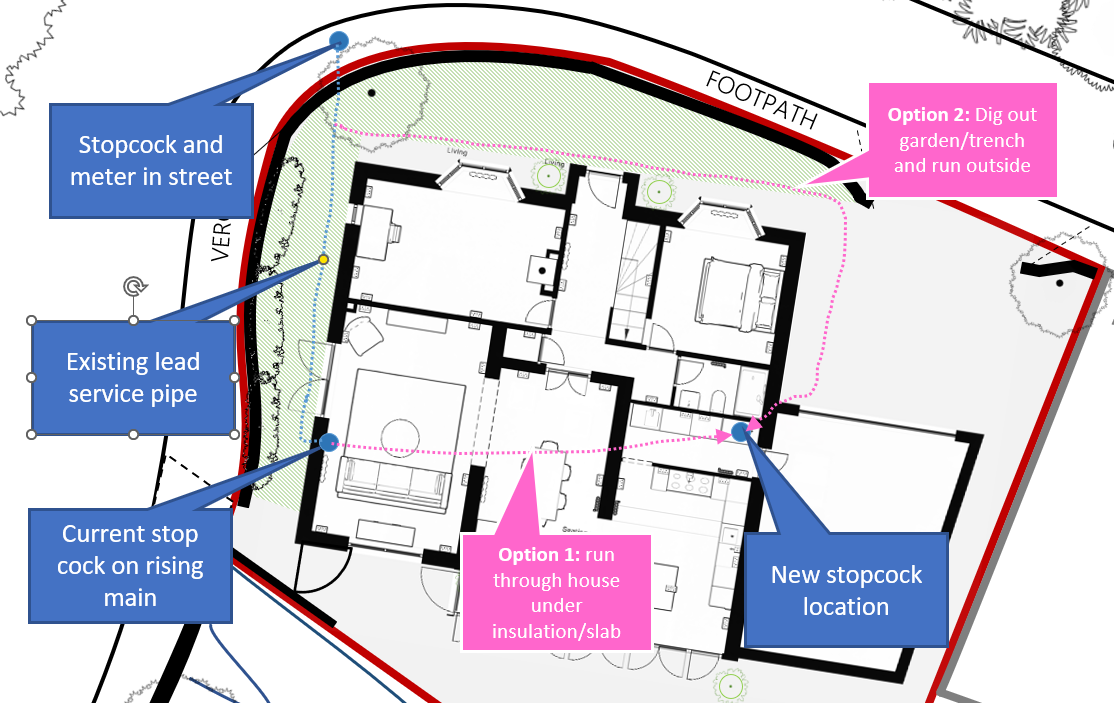
Right Buildhub collective... I currently have the old lead pipe coming into the floor where the old kitchen used to be (opposite side of the house from the new one) - this is going to be a living room, so can't have the stopcock in there (boxing in is not permitted by the big boss...). In an ideal world, I would tap into the service pipe in the garden, dig a trench and run MDPE all the way round the house entering at the garage/utility where the new stopcock will be in a unit. However, the build is currently far from being in an ideal world, and money is problematic. The above option will cost at least £500 (and everytime I've said "at least" on this build it's been more...) plus will delay things somewhat given that where the digging needs to take place is full of materials which can't be moved anywhere at the moment. Could I tap into the lead pipe near the current stopcock under the floor, and just run it across the footprint of the house? I can do the coupling on the outer side of the wall if that helps rather than inside the footprint. All the floors are currently up or dug up, ready to be blinded and insulation laid (~350mm below FFL). It would be much much easier for me to just run a single length of MPDE within the bottom 25mm blinding layer/EPS crush layer.... Is there a reason why this would not be allowed? Above it would be ~200mm of insulation and 100mm of concrete slab...

-
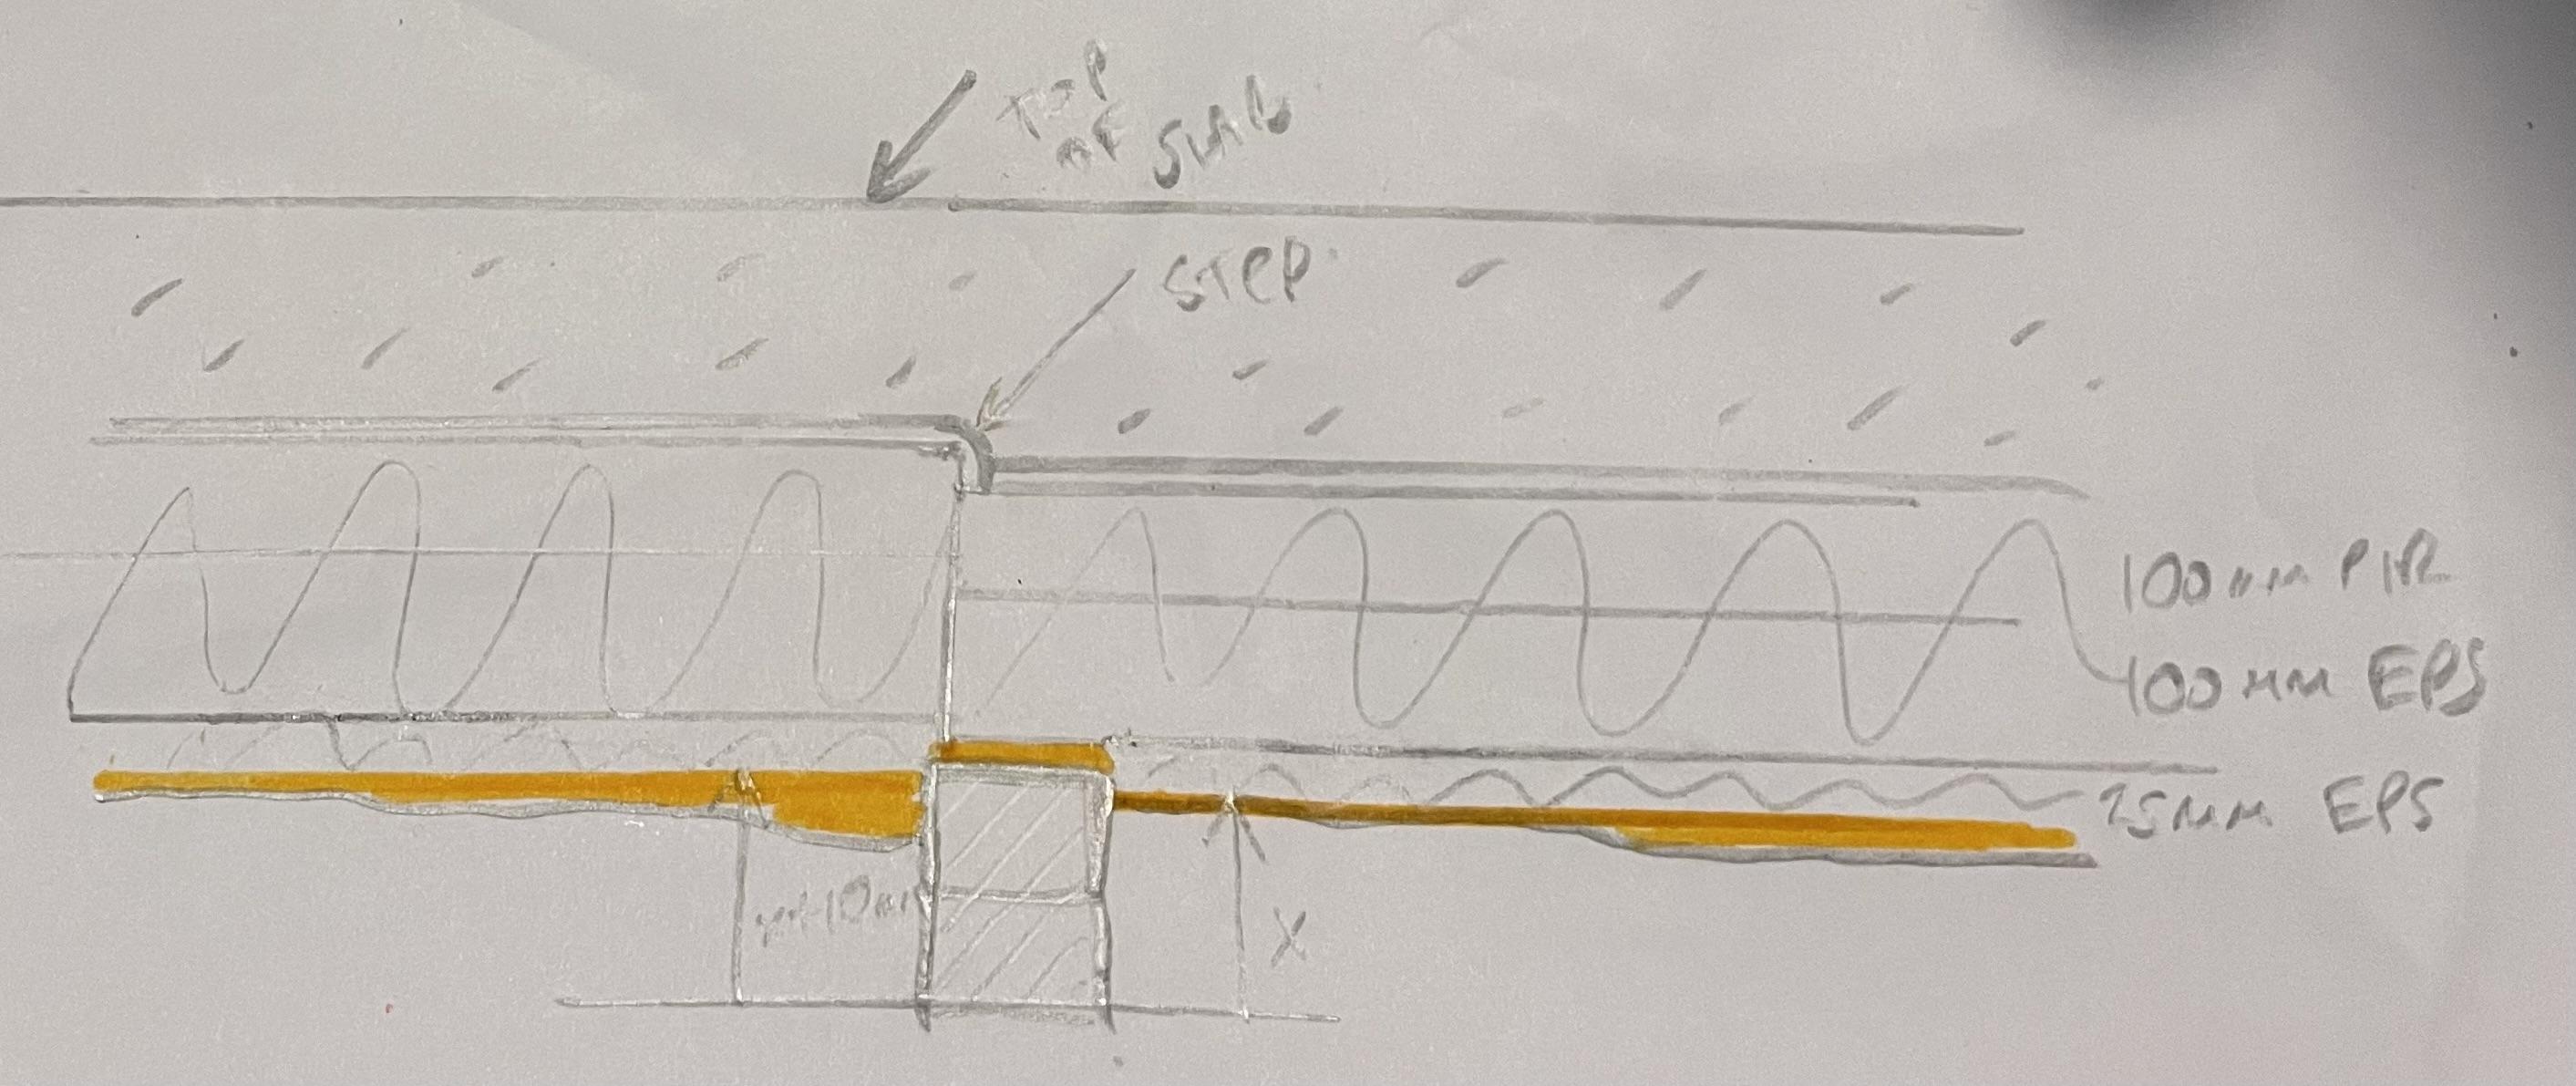
Sorry I might not have been clear - individual rooms will be levelled - no undulations etc. It's where one large room meets another large room, the oversite levels are slightly off, is it OK to have a step in the insulation (the sheets will be cut at that point so will be solid on their respective bases)? Where there are a very localised protrusions (a few concrete remains), I will just channel/reduce thickness of the PIR or leave off the 25mm. Build up is 25mm EPS, 100mm EPS, 100mm PIR

-
It's bad practice and technically not following the guidance, but no real risk of anything happening there unless there's going to be an elephant playing a grand piano on the roof. I wouldn't lose sleep over it.