


DeanAlan
-
Posts
94 -
Joined
-
Last visited
1 Follower

DeanAlan's Achievements
Member (3/5)
5
Reputation
-
Planing/routing proud door frame - tools/techniques?
DeanAlan replied to DeanAlan's topic in Doors & Door Frames
The plaster is fresh, super smooth and typically i) not a perfect beed difference in depth ii) on some doors is narrows to one end. Felt like attaching the beed (clamps initially) and then planing or using a router to register against the plaster was a solution but ... I suspect there is a perfect tool/bit out there if only I could find the name for it. I could also clamp the beed, scribe a line, take it off and then plane it down to that depth. Little tricky if it narrows.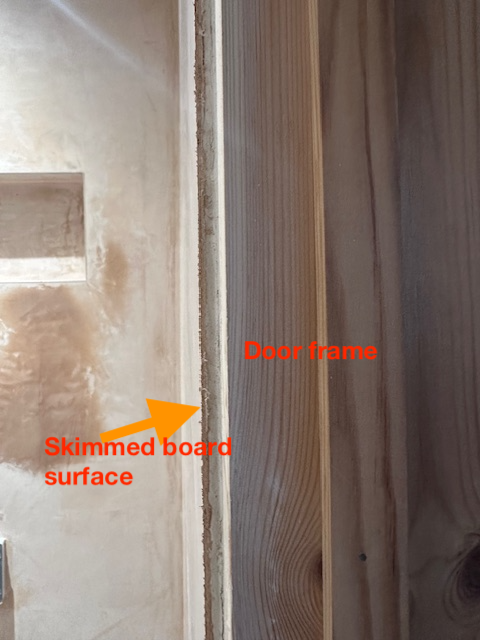
-
Apologies for what is likely an idiotic question! We have door frames that are currently stepped back from the plastered finish. I need to put some beed on to then level up to the plastered finish level (so that I can then fit the architrave). Now, the beed will actually be proud of the plaster finish and I need to take it back so that it is flush. If it were some wood corners on a piece of furniture or such then I would use a router and a following bit with a bearing to to rout out material to the same level. I'm wondering if I should use the same technique (not sure if there is space for my router) to have the bearing on the plaster level and the cutting blades on the wood beeding. Or, can you get a wood plane that will also level to another adjacent surface. Tool suggestions. Or just throw me under the bus and point out the bleeding obvious 🙂 Don't mind. cheers, -Dean
-
Wetroom with shower OVER the bath - how
DeanAlan replied to DeanAlan's topic in Bathrooms, Ensuites & Wetrooms
The 'help' will do it once and then I will find myself living in a 1 bedroom bedsit. -
Wetroom with shower OVER the bath - how
DeanAlan replied to DeanAlan's topic in Bathrooms, Ensuites & Wetrooms
Ignore the towel rail, that has already moved to the r.h.s wall by the WC. If we rotate the bath (we looked at that option) and put in a shower cubicle of some form then it just gets a bit cramped for my liking. The comment about cleaning behind the bath is very valid. So, I think we're going to have to see if we can find a new contemporary bath bath combo with a glass screen to side/top lip of bath and for the bath the flat to the wall and edge. We had our eye set on a much nicer (subjective of course) organic curved bath from lusso stone but not going to work. Thanks all. -
Wetroom with shower OVER the bath - how
DeanAlan replied to DeanAlan's topic in Bathrooms, Ensuites & Wetrooms
Lots of negative opinions about wet rooms I see. Not after a wet room specifically, just don't have room for separate bath and shower and also don't like shower curtains or shower screens that connect to the bath. I'm caught between a rock and a hard place of my own choosing. Here is a render of the potential design, you can't see the glass screen that clearly but it is between bath and basin, floor to ceiling and maybe 1/3rd of the width of the bath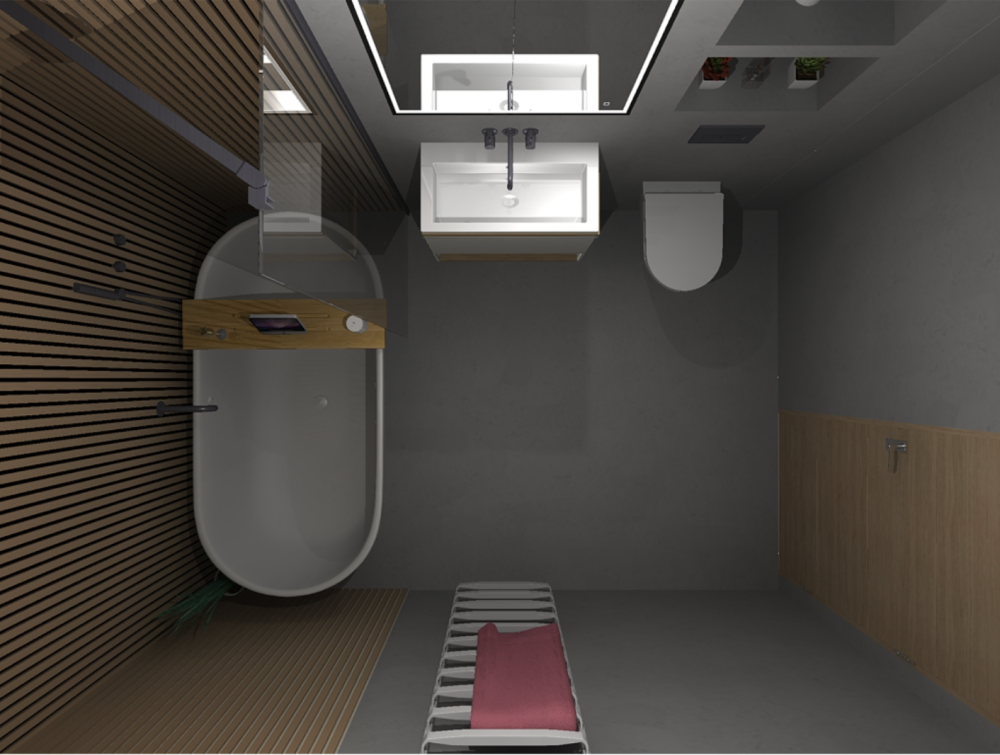
-
Wetroom with shower OVER the bath - how
DeanAlan replied to DeanAlan's topic in Bathrooms, Ensuites & Wetrooms
That is the technical challenge @Russell griffiths: - have a slope under the bath towards linear drain (wet room area, tanked etc) - have a bath sitting within it that itself is levelled and it has its own drainage connection Grout - nah, microcement/continuous surface. -
We have a small bathroom (3m by 2m) and want a bath and shower. We have a lovely contemporary curved bath in mind and dislike shower curtains or glass (to bath) screens and a screen wouldn't work with a curved bath anyway. There are loads of designs out there for bath and a shower sitting in a wet area where the shower and its drain are next to the bath. However, why not use the bath as the shower train and have any overspill of water land outside the bath but onto the wet area below the bath and then have a potential glass divide to help stop water splash into the basin. This makes the most of the space *but* it required the wet area that is all under the bath (and some margin either side) to have its drainage angle and then the bath (not on feet for this particular model) to have some form of 'anti-angle' platform to sit on to keep it flat and for its own drainage to run through that into the centre of the bath. Am I mad! I've spoken to a couple of installers and they scratch their head a little. I've thought through how it could be built from first principles (ultimately just angles and waterproofing materials in the right place) but wondering if there are products, experience, pictures, designs out there? cheers, - Dean
-
I have wet underfloor heating in place upstairs (https://www.continal.co.uk/) but haven't don't the bathroom zone yet. Ultimately I want a micro-cement finish and was wondering what UFH substrate people would recomend. The rest of the upstairs uses the insulated panels with pipe run groves in (slimfix) but that is nowhere near stable enough to put microcement over. They have boards for tiles (tilefix). I was wondering if I should clip their regular pipe system (16mm) to the subfloor and then poor a pugmix or other screed (liquid screed) to 25mm (only a 5m2 section of UFH) and then microcement on that. Thoughts? cheers, -Drean
-
UFH with flow problem - how can I confirm flow rates
DeanAlan replied to DeanAlan's topic in Underfloor Heating
Thanks all. Water is all clear (well, slightly blue cos it has glycol in). Has no air. the ASHP team removed all that. It was very loud to begin with. I was considering getting an infra red camera to trace the pipes through and see if I could see anything that looked like a pipe restriction. Loop pump in the manifold? There is certainly a pump. For most of the circuits it works just fine but 1 of them seems particular limitted. I will start investigating more methodically this weekend. -
We had a wet UFH installed last year in our renovation. I supplied and a local plumber fitted the manifold and pressure tested. It works 🙂 However, the flow meters have always felt pretty unreliable and more so I seem to have a problem getting a good flow of water into some zones that are at the other end of the manifold even if I shut all the other valves off. My starting point would be to ignore the flow meters that are on the manifold and maybe see if there is a more reliable way I can check the flow rate through. Would such a thing be possible? Remove the flow meters and use something a little more calibrated and reliable, what woudl that be. I'm using 12 zone https://file.continal.eu/PD/GB/13_Continal_Manifold_Product_Datasheet_GB-EN.pdf manifold. I can adjust each manifold value and get the flow indicator to go move a little off 0 but not to any great degree (even if it is the only valve that is open). The advice I get from Continual is pretty vanilla. Looking for something a little more helpful. I'm about to start focusing on this problem before winter kicks in 🙂 cheers, -Dean
-
@Rob99thanks. As I'm looking at trimless then it would seem that "look" isn't that important either as all (mostly) hidden except the internal cone. I do wonder why some of the spots identify themselves as dimmable or not but maybe that is about some of them coming a lamp rather than the mechanical fitting itself. I think I am likely going to go with the KSR KSRFRD400 with its extra trimless bezel which old told is about £18 each. I can then mess with lamps later on - although likely to have kitchen being brighter cool white med angle and others being more moody! Will be interested in responses to @Alan Ambrosequestion. I have a couple of these going up into first floor ceiling and would be keen for them to be airtight. They might need an extra cowling for that to be the case. Cheers all. - Dean
-
Thanks @Temp We're at 1.2m centres. I get your point about Kitchen v Corridor. These can be handled with led bulb changes - now that I'm aware of the topic. Do all 240v LED spots contains management circuitry on board themselves - and hence can develop a fault - or are they just mechanical/thermal housing for the LED bulb and that does all the work. It would seem that you have to obtain a housing that is dimmable or not which would suggests it has some smarts built in. These are all the little things I'm grappllng with. cheers, -Dean
-
We have about 30 spots to go in throughout our ground floor, wiring loop already in place and now selecting the product. Prices seem to be all over the place from £70/per unit down to maybe £13/per unit. Finding it hard to spot (yeh, on purpose) the differences and what I actually need. My electrician fancied "Aurora MPRO Trim-Less Downlight 3000K White", circa £35, but then there are "EMC300" at around £16. Then there is KSR Lighting KSRDL400 with Trimless bezel. Most of these seem to be GU10 fitting (and we would use the LED version). Why do I need to be aware of the colour temperature of the fitting at this stage? Does it place different demands on any internal circuitry in the housing? My electrician was suggestion to Aurar as they can be pulled and and replaced if they develop a fault. Can't you do that with all of them? Would appreciate some advice on the differences, what to look for, what is needed and then please just tell me which one 🙂 Thanks in advance. cheers, -Dean
-
Due to construction and neglect the rear lawn of our garden is in a total mess (unlevelled, weeds, holes) It is about 11m wide and 40m long (we're lucky to have such a large back garden here in central Cambridge). I think the best thing is to deweed, rotovate, lay down weed killer, level - additional top soil, air-rate, and seed a new lawn (in the spring). Do I just rotovate the old lawn back into the round? I did read somewhere that you should take the old turf up. That would be a massive, and expensive, job to take that layer off and move to the front of the house for muck away! Anyone got a clear recipe for such a project? cheers, -Dean
-
You must be using the same provider as we are @Hilldes We just had an exclusion proposed on our warranty with these words based on an incorrectly identified defect. The Technical Auditor counted 2 vents when in fact there are 10 and said they are too low when in fact they are 200mm above ground. We're trying to get this defect removed from the record as it is wrong. As per my other thread we do have 2 vents that are low relative to ground but they are not the ones he was looking at. I have a proposed resolution but it is very worrying that you are reporting something very similar.

