


IanR
-
Posts
1857 -
Joined
-
Days Won
6
Everything posted by IanR
-

Best floor type for the discerning selfbuilder. Go. :)
IanR replied to puntloos's topic in General Flooring
Best floor ever... ...for living spaces. Carpet and low-tog underlay works for me in bedroom spaces, with UFH. -
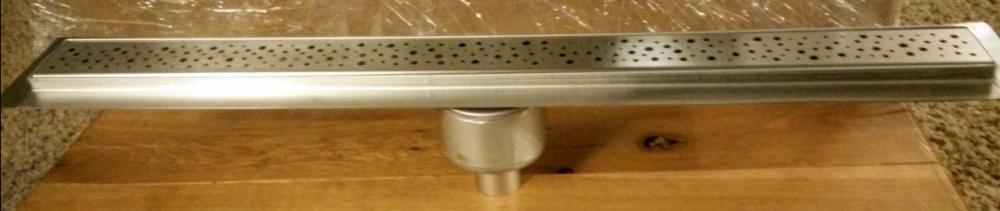
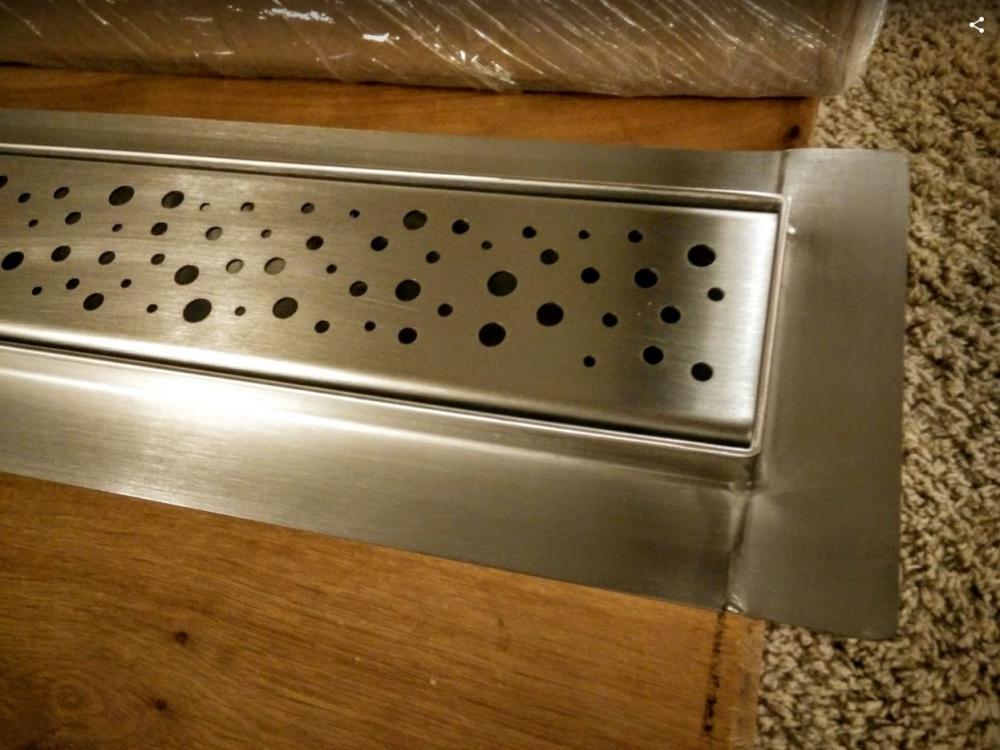
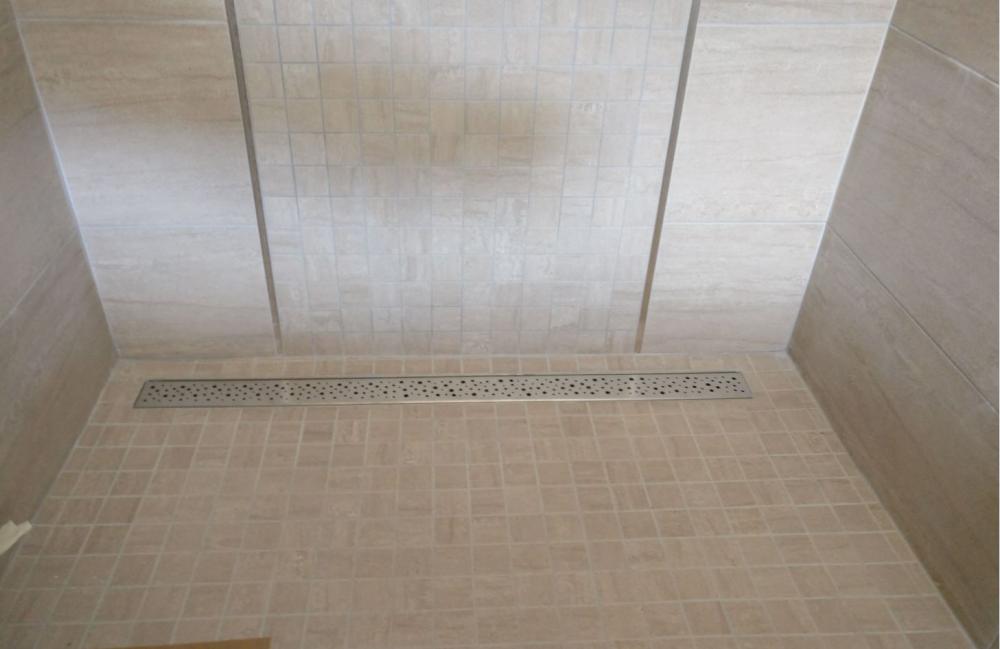
I went with 110mm pipe coming up under the slab, directly to where I wanted the shower drain, but then used a 110mm to 50mm offset connector that allowed me to rotate the connector to get a +/-50mm tolerance in all directions. I didn't use a shower tray, just set a linear drain like this: into the slab, sloped the slab itself and tanked it before tiling I did all my showers the same.
-
Running UFH-ASHP pipe work inside Warmcell filled walls.
IanR replied to MikeSharp01's topic in Underfloor Heating
That sounds like you don't intend to continue the pipe insulation through the wall, but rely on the blown cellulose within the wall. That feels to me a condensation risk, as you suggest. Could you use a pre-insulated twin-pipe duct for the external portion of the run and through the wall, then swap to your PEX-AL-PEX once inside the thermal envelope. Edited to add: I've just re-read you OP. You're not just crossing the wall, you intend to run within the wall for a distance. I feel you need to insulate the pipes separately within the wall to stop water vapour getting to the surface. -
Is this a good price for oil installation?
IanR replied to harry_angel's topic in Boilers & Hot Water Tanks
Unfortunately, after 2026, when their existing oil/LPG Boilers break down beyond reasonable repair, and they are in the market for a new boiler, oil or LPG will not be an option. Biomass is currently an option and that includes bio-fuels. I've never looked at the latter, so do not know if that is a viable option. A 500l UVC coupled with a 12kW ASHP will handle the Hot Water requirement. Depending on energy losses, you may not need to go any larger for space heating as well.- 13 replies
-
- 1
-

-
- oil boiler
- oil tank
- (and 1 more)
-
Running UFH-ASHP pipe work inside Warmcell filled walls.
IanR replied to MikeSharp01's topic in Underfloor Heating
I feel you need to continually insulate the pipes from outside to in. Makes an air-tight seal around the aperture more difficult. Is it too late to duct under the slab/foundation? -
Is this a good price for oil installation?
IanR replied to harry_angel's topic in Boilers & Hot Water Tanks
This is specifically Oil and LPG Boilers for off-gas-grid properties. It's the low hanging fruit, and it's not just new installs, the prohibition will cover replacements, but not spare parts. The BUS is the ideal opportunity for those properties to go ASHP, or biomass (for rural properties, in some circumstances) before 2026 -
Is this a good price for oil installation?
IanR replied to harry_angel's topic in Boilers & Hot Water Tanks
Have you considered the impact of the phasing out of off-gas-grid fossil fuel heating installations for all domestic and non-domestic buildings from 2026? I've not looked at the detail, but assume you won't be able to buy a replacement oil boiler from that date.- 13 replies
-
- 1
-
-
- oil boiler
- oil tank
- (and 1 more)
-
Owner-Builder looking to build our family home!
IanR replied to AccidentalSkydiver's topic in Introduce Yourself
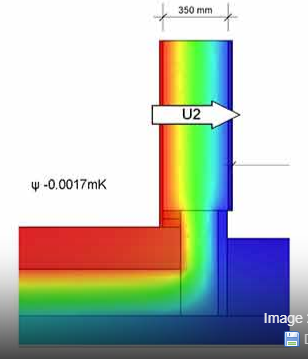
Absolutely I'm familiar with typical twin-stud and Larsen truss wall build up, but MBC's twin stud uses 89 x 37 section size. As a typical framing section, it's logical the vertical loads can be carried through just one side of the twin-stud, allowing the other to overhang a non-loadbearing insulated upstand. For the I-Joist in the image, the flanges are 45 x 47, and finger-jointed. To my knowledge this isn't a typical framing section, and with the outer flange sitting over EPS 100, it's not going to be taking any load. For this reason, the detail I'm familiar with for a thermal bridge free slab detail with I-Joists is a little more complicated than required for a twin-stud and looks like this: A simpler, but not quite thermal bridge free detail is: Where the EPS L former width is reduced at the top to get the concrete slab under the outer flange, to support it. Don't get me wrong, I like the detail shown with the unsupported outer flange of the I-Joist, and an SE must have been happy to sign it off, but it doesn't follow I-Joist principles I'm familiar with. In fact, I needed to provide additional calcs for BC to convince them the outer ring-beam in the first image above could take the loads that would come through the outer flange, with "just" 100mm of EPS beneath.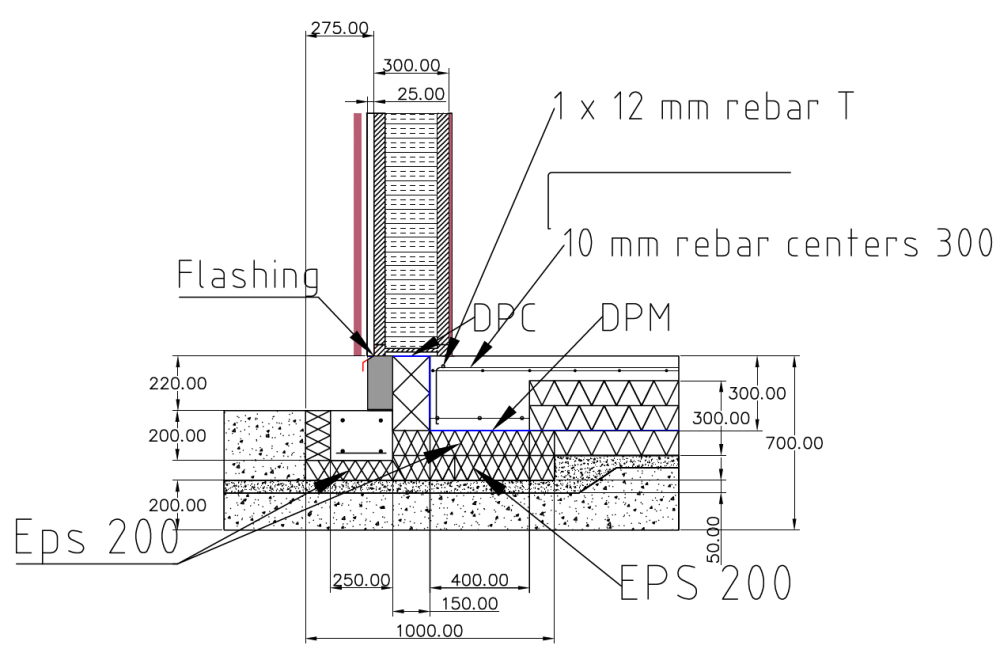
-
Owner-Builder looking to build our family home!
IanR replied to AccidentalSkydiver's topic in Introduce Yourself
Is that really an EPS upstand? Does look like it is performing at the same level as the EPS under the slab. It doesn't look like it would work (to me), but if that's a true reflection of the built house then my views on the structural capability of I-Joists are too conservative. I'd like to see their internal plaster after a coupe of years and see if there's much cracking from any settling of the frame.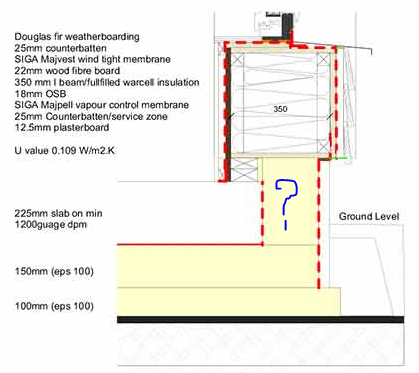
-
Owner-Builder looking to build our family home!
IanR replied to AccidentalSkydiver's topic in Introduce Yourself
Somehow you need to get a bulk price direct from the manufacture, ie. James Jones & Sons or equivalent. You'd be buying an artic load, so you won't be paying BM prices. If you went this route, would you pay for a frame design, or do this yourself? With my frame Designed and Engineered by Cullen Timber Design, they send the cutting files electronically to JJ&Sons, and cutting is automated from their files. It's got to be the cheapest way of buying the I-Joist package, but I never saw this price as it was wrapped up in an erected price from Touchwood Homes. I never saw the price for the Egger DHF board either. I've only ever seen both flanges of the I-Joist supported when used for wall framing. When you say "overhang an upstand" does that mean the outboard flange being unsupported, or sitting on insulation? I don't believe you could do that. Every T&G joint needs a generous squeeze of adhesive, not difficult to do, but there's a lot of joints. The difficult detailing is where boards come together at corners, or the free edges. Making sure the the boards in the corners have a continuous surface on the underlying frame to be sealed on to is more robust that trying to seal to edges of boards coming together at a corner. Wet boards may stop the glue sticking, you'd need to take advice on that as I've not got experience of it. Not at all. But, joists we're on not more than 400mm centres, on the external walls and the roof, and PB was screwed every 150mm. Nothing special about the PB. Just 12mm foil backed. I put the 100mm PB discs I cut out, back in to the hole once the insulation is installed, screwing the discs on to a small length of batten I bridged the hole with. There's a lot to do, but it's surprising how quick you get. I had the PB skimmed. -
Hi Robin, welcome. How does their forecasted kWh use match to what you actually used between June and Feb? Have they just taken the total kWh you consumed, divided by the 8 months and multiplied by 12 to get a year's usage? Even though that would be an over-estimate, since the 8 months usage includes 100% of the heating system, I suspect they've bumped it up a little higher, which is the typical model of the energy suppliers. There is a tendency now to have their customers financing their business, by always having them in credit. The reality is that in a PassivHaus the heating season should now be over, and you likely haven't required space heating for the last few weeks. A PH house will only make a noticeable difference to the space heating proportion of you energy bill. Your hot water requirement, lights, cooking etc. will be pretty much the same as you old house if your lifestyle hasn't changed. My energy bill is quite a bit higher than yours, but my non-space heating energy use is quite high.
-
Owner-Builder looking to build our family home!
IanR replied to AccidentalSkydiver's topic in Introduce Yourself
My timber-frame, built within the original steel portal frame of the shed I converted, derives no strength from the steel frame. ie. the two are not structurally connected at any point. The build up I have is a typical Cullen Timber Design buildup they use for new build, PassivHaus builds. The Egger DHF is the racking strength layer, as well as the air-tightness layer. The first opportunity to air-test would be when all external sheathing is complete, sole-plate sealed to floor, doors and windows in and no plasterboard (and therefore no insulation) installed, so loads of opportunity to fix any leaks. The air-tightness then improves further with the installation of the blown cellulose fibre. -
Boiler Upgrade Scheme Grant - Actions to Take Now
IanR replied to Green Power's topic in Air Source Heat Pumps (ASHP)
I do wonder how they'd legislate/police mid-tenancy changes, I think it's more likely the requirement for EPC C will be for new Tenancies. Expect buy to lets that are EPC D or worse to start to be discounted once the government publicise the new legislation. Agreed -
Owner-Builder looking to build our family home!
IanR replied to AccidentalSkydiver's topic in Introduce Yourself
I'm not sure I'd use a twin stud, unless I was benefiting from its ability to allow a simpler foundation/raft detail, while removing all thermal bridges at this junction. Using a larger 89 x 37 section, at least for the inner stud, allows all loads to run down through the inner stud to the foundation, so that the outer stud can sit over the perimeter insulation of a slab and remove any thermal bridges to the floor and sole plate. If you are going to use smaller sections, that require both sections to take the vertical loads, the an I-Joist seems simpler to me. There's not much to choose between twin stud or I-Joist build up. I-Joist is easier to stick-build on site and has a slightly lower timber fraction, but requires a slightly more complex raft detail to eliminate all thermal bridges. I've never seen it done on a twin stud structure, perhaps because the outer studs are often not load bearing, but an I-Joist structure can allow a very simple build up, combining the racking strength and air tight layer in the outer sheathing, using T&G Egger DHF board, and then a foil-backed plasterboard on the inside as the vapour barrier, with the blown cellulose in between. No membranes required for air-tightness or vapour, although a breather membrane externally for protection. To get very high air-tightness though, a non-curing butyl adhesive is required in the T&G joints. The T&G DHF board and blown cellulose insulation can achieve sub 0.2 ACH, without membranes, if the detailing is done well. Sub 0.1 ACH on mine. This simple build up does mean no plumbing in the external walls (cabling is OK), unless you add a service void. But, that means no OSB, other than where you want plumbing. I'm not sure structural performance should lead the choice of framing type. While it needs to be considered, I would prioritise thermal performance (energy loss) v. cost of the whole envelope: walls, roof and floor. Structural performance leads in to cost, as does the labour required for an over-complicated build up. Ah, but as a Chartered Engineer, once you have all the required data, you will re-calibrate your view. There is a better way... Edited to add: If you are looking at JJ I-Joists, James Jones & Sons will pre-cut all the holes for MVHR ducts etc., if you plan ahead. -
Boiler Upgrade Scheme Grant - Actions to Take Now
IanR replied to Green Power's topic in Air Source Heat Pumps (ASHP)
Please do, you'll be one of the first on here to use the BUS, so it will be good info for us. Since this is a rental property, while you are planning some level of renovation, it is worth targeting and EPC C or better. Not sure what part of the country you are in but both the UK and Scottish Governments have announced an intention to legislate a minimum EPC C for the private rental sector during the mid '20's. Possibly as early as 2026 for the UK and 2028 for Scotland. -
Hunter Douglas stated 36mph max (I think) for the warranty, so I set that up from the start. I must admit, since they are recessed into the cladding they are barely moving before they do get pulled up.
-
I've got both internal and external blinds. I'm happy the external blinds block out enough light. I only get leaks through the small apertures in the blinds through which the chords run and when the blind is closed the chords (tapes) mostly fill the aperture. But, the blinds need to be lifted in moderate to high winds, so sometimes you need the internal blinds for privacy.
-
Boiler Upgrade Scheme Grant - Actions to Take Now
IanR replied to Green Power's topic in Air Source Heat Pumps (ASHP)
I'd sort this out: Loft and cavity wall insulation is not only a "no-brainer", but also prepares the property for an ASHP heating system where reduced energy losses better support a lower energy input into the property over a longer period of day. Next I'd look at improving the output of the emitters, either by increasing their size or swapping for fan assisted radiators, to allow a lower flow temp for improved ASHP efficiency. -
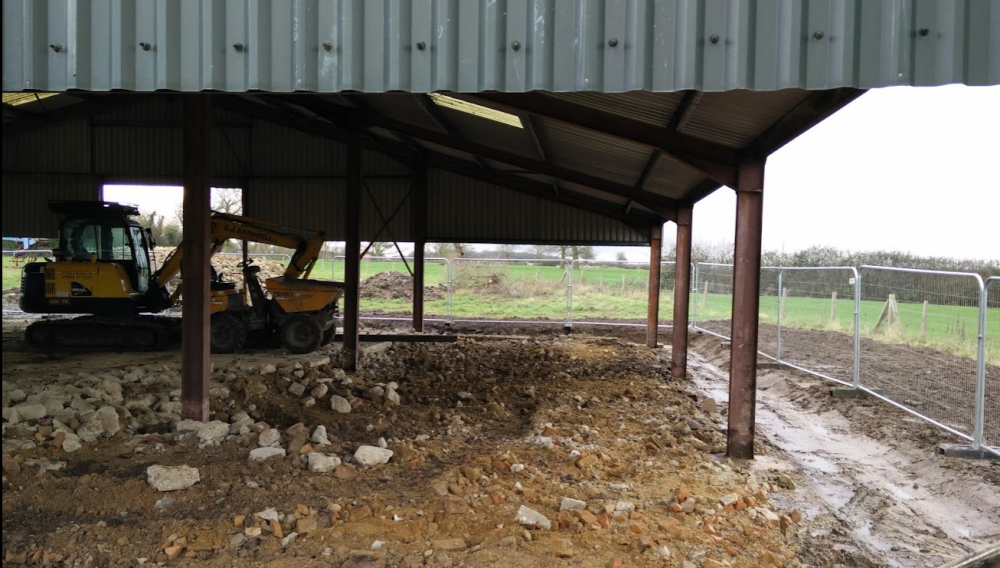
We pulled up around 500m² of agricultural slab in just over a week with a 5T excavator, pecker and a 1T dumper. We were slowed down by a reinforced perimeter ring-beam that had 30 - 40mm rebar in it and had to cut the rebar into manageable lengths. Ours was also a cowshed, so had a significant rake on the slab for slurry drainage. We'd have lost a lot of height to have mass infilled over the top and then insulated. The 5T machine broke it up quickly. I did other channels through hard-standing areas with a 1T, and that was hard going.
-
Timber frame vs ICF vs Traditional masonry for a new build
IanR replied to Indy's topic in General Construction Issues
Ground-bearing insulated raft for me also. The sole-plate was sealed to the slab with a non-curing butyl sealer and bolted down. The loads from my internal load-bearing walls were just low enough to have avoided internal beams, however we still included them to stabilise the raft and remove any risk of it curling up as it cured. The internal beams were 200mm thick, and the integral perimeter ring beam was 300mm. The majority of the raft is 100mm thick with 300mm of EPS100 under. The UFH was stapled to the EPS with A193 mesh over the top. With a light-weight super-structure I didn't need the external, separate ring beam for strength, but it removed all thermal bridges. If I did it again I'd avoid this extra detail and small gain it delivers. The raft sits on 40mm of pea shingle over 160mm of compacted Type I, directly on to clay. A few pictures: I went with a power-floated finish as I planned a 4mm thick poured resin floor finish directly over the top for the living areas.
-
I've edged my front path with Granite kerbs and inset some LED lamps in 8 of them. They needed 32mm holes through the 150mm thickness. I really regretted not getting them pre-drilled, which the supplier offered, it was an awful job. I used diamond tip core drills that were £65 pound a pop and got two or three holes out of each drill. Had to take it slow and use water to keep it cool. If you go too fast the tool just melts. I'm sure it took me over an hour each hole. Good luck.
-
Poured Resin Floor finished and a definite success!!!
IanR replied to IanR's topic in General Flooring
I definitely would. 5 years in and it still looks like new....almost everywhere.. We were very careful with it while the build finished, covering with a thin cortex sheeting, and giving all the trades mats or similar for putting doors, cabinets etc on to to avoid any accidents. We are still careful, in a similar way you would be with a wood floor. All our furniture has felt pads, outside shoes tend not to make it beyond the boot room. Our boot room gets very heavy use, we live on an ex-farm and have 3 young boys and two 60kg dogs. The floor gets filthy, and outside boots come in with stones in the soles. Even this floor will mop up and look excellent, if not quite brand new. In the boot room there are two surface scratches, that are noticeable as the dirt catches in them and our floor is a light grey. The scratches are our fault, a metal dog crate got dragged across it without thinking, but work boots haven't made any wear marks. We found a slight oddity with getting "dull" patches where we have some rugs and mats. Only just noticeable and seems to be worse if there's a backing on the rug/mat that is dark in colour. Remove the mat and these patches seem to fade away after a while. Overall, I would definitely have it again. The groutless/seamless finish leaves no dirt traps. We can leave a robovac to take away 95% of the daily detritus from children and dogs, and just mop it perhaps once a week and it stays looking spotless. If you accept it's not as hardy as a porcelain tile, it's a fantastic floor finish. I understand that it can go down on a suspended floor, but I believe there's more prep in the way of additional layers of, I think, ply to reduce the risk of any movement. -
Decentralised MVHR
IanR replied to HelenS's topic in Mechanical Ventilation with Heat Recovery (MVHR)
Hello @HelenS, and welcome. I can't help with the decentralised MVHR, but just taking a step back, are you renovating to a level where there is a benefit from Heat Recovery? ie. planning to get at least below 5m³/m².h @50Pa infiltration rate, and ideally below 3m³/m².h MVHR can be over-sold, and really only comes in to its own when you are sufficiently air tight that mechanical ventilation is required for good air quality. -
My installation has the 12kW F2040 about 500mm off the side of the house. I then have around 14m of pre-insulated, Dia 32mm twin duct bringing the heated water under my slab and up into the house + a further approx 9m of insulated 32mm pipe continuing the route up to the 1st floor storage area. That 23m pipe run is far more than the suggested 10m limit, so I took care with insulating this pipe to reduce heat loss. I then have a 200l buffer for space heating and cooling via UFH and a 500l UVC for hot water. I have the SMO40 controller and MODBUS link. Flow temps are run at 50°C for hot water, 33°C for space heating and 12.5° for cooling. The ASHP App requires a subscription to allow any control, and then I don't know what you get to control. Without a subscription it gives you the current status and a month's history data, which is reasonably handy. If you want a "Smart" heating App, that would be from the Smart Thermostat you went with. I have the ASHP and UFH manifolds linked up to my Loxone HA, via the MODBUS link (for the ASHP), and Loxone has an excellent App, in my view. The 12kW F2040 has no problem supplying hot water to the 500l UVC for our family of 5, we've never been short of hot water in 5 years. For space heating the 12kW unit is oversized for my heat loss, but the buffer stops any short cycling.
-
F2040 - Yep, got one of those. Nibe is a good brand, I've had no issues with mine.




