Thorfun
-
Posts
4889 -
Joined
-
Last visited
-
Days Won
36
Everything posted by Thorfun
-
Can a slab be too thick to have UFH pipes in it?
Thorfun replied to Thorfun's topic in Underfloor Heating
yeah, I'm thinking more than one probe. the original quote had one per zone but as I reduced it to a single zone they just reduced it to one probe. I think for the cost of them putting a few in will be best. I'll check out the 1-wire sensors for Loxone, thanks. already put the layout through LoopCAD so I know myself and Wunda are on similar wavelengths. Plus they will do a design for me so I can see once that's done if further changes might be required. ?. so do I! -
Strip footing and eps slab for timber frame?
Thorfun replied to DragsterDriver's topic in Foundations
this was exactly my experience with Kore. in the end the groundworks company are just laying pieces of EPS rather than having a pre-cut version from a supplier like Kore/Isoquick/Ekonekt etc. they seem happy to do it that was and as long as I get the thickness and compressive strength as designed I'm not fussed how it's achieved! -
I've thought about going out to help but then I thought I probably shouldn't with the whole health and safety thing will there being deep excavations very near the spoil pile! plus, the way he drives the dumper to the top of the mountain of soil with ease is way beyond my dumper abilities. this is one activity I'm happy to leave to the professionals.
-
exposed roof if you have to remove one, sure, but there's still the membrane underneath to help keep the elements out. and surely the pigeons roosting under the on-roof panels affects the airflow as well? ?
-
The first week of the build is over and I've collated our time-lapse footage for the week and made a 2 minute video, hosted on Vimeo we're a little disappointed at the speed of the dig but the boss has only given us one driver to do the digging/dumping/lorry loading so a lot of his time is spent moving the spoil around. but I've been told that more hands might be on-site next week and a bigger excavator so fingers crossed that happens and we see more progress next week. The basement contractors are due in a week so they need to get moving if they want to hit that deadline! Anyway, I hope you enjoy the video.
-
Can a slab be too thick to have UFH pipes in it?
Thorfun replied to Thorfun's topic in Underfloor Heating
I will be pulling the trigger on the materials for the basement UFH tomorrow. here's what I got from Wunda: all seems pretty reasonable to me. any comments that would stop me from ordering this? I've deliberately left actuators off the order for now as I'm not sure how they'll fit in to my home automation yet and figured I could just add them at a later date once all of those decisions have been made. so it's literally pipe, pump and manifold. which should be all I need for prior to slab pour, right?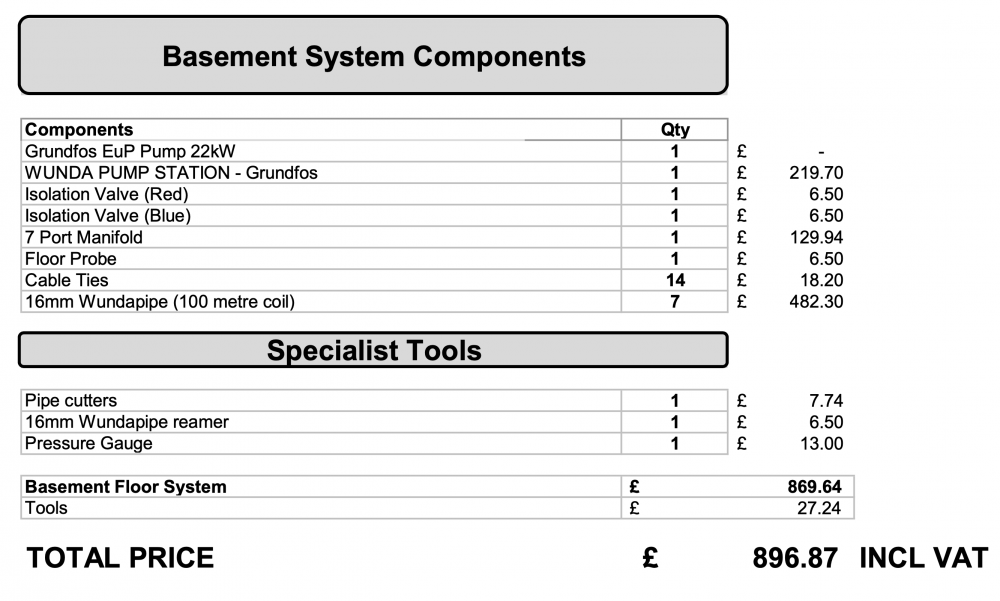
-
Can a slab be too thick to have UFH pipes in it?
Thorfun replied to Thorfun's topic in Underfloor Heating
cheers @Dan F. I have got LoopCAD already and put the basement in there but I haven't bothered with the heat calculations side of it all yet. I've just used it to get an idea of it all. I'll see if I can get to grips with the heat loss figures at some point. Are your self-balancing actuators hooked in to your Loxone system? I was thinking of having underfloor slab probes but with only one zone I wouldn't know where to put them or if multiple would be required! I guess that comes much later though and we can always change the loops to multiple zones at a later date if required. the important bit is to get the loops in right first. everything else above the slab can be changed later. -
I'm pretty sure that Tesla sell these things like hot-cakes so I doubt there's an issue with getting old stock! yep, 3-phase electrics will be installed and a 3-phase inverter. need to figure out how to fit it all together but that's what I'm paying Enhabit for. ?
-
ha ha....I've paid the deposit for my solar PV and powerwall 2. just need to get the house built to a stage we can install. should be about 6 months or so I hope.
-
Can a slab be too thick to have UFH pipes in it?
Thorfun replied to Thorfun's topic in Underfloor Heating
thank you @jack. puts my mind at ease. I also asked for them to just make it all one zone after reading on here. I think with a slab this thick the response times will be so slow there's no point of having individual zones and we'll just keep the whole basement at a constant temperature, assuming we even need to turn it on for most of the year that is! -
Can a slab be too thick to have UFH pipes in it?
Thorfun replied to Thorfun's topic in Underfloor Heating
if I may carry on with this thread and ask another question somewhat related... the A393 rebar that the SE has specified in our slab has a 200mm spacing between the 10mm wires. if I'm not mistaken I've read on here that the UFH pipes are better off being supported by following the runs of rebar so I'd be looking at 200mm spacing for the UFH pipes. I've spoken to Wunda and their response was: "As you will be having a heat pump, I would advise against taking the pipe spacings to 200mm. Having a heat pump would mean the heat outputs are naturally less than they would be with a boiler and by spacing the pipe further apart would make it less again, meaning you would most likely need a supplementary form of heating alongside the underfloor heating." obviously, Wunda are not aware of our planned insulation or airtightness levels as they don't have the SAP calculations (nor did they ask for them), so this could be a stock response from them. This isn't a financial decision for me as the extra cost for 150mm spacing would be negligible in the grand scheme of things it's more about 200mm centres will be better protected during the slab pour. Anyone able to comment or advise on this? I have posed the question to the suppliers/designers of our ASHP system but while I wait for that response I thought I'd ask the collective mind on here. -
Can a slab be too thick to have UFH pipes in it?
Thorfun replied to Thorfun's topic in Underfloor Heating
maybe. tbh I don't really have a clue. I have done lots of reading on this whole thing but I don't seem to be able to retain as much information as I used to (mis-spent youth probably) so I keep having to go over it all again and again. -
Can a slab be too thick to have UFH pipes in it?
Thorfun replied to Thorfun's topic in Underfloor Heating
the dig depth from ground level is approx 4m and with the stone at between 2 - 2.4m it's going around 2m of stone that has to come out. We have a certain type of stone that's local to our area and there is a company that deals with it so I will be speaking to them about either selling it or converting it in to paving slabs etc. so we've already thought of that. ? Don't worry, I'll be taking lots of photos and boring everyone on here with blog posts. -
Can a slab be too thick to have UFH pipes in it?
Thorfun replied to Thorfun's topic in Underfloor Heating
our 'normal' trench foundations for the non-basement areas of the build are designed to be dug down to the sandstone. this is required because of the clay we're on. for the basement though, the sandstone is not deep enough at between 2m - 2.4m from ground level and our basement dig is much deeper than that. so, it's either dig through the sandstone or not have a basement. I think we all know which one won on that decision. ? I don't think you put a spanner in the works. I appreciate a different view on it all. and in fact the way the basement guys have come back saying it'll cost more to take the care around the pipes actually gives me more confidence in them that they do actually know what they're doing! everything I've done with regards to the basement and foundations has been run by the structural engineers (TSD). they have been amazing throughout and I'm very grateful for the assistance and quick responses they've given me to my numerous questions. I also phoned Wunda today about the pipes they use and their technical team said no issues with attaching direct to the rebar using cable ties. so I've got the sign off from them if I decide to go this route and to use them. I'm really not worried about abrasion though as there are so many people on here with pipes attached to rebar and we have friends that have just finished an MBC build with their passive foundations and have the same thing so I just don't think it's an issue if you use the right pipe. this has been an interesting thread and I'm very glad I started it. definitely lots of food for thought! -
Can a slab be too thick to have UFH pipes in it?
Thorfun replied to Thorfun's topic in Underfloor Heating
sure, that link to another post above has a document that will explain it for you. but basically it boils down to for every metre below ground level you are you add 14mm of 0.04W/mK of insulation due to the effect of the earth below it. I'm 99% sure the perimeter/area ratio does apply. pretty sure other posters with more knowledge than me on the subject have said as much. -
Can a slab be too thick to have UFH pipes in it?
Thorfun replied to Thorfun's topic in Underfloor Heating
Hi Gus, thanks for the good advice. I have spoken to the SE and they're ok with the proposal with a few caveats as follows: "Firstly, you should check with the UFH pipe supplier that they are okay with the pipes being tied to the rebar, as some manufacturers are okay with this and some are not due to possible wear in the pipe wall (I’m guessing it has to do with the wall build-up of the pipe). Secondly, just make sure there are no big bunches of pipes together, as these can cause a weakness in the concrete, and can easily happen in the vicinity of the manifold. We usually look for bunches that are no more than 150mm across with a min. gap of 100mm to the next bunch of pipes (hopefully this is clear)." I have also had a response from the basement contractors who have said there will be an extra cost for power floating and protecting / minding the heating strips while the concrete is being placed, so you're spot on there! I have asked what the extra cost will be and am awaiting a response. your advice is wise and it makes a lot of sense and gives a nicely different perspective. The problem at the moment is they've already dug 2.4m down and hit the sandstone and there isn't any surface water so, even if I did take a break and see if the water comes in, I doubt there'd be any to come in especially as we head further in to summer! But I will sleep on it and ponder some more in the morning. -
Can a slab be too thick to have UFH pipes in it?
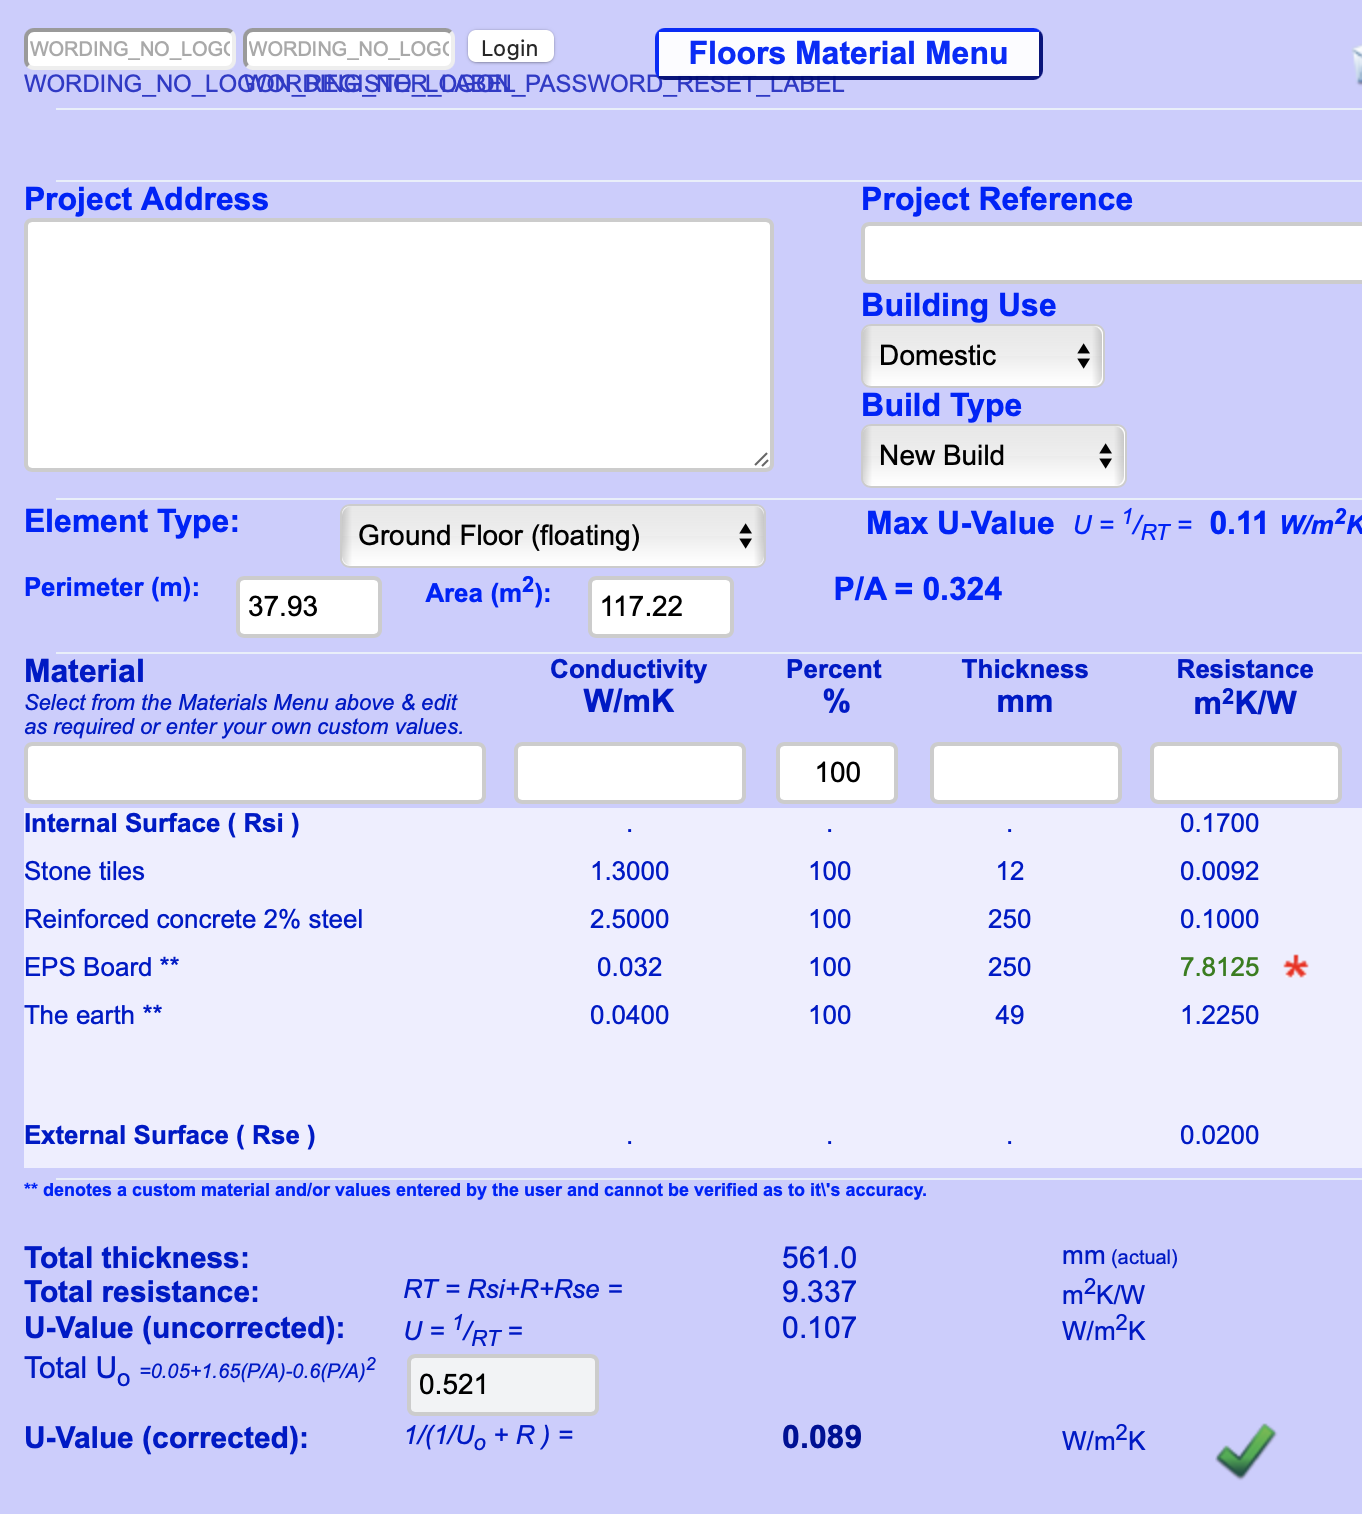
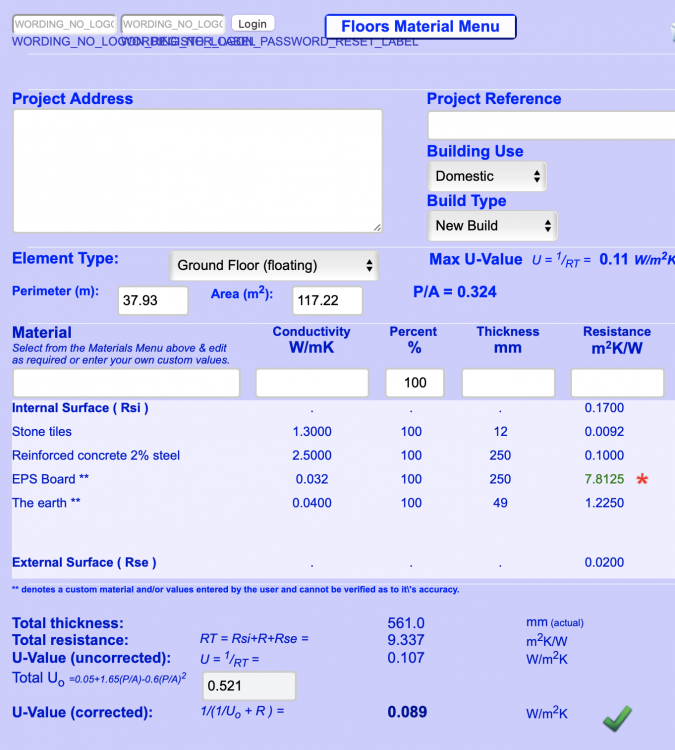
Thorfun replied to Thorfun's topic in Underfloor Heating
comes out to 0.103W/m2K when adding the 3.5m below ground insulated effect (14mm x 3.5m of 0.04W/mK insulation) which will do me just fine. increasing it to 250mm EPS300 gives 0.089W/m2K which, when you consider the extra cost of dig out and muck away over the area and the cost of the extra EPS300 and labour to lay it, I'm not sure it's worth it.
-
Can a slab be too thick to have UFH pipes in it?
Thorfun replied to Thorfun's topic in Underfloor Heating
yep. it is EPS300 under the basement and other parts of the house. I had confirmation from the SE that the thickness of the EPS300 had no bearing on the structural calculations so could increase or decrease as desired. -
Can a slab be too thick to have UFH pipes in it?
Thorfun replied to Thorfun's topic in Underfloor Heating
I was....then dinner was on the table so I had to take a break.....back on it now. ? -
Can a slab be too thick to have UFH pipes in it?
Thorfun replied to Thorfun's topic in Underfloor Heating
but at a depth of 3.5m under ground that U-value is much reduced. -
Can a slab be too thick to have UFH pipes in it?
Thorfun replied to Thorfun's topic in Underfloor Heating
well insulated and airtight is the name of the game around here. ? -
Can a slab be too thick to have UFH pipes in it?
Thorfun replied to Thorfun's topic in Underfloor Heating
200mm EPS. I've done the calculations using previously supplied document that @A_L linked here taking in to consideration the depth below ground. although it's just occurred to me that the recent change I've made to the insulation levels at ground level has removed 30mm PIR from the slab. s**t. think I need to do some more quick calculations to make sure what I've done hasn't completely messed up my desired U-values. ?♂️ -
I know a large number of folks on here have insulated slabs where generally the slab is 100mm thick and the UFH pipes are cable tied to the rebar. We're going this route now for our basement UFH but our slab is 250mm thick with 200mm EPS underneath. I was just wondering if a slab ever got to a thickness where putting the pipe within the slab became the wrong thing to do?
-
Getting ready for the big start!
Thorfun commented on Thorfun's blog entry in West Sussex Forever Home
<goes hunting for a photo of @Dreadnaught's toilet> -
Getting ready for the big start!
Thorfun commented on Thorfun's blog entry in West Sussex Forever Home
that could just be the camera angle. ? but I'm not normally known for being very tidy so I whole heartedly accept the compliment. thank you. ?