Thorfun
-
Posts
4889 -
Joined
-
Last visited
-
Days Won
36
Everything posted by Thorfun
-
the lovely wife bakes lovely cakes if that helps?
-
what have I let myself in for!? 😂 but surely on a new build it's not horrible, nasty or wet as everything is dry, new and non-smelly?
-
😉

-
Hi all, I am between day-jobs at the moment and have 5 weeks to focus on the self-build. I am looking to get all my plumbing first fix done in that time so I thought I'd start this thread with the idea of asking **** loads of questions as I am flying by the seat of my pants with this stuff. oh.....don't get me wrong....I've installed bathrooms, kitchens, toilets and the like on a DIY basis before but they've always just fitted in to existing waste or replaced like with like etc and never anything on a whole house starting from scratch jobby! so this could be fun or it could be a ****-up. hopefully it won't take as long as @Onoff's bathroom and I figure that if @pocster can do it then surely I must be able to, right? I have read the majority of the plumbing sub-forums and have a load of copy and paste notes so I'm not going in to this completely blind but I know I have lots of questions and I'm hoping that all the usual helpful folk ( @Nickfromwales, @ProDave, @PeterW, @Temp, @ToughButterCup, @Ferdinand, @SteamyTea and too many more to mention (and apologies for those I've missed!)) will be able to assist. I'm confident I can do it I'm just a bit nervous about taking the first step. I'll just leave this post here and will start with my questions in the very near future. thanks to all in advance.
-
Hi. I'm a complete beginner confused self-builder!!!
Thorfun replied to Jack757's topic in Introduce Yourself
welcome. you've certainly come to the right place to get information on all of that! you sound like you're in a very similar place to where we were 3 years ago. we decided on timber frame and, if I was to do it again, I would go for a twin-wall passive timber frame with pumped in cellulose for insulation. will give the solid feeling wall you want and also be a lot more environmentally friendly than block and brick. but there are also many on here that have built block and brick and have very good airtightness and low heating. there are so many different factors involved in both build methods. my advice is to spend hours and hours and hours reading this forum as all the information you could think of is here. go through each sub-forum for the subject you're interested in or do a search. maybe your first search should be 'timber frame vs brick and block' as that subject has been discussed many time. good luck and I look forward to following your journey. -
welcome. plenty of useful knowledge and helpful folk on this forum.
-
Now the dungeon you built is starting to make sense. A captive audience to play video games with you.
-
both beat me easily with my little Picade. 😞

-
Timber Cladding, Zinc Guttering, Brise Soleil and External blinds
Thorfun commented on Thorfun's blog entry in West Sussex Forever Home
Stays like that. It is possible to lift it up if we undo the brackets at the bottom but it’s really heavy so probably won’t ever be done. Will be fun cleaning the window though. -
if only I was that clever
-
Timber Cladding, Zinc Guttering, Brise Soleil and External blinds
Thorfun posted a blog entry in West Sussex Forever Home
Greetings on a miserably rainy Sunday October morning. Perfect weather for catching up on some blog writing! As the title suggests this blog will be about our external coverings of the house and, by the end of it, the outside of the building will be pretty much finished allowing us to crack on internally. We started many months ago by battening the outside of the buildings. As we are having external blinds and they have a requirement for fitting the blind cassette we needed a large gap between the house walls and the outside of the cladding. This meant 50mm x 50mm timber battens and counter battens. We did this ourselves and saved many thousands and, even though it was slow going (as, it seems, everything is when you do it yourself!), it was very satisfying with the carpenter saying that it was good work and he’d seen chippies do a lot worse jobs than we did. Nice warm fuzzy feeling ensued. We are having a mixture of burnt Siberian larch (https://en.wikipedia.org/wiki/Yakisugi) and, to contrast the black, standard Siberian larch on the ‘arms’ of our property and entrance porch (all will be revealed in photos below) and I ordered all the cladding to be delivered on-site prior to the carpenter starting. The carpenter started on the garage using the standard Siberian larch which we bought from Jewson at a very reasonable price, and quite a bit cheaper than we could get from the usual timber cladding suppliers and we are very happy with the quality of the wood. He then went on to the black charred larch (which gets everywhere and he and his tools looked like they’d been in a coal mine by the end of each day!). We purchased the charred larch from Permachar (https://permachar.co.uk) who gave us a brilliant price. The wood itself was burnt and delivered from Lithuania (https://degmeda.eu) but they will only sell to the UK via Permachar. It is stunning wood, but incredibly fragile and any sort of dragging or scraping will cause the black char to flake off. While he was busy doing that and while the scaffolding was up I thought it a good time to get the guttering started. Our architect specified Zinc guttering and after a lot of thought and looking at stainless steel and zinc we also decided that zinc was the choice for us. We ordered it from Rainclear (https://www.rainclear.co.uk/guttering/copper-zinc-guttering/guttering-fittings.html?color=235) who offer next day delivery if in stock and were incredibly helpful and very well priced. It’s also a clip on system which even I managed to install without any major issues! Around the same time and while the carpenter was busy putting the cladding up our external blinds got fitted. We bought those from a local company called Powell blinds (https://powellblinds.com) who stepped in brilliantly at the last minute after we were seriously let down by Cornerstar Aluminium (long story which I won’t get in to here). The blinds are fitted up behind the cladding above the windows but externally so they will be hidden from view when lifted up. We absolutely love them and during the heatwave this summer we lowered them and this drastically reduced the temperature inside the house. There was still one large south facing window that didn’t have blinds that needed shading. We wanted and the architect designed a Brise Soleil in this area but all we had to go on was a 2D drawing. I contacted a few companies about getting one made and installed and the quotes came back at between £6k - £7k! A figure we simply could not afford. So I did research and spoke to a local forge called Horsham Forge (https://www.horshamforge.co.uk) with an idea I had. He said ‘that could be done but how about this instead?’. He suggested brackets with a pole running through them and vertical timbers slid on. Genius! On to Sketchup where I draw up the brackets and gave them to the forge to be created and spoke to my timber manager at Jewson who procured me some thermowood at the size I needed and got my carpenter to fit it and it cost me £1700 in total. So we saved around £5k by doing it ourselves and we also enjoyed the journey and got a solution that we designed (with the help of the forge of course). We think it looks fab and it does a good job of shading from the sun apart from a couple of hours when the sun is directly facing that side of the house. So we will still get some solar gain but it is definitely reduced and it’s a brilliant architectural feature. 😉 Right, while all this was going on the chippie was finishing up the cladding and now that it is all finished and I have put the downpipes on we have an almost finished external facade to our dream home. We love it and think it’s stunning. So very happy with the carpenter’s work (http://www.kmlcarpentryandroofing.co.uk). Kieran’s attention to detail at the junctions between the 2 types of wood is fabulous as it is in other areas too. He would also discuss any issues and potential solutions with us to make sure we were happy with them rather than just doing something he thought was right. Hopefully the pictures below do it all justice! (Note: please ignore the 110mm brown downpipe in the below photo! It will eventually be a rain chain but this works for now. 😉 ) Thanks for reading and we hope you like what we’ve achieved so far.- 33 comments
-
- 12
-

-
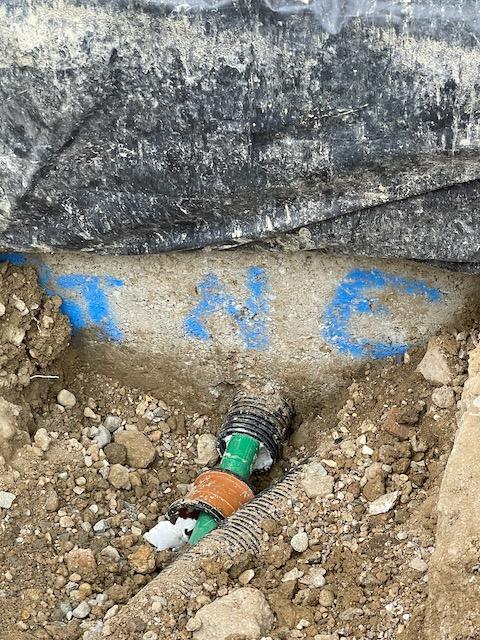
I pulled through 25mm 5-core 30m through 100mm twin wall. That stuff is ******* heavy! I also bought a cobra from Amazon which has been invaluable. Also learnt a valuable lesson. Make sure you remove the draw cord that comes in the duct before pulling cables through as otherwise it bunches up and causes blockages. That was a painful lesson.
-
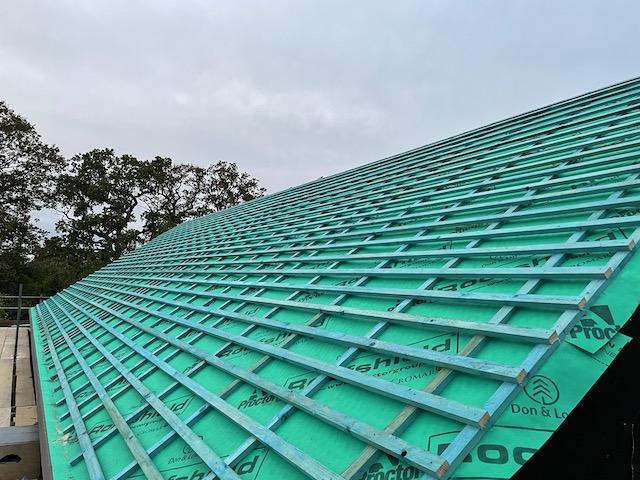
25mm x 50mm battens and counter battens for us. allowed us to fully fill the rafters with insulation as the 50mm air gap was above the Roofshield. all confirmed ok with the BCO.
-
for me the quotes I was getting back from 'local' SEs when compared to TSD was a lot more than a few hundred pounds! and they have the expertise in the insulated slab that I wanted. with all the good reviews on here I was happy to go with them and they were really good with great customer service in responding to questions/queries even after their role was complete. but I do completely understand having someone local to oversee things and if there was a local SE that specialised in insulated slabs maybe I'd have given them an opportunity. but, as with a lot of things in the building game, that's not how they've always done it and so I didn't find any. 🙂
-
well done. we all knew you'd get there in the end. 😉
-
we used TSD for our basement and above ground foundations as we wanted an insulated slab. based in Ireland so didn't visit site but I was very happy with everything and the house is still standing 18 months on. 😉
-
fair enough! then I apologise. I misread your initial post.
-
perfect! just what I needed to see before I start going down the same route. thank you very much.
-
I presume you cut out the P5 chipboard where the former went for it to be level with the chipboard?
-
why are you second guessing your SE? you paid them for a reason and now to try and calculate it on your own is not wise in my opinion. if you think it's over specced then hire a second SE for a second opinion. if someone on here gives you the information and something goes wrong who's to blame? the SE will have professional indemnity insurance to protect against issues.
-
doesn't the structure underneath make a difference? I was told by 3 different roofers that due to the timber frame building and potential movement GRP wasn't suitable and all recommended a single-ply membrane. not sure on the validity of the claims but if 3 of them independently said it it must hold some truth, no?
-
Basement Concrete Pour - Thoughts on this...
Thorfun replied to Internet Know How's topic in Basements
Yep. I remember that feeling! -
yeah. it was great advice and I'm much happier now. it was just the thought of having to dig up the SWA cable after partially filling it in and then digging a wider trench to accommodate the ducts that was putting me off. so much to do and so little time! but I now have the option of running more cable in the future if needed which is much better. I also think I learnt something about crush resistance but I'm sure that'll be forgotten by tomorrow when I've moved on to the next problem that needs resolving!
-
Deciding how to use our new 3 phase connection
Thorfun replied to Ben Weston's topic in Consumer Units, RCDs, MCBOs
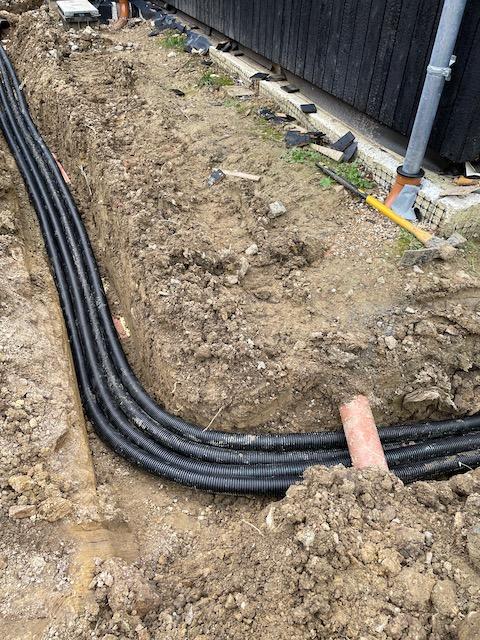
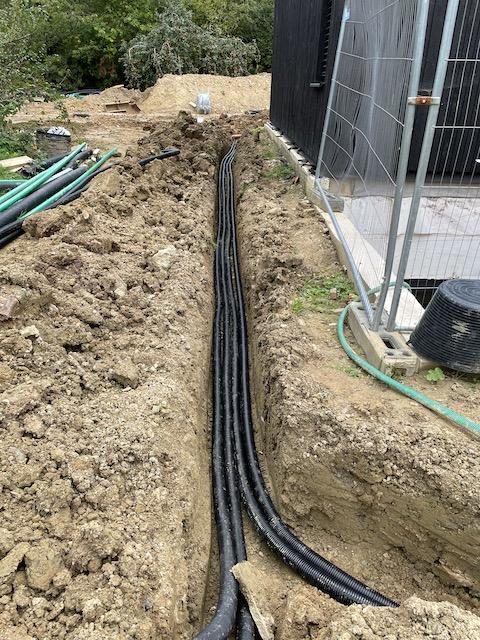
Would have been better asking the milkman, but let’s move on … 😂 ask your electrician - this is not something you need to make a mess of as it could / will be expensive to correct. +1 to this. my electrician told me what to buy and just came and fitted it. I wouldn't like to give advice that might be wrong on a subject like this! the DNO told me what size kiosk to buy and where to site it after discussions during the initial site survey. each DNO may have different requirements. but, I would suggest bigger is better as it seems to fill up pretty quickly especially if you do need a TP&N isolator as they're rather large! here's what we did (note: this is not a recommendation of what to do as it might not work for you!) we installed a W750xD400xH1250 kiosk and the DNO (UKPN) came and installed the 3-phase head. our groundworkers ran a 110mm twinwall duct from the cabinet to the plant room in the basement which we pulled through a 25mm 5-core cable (which is bloody heavy!). our electricity supplier then came and installed a single-phase smart meter to one of the phases at the head. our electrician then wired the tails and the 5-core 25mm cable in to our TP&N switched fused isolator in the kiosk. he then terminated that into another TP&N isolator in the comms room to allow for future expansion to run a 3-phase supply to the garage for EV charging (if required). he then took a single phase and terminated it in the CU. so we are running our whole house off a single phase but have the capability of 3-phase later on if required. e.g. if we ever built a pool house we could run a cable through the ducting I've installed to the comms room and tap in to the TP&N isolator there. or could run a 3-phase connection to the garage etc. my advice with underground work is to try and think where you might need power and/or network as it's a lot easier to run it at build stage rather than after. I know as I've just had to dig 50m of trench to fit 4 x 63mm ducts for power and network to the proposed chicken house and pool house! glad I did it now though rather than have to dig up the garden and patios etc to run it later. the pool house ducts will just be left underground and can be dug up if we ever need them. -
hope you're all happy now! 😂 it's like modern art. currently 3D printing a bespoke reducing funnel to accept 5 ducts (these 4 x 63mm twinwalls plus another 54mm rigiduct) to allow the cables to feed through a 110mm twinwall duct going through to my basement. it's going to take a while to finish!