


Onoff
-
Posts
21127 -
Joined
-
Last visited
-
Days Won
206
Everything posted by Onoff
-

Help with kitchen renovation/ 1st house.
Onoff replied to zoothorn's topic in Bathrooms, Ensuites & Wetrooms
Have a good look where the Celotex meets the battens and foam ANY gaps. -
@newhome's idea to mock it up.
-
Help with kitchen renovation/ 1st house.
Onoff replied to zoothorn's topic in Bathrooms, Ensuites & Wetrooms
Corner beads; something like this: -
Help with kitchen renovation/ 1st house.
Onoff replied to zoothorn's topic in Bathrooms, Ensuites & Wetrooms
Your camera res seems a bit low btw but a bit of a gap between sides and sill? No worries, low expansion foam the gap and cut flush with the side when dry. The wood sill will cover it. Where the top and sides meet the window I'd do those gaps with a flexible filler. -
Help with kitchen renovation/ 1st house.
Onoff replied to zoothorn's topic in Bathrooms, Ensuites & Wetrooms
Halleuja! That's really looking something! Perfectly feasible to fill, sand & paint the reveal. You will have to sink the screw heads under slightly. You'll then need something like this for the top and sides assuming you put a wood sill on: https://www.wickes.co.uk/Wickes-Thin-Coat-Anglebead-2-4m/p/9000036437 -
I'm of the same opinion. The colour is so close to the tiles imo it would go a long way to hiding any faux pas and my inexperience.
-
Unbelievable! Make a serious suggestion and the dirty minded wade in! Sacrifice a bit of pb in the adjacent room or loose tiles in the bathroom.
-
Seriously. Whip everything off in the adjacent room and you can have a 3-way and get your pipe in easier.
-
Roger that!
-
As in come in from the back, maybe in a spare bedroom. Would need a stud to be able to do it. Save making a mess in the bathroom.
-
Install on an old computer?
-
Maybe she could do it from behind?
-
Off cuts, pizza box, duct tape! Hands down I prefer the grey. I think the space will look bigger with the grey. I've left it stategically placed so she can see it through the open door (well, doorway as there isn't yet a door) when she flys by.
-
What does it say about me if it goes brown?
-
I still think wind could get behind what are effectively big sails on your flat roof. However.....something like these but with perforated sheet instead of glass?
-
Help with kitchen renovation/ 1st house.
Onoff replied to zoothorn's topic in Bathrooms, Ensuites & Wetrooms
Take the screws out gently then and see if everything stays there. Or take 'em out, carefully countersink the pb face and screw back in. Just try that on one or two to start with. Set drill on lowest torque, the screw setting NOT the hammer or drill setting. If it won't drive the screw in go up another notch on the torque setting. Put them just under flush. -
@Dreadnaught, @newhome has these she wants shot of:
-
@newhome, have you still got those plastic gate rack sections you wanted shot of? NEVER throw anything away!
-
Plastic rack & pinion?
-
Help with kitchen renovation/ 1st house.
Onoff replied to zoothorn's topic in Bathrooms, Ensuites & Wetrooms
Sorry mate I've had enough. If you can't be bothered to read back from a couple of hours ago then I'm done with this. -
Help with kitchen renovation/ 1st house.
Onoff replied to zoothorn's topic in Bathrooms, Ensuites & Wetrooms
Ref finishing the reveal. You'll have presumably the sides and top to do if you're refitting a wood sill. (Only paper I have to hand is the Metro and a Boris Johnson cartoon). Anyway, this thread can't get any more mental: As above you could use plaster beads. Depending on whether you've a tapered edge meeting a square edge, a tapered meeting a taper or two square edges meeting you either fill level or fill and feather it in.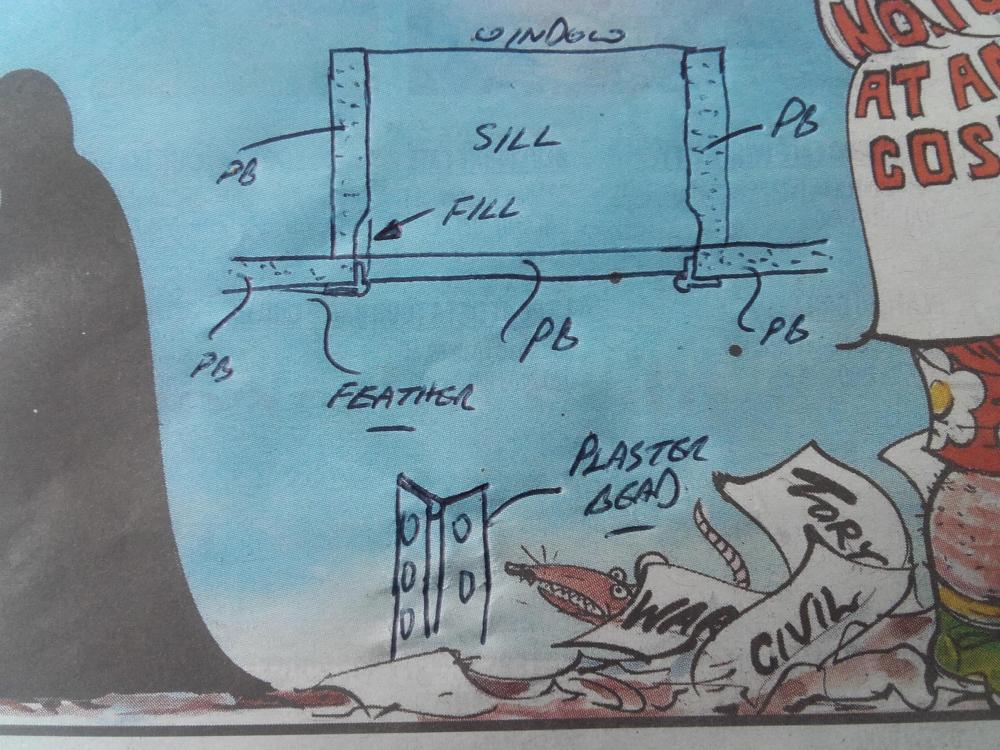
-
Help with kitchen renovation/ 1st house.
Onoff replied to zoothorn's topic in Bathrooms, Ensuites & Wetrooms
Now you're taking the pi $$. Seriously you have got to be. -
Help with kitchen renovation/ 1st house.
Onoff replied to zoothorn's topic in Bathrooms, Ensuites & Wetrooms
I'm tiling it as I said in I think post #782... So.....as I said all of 3 hours ago... "Use the screws to hold the boards in place whilst the foam sticking the boards on sets but only put them in as far as to nip the board and not damage the edge. If you're deft at it you can run a very thin bead of foam up the batten to glue the eps to the the batten. Either take the screws out after or very carefully pilot the pb and countersink the face so you can put a screw in without it breaking the edge". -
Help with kitchen renovation/ 1st house.
Onoff replied to zoothorn's topic in Bathrooms, Ensuites & Wetrooms
I told you earlier to just use the screw to just nip the board not break it! -
Help with kitchen renovation/ 1st house.
Onoff replied to zoothorn's topic in Bathrooms, Ensuites & Wetrooms
No. You just wait for a couple of hours and see if it's set.


