Onoff
-
Posts
21061 -
Joined
-
Last visited
-
Days Won
206
Everything posted by Onoff
-

Help with kitchen renovation/ 1st house.
Onoff replied to zoothorn's topic in Bathrooms, Ensuites & Wetrooms
Feathering is just where the filler is thick at the corner then itself tapers by sanding down to blend into the wall. -
Help with kitchen renovation/ 1st house.
Onoff replied to zoothorn's topic in Bathrooms, Ensuites & Wetrooms
You could cheat and stick this sort of thing up the sides and across the top and forget the filling: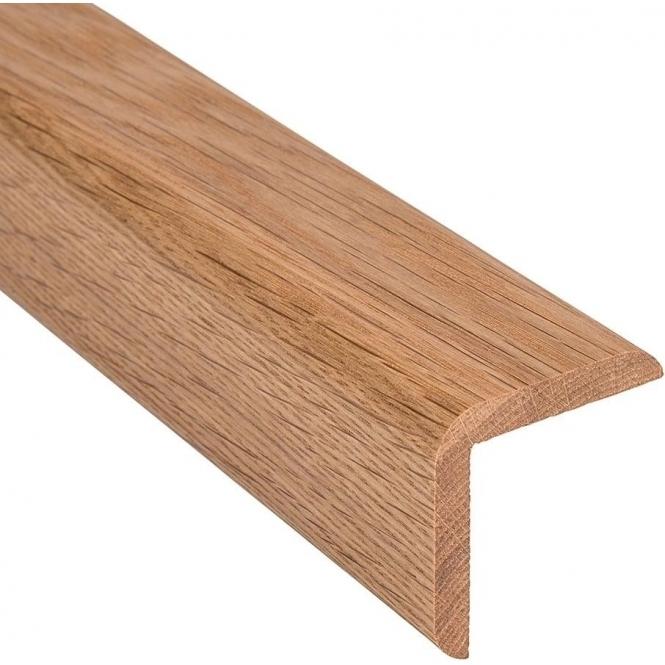
-
Help with kitchen renovation/ 1st house.
Onoff replied to zoothorn's topic in Bathrooms, Ensuites & Wetrooms
As I said earlier I couldn't tell from your camera res but it can be two tapered edges meeting, two straight edges or one of each. So if yours is two "standard" edges you'll need to feather both sides. -
Help with kitchen renovation/ 1st house.
Onoff replied to zoothorn's topic in Bathrooms, Ensuites & Wetrooms
No, you only skim the corners of the board not the whole board: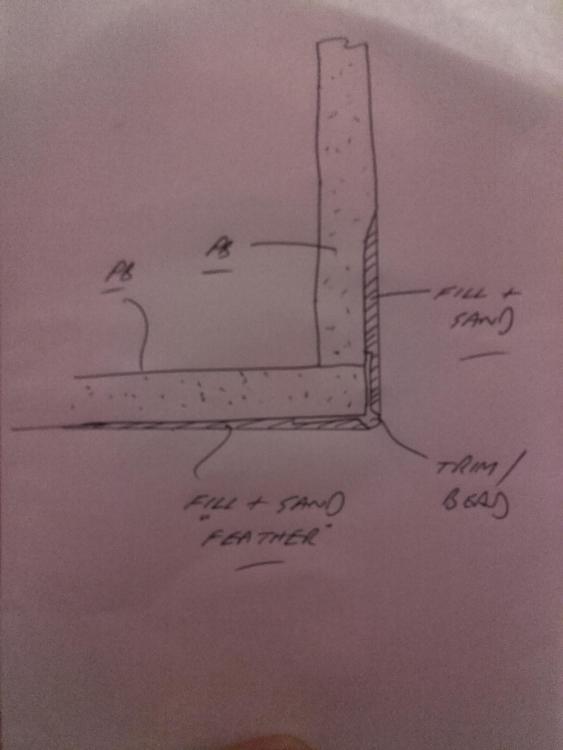
-
Mummy's boy! (The girls first word on the other hand was DAD! ) I asked him what he thought, he asked what Mum thought and I said I didn't know. Next thing they're both in there discussing it. The rear of the pockets will be done in the mosaic. The wall tiles are the lighter grey - one sitting against the wall in the floor. Not sure about the pocket returns, sloping pocket shelf and soffit of the pocket. There'll be a nominal 100mm wide mosaic strip dividing the wet room area and this'll run up the side of the window, floor to ceiling. The white grout in the mosaic dictates then that the wall grout be white.
-
Overheard her discussing the floor grout with No.1 son just now: "I wanted white but I like the grey!" Progress but it ain't over!
-
Other way around here. Me and the lad want the rainfall and the girls the hand spray.
-
Help with kitchen renovation/ 1st house.
Onoff replied to zoothorn's topic in Bathrooms, Ensuites & Wetrooms
How do those reveal boards feel, solid enough? -
Help with kitchen renovation/ 1st house.
Onoff replied to zoothorn's topic in Bathrooms, Ensuites & Wetrooms
No problem. I'm now on strong medication myself because of this thread. I was teetotal before this!
-
Not a peep from her since I got in. Bliss! It'll a be a 'kin long time until the grout goes down at this rate.
-
Help with kitchen renovation/ 1st house.
Onoff replied to zoothorn's topic in Bathrooms, Ensuites & Wetrooms
Have a good look where the Celotex meets the battens and foam ANY gaps. -
@newhome's idea to mock it up.
-
Help with kitchen renovation/ 1st house.
Onoff replied to zoothorn's topic in Bathrooms, Ensuites & Wetrooms
Corner beads; something like this: -
Help with kitchen renovation/ 1st house.
Onoff replied to zoothorn's topic in Bathrooms, Ensuites & Wetrooms
Your camera res seems a bit low btw but a bit of a gap between sides and sill? No worries, low expansion foam the gap and cut flush with the side when dry. The wood sill will cover it. Where the top and sides meet the window I'd do those gaps with a flexible filler. -
Help with kitchen renovation/ 1st house.
Onoff replied to zoothorn's topic in Bathrooms, Ensuites & Wetrooms
Halleuja! That's really looking something! Perfectly feasible to fill, sand & paint the reveal. You will have to sink the screw heads under slightly. You'll then need something like this for the top and sides assuming you put a wood sill on: https://www.wickes.co.uk/Wickes-Thin-Coat-Anglebead-2-4m/p/9000036437 -
I'm of the same opinion. The colour is so close to the tiles imo it would go a long way to hiding any faux pas and my inexperience.
-
Unbelievable! Make a serious suggestion and the dirty minded wade in! Sacrifice a bit of pb in the adjacent room or loose tiles in the bathroom.
-
Seriously. Whip everything off in the adjacent room and you can have a 3-way and get your pipe in easier.
-
Roger that!
-
As in come in from the back, maybe in a spare bedroom. Would need a stud to be able to do it. Save making a mess in the bathroom.
-
Install on an old computer?
-
Maybe she could do it from behind?
-
Off cuts, pizza box, duct tape! Hands down I prefer the grey. I think the space will look bigger with the grey. I've left it stategically placed so she can see it through the open door (well, doorway as there isn't yet a door) when she flys by.
-
What does it say about me if it goes brown?
-
I still think wind could get behind what are effectively big sails on your flat roof. However.....something like these but with perforated sheet instead of glass?