


Onoff
-
Posts
21127 -
Joined
-
Last visited
-
Days Won
206
Everything posted by Onoff
-
Make a bfo warm air panel heater from scrap and strap to the side of the shed. Some of the lads here have snow on the ground: https://simplysolar.supporttopics.com
-
Is the shed atop a slope? You could diy a bfo solar thermal panel and use that for the UFH. Get the heights right and it'd thermosyphon.
-
Can't help feeling that should have "tuck" on all 4 sides of the upstand. As if you'd put say a 20x20 batten around the shuttering before you cast it. Something for the asphalt to key into. Like my little hand sketch a while back. Then you bed the skylight on whatever goop you're using.
-
Welcome. Can't beat going off piste I say!
-
You could load Remix OS on a Windows laptop and get the full Android experience...
-
No Android device?
-
Lots of solar pv apps on the Play Store.
-
Unistrut? Or one of the cheaper clones. Galvanised, lasts pretty well down here as long as you galv spray the ends.
-

Basic advice of block construction and timber cladding please.
Onoff replied to Tony99's topic in Brick & Block
Put simply it has! https://www.homebuilding.co.uk/does-triple-glazing-make-sense/ -
Attaching Christmas wreath to powder coated front door
Onoff replied to Jude1234's topic in Doors & Door Frames
Problem solved! https://m.ebay.co.uk/itm/LED-Lightshow-Projection-Plus-Whirl-a-Motion-Static-Wreath-Red-White-Green/123210588060?ul_ref=http://rover.ebay.com/rover/1/710-53481-19255-0/1?.jpg.9619784b1d1fc26ef337ae073f2ba8dc.jpg)
-
Help with kitchen renovation/ 1st house.
Onoff replied to zoothorn's topic in Bathrooms, Ensuites & Wetrooms
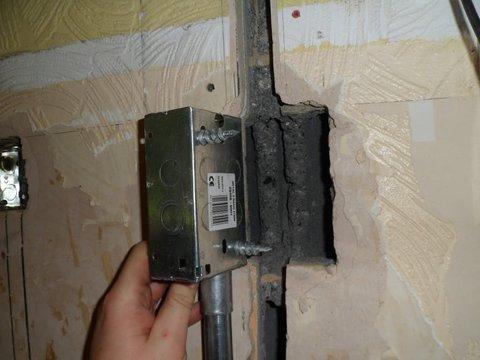
Yes, grab adhesive, many names/makes. Even saw one in the Pound shop yesterday. No Nails Pink Grip Grip Fill I Can't Believe It's Not Nails No More Nails Sticks Like Sh!t Sikaflex EBT CT1 Etc, etc Your cables I'm guessing are two 6mm2 twin and earth. One comes from the consumer unit (40/45A breaker) and the other goes to the cooker. Do they come into the rear of the back box or top and bottom? I've foamed a loose back box in temporarily before (now taken out): This same wall had hollow blocks in. So hollow that the permanent fix to fit the 47mm back box was to first fit curly wurlies meant for pb then push the whole lot into mortar pumped in with a mortar gun.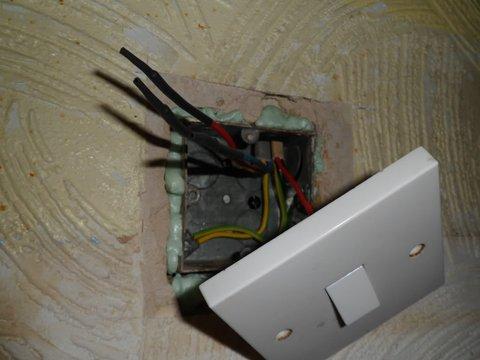
-
Help with kitchen renovation/ 1st house.
Onoff replied to zoothorn's topic in Bathrooms, Ensuites & Wetrooms
What 5-core cable? Just No Nails around the sides of the back box if room then. -
Help with kitchen renovation/ 1st house.
Onoff replied to zoothorn's topic in Bathrooms, Ensuites & Wetrooms
Void behind socket? Socket loose? Get the Hoover in there and suck out what loose crap you can. Pump No Nails or similar in thru the screwhole. Push a Rawlplug through the back box hole into the No Nails. Allow to set. Put screw in. Or redrill where there is something behind the back box. -
Or casting your own even...
-
I looked at their wall hanging WCs I seem to remember... Duravit-D being their low end range?
-
What's a stilted tile?
-
I'm lost...aren't you having block paving atop the asphalt? With the top of the glass level with top of the blocks? Need a section view to remind myself.
-
Help with kitchen renovation/ 1st house.
Onoff replied to zoothorn's topic in Bathrooms, Ensuites & Wetrooms
If you get sick of looking at those missing tiles on the left just glue a strip of stained timber up there. Just a blob of silicon on the tiles and you can remove later if you get access to a tile cutter. Btw, what size are those tiles? Mate has just done his kitchen in white subway tiles though I can't remember if they're bevelled. I could get one, cut a couple of slivers and post to you. -
Screed to falls...that was a bloody good idea! Got a pic of the problem area?
-
Help with kitchen renovation/ 1st house.
Onoff replied to zoothorn's topic in Bathrooms, Ensuites & Wetrooms
For someone with no tile cutter well done that man! -
Attaching Christmas wreath to powder coated front door
Onoff replied to Jude1234's topic in Doors & Door Frames
Plastic coated door? Suckers! Random eBay image: eBay, Amazon, Wilco etc. Available in different diameters. https://www.wilko.com/en-uk/wilko-suction-hooks-30mm-20pk/p/0344714?
-
Cheers. Only got 140mm here from centre of 28mm pipe to loft floor.
-
With hindsight etc! Tbh the pipe sits under the top of the trays but here and there as I trod on the mesh it did start to abrade the pipe without me realising it
-
It was deliberate in my case. Using the Polypipe panels the Pex-Al-Pex 16mm pipe just flies in as per the video. It keeps the pipe up a bit too. The A142 mesh just sat on top. In my case though I left a square to cast my own, to falls, wet room corner. When it came to it though I felt the slab wouldn't be thick/strong enough So I hacked out the Poypipe bit by bit ruining the pir foil face. Repaired it (tin foil) and put a membrane down: Then cast a wet slab to falls:
-
Don't hang about pouring the concrete once the pipes are tied on as you can tread on the mesh and abrade the pipes. My pipes were under the mesh but same potential issue.


